**Contents**
- [Line-of-business application migration hands-on lab step-by-step](#line-of-business-application-migration-hands-on-lab-step-by-step)
- [Abstract and learning objectives](#abstract-and-learning-objectives)
- [Overview](#overview)
- [Solution architecture](#solution-architecture)
- [Requirements](#requirements)
- [Before the hands-on lab](#before-the-hands-on-lab)
- [Exercise 1: Discover and assess the on-premises environment](#exercise-1-discover-and-assess-the-on-premises-environment)
- [Task 1: Create the Azure Migrate project](#task-1-create-the-azure-migrate-project)
- [Task 2: Deploy the Azure Migrate appliance](#task-2-deploy-the-azure-migrate-appliance)
- [Task 3: Configure the Azure Migrate appliance](#task-3-configure-the-azure-migrate-appliance)
- [Task 4: Create a migration assessment](#task-4-create-a-migration-assessment)
- [Task 5: Configure dependency visualization](#task-5-configure-dependency-visualization)
- [Task 6: Explore dependency visualization](#task-6-explore-dependency-visualization)
- [Exercise 2: Migrate the Application Database](#exercise-2-migrate-the-application-database)
- [Overview](#overview-1)
- [Task 1: Create an Azure SQL Database](#task-1-create-an-azure-sql-database)
- [Task 2: Assess the on-premises database](#task-2-assess-the-on-premises-database)
- [Task 3: Migrate On-premises database](#task-3-migrate-on-premises-database)
- [Exercise 3: Migrate the application and web tiers using Azure Site Recovery](#exercise-3-migrate-the-application-and-web-tiers-using-azure-site-recovery)
- [Task 1: Create a Storage Account](#task-1-create-a-storage-account)
- [Task 2: Create a Virtual Network](#task-3-create-a-virtual-network)
- [Task 3: Configure and start replication of VMs](#task-3-configure-and-start-replication-of-vms)
- [Task 4: Test Migration](#task-4-test-migration)
- [Task 5: Configure target IPs](#task-5-configure-target-ips)
- [Task 6: Configure database connection](#task-6-configure-database-connection)
- [Task 7: Configure public IP and test application](#task-7-configure-public-ip-and-test-application)
- [Task 8: Cleanup the test failover](#task-8-cleanup-the-test-failover)
- [After the hands-on lab](#after-the-hands-on-lab)
- [Task 1: Clean up resources](#task-1-clean-up-resources)
# Line-of-business application migration hands-on lab step-by-step
## Abstract and learning objectives
In this hands-on lab, you will learn how to assess and migrate a multi-tier application from Hyper-V to Azure. You will learn the various Azure tools available for different steps of the migration, and walk through using each of those tools.
After this hands-on lab, you will know the role of each of the migration tools and how to use them to successfully migrate an on-premises multi-tier application to Azure.
## Overview
Before the lab, you will have pre-deployed an on-premises infrastructure hosted in Hyper-V. This infrastructure is hosting a multi-tier application called 'SmartHotel', using Hyper-V VMs for each of the application tiers.
During the lab, you will migrate this entire application stack to Azure. This will include assessing the on-premises application using Azure Migrate; migrating the database tier to Azure SQL Database using SQL Server Data Migration Assistant (DMA) and the Azure Database Migration Service (DMS); and migrating the web and application tiers using Azure Site Recovery. This includes migration of both Windows and Linux VMs.
## Solution architecture
The SmartHotel application comprises 4 VMs hosted in Hyper-V:
- **Database tier** Hosted on the smarthotelSQL1 VM, which is running Windows Server 2016 and SQL Server 2017
- **Application tier** Hosted on the smarthotelweb2 VM, which is running Windows Server 2012R2.
- **Web tier** Hosted on the smarthotelweb1 VM, which is running Windows Server 2012R2.
- **Web proxy** Hosted on the UbuntuWAF VM, which is running Nginx on Ubuntu 18.04 LTS.
(For simplicity, there is no redundancy in any of the tiers.)
>**Note:** For convenience, the Hyper-V host itself is deployed as an Azure VM. For the purposes of the lab, you should think of it as an on-premises machine.

To assess the Hyper-V environment, you will use Azure Migrate. This includes deploying the Azure Migrate appliance on the Hyper-V host to gather information about the environment. For deeper analysis, the Microsoft Monitoring Agent and Dependency Agent will be installed on the VMs, enabling the Azure Migrate dependency visualization.
The SQL Server database will be assessed by installing the Microsoft SQL Server Data Migration Assistant (DMA) on the Hyper-V host, and using it to gather information about the database. The DMA will also be used to migrate the database schema to Azure SQL Database. Data migration will then be completed using the Azure Database Migration Service (DMS).
The application, web, and web proxy tiers will be migrated to Azure VMs using Azure Site Recovery (ASR). This includes deploying the ASR collector appliance into the Hyper-V environment, building the Azure environment, replicating data to Azure, and performing a failover to migrate the application to Azure.
>**Note:** After migration, the application could be modernized to use Azure Application Gateway instead of the Ubuntu Nginx VM, and to use Azure App Service to host both the web tier and application tier. These optimizations are out of scope of this lab, which is focused only on a 'lift and shift' migration to Azure VMs.
## Requirements
1. You will need Owner or Contributor permissions for an Azure subscription to use in the lab.
2. Your subscription must have sufficient unused quota to deploy the VMs used in this lab (at least 15 vcpus available)
For further details, see [Before the HOL - Line-of-business application migration](./Before%20the%20HOL%20-%20Line-of-business%20application%20migration.md).
## Before the hands-on lab
Refer to the [Before the HOL - Line-of-business application migration](./Before%20the%20HOL%20-%20Line-of-business%20application%20migration.md) setup guide manual before continuing to the lab exercises.
**Allow at least 60 minutes to deploy the on-premises environment before you start the lab.**
## Exercise 1: Discover and assess the on-premises environment
Duration: 60 minutes
In this exercise, you will use Azure Migrate to assess the on-premises environment.
### Task 1: Create the Azure Migrate project
In this task, you will create the Azure Migrate project and select the migration assessment tool.
1. Log onto the Azure Portal
2. Click **All services**, then search for and select **Azure Migrate** to open the Azure Migrate Overview blade, shown below.
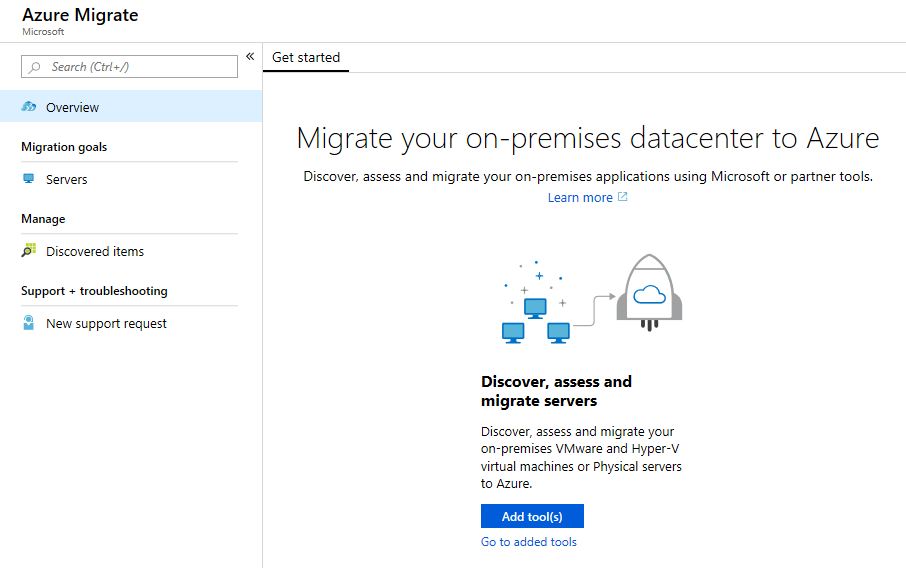
3. Click the **Add tool(s)** button to open the 'Add a tool' wizard at the 'Migrate project' step. Select your subscription and create a new resource group named **AzureMigrateRG**. Choose a geography close to you to store the migration assessment data (Note: options may be limited during the preview phase).
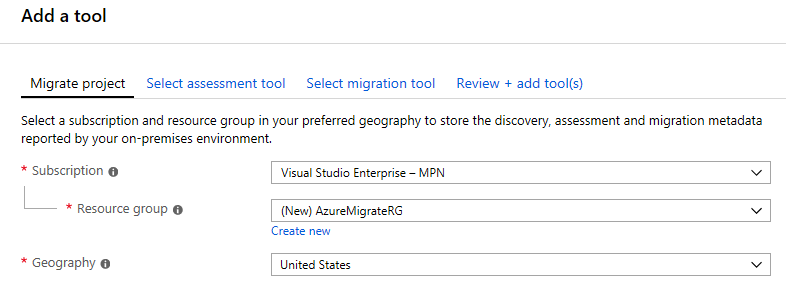
Click **Next**.
4. At the 'Select assessment tool' step, select **Azure Migrate: Server Assessment**, then click **Next**.
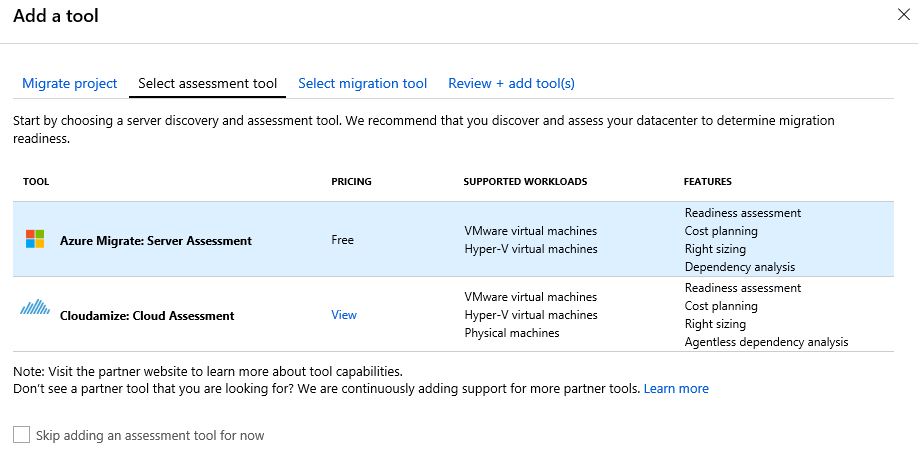
5. At the 'Select migration tool' step, select **Azure Migrate: Server Migration**, then click **Next**.
!add image for step 5
6. At the 'Review + add tool(s)' step, review the settings and click **Add tool(s)**.
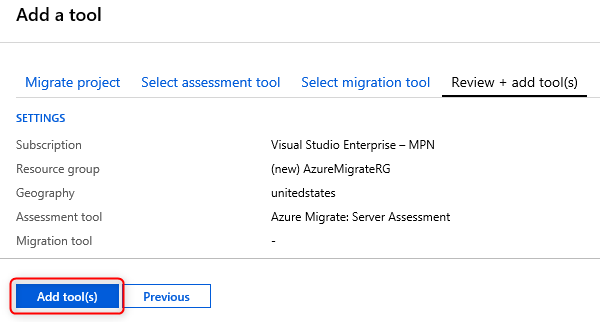
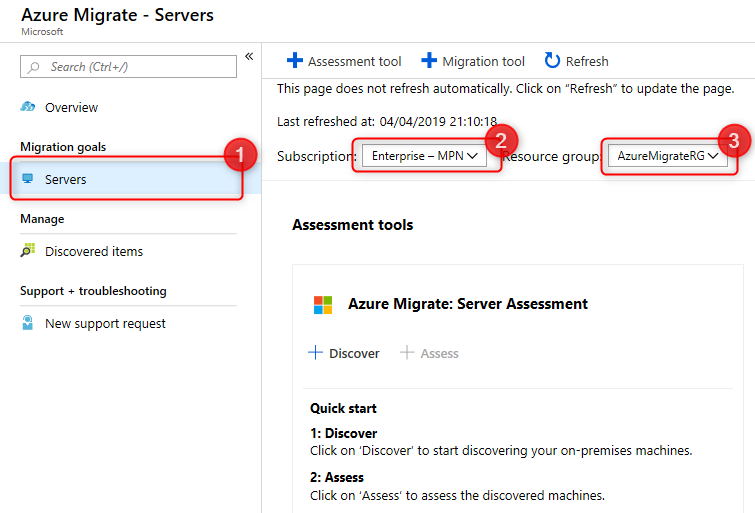
7. The Azure Migrate deployment will start. Once it has completed, click on the **Servers** panel of the Azure Migrate blade. Select your subscription and the **AzureMigrateRG** resource group from the drop-downs. You should now see 'Azure Migrate: Server Assessment', as shown below.
### Task 2: Deploy the Azure Migrate appliance
In this task, you will deploy and configure the Azure Migrate appliance in the on-premises Hyper-V environment. This appliance communicates with the Hyper-V server to gather configuration and performance data about your on-premises VMs.
1. Click **Discover** to open the 'Discover machines' blade. Under 'Are your machines virtualized?', select **Yes, with Hyper-V**.
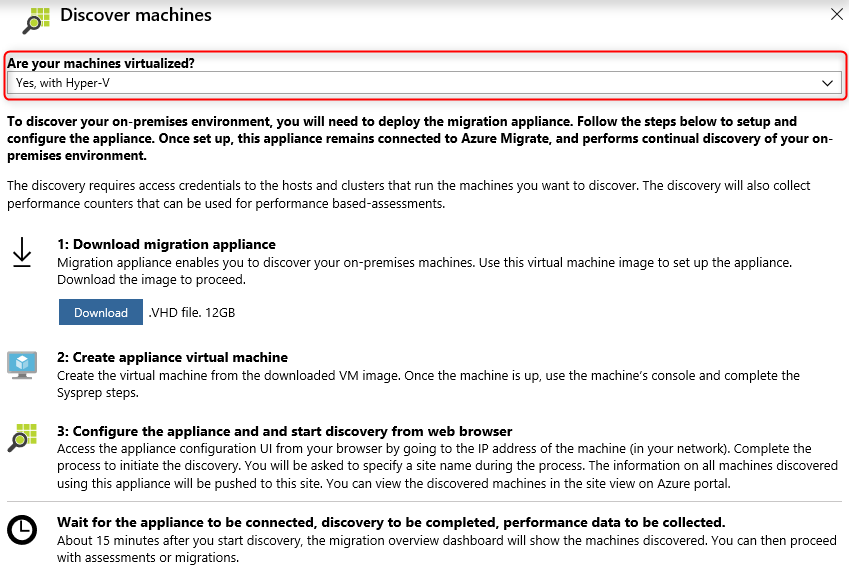
Read through the instructions on how to download, deploy and configure the Azure Migrate appliance. Close the 'Discover machines' blade (do **not** download the .VHD file, it has already been downloaded for you).
2. In a separate tab, navigate to the Azure portal. In the global search box, enter **SmartHotelHost** into the search box, then click on the **SmartHotelHost** virtual machine.

3. Click **Connect**, then download the RDP file and connect to the virtual machine using username **demouser** and password **demo@pass123**. (Please be mindful that if you changed the VM password during ARM deployment, you'll need to use the password you used - hopefully you haven't forgotten!)
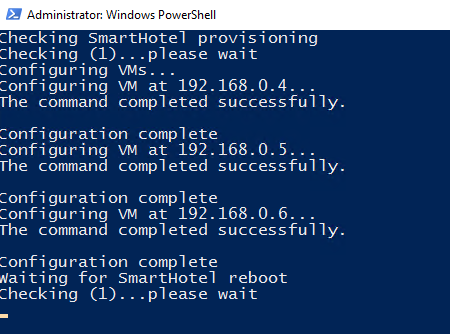
4. In the SmartHotelHost RDP session, a PowerShell script will run automatically. Wait for it to complete.
5. In Server Manager, click **Tools**, then **Hyper-V Manager** (if Server Manager does not open automatically, open it by clicking **Start**, then **Server Manager**). In Hyper-V manager, click **SMARTHOTELHOST**. You should now see a list of the four VMs that comprise the on-premises SmartHotel application.

Before deploying the Azure Migrate appliance virtual machine, we need to create a network switch that it will use to communicate with the Hyper-V host. We could use the existing switch used by the SmartHotel VMs, but since the Azure Migrate appliance does not need to communicate with the SmartHotel VMs directly, we will protect our application environment by creating a separate switch.
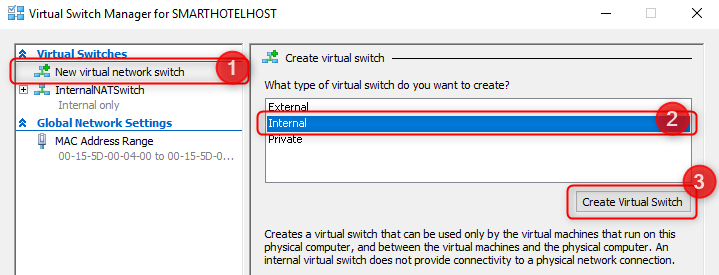
6. In Hyper-V Manager, under 'Actions', click **Virtual Switch Manager** to open the Virtual Switch Manager. The 'New virtual network switch' option should already be selected. Under 'Create virtual switch', select **Internal** as the virtual switch type, then click **Create Virtual Switch**.
7. A new virtual switch is created. Change the name to **Azure Migrate Switch**, then click **OK**.
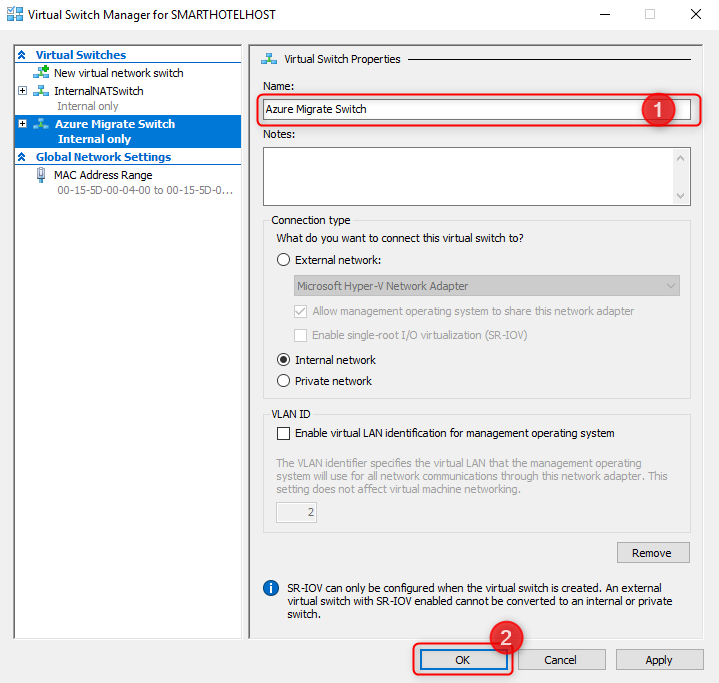
We will now deploy the Azure Migrate appliance virtual machine. Navigate to this link in the VM host to download the latest version of Azure Migrate appliance (https://aka.ms/migrate/appliance/hyperv). Once it's downloaded, extract it to the following path F:\VirtualMachines\AzureMigrateAppliance
8. Back in Hyper-V Manager, under 'Actions', click **Import Virtual Machine...** to open the 'Import Virtual Machine' wizard.

9. At the first step, 'Before You Begin', click **Next**.
10. At the 'Locate Folder' step, click **Browse** and navigate to **F:\VirtualMachines\AzureMigrateAppliance** (the folder name may also include a version number), then click **Select Folder**, then click **Next**.
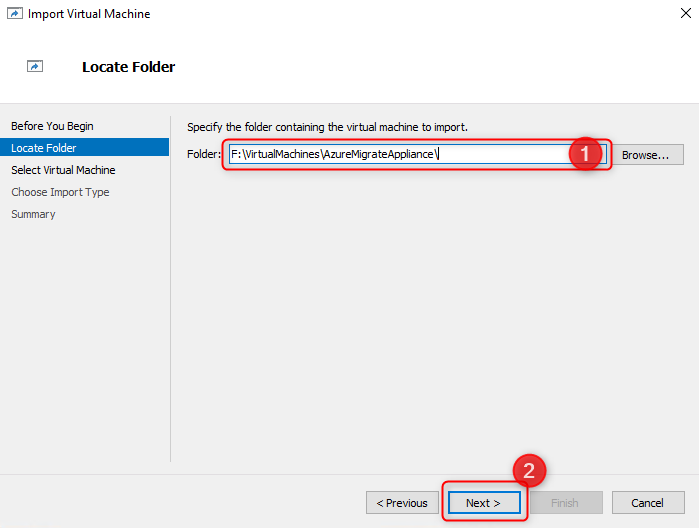
11. At the 'Select Virtual Machine' step, the **AzureMigrateAppliance** VM should already be selected. Click **Next**.
12. At the 'Choose Import Type' step, keep the default setting 'Register the virtual machine in-place'. Click **Next**.
13. At the 'Connect Network' step, you will see an error that the virtual switch previously used by the Azure Migrate appliance could not be found. From the 'Connection' drop down, select the **Azure Migrate Switch** you created earlier, then click **Next**.
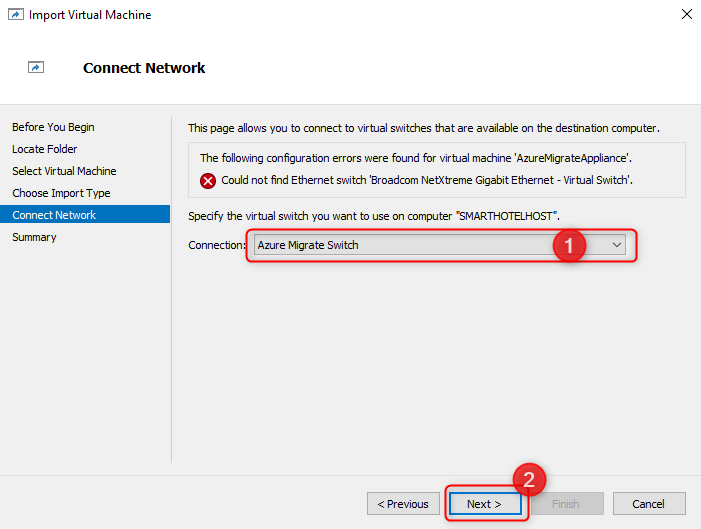
14. Review the summary page, then click **Finish** to create the Azure Migrate appliance VM.
Before starting the Azure Migrate appliance, we must configure the network settings. The existing Hyper-V environment has a NAT network using the IP address space 192.168.0.0/16. The internal NAT switch used by the SmartHotel application uses the subnet 192.168.0.0/24, and each VM in the application has been assigned a static IP address from this subnet.
You will create a new subnet 192.168.1.0/24 within the existing NAT network, with gateway address 192.168.1.1. These steps will be completed using a PowerShell script. The Azure Migrate appliance will be assigned an IP address from this subnet using a DHCP service running on the SmartHotelHost.
15. Open Windows Explorer, and navigate to the folder **C:\OpsgilityTraining**.
16. Right-click on the PowerShell script **ConfigureAzureMigrateApplianceNetwork**, and select **Run with PowerShell**.

The Azure Migrate appliance is now ready to be started.
17. In Hyper-V Manager, click on the **AzureMigrateAppliance** VM, then click **Start**.

### Task 3: Configure the Azure Migrate appliance
In this task, you will configure the Azure Migrate appliance and use it to complete the discovery phase of the migration assessment.
1. In Hyper-V Manager, click on the **AzureMigrateAppliance** VM, then click **Connect**.

2. A new window will open showing the Azure Migrate appliance. Wait for the License terms screen to show, then click **Accept**.
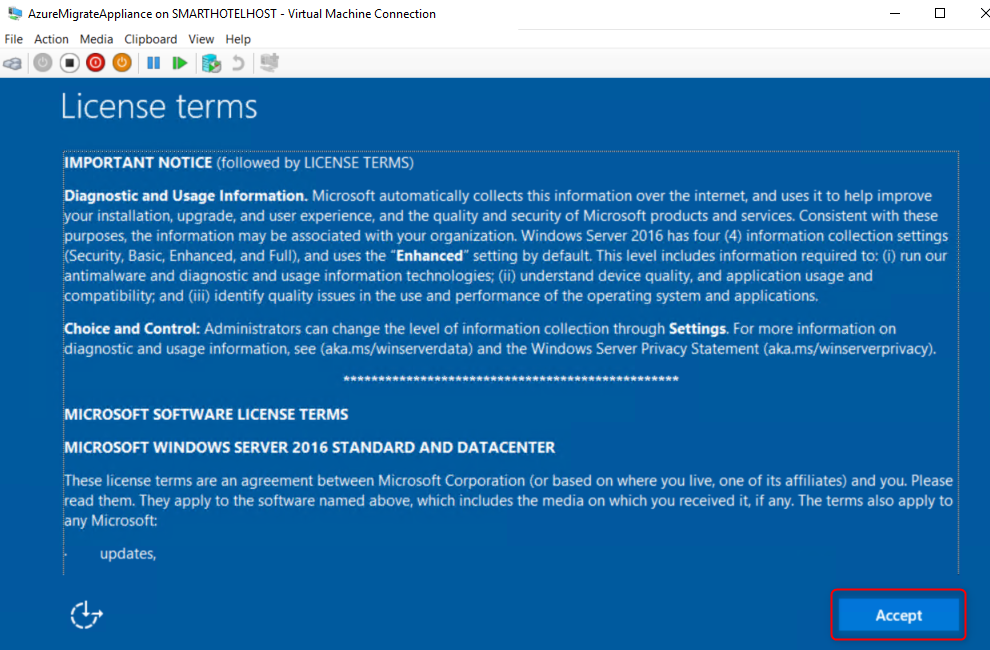
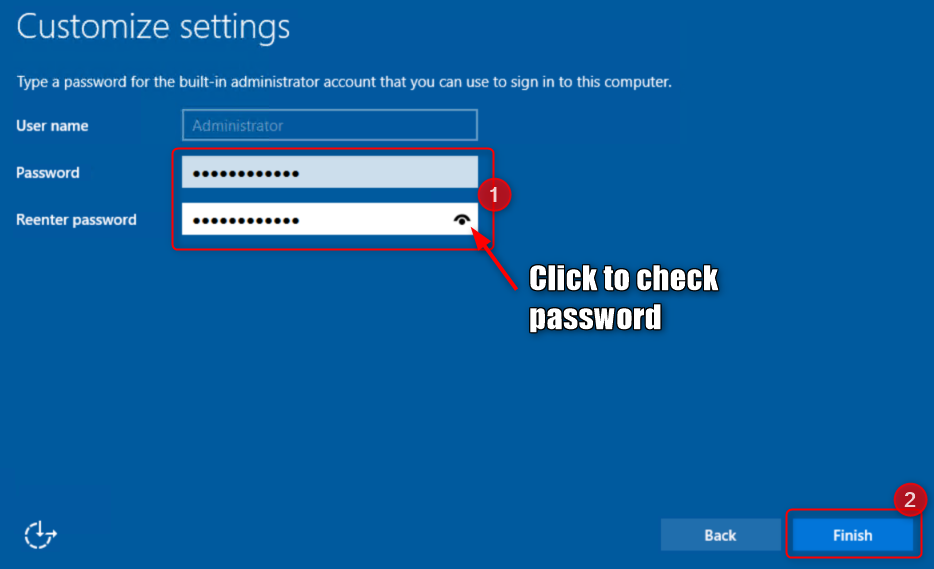
3. On the 'Customize settings' screen, set the Administrator password to **demo@pass123** (twice). Then click **Finish**.
> **Note**: When setting the password, the VM uses a US keyboard mapping. Use **SHIFT + 2** to enter the "@" character, and click on the 'eyeball' icon in the second password entry box to check the password that has been entered.
4. At the 'Connect to AzureMigrateAppliance' prompt, set the appliance screen size using the slider, then click **Connect**.
5. Log in with the Administrator password **demo@pass123** (remember the US keyboard mapping).
6. **Wait.** After a minute or two, an Internet Explorer windows will open showing the Azure Migrate appliance configuration wizard. If the 'Set up Internet Explorer 11' prompt is shown, click **OK** to accept the recommended settings. If the Internet Explorer 'Content from the website listed below is being blocked...' prompt is shown, click **Close** and return to the Azure Migrate Appliance browser tab.
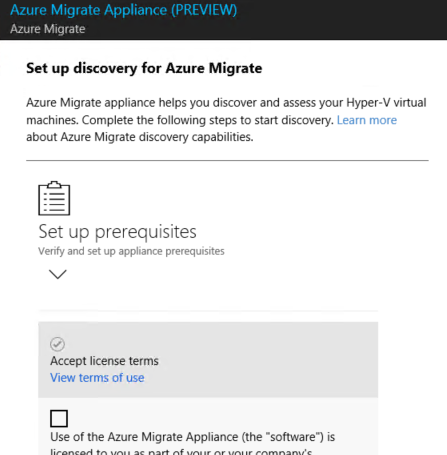
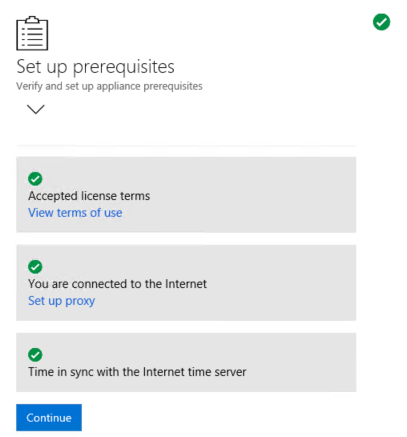
7. Under **Set up prerequisites**, accept the license terms. The following two steps to verify Internet connectivity and time synchronization should pass automatically. Click **Continue**.
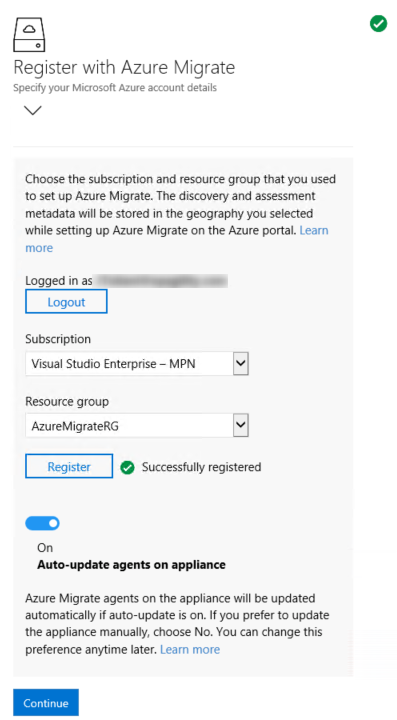
8. At the next steps, 'Register with Azure Migrate', click **Login**. This opens a separate browser tab where you enter your Azure subscription credentials.
9. Once you have logged in, return to the Azure Migrate Appliance tab and select your subscription and the **AzureMigrateRG** resource group using the drop-downs. Then click **Register**. After a short pause, the registration should be successful. Click **Continue**.
10. In the next step, 'Provide Hyper-V hosts details', enter the user name **demouser** and password **demo@pass123**. These are the credentials for the Hyper-V host. Enter **Host login** as the friendly name, then click **Save details**.
> **Note**: The Azure Migrate appliance should have picked up your local keyboard mapping. Click the 'eyeball' in the password box to check the password was entered correctly.
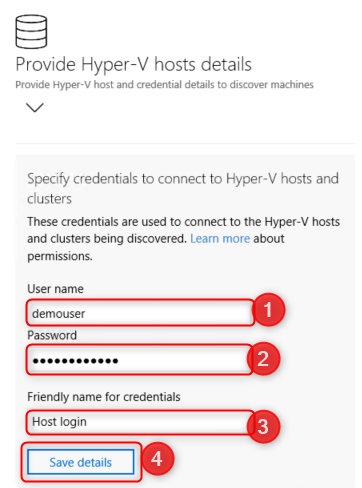
The next step is to register our Hyper-V host with the Azure Migrate appliance. In a conventional on-premises environment, the hyper-V host would be
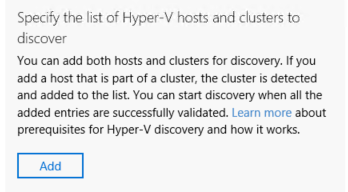
11. Under 'Specify the list of Hyper-V hosts and clusters to discover', click **Add**.
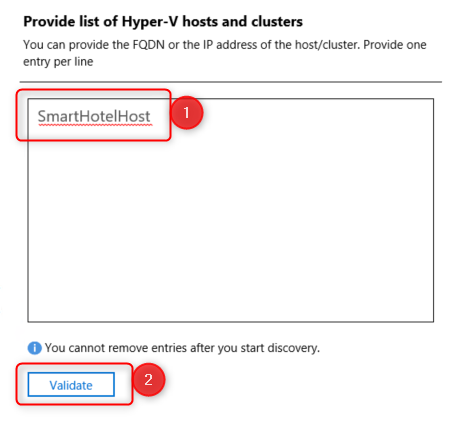
12. A window will appear prompting for a list of Hyper-V hosts. Enter the Hyper-V hostname, **SmartHotelHost**. Then click **Validate**.
> **Note**: The Hyper-V host must be specified using a hostname, and that hostname must resolve to the IP address of the host. The Hyper-V host cannot be specified using an IP address directly.
13. A table shows the SmartHotelHost, with status 'green'. Click **Validate** again, and check the status stays green. Then click **Save and start discovery**.
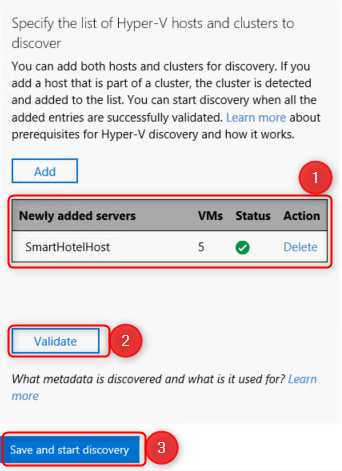
14. A message 'Create Site and initiating discovery' is shown.
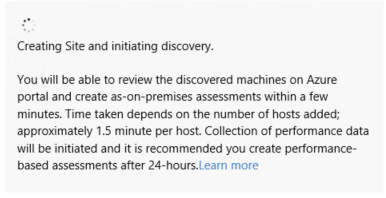
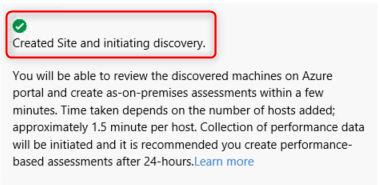
15. Wait for the Azure Migrate status to show 'Created Site and initiating discovery'. This will take several minutes.
16. Return to the Azure Migrate blade in the Azure portal. (If re-opening the portal, remember to use the URL https://aka.ms/migrate/preview during the Azure Migrate preview phase.) Click on **Servers**, make sure the **Subscription** and **Resource group** have been specified correctly. Under 'Azure Migrate: Server Assessment' you should see a count of the number of servers discovered so far. Click **Refresh** periodically until 5 discovered servers are shown. This will take several minutes.
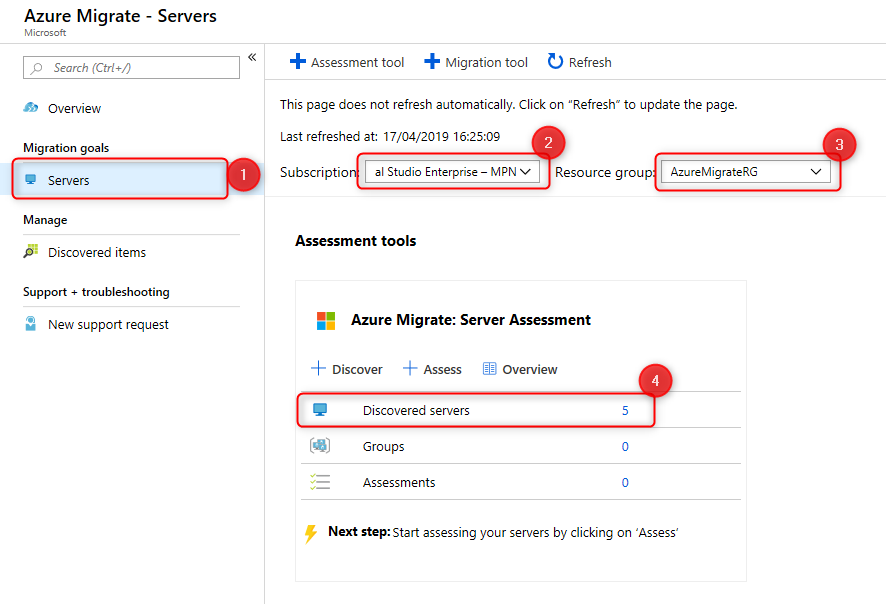
>**Wait for the discovery process to complete before proceeding to the next Task**.
### Task 4: Create a migration assessment
In this task, you will use Azure Migrate to create a migration assessment for the SmartHotel application, using the data gathered during the discovery phase.
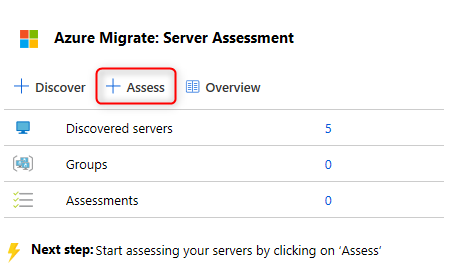
1. Continuing from Task 4, click **+ Assess** to start a new migration assessment.
2. On the Assess servers blade, under Assessment properties, click **View all**.
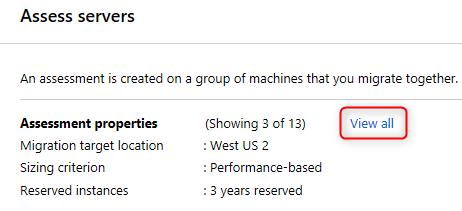
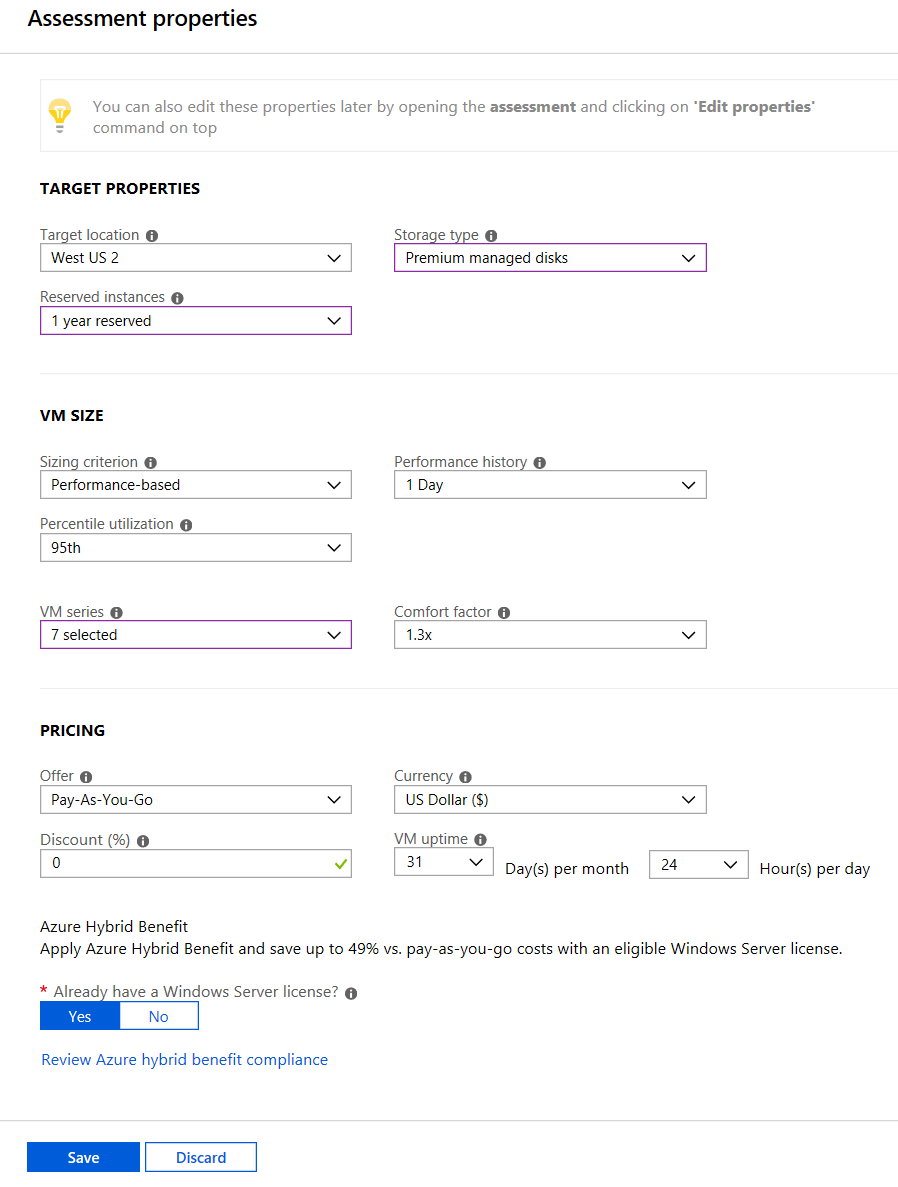
3. The Assessment properties blade allows you to tailor many of the settings used when making a migration assessment report. Take a few moments to explore the wide range of assessment properties. Hover over the information icons to see more details on each setting. Choose any settings you like, then click **Save**.
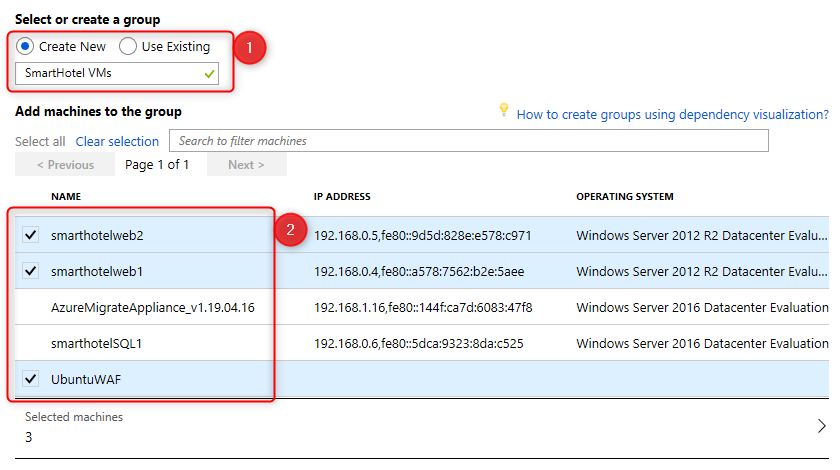
4. On the Assess servers blade, under 'Select or create a group', choose **Create New** and enter the group name **SmartHotel VMs**. Select the **smarthotelweb1**, **smarthotelweb2** and **UbuntuWAF** VMs. Click **Create assessment**.
5. On the 'Azure Migrate - Servers' blade, click **Refresh** periodically until the number of assessments shown is **1**. This may take several minutes.
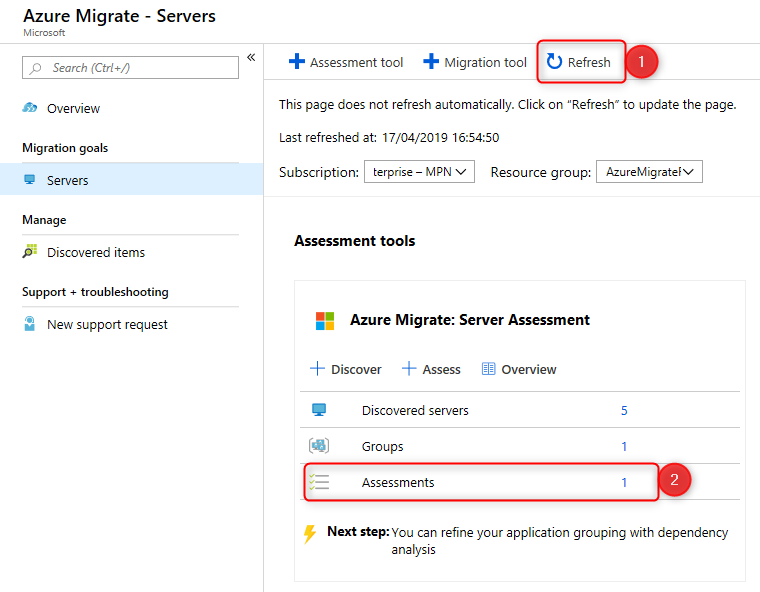
6. Click on **Assessments** to see a list of assessments. Then click on the actual assessment.

7. Take a moment to study the assessment overview.

8. Click on **Edit properties**. Note how you can now modify the assessment properties you chose earlier. Change a selection of settings, and **Save** your changes. After a few moments, the assessment report will update to reflect your changes.
9. Click on **Azure readiness** (either the chart or the left-nav). Note that for each VM, a specific concern is listed regarding the readiness of the VM for migration.
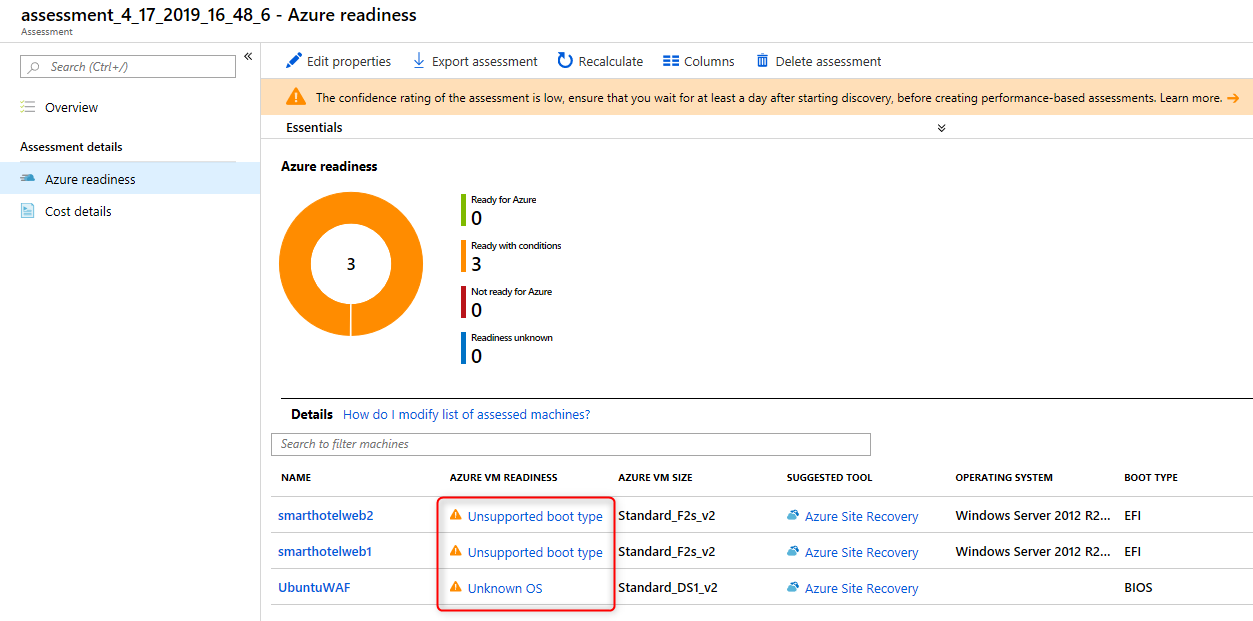
10. Click on **Unsupported boot type** for **smarthotelweb1**. A new browser tab opens showing Azure Migrate documentation. Search for 'Unsupported boot type' and note that the issue relates to EFI boot not being supported, and the recommendation to migrate using Azure Site Recovery, which will convert the boot type to BIOS.

11. Return to the portal browser tab to see details of the issue, and once again the suggested to migrate using Azure Site Recovery.

12. Take a few minutes to explore other aspects of the migration assessment. Check why the UbuntuWAF is marked as 'conditionally ready for Azure', and explore the costs associated with the migration.
### Task 5: Configure dependency visualization
When migrating a workload to Azure, it is important to understand all workload dependencies. A broken dependency could mean that the application doesn't run properly in Azure, perhaps in hard-to-detect ways. Some dependencies, such as those between application tiers, are obvious. Other dependencies, such as DNS lookups, Kerberos ticket validation or certificate revocation checks, are not.
In this task, you will configure the Azure Migrate dependency visualization feature. This requires you to first create a Log Analytics workspace, and then to deploy agents on the to-be-migrated VMs.
1. Return to the Azure Migrate blade in the Azure Portal, and click **Discovered Items**. Note that each VM has their 'Dependencies' status as 'Requires agent installation'. Click on **Requires agent installation** for the **smarthotelweb1** VM.
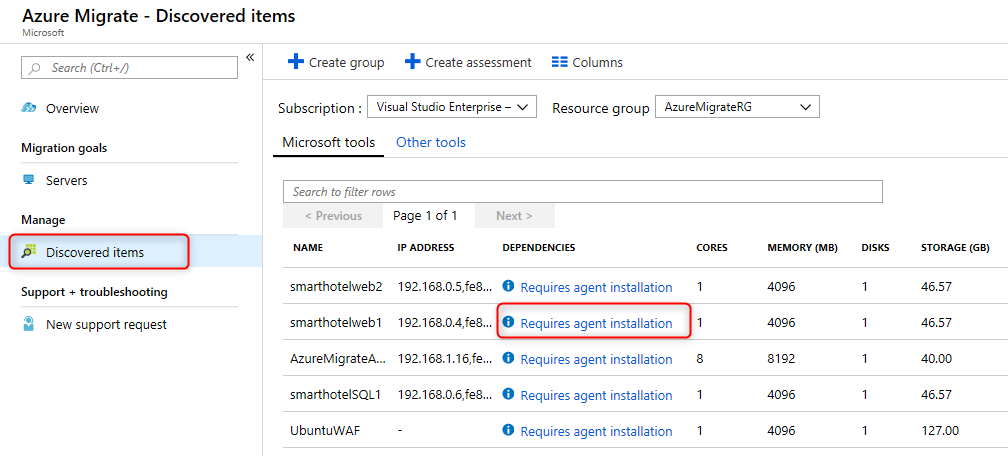
2. On the Dependencies blade, click **Configure OMS workspace**.

3. Create a new OMS workspace. Use **AzureMigrateWorkspace\** as the workspace name, where \ is a random number. Choose **East US** as the workspace location (Azure Migrate v2 private preview only supports the US geography). Click **Configure**.

4. Wait for the workspace to be deployed. Once it is deployed, make a note of the **Workspace ID** and **Workspace key** (for example by using Notepad).

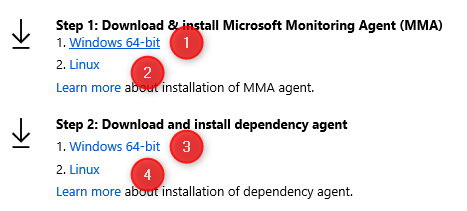
5. Right-click and copy the links for each of the 4 agent installers (the Microsoft Monitoring Agent and the Dependency Agent, for both Windows and Linux). Make a note of each of the links.
6. Return to the RDP session with the **SmartHotelHost**. In **Hyper-V Manager**, click on **smarthotelweb1** and click **Connect**.

7. Log in to the **Administrator** account using the password **demo@pass123**.
8. Open **Internet Explorer**, and paste the link for the Microsoft Monitoring Agent Windows installer into the address bar. **Run** the installer.

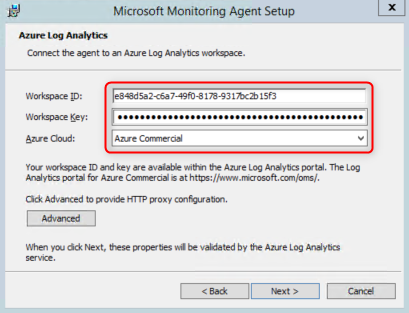
9. Click through the installation wizard. On the **Agent Setup Options** page, select **Connect the agent to Azure Log Analytics (OMS)**. Enter your Workspace ID and Workspace Key on the next page, and select **Azure Commercial** from the Azure Cloud drop-down. Click through the remaining pages and install the agent.
10. Paste the link to the Dependency Agent Windows installer into the browser address bar. **Run** the installer and click through the install wizard to complete the installation.

11. Close the virtual machine connection window for the **smarthotelweb1** VM. Connect to the **smarthotelweb2** VM and repeat the installation process for both agents (the administrator password is the same as for smarthotelweb1).
You will now deploy the Linux versions of the Microsoft Monitoring Agent and Dependency Agent on the UbuntuWAF VM. To do so, you will first connect to the UbuntuWAF remotely using an SSH session to the IP address of the SmartHotelHost. The SmartHotelHost has a NAT rule which forwards SSH connections to the UbuntuWAF VM.
12. In the Azure portal, navigate to the SmartHotelHost VM and note the public IP address. Open a new browser tab and navigate to **https://shell.azure.com**, accept and prompts and open a **Bash shell** session (not a PowerShell session).

13. Enter the following command, replacing \ with the public IP address of the SmartHotelHost:
```
ssh demouser@
```
15. Enter 'yes' if prompted whether to connect. Use the password **demo@pass123**.

16. Enter the following command, followed by the password **demo@pass123** when prompted:
```
sudo -s
```
This gives the terminal session elevated privileges.
17. Enter the following command, substituting \ and \ with the values copied previously:
```
wget https://raw.githubusercontent.com/Microsoft/OMS-Agent-for-Linux/master/installer/scripts/onboard_agent.sh && sh onboard_agent.sh -w -s
```
18. Enter the following command, substituting \ with the value copied previously:
```
/opt/microsoft/omsagent/bin/service_control restart
```
19. Enter the following command. This downloads a script that will install the Dependency Agent.
```
wget --content-disposition https://aka.ms/dependencyagentlinux -O InstallDependencyAgent-Linux64.bin
```
20. Install the dependency agent by running the script download in the previous step.
```
sh InstallDependencyAgent-Linux64.bin -s
```

21. Generate some traffic on the SmartHotel application, so the dependency visualization has some data to work with. Browse to the public IP address of the SmartHotelHost, and spend a few minutes refreshing the page and checking guests in and out.
### Task 6: Explore dependency visualization
In this task, you will explore the dependency visualization that was created based on the data gathered by the dependency agent installed in Task 5.
1. Return to the Azure Portal and refresh the Azure Migrate **Discovered items** blade. The 3 VMs on which the dependency agent was installed should now show their status as 'View dependencies'. (If not, wait a few minutes and refresh your browser.)
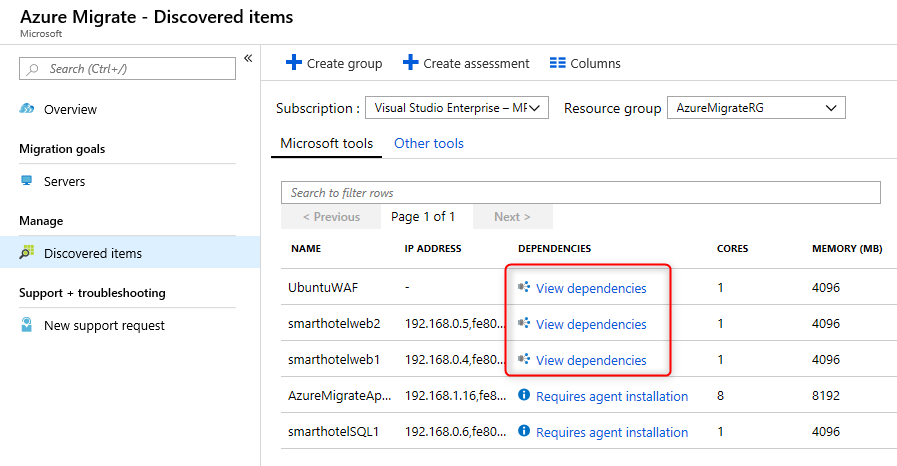
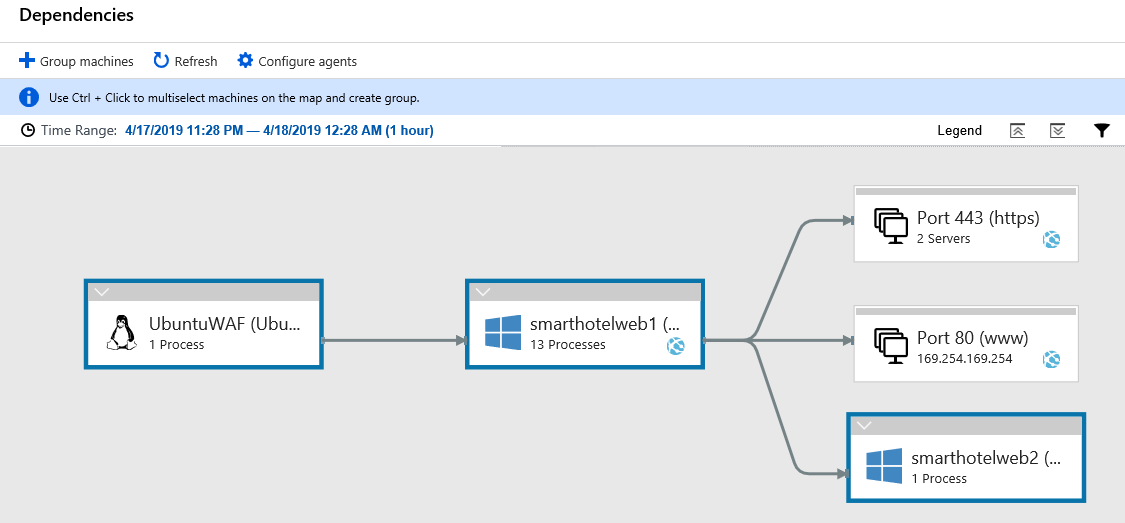
2. Click on **View dependencies** for **smarthotelweb1**.
3. Take a few minutes to explore the dependencies view. Expand each server to show the processes running on that server. Click on a process to see process information. See which connections each server makes.

4. Use **CTRL + click** to multi-select several machines from the dependency visualization. Then click **+ Group machines**, enter a group name, and click **OK**. Note how the dependency visualization can be used to create machine groups for later migration assessment.
## Exercise 2: Migrate the Application Database
### Overview
Duration: 60 minutes
In this exercise you will migrate the application database from the on-premises Hyper-V virtual machine to a new database hosted in the Azure SQL Database service. You will use the Azure Database Migration Service to complete the migration, which uses the SQL Server Data Migration Assistant for the database assessment and schema migration phases.
### Task 1: Create an Azure SQL Database
In this task you will create a new Azure SQL database to migrate the on-premises database to. You will also configure network access to the SQL database from the Hyper-V host that is running the SmartHotel application on-premises.
1. Open the Azure portal at https://portal.azure.com and log in using your subscription credentials.
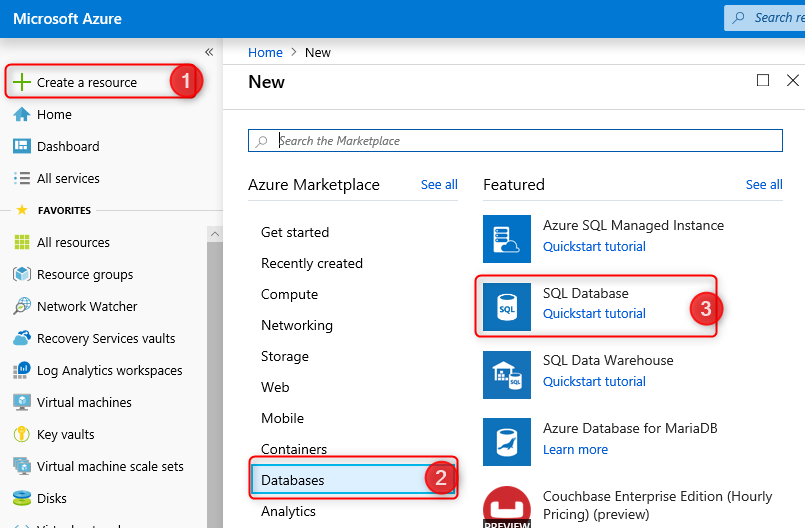
2. Click **+ Create a resource**, then click **Databases**, then click **SQL Database**.
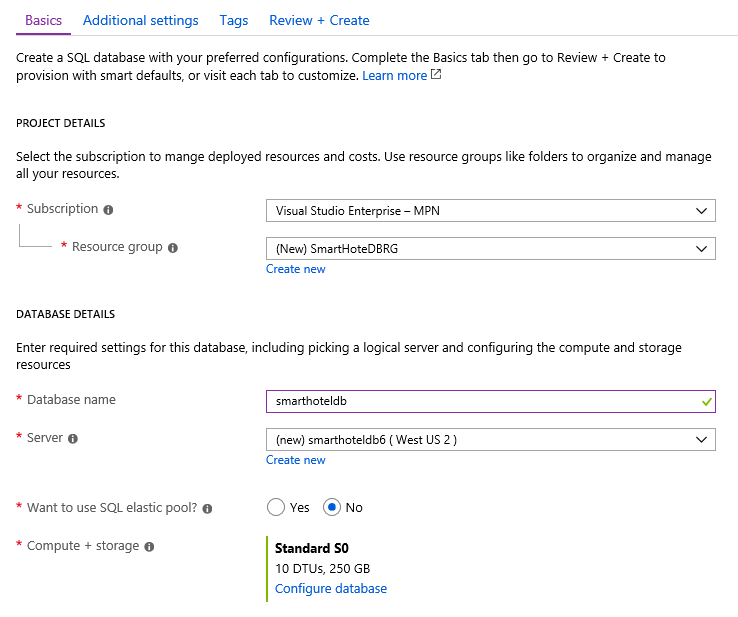
3. The **Create SQL Database** blade opens, showing the 'Basics' tab. Complete the form as follows:
- Subscription: **Select your subscription**.
- Resource group (create new): **SmartHotelDBRG**
- Database name: **smarthoteldb**
- Server: Click **Create new** and fill in the New server blade as follows:
- Server name: **smarthoteldb\[unique number\]**
- Server admin login: **demouser**
- Password: **demo@pass123**
- Location: **IMPORTANT: Select the same region you used when you started your lab - this makes migration faster**.
>**Note**: You can verify the location by opening another browser tab, navigating to https://portal.azure.com and clicking Virtual Machines on the left navigation. Use the same region as the **SmartHotelHost** virtual machine.
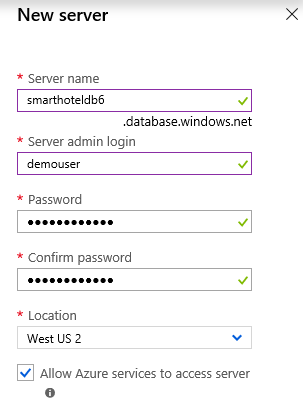
4. Click **Review + Create**, then click **Create** to create the database. Wait for the deployment to complete.
> **Note**: During migration, the existing database schema will be transferred to the Azure SQL Database using the SQL Server Database Migration Assistant (DMA). We will run this on the Hyper-V host. We therefore need to grant access from the Hyper-V host to the Azure SQL server hosting the Azure SQL database.
5. Browse to the Hyper-V host by searching for **smarthotelhost** in the global search and clicking on the result for the virtual machine.

6. Take a note of the public IP address of the SmartHotelHost VM.
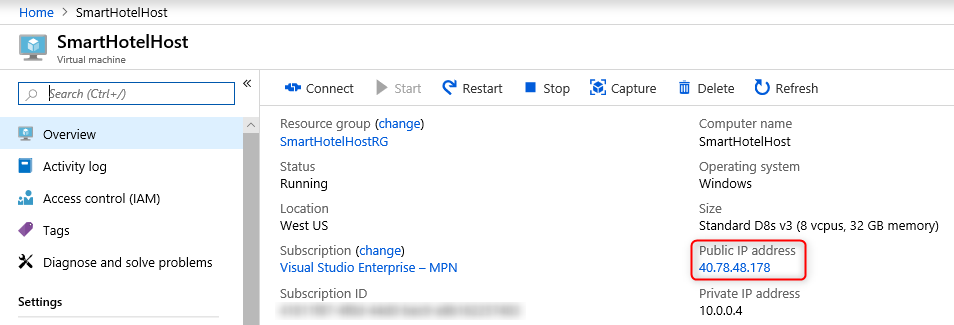
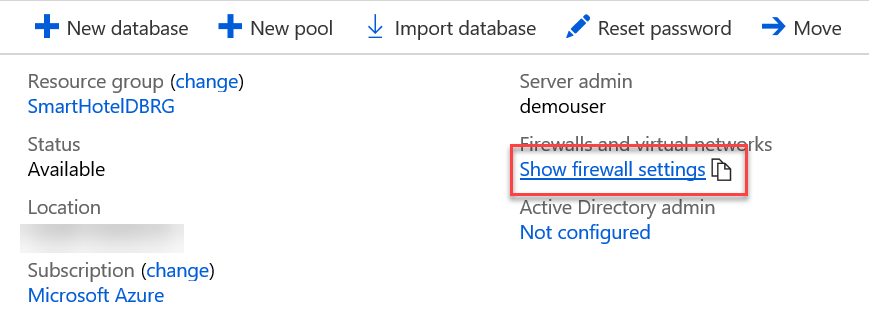
7. Browse to the SQL Server by searching for **smarthoteldb** in the global search and clicking the result for the SQL server (**not** the SQL database).

8. Click **Show firewall settings** to open the SQL server 'Firewalls and virtual networks' blade.
9. Create a new rule, specifying the rule name **Hyper-V host** and the SmartHotelHost VM public IP address noted earlier as both the 'Start IP' and 'End IP'. Click **Save**. When the save operation completes, click **OK**.
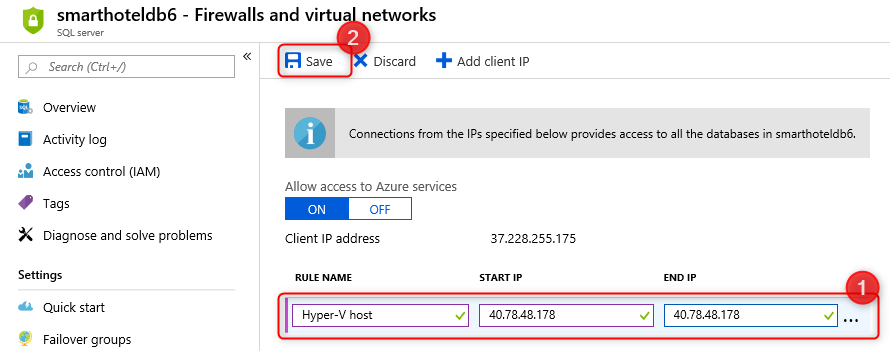
#### Task summary
In this task you created an Azure SQL Database, and enabled network access to the database from the on-premises Hyper-V host.
### Task 2: Assess the on-premises database
In this task you will install and use Microsoft SQL Server Data Migration Assistant (DMA) to assess an on-premises database.
1. From the Azure portal, browse to the Hyper-V host by searching for **smarthotelhost** in the global search and clicking on the result for the virtual machine.

2. Click **Connect**, then download the RDP file and connect to the VM using user name **demouser** and password **demo@pass123**.
3. From within the **SmartHotelHost** VM, launch file explorer and navigate to **C:\\OpsgilityTraining**.
4. Double click on **DataMigrationAssistant** and follow the instructions to complete the install.
5. From within **SmartHotelHost** launch **Microsoft Data Migration Assistant** using the desktop icon.
6. In the Data Migration Assistant, select the New (+) icon, and then select the **Assessment** project type.
7. Specify a project name (*e.g.* SmartHotelAssessment), in the **Source server type** text box select **SQL Server**, in the **Target server type** text box, select **Azure SQL Database**, and then select **Create** to create the project.
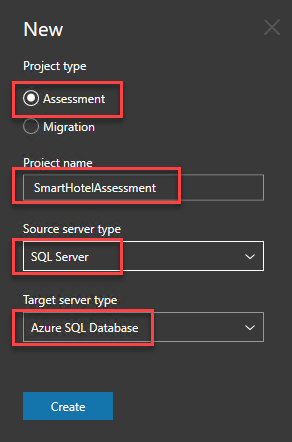
8. On the **Options** tab click **Next**.
9. On the **Select sources** screen, in the **Connect to a server** dialog box, provide the connection details to the SQL Server, and then select **Connect**.
- Server name: **192.168.0.6**
- Authentication type: **SQL Server Authentication**
- Username: **sa**
- Password: **demo@pass123**
- Encrypt connection: **Checked**
- Trust server certificate: **Checked**
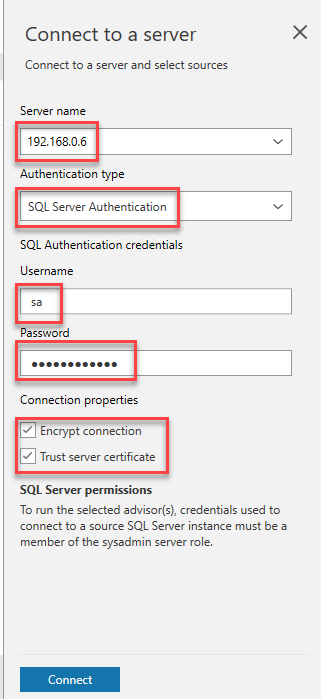
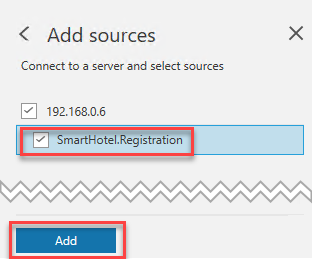
10. In the **Add sources** dialog box, select **SmartHotel.Registration**, then click **Add**.
11. Click **Start Assessment** to start the assessment.
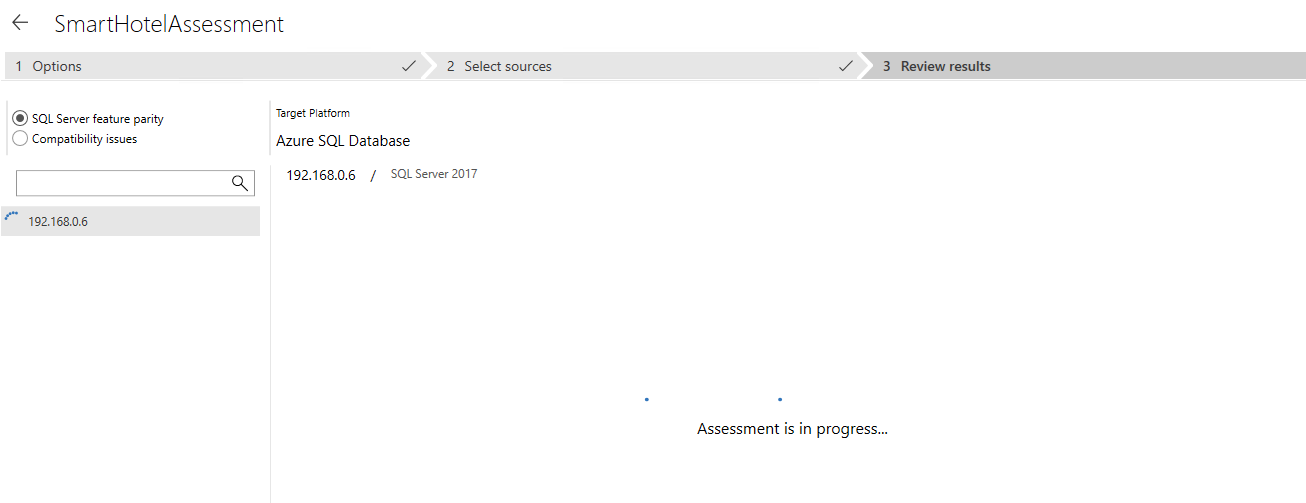
12. **Wait** for the assessment to complete, and review the results. The results should show one unsupported feature, 'Service Broker feature is not supported in Azure SQL Database'. For this migration, we can ignore this issue.
> **Note**: For Azure SQL Database, the assessments identify feature parity issues and migration blocking issues.
>- The SQL Server feature parity category provides a comprehensive set of recommendations, alternative approaches available in Azure, and mitigating steps to help you plan the effort into your migration projects.
>- The Compatibility issues category identifies partially supported or unsupported features that reflect compatibility issues that might block migrating on-premises SQL Server database(s) to Azure SQL Database. Recommendations are also provided to help you address those issues.
#### Task summary
In this task you used Data Migration Assistant to assess an on-premises database for readiness to migrate to Azure SQL.
### Task 3: Migrate On-premises database
In this task you will use Microsoft Data Migration Assistant to migrate the database to Azure SQL Database.
1. In the Data Migration Assistant, select the New (+) icon, and then under **Project type**, select **Migration**.
2. Specify a project name (*e.g.* SmartHotelMigration), in the **Source server type** text box, select **SQL Server** and then in the **Target server type** text box, select **Azure SQL Database**. Under **Migration Scope** select **Schema and data**. Click **Create**.
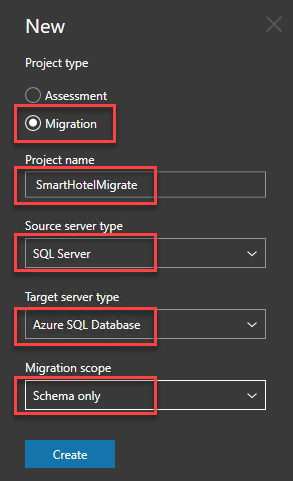
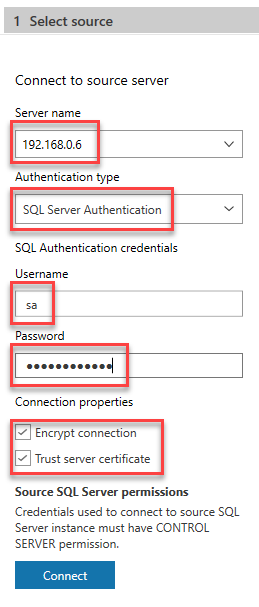
3. In the Data Migration Assistant, on the **Select source** tab, specify the source connection details for the on-premises SQL Server, then click **Connect**,
- Server name: **192.168.0.6**
- Authentication type: **SQL Server Authentication**
- Username: **sa**
- Password: **demo@pass123**
- Encrypt connection: **Checked**
- Trust server certificate: **Checked**
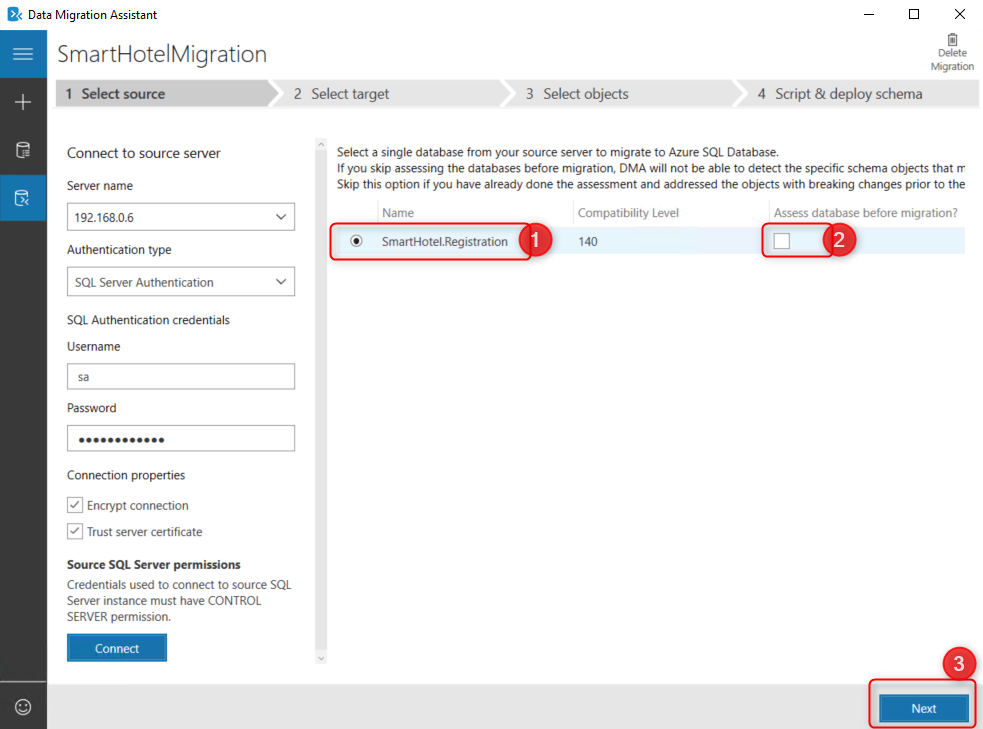
4. Select the **SmartHotel.Registration** database (if it is not selected already). Un-check the **Assess database before migration?** checkbox. Then click **Next**.
5. On the **Select target** tab, specify the target connection details for the Azure SQL database:
- Server name: **Value from Azure - see Note below**.
- Authentication type: **SQL Server Authentication**
- Username: **demouser**
- Password: **demo@pass123**
- Encrypt connection: **Checked**
- Trust server certificate: **Checked**
Click **Connect**.
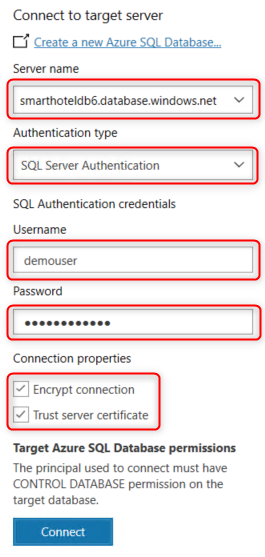
> **Note**: To find the Azure SQL Database server name, use the Azure portal to search for **SmartHotelDB** in the global search, then open the SQL Database resource. The server name is shown in the resource properties.


6. Verify that the **smarthoteldb** database is selected, then click **Next**.
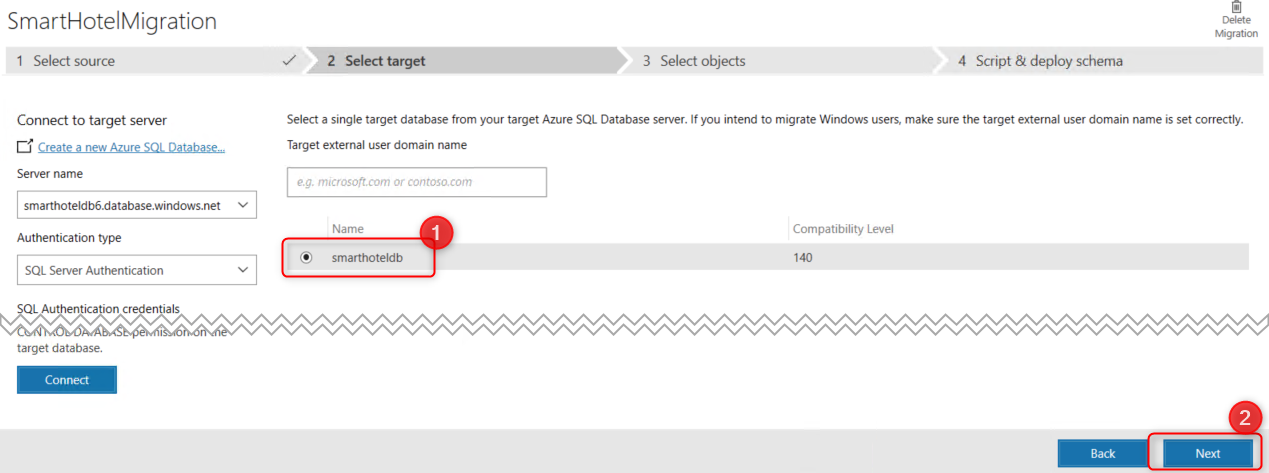
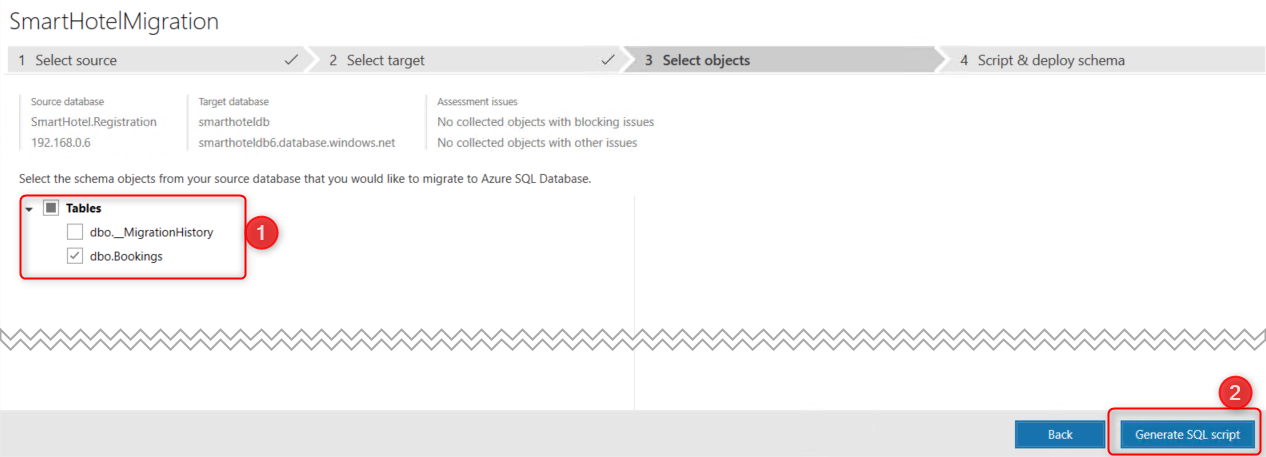
7. The **Select objects** tab allows you to specify the schema objects in the **SmartHotel.Registration** database that need to be deployed to Azure SQL Database. Select both the **Bookings** table and the **_MigrationHistory** table. Then click **Generate SQL script**.
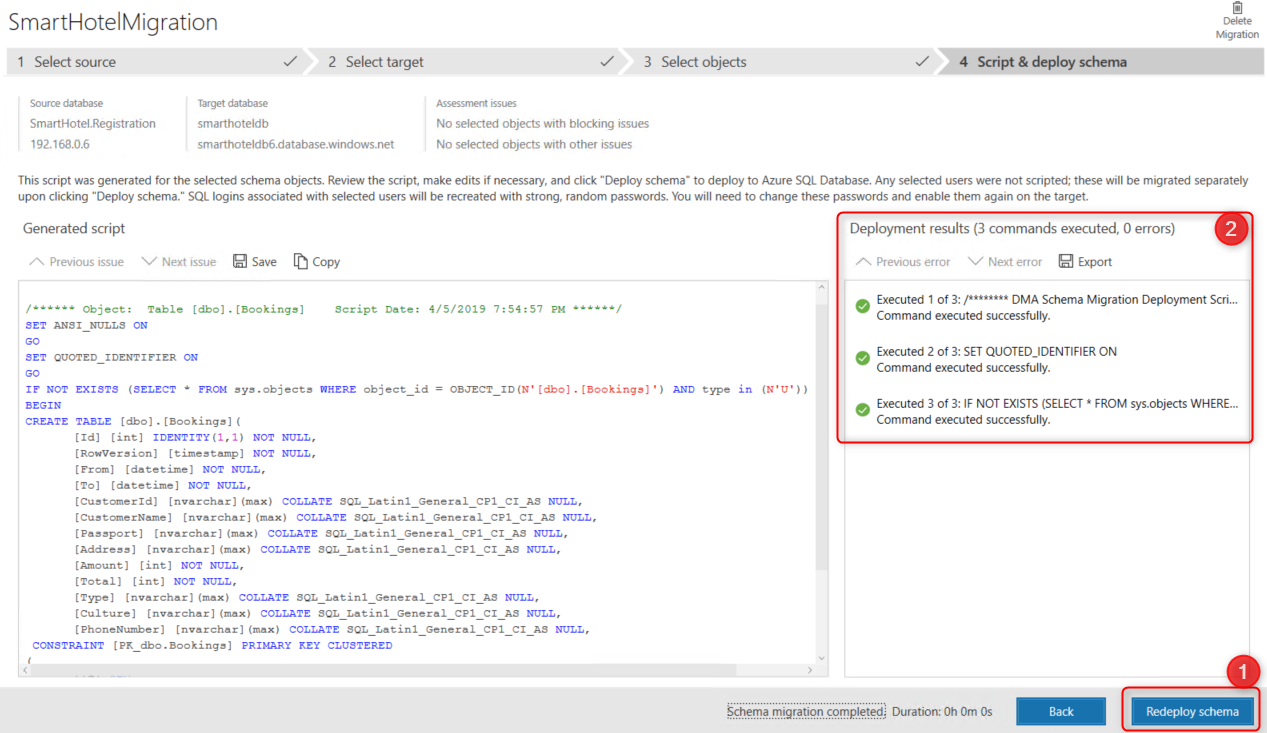
8. The script to migrate the schema to Azure SQL Database is shown on the **Script & deploy schema** tab. Review the script and select **Deploy schema** to deploy the schema to Azure SQL Database. Under **Deployment results**, verify that the script executed successfully.
9. Select **Migrate data** to proceed with the next steps to migrate the database.
10. Under **Selected tables** ensure the target tables are checked and select **Start data migration** (it should only take 1-2 seconds to migrate as it is a tiny dataset).
#### Task summary
In this task you used Microsoft Data Migration Assistant to migrate the database to Azure SQL Database.
## Exercise 3: Migrate the application and web tiers using Azure Migrate: Server Migration
Duration: 45 minutes
In this exercise you will migrate the web tier and application tiers of the application from on-premises to Azure using Azure Site Recovery. You will then perform a test failover of the application. The test servers will be reconfigured to use the application database hosted in Azure SQL.
### Task 1: Create a Storage Account
In this task you will create a new Azure Storage Account that will be used by Azure Site Recovery for storage of your virtual machine data during migration.
1. In the Azure portal, click **+Create a resource**, then select **Storage**, followed by **Storage account**.
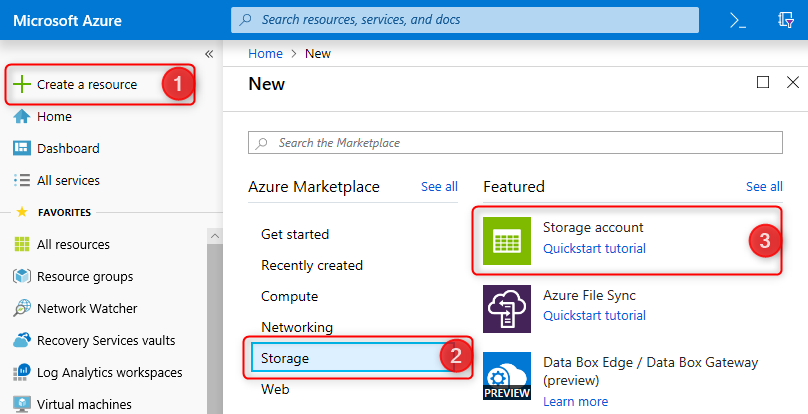
1. In the **Create storage account** blade on the **Basics** tab, use the following values:
- Subscription: **Select your Azure subscription**.
- Resource group (create new): **VaultRG**
- Storage account name: **vaultstorage\[unique number\]**
- Location: **Select the same location as your Azure SQL Database**.
- Account kind: **Storage (general purpose v1)** (do not use a v2 account)
- Replication: **Locally-redundant storage (LRS)**
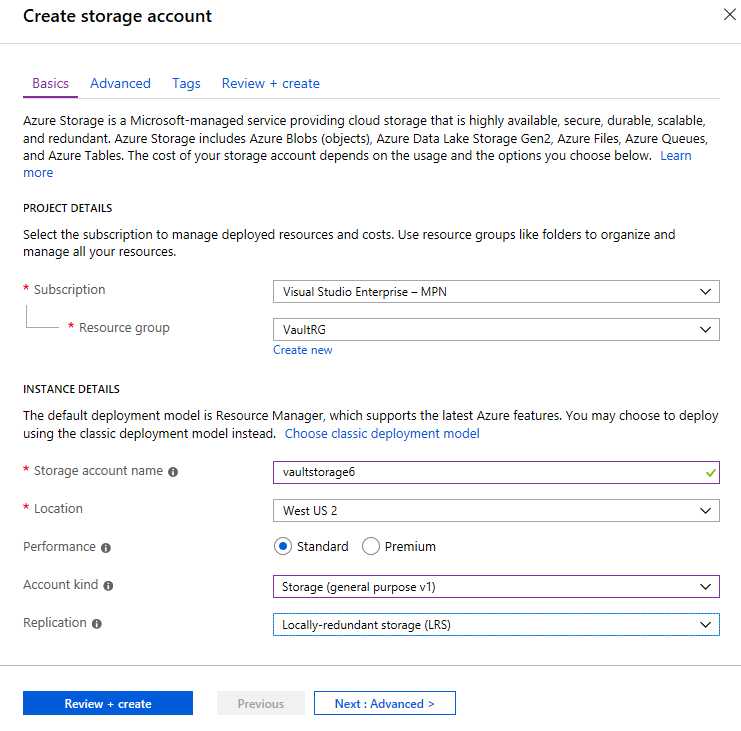
2. Click **Review + create**, then click **Create**.
#### Task summary
In this task you created a new Azure Storage Account that will be used by Azure Migrate: Server Migration.
### Task 2: Create a Virtual Network
In this task you will create a new virtual network that will be used by your migrated virtual machines when they are migrated to Azure. (Azure Site Recovery will only create the VMs, their network interfaces, and their disks; all other resources must be staged in advance.)
1. In the Azure portal, click **+Create a resource**, then select **Networking**, followed by **Virtual network**.
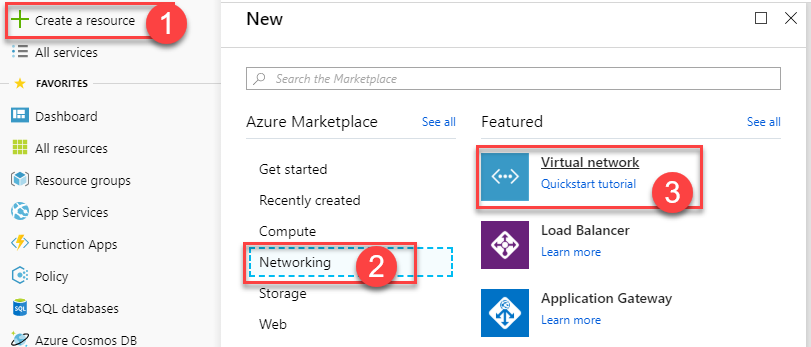
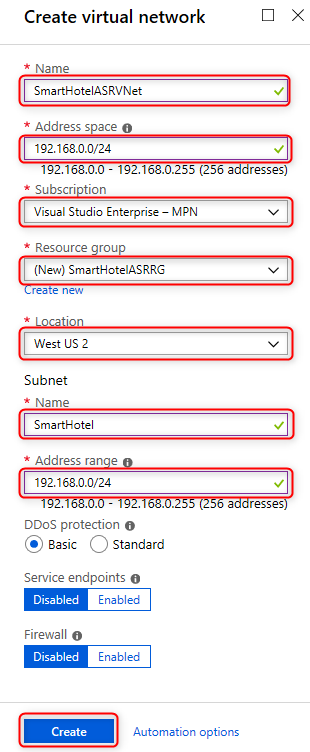
2. In the **Create virtual network** blade, enter the following values and click **Create**.
- Name: **SmartHotelASRVNet**
- Address space: **192.168.0.0/24**
- Subscription: **Select your Azure subscription**.
- Resource group: (create new) **SmartHotelASRRG**
- Location: **Select the same location as your Azure SQL Database**.
- Subnet: **SmartHotel**
- Subnet address range: **192.168.0.0/24**
#### Task summary
In this task you created a new virtual network that will be used by your virtual machines when they are migrated to Azure.
### Task 3: Configure and start replication of VMs
In this task, you will configure the internal IP address used by each VM, and review the VM size.
1. Navigate to the Azure Migrate blade, then click **Servers**. Under **Migration tools**, click on **Replicate**.
2. Select **Replicating machines** and select the **UbuntuWAF** VM then click **Compute and Network**, then click **Edit**.
!add image for step 2
3. For **Source settings**, under **Are your machines virtualized?**, select **Yes, with Hyper-V** from the dropdown. Click **Next: Virtual machines**.
4. For **Virtual machines**, under **Import migration settings from an assessment?**, select **Yes, apply migration settings from an Azure Migrate assessment** from the dropdown.
5. Under **Select group**, select **SmartHotel VMs**, and under **Select assessment**, select **SmartHotel Assessment**
6. You should now see the 3 application layer VMs. Place a tick in the box for each VM then select **Next: Target settings**.
7. For **Target settings**, select your subscription, then use the following settings then click **Next: Compute** :
- Subscription: **Select your Azure subscription**.
- Resource group: **SmartHotelMigrateRG**
- Replication Storage Account: **[Storage Account name created in previous step]**
- Virtual Network: **SmartHotelASRVNet**
- Subnet: **SmartHotel**
8. Under **Compute**, review the target compute settings for the VMs to be replicated. Select the appropriate OS for the dropdowns in column, **OS TYPE** but leave everything else default for now. Then select **Next: Disks**.
- smarthotelweb1: **Windows**
- smarthotelweb2: **Windows**
- UbuntuWAF: **Linux**
9. Under **Disks**, review the target disk settings for the VMs to be replicated. Ensure under **DISKS TO REPLICATE** that the dropdown shows **All selected**. Then select **Next: Review + Start replication**.
10. Finally, review the target settings the click **Replicate**. Azure Migrate will now begin replicated the virtual machines.
#### Task summary
In this task you set up the replication settings and started the replicating to Azure.
### Task 4: Configure static IP addresses for VMs
In this task you will configure the target static IPs for the 3 replicated VMs as the application is configured to use pre-defined IPs.
1. Navigate to **Azure Migrate** and under **Migration tools**, click on **Overview**
2. Under **Manage** in the left pane, click on **Replicating machines**.
3. Click on **UbuntuWAF**. Under **General**, click on **Compute and Network** and then select **Edit**
4. Under **Network Interfaces**, you will see the target network configuration for the VM. Click on the name of the On-Premises Network Name: **InternalNATSwitch**
5. For **Private IP address**, enter **Target* address **192.168.0.8** in the available field.

6. Click **OK** to close the network interface settings blade, then **Save** the UbuntuWAF Compute and Network settings.
6. Repeat these steps to configure managed disks for the other VMs.
- For **smarthotelweb1** use private IP address **192.168.0.4**.
- For **smarthotelweb2** use private IP address **192.168.0.5**.
### Task 5: Test Migration
In this task you will perform a test failover of the SmartHotelWeb* virtual machines and configure the machines to point to the previously migrated Azure SQL Database.
1. Click **Replicated items** under **Protected items** to view the status of replication for your virtual machines. Verify they have a status of **Protected**.
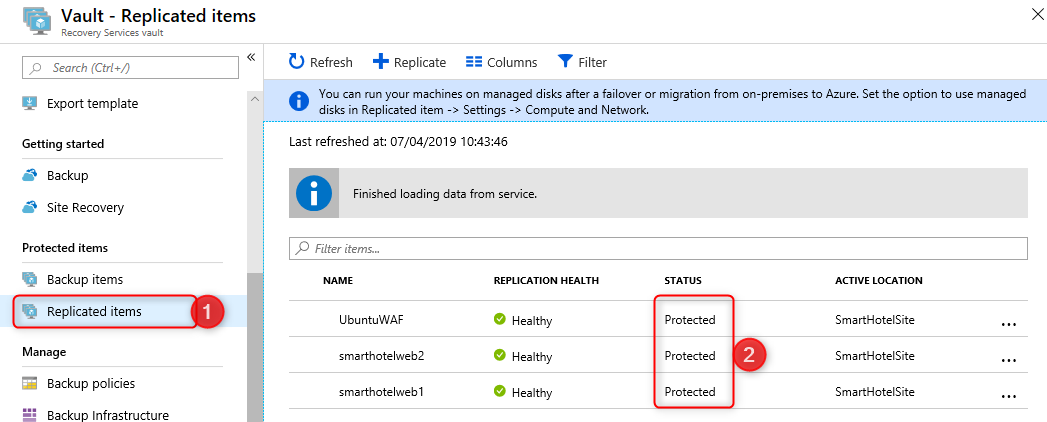
> **Note**: If the virtual machines are still synchronizing, wait for replication to finish before moving on to the next step. Refresh your browser to see the current replication status.
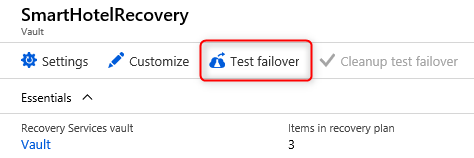
6. Click on **Recovery Plans (Site Recovery)** and select the **SmartHotelRecovery** plan. Click **Test failover**.
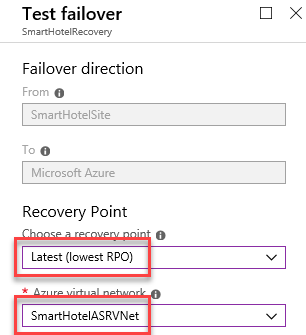
7. In the **Test failover** blade, change **Recovery point** to **Latest (lowest RPO)** and select the **Azure virtual network** **SmartHotelASRVNet**. Click **OK**.
8. Click the notification for **Test failover of 'SmartHotelRecovery' is in progress** to view the status of the failover.

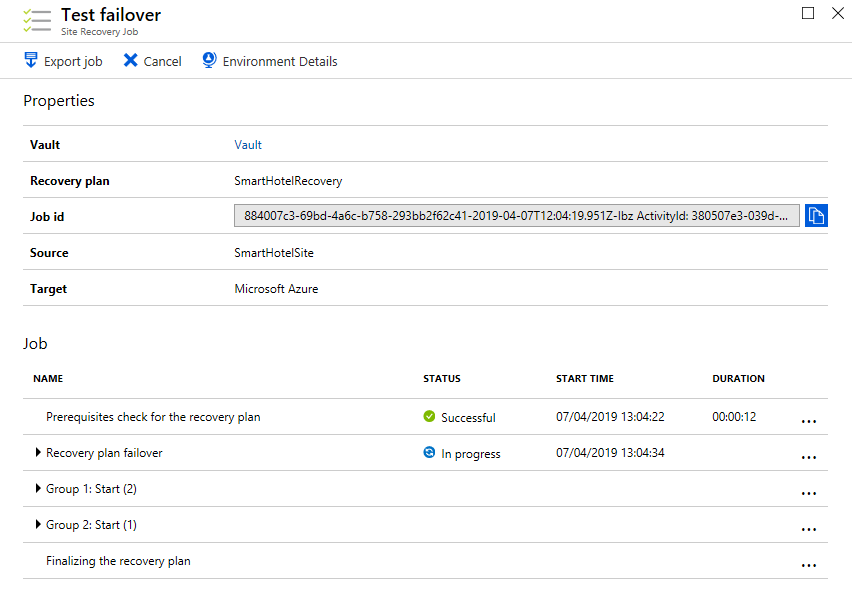
**Wait for the test failover to complete before continuing to the next task.**
> **Note**: The test failover can take up to 30 minutes to complete for all machines.
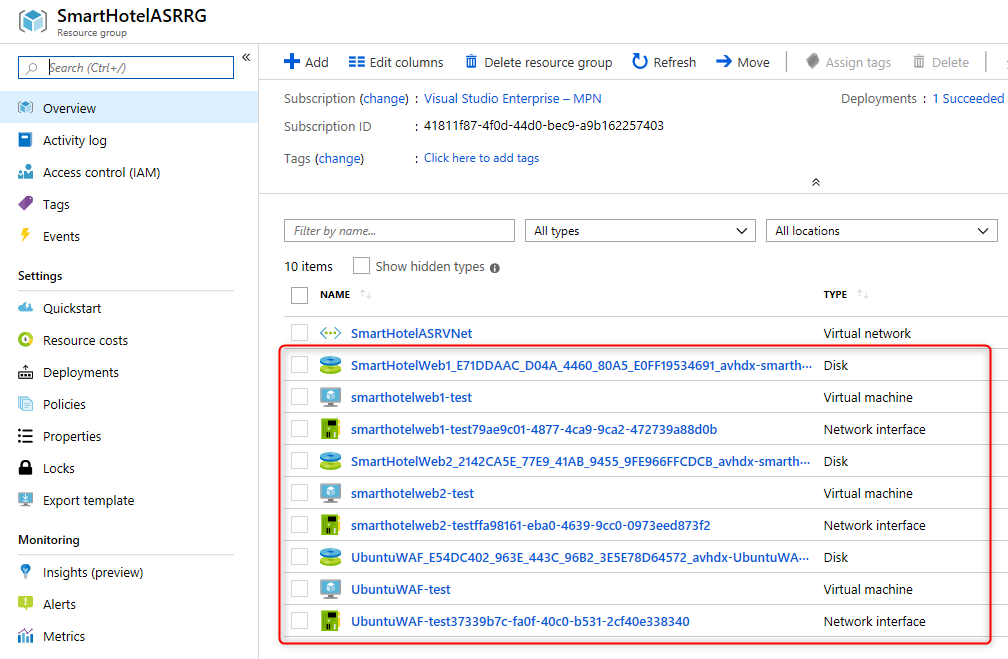
9. Navigate to the **SmartHotelASRRG** resource group and check that the VM, network interface, and disk resources have been created for each of the virtual machines being migrated.
> **Note:** Because this is a test failover, the virtual machine names have had the suffix **-test** appended.
#### Task summary
In this task you used Azure Site Recovery to perform a test failover. This migrated your on-premises VMs to Azure.
### Task 9: Configure database connection
The application tier VM **smarthotelweb2** is configured to connect to the application database running on the **smarthotelsql** VM.
On the migrated VM **smarthotelweb2-test**, this configuration needs to be updated to use the Azure SQL Database.
As a preliminary step, you will temporarily associate a public IP address with the **smarthotelweb2** VM, so that you can connect to it using Remote Desktop. (Alternatively, you could connect via a separate 'jumppbox' VM or via a Site-to-Site or ExpressRoute connection.)
> **Note:** You do not need to update any configuration files on **smarthotelweb1-test** or the **UbuntuWAF-test** VMs, since the migration has preserved the private IP addresses of all virtual machines they connect with.
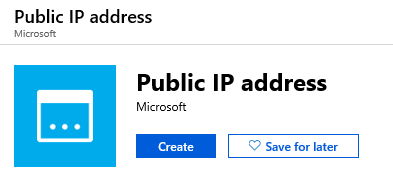
1. Click **+ Create a resource** and enter **Public IP Address** in the search box. In the **Public IP Address** blade click **Create**.
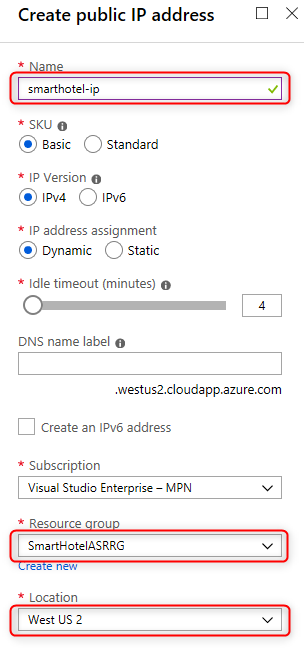
2. Create a new public IP address with the following values (plus defaults) and click **Create**.
- Name: **smarthotel-ip**
- Resource group: **SmartHotelASRRG**
- Location: **Select the same location as the smarthotelweb2-test VM**.
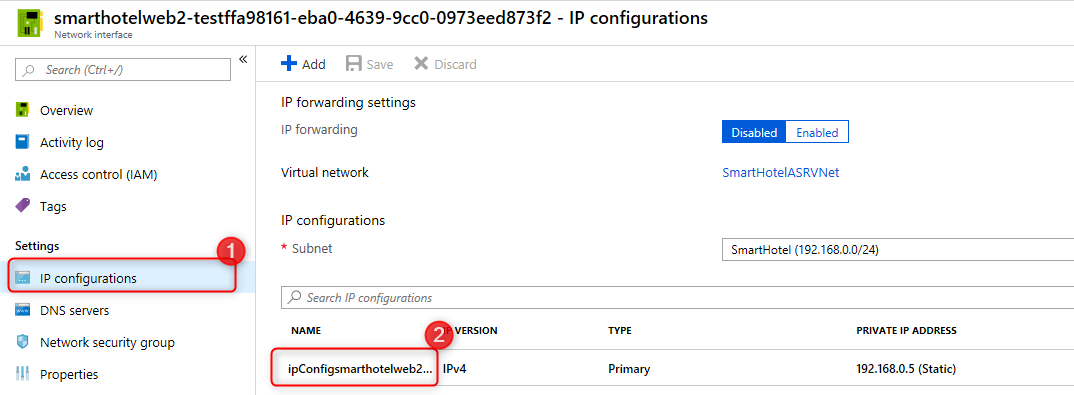
3. Browse to the **SmartHotelWeb2-test** VM, click **Networking**, and then click the name of the **Network interface** associated with the virtual machine.

4. In the network interface settings, click **IP configurations** and then click on the available configuration.
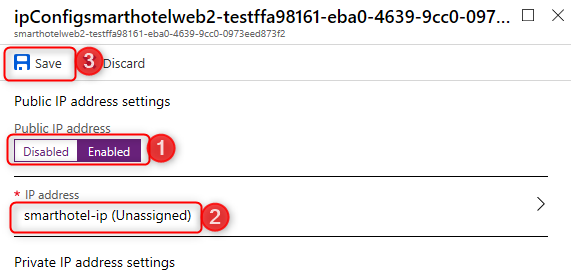
5. Change the **Public IP address** to **Enabled**, select **smarthotel-ip** and click **Save**.
6. Return to the **SmartHotelWeb2-test** VM overview blade, and click **Connect**. Download the RDP file and connect to the machine with the username **Administrator** and the password **demo@pass123**.

7. Open Windows Explorer and navigate to the **C:\\inetpub\\SmartHotel.Registration.Wcf** folder. Double-click the **Web.config** file and open with Notepad.
8. Update the **DefaultConnection** setting to connect to your Azure SQL Database.
You can find the connection string for the Azure SQL Database in the Azure portal by browsing to the database, and clicking **Show database connection strings**

Copy the connection string, and paste into the web.config file on **smarthotelweb2-test**, replacing the existing connection string. Be careful not to overwrite the 'providerName' parameter which is specified after the connection string.
Make the following changes to the connection string:
- Set the User ID to **demouser**.
- Set the Password to **demo@pass123**.


9. Save the web.config file and exit your RDP session.
10. Browse to **SmartHotelWeb2-test**, click **Networking**, and then click the name of the **Network interface** associated with the virtual machine.

11. In the network interface settings, click **IP configurations** and then click on the available configuration.

12. Change the **Public IP address** to **Disabled** and click **Save**.
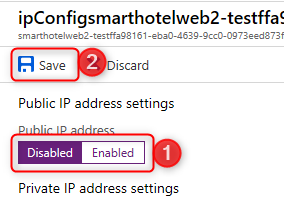
#### Task summary
In this task, you updated the **smarthotelweb2-test** configuration to connect to the Azure SQL Database.
### Task 10: Configure public IP and test application
In this task, you will associate the public IP address with the UbuntuWAF VM. This will allow you to verify that the SmartHotel application is running in Azure.
1. Using similar steps, associate the public IP address resource **smarthotel-ip** with the network interface of the **UbuntuWAF-test** VM.
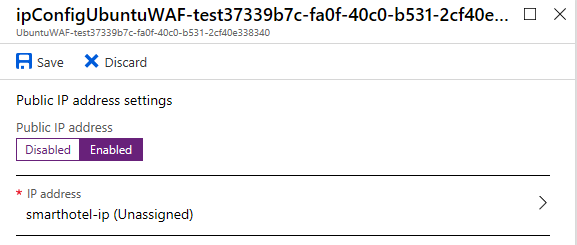
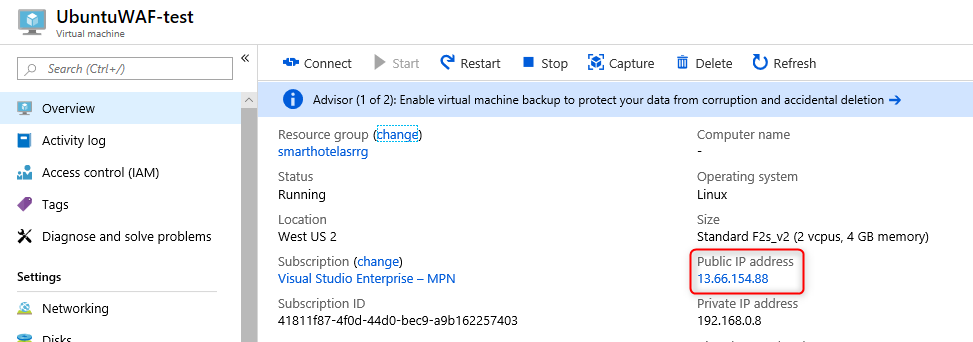
2. Return to the **UbuntuWAF-test** VM overview blade and copy the **Public IP address** value.
3. Open a new browser tab and paste the IP address. Verify that the SmartHotel360 application is available in Azure.
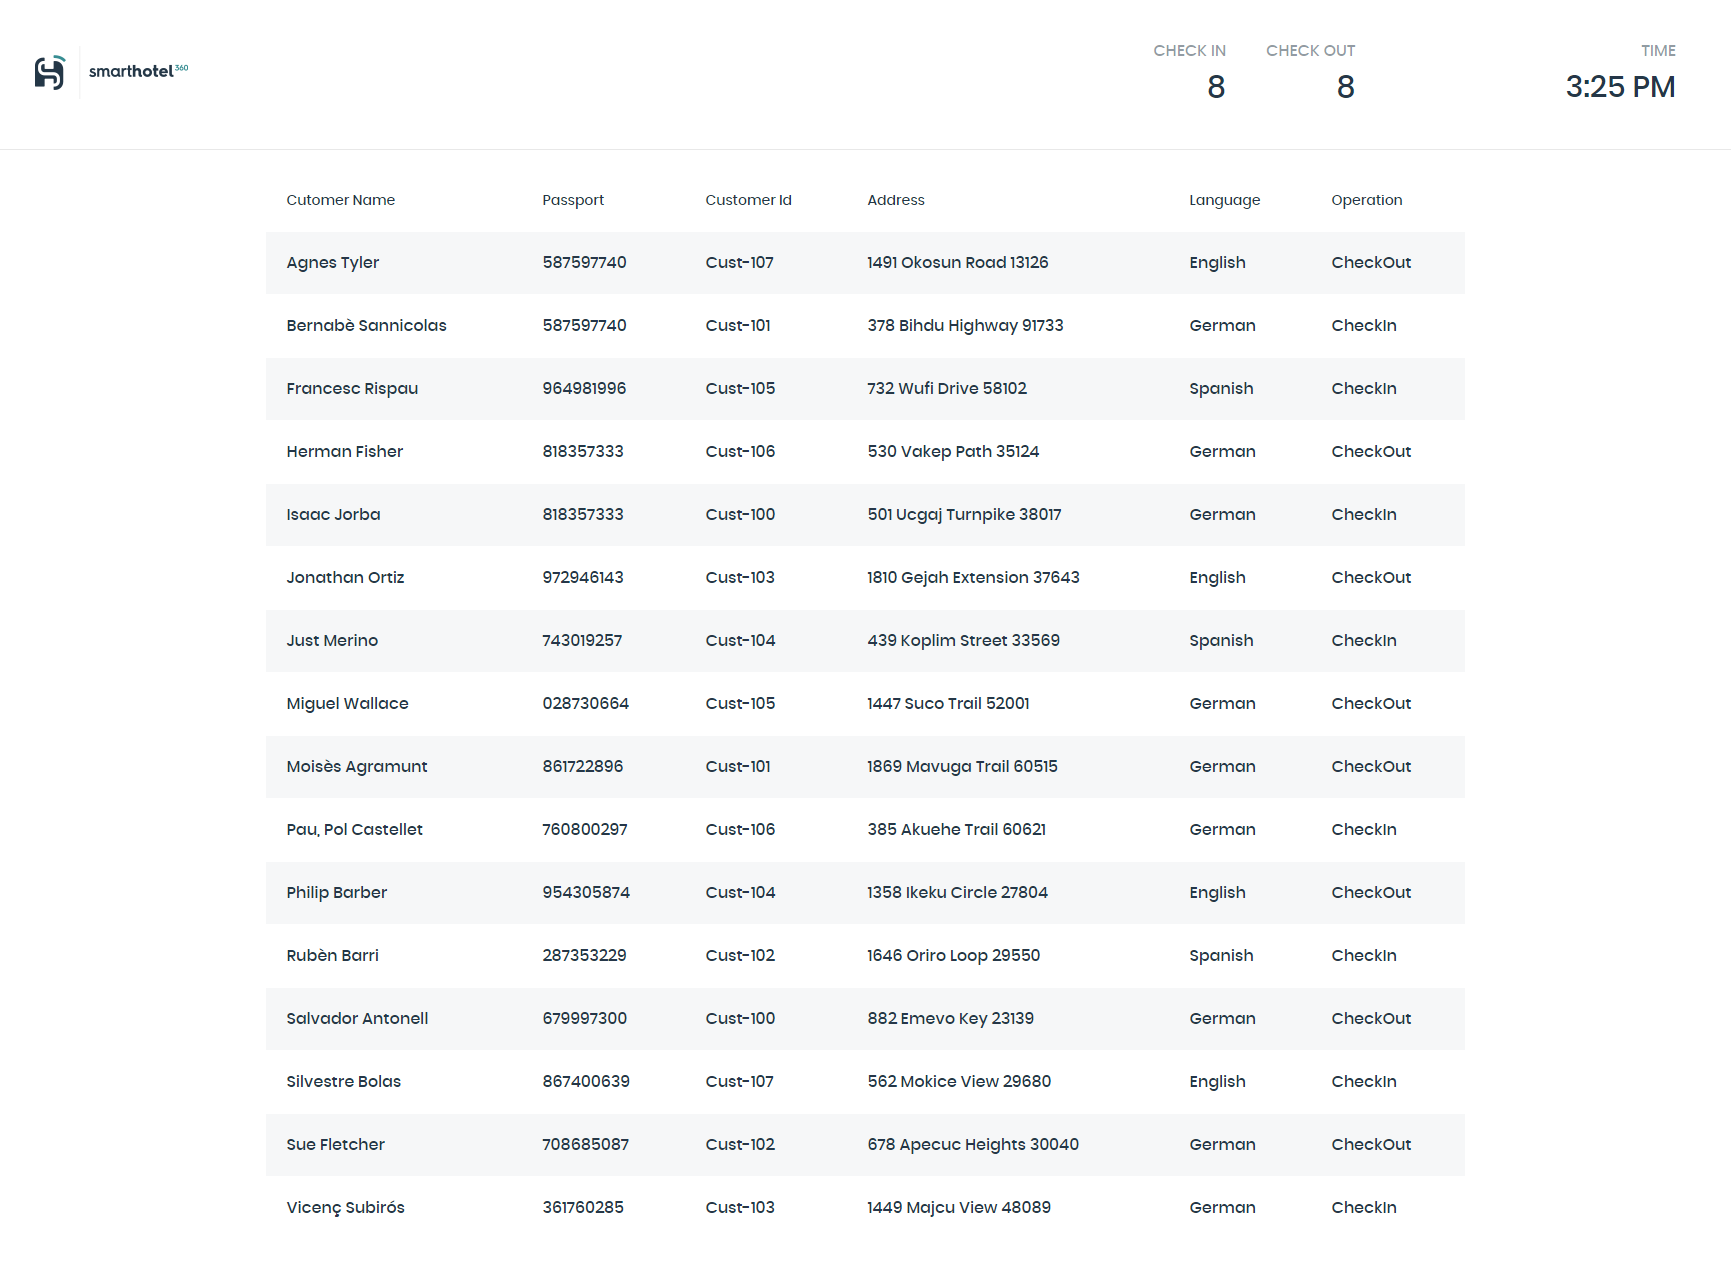
> **Note**: If you see the default IIS web application, the default site started before SmartHotel.Registration. RDP to the **smarthotelweb1-test** server (you will need to add a public IP address first), open IIS Manager, stop the default site and start the SmartHotel.Registration site.
#### Task summary
In this task you configured the public IP address for the SmartHotel application and verified that the migrated site is working.
### Task 11: Cleanup the test failover
In this task you will clean up the test failover of the application. This deletes the resources created during the test failover and marks the test failover as complete.
1. Navigate to your Recovery Services Vault in the Azure portal. Click on **Recovery Plans (Site Recovery)** and select the **SmartHotelRecovery** plan. Click **Cleanup test failover**.

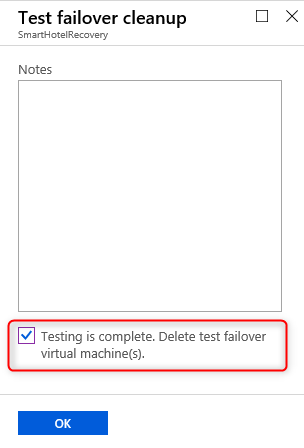
2. On the **Test failover cleanup** blade, check the **Testing is complete. Delete test failover virtual machine(s).** checkbox and click **OK**.
#### Task summary
In this task, you completed the test failover process by cleaning up the test failover resources.
## After the hands-on lab
Duration: 10 minutes
### Task 1: Clean up resources
You should complete all of these steps *after* attending the Hands-on lab. Failure to delete the resources created during the lab will result in continued billing.
1. Delete the resource group containing the SmartHotelHost.
2. Delete the **SmartHotelDBRG** resource group containing the Azure SQL Database.
3. Delete the **VaultRG** resource group containing the Recovery Services Vault.
4. Delete the **SmartHotelASRRG** resource group containing the migrated VMs and related infrastructure resources.
5. Delete the **AzureMigrateRG** resource group containing the Azure Migrate resources.
You should follow all steps provided *after* attending the Hands-on lab.