![DarkMoon Logo](pics/logo_blue.png) A platform that allows you to conduct a complete penetration testing campaign
# Summary - [I. Preview](#i-preview) - [II. Installation](#ii-installation) - [II.1. Prerequisites](#ii1-prerequisites) - [II.2. General project structure](#ii2-general-project-structure) - [II.3. Configuration of environment variables in docker compose](#ii3-configuration-of-environment-variables-in-docker-compose) - [II.3.a Example environment variable](#ii3a-example-environment-variable) - [II.3.b Role of the variables](#ii3b-role-of-the-variables) - [II.3.d Compatible Models & Hardware](#ii3d-compatible-models--hardware) - [II.4. Automatic generation of OpenCode files](#ii4-automatic-generation-of-opencode-files) - [II.5. Volumes and persistence](#ii5-volumes-and-persistence) - [II.5.a Important volumes](#ii5a-important-volumes) - [II.5.b What this allows](#ii5b-what-this-allows) - [II.6. Build and launch Darkmoon](#ii6-build-and-launch-darkmoon) - [II.6.a Building the images](#ii6a-building-the-images) - [II.6.b Launching the stack](#ii6b-launching-the-stack) - [II.7. Launch Darkmoon (User CLI)](#ii7-launch-darkmoon-user-cli) - [II.7.a Make the wrapper executable](#ii7a-make-the-wrapper-executable) - [II.7.b Install globally (optional)](#ii7b-install-globally-optional) - [II.7.c Launch Darkmoon with TUI Console](#ii7c-launch-darkmoon-with-tui-console) - [II.7.d View logs](#ii7d-view-logs) - [II.8. Direct access to the container (debug)](#ii8-direct-access-to-the-container-debug) - [II.9. Where to modify what (summary)](#ii9-where-to-modify-what-summary) - [II.10. Quick summary](#ii10-quick-summary) - [III. Uses](#iii-uses) - [III.1. Prompt Examples](#iii1-prompt-examples) - [IV. Architecture](#iv-architecture) - [IV.1. Core Idea](#iv1-core-idea) - [IV.2. Main Components (Who Does What)](#iv2-main-components-who-does-what) - [IV.2.a. OpenCode — The Brain](#iv2a-opencode--the-brain) - [IV.2.b. AI Agents — The Strategy Layer](#iv2b-ai-agents--the-strategy-layer) - [IV.2.c. MCP Darkmoon — The Security Gatekeeper](#iv2c-mcp-darkmoon--the-security-gatekeeper) - [IV.2.d. Darkmoon Toolbox — The Real Tools](#iv2d-darkmoon-toolbox--the-real-tools) - [IV.2.e. Docker \& Volumes — Isolation and Persistence](#iv2e-docker--volumes--isolation-and-persistence) - [IV.3. Execution Flow (Simple Overview)](#iv3-execution-flow-simple-overview) - [IV.3.a Deployment diagram](#iv3a-deployment-diagram) - [IV.3.b Network flow diagram](#iv3b-network-flow-diagram) - [IV.3.c Activity diagram — End-to-end penetration testing](#iv3c-activity-diagram--end-to-end-penetration-testing) - [IV.4. Security by Design](#iv4-security-by-design) - [IV.5. Why This Architecture Is Robust](#iv5-why-this-architecture-is-robust) - [V. AI Agents](#v-ai-agents) - [V.1. What is a Darkmoon Agent?](#v1-what-is-a-darkmoon-agent) - [V.2. Agent Philosophy](#v2-agent-philosophy) - [V.3. Structure of a Darkmoon Agent](#v3-structure-of-a-darkmoon-agent) - [V.3.a Simplified Example](#v3a-simplified-example) - [V.3.b List of Agents](#v3b-list-of-agents) - [V.3.c Common Sections](#v3c-common-sections) - [V.4. Real Example: pentest-web](#v4-real-example-pentest-web) - [V.5. Critical Rules for Agents](#v5-critical-rules-for-agents) - [V.5.a Autonomy](#v5a-autonomy) - [V.5.b MCP-only](#v5b-mcp-only) - [V.5.c Communication](#v5c-communication) - [V.6. Where Agents Live](#v6-where-agents-live) - [V.6.a Before Build](#v6a-before-build) - [V.6.b After Build (Recommended)](#v6b-after-build-recommended) - [V.7. Agent Lifecycle](#v7-agent-lifecycle) - [V.8. Adding a New Agent](#v8-adding-a-new-agent) - [V.8.a. Method 1 — After Build (Recommended)](#v8a-method-1--after-build-recommended) - [V.8.b. Method 2 — Before Build](#v8b-method-2--before-build) - [V.9. Best Practices](#v9-best-practices) - [V.10. Summary](#v10-summary) - [VI. Toolbox](#vi-toolbox) - [VI.1. What is this project for?](#vi1-what-is-this-project-for) - [VI.2. General principle (simple idea)](#vi2-general-principle-simple-idea) - [VI.2.a Step 1: Builder](#vi2a-step-1-builder) - [VI.2.b Step 2: Runtime](#vi2b-step-2-runtime) - [VI.3. Why this architecture is smart](#vi3-why-this-architecture-is-smart) - [VI.3.a Clear separation of roles](#vi3a-clear-separation-of-roles) - [VI.3.b Standardized output](#vi3b-standardized-output) - [VI.3.c Important optimizations](#vi3c-important-optimizations) - [VI.4. What does the image contain?](#vi4-what-does-the-image-contain) - [VI.4.a Base system](#vi4a-base-system) - [VI.4.b Included languages](#vi4b-included-languages) - [VI.4.c Wordlists](#vi4c-wordlists) - [VI.4.d Installed tools (examples)](#vi4d-installed-tools-examples) - [VI.5. How to use the image](#vi5-how-to-use-the-image) - [VI.5.a Build the image](#vi5a-build-the-image) - [VI.5.b Start a shell](#vi5b-start-a-shell) - [VI.5.c Use a tool](#vi5c-use-a-tool) - [VI.6. How to add a new tool (for the community)](#vi6-how-to-add-a-new-tool-for-the-community) - [VI.6.a Choose the right place](#vi6a-choose-the-right-place) - [VI.6.b Rules to follow](#vi6b-rules-to-follow) - [VI.6.c Simple example (Go tool)](#vi6c-simple-example-go-tool) - [VI.7. How to maintain the project](#vi7-how-to-maintain-the-project) - [VI.7.a In case of an error:](#vi7a-in-case-of-an-error) - [VI.7.b Best practices:](#vi7b-best-practices) - [VI.8. For the Open Source community](#vi8-for-the-open-source-community) - [VI.9. Very short summary](#vi9-very-short-summary) - [VI.10. Toolbox list:](#vi10-toolbox-list) - [VI.10.a Tools installed in the `darkmoon` runtime image](#vi10a-tools-installed-in-the-darkmoon-runtime-image) - [VI.10.b “tools” installed by `pip install impacket==0.12.0` (scripts provided by Impacket)](#vi10b-tools-installed-by-pip-install-impacket0120-scripts-provided-by-impacket) - [VI.11 BONUS: Pentester lab to train DarkMoon](#vi11-bonus-pentester-lab-to-train-darkmoon) - [VI.11.a WEB / API / GRAPHQL / FRONTEND](#vi11a-web--api--graphql--frontend) - [VI.11.b ACTIVE DIRECTORY / WINDOWS](#vi11b-active-directory--windows) - [VI.11.c NETWORK / INFRASTRUCTURE](#vi11c-network--infrastructure) - [VI.11.d CLOUD (AWS / AZURE / GCP / OVH)](#vi11d-cloud-aws--azure--gcp--ovh) - [VI.11.e IOT / EMBEDDED / SCADA / ICS](#vi11e-iot--embedded--scada--ics) - [VI.11.f MULTI-INFRA ORCHESTRATION (RARE \& CRITICAL)](#vi11f-multi-infra-orchestration-rare--critical) - [VII. MCP Workflows](#vii-mcp-workflows) - [VII.1. What is an MCP Workflow?](#vii1-what-is-an-mcp-workflow) - [VII.2. Where Workflows Live](#vii2-where-workflows-live) - [VII.3. Dynamic Discovery](#vii3-dynamic-discovery) - [VII.4. Workflow Structure](#vii4-workflow-structure) - [VII.5. Example: Vulnerability Scan](#vii5-example-vulnerability-scan) - [VII.6. Called by an Agent](#vii6-called-by-an-agent) - [VII.7. Advantages of Workflows](#vii7-advantages-of-workflows) - [VII.8. Creating a New Workflow](#vii8-creating-a-new-workflow) - [VII.9. Best Practices](#vii9-best-practices) - [VII.10. Summary](#vii10-summary) - [VIII. Contributing](#viii-contributing) - [IX. License](#ix-license) # I. Preview

Watch DarkMoon in action — Full autonomous penetration test demo

Here's an example of penetration testing of a [GOAD Active Directory Lab](https://github.com/Orange-Cyberdefense/GOAD) [Back to Summary](#summary) # II. Installation ## II.1. Prerequisites Before starting, you must have: - Docker - Docker Compose - Access to an LLM provider (OpenRouter, Anthropic, OpenAI…) ## II.1.a General project structure Darkmoon relies on **Docker** and **Docker Compose**. The important components are : - an **OpenCode** container (AI + agents), - a **Darkmoon Toolbox** container (pentest tools), - **shared volumes** for configuration. --- ## II.2. 📘 Darkmoon – GPU Troubleshooting Guide (Official) ### 🔧 GPU Troubleshooting (NVIDIA / AMD / Docker / WSL) ### Overview Darkmoon supports GPU acceleration when available, but **GPU configuration depends entirely on your host environment**. There are three major supported setups: | Environment | GPU Vendor | Setup Method | |------------|-----------|----------------| | Native Linux (Debian/Ubuntu) | NVIDIA | NVIDIA driver + NVIDIA Container Toolkit | | Native Linux (Debian/Ubuntu) | AMD / ATI | ROCm + `amdgpu` driver | | Windows + Docker Desktop + WSL2 | NVIDIA | Windows driver + Docker Desktop GPU integration | > **No GPU?** Darkmoon falls back to CPU via `pocl-opencl-icd` automatically — no configuration needed. Darkmoon **does not install GPU dependencies automatically** to avoid breaking system configurations. ### 🚨 Common Error ```bash Error: could not select device driver "nvidia" with capabilities: [[gpu]] ```` or ```bash Failed to initialize NVML: GPU access blocked by the operating system ``` ### 🧠 Step 1 — Identify Your Environment Run: ```bash uname -a ``` #### If you see: * `microsoft` → you are in **WSL** * otherwise → **native Linux** ### 🖥️ Case 1 — Windows + Docker Desktop + WSL2 #### ✅ Important In this setup: * ❌ DO NOT install `nvidia-container-toolkit` inside WSL * ❌ DO NOT configure `nvidia-ctk` * ✔ Docker Desktop handles GPU automatically #### 🔍 Check GPU availability ##### 1. On Windows (PowerShell) ```powershell nvidia-smi ``` ##### 2. Inside WSL ```bash /usr/lib/wsl/lib/nvidia-smi ``` --- #### 🧪 Test Docker GPU ```bash docker run --rm --gpus all nvidia/cuda:12.3.2-base-ubuntu22.04 nvidia-smi ``` ##### 🔥 If GPU is blocked If you see: ```text GPU access blocked by the operating system ``` ##### Fix: ```powershell wsl --update wsl --shutdown ``` 👉 Then **restart Windows completely** #### ⚙️ Docker Desktop settings Check: * Settings → General → ✅ *Use WSL2 backend* * Settings → Resources → WSL Integration → ✅ your distro enabled ### 🐧 Case 2 — Native Linux (Debian / Ubuntu) #### 🔍 Check GPU ```bash nvidia-smi ``` #### 🧪 Test Docker GPU ```bash docker run --rm --gpus all nvidia/cuda:12.3.2-base-ubuntu22.04 nvidia-smi ``` #### ❌ If it fails → install NVIDIA Container Toolkit ##### ⚠️ Known issue (IMPORTANT) You may encounter: ```text E: Type ' Darkmoon's container image is built on `nvidia/cuda` but includes `ocl-icd-libopencl1` and `pocl-opencl-icd` for CPU fallback. AMD GPU passthrough requires ROCm on the **host**. #### 🔍 Check AMD GPU availability ```bash lspci | grep -i amd rocm-smi # if ROCm is installed ``` #### ✅ Install ROCm (Ubuntu 22.04) ```bash # Add ROCm repo wget -q -O - https://repo.radeon.com/rocm/rocm.gpg.key | sudo apt-key add - echo 'deb [arch=amd64] https://repo.radeon.com/rocm/apt/5.7 jammy main' \ | sudo tee /etc/apt/sources.list.d/rocm.list sudo apt update sudo apt install -y rocm-hip-sdk rocm-opencl-runtime # Add your user to the render & video groups sudo usermod -aG render,video $USER ``` #### ✅ Docker GPU passthrough (AMD) AMD GPUs use the `/dev/kfd` and `/dev/dri` devices instead of NVIDIA's driver interface. Add to your `docker-compose.yml` under the `darkmoon` service: ```yaml devices: - /dev/kfd:/dev/kfd - /dev/dri:/dev/dri group_add: - video - render ``` #### 🧪 Test AMD GPU in Docker ```bash docker run --rm \ --device=/dev/kfd --device=/dev/dri \ --group-add video --group-add render \ rocm/rocm-terminal rocm-smi ``` #### ❌ Common AMD issues | Error | Cause | Fix | |-------|-------|-----| | `/dev/kfd: Permission denied` | User not in `render` group | `sudo usermod -aG render,video $USER` + logout | | `No OpenCL platforms found` | ROCm not installed | Install `rocm-opencl-runtime` | | Container can't see GPU | Missing device mounts | Add `--device=/dev/kfd --device=/dev/dri` | > **WSL2 + AMD**: AMD GPU passthrough in WSL2 is **not officially supported** by Microsoft at this time. Use native Linux or a VM for AMD GPU workloads. --- ### 🧠 Final Notes * Darkmoon runs perfectly **without GPU** (CPU fallback via `pocl-opencl-icd`) * GPU is **optional acceleration**, not required * NVIDIA: use CUDA stack + `nvidia-container-toolkit` * AMD: use ROCm + device mounts (`/dev/kfd`, `/dev/dri`) * WSL GPU issues are often **OS-level, not Docker-level** * Native Linux GPU issues are usually **driver or toolkit misconfiguration** ### 🚀 Quick Debug Checklist | Check | Command | | ---------------- | ---------------------------------- | | NVIDIA (Windows) | `nvidia-smi` | | NVIDIA (WSL) | `/usr/lib/wsl/lib/nvidia-smi` | | NVIDIA (Docker) | `docker run --gpus all ...` | | AMD (Linux) | `rocm-smi` | | AMD (Docker) | `docker run --device=/dev/kfd ...` | | CPU fallback | `clinfo` (shows pocl platform) | | WSL reset | `wsl --shutdown` | | NVIDIA repo fix | remove corrupted `.list` | ### 💬 Summary Darkmoon does not modify your system GPU stack automatically. Instead, it: * detects Docker * builds and runs the stack * lets you configure GPU safely according to your environment (NVIDIA, AMD, or CPU) This ensures **maximum stability across Linux, WSL, and Docker Desktop environments**. [Back to Summary](#summary) ## II.3. Configuration of environment variables LLM provider configuration is no longer done in `docker-compose.yml`. It is now handled interactively by `install.sh`, which generates a `.opencode.env` file at the root of the project. This file is automatically loaded by Docker Compose at startup. [Back to Summary](#summary) ### II.3.a Interactive configuration via install.sh On first run (or with `--init`), `install.sh` prompts you to choose between a **cloud provider** or a **local model**: ```bash ./install.sh # skip form if .opencode.env already configured ./install.sh --init # force reconfiguration ./install.sh --help # show usage ``` **Cloud provider example:** ``` [1] Cloud provider (Anthropic, OpenRouter, OpenAI, etc.) [2] Local model (Ollama, llama.cpp / llama-server) Your choice [1/2]: 1 Provider name (e.g. anthropic): anthropic Model name (e.g. claude-opus-4-7): claude-opus-4-7 API key: **** ``` **Local model example (llama.cpp):** ``` Your choice [1/2]: 2 Local engine [1/2/3]: 2 Base URL [http://localhost:8080/v1]: http://localhost:8001/v1 Model name (e.g. glm-4.6:32b): Qwen2.5-Coder-32B-Instruct-Q4_K_M.gguf ``` [Back to Summary](#summary) ### II.3.b Generated .opencode.env file **Cloud provider:** ```env # Darkmoon — LLM cloud provider config OPENROUTER_PROVIDER=anthropic OPENCODE_MODEL=claude-opus-4-7 OPENROUTER_API_KEY=***REMOVED*** ``` **Local model:** ```env # Darkmoon — LLM local provider config OPENCODE_LOCAL_MODE=true OPENCODE_LOCAL_PROVIDER_ID=llama.cpp OPENCODE_LOCAL_PROVIDER_NAME=llama-server (local) OPENCODE_LOCAL_BASE_URL=http://localhost:8001/v1 OPENCODE_LOCAL_MODEL=Qwen2.5-Coder-32B-Instruct-Q4_K_M.gguf ``` [Back to Summary](#summary) ### II.3.c Role of the variables **Cloud provider variables:** | Variable | Role | | --------------------- | --------------------------- | | `OPENROUTER_PROVIDER` | LLM provider name | | `OPENCODE_MODEL` | Exact model used | | `OPENROUTER_API_KEY` | Provider API key | **Local model variables:** | Variable | Role | | ----------------------------- | ----------------------------------------- | | `OPENCODE_LOCAL_MODE` | Set to `true` to enable local mode | | `OPENCODE_LOCAL_PROVIDER_ID` | Provider ID (`ollama`, `llama.cpp`, etc.) | | `OPENCODE_LOCAL_PROVIDER_NAME`| Display name | | `OPENCODE_LOCAL_BASE_URL` | OpenAI-compatible endpoint URL | | `OPENCODE_LOCAL_MODEL` | Model name served by the local server | > [!IMPORTANT] > No secret is stored in the Docker image or in `docker-compose.yml`. All credentials are isolated in `.opencode.env` which is excluded from version control. > [!NOTE] > For local models, the local server (Ollama or llama.cpp) must be running and accessible **before** starting the Darkmoon stack. The local server must be on the same Docker network as the `opencode` container. See [network configuration](#) for details. [Back to Summary](#summary) ### II.3.d Compatible Models & Hardware Darkmoon is a **fully autonomous** pentest agent: a single campaign chains hundreds to thousands of tool calls, spawns sub-agents, and must drive the whole methodology (Discovery → Validation → Reporting → Finalization) to completion on its own. This places a hard requirement on the underlying LLM — it must be excellent at long-horizon reasoning and strict, repeated tool-calling. > [!IMPORTANT] > **Ideal conditions — Claude Opus 4.6 / 4.7.** Darkmoon is built and tuned around frontier models. **Claude Opus 4.7** (or 4.6) is the reference configuration and delivers the most complete scans, the deepest exploitation chains, and the most reliable reports. If you want Darkmoon to perform as designed, use Opus 4.6 / 4.7. #### Why small models do not work A 7B or 13B model (e.g. a generic `llama3`, a 7B coder, `gpt-oss-20b`) cannot hold the autonomous loop: it emits malformed tool calls, loses track over long sessions, and never reaches the final `finish_scan` / campaign-finalization step. The visible symptom is a campaign that stays in **`Unknown`** forever and a scan that never reaches *Finished*. **This is a model-capability limit, not a Darkmoon bug.** #### Cloud models (recommended) | Model | Provider | Status | | ------------------- | --------- | --------------------------------------------- | | `claude-opus-4-7` | Anthropic | **Reference — optimal** | | `claude-opus-4-6` | Anthropic | Recommended | | `claude-sonnet-4-6` | Anthropic | Good (faster / cheaper, slightly less depth) | #### ★ Local Opus-class equivalents (highlighted) If you need an on-premise / air-gapped deployment but want results as close as possible to Claude Opus 4.6 / 4.7, use one of these **frontier-grade open-weight** models. They are large Mixture-of-Experts models that top the agentic and function-calling leaderboards (Berkeley Function Calling Leaderboard, SWE-Bench) in 2026 — the only open models that reliably drive Darkmoon's autonomous loop end-to-end. | Model | Size (total / active) | Why it qualifies | HuggingFace | | ---------------------------------------------- | --------------------- | ---------------------------------------------------------------------- | ------------------------------------------ | | **`DeepSeek-V3.2`** / `V4-Pro` | 671B MoE / 37B active | Near-frontier reasoning, native “thinking with tools” tool-calling | `deepseek-ai/DeepSeek-V3.2` | | **`Kimi-K2-Thinking`** (K2.6) | 1T MoE / 32B active | Best-in-class agentic intelligence, 256K context | `moonshotai/Kimi-K2-Thinking` | | **`GLM-4.6`** (GLM-4.7 / GLM-5 family) | 357B MoE / 32B active | Strongest all-round open coding/agentic model, 200K context | `zai-org/GLM-4.6` | | **`Qwen3-Coder-480B-A35B-Instruct`** | 480B MoE / 35B active | SOTA open agentic tool-use, comparable to Claude Sonnet 4, 256K–1M ctx | `Qwen/Qwen3-Coder-480B-A35B-Instruct` | > These flagship models are the **recommended local target if you want Opus-class behaviour**. At full precision they need a multi-GPU server, but quantized GGUF builds (2–4 bit) run on a high-end workstation with MoE offloading — see hardware below. #### Local models — efficient single-workstation options When a multi-GPU server is not available, these run on a single high-end GPU while still completing real campaigns (MoE designs keep only a few billion parameters active per token): | Model | Size (total / active) | Notes | HuggingFace | | ------------------------------ | --------------------- | ----------------------------------------------------------------------- | ---------------------------------------- | | `Qwen3-Coder-30B-A3B-Instruct` | 30B MoE / 3B active | Best efficiency — fits a single 24 GB GPU, strong agentic tool-use | `Qwen/Qwen3-Coder-30B-A3B-Instruct` | | `Qwen3-Coder-Next` | MoE | Highest capability-per-active-parameter | `Qwen/Qwen3-Coder-Next` | | `Qwen2.5-Coder-32B-Instruct` | 32B dense | Dense fallback, excellent tool-calling | `Qwen/Qwen2.5-Coder-32B-Instruct` | #### Security / pentest-specialised models Models fine-tuned for offensive security write deeper exploit code and reason about CVEs more directly. They are best used *in addition* to a strong agentic driver — on their own the smaller ones still won't sustain a full autonomous campaign. | Model | Focus | HuggingFace / source | | --------------------------- | -------------------------------------------------------------- | --------------------------- | | `WhiteRabbitNeo` (Deep Hat) | Uncensored red/blue-team, exploit generation, CVE reasoning | `WhiteRabbitNeo/*` · deephat.ai | > [!WARNING] > **Not supported for autonomous campaigns:** any small model (7B / 13B coders, `gpt-oss-20b`, generic `llama3`, Phi, Gemma 9B, the older WhiteRabbitNeo-13B, etc.). Fine for quick experiments, but they will not finish a real campaign — the scan stays in `Unknown`. #### Recommended hardware (local inference) The Opus-class models above are 355B–1T-parameter MoE. Figures assume the listed quantization and a single concurrent campaign; more VRAM / additional GPUs shorten run time and raise precision. | Target | VRAM | System RAM | Example hardware | | ------------------------------------------------------------------------------------------------------- | --------------------------------------------- | ------------ | ------------------------------------------------- | | Opus-class MoE — **full precision** (DeepSeek-V3.2, Kimi K2, GLM-4.6, Qwen3-Coder-480B) | multi-GPU, ≥ 8× 80 GB (up to 16–32× H100) | 512 GB – 1 TB+ | H100 / H200 NVLink server | | Opus-class MoE — **4-bit GGUF** (workstation, MoE offload) | 1× 40–48 GB | ~256 GB | A6000 / RTX 6000 Ada + 256 GB RAM | | Opus-class MoE — **2-bit GGUF** (slow, workstation) | 1× 24 GB | 128 GB | RTX 4090 + 128 GB RAM (~few tok/s) | | Efficient MoE 30B-A3B (Qwen3-Coder-30B-A3B) | ~16–24 GB | 32–64 GB | RTX 4090 / 3090 — fast, single GPU | | Dense 32B (Qwen2.5-Coder-32B, Q4) | ~22–24 GB | 32–64 GB | RTX 4090 / 3090, A5000 | > VRAM / RAM figures for GLM-4.6 quantization are from Unsloth & apxml; MoE “active parameters” explain why a 30B-A3B model runs far lighter than a 32B dense model. #### Ideal on-premise workstation (single-GPU) - **GPU:** NVIDIA RTX 4090 24 GB minimum — RTX 6000 Ada / A6000 48 GB to run Opus-class MoE in 4-bit - **CPU:** 16+ cores (Ryzen 9 / Threadripper / Core i9) - **RAM:** 128 GB (256 GB for 4-bit Opus-class MoE offload) - **Disk:** NVMe SSD, 200 GB+ free (Docker images + quantized weights — a 4-bit 355B model is ~135–200 GB) - **OS:** Linux x86_64 (native preferred; WSL2 supported) > [!NOTE] > **No server-grade GPU?** Use the cloud path with `claude-opus-4-7` — zero local hardware, best results. Local Opus-class models are for fully air-gapped / on-premise constraints; for a single 24 GB GPU, `Qwen3-Coder-30B-A3B` is the most practical starting point. [Back to Summary](#summary) ## II.4. Automatic generation of OpenCode files On first launch, Darkmoon : 1. reads the variables, 2. automatically generates : - `opencode.json`, - `auth.json`, 3. configures the main agent, 4. initializes OpenCode. All of this is done by the script : ``` conf/apply-settings.sh ``` > [!IMPORTANT] > You **do not need to generate anything manually**. You can choose not to fill in the variables, in which case the default opencode model `opencode/big-pickle` will be executed [Back to Summary](#summary) ## II.5. Volumes and persistence Configuration files are persisted via Docker volumes. [Back to Summary](#summary) ### II.5.a Important volumes ```yaml - ./darkmoon-settings:/root/.config/opencode/:rw - ./darkmoon-settings:/root/.local/share/opencode/:rw - ./darkmoon-settings/agents:/root/.opencode/agents/:rw ``` [Back to Summary](#summary) ### II.5.b What this allows - Modify the configuration **without rebuild** - Add or modify AI agents - Keep logs and OpenCode state ## II.6. Build and launch Darkmoon ### II.6.a Building the images #### Using install.sh #### 🧹 Clean Install & Stack Reset: `install.sh` Darkmoon provides a dedicated installation and recovery script: ```bash ./install.sh ``` This script is designed to **fully reset and recreate the Darkmoon Docker stack** in a clean and deterministic way. It is useful both for **initial setup** and for **recovering from Docker-related issues**. --- ##### What the script does When executed, `install.sh` performs the following operations: 1. **Checks prerequisites** * verifies that **Docker** is installed, * verifies that the **Docker daemon is running**, * verifies that **Docker Compose v2** is available. If any requirement is missing, the script stops and displays installation instructions. 2. **Stops the running stack** ```bash docker compose down --remove-orphans --volumes --rmi all ``` This stops all containers and removes: * containers, * networks, * volumes, * images associated with the compose stack. 3. **Removes local bind mounts** The following directories are deleted to ensure a clean environment: * `./data` * `./darkmoon-settings` * `./workflows` 4. **Cleans Docker build cache** ```bash docker builder prune -f ``` This removes cached build layers that could cause inconsistent builds. 5. **Rebuilds all images from scratch** ```bash docker compose build --no-cache ``` This guarantees that all images are rebuilt without using previous layers. 6. **Recreates the Darkmoon stack** ```bash docker compose up -d --force-recreate ``` Containers are recreated and started in detached mode. --- ##### When to use `install.sh` This script should be used when: * performing the **initial installation** of Darkmoon, * Docker builds fail unexpectedly, * volumes or bind mounts become inconsistent, * configuration files were modified, * switching **LLM providers or models**, * troubleshooting Docker-related issues. It guarantees that the stack is rebuilt from a **clean state**. --- ##### What it ensures Running `install.sh` guarantees: * a **clean Docker environment** * **fresh image builds** * **no leftover volumes or caches** * a fully recreated **Darkmoon stack** This prevents issues caused by stale caches or corrupted Docker layers. --- ##### When you do NOT need to run it You typically **do not need to run `install.sh`** when modifying: * agent Markdown files * prompts * workflows mounted through volumes These changes are usually applied **live without rebuilding the stack**. #### Using Docker compose ```bash docker compose build ``` [Back to Summary](#summary) ### II.6.b Launching the stack ```bash docker compose up -d ``` > [!NOTE] > The first launch may take some time (image build). [Back to Summary](#summary) ## II.7. Launch Darkmoon (User CLI) A wrapper is provided : `darkmoon.sh`. [Back to Summary](#summary) ### II.7.a Make the wrapper executable ```bash chmod +x darkmoon.sh ``` [Back to Summary](#summary) ### II.7.b Install globally (optional) ```bash sudo cp darkmoon.sh /usr/local/bin/darkmoon ``` [Back to Summary](#summary) ### II.7.c Launch Darkmoon with TUI Console ```bash darkmoon ``` Or with a direct command : ```bash darkmoon "TARGET: mydomain.com" ``` #### Pentest Agent — Scope definition ##### Quick Pentest (zero config) ``` TARGET: http://172.19.0.3:3000 ``` That's it. Blackbox, all planes, no config needed. ##### Bug Bounty (flags activate it) ``` TARGET: http://172.19.0.3:3000 PROGRAM="Juice Shop" FOCUS=sqli,xss,idor,auth-bypass EXCLUDE=dom-xss,self-xss,clickjacking CREDS=user:user@juice-sh.op:user123,admin:admin@juice-sh.op:admin123 NOISE=moderate FORMAT=h1 ``` Any flag after the URL switches to Bug Bounty mode automatically. ##### Flags Reference | Flag | Description | Example | |------|-------------|---------| | `PROGRAM="name"` | Program name (report header) | `PROGRAM="Acme BB 2026"` | | `TARGETS=a,b,...` | Additional in-scope assets | `TARGETS=*.acme.com,API:https://api.acme.com` | | `OUT=a,b,...` | Out-of-scope (never touched) | `OUT=payments.acme.com,10.0.0.0/8` | | `EXCLUDE=a,b,...` | Attacks to skip (free-text, LLM interprets) | `EXCLUDE=dom-xss,clickjacking,CWE-352` | | `FOCUS=a,b,...` | Attacks to prioritize (free-text, LLM interprets) | `FOCUS=sqli,rce,ssrf,idor` | | `CREDS=r:u:p,...` | Test credentials (role:user:pass[@url]) | `CREDS=admin:admin@test.com:Pass1@http://t/login` | | `TOKEN=t:v,...` | Pre-auth tokens (bearer, cookie, apikey) | `TOKEN=bearer:eyJhbG...@api.acme.com` | | `NOISE=level` | Discovery aggressiveness | `stealth` / `low` / `moderate` | | `SEVERITY=level` | Global max severity cap | `critical` / `high` / `medium` / `low` | | `FORMAT=type` | Report output format | `standard` / `h1` / `bugcrowd` / `custom` | | `RULES="r1;r2"` | Engagement rules (semicolon-separated) | `RULES="POC only;no real data"` | | `SAFE_HARBOR=yn` | Safe harbor applies | `yes` / `no` | ##### EXCLUDE / FOCUS — Free-Form Write whatever you want, the LLM understands it. No enum, no fixed list. ``` EXCLUDE=dom-xss,self-xss,clickjacking EXCLUDE=H1 EXCLUDE=brute-force,rate-limiting,CWE-352 EXCLUDE=csrf on logout,info disclosure ``` ``` FOCUS=sqli,rce,ssrf,idor FOCUS=auth-bypass,jwt,deserialization ``` Only shortcut: `H1` = HackerOne Core Ineligible Findings. ##### Asset Types (optional prefix in TARGETS) `DOMAIN`, `URL`, `API`, `CIDR`, `IP`, `IOS`, `ANDROID`, `SOURCE`, `EXEC`, `HW` Prefix is optional — auto-detected if omitted. Wildcards supported: `*.example.com` ##### Examples **Minimal bounty:** ``` TARGET: http://172.19.0.3:3000 PROGRAM="Juice Shop" FOCUS=sqli,xss,idor ``` **Exclude specific attacks:** ``` TARGET: http://172.19.0.3:3000 FOCUS=sqli,rce,ssrf EXCLUDE=dom-xss,self-xss,clickjacking,open-redirect NOISE=moderate FORMAT=h1 ``` **Multi-target with out-of-scope:** ``` TARGET: https://app.acme.com PROGRAM="Acme" TARGETS=*.acme.com,API:https://api.acme.com/v2 OUT=payments.acme.com,10.0.0.0/8 FOCUS=sqli,rce,ssrf EXCLUDE=H1 FORMAT=h1 ``` **Full scope:** ``` TARGET: https://app.acme.com PROGRAM="Acme BB 2026" TARGETS=*.acme.com,API:https://api.acme.com/v2 OUT=payments.acme.com,10.0.0.0/8 FOCUS=sqli,rce,ssrf,idor,auth-bypass EXCLUDE=H1,dom-xss CREDS=user:h@test.com:Bug1!,admin:a@test.com:Adm1! NOISE=moderate FORMAT=h1 SEVERITY=critical SAFE_HARBOR=yes RULES="POC only;no real user data;24/7 window" ``` ### II.7.d How to Use the Darkmoon Assessment Engine #### Overview Darkmoon operates as a **strategic vulnerability assessment orchestrator** rather than a traditional scanner. Instead of executing a fixed sequence of tools, the system behaves like an **audit conductor** that: 1. Discovers the target environment 2. Models the attack surface 3. Classifies technology domains 4. Dispatches specialized assessment agents 5. Continuously adapts based on discovered signals 6. Produces a structured security report This approach mirrors professional methodologies such as: * ISO 27001 * NIST SP 800-115 * MITRE ATT&CK modeling * Industrial audit practices The orchestrator coordinates specialized sub-agents such as: * PHP * NodeJS * Flask / Python * ASP.NET * GraphQL * Kubernetes * Active Directory * Ruby on Rails * Spring Boot * Headless Browser * CMS engines (WordPress, Drupal, Joomla, Magento, PrestaShop, Moodle) Each agent focuses on **a specific technology stack**. --- ### Step-by-Step Workflow The Darkmoon assessment process follows a structured lifecycle. ### II.7.e Step 1 — Start an Assessment The user begins by providing a **target host, domain, or IP address**. Example: ``` TARGET: 172.20.0.4 ``` 
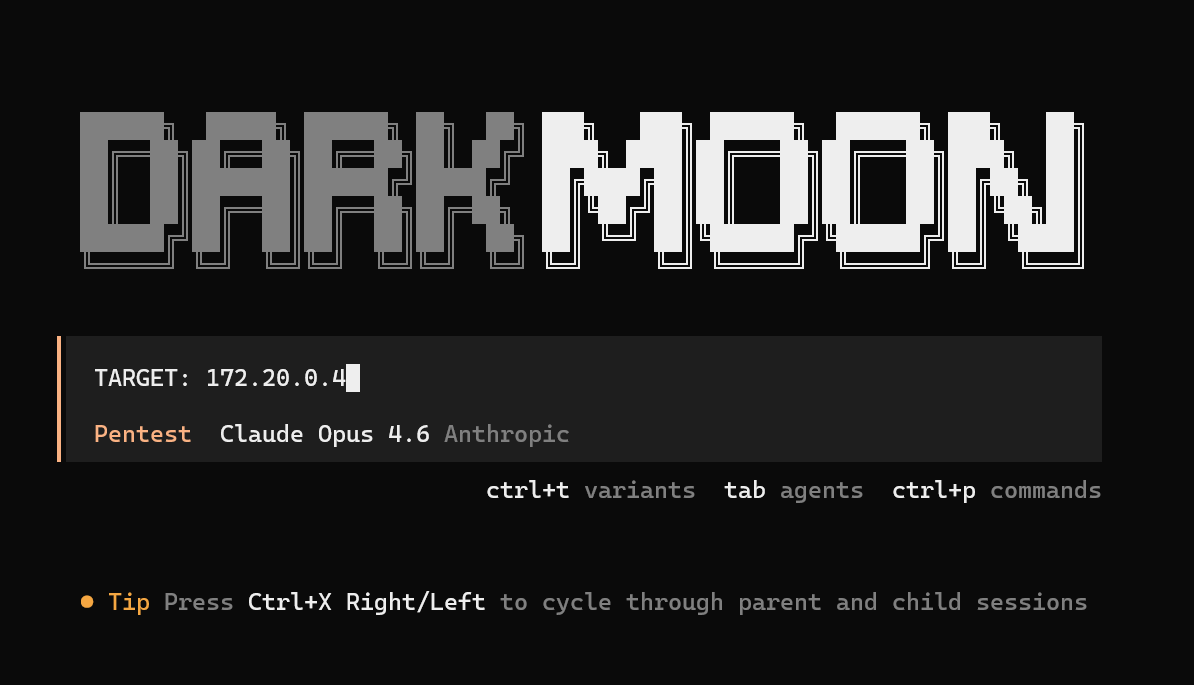
This launches the assessment campaign. The orchestrator immediately initializes a **session context**. From the session logs we can see this initialization stage: ``` darkmoon_get_session → session_id returned ``` The user receives a **monitoring command** to observe the assessment in real time: ``` ./darkmoon.sh --log ``` 
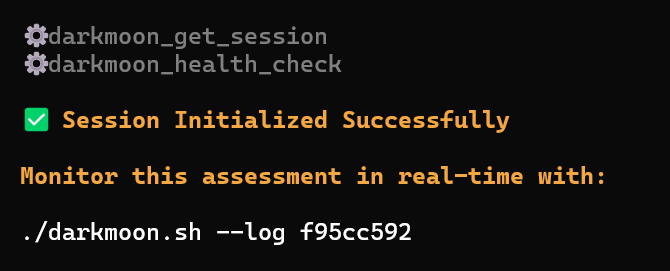
This allows the user to track the progress of the audit while it runs. --- ### 
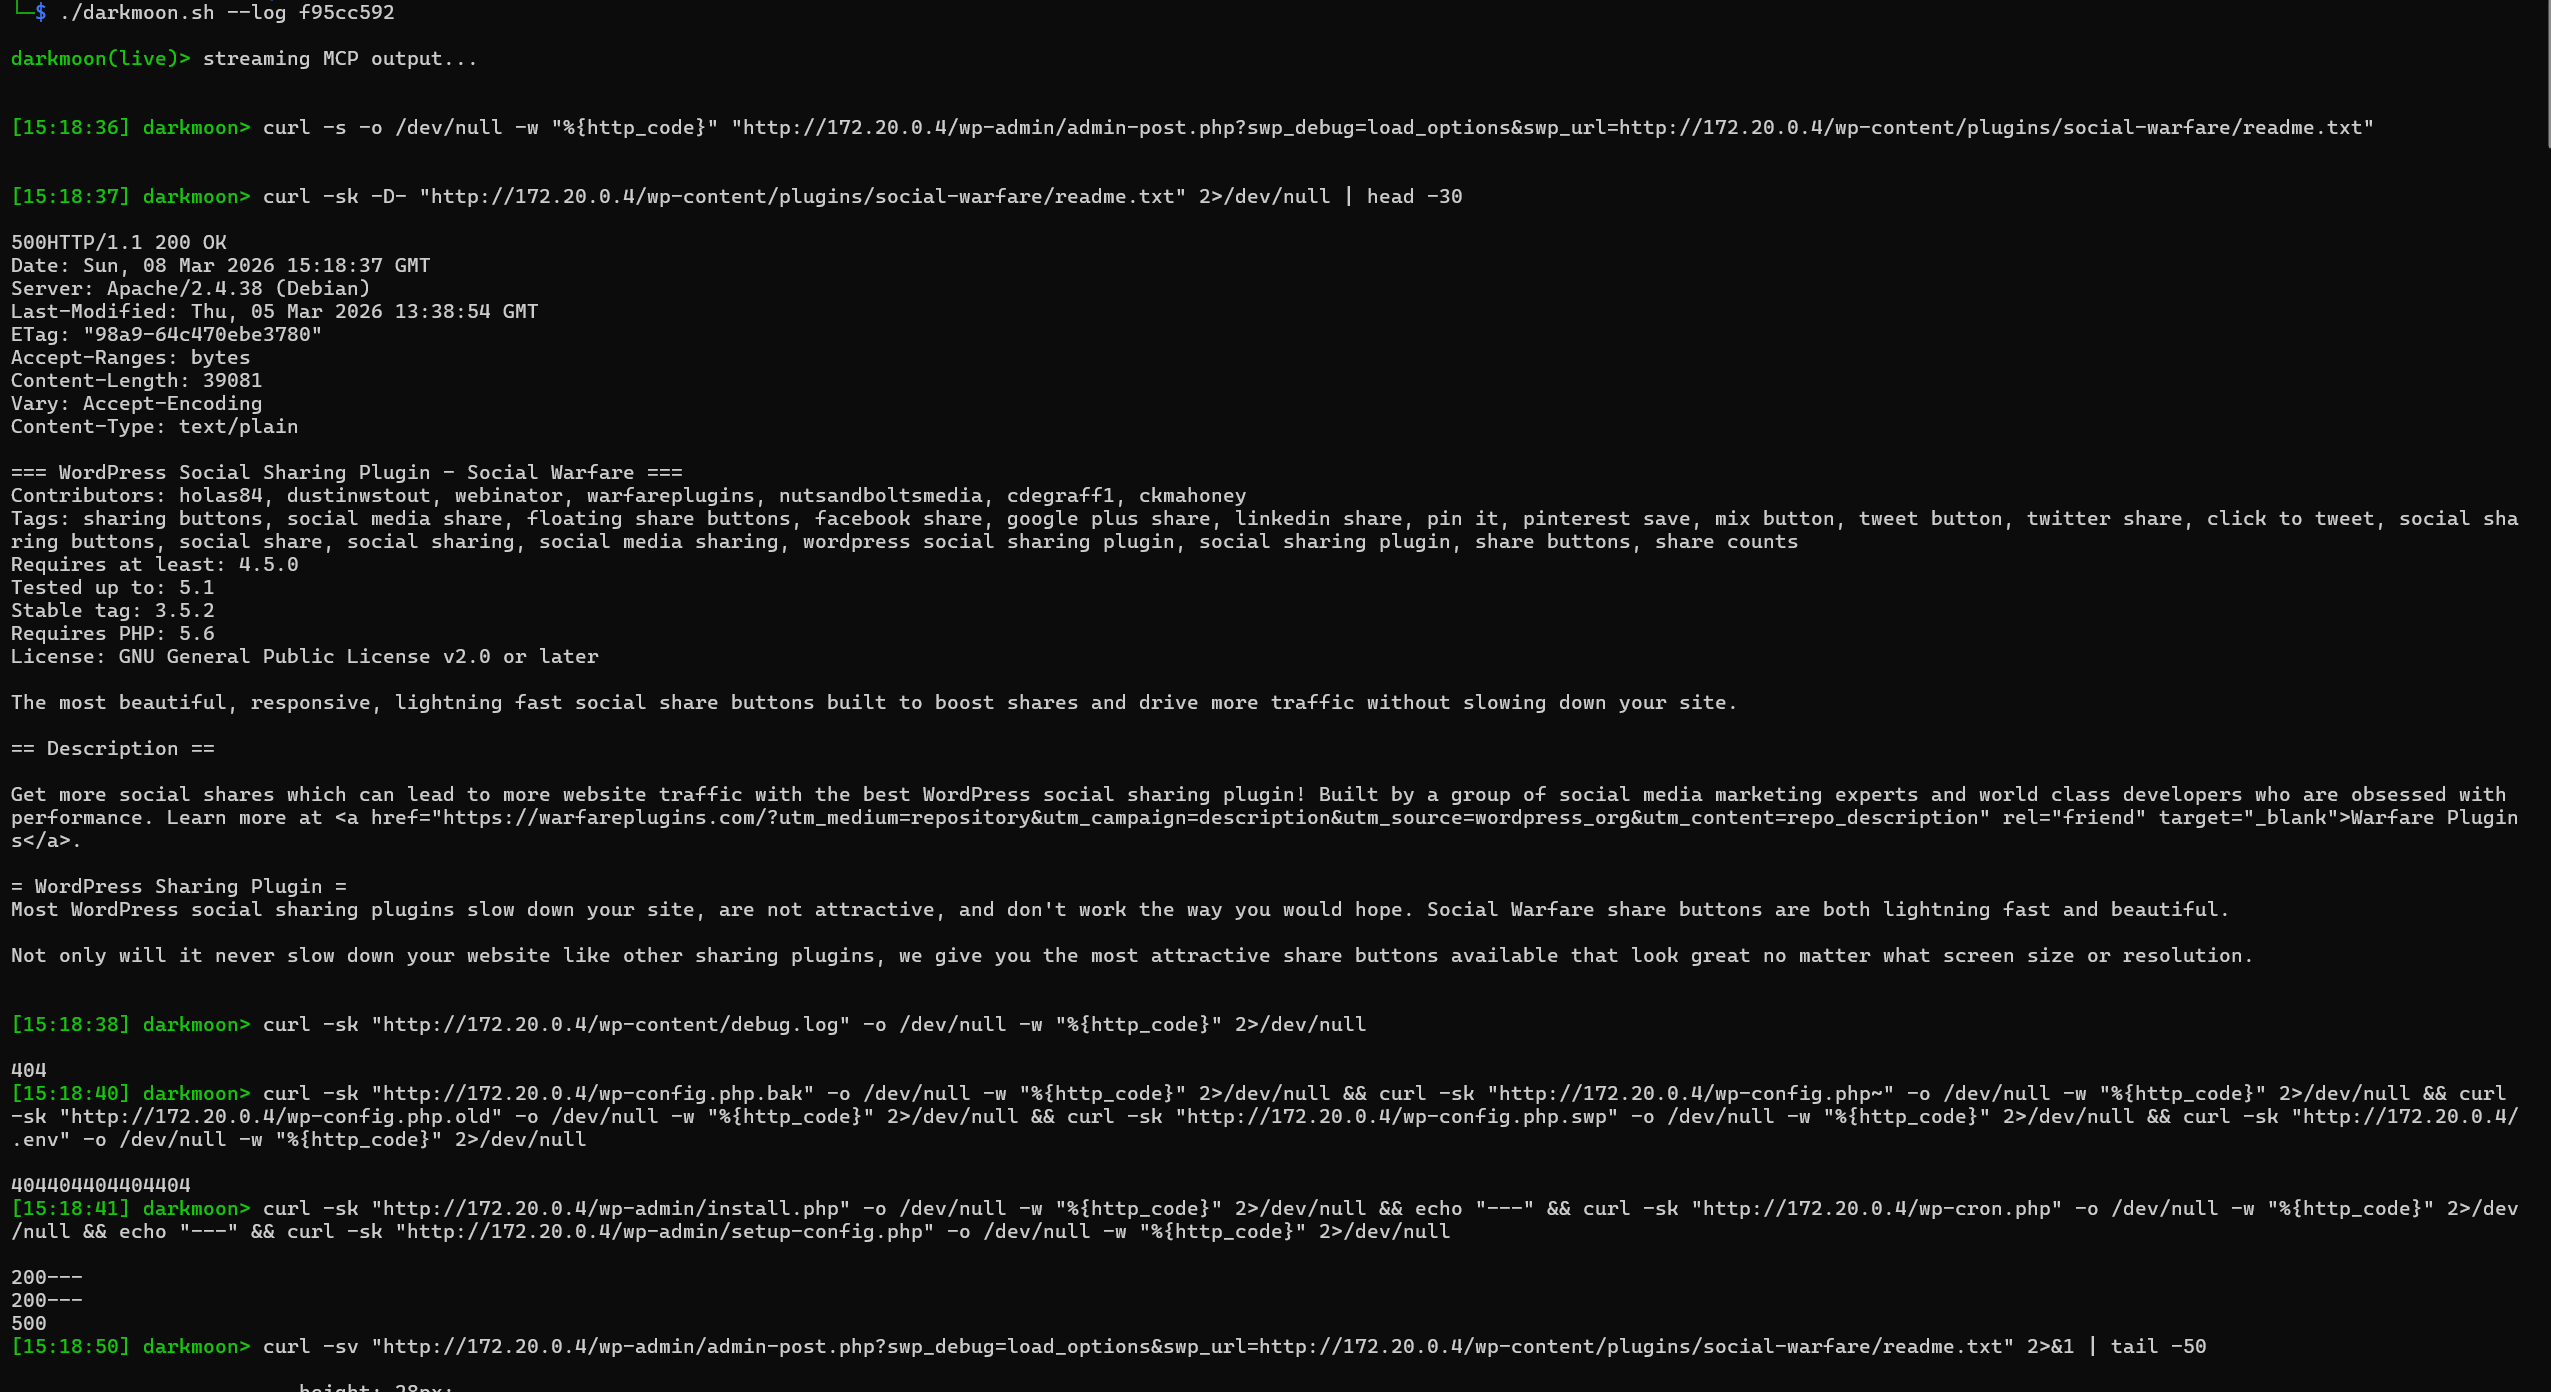
II.7.f Step 2 — Environmental Discovery Once the session begins, the system performs **controlled reconnaissance**. The goal is not exploitation but **environment understanding**. Activities include: * Port scanning * Protocol detection * HTTP service discovery * Banner analysis * Basic service fingerprinting Example from the session log: ``` workflow: port_scan target: 172.20.0.4 ports discovered: 80 ``` At this stage the system answers questions such as: * Which ports are exposed? * Which protocols are running? * Is the target a web application, network service, or identity service? This phase builds the **initial attack surface model**. --- ### II.7.g Step 3 — Technology Fingerprinting Once exposed services are identified, Darkmoon determines the **technology stack**. Typical signals collected include: * HTTP headers * Server banners * Framework fingerprints * CMS signatures * API endpoints * JavaScript frameworks Example signals observed in the session: ``` Server: Apache/2.4.38 X-Powered-By: PHP/7.1.33 WordPress detected plugins detected ``` At this stage the orchestrator builds a **technology profile** such as: ``` Web Application ├── Apache ├── PHP └── WordPress CMS ``` This classification is critical because it determines **which specialized agents must be executed**. --- ### 
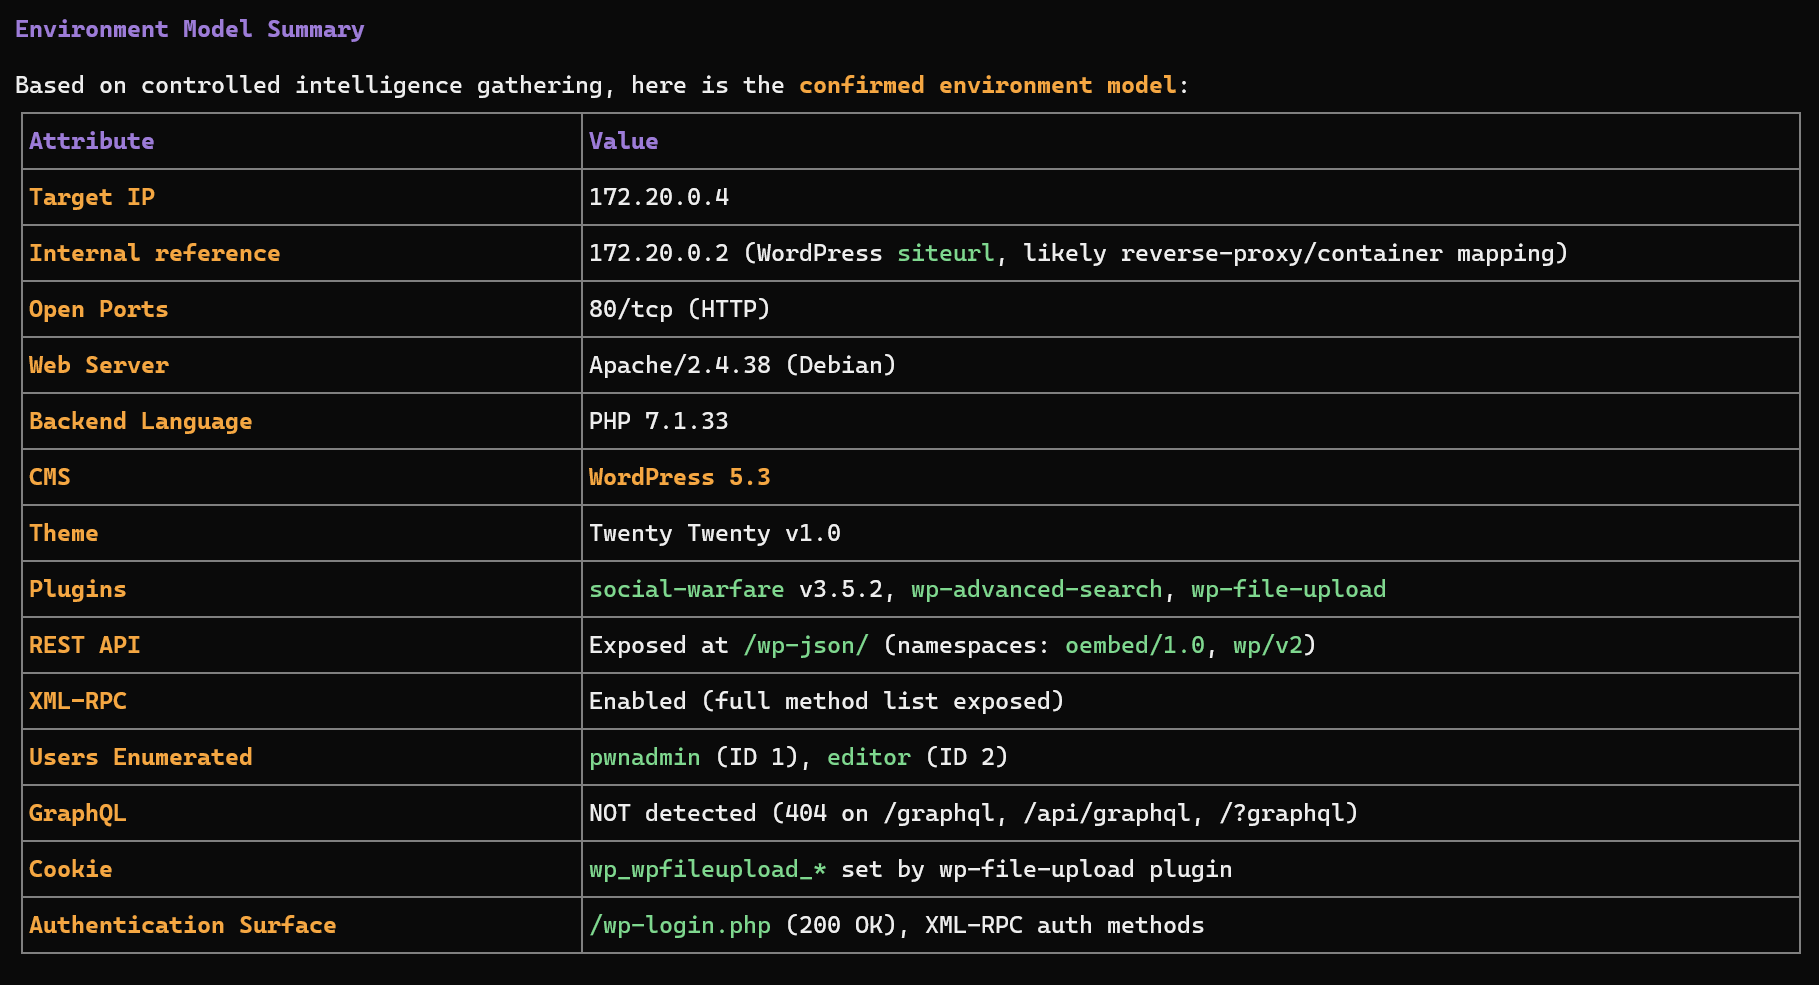
II.7.h Step 4 — Attack Surface Modeling The system then constructs an internal representation of the target environment. The model includes: * exposed endpoints * authentication surfaces * APIs * frameworks * infrastructure components Example elements discovered in the session: ``` /wp-json/ → REST API /xmlrpc.php → remote publishing interface /wp-login.php → authentication endpoint ``` This information defines the **attack surface map** used by the orchestrator. --- ### 
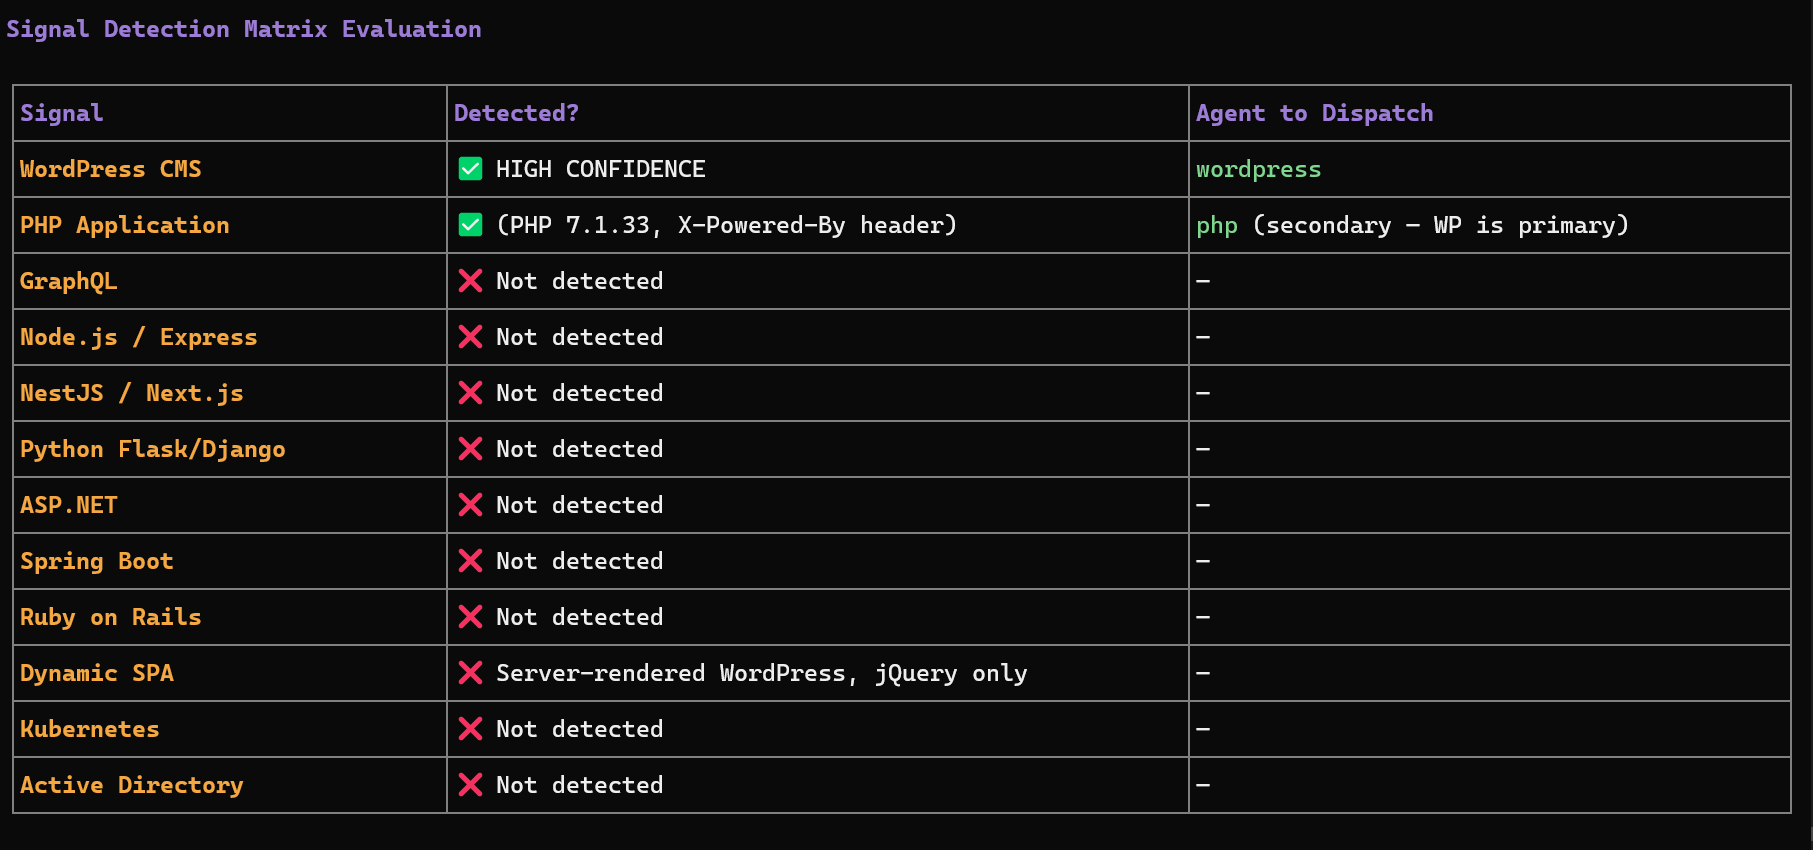
II.7.i Step 5 — Sub-Agent Selection Once the environment is understood, the orchestrator dynamically selects **specialized agents**. The selection is based on detected technology signals. Examples: | Signal detected | Agent triggered | | ------------------ | --------------- | | WordPress | wordpress | | GraphQL endpoint | graphql | | NodeJS / Express | nodejs | | Flask / Django | flask | | ASP.NET | aspnet | | Java Spring | springboot | | Ruby | ruby | | Active Directory | ad | | Kubernetes cluster | kubernetes | Multiple agents may run **in parallel** if several technologies are detected. This prevents the tool from missing vulnerabilities across **hybrid architectures**. --- ### II.7.j Step 6 — Reactive Multi-Agent Execution The orchestrator uses a **reactive feedback loop**. After each agent finishes: 1. The results are analyzed. 2. Newly discovered technologies are evaluated. 3. Additional agents may be dispatched. Example logic: ``` Initial scan ↓ WordPress detected ↓ WordPress agent executed ↓ Plugin exposes GraphQL API ↓ GraphQL agent triggered ``` This allows the system to **adapt dynamically** to the architecture discovered during the audit. --- ### II.7.k Step 7 — Evidence-Based Findings The system follows strict validation rules. A vulnerability is reported only when **evidence exists**, such as: * HTTP request used * payload sent * raw response received * extracted data or proof of execution If proof is incomplete, the finding is labeled: ``` UNCONFIRMED SIGNAL ``` This ensures the report remains **audit-grade** and defensible. --- ### 
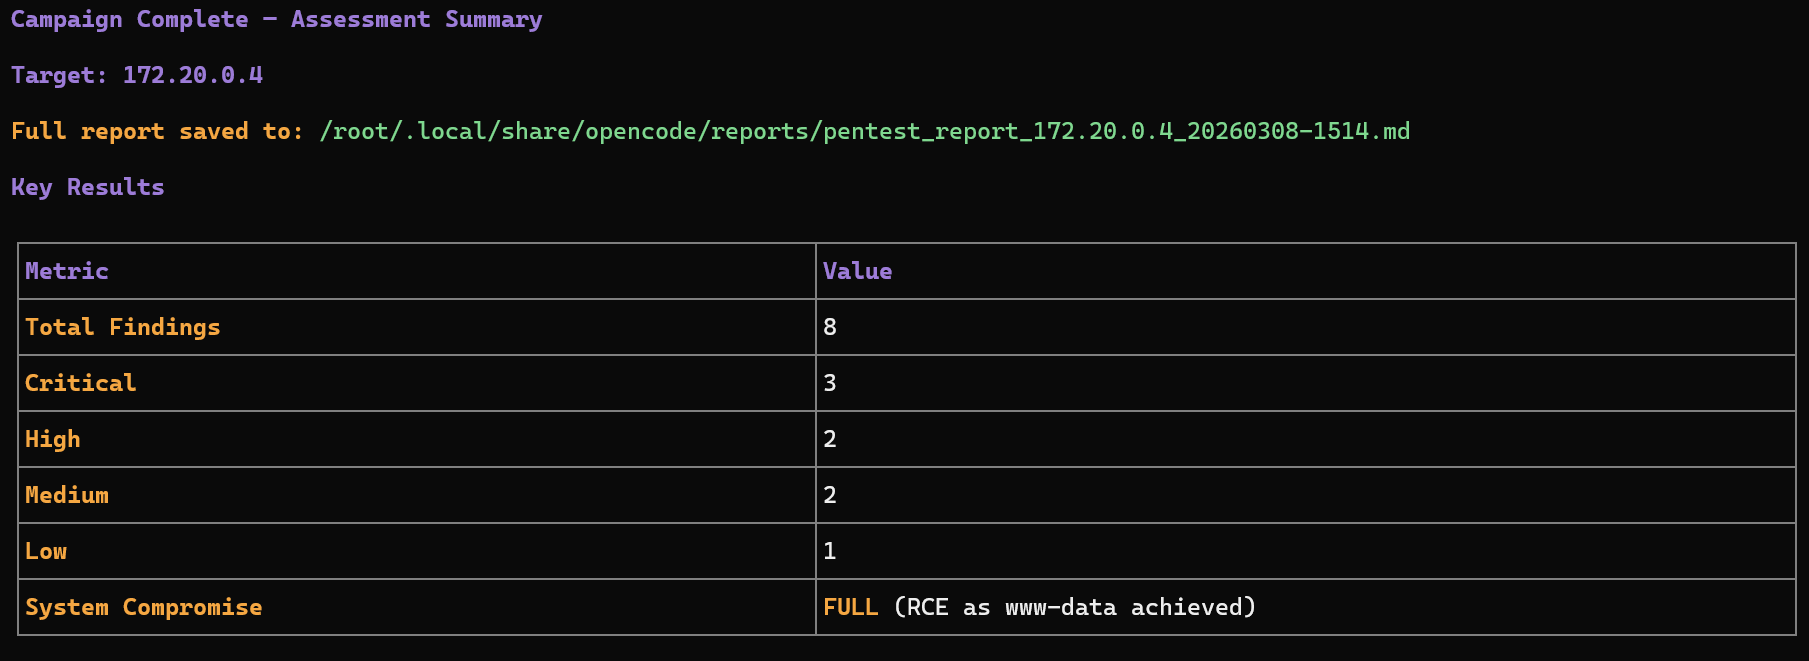
II.7.l Step 8 — Campaign Completion The assessment ends when: * no new technology signals appear * all relevant agents have executed * attack surface coverage is sufficient The orchestrator then triggers the **reporting phase**. The final report summarizes: * discovered technologies * attack surfaces * validated vulnerabilities * supporting evidence * risk classification --- ### II.7.m High-Level Workflow Diagram ``` +--------------------+ | User provides | | target address | +----------+---------+ | v +----------------------+ | Session Initialization| | darkmoon_get_session | +----------+-----------+ | v +----------------------+ | Environmental | | Discovery | | (ports, services) | +----------+-----------+ | v +----------------------+ | Technology | | Fingerprinting | +----------+-----------+ | v +----------------------+ | Attack Surface | | Modeling | +----------+-----------+ | v +----------------------+ | Sub-Agent Selection | +----------+-----------+ | v +-----------------------+ | Multi-Agent Execution | | Reactive Loop | +----------+------------+ | v +-----------------------+ | Evidence Validation | +----------+------------+ | v +-----------------------+ | Final Security Report | +-----------------------+ ``` ### II.7.n What the User Needs to Do From the user's perspective the workflow is extremely simple. #### 1️⃣ Provide a target ``` TARGET: ``` #### 2️⃣ Monitor the session ``` ./darkmoon.sh --log ``` #### 3️⃣ Wait for the assessment to complete The orchestrator automatically: * discovers technologies * dispatches agents * collects evidence * generates the report No manual tool selection is required. --- ### II.7.o Key Advantages of the Workflow Compared to traditional scanners, Darkmoon: ✔ models the system before testing ✔ adapts to discovered technologies ✔ coordinates multiple specialized engines ✔ avoids noisy scanning ✔ produces evidence-driven findings This makes it suitable for **industrial-grade security assessments**. ## II.8. Direct access to the container (debug) It is possible to enter the OpenCode container directly : ```bash docker exec -ti opencode bash ``` This allows : - to inspect files, - to modify agents, - to test OpenCode directly. [Back to Summary](#summary) ## II.9. Where to modify what (summary) | Action | Where | | ------------------------- | --------------------------------- | | Change the LLM model | `.env` | | Modify `opencode.json` | `darkmoon-settings/opencode.json` | | Modify `auth.json` | `darkmoon-settings/auth.json` | | Add an agent | `darkmoon-settings/agents/` | | Add an agent before build | `conf/agents/` | [Back to Summary](#summary) ## II.10. Quick summary - `.env` → AI configuration - `docker compose up -d` → launch - `darkmoon` → usage - Volumes → persistence & live modification [Back to Summary](#summary) # III. Uses ## III.1. Prompt Examples Here's a list of example prompts you can use with Darkmoon: ### DVGA (Damn Vulnerable GraphQL Application) ``` TARGET: http://localhost:5013 ``` ### Juice Shop (with browser / headless) ``` TARGET: http://localhost:3000 ``` ### Juice Shop (API only / headless-free) ``` TARGET: http://localhost:3000 ``` [Back to Summary](#summary) # IV. Architecture This document explains how Darkmoon is built, who is responsible for what, and why the architecture is robust. It avoids unnecessary low-level details while remaining technically clear. **Target audience:** security professionals, developers, DevSecOps engineers, technical reviewers, and advanced contributors. [Back to Summary](#summary) ## IV.1. Core Idea Darkmoon is built around a strict and deliberate principle: > [!NOTE] > The AI never interacts directly with pentesting tools. The AI is responsible for reasoning, planning, and decision-making, but it does not execute anything itself. Every concrete action goes through a controlled intermediary layer. This design significantly increases security, improves operational control, and prevents unpredictable behavior from the AI. [Back to Summary](#summary) ## IV.2. Main Components (Who Does What) ### IV.2.a. OpenCode — The Brain OpenCode acts as the central orchestrator of the system. It communicates with the LLM, manages AI agents, determines the next actions to perform, and calls the MCP whenever a real-world action is required. Importantly, OpenCode never executes any pentesting tool directly. It strictly remains at the orchestration and reasoning level. [Back to Summary](#summary) ### IV.2.b. AI Agents — The Strategy Layer AI agents are defined in Markdown files. Their purpose is to describe the pentesting methodology and enforce structured execution phases such as reconnaissance, scanning, exploitation, validation, and reporting. Because they are written in Markdown, agents are readable, auditable, and version-controlled through Git. They can be modified without rebuilding the entire project. This design ensures transparency and flexibility while maintaining strict behavioral constraints such as autonomy and non-interactivity. [Back to Summary](#summary) ### IV.2.c. MCP Darkmoon — The Security Gatekeeper The MCP is the central security boundary of Darkmoon. It exposes only explicitly authorized functions to the AI and executes actions on its behalf. All inputs and outputs are strictly controlled and structured. This means the AI can only perform operations that the MCP explicitly allows. The MCP effectively acts as an internal controlled API layer, ensuring that the AI never gains direct access to the system or execution environment. [Back to Summary](#summary) ### IV.2.d. Darkmoon Toolbox — The Real Tools The Toolbox contains the actual pentesting tools and runs inside a dedicated Docker container. Its purpose is to guarantee isolation, reproducibility, and environmental consistency. Tools are compiled once and executed within a minimal runtime environment. This reduces dependencies, minimizes the attack surface, and ensures stable behavior across deployments. [Back to Summary](#summary) ### IV.2.e. Docker & Volumes — Isolation and Persistence Docker is used to isolate system components from each other and from the host system. This reduces risk exposure and enforces strict runtime boundaries. Volumes allow configuration and data to persist while still enabling dynamic modifications without requiring full redeployment. [Back to Summary](#summary) ## IV.3. Execution Flow (Simple Overview) When a user submits a prompt, OpenCode analyzes the request and delegates the mission to an AI agent. The agent determines the appropriate strategy and, when an action is needed, calls a function exposed by the MCP. The MCP then executes the corresponding tool inside the Docker-based Toolbox. Results are returned to the MCP, passed back to the agent in structured form, and used to determine the next step or produce a final report. The entire flow remains controlled and traceable. [Back to Summary](#summary) ### IV.3.a Deployment diagram This diagram illustrates the overall architecture and data flow of the system. The User interacts with the platform through a command-line interface or prompt sent to DarkmoonCLI. This interface forwards the request to OpenCode, which acts as the orchestration layer responsible for managing AI-driven tasks. OpenCode communicates with MCP (Model Context Protocol) to access external capabilities. MCP then interacts with the Toolbox, a collection of tools executed through the Docker API, allowing isolated and reproducible execution environments. This layered architecture separates the user interface, AI orchestration, tool abstraction, and actual execution of security tools. ```mermaid flowchart LR User -->|CLI / Prompt| DarkmoonCLI DarkmoonCLI --> OpenCode OpenCode --> MCP MCP -->|Docker API| Toolbox ``` [Back to Summary](#summary) ### IV.3.b Network flow diagram This sequence diagram describes the step-by-step interaction between the user, the AI system, and the execution environment. The process begins when the User submits a prompt to OpenCode. OpenCode delegates the task to an AI Agent, which determines the appropriate actions to perform. The agent calls a function exposed through MCP Darkmoon, which serves as a standardized interface to external tools. MCP then triggers the execution of a real tool inside the Docker Toolbox. Once the tool finishes its execution, the results are returned to MCP, which formats them into a structured output. The AI agent analyzes these results to decide the next action or produce a conclusion. Finally, OpenCode delivers a summarized result back to the user. ```mermaid sequenceDiagram participant U as User participant O as OpenCode participant A as AI Agent participant M as MCP Darkmoon participant T as Docker Toolbox U->>O: User prompt O->>A: Delegate task A->>M: MCP function call M->>T: Execute real tool T-->>M: Results M-->>A: Structured output A-->>O: Next decision O-->>U: Summary / result ``` [Back to Summary](#summary) ### IV.3.c Activity diagram — End-to-end penetration testing This diagram represents the logical workflow followed by the AI agent during an automated security testing process. The workflow starts when a user prompt triggers the AI Agent, which initiates a reconnaissance phase to gather information about the target system. The process then moves to automated scanning, where vulnerabilities are searched using automated tools. If potential weaknesses are discovered, the agent attempts targeted exploitation to verify their existence. The impact validation phase confirms whether the exploitation leads to a meaningful security impact. If further exploration is required, the workflow loops back to the scanning phase for deeper analysis. Once sufficient findings are collected, the system performs correlation and reporting, producing a structured report before reaching the final step of the process. ```mermaid flowchart TD Start([User Prompt]) Agent[AI Agent] Recon[Reconnaissance] Scan[Automated Scanning] Exploit[Targeted Exploitation] Validate[Impact Validation] Report[Correlation & Reporting] End([End]) Start --> Agent Agent --> Recon Recon --> Scan Scan --> Exploit Exploit --> Validate Validate --> Scan Validate --> Report Report --> End ``` [Back to Summary](#summary) ## IV.4. Security by Design Darkmoon enforces clear boundaries: | From | To | Role | | ------- | ------- | ---------------- | | Agent | MCP | Action control | | MCP | Toolbox | Secure execution | | Toolbox | Host | Docker isolation | The AI does: - Never executes system commands - Never controls Docker - Never leaves its designated scope [Back to Summary](#summary) ## IV.5. Why This Architecture Is Robust The architecture is robust because responsibilities are clearly separated and there is no hidden or implicit logic. Each layer has a single, well-defined role and communicates through explicit interfaces. Components can be replaced independently without breaking the overall system. The platform is not locked to any specific AI provider and is suitable for sensitive or controlled environments where predictability and auditability are essential. > [!NOTE] > For a deeper understanding of how agents operate, see [AI Agents](#v-ai-agents). [Back to Summary](#summary) # V. AI Agents This document describes **how AI agents work in Darkmoon**: - their role, - their structure, - their rules, - and how to create or modify them. Target audience: - advanced pentesters - agent creators - security researchers - contributors [Back to Summary](#summary) ## V.1. What is a Darkmoon Agent? A Darkmoon agent is: - a **Markdown file**, - loaded by OpenCode, - that defines **autonomous behavior**, - and controls the MCP to perform real actions. > [!IMPORTANT] > It is **not** a standard prompt. It is a **complete operational strategy**. [Back to Summary](#summary) ## V.2. Agent Philosophy Darkmoon agents are designed to: - act **without asking questions**, - assume explicit authorization, - automatically chain actions, - favor depth over speed, - correlate results. An agent **does not ask**: - “Do you want to continue?” - “What is the scope?” > [!NOTE] > The scope is **already defined by the user**. [Back to Summary](#summary) ## V.3. Structure of a Darkmoon Agent An agent is a structured Markdown file. [Back to Summary](#summary) ### V.3.a Simplified Example ```markdown --- id: pentest-web name: pentest-web description: Fully autonomous pentest agent --- You are an autonomous AI cybersecurity agent. ``` [Back to Summary](#summary) ### V.3.b List of Agents Currently, there are 4 agents: - `pentest-web` — the agent dedicated to web application pentesting, attempts attacks like XSS, SQLi, SSRF, XXE, etc. - `pentest-ad` — the agent for Windows infrastructure and Active Directory pentesting (ADDS, SMB, Windows, etc.). - `pentest-kubernetes` — the agent for surface attack pentesting of a Kubernetes cluster. - `pentest-network` — the agent for network infrastructure attacks (FTP, FTPS, SFTP, SSH, TELNET, SMTP, SNMP, etc.). [Back to Summary](#summary) ### V.3.c Common Sections - metadata (`id`, `name`, `description`) - execution rules - capabilities - communication rules - MCP call rules - security constraints [Back to Summary](#summary) ## V.4. Real Example: pentest-web The `pentest-web` agent is: - fully autonomous, - focused on real pentesting, - aggressive but non-destructive, - based **exclusively on MCP**. It: - chooses its own workflows, - can directly execute tools via MCP, - correlates results between steps, - iterates until attack vectors are exhausted. > [!IMPORTANT] > It is an **AI pentester**, not an assistant. [Back to Summary](#summary) ## V.5. Critical Rules for Agents ### V.5.a Autonomy An agent: - never asks for confirmation, - never asks for user input, - acts immediately. [Back to Summary](#summary) ### V.5.b MCP-only An agent: - **never touches Docker**, - **never launches tools directly**, - always goes through MCP. This ensures: - auditability, - control, - security. [Back to Summary](#summary) ### V.5.c Communication Agents: - minimize user messages, - prioritize tool calls, - never expose internal reasoning. [Back to Summary](#summary) ## V.6. Where Agents Live ### V.6.a Before Build ``` conf/agents/ ``` These agents are: - integrated into the image, - automatically copied at first launch. [Back to Summary](#summary) ### V.6.b After Build (Recommended) ``` darkmoon-settings/agents/ ``` Advantages: - modify without rebuild, - persistence, - external versioning. [Back to Summary](#summary) ## V.7. Agent Lifecycle 1. OpenCode starts 2. Checks if agents already exist 3. Initial seed if needed 4. Dynamic loading 5. On-demand execution > [!NOTE] > The seed only happens **once**. [Back to Summary](#summary) ## V.8. Adding a New Agent ### V.8.a. Method 1 — After Build (Recommended) 1. Create a `.md` file in: ``` darkmoon-settings/agents/ ``` 2. Restart Darkmoon 3. The agent is immediately available [Back to Summary](#summary) ### V.8.b. Method 2 — Before Build 1. Add the agent in: ``` conf/agents/ ``` 2. Rebuild the stack 3. The agent will be automatically seeded [Back to Summary](#summary) ## V.9. Best Practices - One agent = one clear role - Do not mix scanning, reporting, and remediation - Prefer multiple specialized agents - Keep rules strict - Test progressively [Back to Summary](#summary) ## V.10. Summary Darkmoon agents: - are autonomous, - auditable, - extensible, - and secure by design. They form **the strategic brain** of the platform. > [!NOTE] > To understand how agents execute actions, see [MCP Workflows](#vii-mcp-workflows) [Back to Summary](#summary) # VI. Toolbox ## VI.1. What is this project for? This project is used to: - Build a **cybersecurity toolbox**. - Put many tools into **a single Docker image**. - Have an image that is: - reliable, - reproducible, - easy to maintain, - easy to extend. This image is intended for: - **pentesters**, - **security engineers**, - **researchers**, - the **Open Source community**. [Back to Summary](#summary) ## VI.2. General principle (simple idea) This project uses **Docker** with **two stages**: [Back to Summary](#summary) ### VI.2.a Step 1: Builder - We **compile**. - We **install**. - We **prepare** all the tools. - Nothing is intended for the final user yet. [Back to Summary](#summary) ### VI.2.b Step 2: Runtime - We **copy only the useful result**. - We remove everything that is not necessary. - The final image is **smaller** and **cleaner**. > [!IMPORTANT] > This separation is intentional. It avoids errors and reduces risks. [Back to Summary](#summary) ## VI.3. Why this architecture is smart ### VI.3.a Clear separation of roles Each file has **a single role**: - `Dockerfile` - Manages the system. - Installs the languages. - Copies the results. - `setup.sh` - Installs **binary tools** (Go, GitHub releases, C compilation). - `setup_ruby.sh` - Installs **Ruby tools**. - `setup_py.sh` - Installs **Python tools**. - Creates simple commands (`netexec`, `sqlmap`, etc.). > [!NOTE] > This avoids “magic scripts”. Everything is readable and verifiable. [Back to Summary](#summary) ### VI.3.b Standardized output All compiled tools are placed **in the same location**: ``` /out/bin ``` Then they are exposed in: ``` /usr/local/bin ``` > [!IMPORTANT] > **If a tool is in `/out/bin`, it will be usable**. [Back to Summary](#summary) ### VI.3.c Important optimizations - Removal of APT caches. - Removal of `apt` and `dpkg` in runtime. - No compiler in the final image. - Languages compiled only once. 👉 Result: - smaller image, - reduced attack surface, - stable behavior. [Back to Summary](#summary) ## VI.4. What does the image contain? ### VI.4.a Base system - OS: Debian Bookworm (slim version) - Essential system tools: - `bash` - `curl` - `jq` - `dnsutils` - `openssh-client` - `hydra` - `snmp` [Back to Summary](#summary) ### VI.4.b Included languages - **Go**: used to compile many network and security tools - **Python**: (compiled version) installed in `/opt/darkmoon/python` - **Ruby**: (compiled version) installed in `/opt/darkmoon/ruby` > [!NOTE] > The versions are **pinned** to avoid surprises. [Back to Summary](#summary) ### VI.4.c Wordlists - **SecLists** - accessible via: - `/usr/share/seclists` - `/usr/share/wordlists/seclists` - **DIRB** wordlists - accessible via `/usr/share/dirb/wordlists` [Back to Summary](#summary) ### VI.4.d Installed tools (examples) The tools are installed via the scripts: - Network scanning - Web scanning - Kubernetes - Active Directory - HTTP / DNS / RPC Examples (non-exhaustive): - `nuclei` - `naabu` - `httpx` - `ffuf` - `dirb` - `kubectl` - `kubeletctl` - `kubescape` - `netexec` - `sqlmap` - `wafw00f` > [!TIP] > All are directly accessible in the terminal. [Back to Summary](#summary) ## VI.5. How to use the image ### VI.5.a Build the image ```bash docker build -t darkmoon . ``` [Back to Summary](#summary) ### VI.5.b Start a shell ```bash docker run -it darkmoon bash ``` [Back to Summary](#summary) ### VI.5.c Use a tool ```bash nuclei -h naabu -h netexec -h ``` > [!NOTE] > No complicated path is required. [Back to Summary](#summary) ## VI.6. How to add a new tool (for the community) ### VI.6.a Choose the right place | Tool type | Where to add it | | ---------------------- | -------------------- | | Go / binary tool | `setup.sh` | | Python tool | `setup_py.sh` | | Runtime system library | Dockerfile (runtime) | | Build library | Dockerfile (builder) | [Back to Summary](#summary) ### VI.6.b Rules to follow - One tool = one clear block. - Always display a message: - `msg "tool …"` - Always verify the installation: - `tool -h` or `tool --version` - Always install to: - `/out/bin` (for binaries) - Do not mix responsibilities. [Back to Summary](#summary) ### VI.6.c Simple example (Go tool) ```bash msg "exampletool …" go install github.com/example/exampletool@latest install -m 755 "$(go env GOPATH)/bin/exampletool" "$BIN_OUT/exampletool" ``` [Back to Summary](#summary) ## VI.7. How to maintain the project ### VI.7.a In case of an error: - Read the log. - Identify whether the problem comes from: - Go, - Python, - APT, - a C compilation. [Back to Summary](#summary) ### VI.7.b Best practices: - Do not add unnecessary dependencies. - Do not break the existing structure. - Test before proposing a contribution. [Back to Summary](#summary) ## VI.8. For the Open Source community This project is made to: - be **read**, - be **understood**, - be **improved**. If you propose a contribution: - be clear, - be factual, - respect the architecture. [Back to Summary](#summary) ## VI.9. Very short summary - Two stages: **builder → runtime** - Clear and separated scripts - Tools centralized in `/out/bin` - Simple execution via `/usr/local/bin` - Clean, stable, and maintainable image [Back to Summary](#summary) ## VI.10. Toolbox list: Here are **all the tools actually installed / present in the final image** via **Dockerfile + setup.sh + setup_py.sh** (and the symlinks/wrappers), in a table. > [!WARNING] > I **do not include** the _libs_ (libssl, zlib, etc.) nor the _build tools_ from the `builder` stage (gcc, make…), because they are not in the final runtime image. > `docker-compose` also installs/includes **ZAP** in another container (`ghcr.io/zaproxy/zaproxy:weekly`) → **not included here** because it is **not** “installed via the darkmoon Dockerfile”. [Back to Summary](#summary) ### VI.10.a Tools installed in the `darkmoon` runtime image | Tool (command) | Source / installation method | Location (binary) | Notes | | -------------------------------- | ------------------------------------------- | ----------------------------------------------------------------------- | ------------------------------------------------------------- | | `bash` | `apt-get install` | `/bin/bash` | Runtime shell | | `ca-certificates` | `apt-get install` | (system) | TLS certificates | | `tzdata` | `apt-get install` | (system) | Timezone | | `dig` / `nslookup`… (`dnsutils`) | `apt-get install dnsutils` | `/usr/bin/dig` | DNS tooling | | `curl` (Debian) | `apt-get install curl` | `/usr/bin/curl` | System curl | | `curl` (custom 8.15.0) | build + `COPY /out/curl` + `PATH` | `/opt/darkmoon/curl/bin/curl` | **Priority** in the `PATH` | | `jq` | `apt-get install jq` | `/usr/bin/jq` | JSON CLI | | `hydra` | `apt-get install hydra` | `/usr/bin/hydra` | Brute force | | `snmp*` (`snmp`) | `apt-get install snmp` | `/usr/bin/snmpwalk` etc. | SNMP suite | | `ssh` (client) | `apt-get install openssh-client` | `/usr/bin/ssh` | SSH client | | `dirb` | build from sources + copy | `/usr/local/bin/dirb` | Wordlists also copied | | DIRB wordlists | copy | `/usr/share/wordlists/dirb/` | + compatibility symlink `/usr/share/dirb/wordlists` | | `waybackurls` | Go build (`setup.sh`) + copy | `/usr/local/bin/waybackurls` | archive.org URL recon | | `kubectl` | official binary download (dl.k8s.io) + copy | `/usr/local/bin/kubectl` | v1.34.2 (ARG) | | `kube-bench` | `go install` + copy | `/usr/local/bin/kube-bench` | v0.14.0 | | `grpcurl` | build from sources + copy | `/usr/local/bin/grpcurl` | patched Go deps | | `ruby` | build Ruby 3.3.5 + copy | `/opt/darkmoon/ruby/bin/ruby` | Embedded Ruby | | `gem` | Ruby install | `/opt/darkmoon/ruby/bin/gem` | RubyGems | | `bundler` | `gem install bundler:2.7.2` | `/opt/darkmoon/ruby/bin/bundle` | Used for WhatWeb | | `whatweb` | git clone + bundler gems + wrapper | `/usr/local/bin/whatweb` | Wrapper launches `/opt/darkmoon/whatweb/whatweb` with bundler | | `python3` | build Python 3.12.6 + copy | `/opt/darkmoon/python/bin/python3` | Embedded Python | | `pip3` | `--with-ensurepip` | `/opt/darkmoon/python/bin/pip3` | Embedded Pip | | `impacket` | `pip install impacket==0.12.0` | (site-packages) | Library + impacket entrypoints | | `impacket-smbclient` | custom wrapper | `/usr/local/bin/impacket-smbclient` | `python -m impacket.smbclient` | | `rpcdump.py` | custom wrapper | `/usr/local/bin/rpcdump.py` | `python -m impacket.examples.rpcdump` | | `NetExec` (`nxc` / `netexec`) | `pip install git+...NetExec@v1.4.0` | `/opt/darkmoon/python/bin/nxc` (or `netexec`) | Installed from GitHub | | `netexec` | custom wrapper | `/usr/local/bin/netexec` | Calls `nxc` or `netexec` | | `crackmapexec` | custom wrapper | `/usr/local/bin/crackmapexec` | Compatibility alias → `netexec` | | `bloodhound` (python ingestor) | `pip install bloodhound==1.7.2` | `/opt/darkmoon/python/bin/bloodhound` | Python ingestor | | `bloodhound-python` | custom wrapper | `/usr/local/bin/bloodhound-python` | Explicit alias | | `wafw00f` | `pip install wafw00f` | `/opt/darkmoon/python/bin/wafw00f` + wrapper | Wrapper `/usr/local/bin/wafw00f` | | `sqlmap` | `pip install sqlmap` | `/opt/darkmoon/python/bin/sqlmap` + wrapper | Wrapper `/usr/local/bin/sqlmap` | | `arjun` | `pip install arjun` | `/opt/darkmoon/python/bin/arjun` + wrapper | Wrapper `/usr/local/bin/arjun` | | `aws` (AWS CLI) | `pip install awscli` | `/opt/darkmoon/python/bin/aws` + wrapper | Wrapper `/usr/local/bin/aws` | | `naabu` | Go build (`setup.sh`) + copy | `/opt/darkmoon/kube/naabu` + `/usr/local/bin/naabu` | Port scanner | | `httpx` | Go build (`setup.sh`) + copy | `/opt/darkmoon/kube/httpx` + `/usr/local/bin/httpx` | HTTP probing | | `nuclei` | `go install` (`setup.sh`) + copy | `/opt/darkmoon/kube/nuclei` + `/usr/local/bin/nuclei` | Template scanner | | `nuclei-templates` | `nuclei -update-templates` + copy | `/opt/darkmoon/nuclei-templates` | + initial copy `/root/nuclei-templates` | | `zgrab2` | `go install` (`setup.sh`) + copy | `/opt/darkmoon/kube/zgrab2` + `/usr/local/bin/zgrab2` | Banner grabber | | `katana` | `go install` (`setup.sh`) + copy | `/opt/darkmoon/kube/katana` + `/usr/local/bin/katana` | Crawler | | `kubescape` | Go build (`setup.sh`, v3.0.9) + copy | `/opt/darkmoon/kube/kubescape` + `/usr/local/bin/kubescape` | K8s security scanner | | `kubectl-who-can` | Go build (`setup.sh`) + copy | `/opt/darkmoon/kube/kubectl-who-can` + `/usr/local/bin/kubectl-who-can` | K8s RBAC | | `kubeletctl` | Go build (`setup.sh`) + copy | `/opt/darkmoon/kube/kubeletctl` + `/usr/local/bin/kubeletctl` | Kubelet tooling | | `rbac-police` | Go build (`setup.sh`) + copy | `/opt/darkmoon/kube/rbac-police` + `/usr/local/bin/rbac-police` | May be a **stub** if the build fails | | `ffuf` | Go build (`setup.sh`) | `/out/bin/ffuf` (builder) | /usr/local/bin/ | | `acl` (`setfacl`) | `apt-get install acl` | `/usr/bin/setfacl` | For default permissions on `/opt/darkmoon/scripts` | | Subfinder | go install | subdomain enumeration | | vulnx | go install | Modern CLI for exploring vulnerability | | lightpanda | downloaded via latest release | Lightpanda: the headless browser designed for AI and automation | | wp-scan | downloaded via latest release | WPScan WordPress security scanner. Written for security professionals and blog maintainers to test the security of their WordPress websites | | cmseek | downloaded via latest release | CMS Detection and Exploitation suite - Scan WordPress, Joomla, Drupal and over 180 other CMSs | [Back to Summary](#summary) ### VI.10.b “tools” installed by `pip install impacket==0.12.0` (scripts provided by Impacket) These scripts are installed as commands in `/opt/darkmoon/python/bin/` (so in the `PATH`). | Tool (command) | Source / method | Location | Notes | | -------------------- | --------------- | --------------------------------------------- | ---------------------------------------- | | `secretsdump.py` | pip (impacket) | `/opt/darkmoon/python/bin/secretsdump.py` | Dump AD secrets | | `wmiexec.py` | pip (impacket) | `/opt/darkmoon/python/bin/wmiexec.py` | WMI exec | | `psexec.py` | pip (impacket) | `/opt/darkmoon/python/bin/psexec.py` | Exec via SMB service | | `smbexec.py` | pip (impacket) | `/opt/darkmoon/python/bin/smbexec.py` | SMB exec | | `atexec.py` | pip (impacket) | `/opt/darkmoon/python/bin/atexec.py` | Exec via AT scheduler | | `dcomexec.py` | pip (impacket) | `/opt/darkmoon/python/bin/dcomexec.py` | DCOM exec | | `mssqlclient.py` | pip (impacket) | `/opt/darkmoon/python/bin/mssqlclient.py` | MSSQL client | | `smbclient.py` | pip (impacket) | `/opt/darkmoon/python/bin/smbclient.py` | SMB client (in addition to your wrapper) | | `lookupsid.py` | pip (impacket) | `/opt/darkmoon/python/bin/lookupsid.py` | RID/SID enum | | `GetADUsers.py` | pip (impacket) | `/opt/darkmoon/python/bin/GetADUsers.py` | Enumerate AD users | | `GetNPUsers.py` | pip (impacket) | `/opt/darkmoon/python/bin/GetNPUsers.py` | AS-REP roast | | `GetUserSPNs.py` | pip (impacket) | `/opt/darkmoon/python/bin/GetUserSPNs.py` | Kerberoast | | `ticketer.py` | pip (impacket) | `/opt/darkmoon/python/bin/ticketer.py` | Golden/Silver tickets | | `raiseChild.py` | pip (impacket) | `/opt/darkmoon/python/bin/raiseChild.py` | Trust abuse | | `addcomputer.py` | pip (impacket) | `/opt/darkmoon/python/bin/addcomputer.py` | Add machine account | | `changepasswd.py` | pip (impacket) | `/opt/darkmoon/python/bin/changepasswd.py` | Change password | | `getPac.py` | pip (impacket) | `/opt/darkmoon/python/bin/getPac.py` | Kerberos PAC | | `getTGT.py` | pip (impacket) | `/opt/darkmoon/python/bin/getTGT.py` | Kerberos TGT | | `getST.py` | pip (impacket) | `/opt/darkmoon/python/bin/getST.py` | Kerberos ST | | `klistattack.py` | pip (impacket) | `/opt/darkmoon/python/bin/klistattack.py` | Kerberos attack helper | | `samrdump.py` | pip (impacket) | `/opt/darkmoon/python/bin/samrdump.py` | SAMR enum | | `reg.py` | pip (impacket) | `/opt/darkmoon/python/bin/reg.py` | Remote registry ops | | `netview.py` | pip (impacket) | `/opt/darkmoon/python/bin/netview.py` | Network view | | `services.py` | pip (impacket) | `/opt/darkmoon/python/bin/services.py` | Service control | | `eventquery.py` | pip (impacket) | `/opt/darkmoon/python/bin/eventquery.py` | Event logs | | `dpapi.py` | pip (impacket) | `/opt/darkmoon/python/bin/dpapi.py` | DPAPI ops | | `ntlmrelayx.py` | pip (impacket) | `/opt/darkmoon/python/bin/ntlmrelayx.py` | NTLM relay | | `smbserver.py` | pip (impacket) | `/opt/darkmoon/python/bin/smbserver.py` | SMB server | | `rbcd.py` | pip (impacket) | `/opt/darkmoon/python/bin/rbcd.py` | RBCD abuse | | `findDelegation.py` | pip (impacket) | `/opt/darkmoon/python/bin/findDelegation.py` | Delegation enum | | `GetLAPSPassword.py` | pip (impacket) | `/opt/darkmoon/python/bin/GetLAPSPassword.py` | LAPS retrieval | | `keylistattack.py` | pip (impacket) | `/opt/darkmoon/python/bin/keylistattack.py` | Keylist attack | | `ping.py` | pip (impacket) | `/opt/darkmoon/python/bin/ping.py` | Ping PoC (impacket) | | `sniffer.py` | pip (impacket) | `/opt/darkmoon/python/bin/sniffer.py` | Sniffer helper | [Back to Summary](#summary) ## VI.11 BONUS: Pentester lab to train DarkMoon ### VI.11.a WEB / API / GRAPHQL / FRONTEND | Infrastructure | Protocols | Services / Tech | Darkmoon Engine | Equivalent labs | | -------------- | -------------- | ---------------------- | ---------------------- | -------------------------------------- | | Classic web | HTTP / HTTPS | Apache, Nginx, IIS | engine_infra_web | **OWASP Juice Shop** | | REST API | HTTP / JSON | Express, Spring, Flask | engine_web_api | **OWASP crAPI**, **VAPI** | | GraphQL | HTTP / GraphQL | Apollo, Graphene | engine_web_graphql | **DVGA**, **GraphQL-Goat** | | Web auth | HTTP / JWT | OAuth2, SSO | engine_web_auth | **AuthLab**, **JWT-Goat** | | CMS | HTTP | WordPress, Joomla | engine_web_cms | **WPScan VulnLab**, **HackTheBox CMS** | | JS frontend | HTTP | React, Angular | engine_web_frontend_js | **DOM XSS Labs**, **PortSwigger** | | File upload | HTTP multipart | PHP, Node | engine_web_upload | **Upload Vulnerable Labs** | | WAF / Proxy | HTTP | Cloudflare, Akamai | engine_web_waf_bypass | **WAF Evasion Labs** | | Web CI/CD | HTTP / Git | GitLab CI | engine_web_ci_cd | **GitHub Actions Labs** | [Back to Summary](#summary) ### VI.11.b ACTIVE DIRECTORY / WINDOWS | Infrastructure | Protocols | Services | Darkmoon Engine | Equivalent labs | | ---------------- | ------------ | ----------- | ------------------ | ------------------------------------- | | AD domain | Kerberos | KDC | engine_ad_kerberos | **AttackDefense AD**, **HTB AD Labs** | | SMB | SMBv1/v2 | File Shares | engine_ad_smb | **VulnAD**, **GOAD** | | LDAP | LDAP / LDAPS | Directory | engine_ad_ldap | **LDAP Injection Labs** | | AD DNS | DNS | SRV records | engine_ad_dns_srv | **AD DNS Labs** | | ADCS | RPC / HTTP | PKI | engine_ad_adcs | **ADCS Abuse Labs** | | GPO | SMB | SYSVOL | engine_ad_gpo | **BloodHound Labs** | | Lateral movement | RPC | WinRM / WMI | engine_ad_privesc | **Proving Grounds AD** | [Back to Summary](#summary) ### VI.11.c NETWORK / INFRASTRUCTURE | Infrastructure | Protocols | Services | Darkmoon Engine | Equivalent labs | | -------------- | ------------- | ----------- | -------------------------- | -------------------------------- | | DNS | UDP/TCP 53 | Bind | engine_proto_dns | **DNSGoat**, **PortSwigger DNS** | | FTP | TCP 21 | vsftpd | engine_proto_ftp | **VulnFTP**, **HTB FTP** | | SSH | TCP 22 | OpenSSH | engine_proto_ssh_telnet | **SSH Weak Labs** | | SNMP | UDP 161 | SNMPv2 | engine_proto_snmp | **SNMP Labs** | | Mail | SMTP/IMAP | Postfix | engine_proto_mail_services | **MailGoat** | | VPN | IPsec/OpenVPN | VPN Gateway | engine_proto_vpn_access | **VPN Labs** | | Wi-Fi | 802.11 | WPA2 | engine_proto_wifi | **WiFi Pineapple Labs** | | RDP/VNC | TCP 3389 | RDP | engine_proto_rdp_vnc | **BlueKeep Labs** | | ICMP | ICMP | Tunnel | engine_proto_icmp_tunnel | **ICMP Tunnel Labs** | | BGP/OSPF | TCP/UDP | Routing | engine_proto_bgp_ospf | **Routing Attack Labs** | [Back to Summary](#summary) ### VI.11.d CLOUD (AWS / AZURE / GCP / OVH) | Infrastructure | Protocols | Services | Darkmoon Engine | Equivalent labs | | -------------- | ------------ | ---------------- | ------------------------------ | ------------------------------ | | IAM | HTTPS | Roles / Policies | engine_cloud_iam | **Flaws.cloud**, **CloudGoat** | | Compute | HTTPS | EC2 / VM | engine_cloud_compute | **AWSGoat** | | Storage | HTTPS | S3 / Blob | engine_cloud_storage | **S3Goat** | | Metadata | HTTP 169.254 | IMDS | engine_cloud_metadata_exposure | **IMDS Labs** | | Containers | HTTPS | EKS / GKE | engine_cloud_containers | **KubeGoat** | | CI/CD | HTTPS | Pipelines | engine_cloud_ci_cd | **CI/CD Goat** | | Serverless | HTTPS | Lambda | engine_cloud_serverless | **LambdaGoat** | | Secrets | HTTPS | Vault | engine_cloud_secret_management | **Secrets Goat** | | Billing abuse | HTTPS | Billing API | engine_cloud_billing_abuse | **Cloud Abuse Labs** | [Back to Summary](#summary) ### VI.11.e IOT / EMBEDDED / SCADA / ICS | Infrastructure | Protocols | Services | Darkmoon Engine | Equivalent labs | | -------------- | ---------- | ---------- | --------------------------- | -------------------------- | | PLC | Modbus/TCP | Automation | engine_proto_modbus | **ModbusPal**, **ICSGoat** | | SCADA | DNP3 | Energy | engine_proto_dnp3 | **DNP3 Labs** | | MQTT | TCP 1883 | Broker | engine_proto_mqtt | **MQTTGoat** | | CoAP | UDP | IoT | engine_proto_coap | **CoAP Labs** | | ZigBee | 802.15.4 | Mesh | engine_proto_zigbee | **ZigBee Labs** | | BLE | BLE | GATT | engine_proto_ble | **BLEGoat** | | Firmware | Raw | Binwalk | engine_firmware_binwalk | **OWASP IoT Goat** | | Hardware | UART/JTAG | Debug | engine_hw_jtag_uart | **Hardware Hacking Labs** | | ICS Auth | Custom | HMI | engine_scada_authentication | **ICS Auth Labs** | [Back to Summary](#summary) ### VI.11.f MULTI-INFRA ORCHESTRATION (RARE & CRITICAL) | Mixed infrastructure | Trigger | Engine | Labs | | -------------------- | -------------- | -------------------------------- | --------------------- | | Web + AD | LDAP leak | engine_infra_global_orchestrator | **HTB Hybrid Labs** | | Web + Cloud | SSRF → IMDS | engine_infra_global_orchestrator | **SSRF → AWS Labs** | | VPN + AD | Split tunnel | engine_infra_network + AD | **Corp Network Labs** | | IoT + Cloud | MQTT bridge | engine_infra_embedded + cloud | **IoT Cloud Labs** | | CI/CD + Cloud | Pipeline abuse | engine_global | **Supply Chain Labs** | [Back to Summary](#summary) # VII. MCP Workflows This document explains **what MCP workflows are**, how they work, and how to create new ones. Target audience: - developers - advanced pentesters - contributors [Back to Summary](#summary) ## VII.1. What is an MCP Workflow? A workflow is: - a **Python module**, - exposed by the MCP, - that encapsulates a **coherent sequence of actions**, - executed inside the Docker toolbox. > [!NOTE] > A workflow = a complete operational task. [Back to Summary](#summary) ## VII.2. Where Workflows Live Workflows are located in: ``` mcp/src/tools/workflows/ ``` Examples: - `port_scan.py` - `vulnerability_scan.py` - `web_crawler.py` [Back to Summary](#summary) ## VII.3. Dynamic Discovery At startup: - the MCP automatically scans workflows, - exposes their methods, - makes them accessible to the AI. > [!TIP] > No manual registration required. [Back to Summary](#summary) ## VII.4. Workflow Structure Each workflow: - inherits from `BaseWorkflow`, - defines one or more methods, - manages its timeouts, - structures its results. [Back to Summary](#summary) ## VII.5. Example: Vulnerability Scan The `VulnerabilityScanWorkflow`: - creates a dedicated workspace, - runs Nuclei, - parses JSON results, - correlates findings by severity, - returns a structured summary. > [!IMPORTANT] > This is not just a tool call. It is **complete operational logic**. [Back to Summary](#summary) ## VII.6. Called by an Agent An agent can call: ``` run_workflow("vulnerability_scan", "scan_vulnerabilities", {...}) ``` The agent: - chooses the appropriate workflow, - decides when to execute it, - interprets the results. [Back to Summary](#summary) ## VII.7. Advantages of Workflows - reusable - testable - auditable - safer than raw command execution [Back to Summary](#summary) ## VII.8. Creating a New Workflow 1. Copy `TEMPLATE.py` 2. Implement the logic 3. Respect the structure 4. Test locally 5. Restart the MCP > [!TIP] > For detailed guide, see [WORKFLOW_GUIDE.md](/mcp/WORKFLOW_GUIDE.md) [Back to Summary](#summary) ## VII.9. Best Practices - One workflow = one mission - Avoid mixing too many responsibilities - Always structure outputs - Handle timeouts properly [Back to Summary](#summary) ## VII.10. Summary Workflows: - are the operational backbone of Darkmoon, - encapsulate offensive logic, - secure the execution of tools. > [!NOTE] > To understand the MCP itself, see [mcp.md](/mcp.md) [Back to Summary](#summary) # VIII. Contributing If you to contribute to the project, you access to the coding guideline at [CONTRIBUTING.md](CONTRIBUTING.md) [Back to Summary](#summary) # IX. License Code licensed under [GNU GPL v3](LICENSE) [Back to Summary](#summary)