# Keeping Processes Alive on Android
OpenClaw runs as a server, so Android's power management and process killing can interfere with stable operation. This guide covers all the settings needed to keep your processes running reliably.
## Enable Developer Options
1. Go to **Settings** > **About phone** (or **Device information**)
2. Tap **Build number** 7 times
3. You'll see "Developer mode has been enabled"
4. Enter your lock screen password if prompted
> On some devices, Build number is under **Settings** > **About phone** > **Software information**.
## Stay Awake While Charging
1. Go to **Settings** > **Developer options** (the menu you just enabled)
2. Turn on **Stay awake**
3. The screen will now stay on whenever the device is charging (USB or wireless)
> The screen will still turn off normally when unplugged. Keep the charger connected when running the server for extended periods.
## Set Charge Limit (Required)
Keeping a phone plugged in 24/7 at 100% can cause battery swelling. Limiting the maximum charge to 80% greatly improves battery lifespan and safety.
- **Samsung**: **Settings** > **Battery** > **Battery Protection** → Select **Maximum 80%**
- **Google Pixel**: **Settings** > **Battery** > **Battery Protection** → ON
> Menu names vary by manufacturer. Search for "battery protection" or "charge limit" in your settings. If your device doesn't have this feature, consider managing the charger manually or using a smart plug.
## Disable Battery Optimization for Termux
1. Go to Android **Settings** > **Battery** (or **Battery and device care**)
2. Open **Battery optimization** (or **App power management**)
3. Find **Termux** and set it to **Not optimized** (or **Unrestricted**)
> The exact menu path varies by manufacturer (Samsung, LG, etc.) and Android version. Search your settings for "battery optimization" to find it.
## Disable Phantom Process Killer (Android 12+)
Android 12 and above includes a feature called **Phantom Process Killer** that automatically terminates background processes. This can cause Termux processes like `openclaw gateway`, `sshd`, and `ttyd` to be killed without warning.
## Symptoms
If you see this message in Termux, Android has forcibly killed the process:
```
[Process completed (signal 9) - press Enter]
```
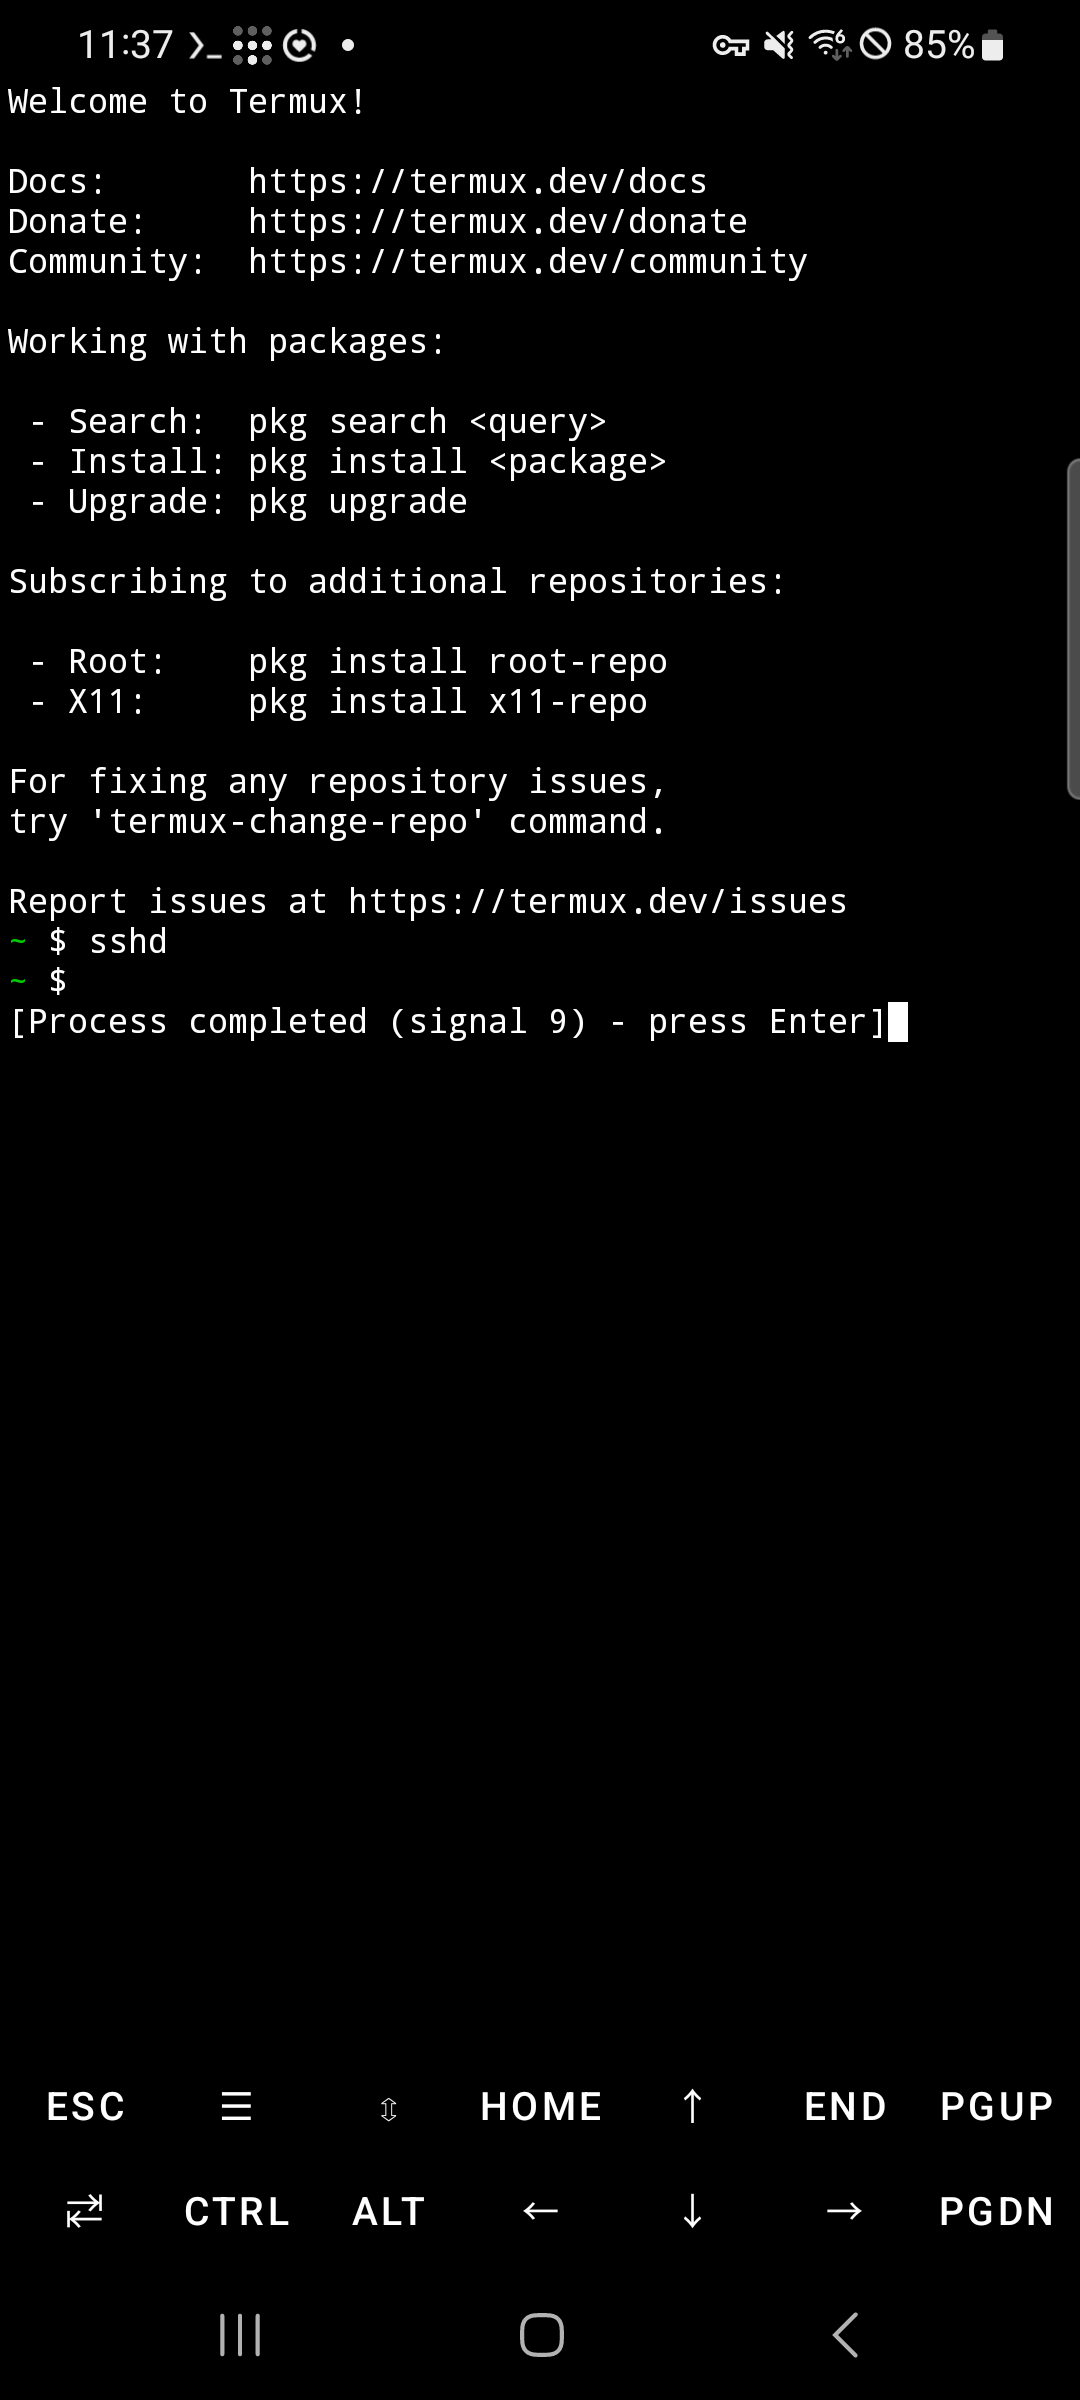 Signal 9 (SIGKILL) cannot be caught or blocked by any process — Android terminated it at the OS level.
## Requirements
- **Android 12 or higher** (Android 11 and below are not affected)
- **Termux** with `android-tools` installed (included in OpenClaw on Android)
## Step 1: Acquire Wake Lock
Pull down the notification bar and find the Termux notification. Tap **Acquire wakelock** to prevent Android from suspending Termux.
Signal 9 (SIGKILL) cannot be caught or blocked by any process — Android terminated it at the OS level.
## Requirements
- **Android 12 or higher** (Android 11 and below are not affected)
- **Termux** with `android-tools` installed (included in OpenClaw on Android)
## Step 1: Acquire Wake Lock
Pull down the notification bar and find the Termux notification. Tap **Acquire wakelock** to prevent Android from suspending Termux.
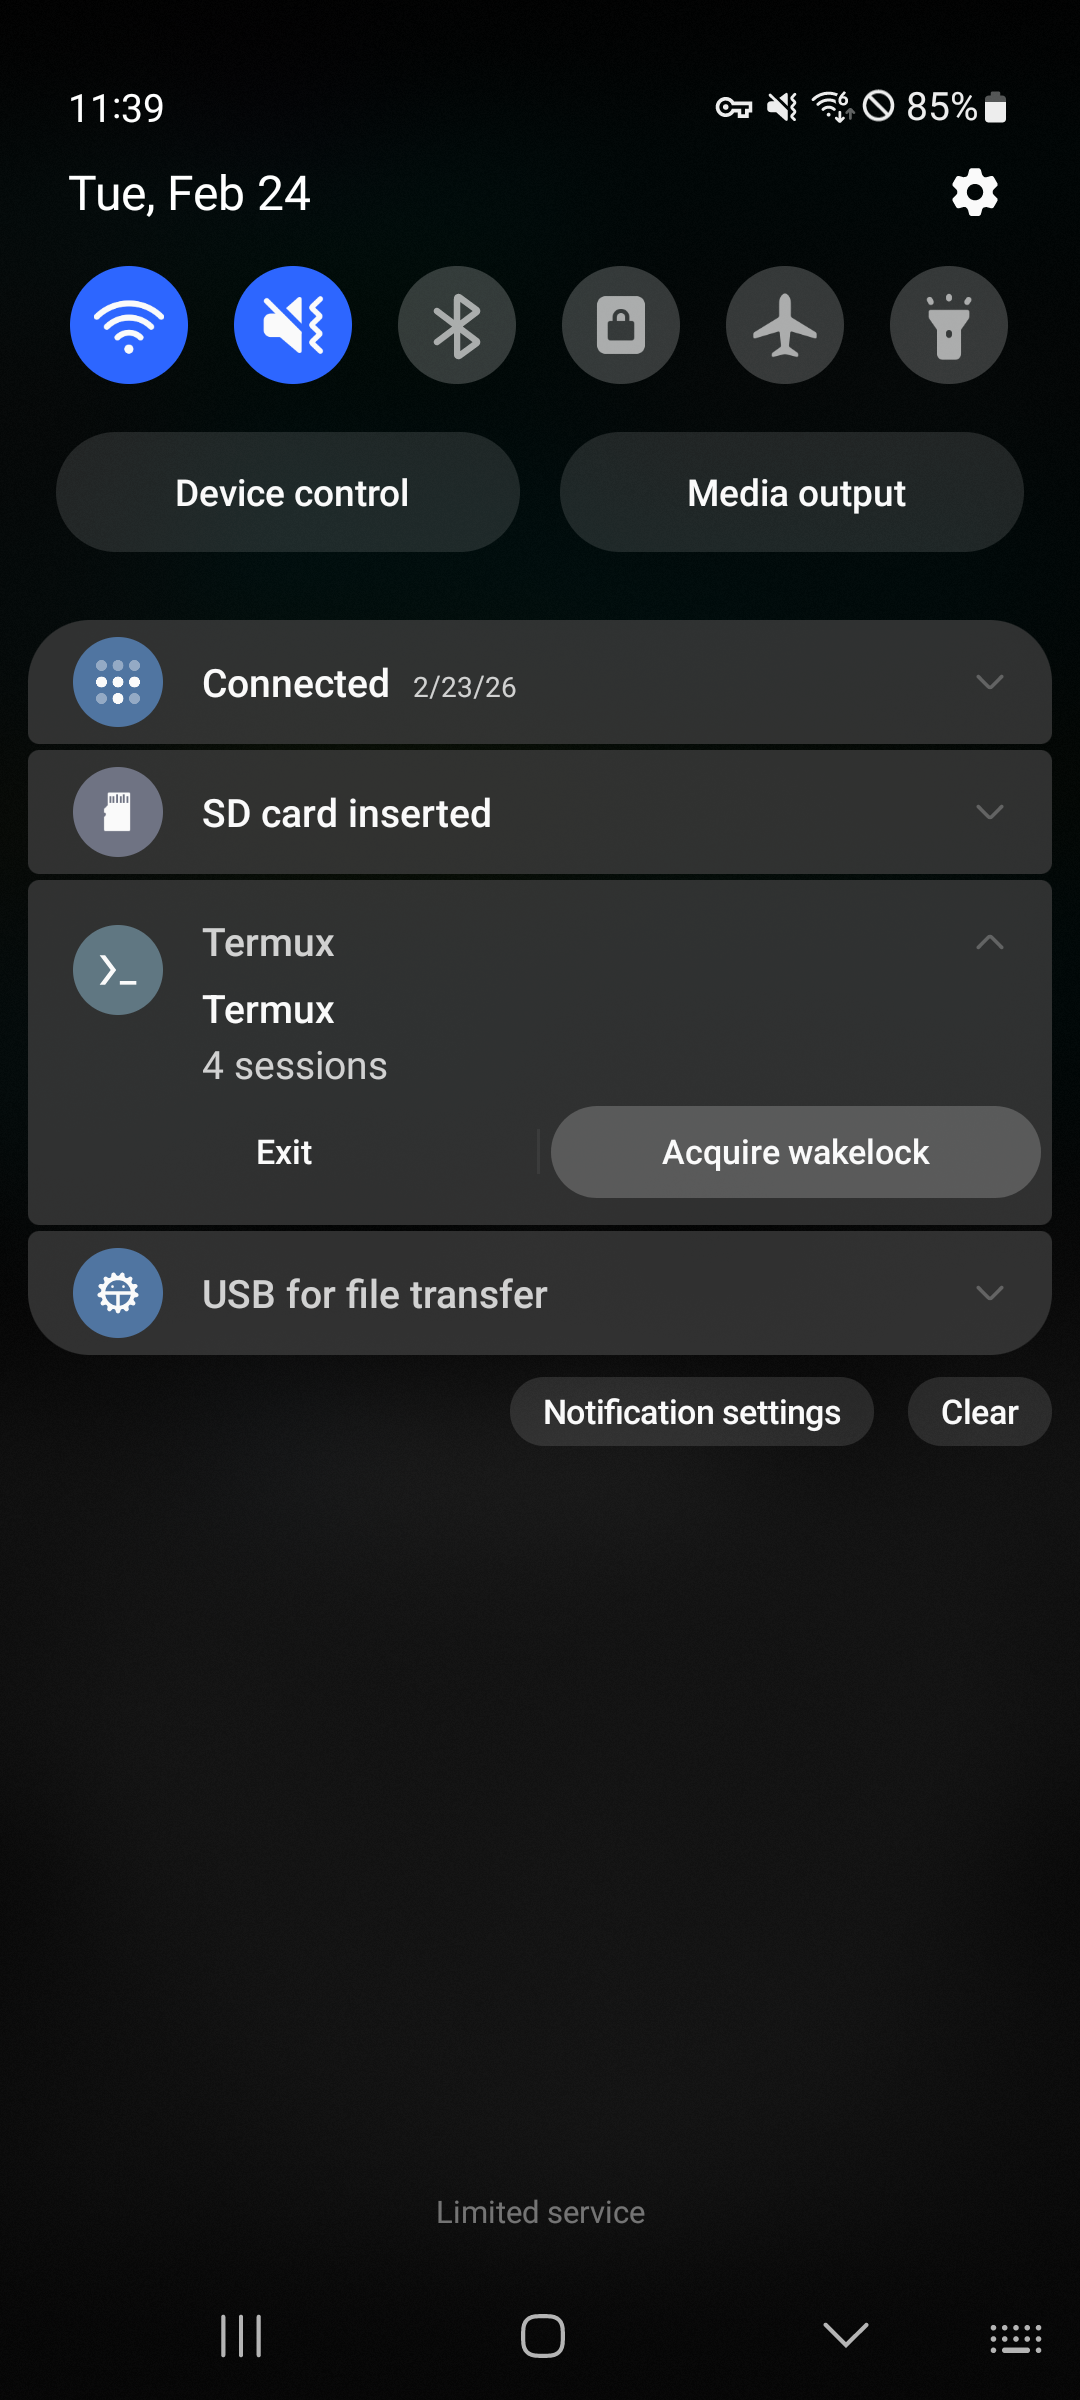

Once activated, the notification will show **"wake lock held"** and the button changes to **Release wakelock**.
> Wake lock alone is not enough to prevent Phantom Process Killer. Continue with the steps below.
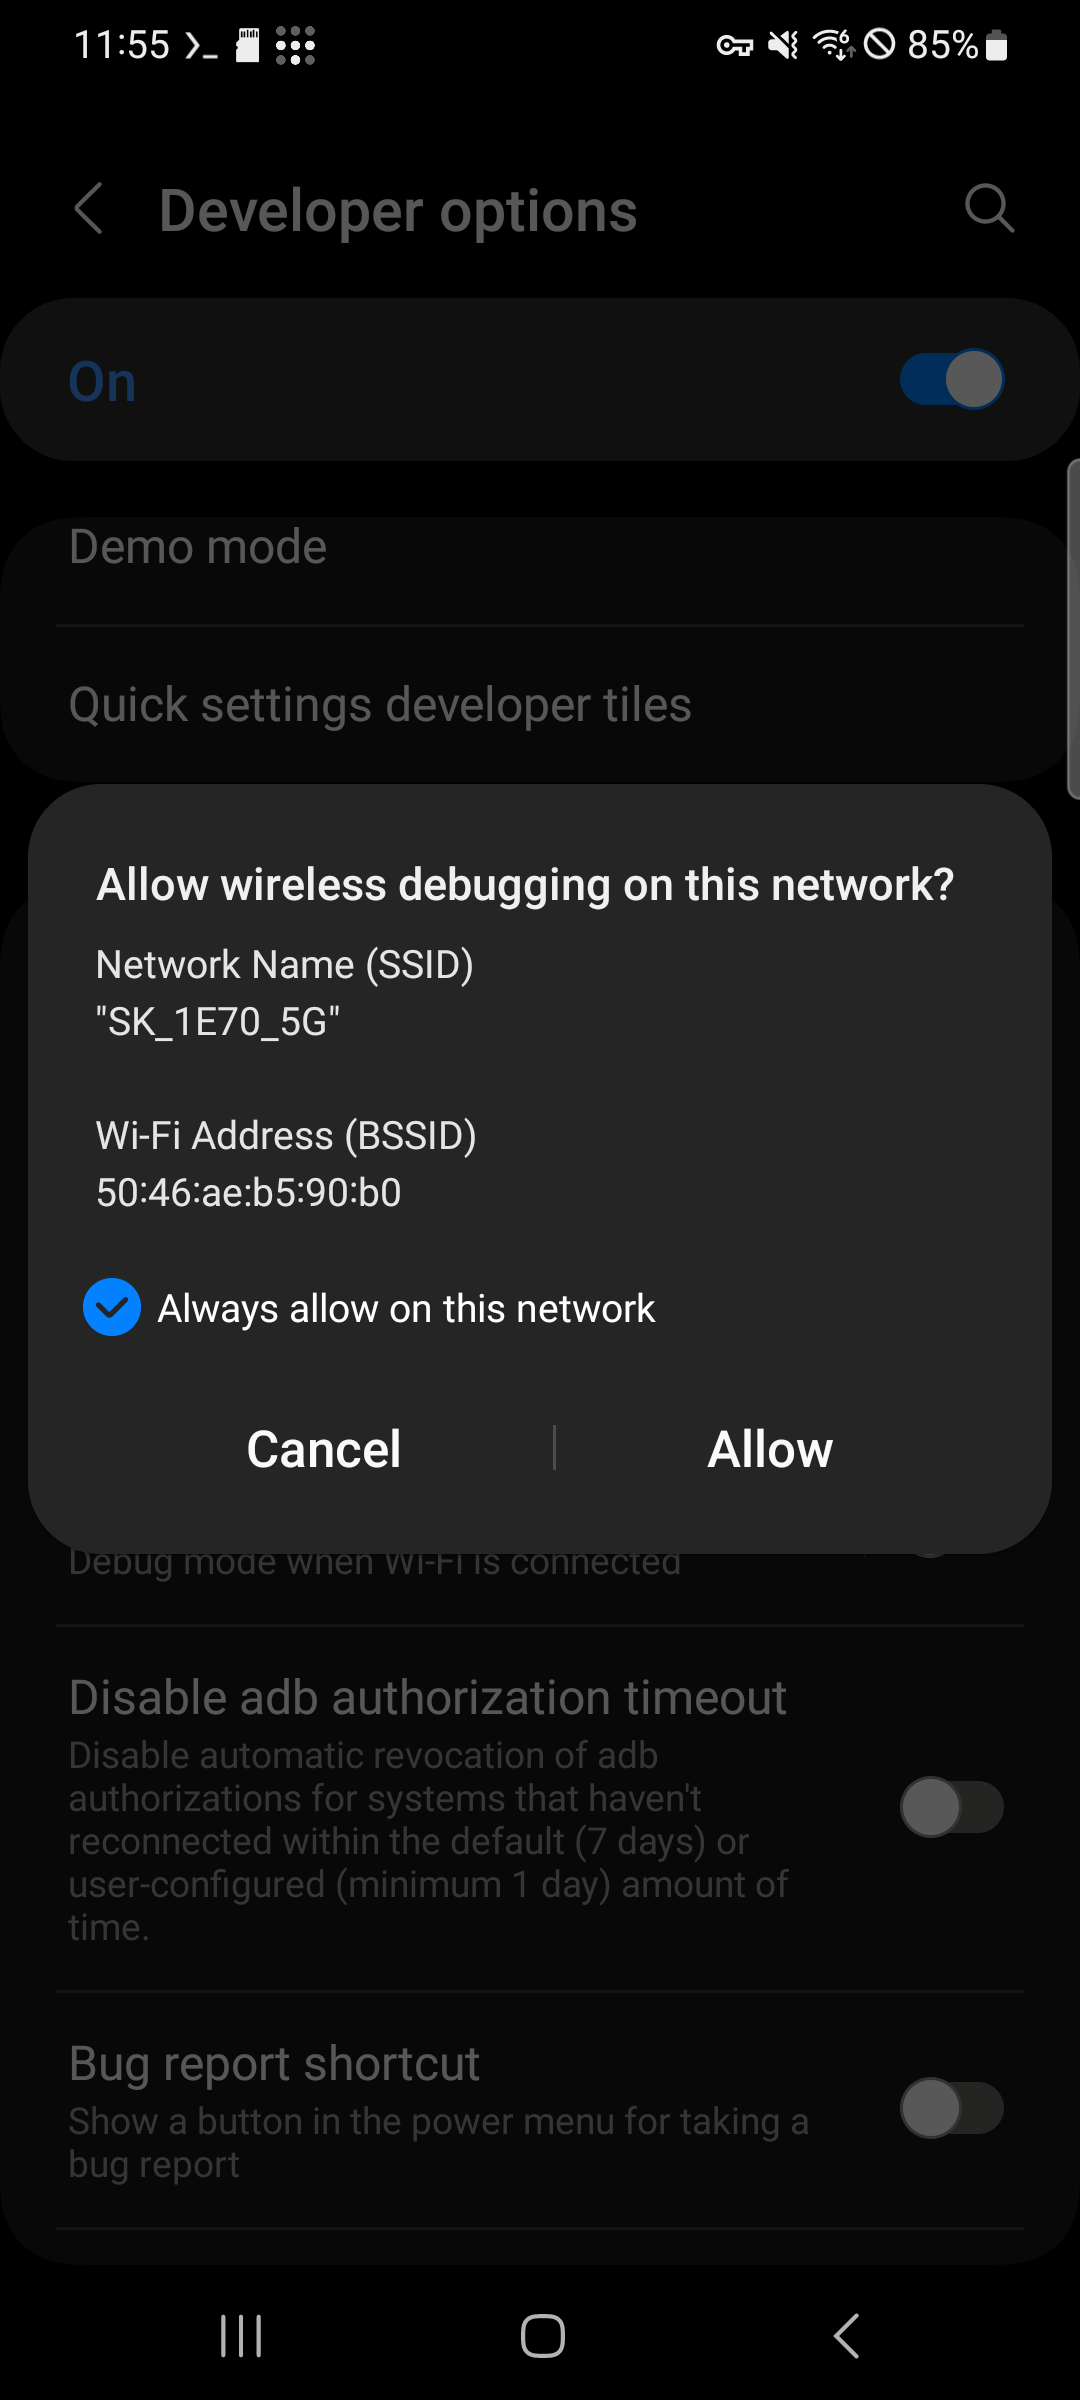
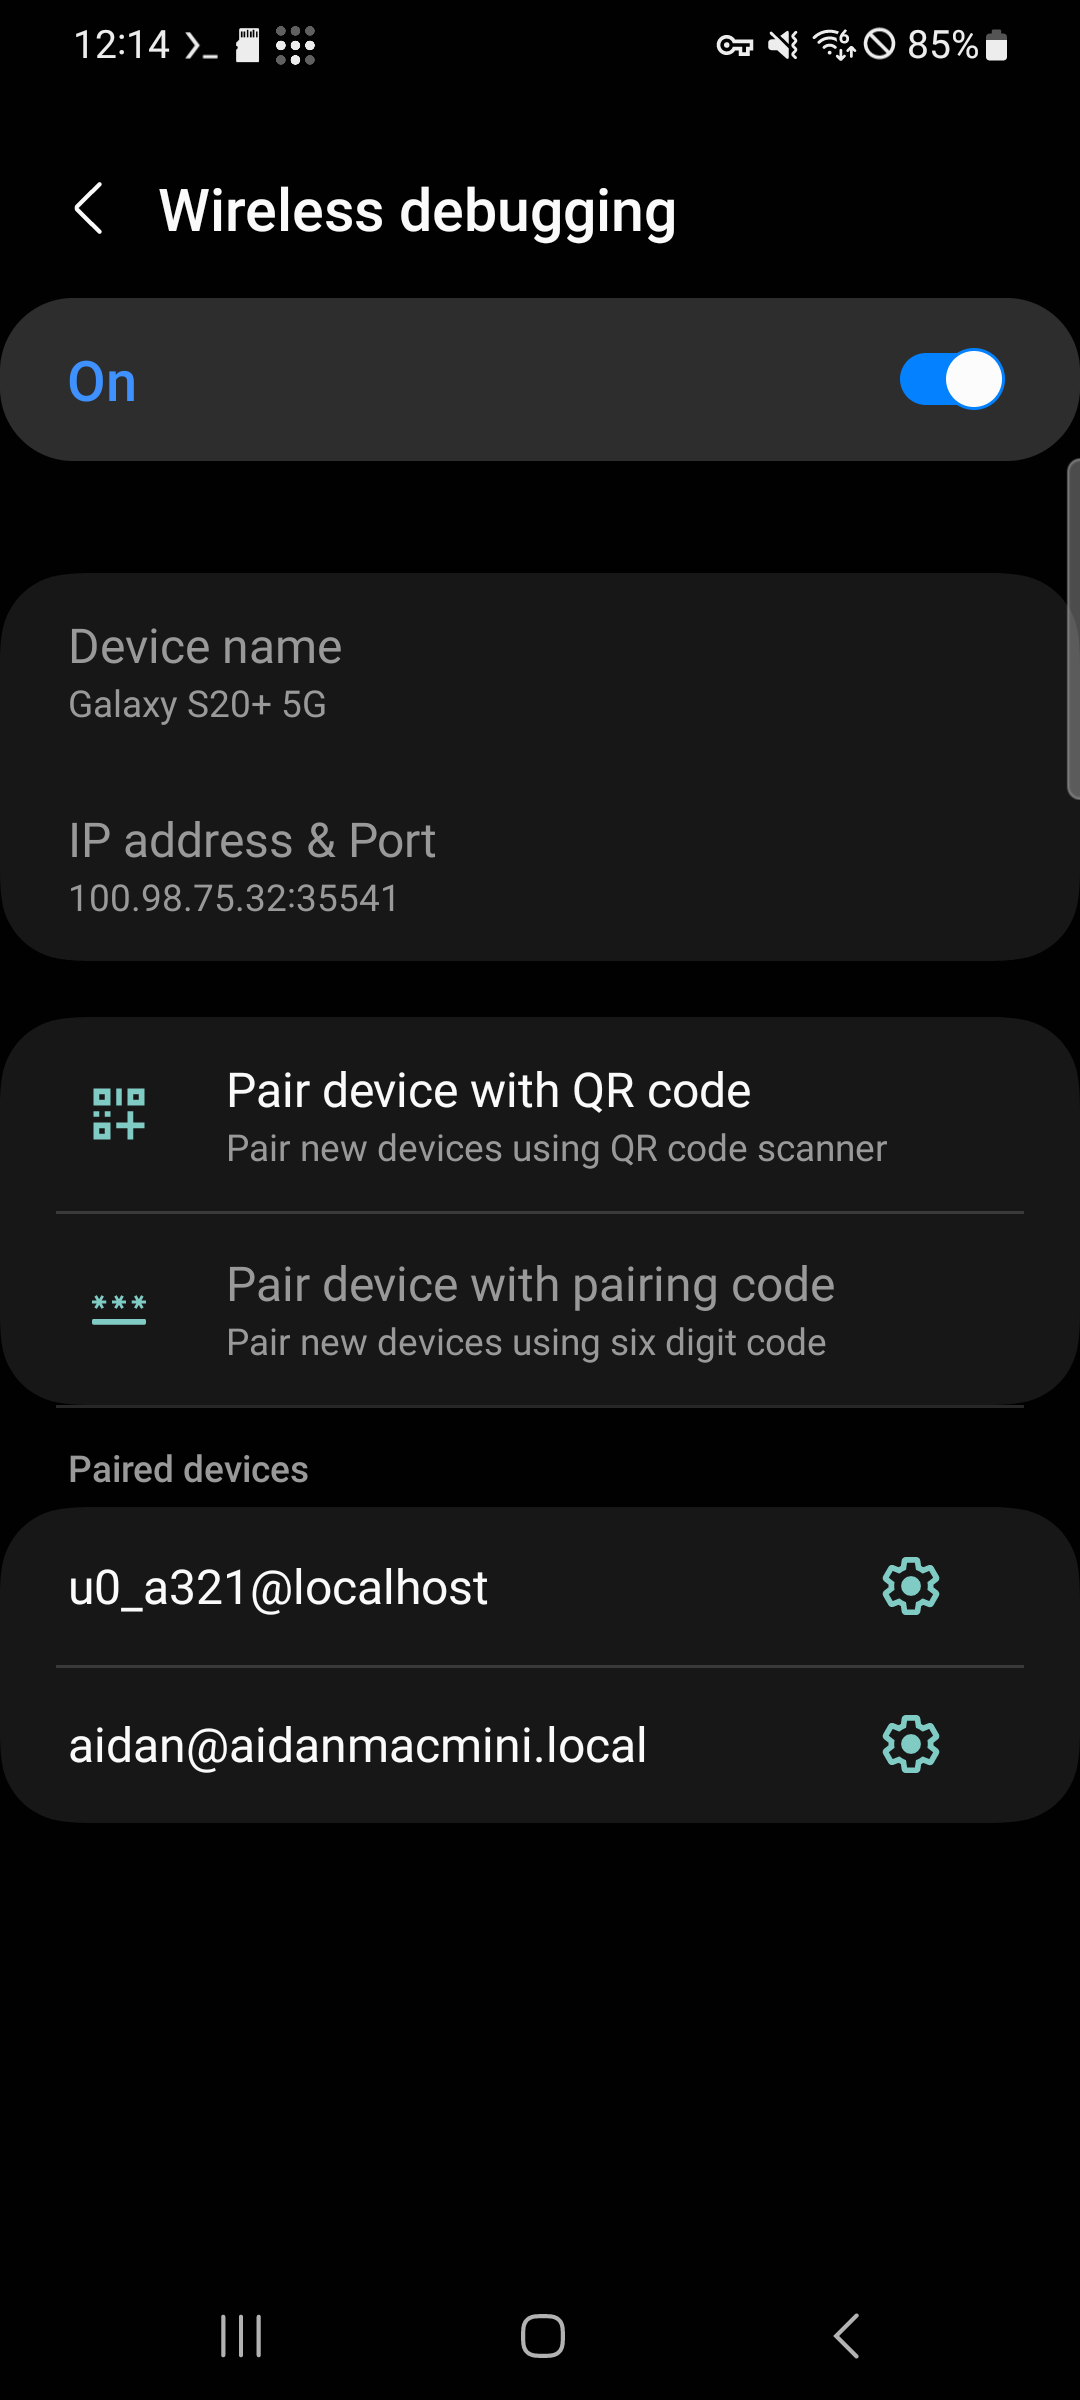
## Step 2: Enable Wireless Debugging
1. Go to **Settings** > **Developer options**
2. Find and enable **Wireless debugging**
3. A confirmation dialog will appear — check **"Always allow on this network"** and tap **Allow**
 ## Step 3: Install ADB (if not already installed)
In Termux, install `android-tools`:
```bash
pkg install -y android-tools
```
> If you installed OpenClaw on Android, `android-tools` is already included.
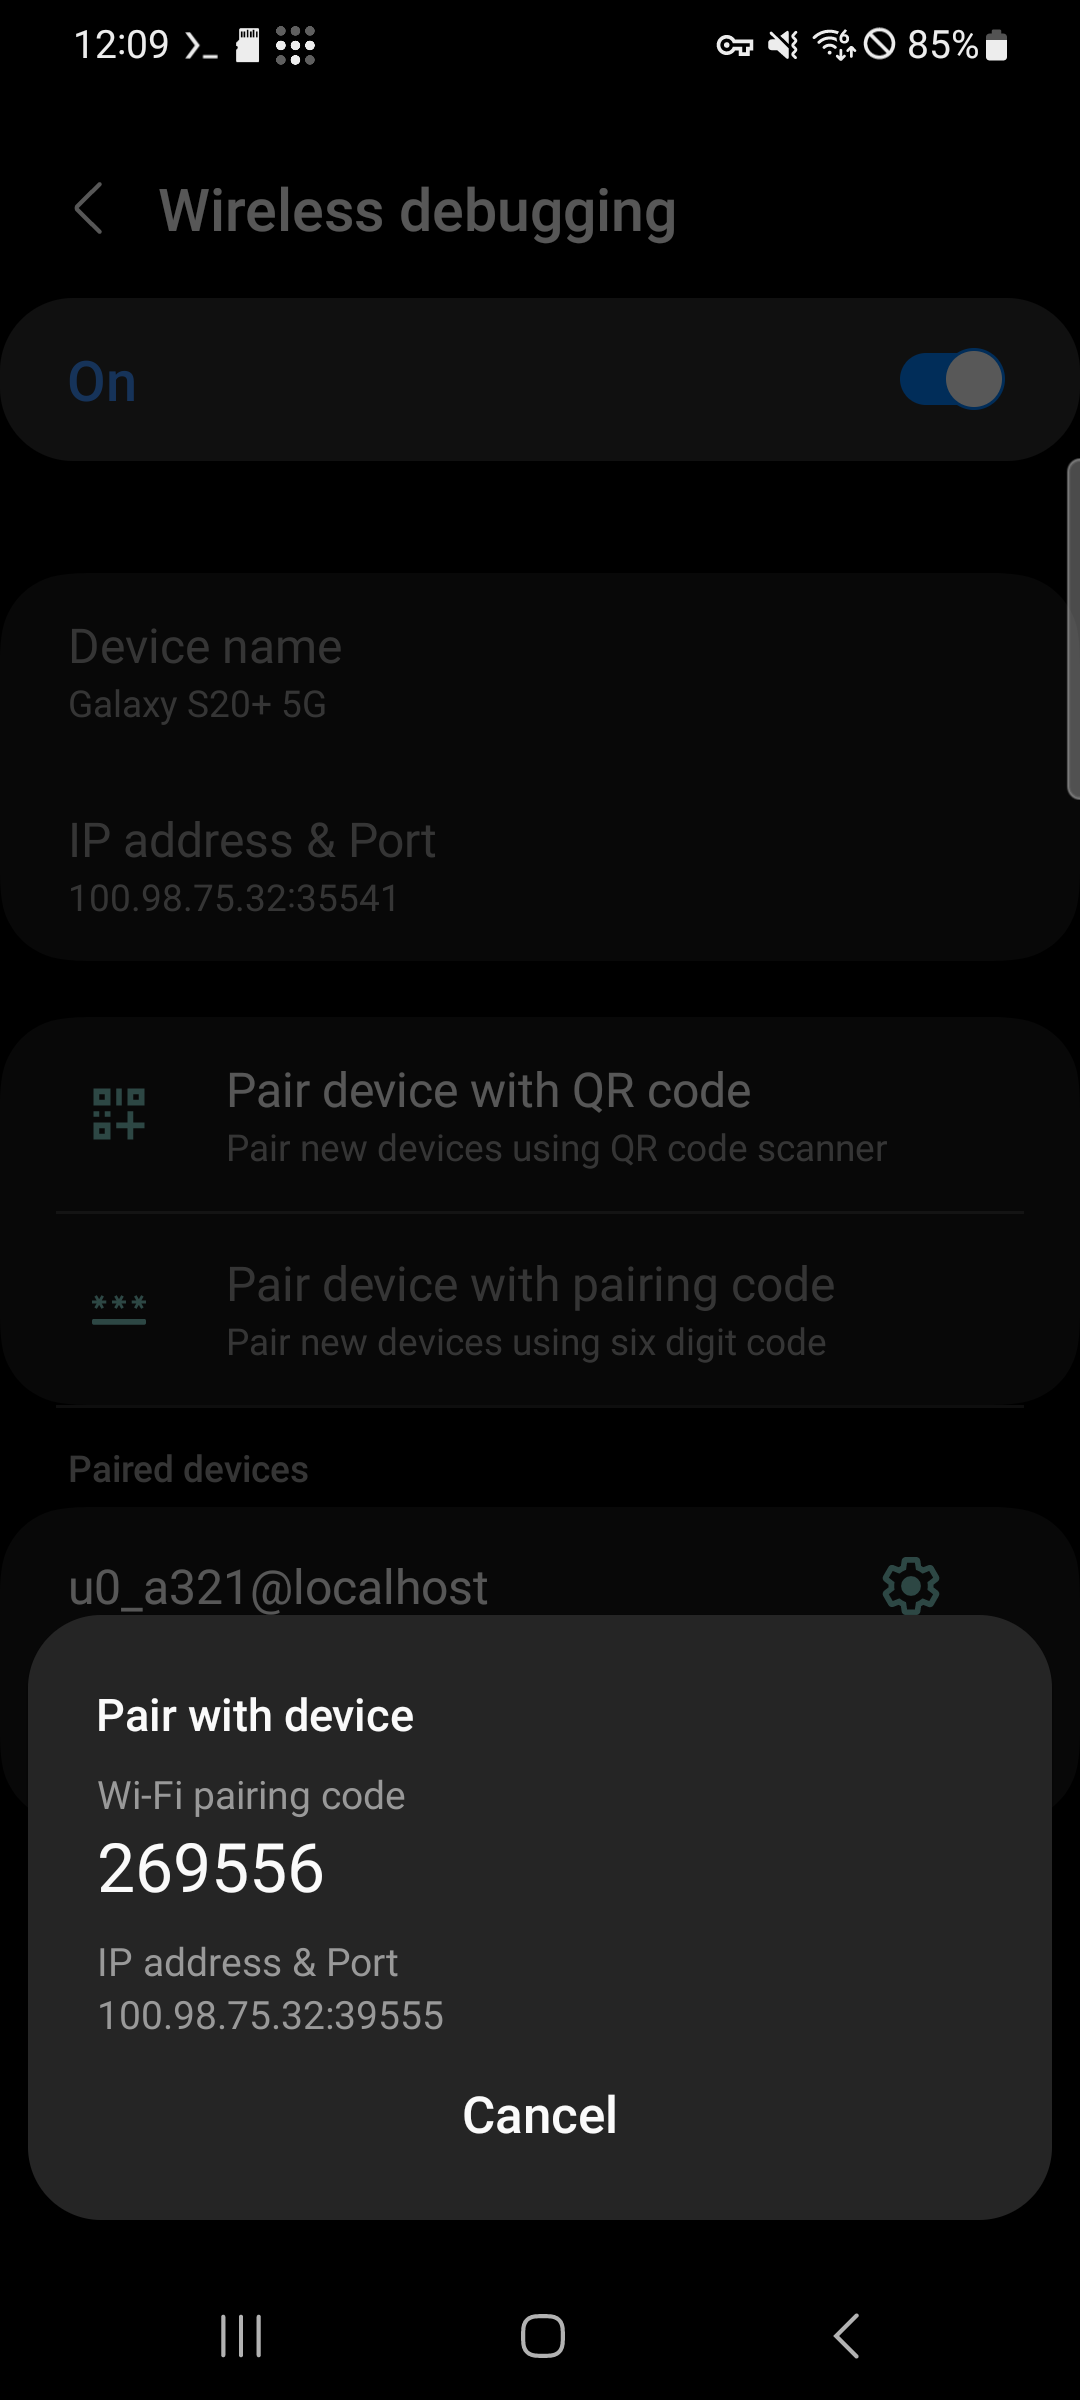
## Step 4: Pair with ADB
1. In **Wireless debugging** settings, tap **Pair device with pairing code**
2. A dialog will show the **Wi-Fi pairing code** and **IP address & Port**
## Step 3: Install ADB (if not already installed)
In Termux, install `android-tools`:
```bash
pkg install -y android-tools
```
> If you installed OpenClaw on Android, `android-tools` is already included.
## Step 4: Pair with ADB
1. In **Wireless debugging** settings, tap **Pair device with pairing code**
2. A dialog will show the **Wi-Fi pairing code** and **IP address & Port**
 3. In Termux, run the pairing command using the port and code shown on screen:
```bash
adb pair localhost:
```
Example:
```bash
adb pair localhost:39555 269556
```
3. In Termux, run the pairing command using the port and code shown on screen:
```bash
adb pair localhost:
```
Example:
```bash
adb pair localhost:39555 269556
```
 You should see `Successfully paired`.
## Step 5: Connect with ADB
After pairing, go back to the **Wireless debugging** main screen. Note the **IP address & Port** shown at the top — this is different from the pairing port.
You should see `Successfully paired`.
## Step 5: Connect with ADB
After pairing, go back to the **Wireless debugging** main screen. Note the **IP address & Port** shown at the top — this is different from the pairing port.
 In Termux, connect using the port shown on the main screen:
```bash
adb connect localhost:
```
Example:
```bash
adb connect localhost:35541
```
You should see `connected to localhost:35541`.
> The pairing port and connection port are different. Use the port shown on the Wireless debugging main screen for `adb connect`.
## Step 6: Disable Phantom Process Killer
Now run the following command to disable Phantom Process Killer:
```bash
adb shell "settings put global settings_enable_monitor_phantom_procs false"
```
Verify the setting:
```bash
adb shell "settings get global settings_enable_monitor_phantom_procs"
```
If the output is `false`, Phantom Process Killer has been successfully disabled.
In Termux, connect using the port shown on the main screen:
```bash
adb connect localhost:
```
Example:
```bash
adb connect localhost:35541
```
You should see `connected to localhost:35541`.
> The pairing port and connection port are different. Use the port shown on the Wireless debugging main screen for `adb connect`.
## Step 6: Disable Phantom Process Killer
Now run the following command to disable Phantom Process Killer:
```bash
adb shell "settings put global settings_enable_monitor_phantom_procs false"
```
Verify the setting:
```bash
adb shell "settings get global settings_enable_monitor_phantom_procs"
```
If the output is `false`, Phantom Process Killer has been successfully disabled.
 ## Notes
- This setting **persists across reboots** — you only need to do this once
- You do **not** need to keep Wireless debugging enabled after completing these steps. You can turn it off
- This does not affect normal app behavior — it only prevents Android from killing background processes in Termux
- If you factory reset your phone, you will need to repeat this process
## Further Reading
Some manufacturers (Samsung, Xiaomi, Huawei, etc.) apply additional aggressive battery optimization that can kill background apps. If you still experience process termination after disabling Phantom Process Killer, check [dontkillmyapp.com](https://dontkillmyapp.com) for device-specific guides.
## Notes
- This setting **persists across reboots** — you only need to do this once
- You do **not** need to keep Wireless debugging enabled after completing these steps. You can turn it off
- This does not affect normal app behavior — it only prevents Android from killing background processes in Termux
- If you factory reset your phone, you will need to repeat this process
## Further Reading
Some manufacturers (Samsung, Xiaomi, Huawei, etc.) apply additional aggressive battery optimization that can kill background apps. If you still experience process termination after disabling Phantom Process Killer, check [dontkillmyapp.com](https://dontkillmyapp.com) for device-specific guides.