# OmaTUNES User Manual
This is the full reference for OmaTUNES — where everything lives, how to do the things you'll want to do day-to-day, and the technical details for when you want to dig deeper (database layout, theming internals, Waybar styling).
If you just want to get playing, the short version is: point `music_dir` in your config at your music folder, launch the app, and everything else in here is here when you need it.
**Contents**
1. [Player Controls & Album Art](#player-controls--album-art)
2. [Resizing the Player Section](#resizing-the-player-section)
3. [Visualizer](#visualizer)
4. [Live Lyrics](#live-lyrics)
5. [Listening Statistics & Leaderboards](#listening-statistics--leaderboards)
6. [Sidebar & Search](#sidebar--search)
7. [Library View & Track Table](#library-view--track-table)
8. [The Song Menu](#the-song-menu)
9. [Now Playing / Up Next Queue](#now-playing--up-next-queue)
10. [ID3 Tag Editor](#id3-tag-editor)
11. [Lyrics Tab in the Tag Editor](#lyrics-tab-in-the-tag-editor)
12. [Online Lookup Helpers](#online-lookup-helpers)
13. [Playlists & Smart Playlists](#playlists--smart-playlists)
14. [Theming](#theming)
15. [Waybar Integration](#waybar-integration)
16. [Quickshell Integration](#Quickshell-Player-Module)
17. [Keybinding Reference](#keybinding-reference)
---
## Player Controls & Album Art
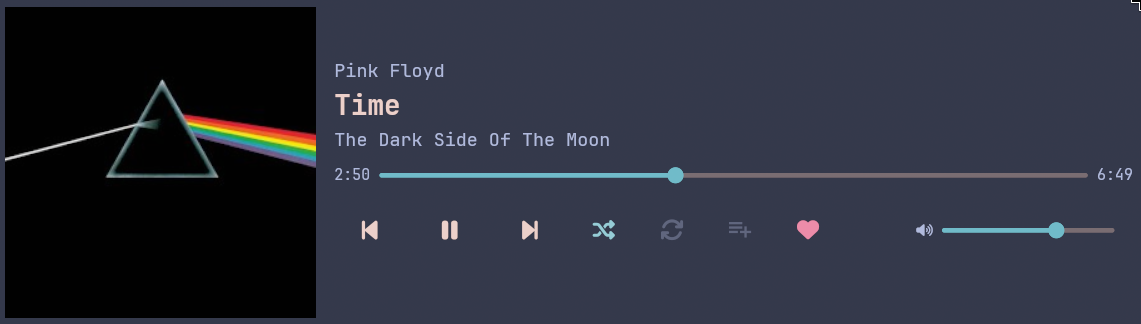
The player sits across the top of the window and handles everything about what's currently playing.
**Playback**
- **Play/Pause** — `Space`
- **Previous / Next track** — `p` / `n`
- **Seek** — click anywhere on the progress bar to jump there, or use `←`/`→` to nudge by the configured seek step (5 seconds by default)
- **Volume** — drag the slider, scroll anywhere over the player panel, or use `+`/`=` and `-` (5% steps by default)
- **Shuffle** (`s`) and **Repeat** (`r`) — both light up in your theme's accent color when active
**Add to Playlist button** — next to the Like heart, this button opens the [Song Menu](#the-song-menu) for whatever's currently playing, so you can add it to a playlist, create a new playlist from it, or remove it from the playlist you're viewing — all without leaving the player.
**Album art** — pulled from the track's embedded artwork first, falling back to a `cover.jpg`/`folder.png` sitting next to the file if there's no embedded art, and finally to a simple placeholder if neither exists. Click the artwork to jump back to the currently playing track's view.
When nothing's loaded yet, the timeline just sits empty and the Like button disappears — hit play or double-click any track to get going.
---
## Resizing the Player Section
The player section can be dragged taller if you want a bigger album art view. Grab the line just below the player controls (above the tab row) and drag it down — the album art scales up to fill the extra space, and everything else (track title, artist, controls) shifts right to make room, keeping its size and layout the same. Drag back up to shrink it again; it won't go any smaller than the default layout. Your chosen height is remembered the next time you open the app.
---
## Visualizer
A real-time audio spectrum analyzer lives in the slide-out drawer on the right side of the window, featuring 9 visually distinct canvas rendering modes, custom background styles, and tailored mode settings:
### Visualizer Modes
- **Mode 0: Mirrored Spectrograph Bars**: Classical dual-mirrored frequency bars with realistic gravity-bouncing peak limiters that dynamically match zenith bar height colors and downsample from 10 to 144 bars.
- **Mode 1: Radial Pulse**: Clean energy shockwave ring bursts launching into infinity with radial bass spark explosions (center core removed).
- **Mode 2: Liquid Ribbon**: 3 overlapping fluid wave ribbons with customizable trail layering.
- **Mode 3: Particle Constellation**: 3x Lissajous winding loops with 120px node connection reach and star node trails.
- **Mode 4: Hyperdrive Depth Tunnel**: Perspective depth rings with unconstrained forward warp velocity expansion extending beyond screen bounds.
- **Mode 5: Rolling Plains**: Dense 36-column rolling audio wave fields set against a twilight sky backdrop with distant stars and mountain silhouettes.
- **Mode 6: Kaleidoscope Mirror**: Sacred geometry mirror symmetry with customizable 4 to 16 symmetry axes.
- **Mode 7: Cosmic Aurora**: Twisting vertical plasma light curtains with 3 selectable color themes (*Emerald Glow*, *Solar Flare*, *Polar Pink & Ice Blue*).
- **Mode 8: Retro Synthwave Horizon**: 40-step progressive vertical sky gradient (Black $\to$ Purple $\to$ Sunset Orange), static valley notch mountains, true progressive sun blind cuts, and matched neon magenta perspective grid.
### Mode Selection & Visualizer Settings
- **Random Mode Dice Selector Button (`\ue270`)**: Click the dice button on the far left of the bottom indicator panel to instantly pick a random visualizer mode distinct from the active one.
- **Dot Selector**: Switch between visualizer modes using the 9 indicator dots at the bottom of the visualizer window. The selected mode adopts your active theme's accent color.
- **Visualizer Settings Tab**: Open App Settings (`Ctrl+,` or Settings icon) and select the **Visualizer** tab to customize:
- **Reaction Intensity / Sensitivity (`0.2x` to `2.5x`)**: Adjust how subtly or dynamically the visualizer responds to audio volume and frequencies.
- **Spectrum Color Shift (`0.0` to `2.0`)**: Adjust how dynamically historical ghost frames shift colors through your theme's palette over time.
- **Visualizer Background Mode**: Pick between **Theme Default (Transparent)**, **Custom RGB Color** (with live hex input `#RRGGBB` and interactive R/G/B sliders), or **Muted Reactive Pulse** (subtle audio-reactive ambient background).
- **Customize Mode Parameters**: Select any of the 9 modes from the dropdown to fine-tune mode-specific parameters (Bar count, Warp speed, Aurora themes, Symmetry axes, Ghost trails, Grid decay).
Click the waveform tab on the right edge of the window to open it, click it again (or hit `Escape`) to close it. Drag the divider between the drawer and the library to resize it.
---
## Live Lyrics
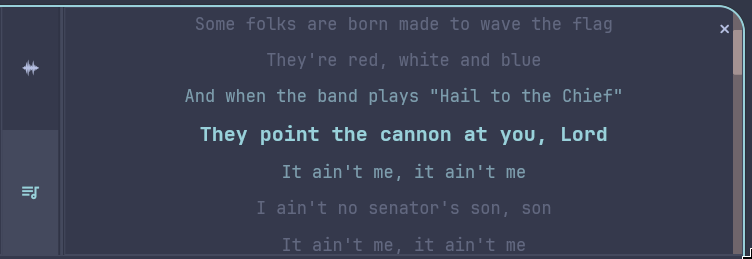
The same drawer also shows lyrics, synced or plain:
- **Synced (LRC) lyrics** scroll and highlight automatically as the track plays — the current line is bold and in your accent color, the lines just before and after are a soft blend color, and everything else dims into the background.
- **Plain lyrics** (no timestamps) just show up as scrollable text.
- **Click any synced line** to jump playback straight to that moment.
- Scroll around freely to read ahead — the view snaps back to center on the active line the next time the song reaches a new timestamp.
---
## Listening Statistics & Leaderboards
OmaTUNES tracks your detailed listening history and provides a comprehensive statistics dashboard and leaderboard system within a dedicated breakdown modal.
**Accessing Statistics**
- Click the **Listening Statistics** icon (the bar-chart icon) located in the top-right toolbar. This opens a modal overlay displaying the **Leaderboards** panel.
**The Leaderboards Modal**
- **Period Tabs**: Select from **Day**, **Week**, **This Month**, or **All-Time** tabs at the top to see statistics aggregated chronologically for that window.
- **Header Info**: The header displays a clean summary for the selected period: `{Period Name} - {Track Count} Tracks | {Hours} Played`.
- **Three-Column Dashboard**: Displays your top 10 rankings side-by-side for three distinct categories:
- **Top Artists**
- **Top Albums**
- **Top Genres**
- **Rank Highlights**: Ranks 1 to 10 are listed with Gold, Silver, and Bronze highlighting for the top 3 podium finishes alongside category-specific Nerd Font icons.
- **Data Formatting**: Displays the entity name, track count, and formatted hours played (right-aligned).
**Drill-Down Song Breakdown**
- Clicking any leaderboard entry (any Artist, Album, or Genre) launches a detailed, scrollable sub-window showing the **Top 100 Songs** by play count for that selection.
- Displays track ranks, song titles, subtitles (Album/Artist details), play counts, and total estimated listening minutes.
- Includes a **Back Arrow** button in the top-left to return to the main leaderboard view, and a close button on the right to close the modal entirely.
- Integrates complete click-through prevention to absorb mouse events so underlying screen rows are not selected accidentally.
**Milestone Toasts & Change Notifications**
- **Persistent Milestone Notifications**: Real-time popups notify you when you cross milestones:
- **Daily milestones**: 25, 50, or 100 tracks played in a single day.
- **Artist milestones**: 50, 100, 500, or 1000 plays for a single artist.
- **Genre milestones**: 50, 100, 500, or 1000 plays for a single genre.
- **Ladder Change Detection**: Automatically checks your top-10 all-time artist rankings at the start of a listening session and alerts you with a notification if an artist climbs or drops positions.
- **Hourly Nudges**: Displays a "Time Flies" reminder toast at the completion of every consecutive hour of an active listening session.
---
## Sidebar & Search
The left sidebar is your way into the library: **Artists**, **Albums**, **Genres**, and **Folders** tabs, each filtering the main view accordingly. The search box at the top filters whichever list is showing, and keeps focus while you type so you're not fighting the UI mid-search.
Right-click any artist or album row for a quick menu: hide it from your browsing views entirely, add all its tracks to an existing playlist, or spin up a brand-new playlist from it on the spot.
---
## Library View & Track Table
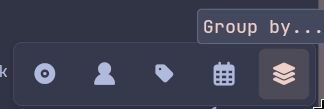
This is where you actually see your tracks. A few things worth knowing:
**Group by Tray** — Hover the grouping capsule in the bottom-right corner of the track list to expand the tray, allowing you to cluster tracks dynamically by **Album**, **Artist**, **Genre**, or **Year** under row headers. Selecting any grouping option automatically sorts your library by that group. While grouped, clicking on any table column header (such as Track Number, Plays, or Title) will sort the tracks *within* each group, while the groups themselves remain in their correct order. Clear the grouping by clicking the base icon or the active grouping option to collapse back to a flat view. Your grouping preference is remembered automatically between sessions.
**Columns** — click and drag a column header to reorder it, right where you want it. Right-click a header for the column menu, which now handles show/hide toggles only (reordering moved to drag-and-drop, since dragging is faster than hunting through a menu). Your column order and visibility choices are saved automatically.
**Liked column** — click the heart on any row to like/unlike a track on the spot. This replaced a cluster of separate per-row buttons that used to live at the end of each row — everything else (playlist actions, metadata editing) now lives in the [Song Menu](#the-song-menu) or your keyboard shortcuts, keeping the row itself clean.
**Responsive columns** — as you shrink the window, columns drop away in this order so nothing wraps awkwardly: Disc #, Plays, Date Played, Genre, Liked, Year, Album, Artist. Title, Duration, and the track number always stay put — if things get really tight, it'll strip down to just Title and Duration. This is purely visual and temporary; your actual saved column preferences aren't touched, and everything comes back once you widen the window again.
**Multi-select** — click a track, then Shift-click another to select the range between them. With multiple tracks selected, `E` opens bulk tag editing, or you can create a new playlist from the whole selection at once.
---
## The Song Menu
Right-click any track — in the Library, in a playlist, wherever — to bring up the Song Menu. The same menu also opens from the **Add to Playlist** button in the player controls, targeting whatever's currently playing.
- **Play Next** — queues it up immediately after the current track
- **Add to Queue** — adds it to the end of Up Next
- **Like / Unlike this song**
- **Edit ID3 tag** — opens the [tag editor](#id3-tag-editor) for this track
- **Open local file folder** — opens your file manager at the track's location
- **Add to Playlist** — click to expand a dropdown listing your playlists (with a `+` next to each), plus a "Create playlist with this song" option at the bottom — collapsed by default so this doesn't turn into a wall of playlist names as your collection grows
- **Remove from current playlist** — only shows up when you're viewing a User Playlist and the track is actually in it, so you'll never see this option somewhere it wouldn't make sense (Smart Playlists and Auto Playlists don't have a manual membership to remove from — see [Playlists & Smart Playlists](#playlists--smart-playlists) for why)
---
## Now Playing / Up Next Queue
Click the **Now Playing** tab (in the same row as Artists/Albums/Genres) to see what's queued up next. Click it again, or click anywhere outside it, to dismiss.
- **Drag to reorder** — grab the handle on the left of any row and drag it to a new position. This is the only way to reorder the queue now; the separate up/down nudge buttons and the per-row remove ✕ that used to sit at the end of each row have been retired, since dragging covers both jobs more directly. To remove a track from the queue, use the Song Menu.
- **Search the queue** — filter Up Next by keyword without disturbing playback.
- **Clear Queue** — empties everything queued up ahead of the current track.
- **Shuffle-aware** — turning shuffle on physically reorders the queue (keeping the current track in place) so what you see is exactly what's coming next, not a hidden internal order.
---
## ID3 Tag Editor
Edit metadata one track at a time, or in bulk across a whole selection.
Every field (Title, Artist, Album, Genre, Track #, Disc #, Year, Cover Path, Lyrics) has its own checkbox — start typing in a field and its box checks itself automatically. Only checked fields get written when you save, so bulk-editing a stack of tracks won't accidentally overwrite something like the Title field across all of them.
Typing in Artist, Album, or Genre brings up autocomplete suggestions pulled from your existing library — click one to fill the field and check its box in one motion. There's also an "Apply to Entire Album" option that grabs every track in the current album and applies your checked changes across all of them.
---
## Lyrics Tab in the Tag Editor
The tag editor has its own Lyrics tab for viewing and adjusting timing, separate from the read-only display in the main lyrics drawer.
- Paste or type raw lyrics text directly, LRC timestamps and all.
- If the sync feels off, use the offset controls (`+0.5s`, `+1.0s`, `-0.5s`, `-1.0s`) to build up a shift, then hit **Apply** to shift every timestamp in the text at once. **Reset** clears the pending shift without touching your lyrics.
---
## Online Lookup Helpers
Two shortcuts in the tag editor save you a trip to the browser's address bar:
- **Search Lyrics Online** — opens [lrclib.net](https://lrclib.net) pre-filled with the current track's details, so you can grab synced lyrics and paste them straight back in.
- **Search Cover Online** — opens a Google Images search pre-filled with `{artist} {album} album art`, for grabbing cover art to drop next to your files.
---
## Playlists & Smart Playlists
Everything lives in `~/.config/omatunes/db.json`. The sidebar organizes playlists into three tabs, each with its own icon and tooltip:
1. **User Playlists** — playlists you build by hand
2. **Auto Playlists** — Liked Songs, Recently Played, Most Played
3. **Smart Playlists** — rule-based, self-updating
**Reordering** — drag playlists within the User Playlists or Smart Playlists tab to put your favorites up top. Each tab keeps its own order independently (Auto Playlists always stay in their fixed positions, since they're not user-created).
### User Playlists
- **Create one** by clicking "New Playlist" at the bottom of the sidebar, or right-click a track/artist/album and create one from there directly.
- **Rename or delete** by hovering over a playlist to reveal the pencil and trash icons.
- **Add a track** via the Song Menu's Add to Playlist dropdown.
- **Reorder the songs inside it** by dragging the handle on the left of any row — the same drag pattern used in the Up Next queue.
- **Remove a song** from it via "Remove from current playlist" in the Song Menu, which only appears when you're actually viewing that playlist and the track is genuinely in it.
### Auto Playlists
These populate themselves — no manual curation needed:
- **Liked Songs** — everything you've hearted. Songs can be dragged into a custom order here, same as a User Playlist.
- **Recently Played** — your listening history, most recent first. Since the whole point of this list is showing recency, it isn't manually reorderable — dragging it around would fight its own purpose the moment you played something new.
- **Most Played** — sorted by play count, for the same reason as above: also not manually reorderable.
### Smart Playlists
These work like iTunes smart playlists: define rules, and OmaTUNES keeps the list current automatically.
- **Create one** from the Smart Playlists tab — this opens the Rule Builder.
- **Build rules** by picking a field (Title, Artist, Album, Genre, Year, Play Count, Duration, Disc Number, Liked, Has Lyrics, Last Played), an operator (Contains, Is, Greater Than, Less Than, Within Last, Between), and a value. Artist/Album/Genre fields get autocomplete chips.
- **Rules combine with AND logic** — a track needs to satisfy every rule to make the cut.
- **Sort and limit** matches by Title, Album, Artist, Play Count, Year, or Random, and optionally cap the list at a maximum size.
- **Live Updating**, when enabled, re-checks the rules automatically as your library and listening habits change.
- **Songs can be dragged into a manual order** here too — when a new track starts matching the rules, it's added to the end of your manual order rather than wherever the sort criteria would normally place it, so your arrangement doesn't get shuffled around every time the underlying set changes.
- Right-click a Smart Playlist in the sidebar to edit its rules or delete it.
---
## Theming
Open Settings (the gear icon at the far right of the library tab row) to get to the theme editor.
- **System** — follows your active Omarchy theme live.
- **Presets** — Nord, Catppuccin Mocha, Catppuccin Latte, Dracula, Gruvbox (Dark), Everforest (Dark), Monokai.
- **Custom** — you edit 7 base colors (Background, Primary Text, Accent, Green, Red, Yellow, Blue), and OmaTUNES derives the remaining 4 supporting shades for you — a deeper background variant, a panel background, muted/secondary text — automatically calculated to hit proper WCAG contrast ratios against your base colors. That means a custom theme you build here won't quietly end up with text you can't read; the math handles it for you.
---
## Quickshell Player Module & Omarchy v4 Bar Plugin
OmaTUNES includes both a standalone **Quickshell Player Module** and a native **Omarchy v4 Bar Plugin** with interactive pop-up control cards.
### Installation
```bash
git clone https://github.com/Balthazzahr/omatunes.git
cd omatunes
bash scripts/quickshell/install.sh
```
Running `install.sh` automatically detects your environment and copies the necessary files:
- **Quickshell Module**: Installed to `~/.config/quickshell/modules/omatunes/` (`OmatunesWidget.qml` & `OmatunesPopup.qml`).
- **Omarchy v4 Bar Plugin**: Installed to `~/.config/omarchy/plugins/omatunes/` (`BarWidget.qml` & `manifest.json`).
### Enabling the Module
- **Omarchy v4**: Add `"omatunes"` to your panel module list (`modules`, `modules-left`, `modules-center`, or `modules-right`) in `~/.config/omarchy/shell.json`.
- **Standalone Quickshell**: Import `./modules/omatunes` and instantiate `OmatunesWidget {}` in `~/.config/quickshell/shell.qml`.
### Module Features & Mouse Controls
- **Offline Auto-Hide**: When OmaTUNES is closed, the bar widget dynamically hides (`visible: false`), leaving `0` empty space on your status bar.
- **Active Player Display**: When OmaTUNES is open, the bar widget appears displaying playback status (``/``), `Artist - Title`, and a heart icon (``) if liked.
- **Mouse Controls**:
- **Left Click**: Toggle Play / Pause.
- **Right Click**: Toggle the pop-up mini-player control card.
- **Middle Click**: Toggle Like / Heart status.
- **Scroll Wheel Up / Down**: Adjust system volume.
---
## Waybar Integration
OmaTUNES listens on UDP port `18888` for commands, which the Waybar script talks to.
### CSS
Drop this into `~/.config/waybar/style.css` for a clean rounded pill that collapses when omaTUNES
isn't running:
```css
#custom-omatunes {
background-color: @theme_bg;
border: 2px solid @active_border;
border-radius: 50px;
padding-left: 14px;
padding-right: 14px;
margin-top: 3px;
margin-bottom: 3px;
margin-right: 10px;
transition: all 0.2s ease;
}
#custom-omatunes:hover {
background-color: #414559;
}
```
### What each click/scroll does
| Input | Action |
|---|---|
| Left click | Play / Pause |
| Middle click | Like / Unlike current track |
| Right click | Next track |
| Scroll up | Volume +5% |
| Scroll down | Volume −5% |
---
## Quickshell Player Module
OmaTUNES includes a native **Quickshell** player module (`OmatunesWidget.qml` & `OmatunesPopup.qml`) as an interactive alternative to Waybar.
> **Note for Omarchy Users**: The Quickshell module is prepared and tested for **Omarchy v4**. Minor adjustments may be published once Omarchy v4 is finalized. OmaTUNES remains 100% independent and works standard on any Linux / Wayland desktop with Quickshell.
### Mouse Controls
| Input | Location | Action |
|---|---|---|
| Left click | Bar Widget | Play / Pause toggle |
| Right click | Bar Widget | Open interactive mini-player pop-up window |
| Middle click | Bar Widget | Toggle Like (``) for the current track |
| Scroll up / down | Bar Widget | Adjust volume (+5% / −5%) |
| Click artwork / title | Pop-up Card | Focus and bring main omaTUNES window to foreground |
| Drag & Release slider | Pop-up Card | Live track timeline scrubbing / seeking |
| Click Shuffle (``) / Repeat (``) | Pop-up Card | Toggle Shuffle / Repeat with live accent highlight |
### Installation
Run the automated installer script included in the repository:
```bash
./scripts/quickshell/install.sh
```
Or manually copy the module files:
```bash
# Standalone Quickshell module
mkdir -p ~/.config/quickshell/modules/omatunes
cp scripts/quickshell/*.qml ~/.config/quickshell/modules/omatunes/
# Omarchy Shell plugin
mkdir -p ~/.config/omarchy/plugins/omatunes
cp scripts/quickshell/BarWidget.qml ~/.config/omarchy/plugins/omatunes/
cp scripts/quickshell/manifest.json ~/.config/omarchy/plugins/omatunes/
```
### Enabling the Module
#### For Omarchy v4 / Omarchy Shell Users (`~/.config/omarchy/shell.json`)
Open your `~/.config/omarchy/shell.json` file in a text editor. Add `"omatunes"` to your preferred panel module array (`modules`, `modules-left`, `modules-center`, or `modules-right` depending on your theme style, such as Pure or Default):
```json
{
"panel": {
"modules-center": [
"clock",
"omatunes",
"system-tray"
]
}
}
```
> **Omarchy v4 Note**: `install.sh` registers `BarWidget.qml` under `~/.config/omarchy/plugins/omatunes/`. Omarchy automatically resolves `"omatunes"` in `shell.json` to this plugin.
#### For Standalone Quickshell Users (`~/.config/quickshell/shell.qml`)
If you are using custom Quickshell without Omarchy, add the import statement and place `OmatunesWidget {}` into your bar structure:
```qml
import "./modules/omatunes"
// Inside your main bar row/container:
OmatunesWidget {}
```
---
## Keybinding Reference
| Key | Context | Action |
|---|---|---|
| `Space` | Player | Play / Pause |
| `→` | Player | Seek forward (default 5s) |
| `←` | Player | Seek backward (default 5s) |
| `↑` / `↓` | Track List | Move track focus up/down |
| `n` / `N` | Player | Next track |
| `p` / `P` | Player | Previous track |
| `s` / `S` | Player | Toggle Shuffle |
| `r` / `R` | Player | Toggle Repeat |
| `+` or `=` | Player | Volume up (default 5%) |
| `-` | Player | Volume down (default 5%) |
| `l` / `L` / `f` / `F` | Track List | Toggle Liked for selected track |
| `e` / `E` | Track List | Open tag editor for selection |
| `c` / `C` | Sidebar | New Playlist dialog |
| `a` / `A` | Track List | Open Add to Playlist for selected track |
| `/` | Player | Focus and clear the track search box |
| `F5` | Player | Rescan your music library folder |
| `Tab` | Player | Cycle focus: sidebar search → sidebar list → track list → song search → back to sidebar search |
| `Enter` | Dialog / Editor | Submit / save (or double-click to play a track) |
| `Escape` | Dialog / Editor | Close whatever's open |
| `]` | Player | Increase UI font scale |
| `[` | Player | Decrease UI font scale |