# Starkpad Installation Manual
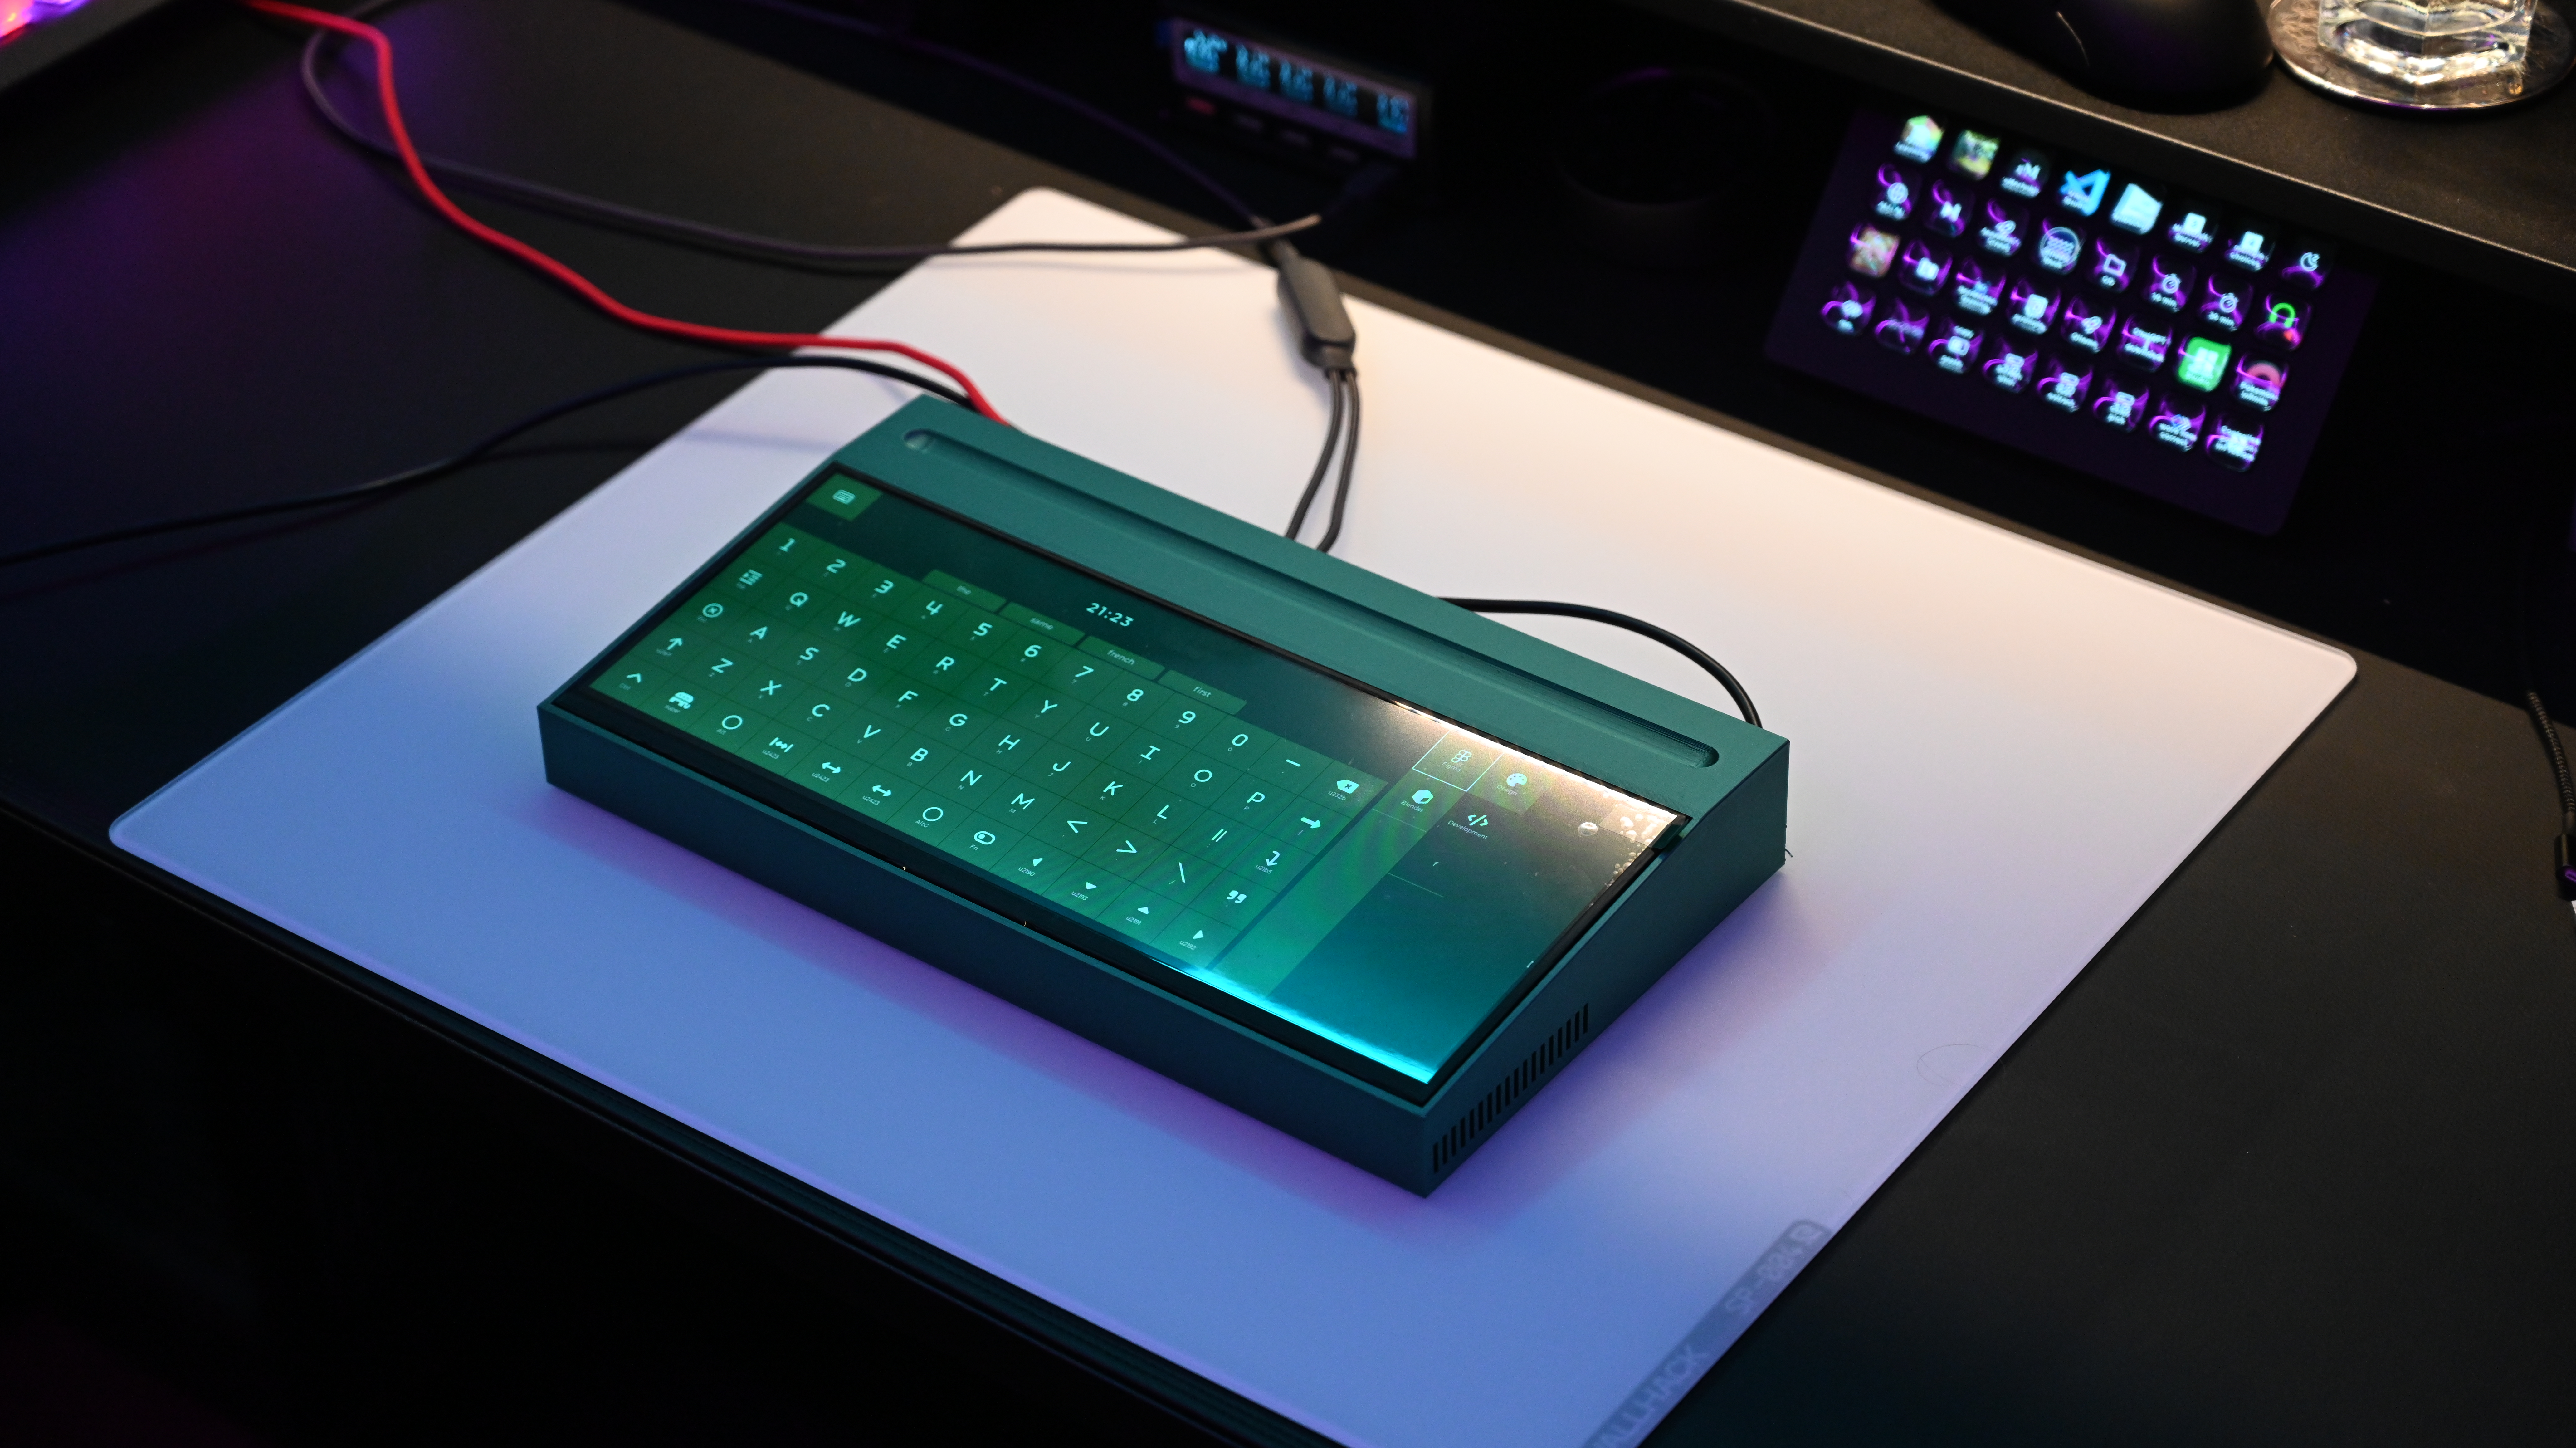
This manual provides a step-by-step guide to assembling, flashing, and configuring the **Starkpad** — a Linux-powered touchscreen macro deck that functions as a universal USB keyboard, mouse, and shortcut controller.
---
## Table of Contents
1. [Bill of Materials (BOM)](#-1-bill-of-materials-bom)
2. [How It Works: The SHIDP Protocol](#-2-how-it-works-the-shidp-protocol)
3. [Hardware Assembly](#️-3-hardware-assembly)
4. [Firmware Installation](#-4-firmware-installation)
5. [Software Installation (Linux Host)](#-5-software-installation-linux-host)
6. [Usage & Configuration](#-6-usage--configuration)
---
## 📦 1. Bill of Materials (BOM)
The following components are required to build the Starkpad.
| Category | Item | Qty | Notes |
| :--- | :--- | :--- | :--- |
| **Display** | Waveshare 12.3-inch Capacitive Touch Display | 1 | In-Cell technology |
| **Compute** | Arduino UNO Q | 1 | Main Linux Host |
| **Receiver** | Seeed XIAO RP2040 | 1 | USB HID Dongle |
| **Mechanical** | 3D Printed Case | 1 | File: `starkpad-case-003.stl` |
| **Power** | Anker 100W USB-C Charger | 1 | Incl. 1.5m cable |
| **Connectivity** | USB-C Hub (Revodok Pro 1062) | 1 | 6-in-1, DP 4K@60Hz, 100W PD |
| | HDMI Cable (0.25m) | 1 | 8K@60Hz / 4K@120Hz |
| | USB-C to USB-C Cable (30cm) | 1 | 60W PD |
| | Bi-directional Level Converter | 1 | 3.3V–5V (4-channel) |
| | USB-C Panel Mount Coupler | 1 | Female-to-Female |
| | Various Adapters | - | U-shaped USB-C, HDMI, etc. |
*(See full pricing and supplier details in `BOM.md`)*
---
## 🔌 2. How It Works: The SHIDP Protocol
Before assembling the hardware, it's helpful to understand how the Starkpad communicates with your computer.
### System Overview
**SHIDP** (Serial Human Interface Device Protocol) is a custom, lightweight serial protocol designed for this project. It allows the Linux touchscreen application to send keyboard, mouse, and media commands to the USB receiver dongle reliably and with minimal latency.
```
┌─────────────────┐ ┌─────────────────┐ ┌─────────────────┐ ┌──────────┐
│ Starkpad App │ │ MCU Bridge │ │ USB Receiver │ │ Your PC │
│ (Linux/LVGL) │─────▶│ (ATmega4809) │─────▶│ (Seeed RP2040) │─────▶│ │
│ │ UART │ │ UART │ │ USB │ │
└─────────────────┘ └─────────────────┘ └─────────────────┘ └──────────┘
/dev/ttyHS1 Passthrough Parses SHIDP Keyboard
115200 baud (transparent) frames Mouse/Media
```
1. **Starkpad App:** The LVGL-based touchscreen UI captures your input and generates SHIDP frames.
2. **MCU Bridge:** The ATmega4809 on the UNO Q acts as a transparent passthrough, forwarding serial data from Linux to the external TX pin.
3. **USB Receiver:** The RP2040 parses the SHIDP frames and converts them into standard USB HID reports (keyboard/mouse/media).
4. **Your PC:** Sees the receiver as a normal USB keyboard and mouse—no drivers required.
### Frame Format
All SHIDP communication uses fixed **8-byte frames** for simplicity and reliability:
```
Byte: [ 0 ] [ 1 ] [ 2 ] [ 3 ] [ 4 ] [ 5 ] [ 6 ] [ 7 ]
Name: [ SYNC] [ TYPE] [ACTION][ P1 ][ P2 ][ P3 ][ P4 ][CHKSUM]
Example: 0xAA 0x01 0x00 0x01 0x06 0x00 0x00 0xAB
─┬── ─┬── ─┬── ─┬── ─┬──
│ │ │ │ └─ Keycode: 'C' (0x06)
│ │ │ └─────── Modifier: Ctrl (0x01)
│ │ └────────────── Action: Tap
│ └────────────────────── Type: Keyboard
└───────────────────────────── Sync byte (start of frame)
```
| Byte | Name | Description |
| :---: | :--- | :--- |
| 0 | **SYNC** | Always `0xAA` — marks the start of a valid frame |
| 1 | **TYPE** | `0x01` = Keyboard, `0x02` = Mouse, `0x03` = Media, `0x04` = Macro |
| 2 | **ACTION** | `0x00` = Tap (press+release), `0x01` = Hold, `0x02` = Release |
| 3–6 | **PAYLOAD** | Type-specific data (keycodes, mouse deltas, media codes, etc.) |
| 7 | **CHECKSUM** | XOR of bytes 0–6 for error detection |
### Safety Features
* **Checksum Validation:** Every frame includes an XOR checksum. Corrupted or incomplete frames are discarded by the receiver.
* **Watchdog Timer (80ms):** If the receiver doesn't get a valid frame for 80 milliseconds, it automatically releases all keys and mouse buttons. This prevents "stuck key" scenarios if the Starkpad loses power or the connection is interrupted.
### Supported Commands
| Type | What It Does | Example |
| :--- | :--- | :--- |
| **Keyboard** | Sends key presses with optional modifiers | `Ctrl+C`, `Alt+F4`, `A` |
| **Mouse** | Moves cursor, clicks buttons, scrolls wheel | Move 10px right, Left click |
| **Media** | Controls playback and volume | Play/Pause, Volume Up, Mute |
> For the complete technical specification with byte-level examples, see:
> **[SHIDP Protocol Specification](Starkpad/docs/protocol/SHIDP_SPECIFICATION.md)**
---
## 🛠️ 3. Hardware Assembly
### 3D Printing the Enclosure
Print the case file located at the root of this repository:
| Parameter | Recommendation |
| :--- | :--- |
| **File** | `starkpad-case-003.stl` |
| **Material** | PLA or PETG |
| **Infill** | 15–20% |
| **Supports** | Yes (for internal overhangs) |
### Assembly Steps
1. **Mount the Display:**
- Place the Waveshare 12.3" display face-down on a soft surface.
- Connect the HDMI and USB-C (touch) cables to the display's ports.
- Carefully seat the display into the front opening of the printed case.
2. **Install the Arduino UNO Q:**
- Position the UNO Q in its designated slot inside the case.
- Route the USB-C power cable to the external panel-mount connector.
- Connect the HDMI cable from the display to the UNO Q (via adapter if needed).
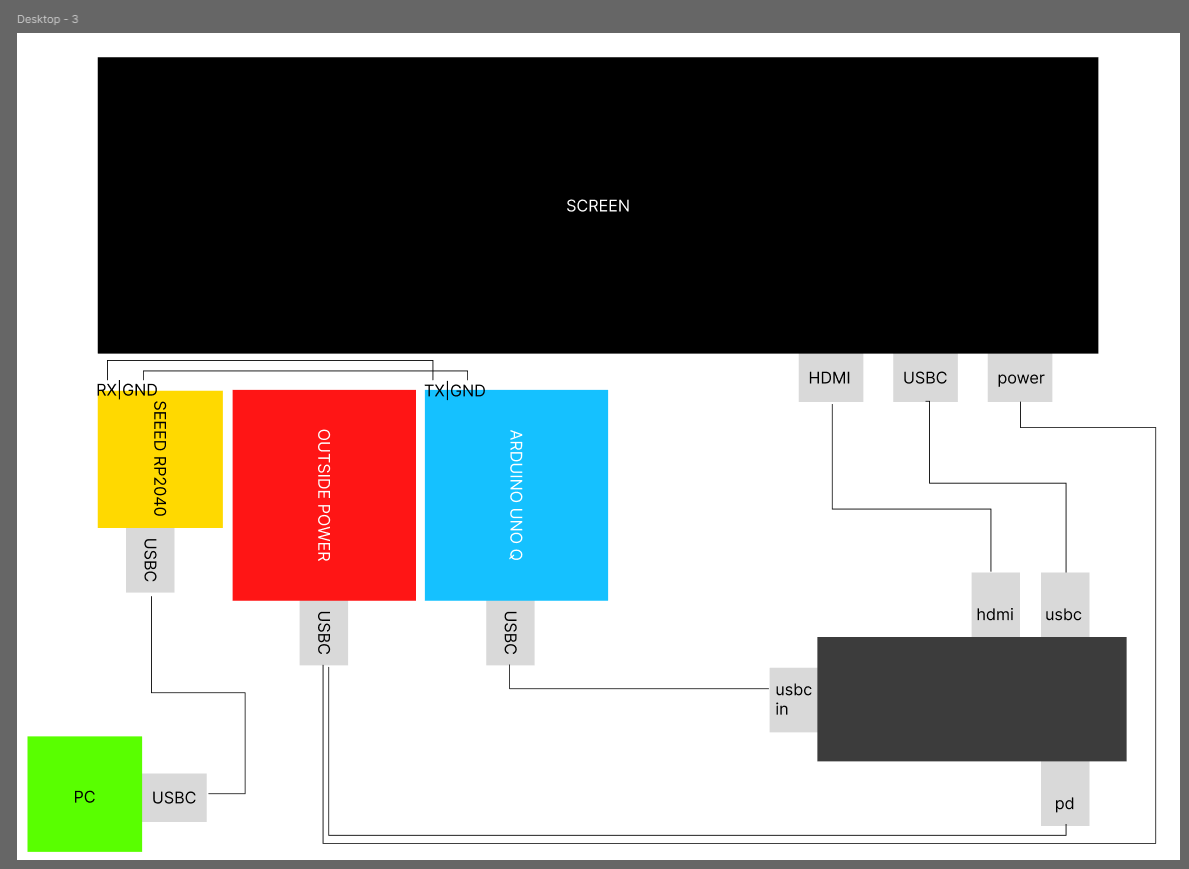
3. **Wire the MCU Bridge to the Receiver:**
- Using jumper wires, connect the UNO Q's **TX pin (Pin 1)** to the RP2040's **RX pin (D7)**.
- Connect **GND** between both boards.
- *(Optional)* If voltage levels differ, use the bi-directional level converter between them.
4. **Install the RP2040 Receiver:**
- Mount the Seeed XIAO RP2040 near the USB-C output port.
- Route its USB-C cable to the external panel-mount connector (this will plug into your PC).
5. **Optional: Install Cooling Fan:**
- If using a fan, connect it to the **5V** and **GND** headers on the UNO Q.
- Mount it to the ventilation area of the case.
6. **Close the Enclosure:**
- Secure all cables and ensure nothing is pinched.
- Attach the back cover with screws or clips.
### Wiring Reference
Refer to the schematic below for the complete wiring diagram:
---
## ⚡ 4. Firmware Installation
> **Prerequisite:** Before flashing any firmware, you must first set up the Arduino UNO Q with a fresh Linux installation. The best guide for this process is the video tutorial by **DroneBot Workshop**:
>
> **[Arduino UNO Q Setup Guide (YouTube)](https://www.youtube.com/watch?v=ConG_fma45M)**
>
> Follow his instructions to prepare the board before continuing with the steps below.
The Starkpad consists of two microcontroller components that need specific firmware.
### Part A: Bridge (Arduino UNO Q MCU)
This firmware acts as a serial bridge between the Linux system and the external pins.
1. Connect the **Arduino UNO Q** to your PC.
2. Open the **Arduino IDE**.
3. Open the sketch: `Starkpad/uno-q-echo/echobridgetoserial.ino`
4. Select the board **Arduino UNO R4 WiFi** (or compatible UNO Q target).
5. **Upload** the sketch.
### Part B: Receiver (Seeed XIAO RP2040)
This firmware receives serial commands and emulates a USB Keyboard/Mouse.
1. Connect the **Seeed XIAO RP2040** to your PC.
2. Open the **Arduino IDE**.
3. Install the **Adafruit TinyUSB** library via the Library Manager.
4. In **Tools > USB Stack**, select **"Adafruit TinyUSB"**.
5. Open the sketch: `Starkpad/shidp_receiver/shidp_receiver.ino`
6. **Upload** the sketch.
---
## 🐧 5. Software Installation (Linux Host)
The core application runs on the Linux environment of the Arduino UNO Q.
### Prerequisites
1. **Clone the LVGL Linux Port:**
First, set up the base LVGL environment by following the [lv_port_linux instructions](https://github.com/lvgl/lv_port_linux).
```bash
git clone --recursive https://github.com/lvgl/lv_port_linux.git Starkpad
cd Starkpad
```
2. **Install Starkpad Source:**
Copy the contents of this repository's `Starkpad` folder into the cloned directory, overwriting where necessary to place files in `src/starkpad/`.
3. **Download Icon Assets:**
The UI icons are hosted separately to keep this repository lightweight. Clone them into the assets folder:
```bash
mkdir -p lv_port_linux/assets
git clone https://github.com/BlommeJan/fa-free-png-vault.git lv_port_linux/assets/icons
```
> These are Font Awesome Free icons converted to PNG format. See the [fa-free-png-vault](https://github.com/BlommeJan/fa-free-png-vault) repo for licensing details.
### Installation Scripts
Run the following installer scripts in order to set up dependencies, services, and networking.
```bash
cd Starkpad/scripts
# 1. Install system dependencies
chmod +x install-dependencies.sh
./install-dependencies.sh
# 2. Setup Systemd services
chmod +x install-service.sh
./install-service.sh
# 3. Configure mDNS (Hostname resolution)
chmod +x setup-mdns.sh
./setup-mdns.sh
# 4. Verify Server Setup
chmod +x test-server.sh
./test-server.sh
```
### Build the Application
Return to the project root and build the application:
```bash
cd ..
./build.sh
```
---
## 🚀 6. Usage & Configuration
### Critical Setup Step
After every login/boot on the UNO Q, you must stop the default Arduino router service to allow the Starkpad application to control the serial port.
**Run this command in the UNO Q terminal:**
```bash
sudo systemctl stop arduino-router
```
*> If this is not done, the connection between the Linux Host and the MCU Bridge will fail.*
### Web Configuration
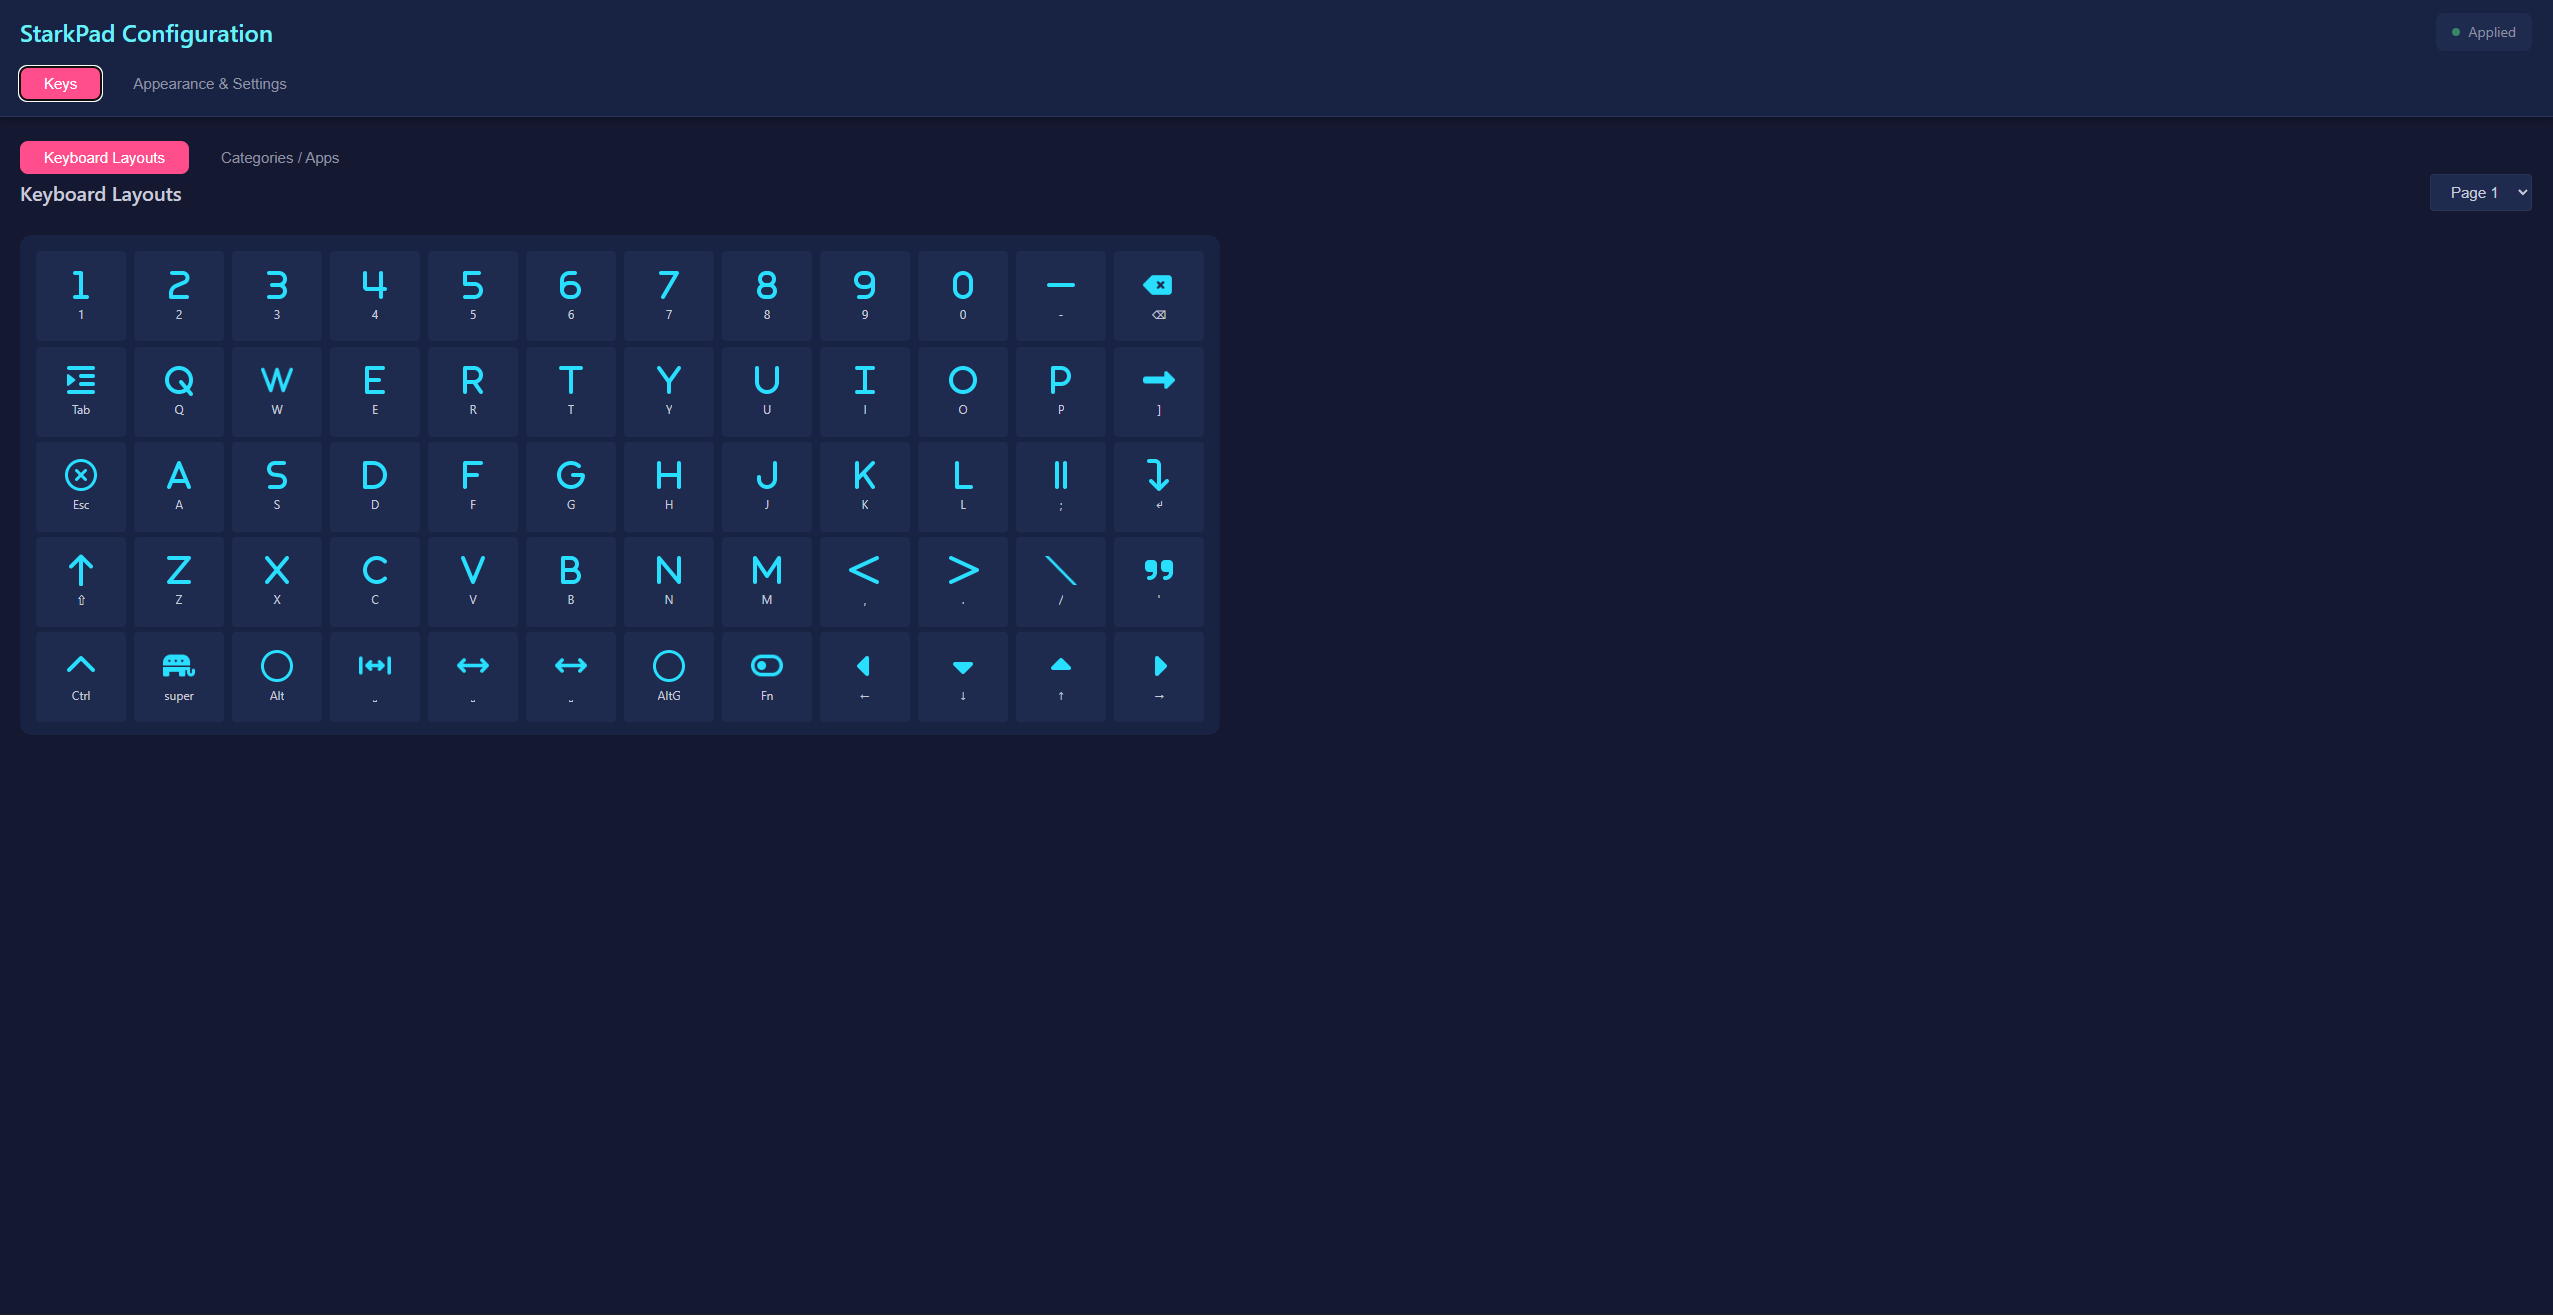
You can configure macros and layouts via the web interface:
* **URL:** `http://starkpad-uno-q.local/`
* **Username:** `admin`
* **Password:** `starkpad123`
---
## ✅ Installation Complete!
Congratulations! Your Starkpad is now fully assembled and configured.
### Next Steps
- **Learn how to use it:** Read the [User Manual](USER_MANUAL.md) for detailed instructions on the Keyboard, Touchpad, and Macro Grid modes.
- **Customize your layouts:** Access the Web UI at `http://starkpad-uno-q.local/` to configure buttons, icons, and themes.
- **Troubleshooting:** If something isn't working, check the [Troubleshooting section](USER_MANUAL.md#7-troubleshooting) in the User Manual.
---
*Installation Manual - Starkpad Project*