# Testing Android In-App Purchases: Complete Guide
This guide covers testing Android in-app purchases using Google Play Console and various testing methods.
## Recommended Testing Method: License Testing
**License Testing** is the best approach for Android IAP development:
- **No app uploads** - Test with debug builds directly
- **Multiple test scenarios** - Various payment responses
- **Fast iteration** - No review process delays
- **Free testing** - No charges for test purchases
- **Real billing flow** - Simulates actual Google Play integration
**Play Billing Lab** (optional advanced testing):
- Download: [Play Billing Lab](https://play.google.com/store/apps/details?id=com.google.android.apps.play.billingtestcompanion)
- Test different regions and payment methods
- Must be a license tester to access
## Prerequisites
- **Google Play paid developer account** ($25 one-time fee)
- **App already released in Google Play Console**
- **Billing permission** in your `AndroidManifest.xml`:
```xml
```
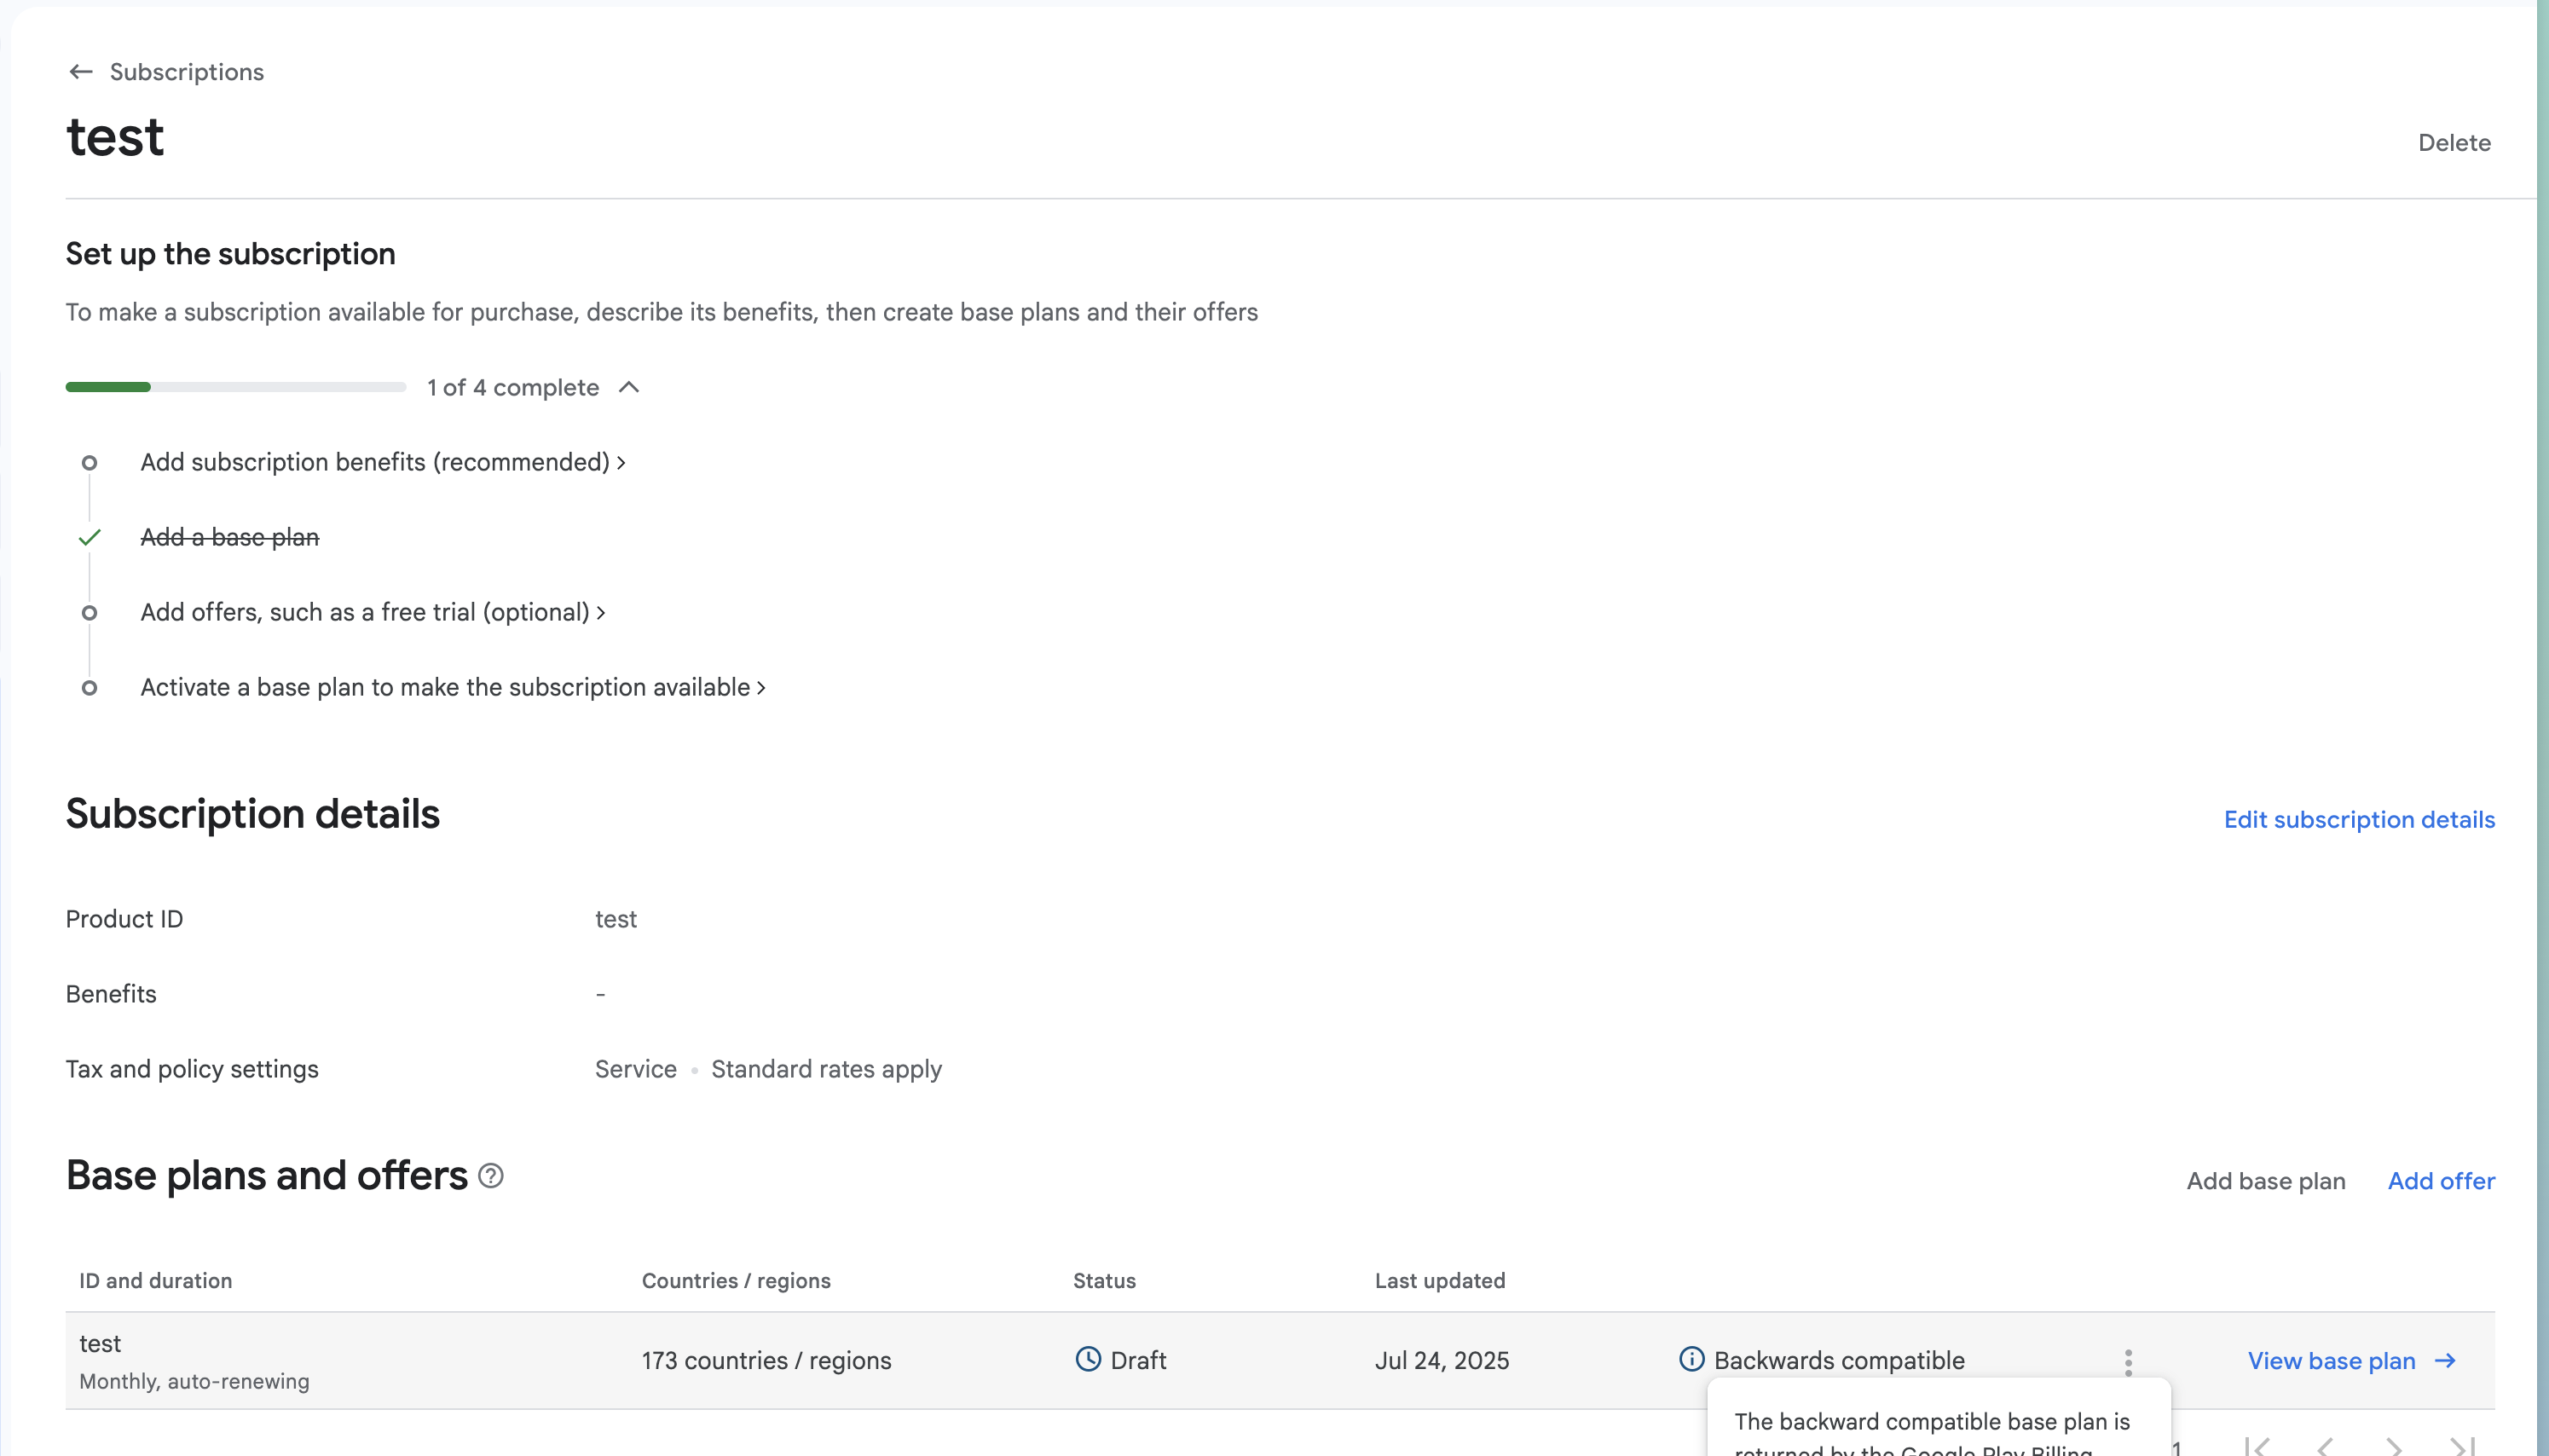
## Product Configuration
1. **Navigate to Monetize → Products**
2. **Create In-App Products**
- Product ID (must match your code)
- Title and description
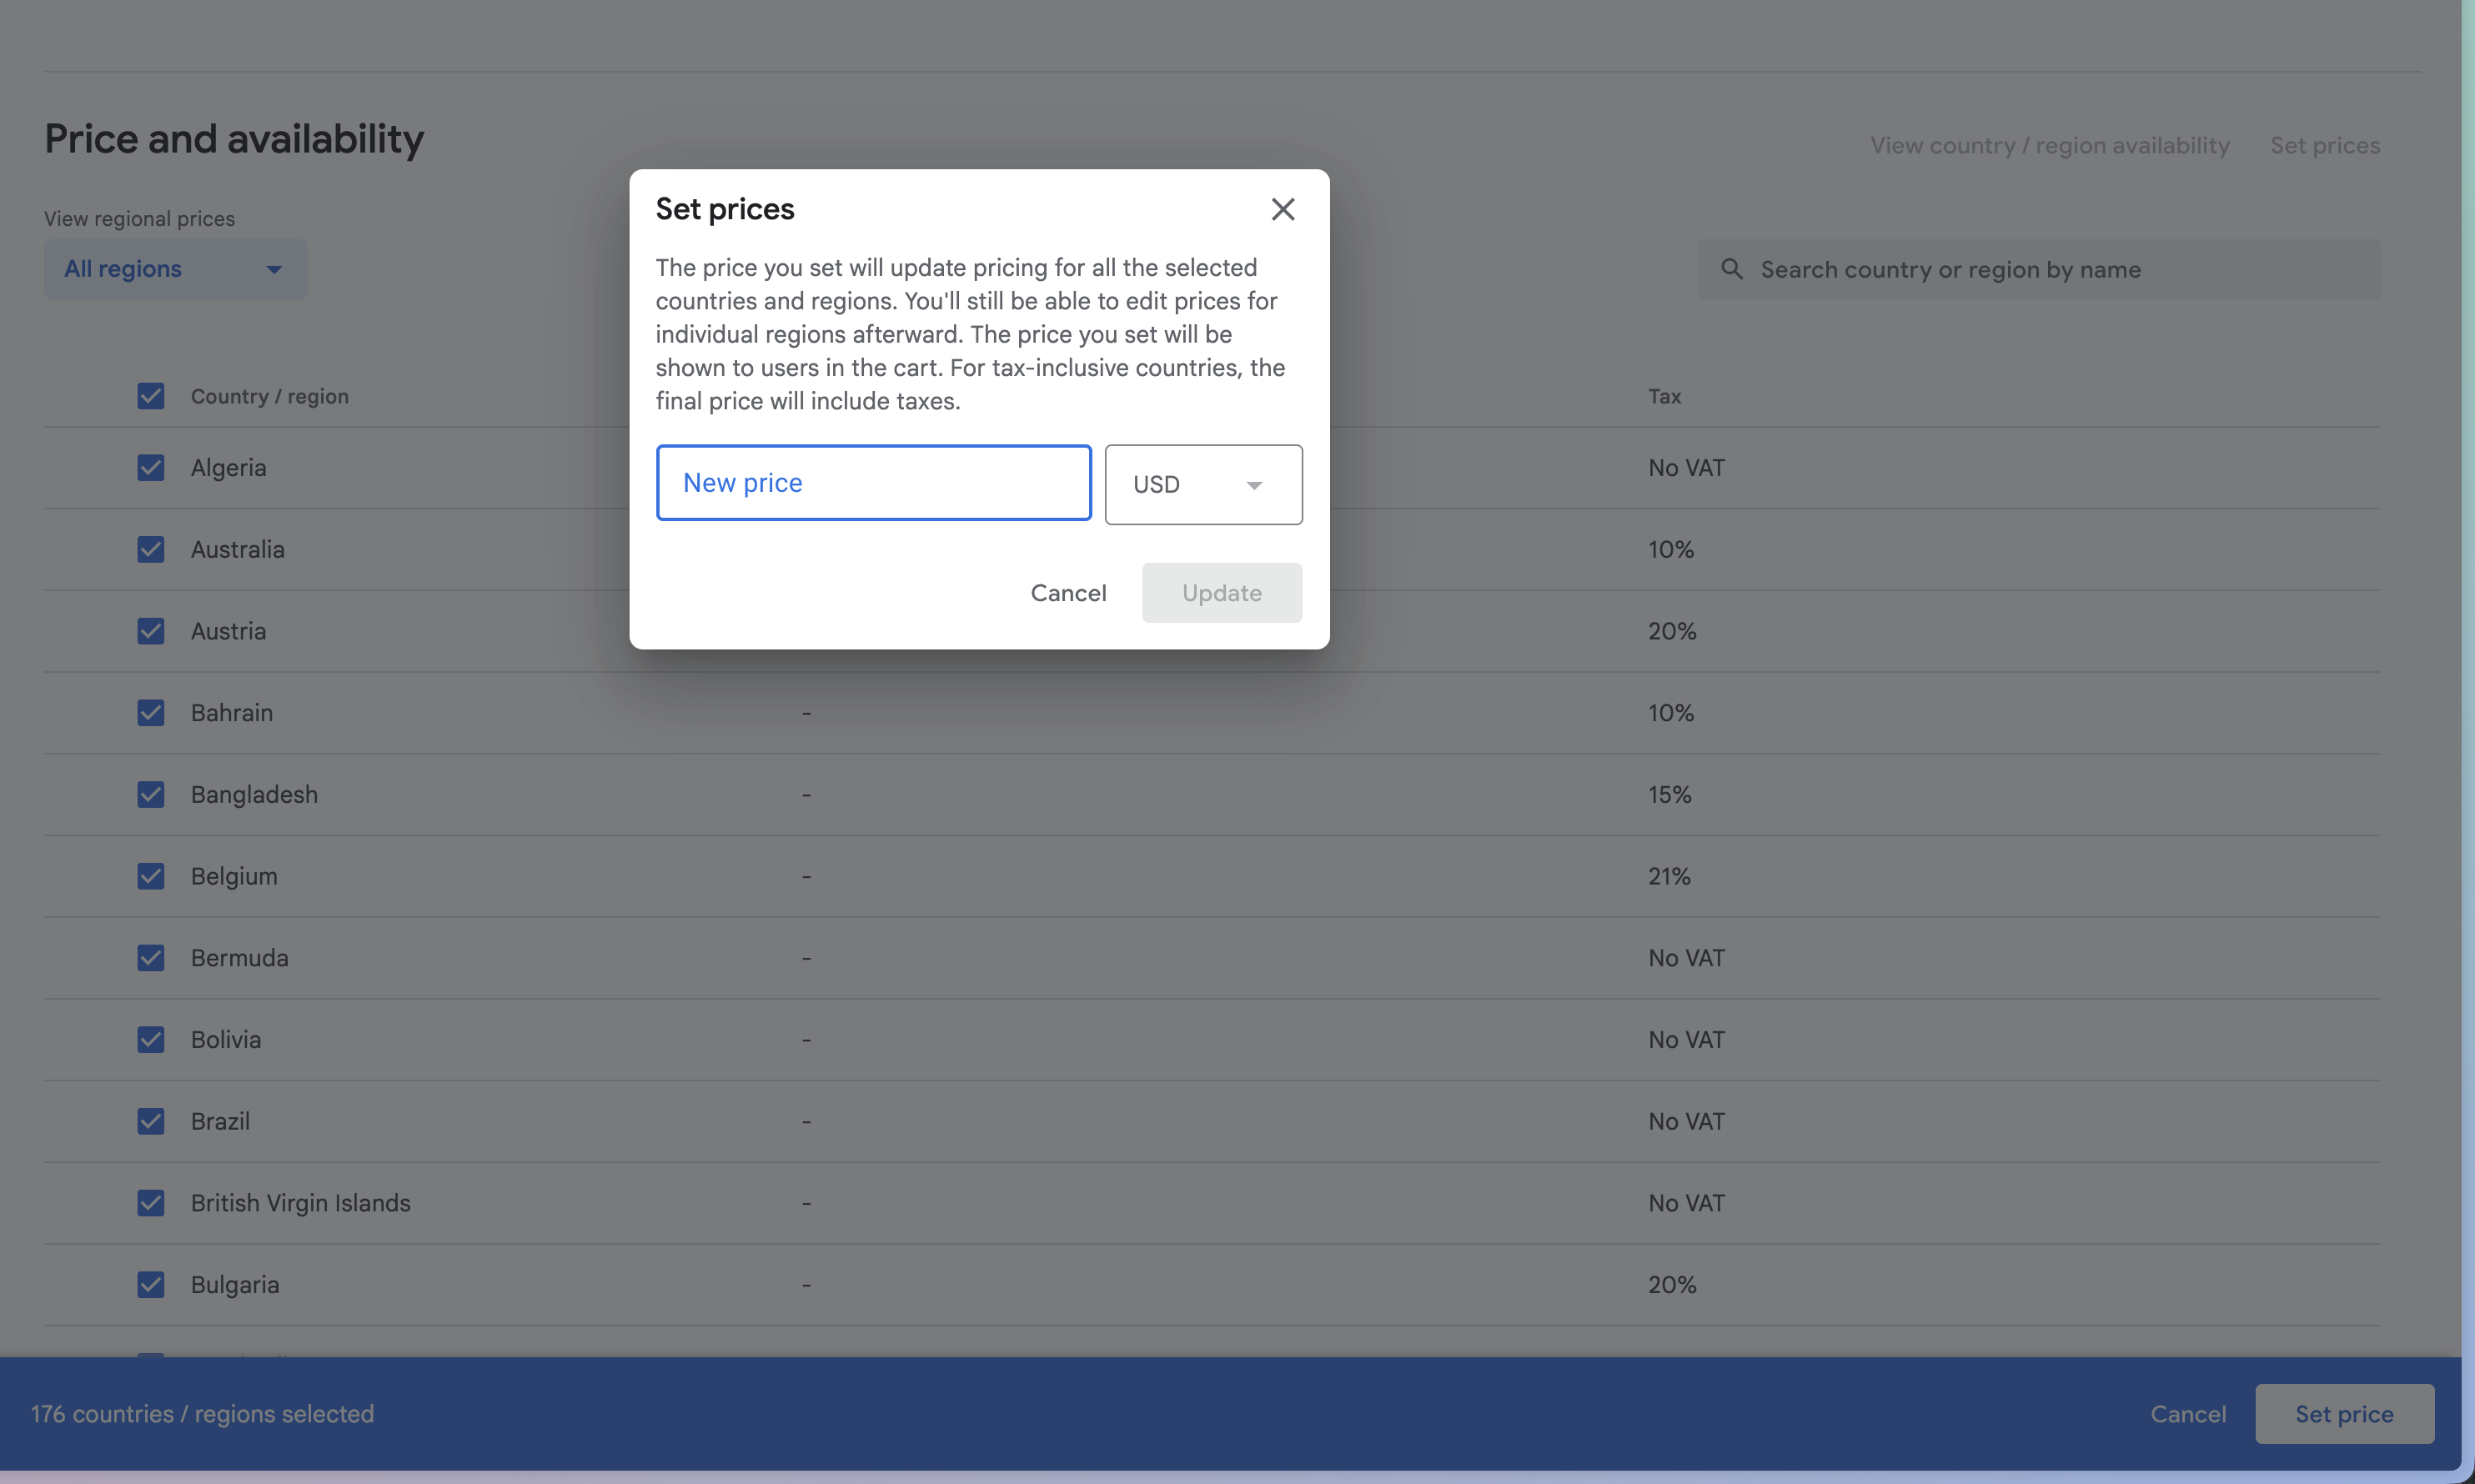
- Price in your default currency
- Activate the product
## License Testing Setup
### Step 1: Configure License Testers
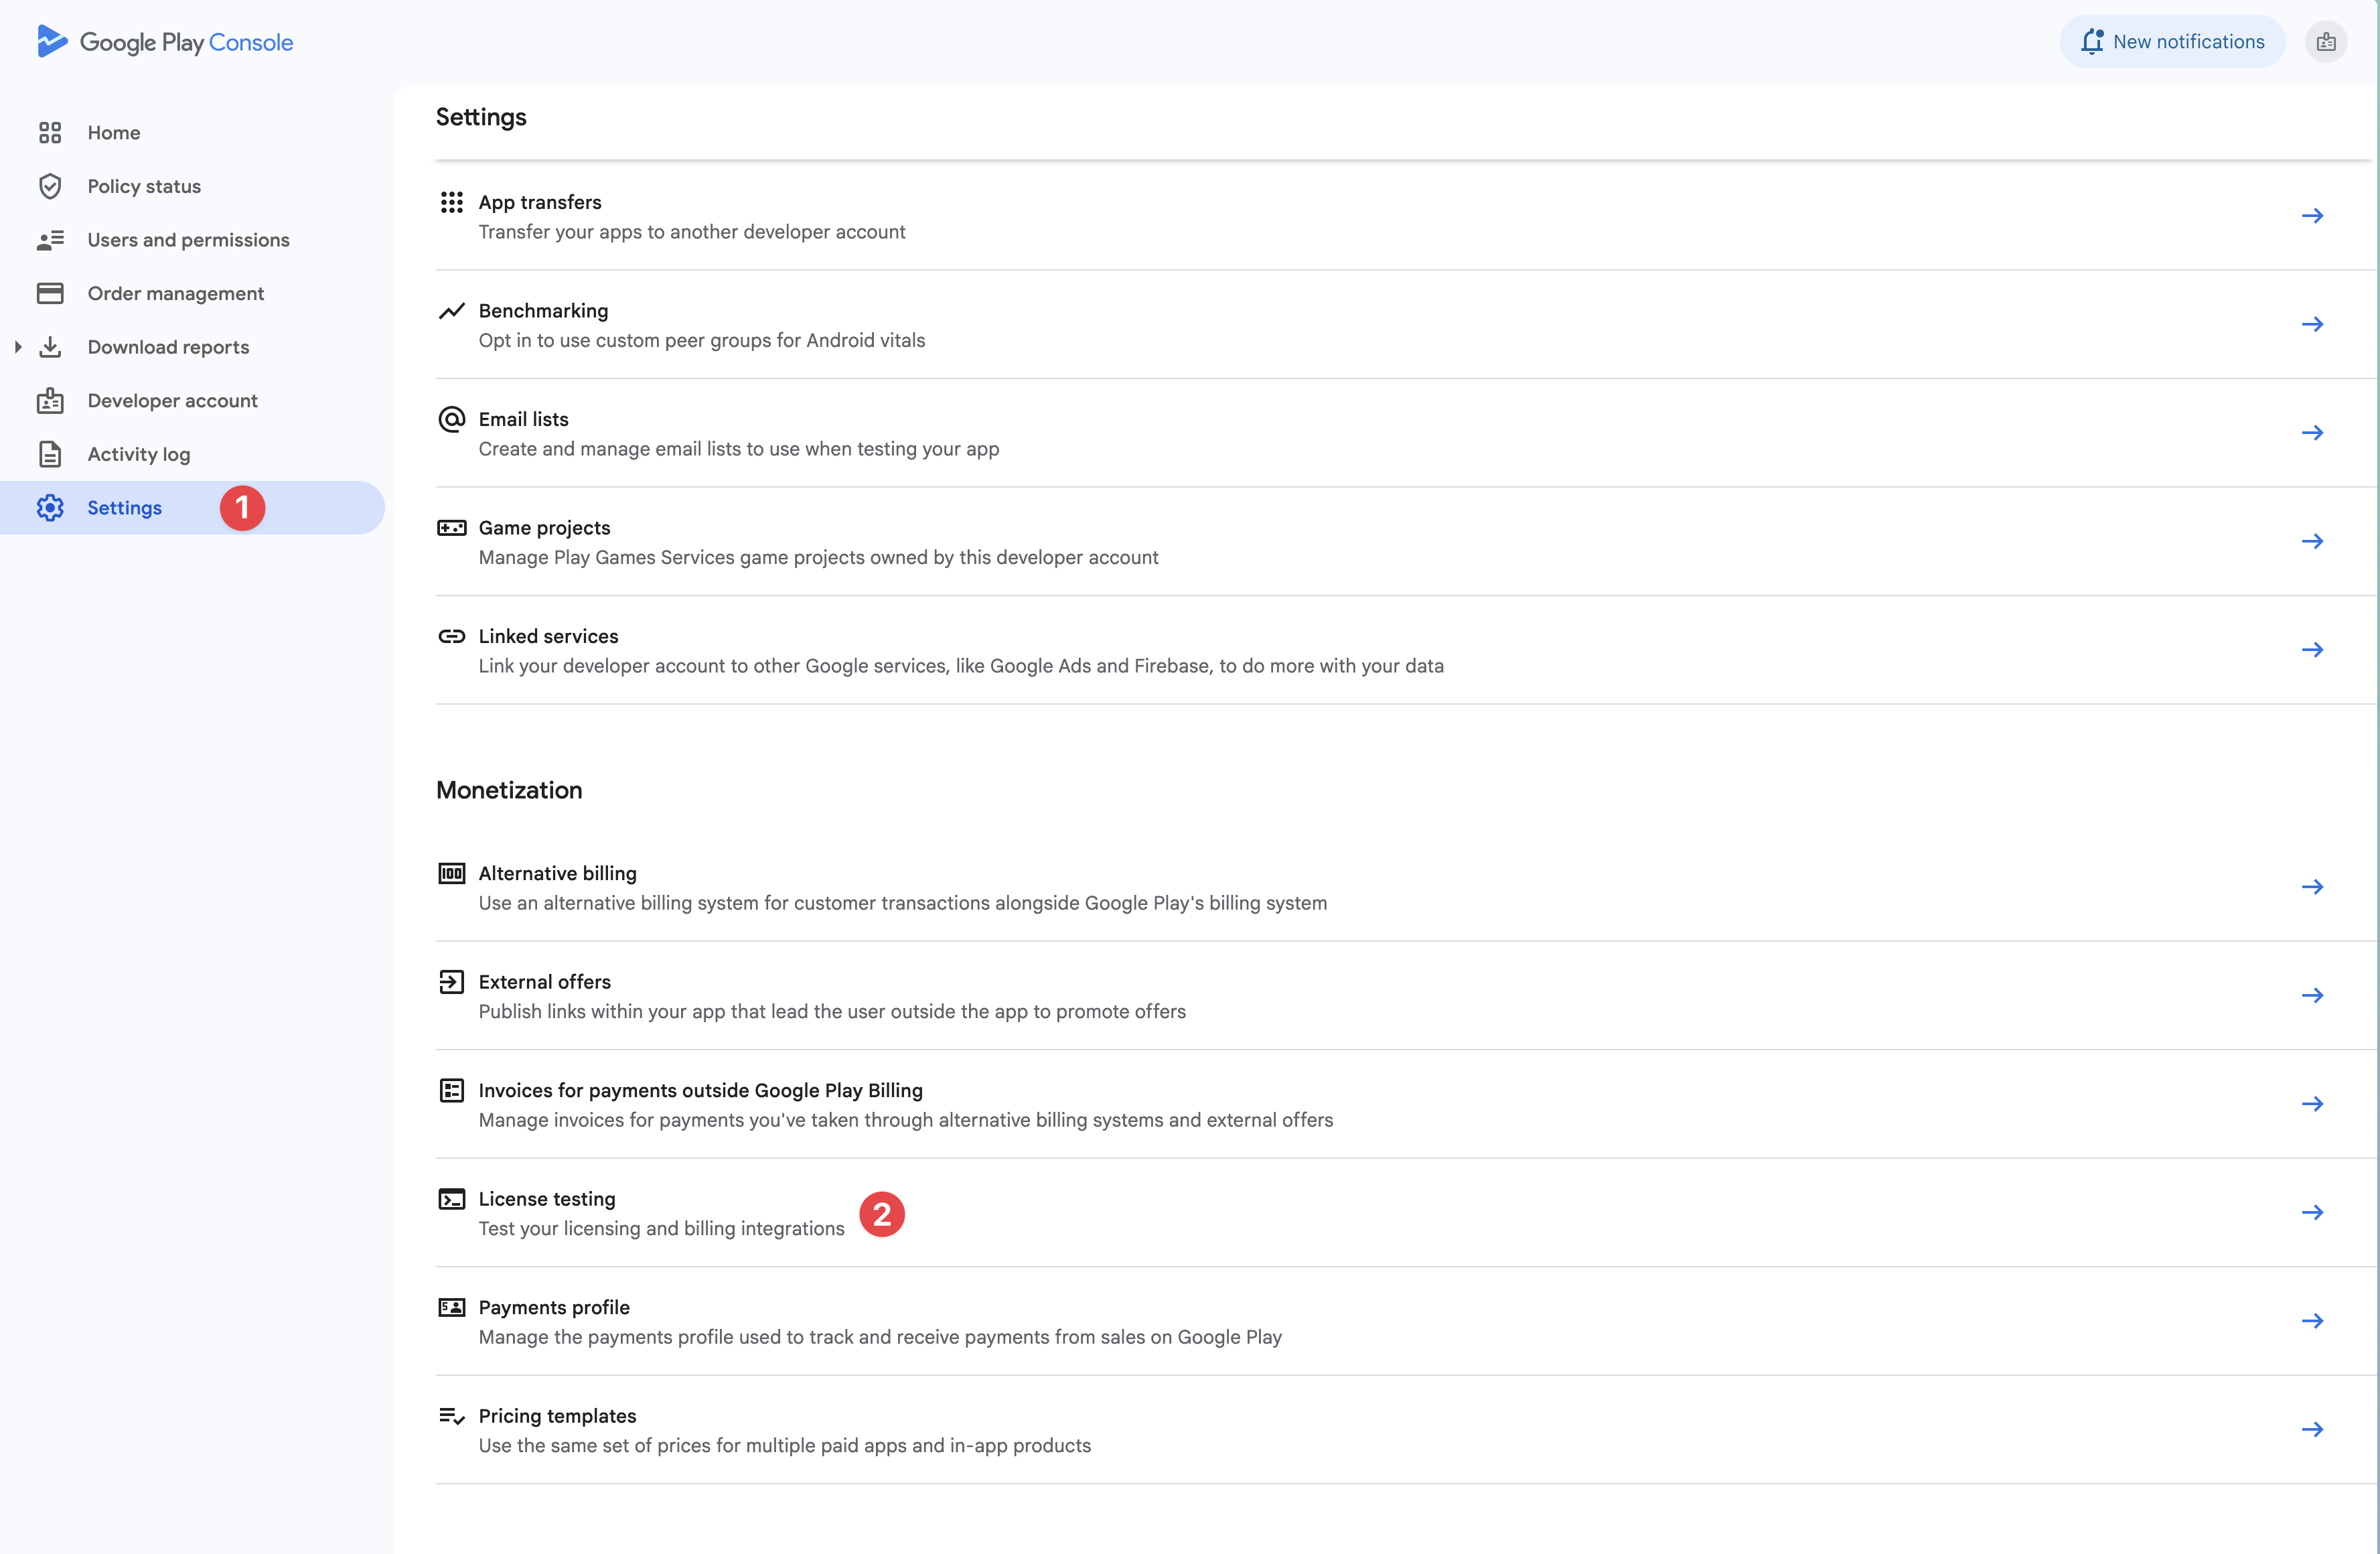
1. **Go to Settings → License testing** in Play Console
2. **Add Gmail accounts** under "License testers" section
- Enter email addresses (one per line)
- Must be valid Gmail accounts
- Testers will receive email invitation
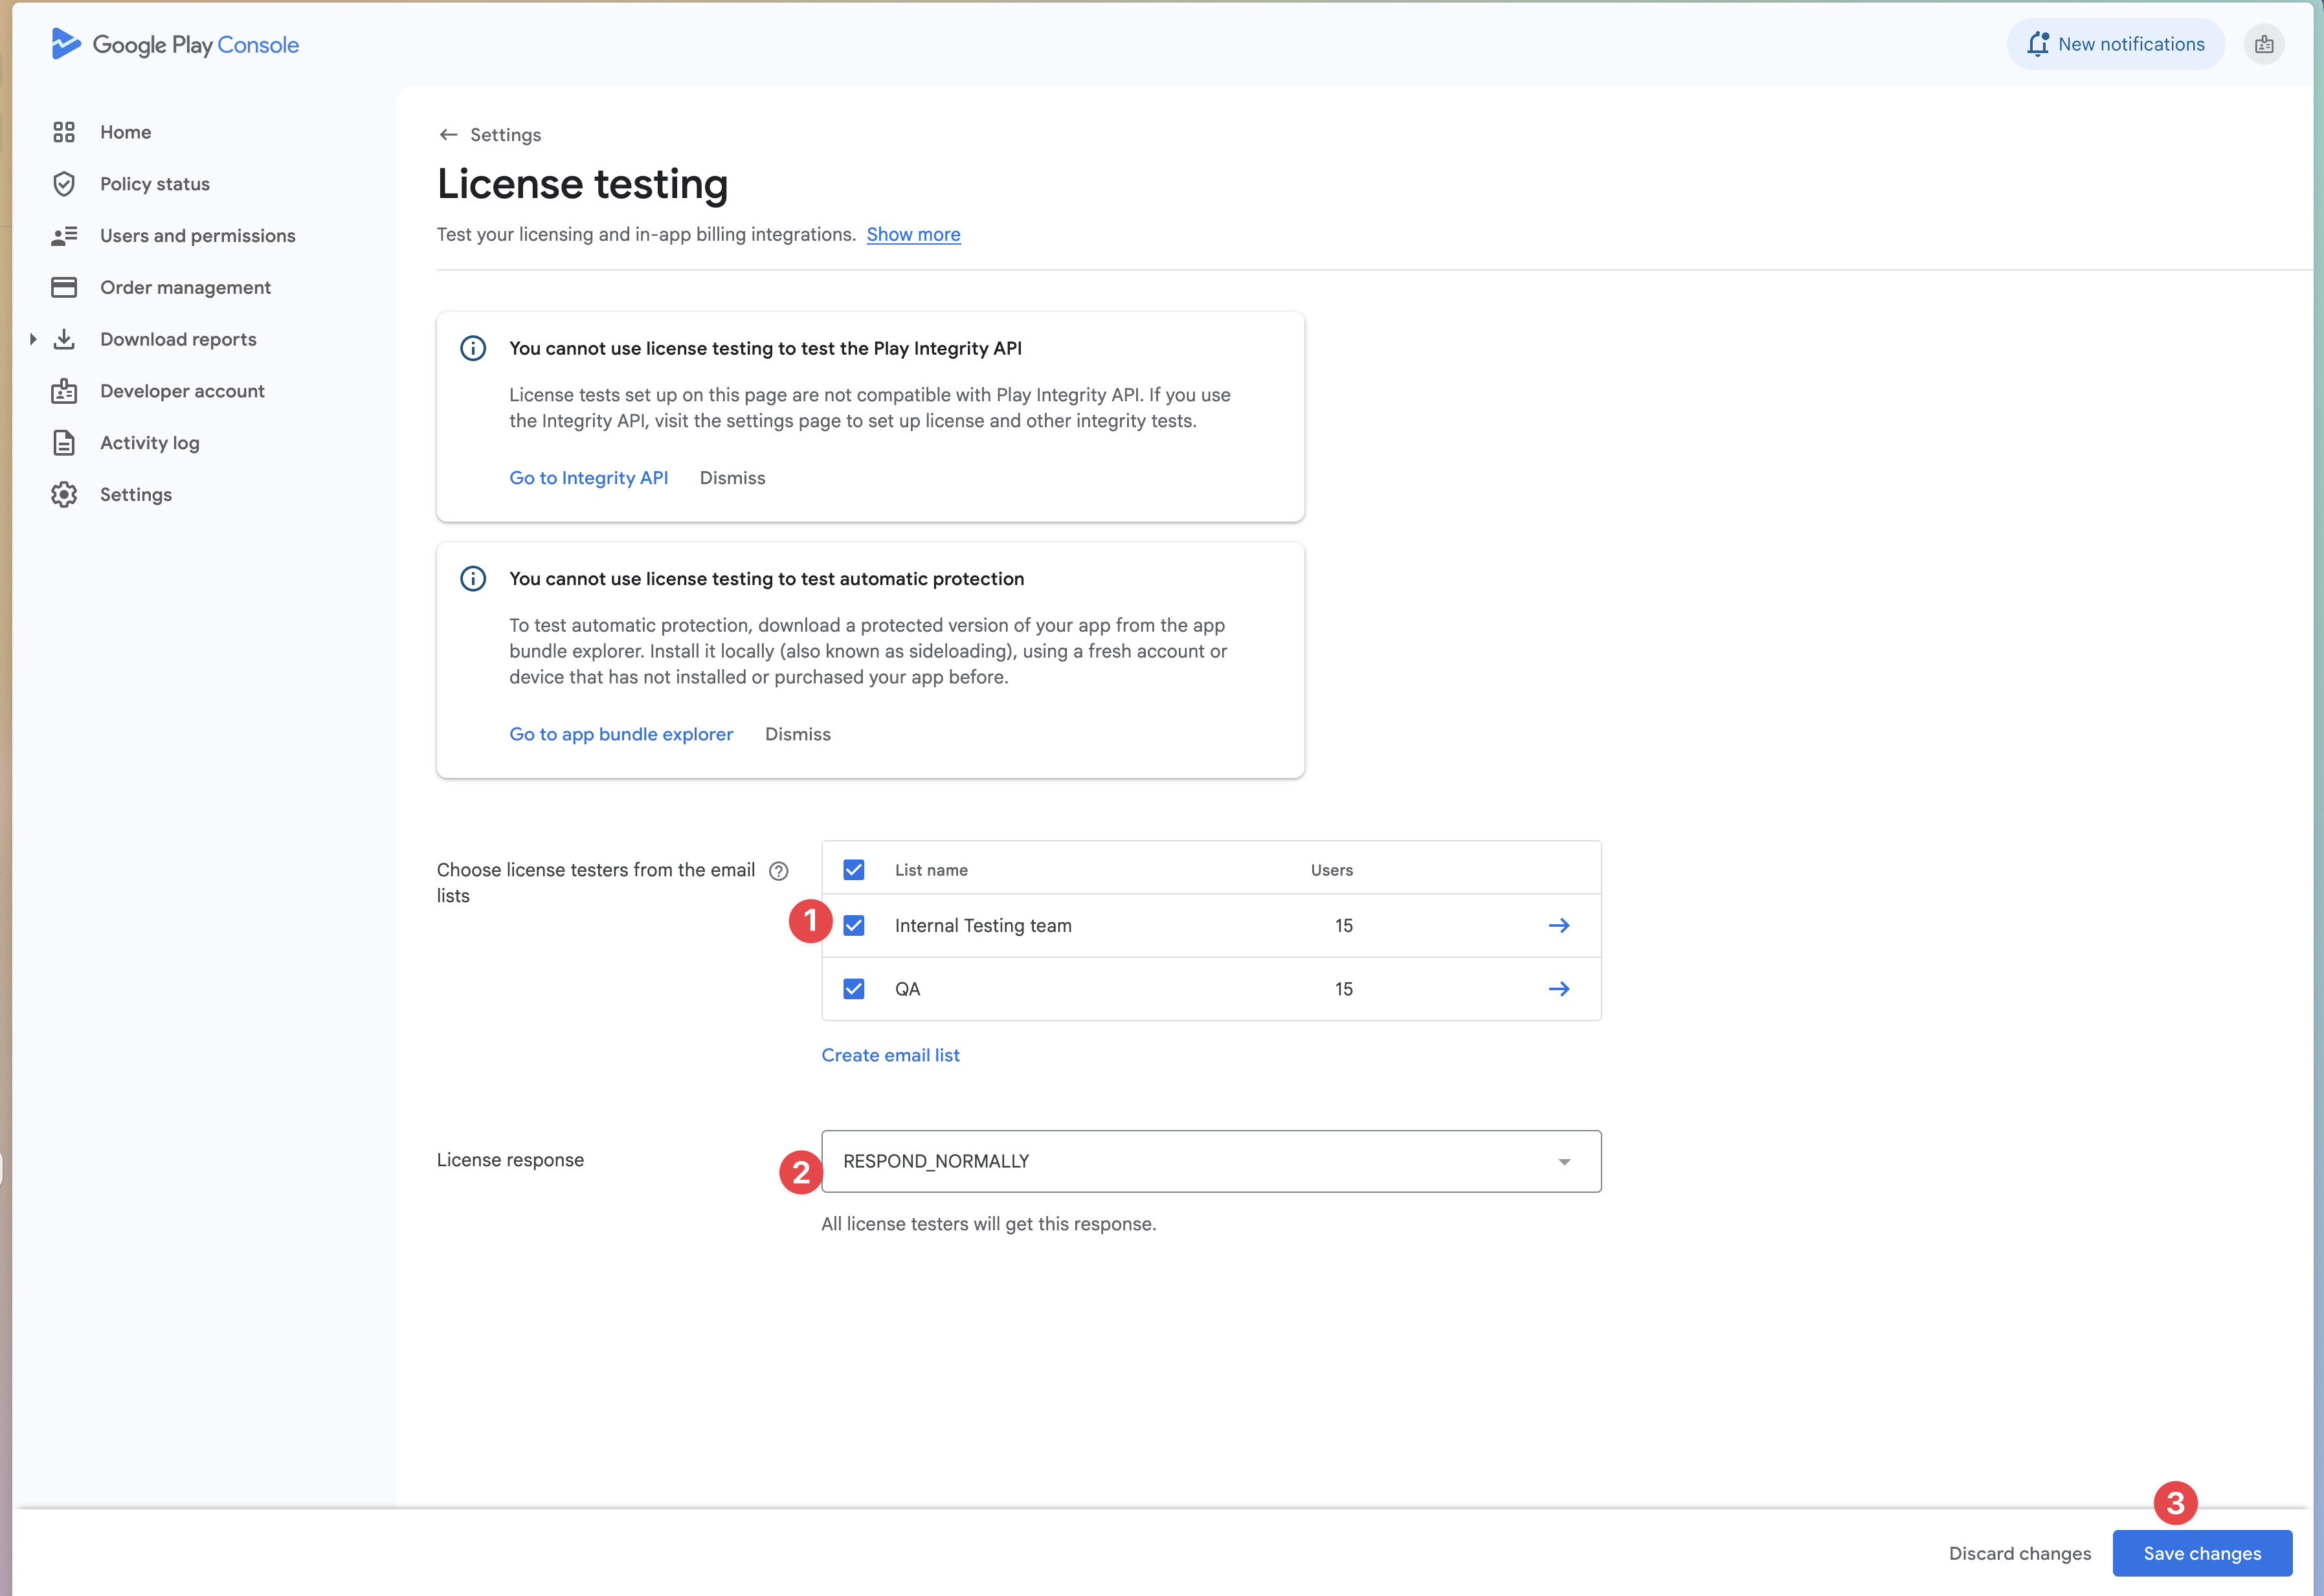
3. **Configure test responses:**
- **PURCHASED** - Simulates successful purchase
- **CANCELED** - Simulates user cancellation
- **UNAVAILABLE** - Simulates product unavailable
- **ITEM_ALREADY_OWNED** - Simulates already purchased
**License Tester Benefits:**
- Can sideload debug builds without uploading to Play Store
- Bypass Google Play signature verification
- Test with various payment methods including test instruments
- No real charges for test purchases
### Step 2: Test with License Accounts
1. **Sign in** to test device with license testing account
2. **Install app** (can be debug build or sideloaded APK)
3. **Available test instruments:**
- Test card (always approves)
- Test card (always declines)
- Slow test card (approves after few minutes)
- Slow test card (declines after few minutes)
4. **Test purchases** - responses will be simulated based on your configuration
5. **No real transactions** are processed
**Testing Benefits:**
- Works with debug builds and custom signatures
- No need to upload to Play Store for each test
- Test various payment scenarios with test instruments
- Ideal for automated testing flows
> ⚠️ **Note**: License testing uses simulated responses, so it's good for testing purchase flow but not for validating real Google Play integration.
## Play Billing Lab Testing (Optional)
### Setup Play Billing Lab
1. **Download from Play Store:** [Play Billing Lab](https://play.google.com/store/apps/details?id=com.google.android.apps.play.billingtestcompanion)
- Only accessible to license testers
2. **Sign in** with your license tester account
3. **Configure testing settings:**
- Select test country/region
- Enable real payment methods (requires permissions)
- Apply configuration changes
### Regional Testing
1. **Select desired country** in Play Billing Lab
2. **Apply changes** and restart your app
3. **Test purchase flow** in selected region
4. **Verify pricing** and currency display
**Alternative without Play Billing Lab:**
- Create Gmail account in target country
- Use VPN to desired region
- Clear Play Store data/cache between tests
### Real Payment Method Testing
**Note:** Requires special permissions from Google Play Business Development.
1. **Enable real payment methods** in Play Billing Lab
2. **Test with actual payment instruments**
3. **Request refunds** for test purchases to avoid charges
## Testing Scenarios
### Basic Purchase Testing
1. **Load products** using your product IDs
2. **Initiate purchase** for each product type
3. **Handle purchase result**:
- Success → Acknowledge purchase
- Pending → Wait for completion
- Error → Handle gracefully
### Pending Transaction Testing
Test pending transactions using license testers with slow test cards:
1. **Test declining payment:**
- Use "Slow test card, declines after a few minutes"
- Purchase should show as `PENDING` initially
- After few minutes, purchase fails
- Verify app handles failure gracefully
2. **Test approving payment:**
- Use "Slow test card, approves after a few minutes"
- Purchase shows as `PENDING` initially
- After few minutes, purchase becomes `PURCHASED`
- Verify app grants access when state changes
### Acknowledgment Testing
**CRITICAL**: All purchases must be acknowledged within 3 days or they will be automatically refunded.
```typescript
// Example acknowledgment
import { NativePurchases } from '@capgo/native-purchases';
try {
const purchases = await NativePurchases.queryPurchases();
for (const purchase of purchases.purchases) {
if (purchase.purchaseState === 'PURCHASED' && !purchase.acknowledged) {
await NativePurchases.acknowledgePurchase({
purchaseToken: purchase.purchaseToken
});
}
}
} catch (error) {
console.error('Acknowledgment failed:', error);
}
```
## Testing Tools and Debugging
### 1. Google Play Console Testing Tools
- **Order management** - View all test transactions
- **Financial reports** - Analyze test transaction data
### 2. Android Debug Logging
Add comprehensive logging to track purchase flow:
```typescript
console.log('🔍 Querying products:', productIds);
console.log('📦 Products found:', products.length);
console.log('💳 Launching purchase for:', productId);
console.log('✅ Purchase successful:', purchase.orderId);
```
### 3. Testing Checklist
- [ ] Products load correctly
- [ ] Purchase flow completes
- [ ] Purchases are acknowledged
- [ ] Error scenarios handled gracefully
- [ ] Network failures handled properly
## Troubleshooting Common Issues
### Products Not Loading
1. **Check Google Play Console**:
- Products are created and activated
- App is published (at least to internal testing)
- Correct package name and signing
2. **Verify API Integration**:
- Correct product IDs in code
- Proper billing client initialization
- Network connectivity on device
3. **Account Issues**:
- Test account has payment method
- Account region matches product availability
- Not using developer account for purchases (use test account)
### Purchase Failures
1. **Common Causes**:
- Missing payment method
- Insufficient funds
- VPN interfering with location
- App not properly signed
2. **Debug Steps**:
- Check BillingResult response codes
- Verify purchase token generation
- Test with different accounts
- Check Google Play Console logs
### Testing Environment Issues
1. **Device Requirements**:
- Google Play Store installed and updated
- Google Play Services available
- Valid Google account signed in
2. **App Requirements**:
- Proper signing (release or debug keystore)
- Correct package name
- Compatible Android version
## Advanced Testing Scenarios
### 1. Multi-Device Testing
- **Purchase on Device A** → Verify on Device B
- **Purchase status sync** across devices
- **Offline purchase** → Sync when online
### 2. Already Owned Products
Test scenarios where user already owns a product:
- **Attempt to purchase again** → Should show "already owned"
- **Restore purchases** → Verify owned status
## Google Play Product Display Guidelines
### 📋 Recommended Practices
While Google Play is less strict than Apple, following these practices improves user experience and compliance:
### Best Practices for Product Display
1. **Use Real Product Data**
```typescript
// Recommended: Use actual product details
product.title // Product name from Play Console
product.priceString // Formatted price
product.description // Product description
```
2. **Handle Localization**
```typescript
// Google Play handles currency conversion automatically
const price = product.priceString;
// Displays as "$9.99", "€8.99", "¥1000", etc. based on user's region
```
3. **Dynamic Content Benefits**
- **Automatic currency conversion** for international users
- **Tax inclusion** where required by local law
- **Promotional pricing** updates automatically
- **A/B testing** price changes through Play Console
### ❌ Not Recommended
```typescript
// Avoid hardcoded values
Premium Plan - $9.99
// Static price
```
### ✅ Recommended
```typescript
// Use dynamic product data
{product.title} - {product.priceString}
```
### Testing Product Display
- [ ] **Prices** show in correct local currency
- [ ] **Names** match Play Console configuration
- [ ] **Descriptions** display properly
- [ ] **Special offers** appear when configured
> 💡 **Note**: Unlike iOS, Google Play won't reject apps for hardcoded prices, but using dynamic data provides better user experience and international support.
## Security and Validation
### 1. Server-Side Verification
Always verify purchases on your server:
```typescript
// Send purchase token to your server for verification
const purchaseData = {
purchaseToken: purchase.purchaseToken,
productId: purchase.productId,
orderId: purchase.orderId
};
// POST to your verification endpoint
await fetch('/api/verify-purchase', {
method: 'POST',
headers: { 'Content-Type': 'application/json' },
body: JSON.stringify(purchaseData)
});
```
### 2. Local Verification
Verify purchase signature locally:
```typescript
import { NativePurchases } from '@capgo/native-purchases';
async function verifyPurchase(purchase: any): Promise {
try {
// Verification is handled by the native layer
// Just check if purchase is valid
return purchase.purchaseState === 'PURCHASED' &&
purchase.purchaseToken &&
purchase.signature;
} catch (error) {
console.error('Verification failed:', error);
return false;
}
}
```
## Best Practices
### For Development
- Use **Internal Testing** for most development work
- Test with multiple Google accounts
- Verify purchase acknowledgment timing
- Test offline/online scenarios
### For Pre-Release
- Test with **License Testing** for automated flows
- Verify payment failure scenarios
- Validate server-side verification
### For Production
- Monitor purchase completion rates
- Track acknowledgment timing
- Handle all possible billing result codes
- Implement robust retry mechanisms
## Testing Timeline
**Week 1-2**: Basic setup and product testing
- Set up Google Play Console
- Create products and test accounts
- Implement basic purchase flow
**Week 3-4**: Advanced scenarios
- Test error handling
- Test multi-device scenarios
**Week 5+**: Production preparation
- Server-side verification
- Security hardening
- Performance optimization
## Additional Resources
- [Google Play Billing Documentation](https://developer.android.com/google/play/billing)
- [Play Console Help](https://support.google.com/googleplay/android-developer/)
- [Billing Library Integration Guide](https://developer.android.com/google/play/billing/integrate)
- [Official Testing Guide](https://developer.android.com/google/play/billing/test#billing-testing-test)
---
## Images Status
### 📸 Screenshots Needed
The following screenshots should be captured to complete this visual guide:
**Google Play Console (3 images still needed):**
- ✅ `edit_product_android.png` - Product creation interface (added)
- ✅ `set_price_android.png` - Product pricing setup (added)
- ✅ `license_testing.png` - License testing configuration (added)
- ✅ `license_testing_add_users.png` - Adding license testers (added)
- 📸 `internal-testing-setup.png` - Internal testing track setup
- 📸 `internal-app-sharing.png` - Internal app sharing interface
- 📸 `order-management.png` - Order management dashboard
**Android Device (2 images still needed):**
- 📸 `android-purchase-flow.png` - Google Play purchase dialog
- 📸 `google-play-testing.png` - Testing environment indicators
### 📋 How to Capture Screenshots
1. **Google Play Console**: Use browser screenshots at 1920x1080 resolution
2. **Android Device**: Use device screenshots or emulator captures
3. **Optimization**: Compress images to maintain < 300KB file sizes
4. **Annotations**: Add arrows/highlights to important UI elements
Once screenshots are added, update the image references in this guide and remove this section.
---
*This guide provides comprehensive coverage of Android in-app purchase testing methods and best practices.*