# NSO Playground - System Install
[](https://developer.cisco.com/codeexchange/devenv/CiscoDevNet/NSO-Playground-System-Install)
Explore and experiment with the world of NSO on Cisco Code Exchange, where you can dive right in and try out examples in a user-friendly browser-based integrated development environment (IDE).
But wait, there's more! You can also contribute your examples and share them with everyone. The best part is your peers can play with your examples without installing anything.
If you are new to NSO, start with the [NSO Learning Labs](https://developer.cisco.com/learning/search/?contentType=track,module,lab&keyword=nso&sortBy=luceneScore), where you can find step-by-step guides.
## Variants
Two **flavors** of the NSO Playground are available. Choose the environment that suits you best:
- Local install. [See the Local Install repository for more information.](https://github.com/CiscoDevNet/NSO-Playground-Local-Install)
- System install. Based on the official NSO container.
- The environment associated with this repository.
See [this guide](https://developer.cisco.com/docs/nso/#!getting-and-installing-nso/local-vs-system-installation) to learn the difference between System and Local install.
The rest of this guide focuses on the System Install option.
## Explore
Click [here to start using Cisco Cloud IDE.](https://developer.cisco.com/codeexchange/devenv/CiscoDevNet/NSO-Playground-System-Install)
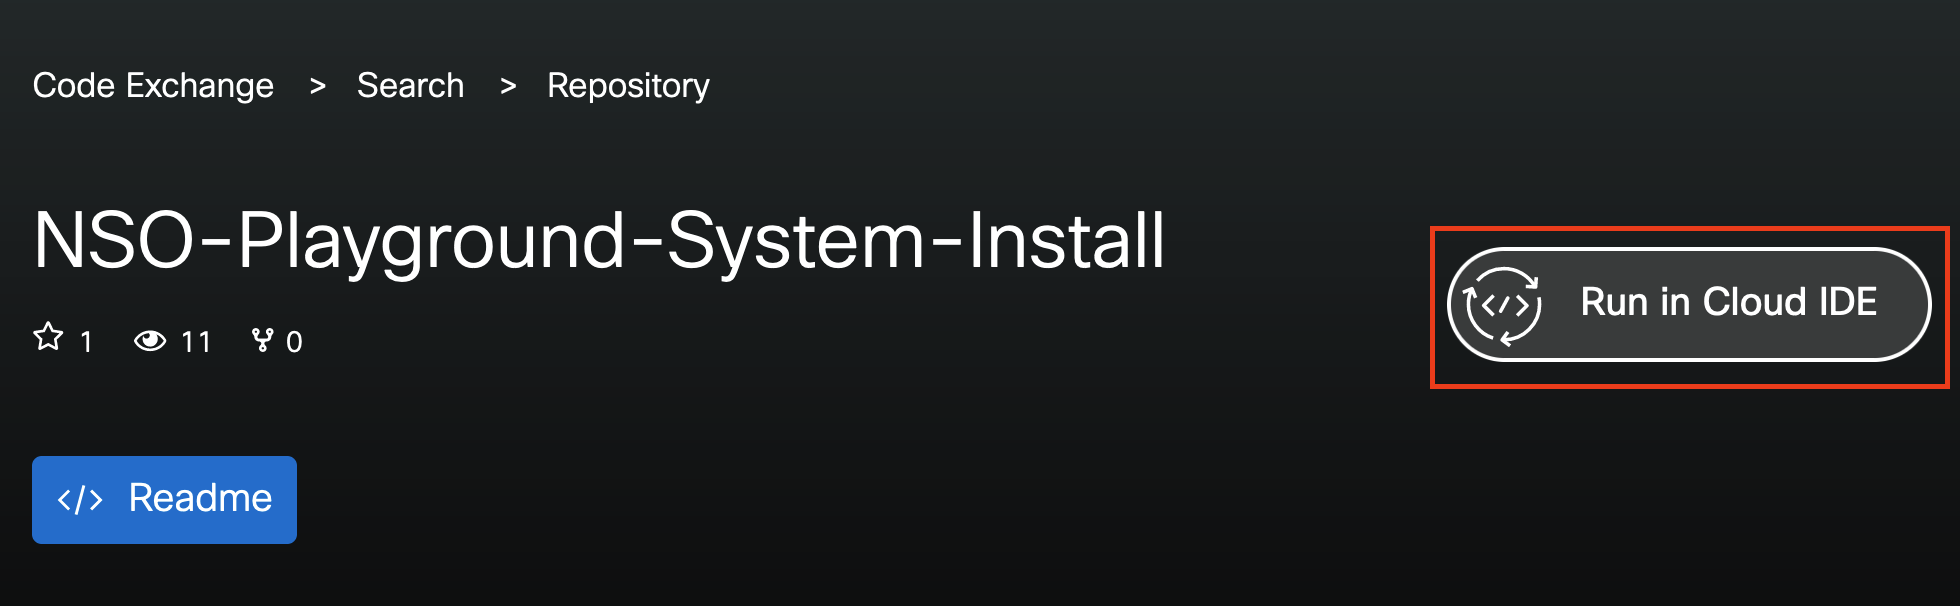
Or go to [Cisco Code Exchange](https://developer.cisco.com/codeexchange/github/repo/CiscoDevNet/NSO-Playground-System-Install/) and start the environment. Click on the **Run in Cloud IDE** button on the right side of the Repo title.
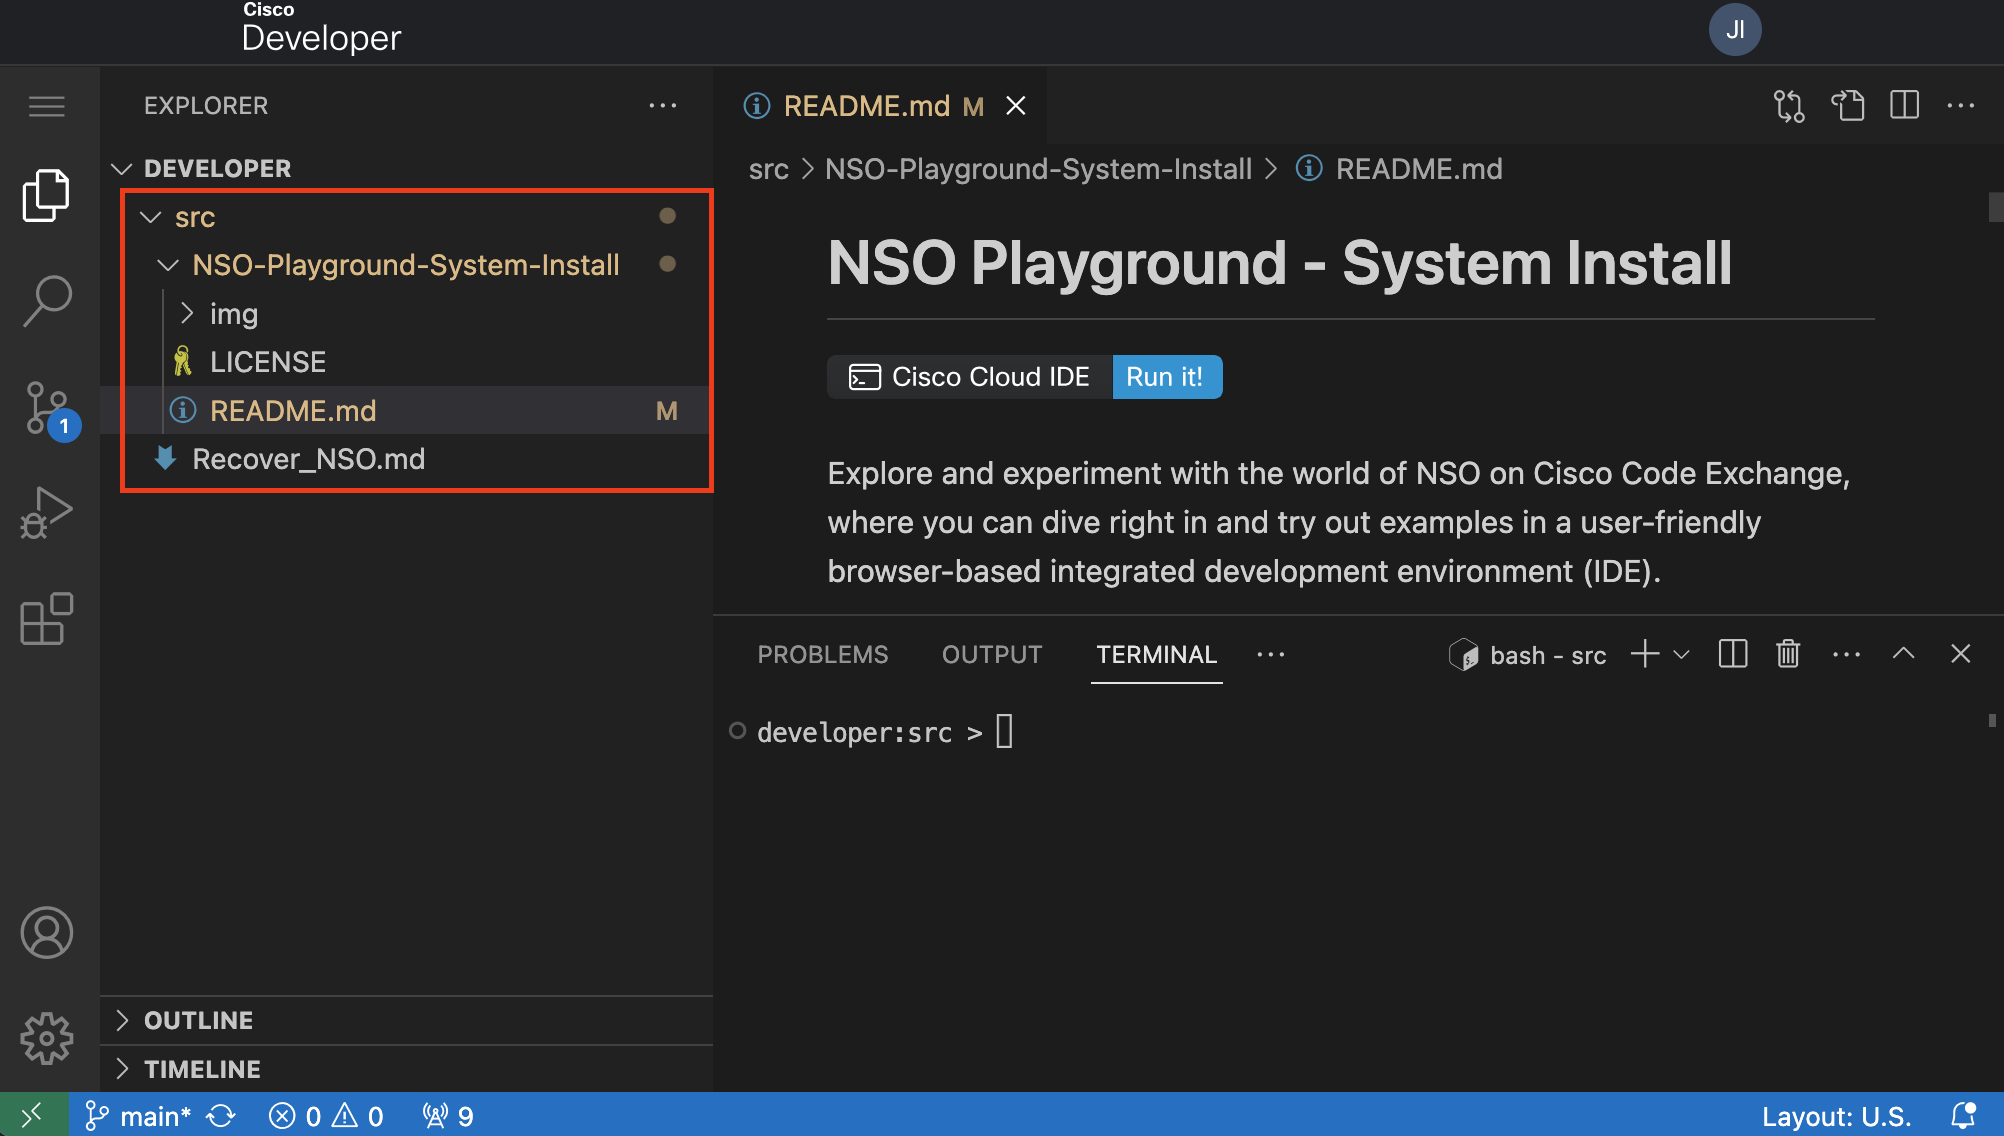
 Once you click the **Run in Cloud IDE** button, a Cloud IDE instance with the Github repository appears. **You find your code under the ~/src directory.**
> **_NOTE:_** Click on the **src** directory to expand it and see the code of the repo cloned. **Pay attention to the directory structure of the workspace.**
Once you click the **Run in Cloud IDE** button, a Cloud IDE instance with the Github repository appears. **You find your code under the ~/src directory.**
> **_NOTE:_** Click on the **src** directory to expand it and see the code of the repo cloned. **Pay attention to the directory structure of the workspace.**
 ## How can I add my own example?
To create a new example, follow these steps.
> **_NOTE:_** You must use your own repositories.
1. Develop your example locally on your computer.
1. You can also develop an example on the Playground, but keep in mind the guidelines, especially the 2-hour container lifespan.
2. Push your example to the default branch of your GitHub repository.
3. In your README.md file, specify the NSO variant (System, Local install) you used for your example.
4. Submit your repository on
5. Once your submission is approved, your repository will be featured on the [Cisco Cloud IDE.](https://developer.cisco.com/codeexchange/search/?complexity=devenv)
6. Congratulations! You can now start exploring, playing, and sharing your awesome examples. Let your creativity flow!
## Need help?
[You can open an issue on the NSO Local install repository](https://github.com/CiscoDevNet/NSO-Playground-Local-Install/issues) to ask for help, share feedback, or request new features.
## Need an example?
You can try the following example to get familiar with the Cloud IDE Environment. Copy or type the next commands into the **VS Code terminal.**
## How can I add my own example?
To create a new example, follow these steps.
> **_NOTE:_** You must use your own repositories.
1. Develop your example locally on your computer.
1. You can also develop an example on the Playground, but keep in mind the guidelines, especially the 2-hour container lifespan.
2. Push your example to the default branch of your GitHub repository.
3. In your README.md file, specify the NSO variant (System, Local install) you used for your example.
4. Submit your repository on
5. Once your submission is approved, your repository will be featured on the [Cisco Cloud IDE.](https://developer.cisco.com/codeexchange/search/?complexity=devenv)
6. Congratulations! You can now start exploring, playing, and sharing your awesome examples. Let your creativity flow!
## Need help?
[You can open an issue on the NSO Local install repository](https://github.com/CiscoDevNet/NSO-Playground-Local-Install/issues) to ask for help, share feedback, or request new features.
## Need an example?
You can try the following example to get familiar with the Cloud IDE Environment. Copy or type the next commands into the **VS Code terminal.**
 The examples that you can find from the NSO example set `$NCS_DIR/examples.ncs` run with a local installation of NSO.
The following instructions show you how to run the example `netsim-sshkey` with an NSO system installation where NSO is already running.
For a detailed explanation see the getting started guide: [Developing and Deploying a Nano Service](https://developer.cisco.com/docs/nso/guides/#!developing-and-deploying-a-nano-service/development) and the README file in the `$NCS_DIR/examples.ncs/development-guide/nano-services/netsim-sshkey/` directory.
In addition, a container-based variant of the example is available in the [NSO-Developer repository.](https://gitlab.com/nso-developer/nso-examples/-/tree/main/deployment/netsim-sshkey)
1. Build the packages and copy them to the NSO run-time directory.
```bash
EXAMPLE_DIR=${NCS_DIR}/examples.ncs/development-guide/nano-services/netsim-sshkey
# Temporary fix pre-NSO 6.1.4
sed -i.orig -e "s|user\[service.local_user\]|user\[service.remote_name\]|" $EXAMPLE_DIR/packages/distkey/python/distkey/distkey_app.py
for f in $EXAMPLE_DIR/packages/*/src; do make -C $f all; done
cp -r $EXAMPLE_DIR/packages/* $NCS_RUN_DIR/packages/
```
2. Reload the packages using the `ncs_cmd` tool through the NSO Management Agent API (MAAPI).
```bash
ncs_cmd -dd -c 'maction "/packages/reload"'
```
3. Create, configure NSO, and start three simulated devices.
```bash
ncs-netsim create-network $NCS_RUN_DIR/packages/ne 3 ex --dir ./netsim
ncs-netsim ncs-xml-init > devices_init.xml
ncs-netsim start
```
4. Configure a default authgroup for the developer user.
```bash
echo "config; devices authgroups group default umap developer remote-name admin remote-password admin; commit" | ncs_cli -C -u developer -g ncsadmin
```
5. Load the XML configuration files for device and service notification config using the `ncs_load` tool through NSO MAAPI.
```bash
ncs_load -dd -m -l devices_init.xml
ncs_load -dd -m -l $EXAMPLE_DIR/service_notif_init.xml
```
6. Generate keys, distribute the public key, and configure NSO for public key authentication with the three network elements.
```bash
ncs_cli -n -u developer -g ncsadmin -C << EOF
devices sync-from
config
pubkey-dist key-auth ex0 developer remote-name admin authgroup-name default passphrase "GThunberg18!"
top pubkey-dist key-auth ex1 developer remote-name admin authgroup-name default passphrase "GThunberg18!"
top pubkey-dist key-auth ex2 developer remote-name admin authgroup-name default passphrase "GThunberg18!"
commit dry-run
commit
EOF
```
7. Show the nano service plan status.
```bash
echo "show pubkey-dist key-auth plan component | tab | nomore" | ncs_cli -C -u developer -g ncsadmin
```
8. Show the configuration added to NSO and network elements.
```bash
ncs_cli -n -u developer -g ncsadmin -C << EOF
show running-config devices authgroups group umap developer
show running-config devices device authgroup
show running-config devices device config aaa authentication users user admin authkey | nomore
EOF
```
9. Show the generated private and public keys.
```bash
cat $NCS_RUN_DIR/*ed25519*
```
10. Delete the nano service to revert to password-based network element authentication.
```bash
ncs_cli -n -u developer -g ncsadmin -C << EOF
config
no pubkey-dist
commit dry-run
commit
EOF
```
11. Show the restored configuration for password authentication.
```bash
ncs_cli -n -u developer -g ncsadmin -C << EOF
show running-config devices authgroups group umap developer
show running-config devices device authgroup
show running-config devices device config aaa authentication users user admin authkey
EOF
```
### Explore and play with the NSO Example Collection
Go to `$NCS_DIR` > `examples.ncs` in the VS Code workspace or use the terminal.
```bash
cd $NCS_DIR/examples.ncs/
developer:examples.ncs > ll
total 28
drwxr-xr-x 1 developer ncsadmin 267 Jun 28 11:38 .
drwx------ 1 developer ncsadmin 294 Jul 18 13:33 ..
-rw-r--r-- 1 developer ncsadmin 27052 Jun 28 11:38 README
drwxr-xr-x 1 developer ncsadmin 27 Jun 28 11:05 crypto
drwxr-xr-x 1 developer ncsadmin 36 Jun 28 11:05 datacenter
drwxr-xr-x 1 developer ncsadmin 261 Jun 28 11:38 development-guide
drwxr-xr-x 1 developer ncsadmin 27 Jun 28 11:05 generic-ned
drwxr-xr-x 1 developer ncsadmin 50 Jun 28 11:05 getting-started
drwxr-xr-x 1 developer ncsadmin 26 Jun 28 11:05 high-availability
drwxr-xr-x 1 developer ncsadmin 69 Jun 28 11:05 misc
drwxr-xr-x 1 developer ncsadmin 143 Jun 28 11:05 service-provider
drwxr-xr-x 1 developer ncsadmin 19 Jun 28 11:05 snmp-ned
drwxr-xr-x 1 developer ncsadmin 155 Jun 28 11:38 snmp-notification-receiver
drwxr-xr-x 1 developer ncsadmin 53 Jun 28 11:05 web-server-farm
drwxr-xr-x 1 developer ncsadmin 31 Jun 28 11:05 web-ui
```
> **_NOTE:_** The NSO examples target Local Install and must be modified to run on a System Install. See the [NSO Getting Started Guide](https://developer.cisco.com/docs/nso/guides/#!installation/modify-examples-for-system-install) for more details.
### More Playground examples?
Go to [Cisco Code Exchange](https://developer.cisco.com/codeexchange/search/?complexity=devenv&products=NSO) to find more examples created by the community.
## Guidelines
- **Avoid any confidential information.** When you share code, it becomes public.
- NSO Playground is designed for short "_How-to_" examples. Consider the following points when you create instructions:
- The NSO Playground container is **ephemeral**. Save your work in your remote GitHub repository if you want to keep it.
- To save your work permanently, remember to **merge** your changes in your remote GitHub repository.
- The container in the NSO Playground has a lifespan of **2 hours.** After 2 hours, the system automatically destroys the container.
- The system prompts you to start a new session to continue working.
- Time starts the moment that you access the URL of the NSO Playground environment.
- If you must work on NSO for a longer time, consider using a [free NSO evaluation copy](https://developer.cisco.com/docs/nso/#!getting-and-installing-nso/download-your-nso-free-trial-installer-and-cisco-neds) or [reserve a free DevNet Sandbox.](https://developer.cisco.com/site/sandbox/)
- You can use only one environment at a time in Code Exchange.
- If you open multiple environments for the same user, Code Exchange closes the oldest environment.
## Recommendations
- Create examples with an "_Infrastructure as a Code_" mindset. This means everything needed to create your examples is in your GitHub repository.
- Avoid specifying NSO versions in the code, we update the playground continuously.
- As seen in the examples, use environment variables when developing.
- `$NCS_DIR` Is a handy environment variable.
- `env | grep -i ncs` Shows other environment variables available by `ncs`.
- The directory structure of the workspace matters. Consider it when creating an example.
- Always add a README.md file to the root directory of your repository with instructions on how to set up or run your example.
- Use the **preview** feature (right click) in VS Code to see the markdown files formatted.
The examples that you can find from the NSO example set `$NCS_DIR/examples.ncs` run with a local installation of NSO.
The following instructions show you how to run the example `netsim-sshkey` with an NSO system installation where NSO is already running.
For a detailed explanation see the getting started guide: [Developing and Deploying a Nano Service](https://developer.cisco.com/docs/nso/guides/#!developing-and-deploying-a-nano-service/development) and the README file in the `$NCS_DIR/examples.ncs/development-guide/nano-services/netsim-sshkey/` directory.
In addition, a container-based variant of the example is available in the [NSO-Developer repository.](https://gitlab.com/nso-developer/nso-examples/-/tree/main/deployment/netsim-sshkey)
1. Build the packages and copy them to the NSO run-time directory.
```bash
EXAMPLE_DIR=${NCS_DIR}/examples.ncs/development-guide/nano-services/netsim-sshkey
# Temporary fix pre-NSO 6.1.4
sed -i.orig -e "s|user\[service.local_user\]|user\[service.remote_name\]|" $EXAMPLE_DIR/packages/distkey/python/distkey/distkey_app.py
for f in $EXAMPLE_DIR/packages/*/src; do make -C $f all; done
cp -r $EXAMPLE_DIR/packages/* $NCS_RUN_DIR/packages/
```
2. Reload the packages using the `ncs_cmd` tool through the NSO Management Agent API (MAAPI).
```bash
ncs_cmd -dd -c 'maction "/packages/reload"'
```
3. Create, configure NSO, and start three simulated devices.
```bash
ncs-netsim create-network $NCS_RUN_DIR/packages/ne 3 ex --dir ./netsim
ncs-netsim ncs-xml-init > devices_init.xml
ncs-netsim start
```
4. Configure a default authgroup for the developer user.
```bash
echo "config; devices authgroups group default umap developer remote-name admin remote-password admin; commit" | ncs_cli -C -u developer -g ncsadmin
```
5. Load the XML configuration files for device and service notification config using the `ncs_load` tool through NSO MAAPI.
```bash
ncs_load -dd -m -l devices_init.xml
ncs_load -dd -m -l $EXAMPLE_DIR/service_notif_init.xml
```
6. Generate keys, distribute the public key, and configure NSO for public key authentication with the three network elements.
```bash
ncs_cli -n -u developer -g ncsadmin -C << EOF
devices sync-from
config
pubkey-dist key-auth ex0 developer remote-name admin authgroup-name default passphrase "GThunberg18!"
top pubkey-dist key-auth ex1 developer remote-name admin authgroup-name default passphrase "GThunberg18!"
top pubkey-dist key-auth ex2 developer remote-name admin authgroup-name default passphrase "GThunberg18!"
commit dry-run
commit
EOF
```
7. Show the nano service plan status.
```bash
echo "show pubkey-dist key-auth plan component | tab | nomore" | ncs_cli -C -u developer -g ncsadmin
```
8. Show the configuration added to NSO and network elements.
```bash
ncs_cli -n -u developer -g ncsadmin -C << EOF
show running-config devices authgroups group umap developer
show running-config devices device authgroup
show running-config devices device config aaa authentication users user admin authkey | nomore
EOF
```
9. Show the generated private and public keys.
```bash
cat $NCS_RUN_DIR/*ed25519*
```
10. Delete the nano service to revert to password-based network element authentication.
```bash
ncs_cli -n -u developer -g ncsadmin -C << EOF
config
no pubkey-dist
commit dry-run
commit
EOF
```
11. Show the restored configuration for password authentication.
```bash
ncs_cli -n -u developer -g ncsadmin -C << EOF
show running-config devices authgroups group umap developer
show running-config devices device authgroup
show running-config devices device config aaa authentication users user admin authkey
EOF
```
### Explore and play with the NSO Example Collection
Go to `$NCS_DIR` > `examples.ncs` in the VS Code workspace or use the terminal.
```bash
cd $NCS_DIR/examples.ncs/
developer:examples.ncs > ll
total 28
drwxr-xr-x 1 developer ncsadmin 267 Jun 28 11:38 .
drwx------ 1 developer ncsadmin 294 Jul 18 13:33 ..
-rw-r--r-- 1 developer ncsadmin 27052 Jun 28 11:38 README
drwxr-xr-x 1 developer ncsadmin 27 Jun 28 11:05 crypto
drwxr-xr-x 1 developer ncsadmin 36 Jun 28 11:05 datacenter
drwxr-xr-x 1 developer ncsadmin 261 Jun 28 11:38 development-guide
drwxr-xr-x 1 developer ncsadmin 27 Jun 28 11:05 generic-ned
drwxr-xr-x 1 developer ncsadmin 50 Jun 28 11:05 getting-started
drwxr-xr-x 1 developer ncsadmin 26 Jun 28 11:05 high-availability
drwxr-xr-x 1 developer ncsadmin 69 Jun 28 11:05 misc
drwxr-xr-x 1 developer ncsadmin 143 Jun 28 11:05 service-provider
drwxr-xr-x 1 developer ncsadmin 19 Jun 28 11:05 snmp-ned
drwxr-xr-x 1 developer ncsadmin 155 Jun 28 11:38 snmp-notification-receiver
drwxr-xr-x 1 developer ncsadmin 53 Jun 28 11:05 web-server-farm
drwxr-xr-x 1 developer ncsadmin 31 Jun 28 11:05 web-ui
```
> **_NOTE:_** The NSO examples target Local Install and must be modified to run on a System Install. See the [NSO Getting Started Guide](https://developer.cisco.com/docs/nso/guides/#!installation/modify-examples-for-system-install) for more details.
### More Playground examples?
Go to [Cisco Code Exchange](https://developer.cisco.com/codeexchange/search/?complexity=devenv&products=NSO) to find more examples created by the community.
## Guidelines
- **Avoid any confidential information.** When you share code, it becomes public.
- NSO Playground is designed for short "_How-to_" examples. Consider the following points when you create instructions:
- The NSO Playground container is **ephemeral**. Save your work in your remote GitHub repository if you want to keep it.
- To save your work permanently, remember to **merge** your changes in your remote GitHub repository.
- The container in the NSO Playground has a lifespan of **2 hours.** After 2 hours, the system automatically destroys the container.
- The system prompts you to start a new session to continue working.
- Time starts the moment that you access the URL of the NSO Playground environment.
- If you must work on NSO for a longer time, consider using a [free NSO evaluation copy](https://developer.cisco.com/docs/nso/#!getting-and-installing-nso/download-your-nso-free-trial-installer-and-cisco-neds) or [reserve a free DevNet Sandbox.](https://developer.cisco.com/site/sandbox/)
- You can use only one environment at a time in Code Exchange.
- If you open multiple environments for the same user, Code Exchange closes the oldest environment.
## Recommendations
- Create examples with an "_Infrastructure as a Code_" mindset. This means everything needed to create your examples is in your GitHub repository.
- Avoid specifying NSO versions in the code, we update the playground continuously.
- As seen in the examples, use environment variables when developing.
- `$NCS_DIR` Is a handy environment variable.
- `env | grep -i ncs` Shows other environment variables available by `ncs`.
- The directory structure of the workspace matters. Consider it when creating an example.
- Always add a README.md file to the root directory of your repository with instructions on how to set up or run your example.
- Use the **preview** feature (right click) in VS Code to see the markdown files formatted.
 ## FAQ
- Where is the NSO webUI?
- Follow the steps that described on [Enable the NSO webUI](webui/README.md)
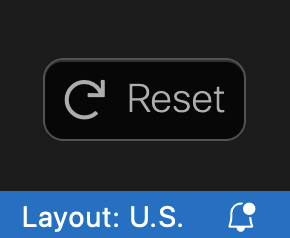
- Can I reset the environment?
- Yes, click on the reset button at the bottom-right corner. This action fully resets the container.
## FAQ
- Where is the NSO webUI?
- Follow the steps that described on [Enable the NSO webUI](webui/README.md)
- Can I reset the environment?
- Yes, click on the reset button at the bottom-right corner. This action fully resets the container.
 - If you want to keep some work, make sure you save it on your remote GitHub repository first.
- How to enable the [VS Code NSO Developer Studio - Explorer?](https://marketplace.visualstudio.com/items?itemName=CiscoCrossworkNSO.nso-explorer)
- This extension is already present on the playground.
- To use the extension, follow next the steps:
- Enable the NSO webUI and authentication. [See enable the NSO webUI](webui/README.md)
- Refresh the explorer extension (load icon inside the extension).
- Which NEDs come with the container?
- Example NEDs, which must be considered as examples. NEDs in the container are only used to run the simulated networks. Do not use these example NEDs with real devices.
```bash
developer:~ > ls -1 $NCS_DIR/packages/neds/
a10-acos-cli-3.0
alu-sr-cli-3.4
cisco-asa-cli-6.6
cisco-ios-cli-3.0
cisco-ios-cli-3.8
cisco-iosxr-cli-3.0
cisco-iosxr-cli-3.5
cisco-nx-cli-3.0
dell-ftos-cli-3.0
juniper-junos-nc-3.0
developer:~ > ls -1 $NCS_DIR/packages/neds/ | wc -l
10
developer:~ >
```
- My code is approved and is already published on Cisco Code Exchange, why isn't it visible on the playground?
- Expand the `/home/developer/src` in the workspace.
- Or do: `ls -l /home/developer/src`
- If you want to keep some work, make sure you save it on your remote GitHub repository first.
- How to enable the [VS Code NSO Developer Studio - Explorer?](https://marketplace.visualstudio.com/items?itemName=CiscoCrossworkNSO.nso-explorer)
- This extension is already present on the playground.
- To use the extension, follow next the steps:
- Enable the NSO webUI and authentication. [See enable the NSO webUI](webui/README.md)
- Refresh the explorer extension (load icon inside the extension).
- Which NEDs come with the container?
- Example NEDs, which must be considered as examples. NEDs in the container are only used to run the simulated networks. Do not use these example NEDs with real devices.
```bash
developer:~ > ls -1 $NCS_DIR/packages/neds/
a10-acos-cli-3.0
alu-sr-cli-3.4
cisco-asa-cli-6.6
cisco-ios-cli-3.0
cisco-ios-cli-3.8
cisco-iosxr-cli-3.0
cisco-iosxr-cli-3.5
cisco-nx-cli-3.0
dell-ftos-cli-3.0
juniper-junos-nc-3.0
developer:~ > ls -1 $NCS_DIR/packages/neds/ | wc -l
10
developer:~ >
```
- My code is approved and is already published on Cisco Code Exchange, why isn't it visible on the playground?
- Expand the `/home/developer/src` in the workspace.
- Or do: `ls -l /home/developer/src`