 | [English](README.md) | [简体中文](docs/i18n/README-zh.md) |
|----------------------|---------------------------------|
#### Proudly sponsored and maintained by [Coplay](https://www.coplay.dev/?ref=unity-mcp) -- the best AI assistant for Unity.
[](https://discord.gg/y4p8KfzrN4)
[](https://www.coplay.dev/?ref=unity-mcp)
[](https://unity.com/releases/editor/archive)
[](https://assetstore.unity.com/packages/tools/generative-ai/mcp-for-unity-ai-driven-development-329908)
[](https://www.python.org)
[](https://modelcontextprotocol.io/introduction)
[](https://opensource.org/licenses/MIT)
**Create your Unity apps with LLMs!** MCP for Unity bridges AI assistants (Claude, Cursor, VS Code, etc.) with your Unity Editor via the [Model Context Protocol](https://modelcontextprotocol.io/introduction). Give your LLM the tools to manage assets, control scenes, edit scripts, and automate tasks.
| [English](README.md) | [简体中文](docs/i18n/README-zh.md) |
|----------------------|---------------------------------|
#### Proudly sponsored and maintained by [Coplay](https://www.coplay.dev/?ref=unity-mcp) -- the best AI assistant for Unity.
[](https://discord.gg/y4p8KfzrN4)
[](https://www.coplay.dev/?ref=unity-mcp)
[](https://unity.com/releases/editor/archive)
[](https://assetstore.unity.com/packages/tools/generative-ai/mcp-for-unity-ai-driven-development-329908)
[](https://www.python.org)
[](https://modelcontextprotocol.io/introduction)
[](https://opensource.org/licenses/MIT)
**Create your Unity apps with LLMs!** MCP for Unity bridges AI assistants (Claude, Cursor, VS Code, etc.) with your Unity Editor via the [Model Context Protocol](https://modelcontextprotocol.io/introduction). Give your LLM the tools to manage assets, control scenes, edit scripts, and automate tasks.
 ---
## Quick Start
### Prerequisites
* **Unity 2021.3 LTS+** — [Download Unity](https://unity.com/download)
* **Python 3.10+** and **uv** — [Install uv](https://docs.astral.sh/uv/getting-started/installation/)
* **An MCP Client** — [Claude Desktop](https://claude.ai/download) | [Cursor](https://www.cursor.com/en/downloads) | [VS Code Copilot](https://code.visualstudio.com/docs/copilot/overview) | [GitHub Copilot CLI](https://docs.github.com/en/copilot/concepts/agents/about-copilot-cli) | [Windsurf](https://windsurf.com)
### 1. Install the Unity Package
In Unity: `Window > Package Manager > + > Add package from git URL...`
> [!TIP]
> ```text
> https://github.com/CoplayDev/unity-mcp.git?path=/MCPForUnity#main
> ```
**Want the latest beta?** Use the beta branch:
```text
https://github.com/CoplayDev/unity-mcp.git?path=/MCPForUnity#beta
```
---
## Quick Start
### Prerequisites
* **Unity 2021.3 LTS+** — [Download Unity](https://unity.com/download)
* **Python 3.10+** and **uv** — [Install uv](https://docs.astral.sh/uv/getting-started/installation/)
* **An MCP Client** — [Claude Desktop](https://claude.ai/download) | [Cursor](https://www.cursor.com/en/downloads) | [VS Code Copilot](https://code.visualstudio.com/docs/copilot/overview) | [GitHub Copilot CLI](https://docs.github.com/en/copilot/concepts/agents/about-copilot-cli) | [Windsurf](https://windsurf.com)
### 1. Install the Unity Package
In Unity: `Window > Package Manager > + > Add package from git URL...`
> [!TIP]
> ```text
> https://github.com/CoplayDev/unity-mcp.git?path=/MCPForUnity#main
> ```
**Want the latest beta?** Use the beta branch:
```text
https://github.com/CoplayDev/unity-mcp.git?path=/MCPForUnity#beta
```
Other install options (Asset Store, OpenUPM)
**Unity Asset Store:**
1. Visit [MCP for Unity on the Asset Store](https://assetstore.unity.com/packages/tools/generative-ai/mcp-for-unity-ai-driven-development-329908)
2. Click `Add to My Assets`, then import via `Window > Package Manager`
**OpenUPM:**
```bash
openupm add com.coplaydev.unity-mcp
```
### 2. Start the Server & Connect
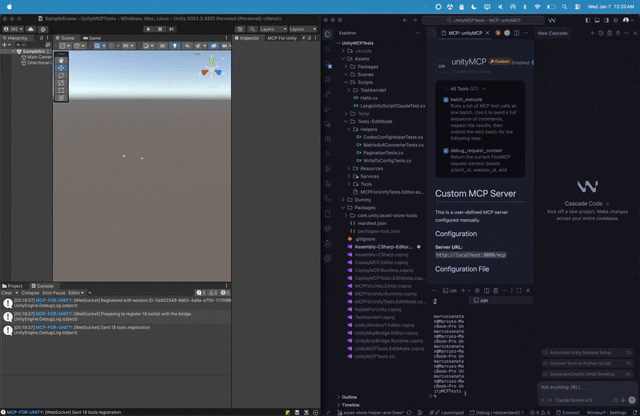
1. In Unity: `Window > MCP for Unity`
2. Click **Start Server** (launches HTTP server on `localhost:8080`)
3. Select your MCP Client from the dropdown and click **Configure**
4. Look for 🟢 "Connected ✓"
5. **Connect your client:** Some clients (Cursor, Windsurf, Antigravity) require enabling an MCP toggle in settings, while others (Claude Desktop, Claude Code) auto-connect after configuration.
**That's it!** Try a prompt like: *"Create a red, blue and yellow cube"* or *"Build a simple player controller"*
---
Features & Tools
### Key Features
* **Natural Language Control** — Instruct your LLM to perform Unity tasks
* **Powerful Tools** — Manage assets, scenes, materials, scripts, and editor functions
* **Automation** — Automate repetitive Unity workflows
* **Extensible** — Works with various MCP Clients
### Available Tools
`manage_asset` • `manage_editor` • `manage_gameobject` • `manage_components` • `manage_material` • `manage_prefabs` • `manage_scene` • `manage_script` • `manage_scriptable_object` • `manage_shader` • `manage_vfx` • `manage_texture` • `batch_execute` • `find_gameobjects` • `find_in_file` • `read_console` • `refresh_unity` • `run_tests` • `get_test_job` • `execute_menu_item` • `apply_text_edits` • `script_apply_edits` • `validate_script` • `create_script` • `delete_script` • `get_sha`
### Available Resources
`custom_tools` • `unity_instances` • `menu_items` • `get_tests` • `gameobject` • `gameobject_components` • `prefab_api` • `prefab_info` • `prefab_hierarchy` • `editor_state` • `editor_selection` • `editor_prefab_stage` • `project_info` • `project_tags` • `project_layers`
**Performance Tip:** Use `batch_execute` for multiple operations — it's 10-100x faster than individual calls!
Manual Configuration
If auto-setup doesn't work, add this to your MCP client's config file:
**HTTP (default — works with Claude Desktop, Cursor, Windsurf):**
```json
{
"mcpServers": {
"unityMCP": {
"url": "http://localhost:8080/mcp"
}
}
}
```
**VS Code:**
```json
{
"servers": {
"unityMCP": {
"type": "http",
"url": "http://localhost:8080/mcp"
}
}
}
```
Stdio configuration (uvx)
**macOS/Linux:**
```json
{
"mcpServers": {
"unityMCP": {
"command": "uvx",
"args": ["--from", "mcpforunityserver", "mcp-for-unity", "--transport", "stdio"]
}
}
}
```
**Windows:**
```json
{
"mcpServers": {
"unityMCP": {
"command": "C:/Users/YOUR_USERNAME/AppData/Local/Microsoft/WinGet/Links/uvx.exe",
"args": ["--from", "mcpforunityserver", "mcp-for-unity", "--transport", "stdio"]
}
}
}
```
Multiple Unity Instances
MCP for Unity supports multiple Unity Editor instances. To target a specific one:
1. Ask your LLM to check the `unity_instances` resource
2. Use `set_active_instance` with the `Name@hash` (e.g., `MyProject@abc123`)
3. All subsequent tools route to that instance
Roslyn Script Validation (Advanced)
For **Strict** validation that catches undefined namespaces, types, and methods:
1. Install [NuGetForUnity](https://github.com/GlitchEnzo/NuGetForUnity)
2. `Window > NuGet Package Manager` → Install `Microsoft.CodeAnalysis` v5.0
3. Also install `SQLitePCLRaw.core` and `SQLitePCLRaw.bundle_e_sqlite3` v3.0.2
4. Add `USE_ROSLYN` to `Player Settings > Scripting Define Symbols`
5. Restart Unity
Manual DLL installation (if NuGetForUnity isn't available)
1. Download `Microsoft.CodeAnalysis.CSharp.dll` and dependencies from [NuGet](https://www.nuget.org/packages/Microsoft.CodeAnalysis.CSharp/)
2. Place DLLs in `Assets/Plugins/` folder
3. Ensure .NET compatibility settings are correct
4. Add `USE_ROSLYN` to Scripting Define Symbols
5. Restart Unity
Troubleshooting
* **Unity Bridge Not Connecting:** Check `Window > MCP for Unity` status, restart Unity
* **Server Not Starting:** Verify `uv --version` works, check the terminal for errors
* **Client Not Connecting:** Ensure the HTTP server is running and the URL matches your config
**Detailed setup guides:**
* [Fix Unity MCP and Cursor, VSCode & Windsurf](https://github.com/CoplayDev/unity-mcp/wiki/1.-Fix-Unity-MCP-and-Cursor,-VSCode-&-Windsurf) — uv/Python installation, PATH issues
* [Fix Unity MCP and Claude Code](https://github.com/CoplayDev/unity-mcp/wiki/2.-Fix-Unity-MCP-and-Claude-Code) — Claude CLI installation
* [Common Setup Problems](https://github.com/CoplayDev/unity-mcp/wiki/3.-Common-Setup-Problems) — macOS dyld errors, FAQ
Still stuck? [Open an Issue](https://github.com/CoplayDev/unity-mcp/issues) or [Join Discord](https://discord.gg/y4p8KfzrN4)
Contributing
See [README-DEV.md](docs/development/README-DEV.md) for development setup. For custom tools, see [CUSTOM_TOOLS.md](docs/reference/CUSTOM_TOOLS.md).
1. Fork → Create issue → Branch (`feature/your-idea`) → Make changes → PR
Telemetry & Privacy
Anonymous, privacy-focused telemetry (no code, no project names, no personal data). Opt out with `DISABLE_TELEMETRY=true`. See [TELEMETRY.md](docs/reference/TELEMETRY.md).
---
**License:** MIT — See [LICENSE](LICENSE) | **Need help?** [Discord](https://discord.gg/y4p8KfzrN4) | [Issues](https://github.com/CoplayDev/unity-mcp/issues)
---
## Star History
[](https://www.star-history.com/#CoplayDev/unity-mcp&Date)
Citation for Research
If you are working on research that is related to Unity-MCP, please cite us!
```bibtex
@inproceedings{10.1145/3757376.3771417,
author = {Wu, Shutong and Barnett, Justin P.},
title = {MCP-Unity: Protocol-Driven Framework for Interactive 3D Authoring},
year = {2025},
isbn = {9798400721366},
publisher = {Association for Computing Machinery},
address = {New York, NY, USA},
url = {https://doi.org/10.1145/3757376.3771417},
doi = {10.1145/3757376.3771417},
series = {SA Technical Communications '25}
}
```
## Unity AI Tools by Coplay
Coplay offers 3 AI tools for Unity:
- **MCP for Unity** is available freely under the MIT license.
- **Coplay** is a premium Unity AI assistant that sits within Unity and is more than the MCP for Unity.
- **Coplay MCP** a free-for-now MCP for Coplay tools.
(These tools have different tech stacks. See this blog post [comparing Coplay to MCP for Unity](https://coplay.dev/blog/coplay-vs-coplay-mcp-vs-unity-mcp).)
 ## Disclaimer
This project is a free and open-source tool for the Unity Editor, and is not affiliated with Unity Technologies.
## Disclaimer
This project is a free and open-source tool for the Unity Editor, and is not affiliated with Unity Technologies.