# 服务接入 Nacos SDK
本文介绍不同框架的传统微服务如何接入 Nacos 的原生 SDK。
## JAVA(无框架)
1. 在 `pom.xml` 文件中添加依赖项。目前的最新版本为 `2.2.2`
```xml
com.alibaba.nacos
nacos-client
${latest.version}
```
2. 在服务中添加服务注册和服务发现的代码:
```java
//添加配置变量 serverAddr: Nacos 的地址, e.g,: 192.168.0.0:8848. namespace: Nacos 中的命名空间
Properties properties = new Properties();
properties.setProperty("serverAddr", System.getProperty("serverAddr"));
properties.setProperty("namespace", System.getProperty("namespace"));
NamingService naming = NamingFactory.createNamingService(properties);
//注册实例: 注册时带上服务的 IP 和端口
naming.registerInstance("sentinel-demo", "11.11.11.11", 8888, "DEFAULT");
System.out.println(naming.getAllInstances("sentinel-demo"));
naming.deregisterInstance("sentinel-demo", "11.11.11.11", 8888, "DEFAULT");
System.out.println(naming.getAllInstances("sentinel-demo"));
//添加对服务的订阅,在变更时获取事件通知
naming.subscribe("sentinel-demo", new EventListener() {
@Override
public void onEvent(Event event) {
System.out.println(((NamingEvent)event).getServiceName());
System.out.println(((NamingEvent)event).getInstances());
}
});
```
3. 如需添加 Nacos 的更多特性,可参考[更多使用方式](https://github.com/nacos-group/nacos-examples/tree/master/nacos-client-example)
## JAVA (SpringBoot) 框架
1. 在 `pom.xml` 文件中添加依赖项
```xml
com.alibaba.boot
nacos-config-spring-boot-starter
${latest.version}
```
!!! note
- 版本 [0.2.x.RELEASE](https://mvnrepository.com/artifact/com.alibaba.boot/nacos-config-spring-boot-starter) 对应的是 Spring Boot 2.x 版本。
- 版本 [0.1.x.RELEASE](https://mvnrepository.com/artifact/com.alibaba.boot/nacos-config-spring-boot-starter) 对应的是 Spring Boot 1.x 版本。
2. 在项目中添加 `bootstrap.yaml` 配置文件
```yaml
spring:
application:
name: demo
nacos:
config:
data-id: test # Nacos 配置的 data-id
server-addr: 127.0.0.1:8848 # Nacos 服务器地址
group: DEFAULT_GROUP # 配置文件 Group
namespace: public # 命名空间 ID
type: yaml # Nacos 配置文件类型
auto-refresh: true # 是否启用动态刷新配置
discovery:
server-addr: 127.0.0.1:8848 # Nacos 服务器地址
group: DEFAULT_GROUP # 注册应用的 Group
namespace: public # Nacos 的命名空间
```
3. 服务注册功能无需改动代码,直接启动项目就能在服务列表看到启动的服务。
4. 添加服务配置的代码
1. 登录 Nacos 控制台添加配置文件。
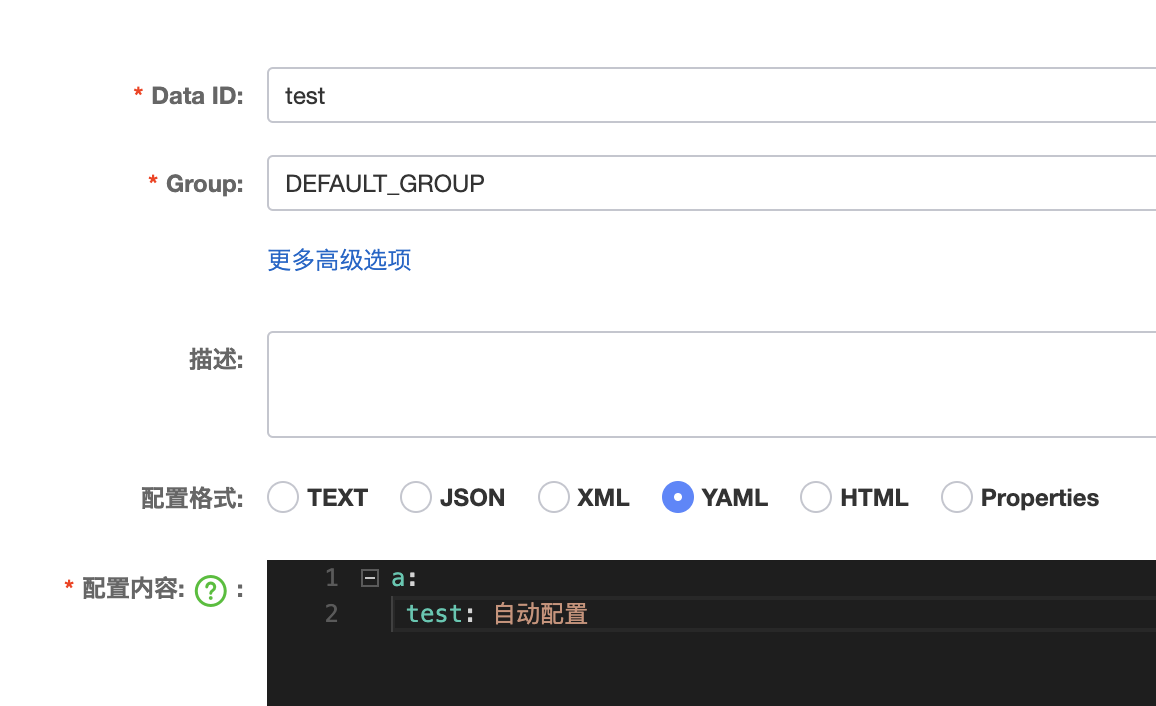
2. 然后在控制器代码中添加如下代码:
```java
@RestController
@RequestMapping("config")
public class Controller {
@NacosValue(value = "${a.test}", autoRefreshed = true)
private String name;
@GetMapping("get")
public String get() {
return this.name;
}
}
```
5. 如需添加 Nacos 的更多特性,可参考[更多使用方式](https://github.com/nacos-group/nacos-examples/tree/master/nacos-spring-boot-example)
## JAVA (SpringCloud) 框架
1. 在 `pom.xml` 文件中添加依赖项。
版本对应关系参考:[版本说明](https://github.com/spring-cloud-incubator/spring-cloud-alibaba/wiki/版本说明)
```xml
com.alibaba.cloud
spring-cloud-starter-alibaba-nacos-config
${latest.version}
com.alibaba.cloud
spring-cloud-starter-alibaba-nacos-discovery
${latest.version}
```
2. 在项目中添加 `bootstrap.yaml` 配置文件
```java
spring:
application:
name: demo
---
spring:
cloud:
nacos:
config:
enabled: true
server-addr: 127.0.0.1:8848 # nacos 服务器地址
name: test # nacos 配置的 data-id
group: DEFAULT_GROUP # 配置文件 Group
namespace: public # 命名空间ID
file-extension: yaml # 配置文件后缀
discovery:
enabled: true
server-addr: 127.0.0.1:8848 # nacos 服务器地址
namespace: public # 命名空间ID
group: DEFAULT_GROUP # 应用分组名
```
3. 在服务添加 Nacos 服务注册的代码
在启动类上添加 `@EnableDiscoveryClient` 注解开启服务注册
```java
@SpringBootApplication
@EnableDiscoveryClient
public class NacosProviderApplication {
public static void main(String[] args) {
SpringApplication.run(NacosProviderApplication.class, args);
}
}
```
4. 添加动态配置的代码
1. 在 Nacos 控制台添加配置文件

2. 在控制器中添加 `@RefreshScope` 和 `@Value` 注解
通过 springcloud 的 `@RefreshScope` 注解可以实现自动配置
```java
@RestController
@RequestMapping("config")
@RefreshScope
public class Controller {
@Value(value = "${a.test}")
private String name;
@GetMapping("get")
public String get() {
return this.name;
}
}
```
5. 如需添加 Nacos 的更多特性,可参考[更多使用方式](https://github.com/nacos-group/nacos-examples/tree/master/nacos-spring-cloud-example)
## Go 框架
在 Go 框架微服务中添加 Nacos SDK 时,需要满足以下两个前提条件:
- Go 版本 1.15 以上
- Nacos 版本 2.x 以上
具体操作步骤如下:
1. 获取依赖
```go
go get -u github.com/nacos-group/nacos-sdk-go/v2
```
2. 在服务中添加服务注册的代码
```go
//create ServerConfig,配置 Nacos 服务器的地址
sc := []constant.ServerConfig{
*constant.NewServerConfig("127.0.0.1", 8848, constant.WithContextPath("/nacos")),
}
//create ClientConfig,配置客户端的链接配置
cc := *constant.NewClientConfig(
constant.WithNamespaceId("public"), //命名空间 ID
constant.WithTimeoutMs(5000), // 超时时间
constant.WithLogDir("/tmp/nacos/log"), //日志地址
constant.WithCacheDir("/tmp/nacos/cache"), // Nacos 服务缓存的地址
constant.WithLogLevel("debug"), // 日志级别
)
// 通过 ServerConfig 和 ClientConfig 创建 nacosclient 链接
client, err := clients.NewNamingClient(
vo.NacosClientParam{
ClientConfig: &cc,
ServerConfigs: sc,
},
)
//Register 注册服务
registerServiceInstance(client, vo.RegisterInstanceParam{
Ip: "10.0.0.10",
Port: 8848,
ServiceName: "demo.go",
GroupName: "group-a",
ClusterName: "cluster-a",
Weight: 10,
Enable: true,
Healthy: true,
Ephemeral: true,
Metadata: map[string]string{"idc": "shanghai"},
})
//DeRegister 注销服务
deRegisterServiceInstance(client, vo.DeregisterInstanceParam{
Ip: "10.0.0.10",
Port: 8848,
ServiceName: "demo.go",
GroupName: "group-a",
Cluster: "cluster-a",
Ephemeral: true, //must be true
})
```
3. 配置加载
```go
//create ServerConfig,配置 Nacos 服务器的地址
sc := []constant.ServerConfig{
*constant.NewServerConfig("127.0.0.1", 8848, constant.WithContextPath("/nacos")),
}
//create ClientConfig,配置客户端的链接配置
cc := *constant.NewClientConfig(
constant.WithNamespaceId("public"), //命名空间 ID
constant.WithTimeoutMs(5000), // 超时时间
constant.WithLogDir("/tmp/nacos/log"), //日志地址
constant.WithCacheDir("/tmp/nacos/cache"), // Nacos 服务缓存的地址
constant.WithLogLevel("debug"), // 日志级别
)
// 通过 ServerConfig 和 ClientConfig 创建 nacosclient 链接
client, err := clients.NewNamingClient(
vo.NacosClientParam{
ClientConfig: &cc,
ServerConfigs: sc,
},
)
//get config 获取配置
content, err := client.GetConfig(vo.ConfigParam{
DataId: "test-data",
Group: "test-group",
})
fmt.Println("GetConfig,config :" + content)
//Listen config change,key=dataId+group+namespaceId. 监听配置改变
err = client.ListenConfig(vo.ConfigParam{
DataId: "test-data",
Group: "test-group",
OnChange: func(namespace, group, dataId, data string) {
fmt.Println("config changed group:" + group + ", dataId:" + dataId + ", content:" + data)
},
})
```
4. 如需添加 Nacos 的更多特性,可参考[更多使用方式](https://github.com/nacos-group/nacos-sdk-go)
## Python 框架
1. 获取依赖
```sh
pip install nacos-sdk-python
```
2. 代码接入
```python
import nacos
# Nacos server地址
SERVER_ADDRESSES = "127.0.0.1:8848"
# 命名空间 ID
NAMESPACE = "public"
client = nacos.NacosClient(SERVER_ADDRESSES, namespace=NAMESPACE)
# 注册服务
client.add_naming_instance("test.service1", "1.0.0.7", 8080, "testCluster2", 0.2, "{}", False, True)
# 发送心跳
client.send_heartbeat("test.service", "1.0.0.7", 8080, "testCluster2", 0.1, "{}")
# get config
data_id = "dev-config"
group = "DEFAULT_GROUP"
# 全局服务配置
server_config = json.loads(client.get_config(data_id, group))
# 当服务配置发生变化
def config_update(data):
global server_config
server_config = json.loads(data['content'])
print('new data->', server_config)
# 监听服务配置变化
client.add_config_watcher(data_id, group, config_update)
```
3. 如需添加 Nacos 的更多特性,可参考[更多使用方式](https://github.com/nacos-group/nacos-sdk-python)
## Node.js 框架
1. 添加依赖
需要使用 `2.x` 以上的版本
```shell
npm install nacos --save
```
2. 添加服务发现的代码逻辑
```js
'use strict';
const NacosNamingClient = require('nacos').NacosNamingClient;
const logger = console;
const client = new NacosNamingClient({
logger,
serverList: '127.0.0.1:8848', // Nacos 服务地址
namespace: 'public', //命名空间ID
});
await client.ready();
const serviceName = 'nodejs.test.domain';
// 注册服务
await client.registerInstance(serviceName, {
ip: '1.1.1.1',
port: 8080,
});
await client.registerInstance(serviceName, {
ip: '2.2.2.2',
port: 8080,
});
// 订阅服务
client.subscribe(serviceName, hosts => {
console.log(hosts);
});
// 注销服务
await client.deregisterInstance(serviceName, {
ip: '1.1.1.1',
port: 8080,
});
```
3. 添加动态配置的代码逻辑
```js
import {NacosConfigClient} from 'nacos'; // ts
const NacosConfigClient = require('nacos').NacosConfigClient; // js
const configClient = new NacosConfigClient({
serverAddr: '127.0.0.1:8848',
namespace: 'public', //命名空间 ID
});
// 获取配置文件
const content= await configClient.getConfig('test', 'DEFAULT_GROUP'); //dataID: test,group: DEFAULT_GROUP
console.log('getConfig = ',content);
// 监听配置变化
configClient.subscribe({
dataId: 'test',
group: 'DEFAULT_GROUP',
}, content => {
console.log(content);
});
```
4. 如需添加 Nacos 的更多特性,可参考[更多使用方式](https://github.com/nacos-group/nacos-sdk-nodejs)
## C++ 框架
1. 下载依赖
下载工程[源代码](https://github.com/nacos-group/nacos-sdk-cpp)并执行下述命令:
```sh
cd nacos-sdk-cpp
cmake .
make
```
执行命令后会产生一个 l`ibnacos-cli.so` 和一个 `nacos-cli.out` 文件
2. 运行 `make install` 将 `libnacos-cli` 安装到 `lib` 目录
3. 在服务代码中添加服务注册的代码逻辑
```c++
#include
#include
#include "Nacos.h"
using namespace std;
using namespace nacos;
int main() {
Properties configProps;
configProps[PropertyKeyConst::SERVER_ADDR] = "127.0.0.1"; // nacos 服务地址
configProps[PropertyKeyConst::NAMESPACE] = "public"; // 命名空间ID
NacosServiceFactory *factory = new NacosServiceFactory(configProps);
ResourceGuard _guardFactory(factory);
NamingService *namingSvc = factory->CreateNamingService();
ResourceGuard _serviceFactory(namingSvc);
Instance instance;
instance.clusterName = "DEFAULT";
instance.ip = "127.0.0.1";
instance.port = 2333;
instance.instanceId = "1";
instance.ephemeral = true;
//模拟注册5个服务
try {
for (int i = 0; i < 5; i++) {
NacosString serviceName = "TestNamingService" + NacosStringOps::valueOf(i);
instance.port = 2000 + i;
namingSvc->registerInstance(serviceName, instance);
}
}
catch (NacosException &e) {
cout << "encounter exception while registering service instance, raison:" << e.what() << endl;
return -1;
}
sleep(30);
//注销服务
try {
for (int i = 0; i < 5; i++) {
NacosString serviceName = "TestNamingService" + NacosStringOps::valueOf(i);
namingSvc->deregisterInstance(serviceName, "127.0.0.1", 2000 + i);
sleep(1);
}
}
catch (NacosException &e) {
cout << "encounter exception while registering service instance, raison:" << e.what() << endl;
return -1;
}
sleep(30);
return 0;
}
```
4. 添加动态配置的代码逻辑
```c++
#include
#include "Nacos.h"
using namespace std;
using namespace nacos;
class MyListener : public Listener {
private:
int num;
public:
MyListener(int num) {
this->num = num;
}
void receiveConfigInfo(const NacosString &configInfo) {
cout << "===================================" << endl;
cout << "Watcher" << num << endl;
cout << "Watched Key UPDATED:" << configInfo << endl;
cout << "===================================" << endl;
}
};
int main() {
Properties props;
props[PropertyKeyConst::SERVER_ADDR] = "127.0.0.1:8848"; //nacos地址
props[PropertyKeyConst::NAMESPACE] = "public"; // 命名空间ID
NacosServiceFactory *factory = new NacosServiceFactory(props);
ResourceGuard _guardFactory(factory);
ConfigService *n = factory->CreateConfigService();
ResourceGuard _serviceFactory(n);
MyListener *theListener = new MyListener(1);//You don't need to free it, since it will be deleted by the function removeListener
n->addListener("dqid", "DEFAULT_GROUP", theListener);//dataID为"dqid"并且group为"DEFAULT_GROUP"的配置改变都将监听到
cout << "Input a character to continue" << endl;
getchar();
cout << "remove listener" << endl;
n->removeListener("dqid", NULLSTR, theListener);//取消监听
getchar();
return 0;
}
```
5. 如需添加 Nacos 的更多特性,可参考[更多使用方式](https://github.com/nacos-group/nacos-sdk-cpp/blob/master/README_zh_CN.md)