# Table of Content
- [Overview](#overview)
- [Prerequisites](#prerequisites)
- [Making Da Boss](#making-da-boss)
- [Final Thoughts](#final-thoughts)
- [FAQ](#faq)
# Overview
This is a step-by-step guide to making your own boss AI using the addon. It will help you familiarize with the addon and its features and by the end you should be able to use the knowledge to make your own custom AI.
Here's a preview of the boss AI that we'll be making, our boss will have an idle, combat and dead related behaviors and a few attack patterns that it will use based on its health:
 We will cover:
- The process of creating and iterating a behavior tree.
- The behavior nodes and the most common use cases.
- Sharing data between behavior nodes.
- Reusing modular behaviors.
and other things.
# Prerequisites
This guide is designed to be as beginner friendly as possible so a prior experience with Godot as well as a general understanding of behavior trees (see [start here](../docs/(1)%20start%20here.md)) is all you need. Although it helps if you've implemented some form of AI in a game before and have checked [using addon](../docs/(2)%20using%20addon.md).
Here's the [source code](https://github.com/DissonantVoid/DVs-Behavior-Tree-Example) of what we'll be making if you have problems following along or just want the source code.
You'll need the latest version of this addon which you can grab from the assets library inside Godot or from [github](https://github.com/DissonantVoid/DVs-Behavior-Tree/releases).
We will cover:
- The process of creating and iterating a behavior tree.
- The behavior nodes and the most common use cases.
- Sharing data between behavior nodes.
- Reusing modular behaviors.
and other things.
# Prerequisites
This guide is designed to be as beginner friendly as possible so a prior experience with Godot as well as a general understanding of behavior trees (see [start here](../docs/(1)%20start%20here.md)) is all you need. Although it helps if you've implemented some form of AI in a game before and have checked [using addon](../docs/(2)%20using%20addon.md).
Here's the [source code](https://github.com/DissonantVoid/DVs-Behavior-Tree-Example) of what we'll be making if you have problems following along or just want the source code.
You'll need the latest version of this addon which you can grab from the assets library inside Godot or from [github](https://github.com/DissonantVoid/DVs-Behavior-Tree/releases).
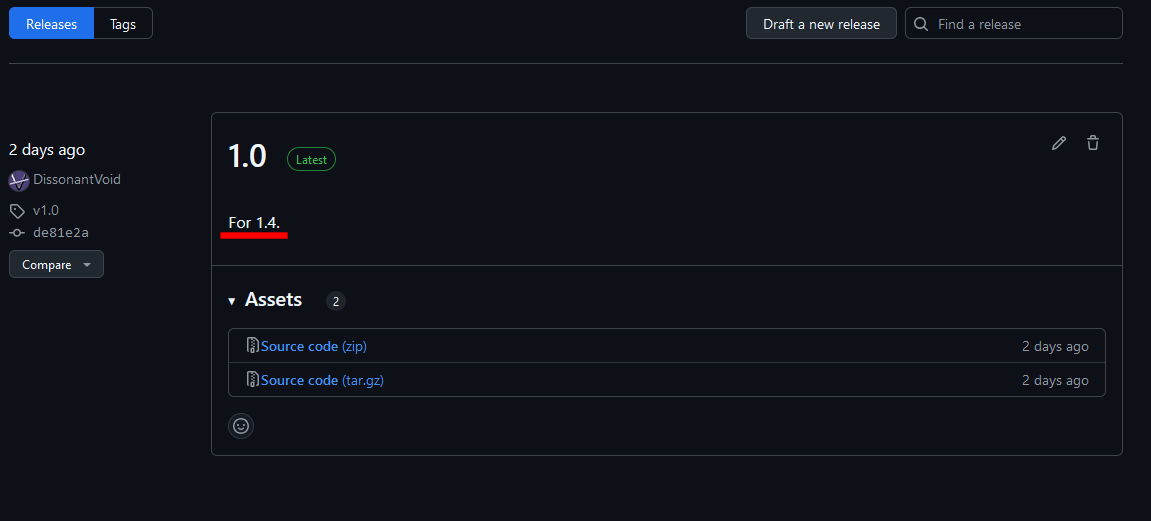
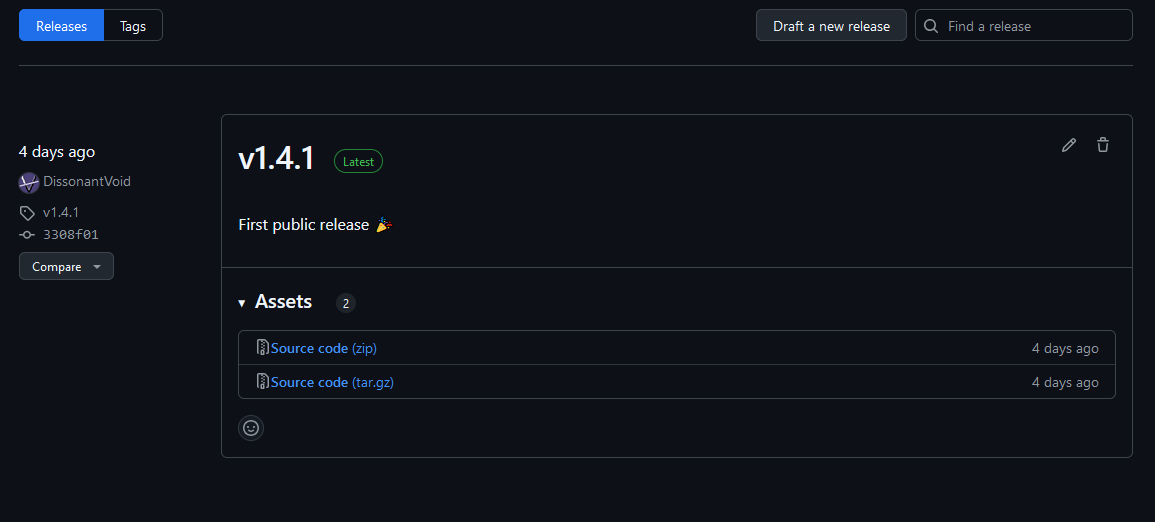 You'll also need to download the [project template](https://github.com/DissonantVoid/DVs-Behavior-Tree-Example/releases) before we start. Make sure to download the version that matches with your addon version.
 Add the addon and its script templates to the project and activate it in the plugins tab, if you get any errors just restart the editor after activating the addon and it should go away.
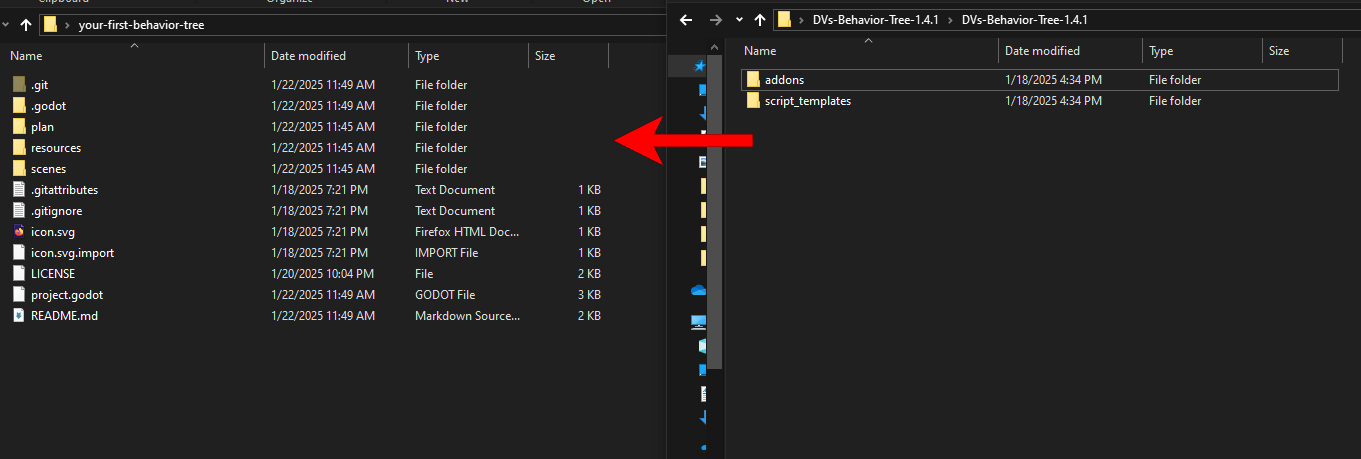 It's a pre-set project to save us the tedious setup process so we can just get to the fun stuff. It contains:
- Assets (a few textures, sounds and music).
- Scenes (main scene, basic player scene, empty boss scene).
- Project settings (resolution and texture filtering settings for pixel art).
- Basic input actions for player.
# Making Da Boss
Our game consists of 3 main scenes: main game scene, player and boss. For the sake of keeping it to the point we'll mostly focus on the behavior tree design of the boss. The player and game scenes are already setup for you. Feel free to look around and get familiar with things before we start, it's nothing complicated.
You'll notice the specific way I setup the files, that's just how I like to setup my projects with all resources going into the `resources` folder while scenes and their scripts go into the `scenes` folder. You are free to shuffle things around as you see fit.
## The Game Scene
If you open the main scene you'll notice that it already has everything we need. A small level, some UI and music, the boss and the player. Play the scene if you haven't already. The player is this badass square (don't ask) that can move around and shoot projectiles while the boss, this ancient circle of evil is... well it just IS at the moment.
## The Boss Scene
Alright can we do somethig now? yes deer reader. Please take delight in knowing that this part was originaly burried under +100 lines of text about seting up everything from scratch.
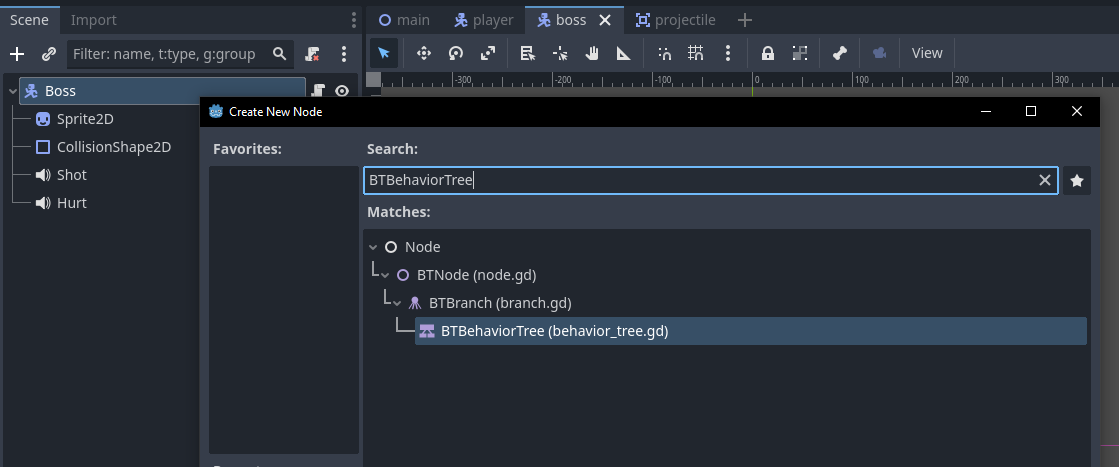
Let's give our boss a brain. All behavior trees start with a root node, open the boss scene and add a root node by searching for `BTBehaviorTree`.
It's a pre-set project to save us the tedious setup process so we can just get to the fun stuff. It contains:
- Assets (a few textures, sounds and music).
- Scenes (main scene, basic player scene, empty boss scene).
- Project settings (resolution and texture filtering settings for pixel art).
- Basic input actions for player.
# Making Da Boss
Our game consists of 3 main scenes: main game scene, player and boss. For the sake of keeping it to the point we'll mostly focus on the behavior tree design of the boss. The player and game scenes are already setup for you. Feel free to look around and get familiar with things before we start, it's nothing complicated.
You'll notice the specific way I setup the files, that's just how I like to setup my projects with all resources going into the `resources` folder while scenes and their scripts go into the `scenes` folder. You are free to shuffle things around as you see fit.
## The Game Scene
If you open the main scene you'll notice that it already has everything we need. A small level, some UI and music, the boss and the player. Play the scene if you haven't already. The player is this badass square (don't ask) that can move around and shoot projectiles while the boss, this ancient circle of evil is... well it just IS at the moment.
## The Boss Scene
Alright can we do somethig now? yes deer reader. Please take delight in knowing that this part was originaly burried under +100 lines of text about seting up everything from scratch.
Let's give our boss a brain. All behavior trees start with a root node, open the boss scene and add a root node by searching for `BTBehaviorTree`.
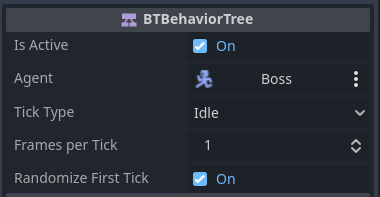
 You'll notice that there are some export variables that need setup. Toggle `active` on and set the agent to the root node of the scene. The agent can be any node and is used by behavior nodes to communicate with our boss script, we'll see that later. Your inspector should look like this:
 There are some other export variables that we can mess with but we won't have to here, you can hover over variables to read their description. If it says "No Description Available." it seems to be [a bug](https://github.com/godotengine/godot/issues/100910). Just restart the editor and it should work. Certified Godot moment!
### Idle
For our first behavior let's add idling, in this state the boss should just sit there and do nothing until combat is started. "But DV, the boss is already doing nothing" I hear you say, well yes it is the same thing visually except we'll add idling as a proper **behavior** that is considered by other behavior nodes.
Nodes of a behavior tree are categorized into 3 main categories:
- **Composite** nodes are responsible for organizing behaviors and dictating when to transition to each one. You can think of these as the foundation on which we place our behaviors.
- **Leaf** nodes which represent the actual behaviors and can be any action or condition we want.
- **Decorator** nodes which simply take the result of a leaf node and do something with it.
While the addon comes with some generic leaf nodes. Generally speaking whenever you use a behavior tree you'll be using Composites and Decorators provided by the addon but you'll have to code your own Leaf nodes since behaviors can vary wildly from case to case depending on the game. So let's create our very first custom behavior node!
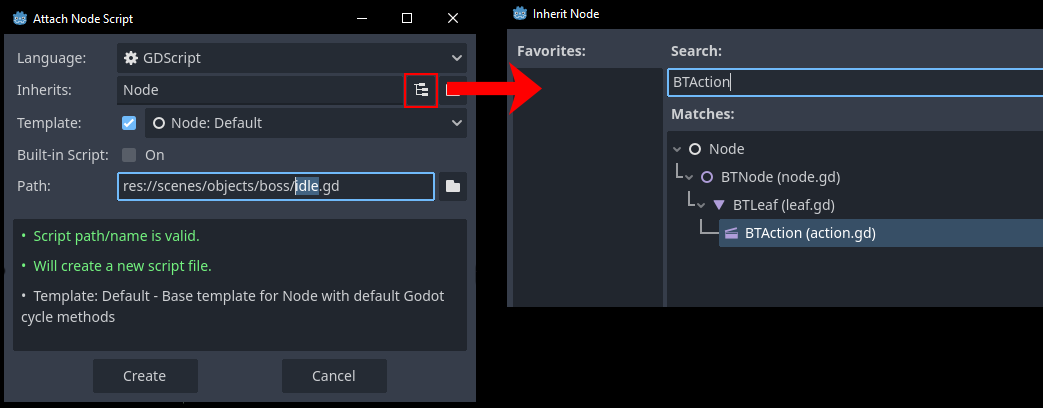
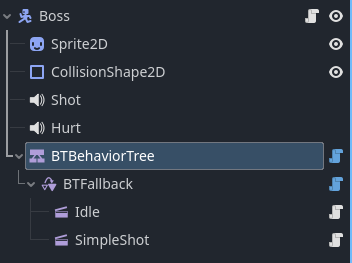
Add a new `Node` node as a child of the root node and let's name it "Idle". Attach a script and name it "idle", make sure it inherites from `BTAction` and let's save it to the boss folder. This will provide us with a template for our script.
There are some other export variables that we can mess with but we won't have to here, you can hover over variables to read their description. If it says "No Description Available." it seems to be [a bug](https://github.com/godotengine/godot/issues/100910). Just restart the editor and it should work. Certified Godot moment!
### Idle
For our first behavior let's add idling, in this state the boss should just sit there and do nothing until combat is started. "But DV, the boss is already doing nothing" I hear you say, well yes it is the same thing visually except we'll add idling as a proper **behavior** that is considered by other behavior nodes.
Nodes of a behavior tree are categorized into 3 main categories:
- **Composite** nodes are responsible for organizing behaviors and dictating when to transition to each one. You can think of these as the foundation on which we place our behaviors.
- **Leaf** nodes which represent the actual behaviors and can be any action or condition we want.
- **Decorator** nodes which simply take the result of a leaf node and do something with it.
While the addon comes with some generic leaf nodes. Generally speaking whenever you use a behavior tree you'll be using Composites and Decorators provided by the addon but you'll have to code your own Leaf nodes since behaviors can vary wildly from case to case depending on the game. So let's create our very first custom behavior node!
Add a new `Node` node as a child of the root node and let's name it "Idle". Attach a script and name it "idle", make sure it inherites from `BTAction` and let's save it to the boss folder. This will provide us with a template for our script.
 Whenever we create our own custom scripts we attach them to a `Node` node. This is because behavior nodes are just scripts with no related scenes so we need a default node to attach that script to. Also, we chose to inherite the `BTAction` node, that is one of the 2 types of leaf nodes which are Actions (`BTAction`) and Conditions (`BTCondition`). An action is what you'll be inheriting most of the time to represent an action like idling in our case while condition is basically a boolean that checks some condition and returns true or false (success or failure).
Our script has 3 main functions:
- `enter` which is called when the behavior is entered and about to be ticked.
- `exit` which is called after the last tick. `is_interrupted` indicates whether or not the node exited properly or was interrupted by another node (more later).
- `tick` which happens each tick.
A tick is just an update that in our case happens each `_process` call because in the export variables of the root nodes we have `tick type` set to `idle` and `frames per tick` set to 1.
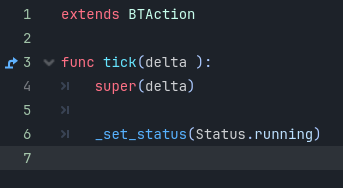
The tick function is expected to set a status every time it's called by calling `_set_status()` with one of: `Status.success`, `Status.failure` or `Status.running`. success and failure determines the behavior's final result while running will keep the node ticking until another status is returned. In our case idling for our boss is just doing nothing so we'll just set status to `Status.running` and remove `enter` and `exit` since these 2 are optional.
Whenever we create our own custom scripts we attach them to a `Node` node. This is because behavior nodes are just scripts with no related scenes so we need a default node to attach that script to. Also, we chose to inherite the `BTAction` node, that is one of the 2 types of leaf nodes which are Actions (`BTAction`) and Conditions (`BTCondition`). An action is what you'll be inheriting most of the time to represent an action like idling in our case while condition is basically a boolean that checks some condition and returns true or false (success or failure).
Our script has 3 main functions:
- `enter` which is called when the behavior is entered and about to be ticked.
- `exit` which is called after the last tick. `is_interrupted` indicates whether or not the node exited properly or was interrupted by another node (more later).
- `tick` which happens each tick.
A tick is just an update that in our case happens each `_process` call because in the export variables of the root nodes we have `tick type` set to `idle` and `frames per tick` set to 1.
The tick function is expected to set a status every time it's called by calling `_set_status()` with one of: `Status.success`, `Status.failure` or `Status.running`. success and failure determines the behavior's final result while running will keep the node ticking until another status is returned. In our case idling for our boss is just doing nothing so we'll just set status to `Status.running` and remove `enter` and `exit` since these 2 are optional.
 And check it out! well... not much is going on visually.\
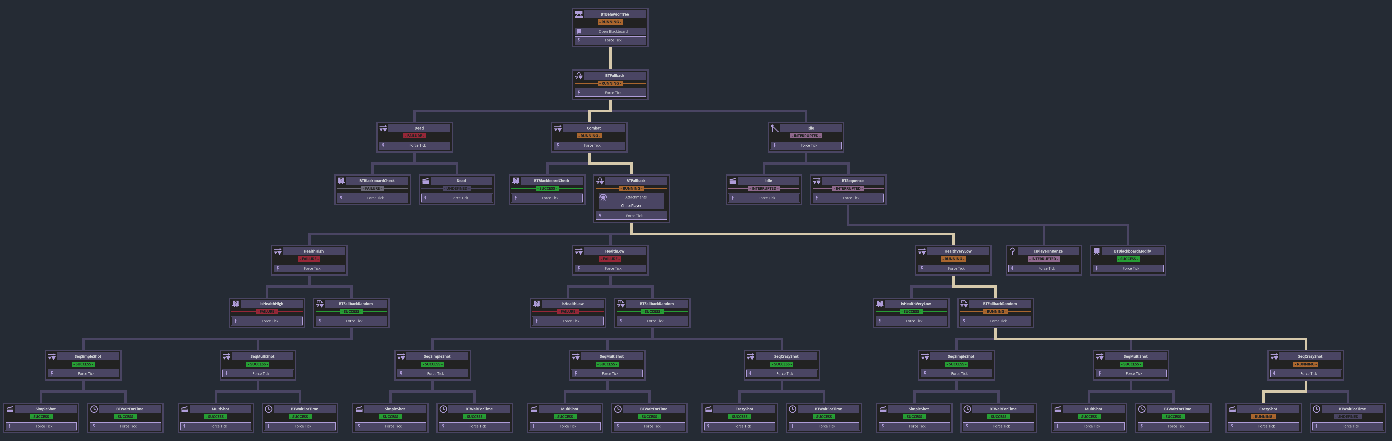
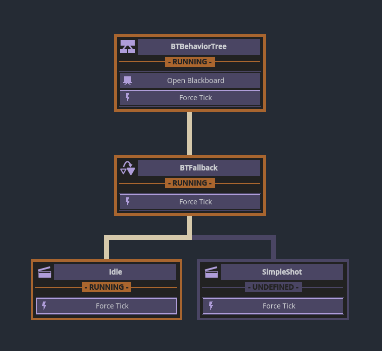
Open the debugger in the editor while the game is running and navigate to "Behavior Trees", select the "Boss" tree and there it is, the very brain of our boss! A tiny little brain with one behavior but it's a start and it's ready for us to expand upon with more behaviors. It will look more like this in no time:
And check it out! well... not much is going on visually.\
Open the debugger in the editor while the game is running and navigate to "Behavior Trees", select the "Boss" tree and there it is, the very brain of our boss! A tiny little brain with one behavior but it's a start and it's ready for us to expand upon with more behaviors. It will look more like this in no time:
 ### Attack
Time for the real stuff, let's add combat! Add another `Node` as sibling to our idle node and let's call it "SimpleShot", attach an action script just like before and save it in the boss folder. The root node is going to give us a warning, that's because the root node must only have one child and can't decide on its own what behavior to run if there are many. As we mentioned earlier decision making is the specialty of **Composite** nodes so let's add one. There are many built-in composite nodes available but the 2 that you'll use the most are `BTSequence` and `BTFallback`.
A **Sequence** as the name implies will run all its children in a sequence one after the other, this can be used for example to make our boss do a charge attack where we run in sequence: go_to_player -> charge -> explode -> cooldown. A sequence will continue to its next child when its current child succeeds (`Status.success`) and stop and fail when one of its children fails (`Status.failure`). It helps to think of sequence nodes as an **AND** operation.
A **Fallback** on the other hand is the opposite. if a sequence represents **AND** a fallback represent an **OR** where is will run a child and if it fails will try (aka fallback to) the next child until one of them succeeds. This for example can be used to make our boss idle by default but if we're in combat mode will instead chose the attack behavior, that's **exactly** what we want right now!
Add a `BTFallback` node, no need to inherite composite nodes just add it as a child of the root node then move our 2 actions nodes to be children of the fallback node.
### Attack
Time for the real stuff, let's add combat! Add another `Node` as sibling to our idle node and let's call it "SimpleShot", attach an action script just like before and save it in the boss folder. The root node is going to give us a warning, that's because the root node must only have one child and can't decide on its own what behavior to run if there are many. As we mentioned earlier decision making is the specialty of **Composite** nodes so let's add one. There are many built-in composite nodes available but the 2 that you'll use the most are `BTSequence` and `BTFallback`.
A **Sequence** as the name implies will run all its children in a sequence one after the other, this can be used for example to make our boss do a charge attack where we run in sequence: go_to_player -> charge -> explode -> cooldown. A sequence will continue to its next child when its current child succeeds (`Status.success`) and stop and fail when one of its children fails (`Status.failure`). It helps to think of sequence nodes as an **AND** operation.
A **Fallback** on the other hand is the opposite. if a sequence represents **AND** a fallback represent an **OR** where is will run a child and if it fails will try (aka fallback to) the next child until one of them succeeds. This for example can be used to make our boss idle by default but if we're in combat mode will instead chose the attack behavior, that's **exactly** what we want right now!
Add a `BTFallback` node, no need to inherite composite nodes just add it as a child of the root node then move our 2 actions nodes to be children of the fallback node.
 We haven't implemented our simple shot code yet so let's do that real quick. Here's the code:
```
extends BTAction
func tick(delta : float):
super(delta)
var player : Player = get_tree().current_scene.player
var player_perdicted_pos : Vector2 = player.global_position + player.velocity/2.0
var direction : Vector2 = (player_perdicted_pos - behavior_tree.agent.global_position).normalized()
behavior_tree.agent.shoot(direction)
_set_status(Status.success)
```
We're simply getting a reference to the player, determining which direction to shoot based on player position and velocity and finally shooting our shot then calling `_set_status(Status.success)` to signal that the behavior is over, note that this behavior is very brief it takes a single tick to execute therefore we succeed as soon as we tick.
Notice how we grabbed a reference to our agent by using `behavior_tree`, all behavior nodes have access to that variable which can be used to reference the agent variable `behavior_tree.agent` and the blackboard `behavior_tree.blackboard`, `behavior_tree.global_blackboard` which we'll get to. In our case we grab the agent and call `shoot` which we haven't implemented just yet so let's go to the `boss.gd` script and implement it.
Add this function to the boss script for spawning projectiles:
```
func shoot(direction : Vector2):
var projectile := _projectile_scene.instantiate()
get_tree().current_scene.add_child(projectile)
projectile.global_position = global_position
projectile.setup(direction, false)
_shot_sound.play()
```
And the required variables
```
@onready var _shot_sound : AudioStreamPlayer = $Shot
const _projectile_scene : PackedScene = preload("res://scenes/objects/projectile.tscn")
```
Your script should look like this:
We haven't implemented our simple shot code yet so let's do that real quick. Here's the code:
```
extends BTAction
func tick(delta : float):
super(delta)
var player : Player = get_tree().current_scene.player
var player_perdicted_pos : Vector2 = player.global_position + player.velocity/2.0
var direction : Vector2 = (player_perdicted_pos - behavior_tree.agent.global_position).normalized()
behavior_tree.agent.shoot(direction)
_set_status(Status.success)
```
We're simply getting a reference to the player, determining which direction to shoot based on player position and velocity and finally shooting our shot then calling `_set_status(Status.success)` to signal that the behavior is over, note that this behavior is very brief it takes a single tick to execute therefore we succeed as soon as we tick.
Notice how we grabbed a reference to our agent by using `behavior_tree`, all behavior nodes have access to that variable which can be used to reference the agent variable `behavior_tree.agent` and the blackboard `behavior_tree.blackboard`, `behavior_tree.global_blackboard` which we'll get to. In our case we grab the agent and call `shoot` which we haven't implemented just yet so let's go to the `boss.gd` script and implement it.
Add this function to the boss script for spawning projectiles:
```
func shoot(direction : Vector2):
var projectile := _projectile_scene.instantiate()
get_tree().current_scene.add_child(projectile)
projectile.global_position = global_position
projectile.setup(direction, false)
_shot_sound.play()
```
And the required variables
```
@onready var _shot_sound : AudioStreamPlayer = $Shot
const _projectile_scene : PackedScene = preload("res://scenes/objects/projectile.tscn")
```
Your script should look like this:
 If we run the game our boss will still be just idling, we can see why if we open the debugger tab again.
 Since our idle behavior never fails the fallback has no reason to fallback to the next behavior. The fallback node is prioritizing the idle behavior since that's its first child. In a behavior tree typically children that come first are prioritized and checked first so let's swap our idle and simple shot nodes so idle becomes the second child and only runs if the boss isn't fighting. This easily turns our boss into the hardest boss ever.
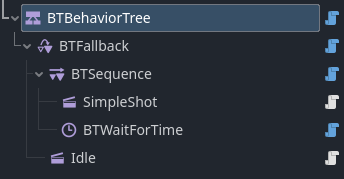
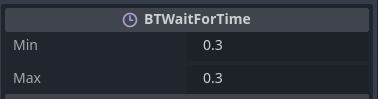
 To fix this we need to add a cooldown between shots, luckily there is a built-in action node for that called `BTWaitForTime` which as the name implies will wait for a certain time with a status of `Status.running` until the timer is finished in which case it will set its status to `Status.success`. We want the cooldown to happen after each shot so let's also add a `BTSequence` composite that will be the parent of both the simple shot action and the cooldown timer and set the timer to wait for 0.3seconds
 \
\
 Ah! much better. I would tell you to checkout the debugger graph now but good luck with that while getting shot at. The boss is too agressive, let's make it so it starts fighting only after we get too close. We need a variable to determine if combat has started and a way to set it to true.
That's where the blackboard comes in, a blackboard is literally just a dictionary that stores variables shared between all nodes in the behavior tree. Nothing prevents us from putting those variables somewhere else like in `boss.gd` or some autoload but using the blackboard is the recommended way to do it. So let's initialize our variable `is_fighting` as false, to do that add this code to the `boss.gd` script:
```
@onready var _behavior_tree : BTBehaviorTree = $BTBehaviorTree
func _ready():
_behavior_tree.blackboard["is_fighting"] = false
```
Now we have a variable `is_fighting` that any behavior can check and modify. The agent script is typically a good place for initializing blackboard variables with a default value.
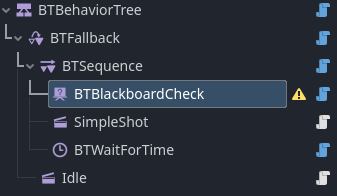
In our sequence we'll start by checking if we are fighting, if we aren't the sequence should fail prompting the fallback node to tick its next child which is the idling behavior. To do that let's use a **Condition** node which as we mentioned before plays the role of a boolean. Luckily there is already a built-in condition for checking blackboard variables. Add a `BTBlackboardCheck` as the first child of the sequence.
Ah! much better. I would tell you to checkout the debugger graph now but good luck with that while getting shot at. The boss is too agressive, let's make it so it starts fighting only after we get too close. We need a variable to determine if combat has started and a way to set it to true.
That's where the blackboard comes in, a blackboard is literally just a dictionary that stores variables shared between all nodes in the behavior tree. Nothing prevents us from putting those variables somewhere else like in `boss.gd` or some autoload but using the blackboard is the recommended way to do it. So let's initialize our variable `is_fighting` as false, to do that add this code to the `boss.gd` script:
```
@onready var _behavior_tree : BTBehaviorTree = $BTBehaviorTree
func _ready():
_behavior_tree.blackboard["is_fighting"] = false
```
Now we have a variable `is_fighting` that any behavior can check and modify. The agent script is typically a good place for initializing blackboard variables with a default value.
In our sequence we'll start by checking if we are fighting, if we aren't the sequence should fail prompting the fallback node to tick its next child which is the idling behavior. To do that let's use a **Condition** node which as we mentioned before plays the role of a boolean. Luckily there is already a built-in condition for checking blackboard variables. Add a `BTBlackboardCheck` as the first child of the sequence.
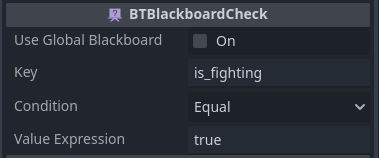
 The variable we want to check in the inspector is `is_fighting` and we want to check that it's equal to `true`.
 Now run the game and see how our boss goes back to not fighting because `is_fighting` is false. Open the debugger graph and hey! our tree is growing and we can visualize why the boss isn't fighting. Also, the root node in the graph has a button `open blackboard`, click that to see our tree's blackboard in real-time.
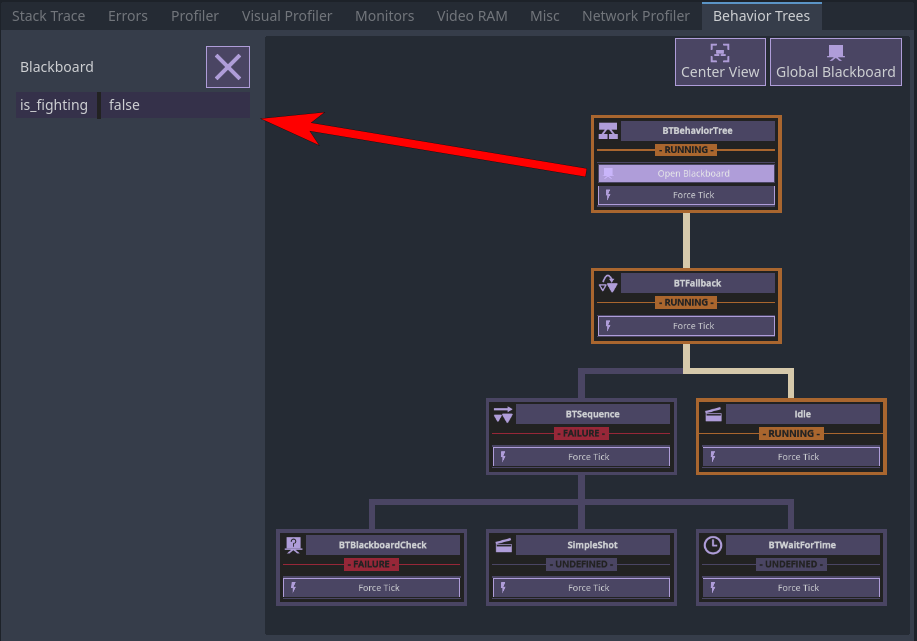 Another cool thing you can do in the debugger is force a node to be ticked for debugging purposes, try and click `force tick` of the simple shot node and see how that causes the boss to shoot at the player once. Cool beans ey?
We need to check if player is close while we're idling and if so set `is_fighting` to true. There are 3 ways to do that:
- We can simply add the distance check as part of the idle behavior.
- Use **conditional abort**.
- Or use a **parallel node**.
The first approach is simple but it breaks the single responsibility principle where each behavior should ideally only do one thing in order to keep our behaviors reusable and well organized. You can still use the first approach in your projects if they're small enough or you just don't care but let's do things properly here and learn something new while we're at it, it's a win win!
We'll discuss the second approach soon, for now I think it's best to use a **Parallel** node that runs at the same time as the idle behavior. To do that, add a new node `BTSimpleParallel` and set the idle node as its child. The simple parallel node as the name implies can have exactly 2 children that will both run in parallel. As a second child we'll add a sequence node. So far your tree should look like this:
Another cool thing you can do in the debugger is force a node to be ticked for debugging purposes, try and click `force tick` of the simple shot node and see how that causes the boss to shoot at the player once. Cool beans ey?
We need to check if player is close while we're idling and if so set `is_fighting` to true. There are 3 ways to do that:
- We can simply add the distance check as part of the idle behavior.
- Use **conditional abort**.
- Or use a **parallel node**.
The first approach is simple but it breaks the single responsibility principle where each behavior should ideally only do one thing in order to keep our behaviors reusable and well organized. You can still use the first approach in your projects if they're small enough or you just don't care but let's do things properly here and learn something new while we're at it, it's a win win!
We'll discuss the second approach soon, for now I think it's best to use a **Parallel** node that runs at the same time as the idle behavior. To do that, add a new node `BTSimpleParallel` and set the idle node as its child. The simple parallel node as the name implies can have exactly 2 children that will both run in parallel. As a second child we'll add a sequence node. So far your tree should look like this:
 We'll add a custom node to the sequence node we created to check if player is close, this time we will not inherite from `BTAction` but rather `BTCondition` because we want it to act like a boolean that runs a check and either succeeds or fails. Create a new `Node` and call it "IsPlayerInRange" and give it a script that inherits `BTCondition`. copy this code:
```
extends BTCondition
const _detect_distance : float = 250.0
func tick(delta : float):
super(delta)
var agent := behavior_tree.agent
var player_pos : Vector2 = get_tree().current_scene.player.global_position
var distance : float = agent.global_position.distance_to(player_pos)
if distance <= _detect_distance:
_set_status(Status.success)
else:
_set_status(Status.failure)
```
Again it's a simple behavior that checks the distance between the boss (agent) and player and compares it to some distance. It's important that condition nodes set their status to either `success` or `failure` just like a boolean, if we set the status to `running` we'll get an error.
And finally since our condition node is inside a sequence let's add a second node that sets `is_fighting` to true. Just like we used `BTBlackboardCheck` to check a blackboard value, we have another built-in action node that set blackboard variables called `BTBlackboardModify`. Add that and set its export variables so that the action is `write`, the key is `is_fighting` and the value is `true`.
We'll add a custom node to the sequence node we created to check if player is close, this time we will not inherite from `BTAction` but rather `BTCondition` because we want it to act like a boolean that runs a check and either succeeds or fails. Create a new `Node` and call it "IsPlayerInRange" and give it a script that inherits `BTCondition`. copy this code:
```
extends BTCondition
const _detect_distance : float = 250.0
func tick(delta : float):
super(delta)
var agent := behavior_tree.agent
var player_pos : Vector2 = get_tree().current_scene.player.global_position
var distance : float = agent.global_position.distance_to(player_pos)
if distance <= _detect_distance:
_set_status(Status.success)
else:
_set_status(Status.failure)
```
Again it's a simple behavior that checks the distance between the boss (agent) and player and compares it to some distance. It's important that condition nodes set their status to either `success` or `failure` just like a boolean, if we set the status to `running` we'll get an error.
And finally since our condition node is inside a sequence let's add a second node that sets `is_fighting` to true. Just like we used `BTBlackboardCheck` to check a blackboard value, we have another built-in action node that set blackboard variables called `BTBlackboardModify`. Add that and set its export variables so that the action is `write`, the key is `is_fighting` and the value is `true`.
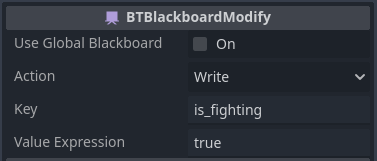 Our nodes setup should look like this:
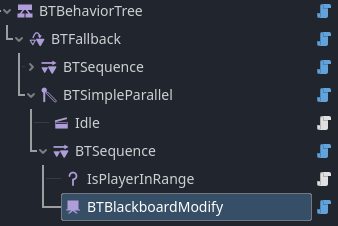 As you can see we have a parallel node that executes 2 children at once, and we're taking advantage of that to both make our boss idle and check if player is nearby at the same time. This is a good time to name your nodes so they're easy to understand both in the nodes tab and in the addon graph.
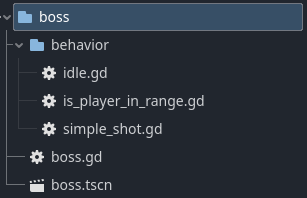
Also let's move our behavior scripts into a sub-directory called "behavior" so we don't make a mess inside the "boss" folder.
As you can see we have a parallel node that executes 2 children at once, and we're taking advantage of that to both make our boss idle and check if player is nearby at the same time. This is a good time to name your nodes so they're easy to understand both in the nodes tab and in the addon graph.
Also let's move our behavior scripts into a sub-directory called "behavior" so we don't make a mess inside the "boss" folder.
 We're almost there. If you run the game you'll notice that even though everything runs as expected, and `is_fighting` is set to true when the player gets close, the boss never starts blasting. That's because our idle behavior always sets a status of `Status.running` so it's always ticked never allowing its parent to move on to the next child or start over, it's like a `while true` situation where once the idle node is entered it's never exited. We can of course modify it to set a status of `Status.success` instead but doing that will prevent its parallel sibling from ticking because the `BTSimpleParallel` parent will exit as soon as it ticks the idle behavior and before getting to tick the parallel sequence.
This is where we introduce something we've mentioned briefly before, the super handy **conditional abort**. In modern behavior trees a conditional abort system allows a composite node to interrupt other nodes and redirects ticks towards itself if it needs to. This means that say a "run away" sequence can immediately interrupt an "idle" behavior when a grenade is thrown at the agent, or a "combat" branch can interrupt an "idle" branch as soon as the player enters the aggro distance of an agent (sounds familiar?) without waiting for that behavior to finish first. This adds a huge responsiveness factor to our AI and is one of the main reasons I created this addon to begin with.
Let's click our combat sequence node and in the inspector set `conditional abort` to `low priority` and run the game.
We're almost there. If you run the game you'll notice that even though everything runs as expected, and `is_fighting` is set to true when the player gets close, the boss never starts blasting. That's because our idle behavior always sets a status of `Status.running` so it's always ticked never allowing its parent to move on to the next child or start over, it's like a `while true` situation where once the idle node is entered it's never exited. We can of course modify it to set a status of `Status.success` instead but doing that will prevent its parallel sibling from ticking because the `BTSimpleParallel` parent will exit as soon as it ticks the idle behavior and before getting to tick the parallel sequence.
This is where we introduce something we've mentioned briefly before, the super handy **conditional abort**. In modern behavior trees a conditional abort system allows a composite node to interrupt other nodes and redirects ticks towards itself if it needs to. This means that say a "run away" sequence can immediately interrupt an "idle" behavior when a grenade is thrown at the agent, or a "combat" branch can interrupt an "idle" branch as soon as the player enters the aggro distance of an agent (sounds familiar?) without waiting for that behavior to finish first. This adds a huge responsiveness factor to our AI and is one of the main reasons I created this addon to begin with.
Let's click our combat sequence node and in the inspector set `conditional abort` to `low priority` and run the game.
 \
\
 It does the thing! conditional aborts are documented in the docs but to give a brief explanation of what the heck is going on when we set the conditional abort of a composite node to `low priority` it becomes able to interrupt any low priority nodes at any time, low priority nodes are nodes that come after the composite in the tree, in this case the simple parallel node. Remember what I said earlier about how we should organize our tree so more prioritized behaviors come first? this is one of the reasons why.
Now how does the composite, in this case the "combat" branch know when to interrupt a low priority branch? It simply runs its first child in parallel whenever a low priority branch is ticking, and when this child succeeds the composite interrupts other branches. This only works if the first child is a `BTCondition` child and you'll get a warning otherwise. In our case the combat composite has `BTBlackboardCheck` as its first child which is a condition node, as such it ticks in parallel as long as the Idle branch is ticking.
### Dead
We'll come back to our combat branch and add more combat patterns later now that the hardest part of introducing a bunch of features is over, but first! Let's give our boss a **dead** state. Can you figure out how we'll do that?
First we need a `health` variable that tracks the boss's health, just like before let's initialize that in the `boss.gd` script with a value of `100`.
```
func _ready():
_behavior_tree.blackboard["health"] = 100
```
Now let's implement the `take_damage` fuction that's been sitting there doing nothing all this time.
```
@onready var _hurt_sound : AudioStreamPlayer = $Hurt
func take_damage():
_behavior_tree.blackboard["health"] -= 1
_hurt_sound.play()
get_tree().current_scene.set_boss_health(_behavior_tree.blackboard["health"])
if _behavior_tree.blackboard["is_fighting"] == false:
_behavior_tree.blackboard["is_fighting"] = true
```
Your boss script should look like this:
It does the thing! conditional aborts are documented in the docs but to give a brief explanation of what the heck is going on when we set the conditional abort of a composite node to `low priority` it becomes able to interrupt any low priority nodes at any time, low priority nodes are nodes that come after the composite in the tree, in this case the simple parallel node. Remember what I said earlier about how we should organize our tree so more prioritized behaviors come first? this is one of the reasons why.
Now how does the composite, in this case the "combat" branch know when to interrupt a low priority branch? It simply runs its first child in parallel whenever a low priority branch is ticking, and when this child succeeds the composite interrupts other branches. This only works if the first child is a `BTCondition` child and you'll get a warning otherwise. In our case the combat composite has `BTBlackboardCheck` as its first child which is a condition node, as such it ticks in parallel as long as the Idle branch is ticking.
### Dead
We'll come back to our combat branch and add more combat patterns later now that the hardest part of introducing a bunch of features is over, but first! Let's give our boss a **dead** state. Can you figure out how we'll do that?
First we need a `health` variable that tracks the boss's health, just like before let's initialize that in the `boss.gd` script with a value of `100`.
```
func _ready():
_behavior_tree.blackboard["health"] = 100
```
Now let's implement the `take_damage` fuction that's been sitting there doing nothing all this time.
```
@onready var _hurt_sound : AudioStreamPlayer = $Hurt
func take_damage():
_behavior_tree.blackboard["health"] -= 1
_hurt_sound.play()
get_tree().current_scene.set_boss_health(_behavior_tree.blackboard["health"])
if _behavior_tree.blackboard["is_fighting"] == false:
_behavior_tree.blackboard["is_fighting"] = true
```
Your boss script should look like this:
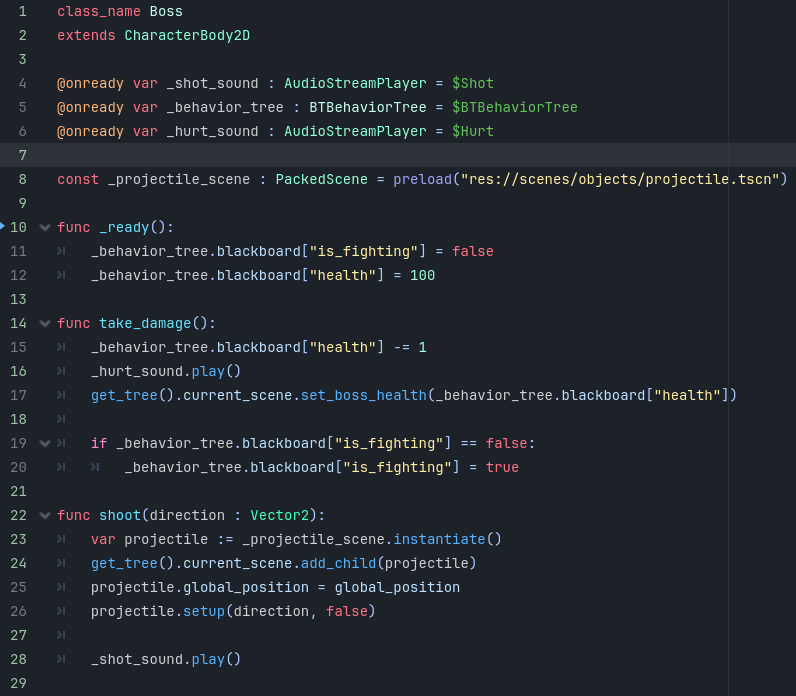 The `take_damage` function will be called whenever the player's projectile hits the boss and will simply reduce the boss's health by 1 and handle UI and sound. Notice the `if` statement at the bottom that sets `is_fighting` to true if it's not true already. This is to prevent an exploit where player can sit outside the detection range of the boss and shoot at it without the boss reacting.
Now the boss has health but when its health reaches 0 nothing happens. Let's create our custom `dead` behavior as a child of the `BTFallback` node and make it run when health is 0. You know how it goes by now, new `Node` called `Dead`, attach script that inherites `BTAction` and save inside `boss/behavior`.
This is our `dead.gd` code:
```
extends BTAction
func enter():
super()
behavior_tree.agent.modulate = Color.BLACK
func tick(delta : float):
super(delta)
_set_status(Status.running)
```
Its status is `Status.running` because we'll not be transitioning to other behaviors, once the boss is dead it's always dead. When we enter this behavior we give the boss a black color to show that it's dead. This will be the most high priority behavior that will interrupt any other behavior once our health reaches 0, regardless of whether the boss was idling or fighting if it's health reaches 0 it's dead. Try to figure out where to place the dead behavior and how to make it interrupt other behaviors.
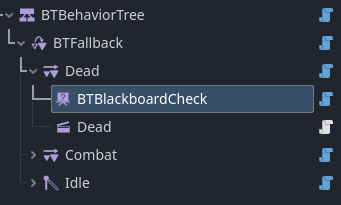
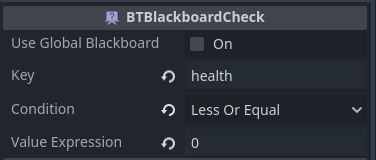
Here's the solution: Place the **Dead** behavior as the first child of the fallback node. Add a new `BTSequence` node and set it as parent to our dead behavior, set its `conditional abort` to `low priority`. Now our sequence node needs a `BTCondition` node as its first child for the conditional abort to work, for that add a `BTBlackboardCheck` as its first child and set its `key` to `health`, `condition` to `Less Or Equal`, and `value` to `0`.
The `take_damage` function will be called whenever the player's projectile hits the boss and will simply reduce the boss's health by 1 and handle UI and sound. Notice the `if` statement at the bottom that sets `is_fighting` to true if it's not true already. This is to prevent an exploit where player can sit outside the detection range of the boss and shoot at it without the boss reacting.
Now the boss has health but when its health reaches 0 nothing happens. Let's create our custom `dead` behavior as a child of the `BTFallback` node and make it run when health is 0. You know how it goes by now, new `Node` called `Dead`, attach script that inherites `BTAction` and save inside `boss/behavior`.
This is our `dead.gd` code:
```
extends BTAction
func enter():
super()
behavior_tree.agent.modulate = Color.BLACK
func tick(delta : float):
super(delta)
_set_status(Status.running)
```
Its status is `Status.running` because we'll not be transitioning to other behaviors, once the boss is dead it's always dead. When we enter this behavior we give the boss a black color to show that it's dead. This will be the most high priority behavior that will interrupt any other behavior once our health reaches 0, regardless of whether the boss was idling or fighting if it's health reaches 0 it's dead. Try to figure out where to place the dead behavior and how to make it interrupt other behaviors.
Here's the solution: Place the **Dead** behavior as the first child of the fallback node. Add a new `BTSequence` node and set it as parent to our dead behavior, set its `conditional abort` to `low priority`. Now our sequence node needs a `BTCondition` node as its first child for the conditional abort to work, for that add a `BTBlackboardCheck` as its first child and set its `key` to `health`, `condition` to `Less Or Equal`, and `value` to `0`.
 \
\
 And we're donzo! Try to beat the boss now and once its health reaches zero it's a goner! You might find having to shoot the boss 100 times to test this a bit tedious so feel free to modify the `take_damage` function inside `boss.gd` to deal more damage while testing but make sure to set it back to 1 when done because we'll introduce some combat patterns and we'll need a big health bar to see all of them before the boss dies. Also, take a look at the graph!
 ### Movement
So far our boss idles by default, then switches to combat when triggered and finally dies. It's a functional boss and we can stop here if we want to but it would make for a boring boss fight. Let's add some very simple movement.
We want our boss to move while in combat, there is no need for movement while idling or while dead so that means our movement behavior goes to the combat sequence, we will be adding more combat patterns soon so we want the movement to happen in parallel while any combat behavior is running. Based on that we can use one of our 2 parallel execution approaches that we have discussed above. `conditional abort` won't work because movement won't be interrupting anything. `BTSimpleParallel` works fine but there is another! a third approach. Don't worry it's the final parallel execution-related node and it's the cleanest and simplest of the 3. We're going to use `BTCompositeAttachment`!
Composite attachments as the name implies attach to a composite node, meaning they will tick in parallel as long as a composite node is ticking. If you've researched behavior trees before, composite attachments in this addon are basically the same thing as Services from Unreal Engine's behavior tree. Each composite could have as many attachments as we want. The main reason to use attachments is to run code while a long or complex branch is running for example to monitor and update some blackboard variable like player position or in our case make the boss move while doing combat.
Let's add a `Node` node like always, name it "ChasePlayer" and give it a script, this time we'll inherite from `BTCompositeAttachment`. You'll notice that the template functions are a little different. We have 2 optional functions `parent_entered` and `parent_exiting` similar to how behavior nodes have `enter` and `exit`. And a `tick` function but in this case it's not required to set a status. Copy this code:
```
extends BTCompositeAttachment
const _move_in_speed : float = 240.0
const _move_out_speed : float = 300.0
const _min_distance : float = 180.0
const _max_distance : float = 200.0
func parent_exiting(is_interrupted):
super(is_interrupted)
behavior_tree.agent.velocity = Vector2.ZERO
func tick(delta : float):
super(delta)
var agent := behavior_tree.agent
var player_pos : Vector2 = get_tree().current_scene.player.global_position
var distance : float = agent.global_position.distance_to(player_pos)
if distance >= _max_distance:
var direction : Vector2 = (player_pos - agent.global_position).normalized()
agent.velocity = direction * _move_in_speed
elif distance <= _min_distance:
var direction : Vector2 = (agent.global_position - player_pos).normalized()
agent.velocity = direction * _move_out_speed
else:
agent.velocity = Vector2.ZERO
agent.move_and_slide()
```
This code will make it so the boss will chase the player and also back away when the player gets too close so it always stays close enough to shoot at the player but not too close.
We haven't discussed where to place our new attachment in the tree. Add a `BTSequence` node as a child of our combat sequence and move the simple shot behavior and the timer to be children of this new sequence. Then move our composite attachment to be its first child like this:
### Movement
So far our boss idles by default, then switches to combat when triggered and finally dies. It's a functional boss and we can stop here if we want to but it would make for a boring boss fight. Let's add some very simple movement.
We want our boss to move while in combat, there is no need for movement while idling or while dead so that means our movement behavior goes to the combat sequence, we will be adding more combat patterns soon so we want the movement to happen in parallel while any combat behavior is running. Based on that we can use one of our 2 parallel execution approaches that we have discussed above. `conditional abort` won't work because movement won't be interrupting anything. `BTSimpleParallel` works fine but there is another! a third approach. Don't worry it's the final parallel execution-related node and it's the cleanest and simplest of the 3. We're going to use `BTCompositeAttachment`!
Composite attachments as the name implies attach to a composite node, meaning they will tick in parallel as long as a composite node is ticking. If you've researched behavior trees before, composite attachments in this addon are basically the same thing as Services from Unreal Engine's behavior tree. Each composite could have as many attachments as we want. The main reason to use attachments is to run code while a long or complex branch is running for example to monitor and update some blackboard variable like player position or in our case make the boss move while doing combat.
Let's add a `Node` node like always, name it "ChasePlayer" and give it a script, this time we'll inherite from `BTCompositeAttachment`. You'll notice that the template functions are a little different. We have 2 optional functions `parent_entered` and `parent_exiting` similar to how behavior nodes have `enter` and `exit`. And a `tick` function but in this case it's not required to set a status. Copy this code:
```
extends BTCompositeAttachment
const _move_in_speed : float = 240.0
const _move_out_speed : float = 300.0
const _min_distance : float = 180.0
const _max_distance : float = 200.0
func parent_exiting(is_interrupted):
super(is_interrupted)
behavior_tree.agent.velocity = Vector2.ZERO
func tick(delta : float):
super(delta)
var agent := behavior_tree.agent
var player_pos : Vector2 = get_tree().current_scene.player.global_position
var distance : float = agent.global_position.distance_to(player_pos)
if distance >= _max_distance:
var direction : Vector2 = (player_pos - agent.global_position).normalized()
agent.velocity = direction * _move_in_speed
elif distance <= _min_distance:
var direction : Vector2 = (agent.global_position - player_pos).normalized()
agent.velocity = direction * _move_out_speed
else:
agent.velocity = Vector2.ZERO
agent.move_and_slide()
```
This code will make it so the boss will chase the player and also back away when the player gets too close so it always stays close enough to shoot at the player but not too close.
We haven't discussed where to place our new attachment in the tree. Add a `BTSequence` node as a child of our combat sequence and move the simple shot behavior and the timer to be children of this new sequence. Then move our composite attachment to be its first child like this:
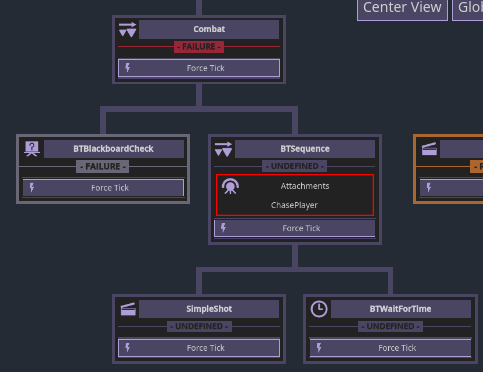
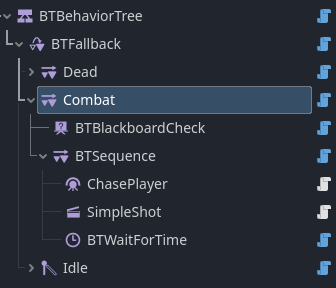 We check if we're fighting and if so enter the fighting sequence. Even though the composite attachment is the first child of the sequence it's not treated like other nodes. The sequence node will just ignore the attachment and tick the simple shot behavior as its first child, it might be hard to visualize that with the Godot nodes tree since each node is either a parent or a child but this is easier to see in the debugger graph:
 Run the game and see for yourself!
### Combat patterns
It's time for the pure fun part. All the setup that we've been doing so far leads to this point where we get to reap what we sown and see what trully distinguishes behavior trees from other AI approaches!
Currently our boss have one attack type, it just shoots projectiles directly at the player and waits for a timeout. That's all fun and games but a true boss has at least a couple of attack patterns that are picked based on some variables and some randomness. For our case we just want something simple and interesting so we'll add 2 more attack patterns and pick one of our total 3 patterns at random each time.
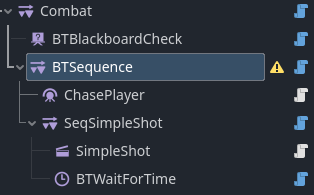
First, group the simple shot behavior and its timer under a sequence node parent that we'll call "SeqSimpleShot".
Run the game and see for yourself!
### Combat patterns
It's time for the pure fun part. All the setup that we've been doing so far leads to this point where we get to reap what we sown and see what trully distinguishes behavior trees from other AI approaches!
Currently our boss have one attack type, it just shoots projectiles directly at the player and waits for a timeout. That's all fun and games but a true boss has at least a couple of attack patterns that are picked based on some variables and some randomness. For our case we just want something simple and interesting so we'll add 2 more attack patterns and pick one of our total 3 patterns at random each time.
First, group the simple shot behavior and its timer under a sequence node parent that we'll call "SeqSimpleShot".
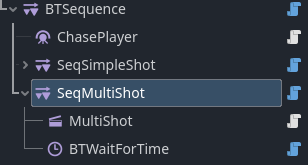
 Let's add another sequence node sibling called "SeqMultiShot" which will be the parent of a new multi-shot pattern that we're going to create.
Create a new `Node` that we'll call "MultiShot", attach a `BTAction` script and save it inside the `boss/behavior` folder as always and copy this code:
```
extends BTAction
const _shots_count : int = 12
func tick(delta : float):
super(delta)
for i : int in _shots_count:
var angle : float = float(i)/_shots_count * TAU
behavior_tree.agent.shoot(Vector2.RIGHT.rotated(angle))
_set_status(Status.success)
```
The multi-shot pattern simply shoots in all directions at once, you can change the `_shots_count` and the shots will be automatically spread evenly but I found `12` to be a balanced value.
Add another child to our "SeqMultiShot" sequence which will be `BTWaitForTime` with a wait time of `1.5`.
Let's add another sequence node sibling called "SeqMultiShot" which will be the parent of a new multi-shot pattern that we're going to create.
Create a new `Node` that we'll call "MultiShot", attach a `BTAction` script and save it inside the `boss/behavior` folder as always and copy this code:
```
extends BTAction
const _shots_count : int = 12
func tick(delta : float):
super(delta)
for i : int in _shots_count:
var angle : float = float(i)/_shots_count * TAU
behavior_tree.agent.shoot(Vector2.RIGHT.rotated(angle))
_set_status(Status.success)
```
The multi-shot pattern simply shoots in all directions at once, you can change the `_shots_count` and the shots will be automatically spread evenly but I found `12` to be a balanced value.
Add another child to our "SeqMultiShot" sequence which will be `BTWaitForTime` with a wait time of `1.5`.
 Now the boss has 2 attack patterns, both of which shoot in a specific way and have a cooldown timer.
Start the game and you'll notice how the boss does the 2 attack patterns in order one after the other since both patterns are children of a sequence node. What we want instead is for the boss to pick one of them at random based on some weight so the simple shot pattern happens more frequently than the harder multi-shot pattern. Sounds complicated? it's not.
Introducing `BTFallbackRandom`! It's a `BTFallback` node except it picks its children at random which is exactly what we want! replace the sequence node the is a parent to both "SeqSimpleShot" and "SeqMultiShot" with a `BTFallbackRandom` node (don't right click the sequence node and chose "change type" or Godot might freakout, instead add the `BTFallbackRandom` node, move the children of the sequence into it and delete the sequence).
Now the boss has 2 attack patterns, both of which shoot in a specific way and have a cooldown timer.
Start the game and you'll notice how the boss does the 2 attack patterns in order one after the other since both patterns are children of a sequence node. What we want instead is for the boss to pick one of them at random based on some weight so the simple shot pattern happens more frequently than the harder multi-shot pattern. Sounds complicated? it's not.
Introducing `BTFallbackRandom`! It's a `BTFallback` node except it picks its children at random which is exactly what we want! replace the sequence node the is a parent to both "SeqSimpleShot" and "SeqMultiShot" with a `BTFallbackRandom` node (don't right click the sequence node and chose "change type" or Godot might freakout, instead add the `BTFallbackRandom` node, move the children of the sequence into it and delete the sequence).
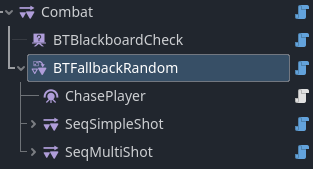 Why did we use a `BTFallbackRandom` and not a `BTSequenceRandom`? Well dear reader, you got good attention to details. As you might remember fallback composites are like an **OR** check while sequence composites are more like an **AND**. In this case we want our random composite to pick a random child, and if the child does its thing and succeeds we **stop** there instead of picking another child immediately.
Now a patterns in picked randomly each time but both patterns have a 50% chance of running which isn't what we want. Select the `BTFallbackRandom` node and in the inspector toggle `Custom Weights` on this should unlock new variables that determine the chances of each pattern to be picked. Let's give a value of 6 for the simple shot pattern and 1 for the multi-shot pattern. Now multi-shots are 6 times less likely to be chosen.
Try it out! The boss fight should be more engaging now.
One more attack pattern left, it's the same process so we'll go through it briefly: Create new action node called "CrazyShot" with a script and save it to the behavior folder. Copy this code:
```
extends BTAction
@onready var _attack_timer : Timer = $AttackTime
@onready var _time_between_shots : Timer = $TimeBetweenShots
const _shot_angle_increment : float = deg_to_rad(20)
var _shot_angle : float = 0.0
func enter():
super()
_shot_angle = 0.0
_attack_timer.start()
_time_between_shots.start()
func exit(is_interrupted : bool):
super(is_interrupted)
if is_interrupted:
_attack_timer.stop()
_time_between_shots.stop()
func tick(delta : float):
super(delta)
if _attack_timer.is_stopped():
_set_status(Status.success)
else:
_set_status(Status.running)
func _on_time_between_shots_timeout():
_shot_angle += _shot_angle_increment
behavior_tree.agent.shoot(Vector2.RIGHT.rotated(_shot_angle))
```
This time give the node 2 `Timer` children, one called "AttackTime" with a `wait_time` of `4` and `one_shot` on. The other called "TimeBetweenShots" with a `wait_time` of `0.12` and it's `timout` signal connected to our `_on_time_between_shots_timeout` function.
Why did we use a `BTFallbackRandom` and not a `BTSequenceRandom`? Well dear reader, you got good attention to details. As you might remember fallback composites are like an **OR** check while sequence composites are more like an **AND**. In this case we want our random composite to pick a random child, and if the child does its thing and succeeds we **stop** there instead of picking another child immediately.
Now a patterns in picked randomly each time but both patterns have a 50% chance of running which isn't what we want. Select the `BTFallbackRandom` node and in the inspector toggle `Custom Weights` on this should unlock new variables that determine the chances of each pattern to be picked. Let's give a value of 6 for the simple shot pattern and 1 for the multi-shot pattern. Now multi-shots are 6 times less likely to be chosen.
Try it out! The boss fight should be more engaging now.
One more attack pattern left, it's the same process so we'll go through it briefly: Create new action node called "CrazyShot" with a script and save it to the behavior folder. Copy this code:
```
extends BTAction
@onready var _attack_timer : Timer = $AttackTime
@onready var _time_between_shots : Timer = $TimeBetweenShots
const _shot_angle_increment : float = deg_to_rad(20)
var _shot_angle : float = 0.0
func enter():
super()
_shot_angle = 0.0
_attack_timer.start()
_time_between_shots.start()
func exit(is_interrupted : bool):
super(is_interrupted)
if is_interrupted:
_attack_timer.stop()
_time_between_shots.stop()
func tick(delta : float):
super(delta)
if _attack_timer.is_stopped():
_set_status(Status.success)
else:
_set_status(Status.running)
func _on_time_between_shots_timeout():
_shot_angle += _shot_angle_increment
behavior_tree.agent.shoot(Vector2.RIGHT.rotated(_shot_angle))
```
This time give the node 2 `Timer` children, one called "AttackTime" with a `wait_time` of `4` and `one_shot` on. The other called "TimeBetweenShots" with a `wait_time` of `0.12` and it's `timout` signal connected to our `_on_time_between_shots_timeout` function.
 This pattern is similar to multi-shot but shoots sequentially and for a longer duration, you'll understand when you see it. What's worth noting is that we start our timers in `enter` and if we get interrupted by another node in the middle of waiting for the timer we make sure to stop the attack timer in `exit` (`is_interrupted`).
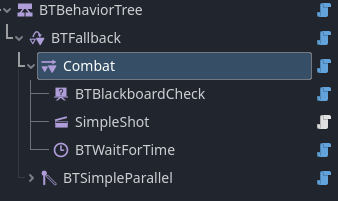
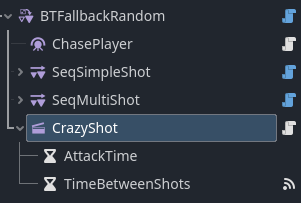
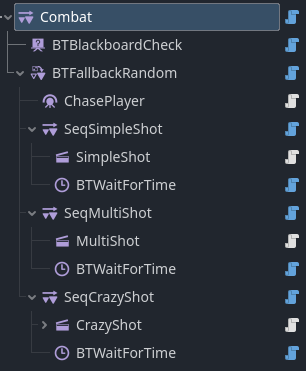
Just like other patterns, give it a parent `BTSequence` that we'll name "SeqCrazyShot" and a sibling `BTWaitForTime` with a time of `2`. All in all our combat branch should look like this.
This pattern is similar to multi-shot but shoots sequentially and for a longer duration, you'll understand when you see it. What's worth noting is that we start our timers in `enter` and if we get interrupted by another node in the middle of waiting for the timer we make sure to stop the attack timer in `exit` (`is_interrupted`).
Just like other patterns, give it a parent `BTSequence` that we'll name "SeqCrazyShot" and a sibling `BTWaitForTime` with a time of `2`. All in all our combat branch should look like this.
 Back in the `BTFallbackRandom` node and let's assign the new pattern a weight of `1` and change multi-shot to have a weight of `4` and simple shot a weight of `20`. Now we can play the game and see how the additional patterns have really given some character to our boss! And our tree is now fairly complicated but also hopefully simple to understand.
Some nodes such as `BTFallback` and `BTSequence` can be tricky to understand at first but just like game development you just have to do it a few times for it to click.
If you wish to stop here I understand. I try my best to keep this guide short and simple but following a written guide can be exhusting compared to say a video guide (wink wink hero needed). Congratulations! you implemented your first (I assume) behavior tree and got a cool boss fight going! you can skip the next section and go to the Summery.
Elif you wish to continue there is one last brief thing that we're going to cover which is making our attack patterns reusable and using them with different random weights depending on the health value of the boss so the less health it has to more it will use difficult patterns more.
### Health Influence
Remember our blackboard variables? we'll use the `health` to give our boss combat "phases" so each phase will be triggered when the health goes down to a certain value and each phase will have its own patterns and their randomness weight.
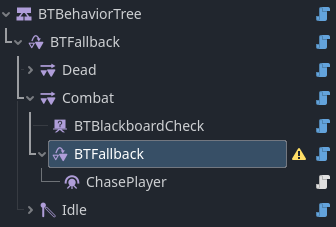
Since we're going to be reusing our attack patterns let's save them to file. Right click each of "SeqSimpleShot", "SeqMultiShot" and "SeqCrazyShot" and select "Save Branch as Scene" then save them in the behavior folder. Then just delete them from the game for now and replace the `BTFallbackRandom` with a simple `BTFallback`. The nodes setup should look lik this:
Back in the `BTFallbackRandom` node and let's assign the new pattern a weight of `1` and change multi-shot to have a weight of `4` and simple shot a weight of `20`. Now we can play the game and see how the additional patterns have really given some character to our boss! And our tree is now fairly complicated but also hopefully simple to understand.
Some nodes such as `BTFallback` and `BTSequence` can be tricky to understand at first but just like game development you just have to do it a few times for it to click.
If you wish to stop here I understand. I try my best to keep this guide short and simple but following a written guide can be exhusting compared to say a video guide (wink wink hero needed). Congratulations! you implemented your first (I assume) behavior tree and got a cool boss fight going! you can skip the next section and go to the Summery.
Elif you wish to continue there is one last brief thing that we're going to cover which is making our attack patterns reusable and using them with different random weights depending on the health value of the boss so the less health it has to more it will use difficult patterns more.
### Health Influence
Remember our blackboard variables? we'll use the `health` to give our boss combat "phases" so each phase will be triggered when the health goes down to a certain value and each phase will have its own patterns and their randomness weight.
Since we're going to be reusing our attack patterns let's save them to file. Right click each of "SeqSimpleShot", "SeqMultiShot" and "SeqCrazyShot" and select "Save Branch as Scene" then save them in the behavior folder. Then just delete them from the game for now and replace the `BTFallbackRandom` with a simple `BTFallback`. The nodes setup should look lik this:
 Let's add 3 `BTSequence` nodes as children of our fallback node. right after the "ChasePlayer" node. Name them "HealthHigh", "HealthLow" and "HealthVeryLow" respectively. For each one of the 3 give it a `BTBlackboardCheck` child and a `BTFallbackRandom` child. It should look like this:
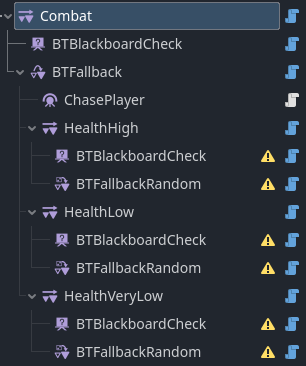 Let's rename and set the variables of each of the 3 `BTBlackboardCheck` nodes:
- Name the first "IsHealthHigh" and set `key` to `health`, `condition` to `More Than` and `value` to `75`.
- The second "IsHealthLow", `key` to `health`, `condition` to `More Than` and `value` to `40`.
- The third "IsHealthVeryLow", `key` to `health`, `condition` to `More Than` and `value` to `0`.
This way each the `BTBlackboardCheck` node will check that the health is more than a certain value, if so succeeds and causes parent sequence to run the `BTFallbackRandom` which will include our combat patterns. Otherwise fails causing the parent sequence to fail and the granparent fallback to run the next sequence. That's how we end up with each of the 3 branches ("HealthHigh", "HealthLow" and "HealthVeryLow") running only when the previous branch fails.
Now the final step is to add our combat patterns to each of the `BTFallbackRandom` nodes and configure their weights differently to adjust the boss difficulty for each phase. You're free to set patterns up as you please but this is what I think works best:
- For "HealthHigh" we will instance "SeqSimpleShot" and "SeqMultiShot" as children of the `BTFallbackRandom`, enable `Custom Weights` and set the weights to: 14 and 1.
- For "HealthLow" instance all 3 ("SeqSimpleShot", "SeqMultiShot" and "SeqCrazyShot") with weights of: 12, 5, 1.
- For "HealthVeryLow" instance all 3 with weights of: 7, 3, 1.
And we're so very done! That's it really. Give the game a shot and see how it feels. You can also open the debugger graph while the boss is idle and resize the game window so you can see both the game and the graph and observe the boss's brain in action.
Congratulations!
## Summery
In this guide we learned how to use behavior trees in general and specifically DVs Behavior Tree addon.
Some key takeaways:
- `BTLeaf` nodes are used to define a specific action or condition.
- `BTComposite` control what leaf should tick and the transition between nodes.
- Generally you'll be using built-in composites and decorators while creating your own custom leaves.
- To create a custom bahavior node add a `Node` node and attach custom script to it.
- `BTFallback` and `BTSequence` are the most commonly used nodes to run children in an **OR** or **AND** fashion.
- `BTSimpleParallel`, `conditional abort` and `BTCompositeAttachment` are the 3 ways to have parallel execution.
- Behaviors can be saved as scenes and reused.
- Nodes are typically executed from first to last where children that come first have more priority.
- Debugger graph can be used to observe the behavior tree, its flow and its variables at run-time.
Here's a summery of our nodes structure:
- Our boss has 3 states: Idle, Combat and Dead ordered backwards in order of priority.
- Idle consists of a parallel node that runs the idle behavior as well as check if it's time to switch to combat.
- Combat has the most nodes of the 3 but it's very simple. It listens for `is_fighting` while the boss is idle, and as soon as the idle branch sets it to true the combat branch interrupts and redirects flow to itself. It consists of a `BTCompositeAttachment` that handles movement while any combat node ticks and 3 phases each of which begins when the previous phase ends.
- Dead is constantly checking if the health is 0 while the other 2 lower priority branches are running. As soon as health is 0 the dead branch interrupts and redirects flow to itself.
# Final Thoughts
There are some things that we didn't cover in this guide such as `BTDecorator` nodes, the global blackboard and other types of conditional abort. I didn't want to include everything in this guide to avoid overwhelming users and avoid a 1000 words document that no one would read. What we covered here is more than enough to make almost any behavior tree, please check the docs for everything.
Feel free to add you own stuff like a camera shake, better feedback and a proper death sequence for example.
I'm constantly trying to improve and simplify this guide but I'm not much of a writer and don't speak English natively so any feedback or help would be appreciated. If you're a youtuber and want to make a video guide of your own or something similar to what I wrote please contact me, I'll be very grateful, my contact info is in the addon's repository at the bottom of the page.
# FAQ
(Ask away)
Let's rename and set the variables of each of the 3 `BTBlackboardCheck` nodes:
- Name the first "IsHealthHigh" and set `key` to `health`, `condition` to `More Than` and `value` to `75`.
- The second "IsHealthLow", `key` to `health`, `condition` to `More Than` and `value` to `40`.
- The third "IsHealthVeryLow", `key` to `health`, `condition` to `More Than` and `value` to `0`.
This way each the `BTBlackboardCheck` node will check that the health is more than a certain value, if so succeeds and causes parent sequence to run the `BTFallbackRandom` which will include our combat patterns. Otherwise fails causing the parent sequence to fail and the granparent fallback to run the next sequence. That's how we end up with each of the 3 branches ("HealthHigh", "HealthLow" and "HealthVeryLow") running only when the previous branch fails.
Now the final step is to add our combat patterns to each of the `BTFallbackRandom` nodes and configure their weights differently to adjust the boss difficulty for each phase. You're free to set patterns up as you please but this is what I think works best:
- For "HealthHigh" we will instance "SeqSimpleShot" and "SeqMultiShot" as children of the `BTFallbackRandom`, enable `Custom Weights` and set the weights to: 14 and 1.
- For "HealthLow" instance all 3 ("SeqSimpleShot", "SeqMultiShot" and "SeqCrazyShot") with weights of: 12, 5, 1.
- For "HealthVeryLow" instance all 3 with weights of: 7, 3, 1.
And we're so very done! That's it really. Give the game a shot and see how it feels. You can also open the debugger graph while the boss is idle and resize the game window so you can see both the game and the graph and observe the boss's brain in action.
Congratulations!
## Summery
In this guide we learned how to use behavior trees in general and specifically DVs Behavior Tree addon.
Some key takeaways:
- `BTLeaf` nodes are used to define a specific action or condition.
- `BTComposite` control what leaf should tick and the transition between nodes.
- Generally you'll be using built-in composites and decorators while creating your own custom leaves.
- To create a custom bahavior node add a `Node` node and attach custom script to it.
- `BTFallback` and `BTSequence` are the most commonly used nodes to run children in an **OR** or **AND** fashion.
- `BTSimpleParallel`, `conditional abort` and `BTCompositeAttachment` are the 3 ways to have parallel execution.
- Behaviors can be saved as scenes and reused.
- Nodes are typically executed from first to last where children that come first have more priority.
- Debugger graph can be used to observe the behavior tree, its flow and its variables at run-time.
Here's a summery of our nodes structure:
- Our boss has 3 states: Idle, Combat and Dead ordered backwards in order of priority.
- Idle consists of a parallel node that runs the idle behavior as well as check if it's time to switch to combat.
- Combat has the most nodes of the 3 but it's very simple. It listens for `is_fighting` while the boss is idle, and as soon as the idle branch sets it to true the combat branch interrupts and redirects flow to itself. It consists of a `BTCompositeAttachment` that handles movement while any combat node ticks and 3 phases each of which begins when the previous phase ends.
- Dead is constantly checking if the health is 0 while the other 2 lower priority branches are running. As soon as health is 0 the dead branch interrupts and redirects flow to itself.
# Final Thoughts
There are some things that we didn't cover in this guide such as `BTDecorator` nodes, the global blackboard and other types of conditional abort. I didn't want to include everything in this guide to avoid overwhelming users and avoid a 1000 words document that no one would read. What we covered here is more than enough to make almost any behavior tree, please check the docs for everything.
Feel free to add you own stuff like a camera shake, better feedback and a proper death sequence for example.
I'm constantly trying to improve and simplify this guide but I'm not much of a writer and don't speak English natively so any feedback or help would be appreciated. If you're a youtuber and want to make a video guide of your own or something similar to what I wrote please contact me, I'll be very grateful, my contact info is in the addon's repository at the bottom of the page.
# FAQ
(Ask away)