 [Paper](https://hannes-stark.com/assets/boltzgen.pdf) |
[Slack](https://boltz.bio/join-slack) |
[Video](https://www.youtube.com/watch?v=9d_QWUUI1Qo)
[Paper](https://hannes-stark.com/assets/boltzgen.pdf) |
[Slack](https://boltz.bio/join-slack) |
[Video](https://www.youtube.com/watch?v=9d_QWUUI1Qo) 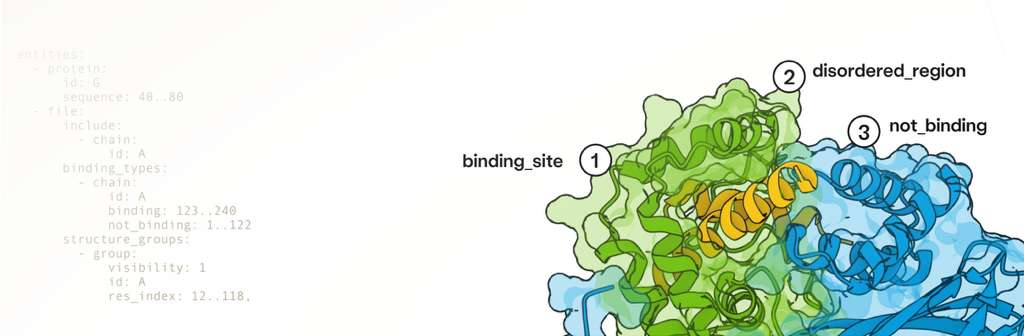
[Paper](https://hannes-stark.com/assets/boltzgen.pdf) |
[Slack](https://boltz.bio/join-slack) |
[Video](https://www.youtube.com/watch?v=9d_QWUUI1Qo) 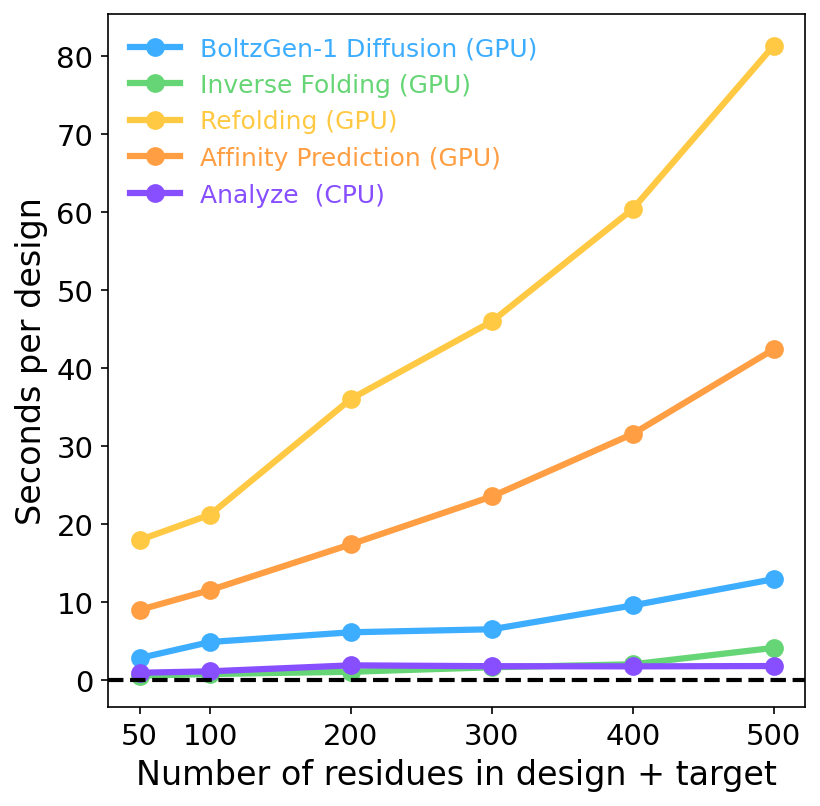 5. You likely want to rerun the filtering step with different settings (takes ~15 sec). Use
`boltzgen run --steps filtering --output ...` or the Jupyter notebook `filter.ipynb` which is often more convenient.
Detailed explanation in ["Rerunning the Filtering"](#rerunning-the-filtering-recommended).
**How many designs to generate?** \
More is better. The "minimum" depends on your target.
BoltzGen should be run on a GPU. On the right you can see the time required for each step in the pipeline for a single design on an A100 GPU.
We suggest first running with e.g. `--num_design 50`, checking that everything behaves as desired, and then increasing `--num_design` to between 10,000 - 60,000.
## Pipeline output
When the pipeline completes your output directory will have:
- `config/`, `steps.yaml`: configuration files.
- `intermediate_designs/`: output of design step
- `/*.cif` and `/*.npz`: CIF and NPZ (metadata files) for the designed proteins and targets before inverse folding
- `intermediate_designs_inverse_folded/`: output of inverse folding, folding, and analysis steps
- `/*.cif` and `/*.npz` : CIF and NPZ for designed proteins and targets after inverse folding. *Note: For designed residues, only the backbone atoms will have coordinates (sidechain coordinates will be 0,0,0).*
- `/refold_cif`: refolded complex structures (target and binder). This is the primary input to the analysis and filtering steps.
- `/refold_design_cif`: refolded binder structures, without target.
- `/aggregate_metrics_analyze.csv`, `/per_target_metrics_analyze.csv` — outputs of the analysis step.
- `final_ranked_designs/` : outputs of the filtering step
- `/intermediate_ranked_
5. You likely want to rerun the filtering step with different settings (takes ~15 sec). Use
`boltzgen run --steps filtering --output ...` or the Jupyter notebook `filter.ipynb` which is often more convenient.
Detailed explanation in ["Rerunning the Filtering"](#rerunning-the-filtering-recommended).
**How many designs to generate?** \
More is better. The "minimum" depends on your target.
BoltzGen should be run on a GPU. On the right you can see the time required for each step in the pipeline for a single design on an A100 GPU.
We suggest first running with e.g. `--num_design 50`, checking that everything behaves as desired, and then increasing `--num_design` to between 10,000 - 60,000.
## Pipeline output
When the pipeline completes your output directory will have:
- `config/`, `steps.yaml`: configuration files.
- `intermediate_designs/`: output of design step
- `/*.cif` and `/*.npz`: CIF and NPZ (metadata files) for the designed proteins and targets before inverse folding
- `intermediate_designs_inverse_folded/`: output of inverse folding, folding, and analysis steps
- `/*.cif` and `/*.npz` : CIF and NPZ for designed proteins and targets after inverse folding. *Note: For designed residues, only the backbone atoms will have coordinates (sidechain coordinates will be 0,0,0).*
- `/refold_cif`: refolded complex structures (target and binder). This is the primary input to the analysis and filtering steps.
- `/refold_design_cif`: refolded binder structures, without target.
- `/aggregate_metrics_analyze.csv`, `/per_target_metrics_analyze.csv` — outputs of the analysis step.
- `final_ranked_designs/` : outputs of the filtering step
- `/intermediate_ranked_.yaml design specification files work is in example/README.md. Below is an example based explanation, which is sufficient for most tasks.
**IMPORTANT:** ⚠️ All residue indices are specified **starting at 1** and we use the canonical mmcif residue index `label_asym_id`, and **not** the `auth_asym_id` author residue index!
You can check the indexing in your mmcif file by opening it in https://molstar.org/viewer/, hovering over a residue, and checking the index on the bottom right. You will see something like this where **41 is the index we use, the auth id 22 is incorrect**:

After you constructed your `.yaml` file we recommend that you run the `check` command on it:
1. Run `boltzgen check example/vanilla_peptide_with_target_binding_site/beetletert.yaml`.
2. Visualize the resulting mmcif file in a protein structure viewer (e.g. PyMOL, Chimera, or online: https://molstar.org/viewer/).
3. Your viewer should show the binding site in a differnt color than the rest of the target.
## Example based explanation:
We provide many example `.yaml` files in the `example/` directory, including:
- `example/design_spec_showcasing_all_functionalities.yaml`
- `example/vanilla_peptide_with_target_binding_site/beetletert.yaml`
- `example/peptide_against_specific_site_on_ragc/rragc.yaml`
- `example/nanobody/penguinpox.yaml`
- `example/fab_targets/pdl1.yaml`
- `example/denovo_zinc_finger_against_dna/zinc_finger.yaml`
- `example/protein_binding_small_molecule/chorismite.yaml`
- `example/small_molecule_from_file_and_smiles/4g37.yaml`
Small example of a protein design against a target protein without binding site specified:
```yaml
entities:
# Designed protein with between 80 and 140 residues
# (The length is randomly sampled)
- protein:
id: B
sequence: 80..140
# The target is extracted from a .cif file
- file:
# file references are relative to the location of the .yaml file
path: 6m1u.cif # .pdb files also work
# Which chain in the .cif file to use as target (uses all chains if unspecified)
include:
- chain:
id: A
```
**IMPORTANT:** ⚠️ File references inside a yaml file (e.g. to cif files) are interpreted relative to the directory of the yaml file.
Example highlighting many (not all) functionalities:
```yaml
entities:
# Specification of the target which is extracted from a .cif file
- file:
path: 8r3a.cif # .pdb files also work
# Which chain and residues in the .cif file to use as target (uses all chains if unspecified)
include:
- chain:
id: A
res_index: 2..50,55.. # residues between 2 and 50 and anything larger than 55
- chain:
id: B
# Wich regions of the target the design should or should NOT
# bind to (this can be left unspecified, then we just bind anywhere)
binding_types:
- chain:
id: A
binding: 5..7,13
- chain:
id: B
not_binding: "all"
# Which regions of the target should have their structure specified.
# By default, everything is visibility 1 which means that the structure is specified.
# If the visibility is 0, then the structure is not specified.
structure_groups:
- group:
visibility: 1
id: A
res_index: 10..13
- group:
# The relative positioning of things in structure group 2
# is not specified w.r.t to things in structure group 1
visibility: 2
id: B
# Overwrite the previous visibility setting and set it to 0 for res_index 13
- group:
visibility: 0
id: A
res_index: 13
# Optionally you can say that some residues in a loaded .cif file should also be redesigned.
design:
- chain:
id: A
res_index: 14..19
# For designed regions you can say what secondary structure they should have
secondary_structure:
- chain:
id: A
loop: 14
helix: 15..17
sheet: 19
# Specify a NON-designed protein chain
- protein:
id: X
sequence: AAVTTTTPPP
# Specify a designed protein chain
# Numbers specify what is being designed
- protein:
id: G
# random number between 15 and 20 of designed residues (inclusive)
sequence: 15..20AAAAAAVTTTT18PPP
# A designed helical peptides with WHL staple
# (see the constraints below that connect the peptide with the WHL ligand)
- protein:
id: R
# Random number of design residues between 3 and 5,
# then a Cystein, then 6 design residues, then ...
sequence: 3..5C6C3
- ligand:
id: Q
ccd: WHL
# A designed peptide with 17 residues
- protein:
id: H
sequence: 17
# specification for a designed peptide with two Cys and a disulfide bond (see constraints)
- protein:
id: S
sequence: 10..14C6C3
constraints:
# specify connections as if the minimum possible number of residues was sampled
- bond:
atom1: [R, 4, SG] # connection for a helical peptides with WHL staple between small molecule and designed peptide
atom2: [Q, 1, CK]
- bond:
atom1: [R, 11, SG] # connection for a helical peptides with WHL staple between small molecule and designed peptide
atom2: [Q, 1, CH]
- bond:
atom1: [S, 11, SG] # connection for a disulfide bond between Cys and Cys in designed peptide
atom2: [S, 18, SG]
```
## Symmetric complex design (inverse-folding only)
For symmetric complexes (e.g., homo-dimers), the you can tie sequence generation during inverse folding by specifying the `symmetric_group` for each symmetric chain. The `protein-redesign` protocol allows for scoring complexes without separate binders/targets.
Sequence tying works with `--only_inverse_fold` and after backbone generation.
```yaml
entities:
- file:
path: symmetric_dimer.cif
include:
- chain:
id: A
res_index: 100..300
symmetric_group: 1 # Link chains A and B for symmetric sampling
- chain:
id: B
res_index: 100..300
symmetric_group: 1 # Same group = same sampled insertion length
# Mark residues to redesign on both chains
design:
- chain:
id: A
res_index: 200..210
- chain:
id: B
res_index: 200..210
```
# Running only specific pipeline steps
You can run only specific parts of the pipeline using the `--steps` flag:
**Run only the design and inverse_folding steps:**
```bash
boltzgen run example/cyclotide/3ivq.yaml \
--output workbench/partial-run \
--protocol peptide-anything \
--steps design inverse_folding \
--num_designs 2
```
If you want to run only the inverse folding and subsequent design evaluation steps (but not the backbone design step), you can also run:
**Run only inverse_folding step:**
```bash
boltzgen run example/inverse_folding/1brs.yaml \
--output workbench/if-only \
--only_inverse_fold \
--inverse_fold_num_sequences 2
```
**Available steps:**
- `design` - Generate num_design candidates using the diffusion model based on your design specification
- `inverse_folding` - Redesign sequences from the previous step using our inverse folding model
- `folding` - Re-fold the designed binders with their targets using Boltz-2 model
- `design_folding` - Re-fold the designed binders alone without target (disabled for peptide and nanobody binders)
- `affinity` - Predict binding affinity between designed proteins and their target small molecules using Boltz-2 (for design of small molecule binders only)
- `analysis` - Analyze the folded structures using various metrics to assess design quality
- `filtering` - Filter and rank designs based on analysis results to select the best candidates
# Rerunning the filtering (recommended)
After you generate designs, you will probably want to rerun the filtering step (which runs very fast) several times to tune your criteria for selecting good ones.
You can run the filtering step either using the `boltzgen` command or
using a [jupyter notebook](filter.ipynb) that we provide. In most cases the notebook is more convenient. If you'd prefer to use the command-line, here is an example of re-running the filters without the notebook.
First, suppose we initially generated some designs with default filtering options:
```bash
boltzgen run example/binding_disordered_peptides/tpp4.yaml \
--output workbench/tpp4 \
--protocol protein-anything \
--num_designs 20
```
After this runs we see that only a few designs passed our filters. We might now adjust the filters by running:
```
boltzgen run example/binding_disordered_peptides/tpp4.yaml \
--output workbench/tpp4 \
--protocol protein-anything \
--steps filtering \
--refolding_rmsd_threshold 3.0 \
--filter_biased=false \
--additional_filters 'ALA_fraction<0.3' 'filter_rmsd_design<2.5' \
--metrics_override plip_hbonds_refolded=4 \
--alpha 0.2
```
# Running on SLURM
See [slurm-example](slurm-example).
# All command line arguments
## `boltzgen run`
The `boltzgen run` command executes the BoltzGen binder design pipeline. Here are all available options:
### Design Specification
- `design_spec` - Path(s) to design specification YAML file(s), or a directory containing prepared configs
### General Configuration
- `--protocol {protein-anything,peptide-anything,protein-small_molecule,nanobody-anything,antibody-anything,protein-redesign}` - Protocol to use for the design. This determines default settings and in some cases what steps are run. Default: protein-anything. See [Protocols](#protocols) section for details.
- `--output OUTPUT` - Output directory for pipeline results
- `--config CONFIG [CONFIG ...]` - Override pipeline step configuration, in format `