HarnessRouter
The unified interface for agent harnesses.

GitHub Stars, exact count License: Apache 2.0 Docker pulls UHP conformance: Full OpenAI Responses: Compatible

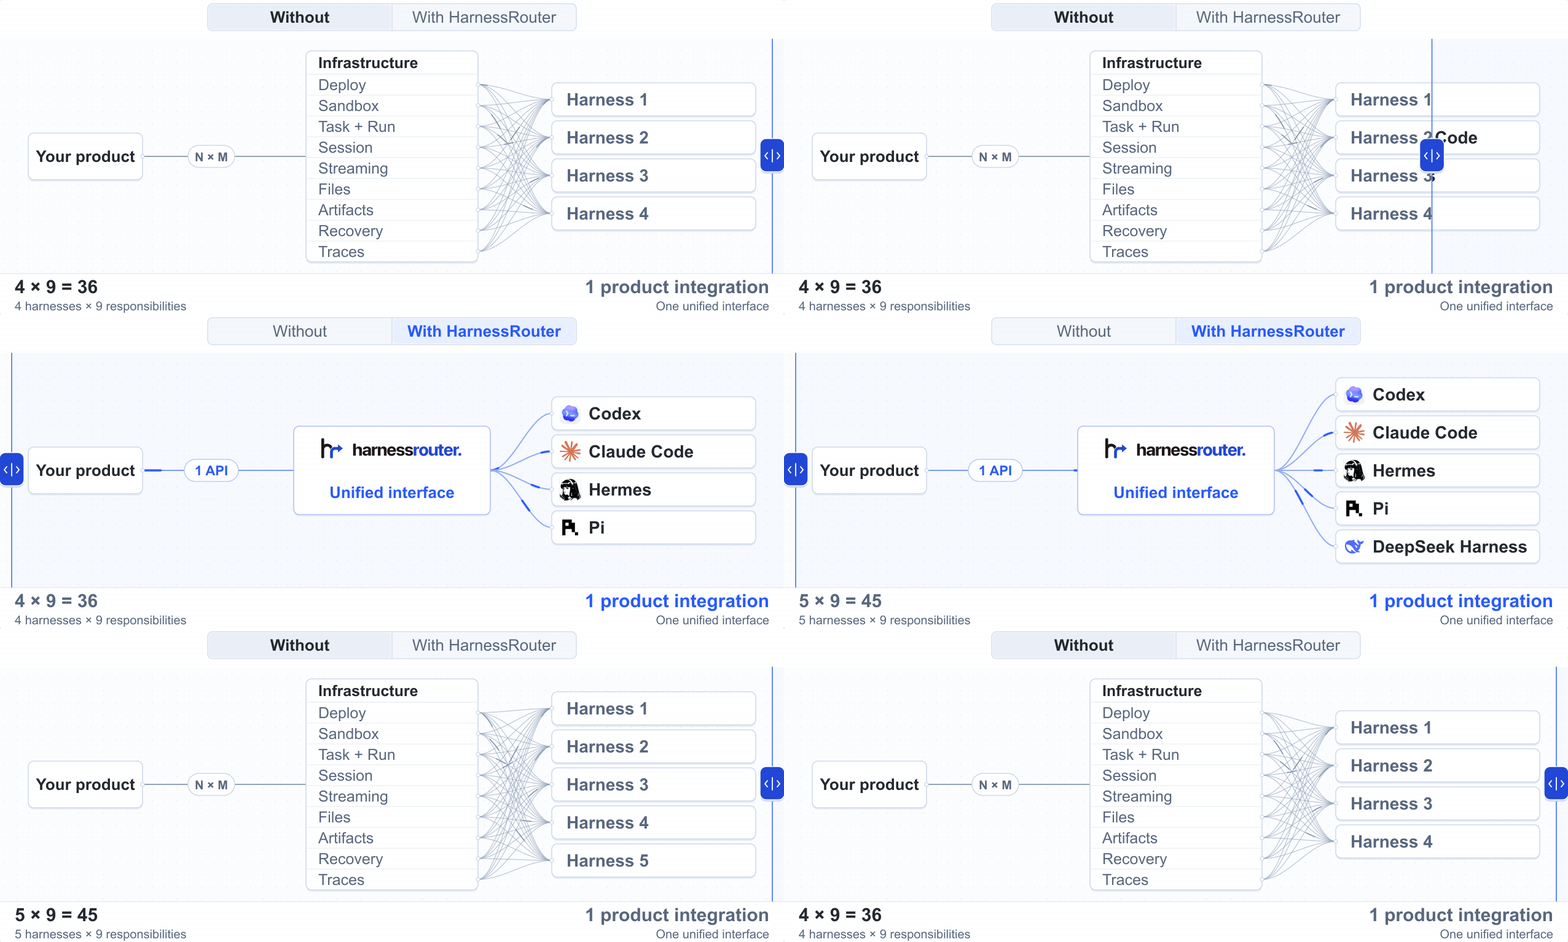
**Build agent products without handling harness engineering.** HarnessRouter is the infrastructure layer that turns existing harnesses like Codex and Claude Code into plug-and-play agent backends, letting your product run tasks, retrieve results, and switch harnesses through one API. Help grow the HarnessRouter community. Star this repo → Animated diagram comparing separate harness integrations with one HarnessRouter API. Without HarnessRouter, four harnesses require 36 integration responsibilities, increasing to 45 with a fifth. With HarnessRouter, the product keeps one integration as harnesses are added. HarnessRouter implements the [Unified Harness Protocol (UHP)](#the-unified-harness-protocol) and provides an OpenAI Responses-compatible API, handling persistent sessions, streaming progress, files, artifacts, cancellation, and structured failures. ## Switch harnesses. Optimize cost and latency. Cost: 99.8% lower, from 223 to 0.47 credits. End-to-end latency: 3.2 times faster, from 4m 36s to 1m 25s. Eight harness and model configurations on the same task. Each metric compares its best and worst results. The lowest-cost and fastest configurations vary by task. Eight harness × model configurations on the same task. Each metric compares its best and worst results. The lowest-cost and fastest configurations vary by task. [Methodology](https://harnessrouter.ai/benchmarks) > [!TIP] > **Get started:** [Run locally](#quickstart) · [Integrate into your product](#use-the-api-directly) · [Starter kits](#starter-kits) · [Use managed Cloud](https://harnessrouter.ai)
## Quickstart Self-host Community Edition with your own provider keys, on infrastructure you control. Start with one Docker command, wait for the first launch, then connect a model provider and run your first task. **You need:** Docker · About **4 GB** of disk · A **provider API key** No HarnessRouter account required. No bundled model or trial key. ### 1. Start HarnessRouter ```bash docker run -d --name harnessrouter \ -p 127.0.0.1:3000:3000 \ -v harnessrouter:/data \ harnessrouter/harnessrouter ``` Docker pulls the image if needed. The named volume preserves your database, files, installed harness CLIs, and workspaces between restarts.
Existing installation or custom setup **Already installed?** `docker pull harnessrouter/harnessrouter` downloads the latest image but does not upgrade a running container. Follow the [upgrade and backup guide](docs/self-hosting-guide.md#restarts-upgrades-and-backups). **Port 3000 busy?** Use `-p 127.0.0.1:3100:3000` and open port 3100 instead. Keep the loopback binding while using the initial credentials. **Do not add `--user`.** The entrypoint and Runner need root to manage per-session users. The Console and Gateway run unprivileged; agent processes run as their session’s user. For version pinning, Compose, and scripted setup, see the [setup guide](docs/self-hosting-guide.md#install).
### 2. Wait for the first launch ```bash docker logs -f harnessrouter ``` The first launch installs the enabled harness CLIs. Continue when the logs show: ```text [harnessrouter] ready on :3000 ``` Press **Ctrl+C** to stop following logs. The container keeps running.
Console not ready or a harness missing? If the browser refuses the connection, retry after a few seconds while the Console finishes starting. For a missing harness, check `backends available:` and any `requested but not installed` warning in the logs.
### 3. Open the console Open [http://localhost:3000](http://localhost:3000), or your chosen host port, and sign in:
Usernameharnessrouter
Passwordharnessrouter
> [!WARNING] > **Change the default password in Profile.** Keep the instance local until you change it. Saving briefly restarts the Console and signs out other browsers.
See the sign-in screen ![HarnessRouter Community Edition sign-in screen](docs/images/01-login.png)
Using an existing volume or custom credentials? [Check credential precedence and setup](docs/self-hosting-guide.md#install). These credentials sign you into the Console. You do not need a HarnessRouter API key to run tasks here. ### 4. Connect a model provider Open **Bring Your Own Key** in the sidebar and press **Add Integration**. Choose a provider, give the integration a name, and add its API key. Its supported models become available in the Console. This provider key authorizes model requests. It is separate from the HarnessRouter API key used for product integration below.
See the provider setup screen ![Adding a model provider in HarnessRouter](docs/images/05-add-integration.png)
### 5. Run your first task Open **Agent harnesses**, choose a supported harness, and select **New task**. Pick an available model and give the agent a concrete task. Follow live progress and open the files it produces in the same session. ![Hermes reviewing a fictional NDA and opening the redlined output](docs/images/harnessrouter-hermes-nda-redline-complete-run-readme.gif) In the illustrative run above, Hermes reviews a fictional NDA and produces a redlined version, a clean copy, and a negotiation memo. ### Configure a custom harness (optional) Built-in harnesses work without this step. Create a custom harness when you want reusable behavior tailored to your product. 1. **Create.** Select **New harness** in **Agent harnesses**. In **Add harness**, set the **Name**, **Base harness**, and **Default model** together, then select **Create and configure**. 2. **Customize.** In **Harness Settings**, add **Agent instructions**, configure **Tools** (use **Add MCP** for an optional MCP server), and add **Skills** as needed. 3. **Save and test.** Select **Save Changes**, then **Run Task** to test the saved configuration. You can change the default model later in Settings, but the base harness cannot be changed after creation.
Watch the configuration walkthrough · 48 seconds ![Animated walkthrough of creating and configuring a custom harness, including instructions, tools, and skills.](docs/images/2026-09-10-harnessrouter-custom-harness-feedback-configuration-v5.gif) Configure DeepSeek Harness for customer-feedback analysis.

## Integrate your harness into your product backend with one API Run product tasks with built-in or custom harnesses as pluggable agent backends. Call your self-hosted instance’s OpenAI Responses-compatible API and select the harness with `metadata.harness_id`. No Cloud deployment is required. Once your harness runs successfully in the Console: 1. Open **API Keys** in the Console sidebar of the same CE instance ([default local address](http://localhost:3000/keys)) and choose **Create API key**. 2. Store the secret shown once as `HARNESSROUTER_API_KEY` in your product backend. Never expose it in browser code. This CE-issued key is separate from your Console password and provider key. 3. Call the API with the Harness ID shown in the Console and a model served by your connected provider. ```bash export HARNESSROUTER_BASE_URL=http://localhost:3000/api/harness curl --fail-with-body -sS "$HARNESSROUTER_BASE_URL/v1/responses" \ -H "Authorization: Bearer ${HARNESSROUTER_API_KEY:?}" \ -H 'content-type: application/json' \ -d '{ "input":"Reply with exactly: it works.", "metadata":{"harness_id":"codex"}, "model":"gpt-5.4-mini", "stream":false }' ``` The task and its transcript appear in the same workspace in the Console. Set `"stream": true` to receive server-sent events. The default URL works when your backend and CE run on the same computer. From another machine or container, use a reachable URL for the CE instance. [Read the complete self-hosted API and networking guide →](docs/self-hosting-guide.md#using-the-api)
Your application can…How
Start tasksSend instructions and check execution status
Continue sessionsSend follow-up instructions with previous_response_id
Stream progressReceive live updates as the agent works
Work with filesAttach input files and retrieve generated outputs
Cancel tasksStop work that is no longer needed
Inspect executionReview structured errors and execution traces

## Agent harnesses as pluggable backends for your product Power agentic features in your product with agent harnesses, including knowledge-work tasks such as creating content and analyzing data. Explore these ready-to-use kits to see harnesses in action as pluggable backends.
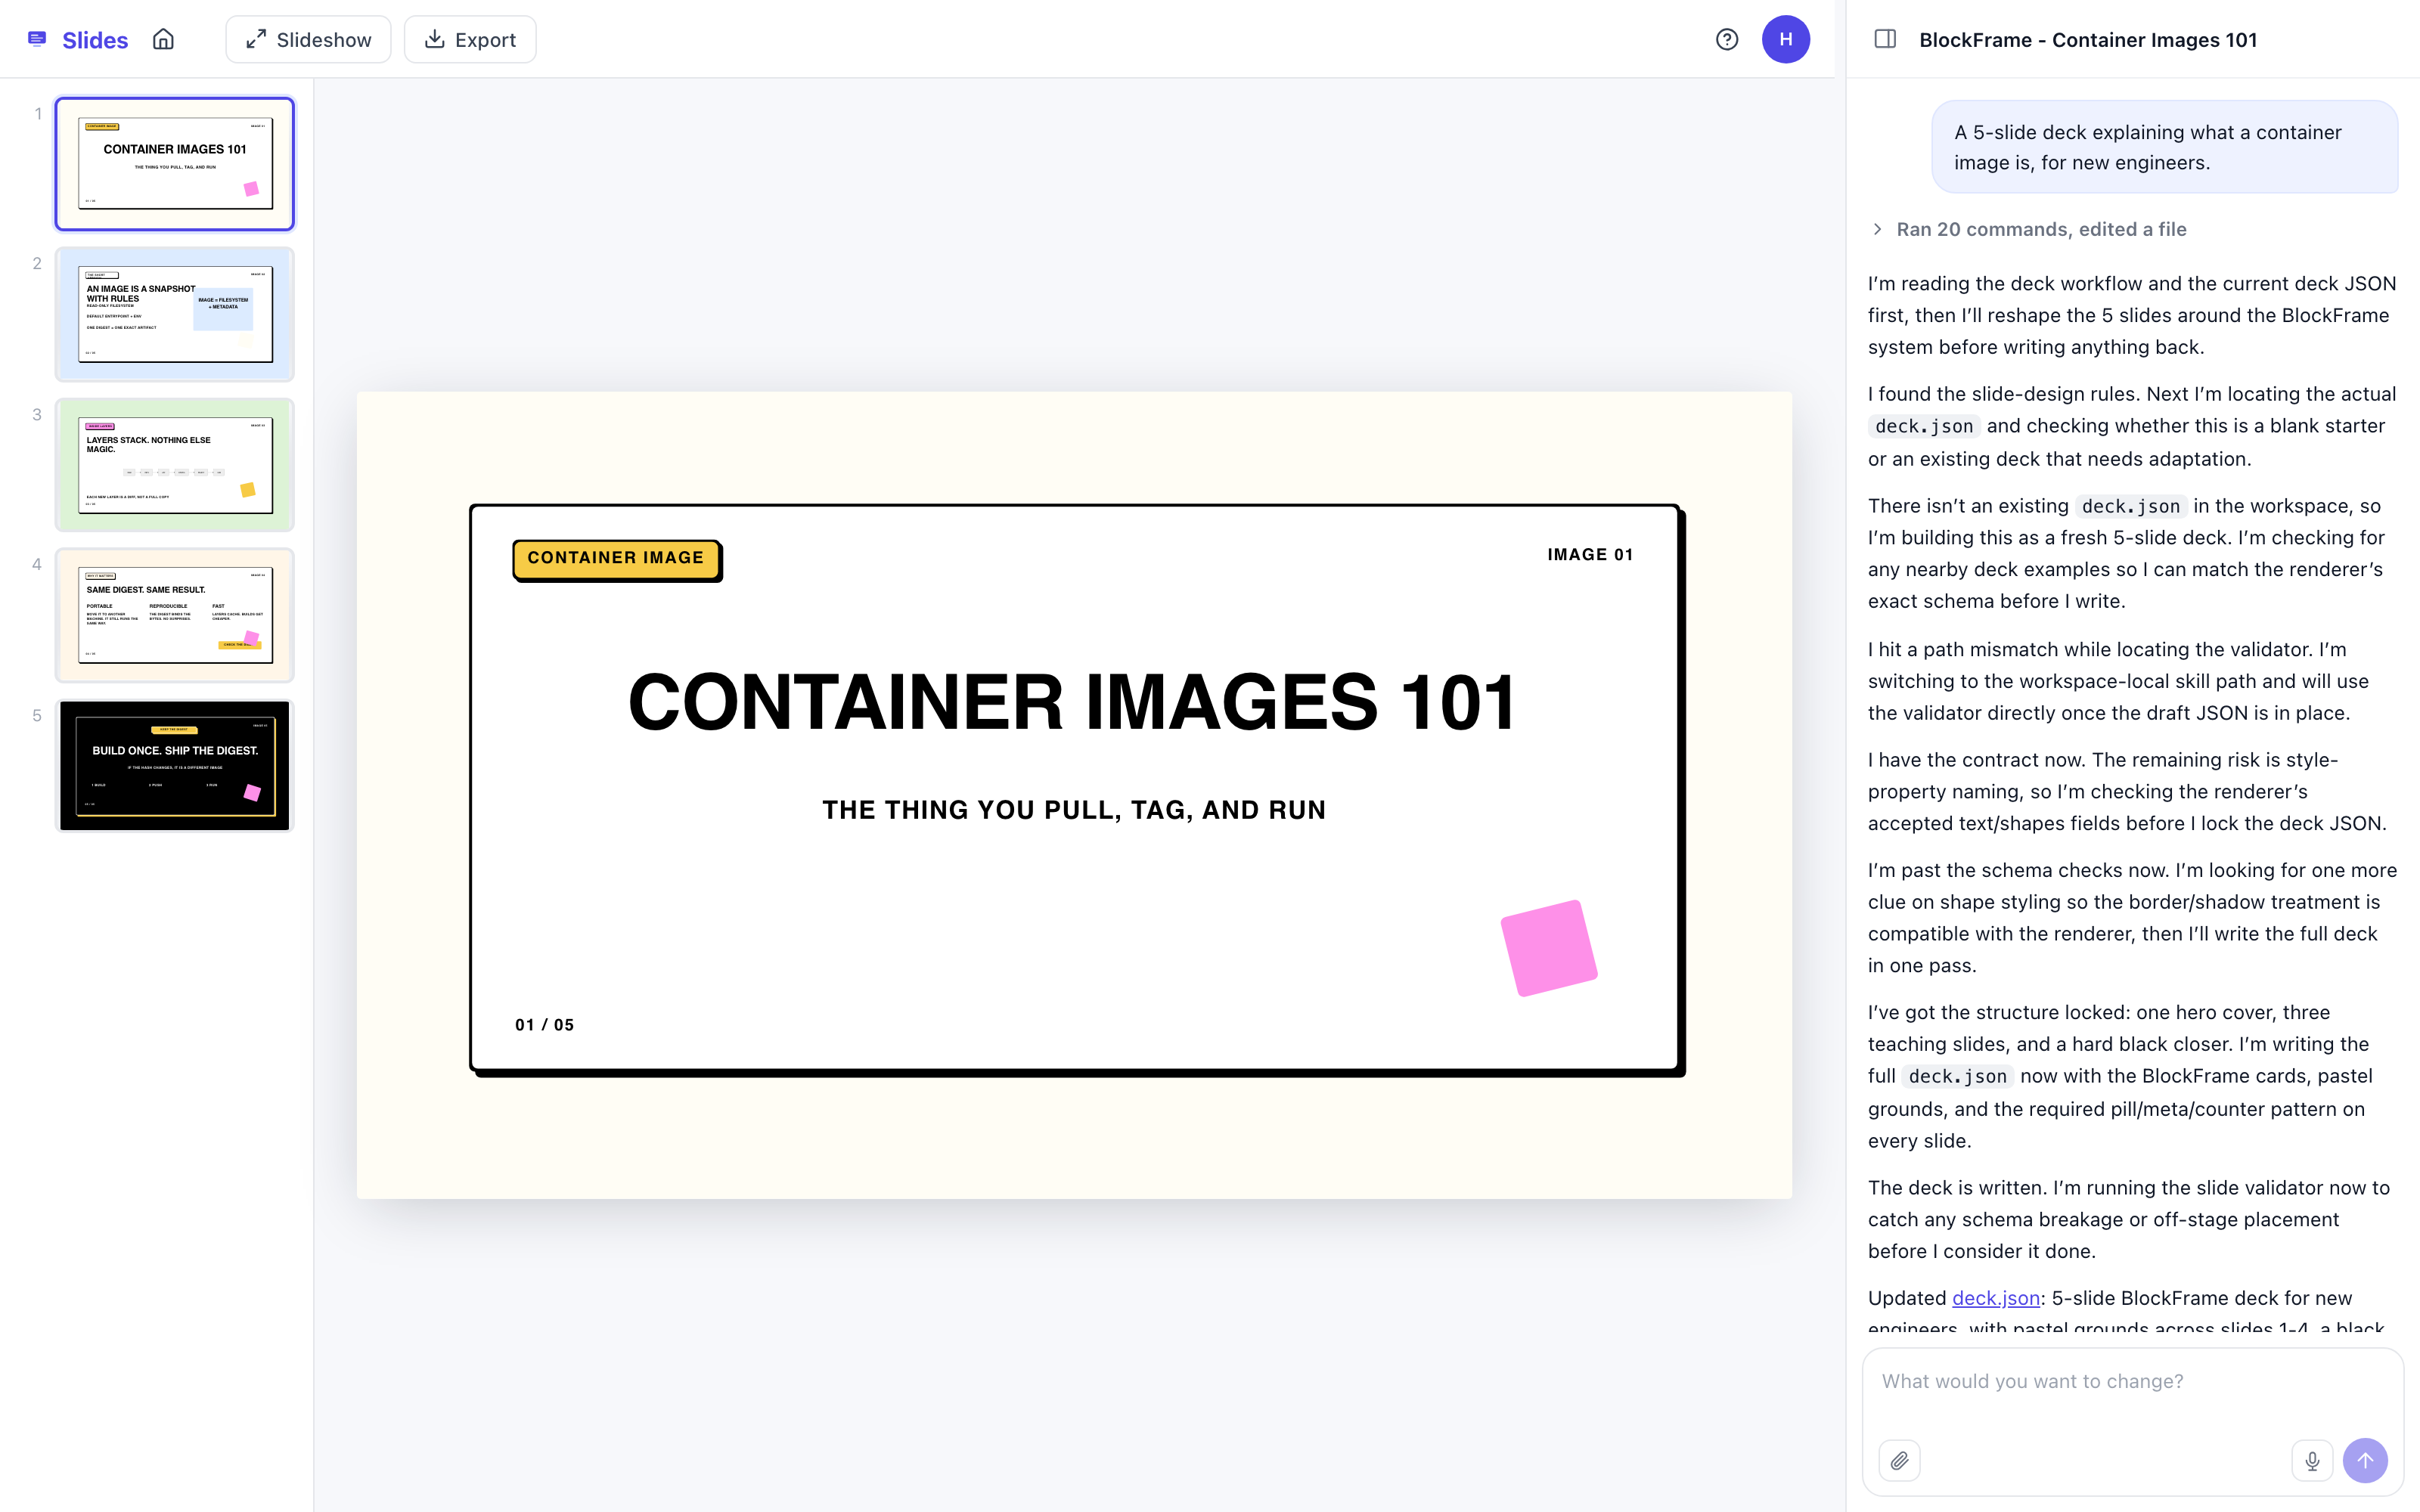
HarnessRouter Slides Starter Kit

Slides

An agent harness turns your brief into slide content and layouts for an editable deck.

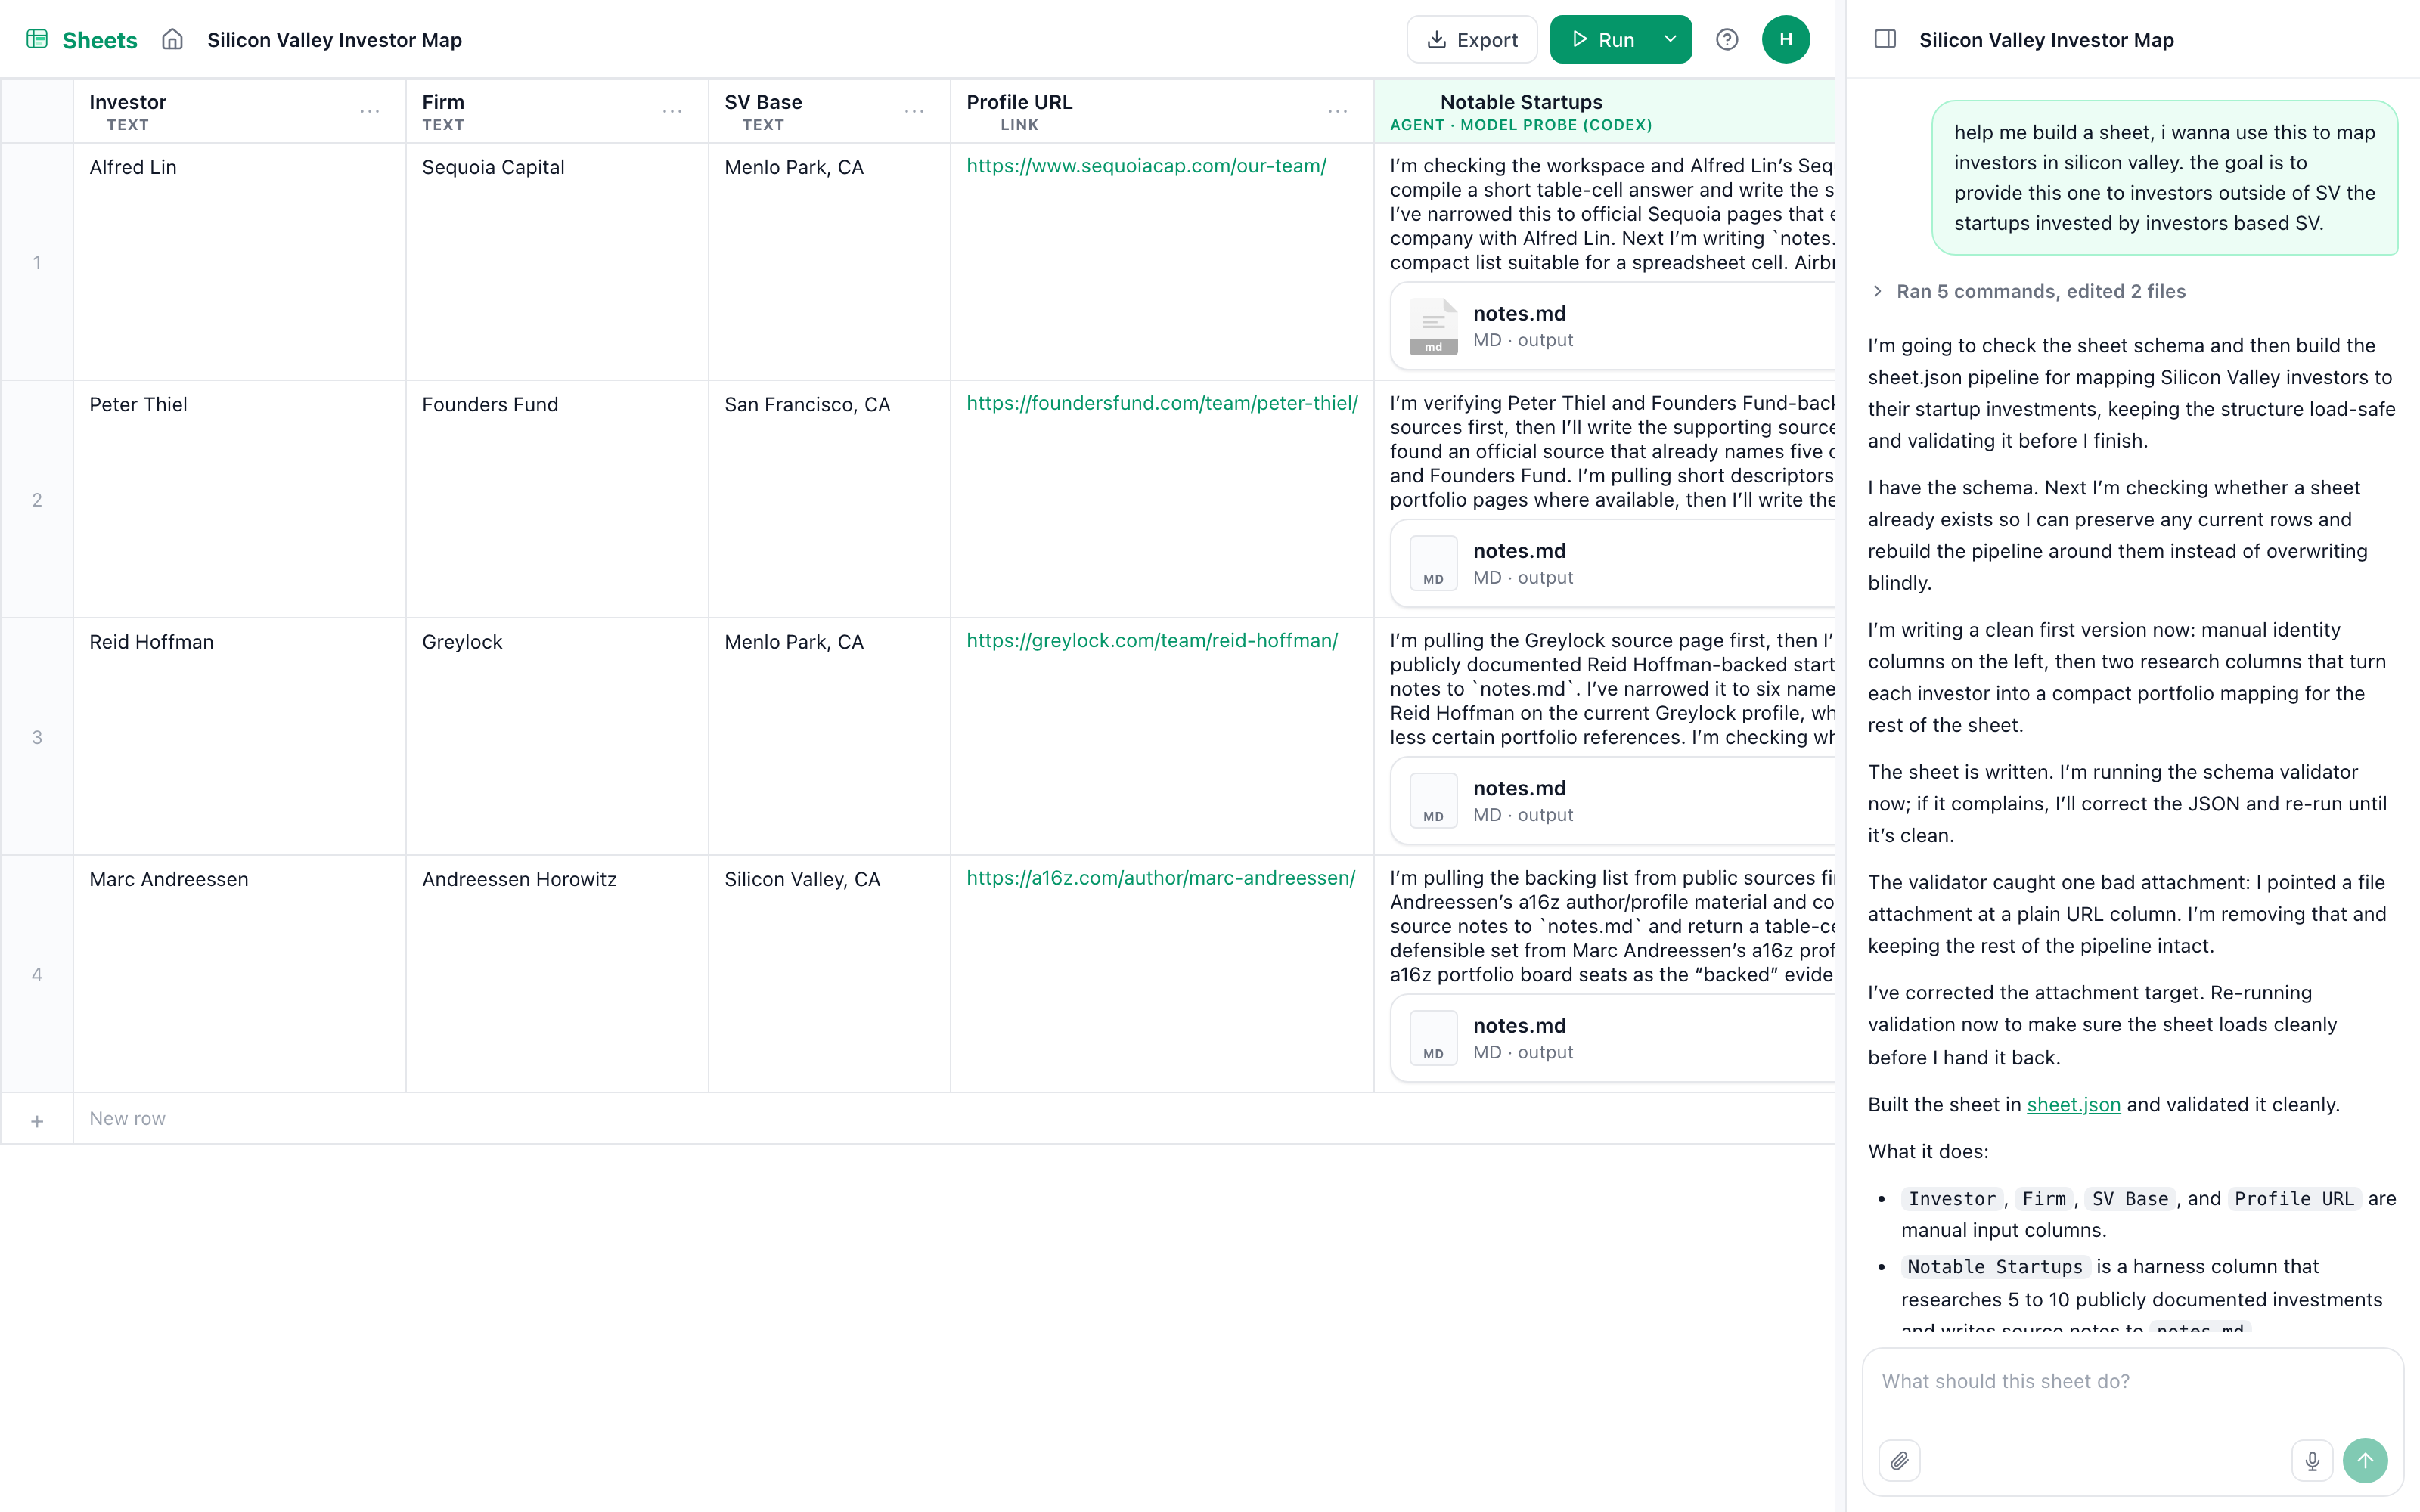
HarnessRouter Sheets Starter Kit

Sheets

An agent harness uses each row’s data to execute a task and writes the result back into the sheet.

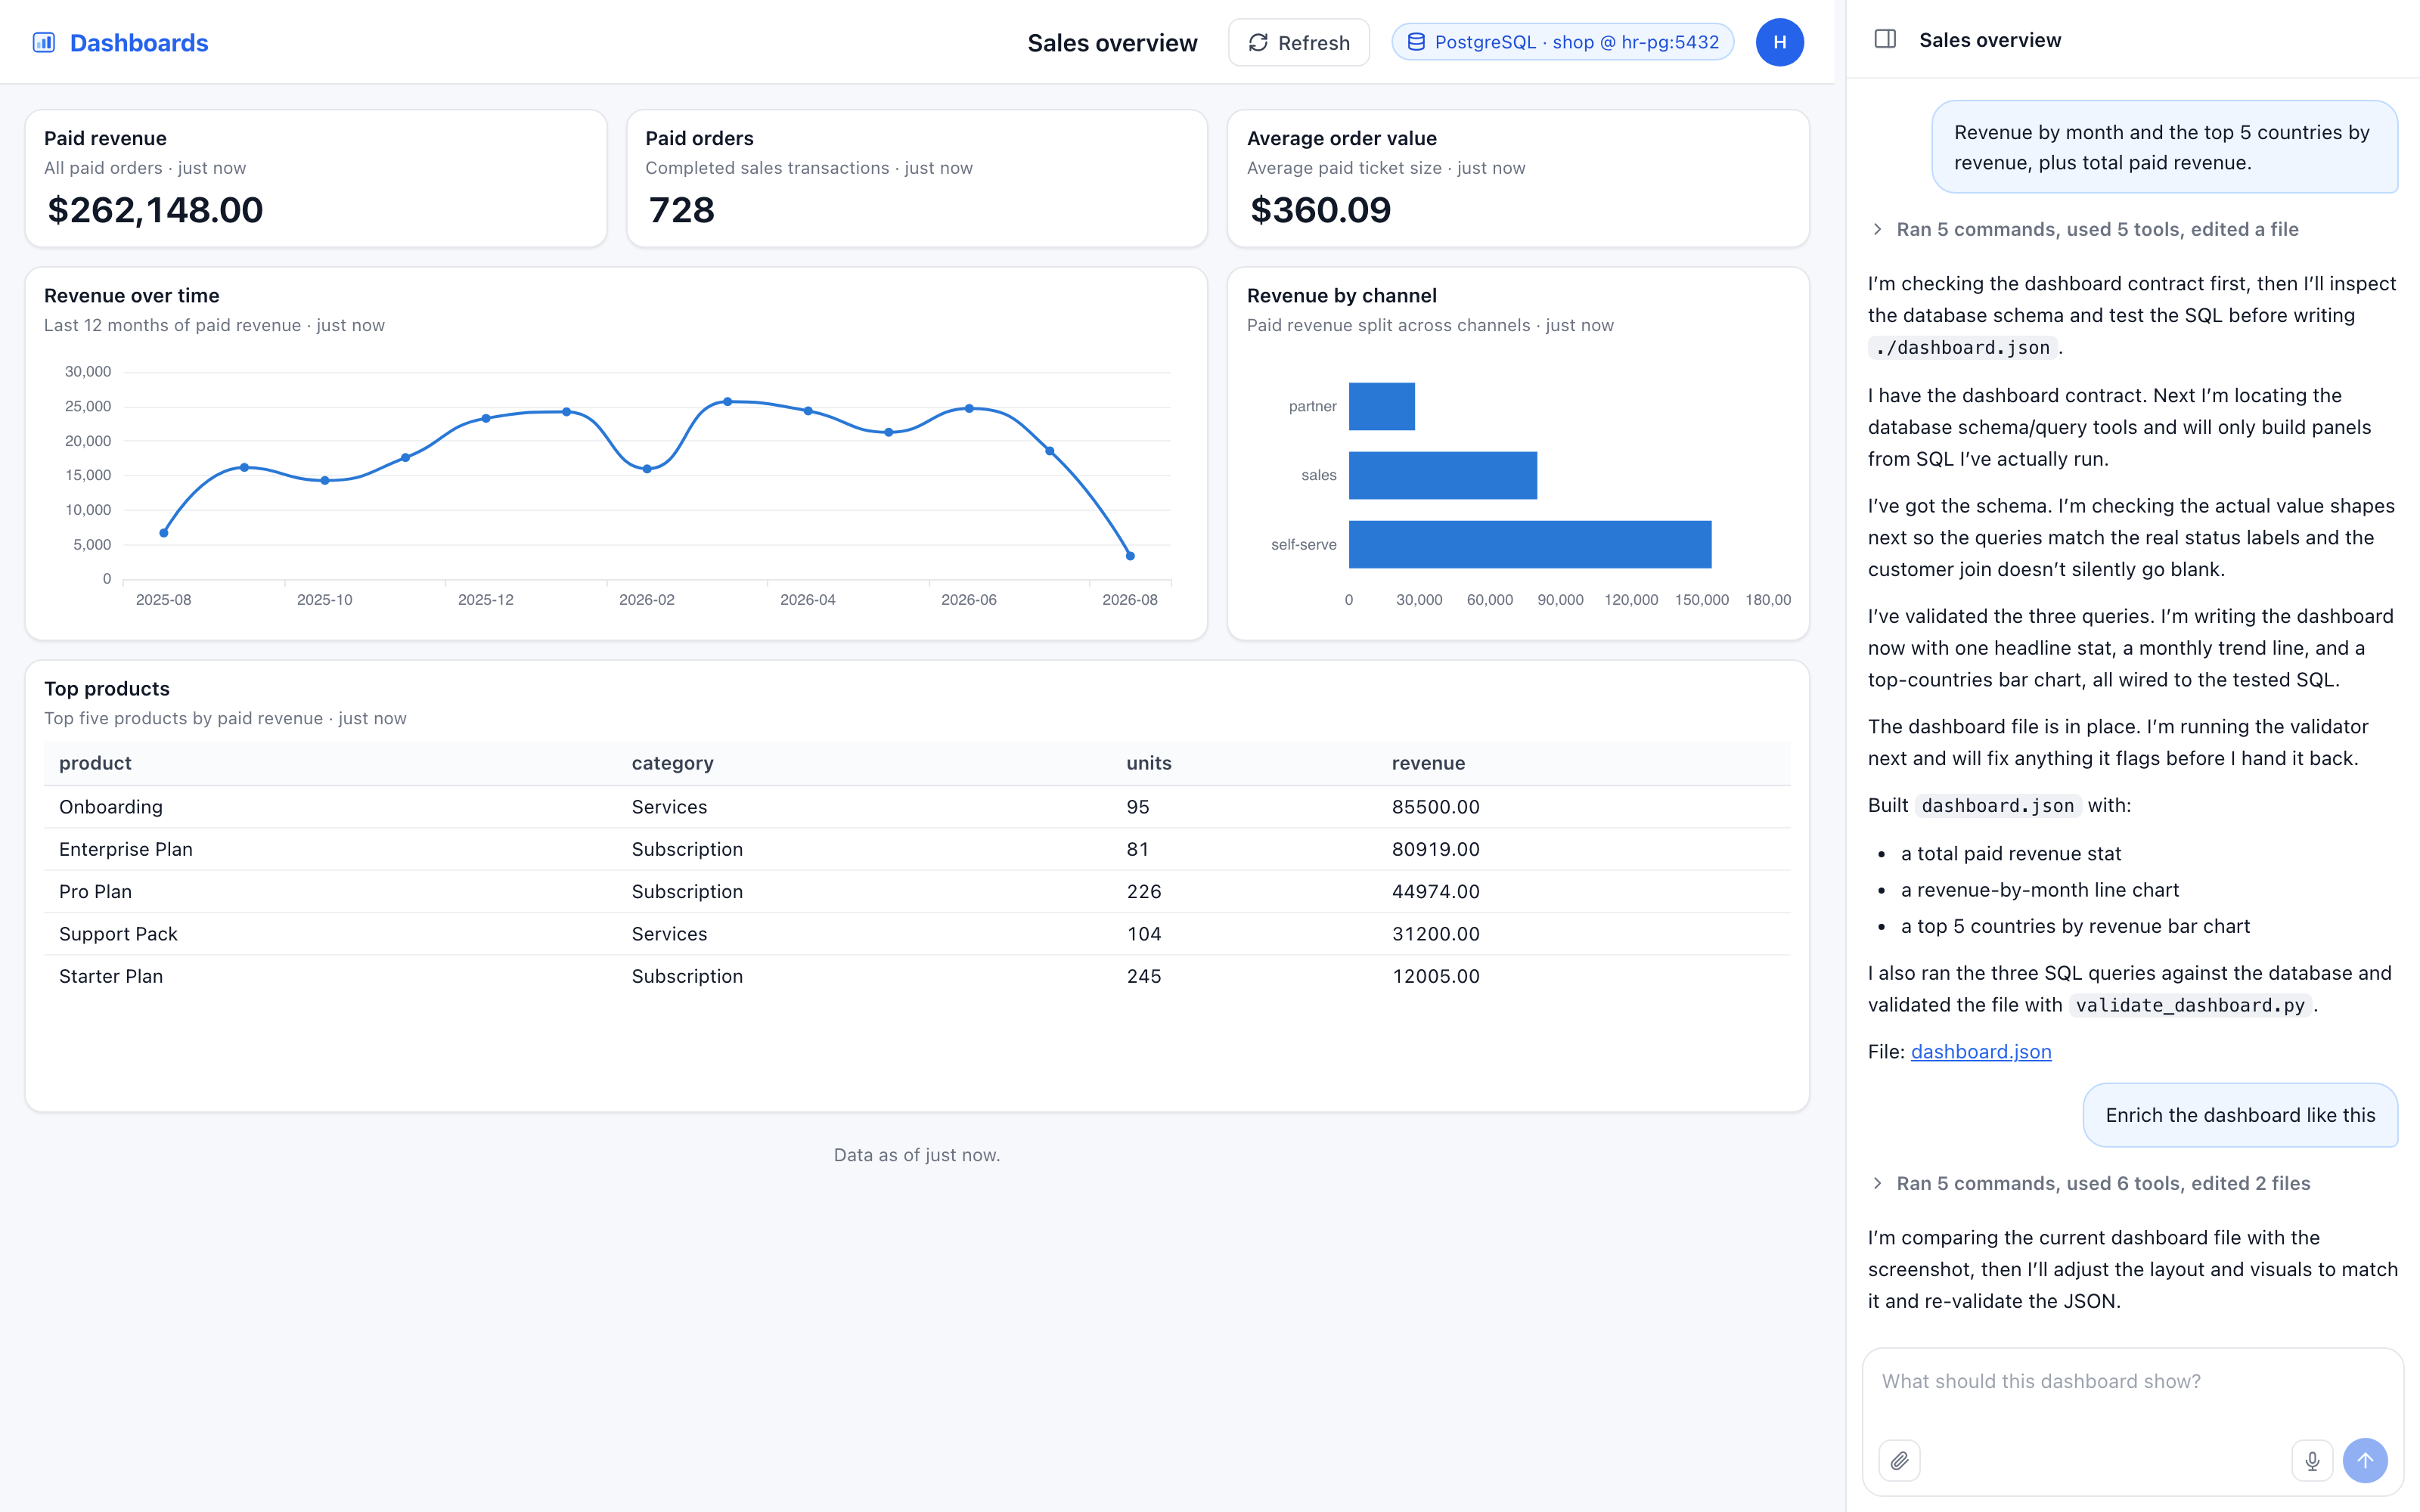
HarnessRouter Dashboards Starter Kit

Dashboards

An agent harness reads your database schema and writes SQL queries to power dashboard charts.

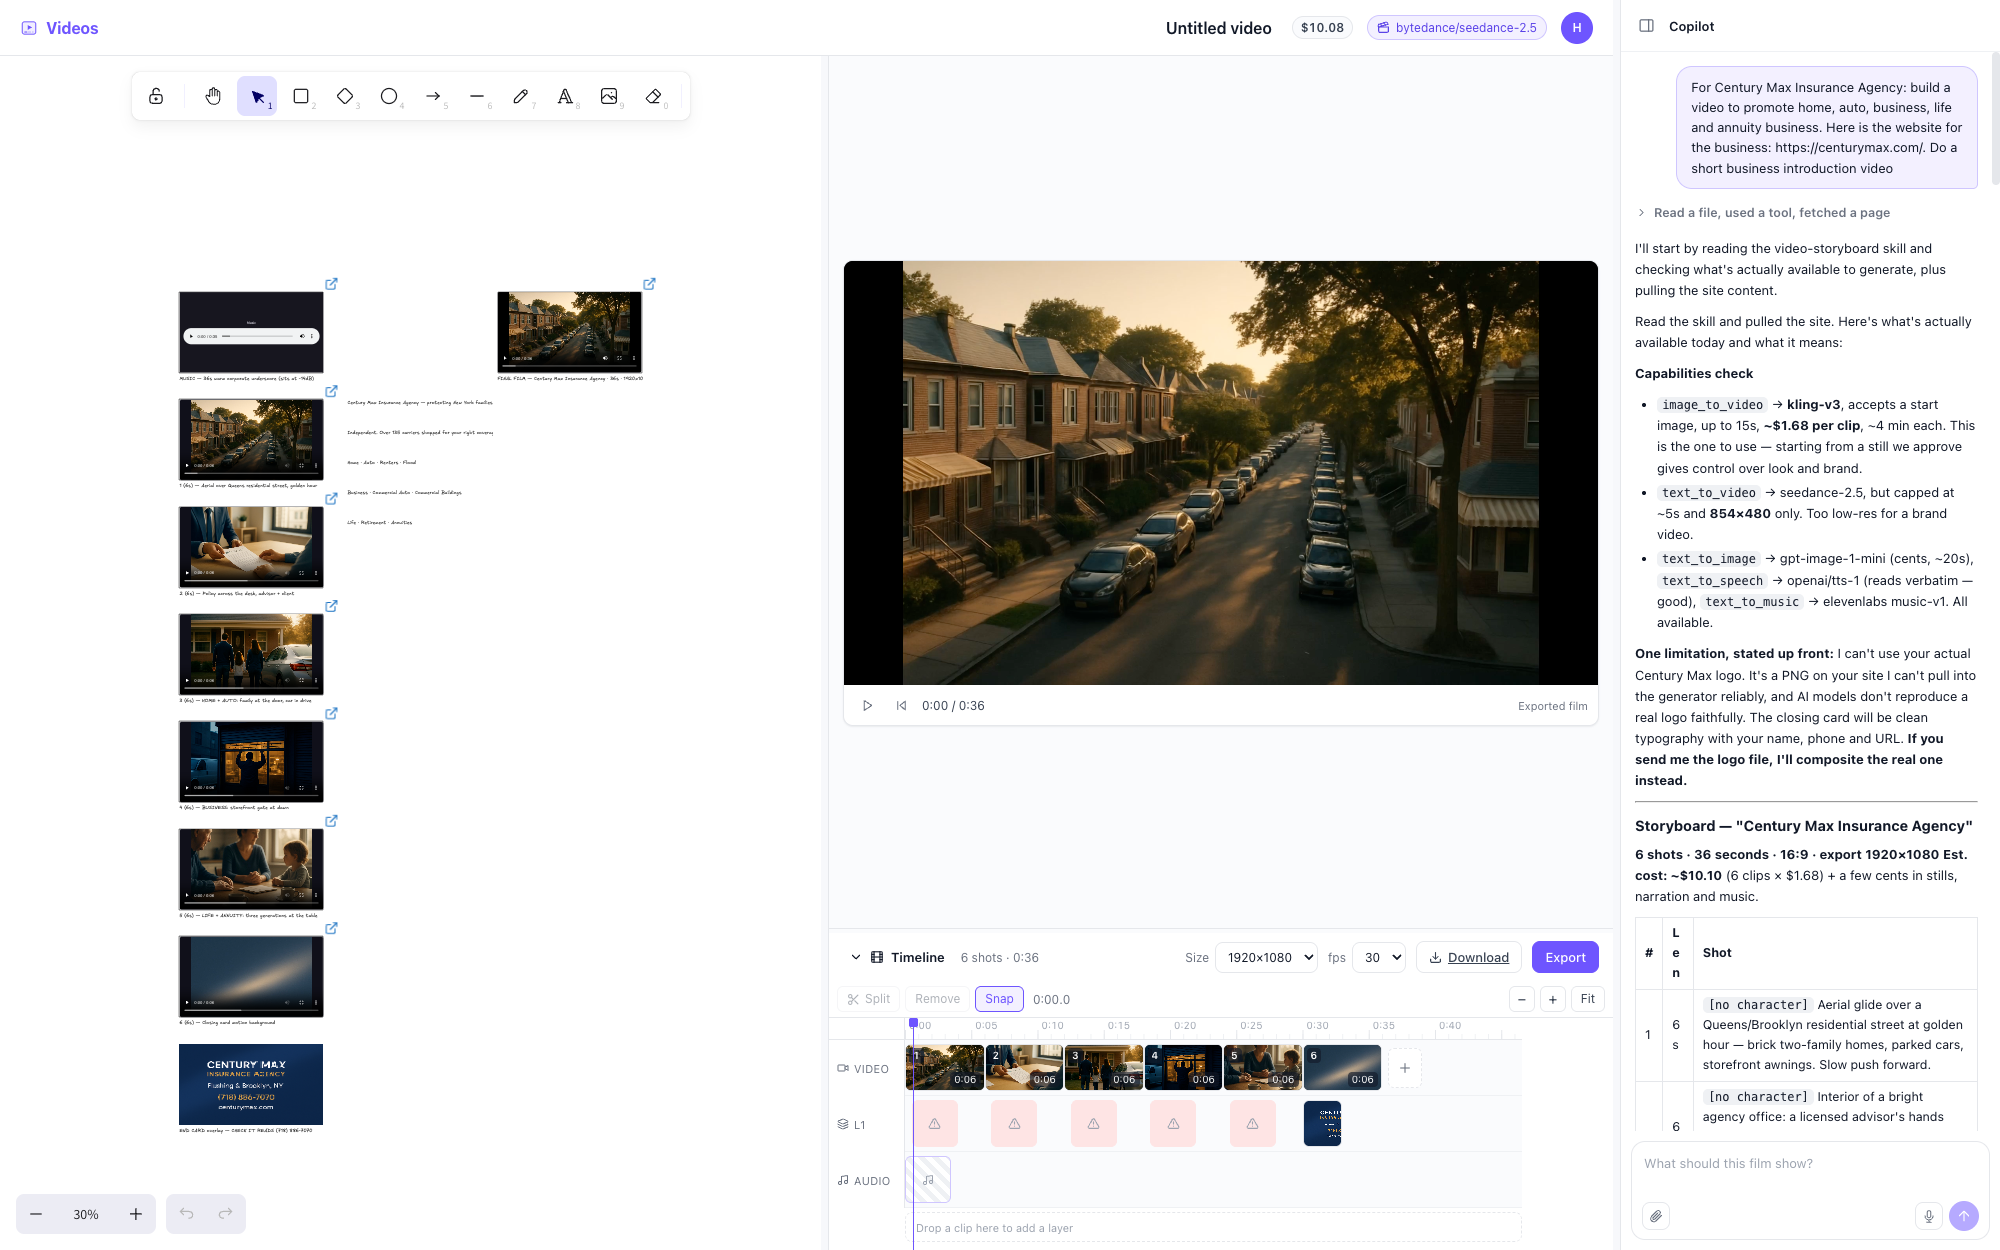
HarnessRouter Videos Starter Kit

Videos

An agent harness turns your brief into a shot plan and calls video tools to generate clips for the timeline.

[**Explore the Starter Kits →**](https://github.com/HarnessRouter/starter-kit)
Setup notes & licensing **Start:** Open **Starter Kits** in the Console and select a harness and model supported by your connected providers. **Dashboards:** use a reachable database and a read-only database account. Set `HR_SECRET_KEY` to encrypt stored connections, and review the sample-row setting before connecting. **Licensing:** Starter Kits use [different terms](https://github.com/HarnessRouter/starter-kit#licensing) from Community Edition. [Setup guide →](docs/self-hosting-guide.md#starter-kits)

## Deployment choices ### Self-host for control - **Your infrastructure.** One Docker deployment for the Console, Gateway, and Runner. - **Your credentials and state.** Provider keys, sessions, files, and workspaces stay under your control. Model requests still go to your configured provider. - **Real workspaces.** Native filesystem, shell, and Git workflows, with separate session workspaces. - **No Console product analytics.** Community Edition disables the Console analytics pipeline. ### Choose your path to Cloud Choose **HarnessRouter Cloud** for managed deployment, maintenance, and scaling, with tasks running in serverless, isolated sandboxes through the same API contract. | Local → Cloud | Start directly in Cloud | |---|---| | Bring a custom harness you’ve configured locally.
[Follow the upload guide →](docs/self-hosting-guide.md#moving-to-the-hosted-service) | Create and run harnesses without a local deployment.
[Open HarnessRouter Cloud →](https://harnessrouter.ai) | **For local uploads:** set `HR_SECRET_KEY` on your local instance to encrypt the saved destination key. Save your custom harness in **Settings**, select **Upload to Cloud**, then connect a destination using its Cloud workspace API key. Uploads copy harness configuration, not provider keys, sessions, or generated files. Uploading again replaces that destination’s hosted copy. ### Inside Community Edition ```text ┌─ HarnessRouter container ─────────────────────────────────┐ │ Console :3000 ← only published port │ │ │ same-origin proxy │ │ ▼ │ │ Gateway :8080 Responses API + harness lifecycle │ │ │ loopback │ │ ▼ │ │ Runner :8081 runs harnesses in session workspaces │ │ │ │ /data volume database · files · secrets · workspaces │ └───────────────────────────────────────────────────────────┘ ``` The Gateway and Runner listen on loopback inside the container. Sessions use separate workspaces and operating-system users, not separate containers. The Console is the entry point for both UI and API. See [configuration](docs/self-hosting-guide.md#configuration), [upgrades and backups](docs/self-hosting-guide.md#restarts-upgrades-and-backups), and [public deployment with TLS](docs/self-hosting-guide.md#putting-it-on-a-public-url).
## The Unified Harness Protocol [Unified Harness Protocol (UHP)](https://unifiedharnessprotocol.org) is the public, versioned contract implemented by Community Edition and HarnessRouter Cloud. Its task surface is deliberately compatible with the **OpenAI Responses API**, so existing Responses SDKs, streaming parsers, and UI components can work with a UHP server. UHP defines harness execution semantics for harness selection, persistent sessions, files, cancellation, and harness-managed tools and skills. This repository contains the Apache 2.0 reference implementation, machine-readable schemas, and the conformance suite.
ResourcePurpose
SpecificationNormative protocol behavior
OpenAI Responses compatibilityCompatibility with existing OpenAI Responses API clients
OpenAPI and JSON SchemaMachine-readable contracts
Conformance suiteTestable compatibility requirements
GovernanceHow the standard evolves

## Resources | Goal | Resources | |---|---| | **Build** | [Cloud & integration docs](https://harnessrouter.ai/docs) · [API guide](#use-the-api-directly) · [Starter kits](https://github.com/HarnessRouter/starter-kit) | | **Deploy** | [Setup & operations](docs/self-hosting-guide.md) · [Local → Cloud](#local-to-cloud) · [HarnessRouter Cloud](https://harnessrouter.ai) | | **Protocol** | [Unified Harness Protocol (UHP)](https://unifiedharnessprotocol.org) | | **Community** | [Join the community (Discord)](https://discord.gg/nPcbwqVPb2) · [Contribute](CONTRIBUTING.md) · [LinkedIn](https://linkedin.com/company/harnessrouter/) · [X](https://x.com/HARNESSROUTER) · [Security](SECURITY.md) |
## Star History

HarnessRouter GitHub star history. Open the full interactive chart.


## License HarnessRouter Community Edition is licensed under [Apache 2.0](LICENSE). Agent harness CLIs are installed on first launch and remain subject to their respective upstream licenses. See [NOTICE](NOTICE) for third-party notices and the [Starter Kits repository](https://github.com/HarnessRouter/starter-kit#licensing) for its separate licensing terms.

HarnessRouter is the world's first unified interface for agent harnesses.