Aruba ClearPass Universal Orchestrator Extension



Support
·
Installation
·
License
·
Related Integrations
## Overview
The Aruba ClearPass Orchestrator Extension is an integration that can inventory and re-enroll certificates on a server in [Aruba ClearPass](https://www.hpe.com/us/en/aruba-clearpass-policy-manager.html). The certificate store types that can be managed in the current version are:
* Aruba
## Compatibility
This integration is compatible with Keyfactor Universal Orchestrator version 10.1 and later.
## Support
The Aruba ClearPass Universal Orchestrator extension is supported by Keyfactor. If you require support for any issues or have feature request, please open a support ticket by either contacting your Keyfactor representative or via the Keyfactor Support Portal at https://support.keyfactor.com.
> If you want to contribute bug fixes or additional enhancements, use the **[Pull requests](../../pulls)** tab.
## Requirements & Prerequisites
Before installing the Aruba ClearPass Universal Orchestrator extension, we recommend that you install [kfutil](https://github.com/Keyfactor/kfutil). Kfutil is a command-line tool that simplifies the process of creating store types, installing extensions, and instantiating certificate stores in Keyfactor Command.
## Aruba Certificate Store Type
To use the Aruba ClearPass Universal Orchestrator extension, you **must** create the Aruba Certificate Store Type. This only needs to happen _once_ per Keyfactor Command instance.
#### Aruba Requirements
#### Supported Operations
| Operation | Is Supported |
|--------------|------------------------------------------------------------------------------------------------------------------------|
| Add | 🔲 Unchecked |
| Remove | 🔲 Unchecked |
| Discovery | 🔲 Unchecked |
| Reenrollment | ✅ Checked |
| Create | 🔲 Unchecked |
#### Store Type Creation
##### Using kfutil:
`kfutil` is a custom CLI for the Keyfactor Command API and can be used to create certificate store types.
For more information on [kfutil](https://github.com/Keyfactor/kfutil) check out the [docs](https://github.com/Keyfactor/kfutil?tab=readme-ov-file#quickstart)
Click to expand Aruba kfutil details
##### Using online definition from GitHub:
This will reach out to GitHub and pull the latest store-type definition
```shell
# Aruba
kfutil store-types create Aruba
```
##### Offline creation using integration-manifest file:
If required, it is possible to create store types from the [integration-manifest.json](./integration-manifest.json) included in this repo.
You would first download the [integration-manifest.json](./integration-manifest.json) and then run the following command
in your offline environment.
```shell
kfutil store-types create --from-file integration-manifest.json
```
Click to expand manual Aruba details
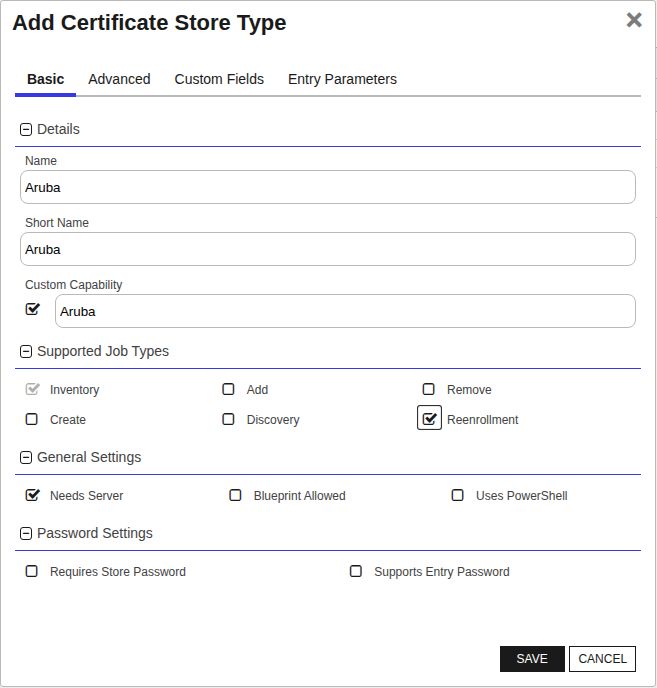
Create a store type called `Aruba` with the attributes in the tables below:
##### Basic Tab
| Attribute | Value | Description |
| --------- | ----- | ----- |
| Name | Aruba | Display name for the store type (may be customized) |
| Short Name | Aruba | Short display name for the store type |
| Capability | Aruba | Store type name orchestrator will register with. Check the box to allow entry of value |
| Supports Add | 🔲 Unchecked | Indicates that the Store Type supports Management Add |
| Supports Remove | 🔲 Unchecked | Indicates that the Store Type supports Management Remove |
| Supports Discovery | 🔲 Unchecked | Indicates that the Store Type supports Discovery |
| Supports Reenrollment | ✅ Checked | Indicates that the Store Type supports Reenrollment |
| Supports Create | 🔲 Unchecked | Indicates that the Store Type supports store creation |
| Needs Server | ✅ Checked | Determines if a target server name is required when creating store |
| Blueprint Allowed | 🔲 Unchecked | Determines if store type may be included in an Orchestrator blueprint |
| Uses PowerShell | 🔲 Unchecked | Determines if underlying implementation is PowerShell |
| Requires Store Password | 🔲 Unchecked | Enables users to optionally specify a store password when defining a Certificate Store. |
| Supports Entry Password | 🔲 Unchecked | Determines if an individual entry within a store can have a password. |
The Basic tab should look like this:
##### Advanced Tab
| Attribute | Value | Description |
| --------- | ----- | ----- |
| Supports Custom Alias | Forbidden | Determines if an individual entry within a store can have a custom Alias. |
| Private Key Handling | Forbidden | This determines if Keyfactor can send the private key associated with a certificate to the store. Required because IIS certificates without private keys would be invalid. |
| PFX Password Style | Default | 'Default' - PFX password is randomly generated, 'Custom' - PFX password may be specified when the enrollment job is created (Requires the Allow Custom Password application setting to be enabled.) |
The Advanced tab should look like this:
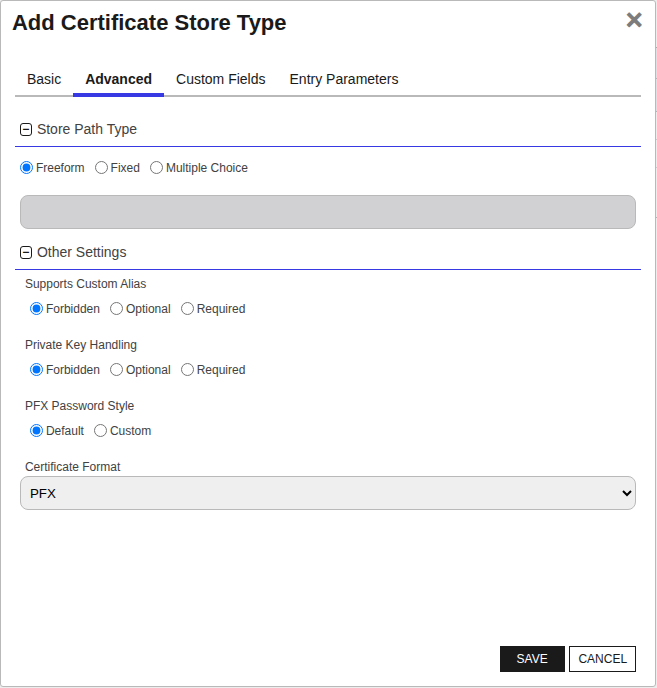
> For Keyfactor **Command versions 24.4 and later**, a Certificate Format dropdown is available with PFX and PEM options. Ensure that **PFX** is selected, as this determines the format of new and renewed certificates sent to the Orchestrator during a Management job. Currently, all Keyfactor-supported Orchestrator extensions support only PFX.
##### Custom Fields Tab
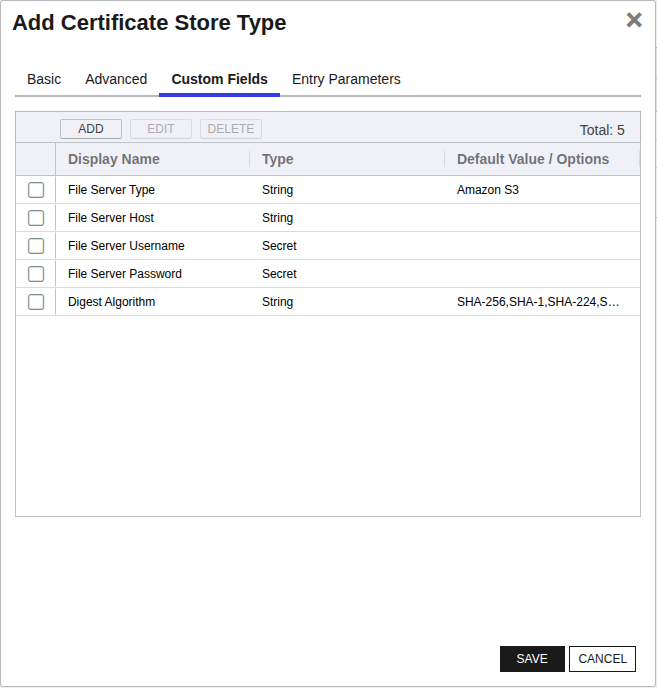
Custom fields operate at the certificate store level and are used to control how the orchestrator connects to the remote target server containing the certificate store to be managed. The following custom fields should be added to the store type:
| Name | Display Name | Description | Type | Default Value/Options | Required |
| ---- | ------------ | ---- | --------------------- | -------- | ----------- |
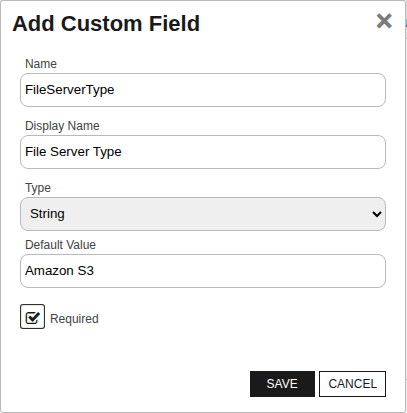
| FileServerType | File Server Type | The type of file server that the certificate will be uploaded to. The file server must be able to serve the file via HTTPS. | MultipleChoice | Amazon S3 | ✅ Checked |
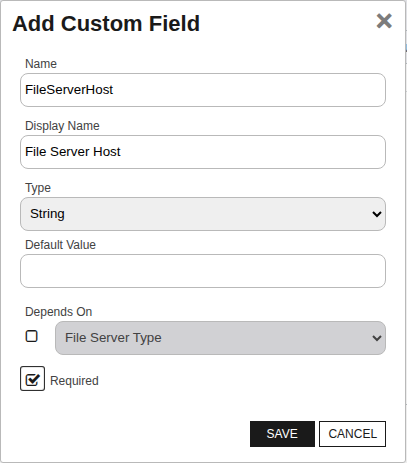
| FileServerHost | File Server Host | Required. The base URL for the file server host without the scheme. (i.e. my-server-name.com if the file server URL is https://my-server-name.com). See File Server Configuration section in the orchestrator documentation for more details. | String | | ✅ Checked |
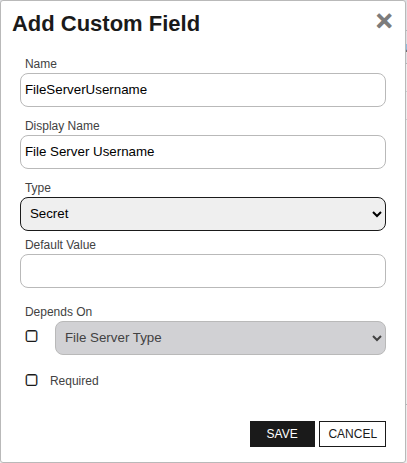
| FileServerUsername | File Server Username | Optional. The username used to access the file server. See File Server Configuration section in the orchestrator documentation for more details. | Secret | | 🔲 Unchecked |
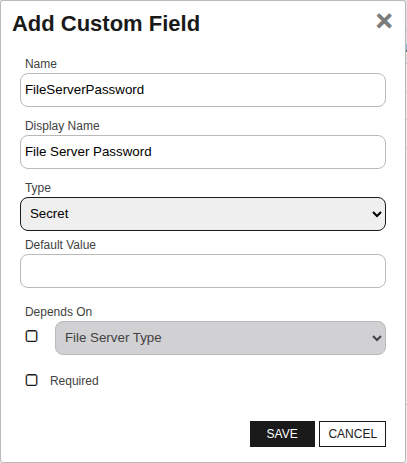
| FileServerPassword | File Server Password | Optional. The password used to access the file server. See File Server Configuration section in the orchestrator documentation for more details. | Secret | | 🔲 Unchecked |
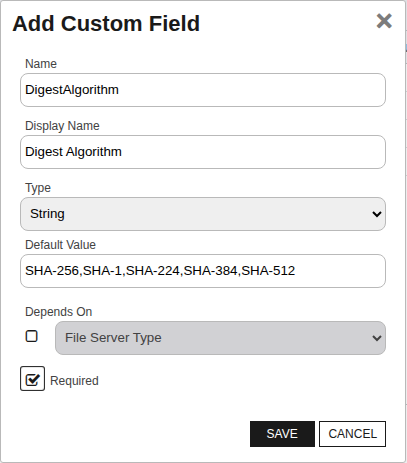
| DigestAlgorithm | Digest Algorithm | The hash digest algorithm used for the certificate signing request (CSR). | MultipleChoice | SHA-256,SHA-1,SHA-224,SHA-384,SHA-512 | ✅ Checked |
The Custom Fields tab should look like this:
###### File Server Type
The type of file server that the certificate will be uploaded to. The file server must be able to serve the file via HTTPS.
###### File Server Host
Required. The base URL for the file server host without the scheme. (i.e. my-server-name.com if the file server URL is https://my-server-name.com). See File Server Configuration section in the orchestrator documentation for more details.
###### File Server Username
Optional. The username used to access the file server. See File Server Configuration section in the orchestrator documentation for more details.
###### File Server Password
Optional. The password used to access the file server. See File Server Configuration section in the orchestrator documentation for more details.
###### Digest Algorithm
The hash digest algorithm used for the certificate signing request (CSR).
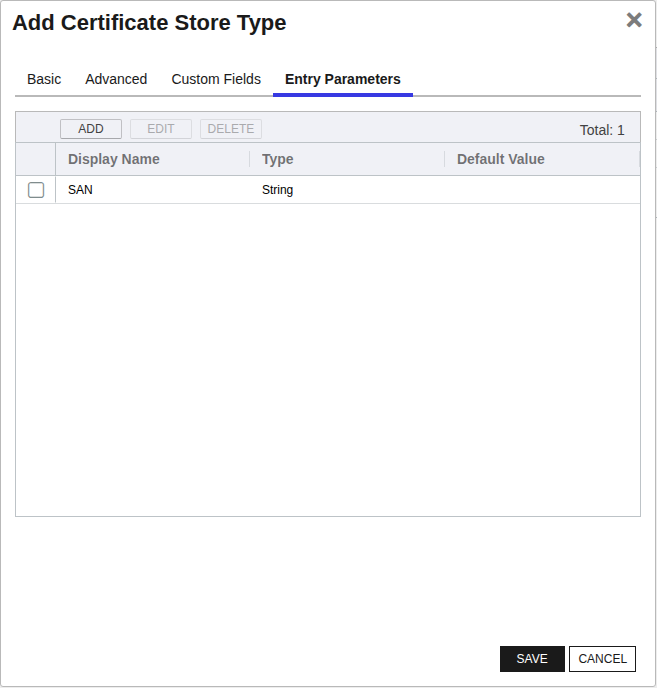
##### Entry Parameters Tab
| Name | Display Name | Description | Type | Default Value | Entry has a private key | Adding an entry | Removing an entry | Reenrolling an entry |
| ---- | ------------ | ---- | ------------- | ----------------------- | ---------------- | ----------------- | ------------------- | ----------- |
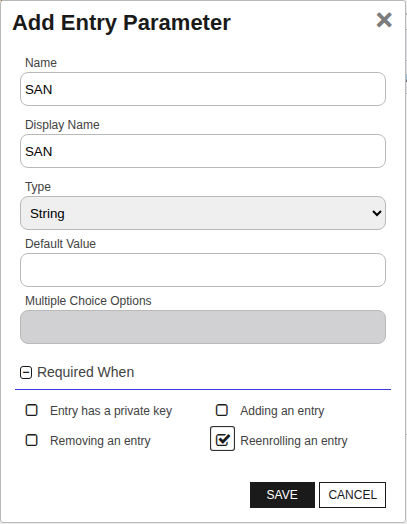
| SAN | SAN | String value specifying the Subject Alternative Name (SAN) to be used when performing reenrollment jobs. Format as a list of : entries separated by comma; Example: 'DNS:www.example.com,DNS:www.example2.com' for multiple SANs. Can be made optional if RFC 2818 is disabled on the CA. Allowed SAN types are email, URI, DNS, RID or IP. | String | | 🔲 Unchecked | 🔲 Unchecked | 🔲 Unchecked | ✅ Checked |
The Entry Parameters tab should look like this:
##### SAN
String value specifying the Subject Alternative Name (SAN) to be used when performing reenrollment jobs. Format as a list of : entries separated by comma; Example: 'DNS:www.example.com,DNS:www.example2.com' for multiple SANs. Can be made optional if RFC 2818 is disabled on the CA. Allowed SAN types are email, URI, DNS, RID or IP.
Click to expand details
1. **Navigate to the _Certificate Stores_ page in Keyfactor Command.**
Log into Keyfactor Command, toggle the _Locations_ dropdown, and click _Certificate Stores_.
2. **Add a Certificate Store.**
Click the Add button to add a new Certificate Store. Use the table below to populate the **Attributes** in the **Add** form.
| Attribute | Description |
| --------- |---------------------------------------------------------|
| Category | Select "Aruba" or the customized certificate store name from the previous step. |
| Container | Optional container to associate certificate store with. |
| Client Machine | The base URL / IP address of the Aruba instance without the scheme. (i.e. my-server-name.com if the Aruba URL is https://my-server-name.com) |
| Store Path | A semicolon-delimited string that in the format `;` (i.e. clearpass.localhost;HTTP(RSA)). Please see orchestrator documentation for more information. |
| Orchestrator | Select an approved orchestrator capable of managing `Aruba` certificates. Specifically, one with the `Aruba` capability. |
| FileServerType | The type of file server that the certificate will be uploaded to. The file server must be able to serve the file via HTTPS. |
| FileServerHost | Required. The base URL for the file server host without the scheme. (i.e. my-server-name.com if the file server URL is https://my-server-name.com). See File Server Configuration section in the orchestrator documentation for more details. |
| FileServerUsername | Optional. The username used to access the file server. See File Server Configuration section in the orchestrator documentation for more details. |
| FileServerPassword | Optional. The password used to access the file server. See File Server Configuration section in the orchestrator documentation for more details. |
| DigestAlgorithm | The hash digest algorithm used for the certificate signing request (CSR). |
Click to expand details
1. **Generate a CSV template for the Aruba certificate store**
```shell
kfutil stores import generate-template --store-type-name Aruba --outpath Aruba.csv
```
2. **Populate the generated CSV file**
Open the CSV file, and reference the table below to populate parameters for each **Attribute**.
| Attribute | Description |
| --------- | ----------- |
| Category | Select "Aruba" or the customized certificate store name from the previous step. |
| Container | Optional container to associate certificate store with. |
| Client Machine | The base URL / IP address of the Aruba instance without the scheme. (i.e. my-server-name.com if the Aruba URL is https://my-server-name.com) |
| Store Path | A semicolon-delimited string that in the format `;` (i.e. clearpass.localhost;HTTP(RSA)). Please see orchestrator documentation for more information. |
| Orchestrator | Select an approved orchestrator capable of managing `Aruba` certificates. Specifically, one with the `Aruba` capability. |
| Properties.FileServerType | The type of file server that the certificate will be uploaded to. The file server must be able to serve the file via HTTPS. |
| Properties.FileServerHost | Required. The base URL for the file server host without the scheme. (i.e. my-server-name.com if the file server URL is https://my-server-name.com). See File Server Configuration section in the orchestrator documentation for more details. |
| Properties.FileServerUsername | Optional. The username used to access the file server. See File Server Configuration section in the orchestrator documentation for more details. |
| Properties.FileServerPassword | Optional. The password used to access the file server. See File Server Configuration section in the orchestrator documentation for more details. |
| Properties.DigestAlgorithm | The hash digest algorithm used for the certificate signing request (CSR). |
3. **Import the CSV file to create the certificate stores**
```shell
kfutil stores import csv --store-type-name Aruba --file Aruba.csv
```
Attributes eligible for retrieval by a PAM Provider on the Universal Orchestrator
If a PAM provider was installed _on the Universal Orchestrator_ in the [Installation](#Installation) section, the following parameters can be configured for retrieval _on the Universal Orchestrator_.
| Attribute | Description |
| --------- | ----------- |
| ServerUsername | Username to use when connecting to server |
| ServerPassword | Password to use when connecting to server |
| FileServerUsername | Optional. The username used to access the file server. See File Server Configuration section in the orchestrator documentation for more details. |
| FileServerPassword | Optional. The password used to access the file server. See File Server Configuration section in the orchestrator documentation for more details. |
Please refer to the **Universal Orchestrator (remote)** usage section ([PAM providers on the Keyfactor Integration Catalog](https://keyfactor.github.io/integrations-catalog/content/pam)) for your selected PAM provider for instructions on how to load attributes orchestrator-side.
> Any secret can be rendered by a PAM provider _installed on the Keyfactor Command server_. The above parameters are specific to attributes that can be fetched by an installed PAM provider running on the Universal Orchestrator server itself.