English | [简体中文](https://github.com/Kuingsmile/word-GPT-Plus/blob/master/README_cn.md)
## 📋 Introduction
Word GPT Plus seamlessly integrates AI and Agent directly into Microsoft Word, allowing you to generate, translate, summarize, and polish text directly within your documents. Enhance your writing workflow without leaving your Word environment.

## ✨ Features
- **Multiple Platform Support** with Latest Models:
- **OpenAI**: Latest GPT series (compatible with DeepSeek and other OpenAI-compatible interfaces)
- **Azure OpenAI**: Full Azure integration with custom deployment names
- **Google Gemini**: Gemini 3 Pro/Flash, Gemini 2.5 Pro/Flash, AQA
- **Ollama** : Available for local deployments only
- **Groq**: Llama 3.3/4, Qwen3, Kimi-K2, and more
- Custom model names supported for all platforms
- **Intelligent Agent Mode** (Powered by LangChain):
- **Direct Word Document Manipulation**: Agent can read, write, and modify your Word documents
- **Multiple Built-in Word Tools**: Web search, Insert text, format content, create tables, manage bookmarks, search and replace, and more
- Multi-step reasoning with conversation memory
- Streaming responses with real-time updates
- Thought process visualization with collapsible details
- **Dual Chat Modes**:
- **Chat Mode**: Quick Q&A and content generation
- **Agent Mode**: Advanced document manipulation with tool access
- **Quick Actions**:
- One-click translation (40+ languages)
- Text polishing and improvement
- Academic writing enhancement
- Content summarization
- Grammar checking and correction
- **Customization & Flexibility**:
- Add custom models for each provider
- Save and manage custom prompts
- Adjust temperature and max tokens per provider
- Support for custom base URLs and proxies
- Local storage for complete privacy
- Multilingual interface (English, 简体中文)
- **Advanced Formatting**:
- **Automatic Word Formatting**: AI responses formatted with proper Word styles
- Markdown parsing and conversion to Word formatting
- Per-message actions: replace, append, or copy
- **Modern User Experience**:
- Clean, copilot-style interface
- Real-time streaming responses
- Quick model and provider switching
- Abort generation at any time
## 🚀 Getting Started
### Requirements
#### Software
- Microsoft Word 2016/2019 (retail version), Word 2021, or Microsoft 365
- [Edge WebView2 Runtime](https://developer.microsoft.com/en-us/microsoft-edge/webview2/)
- Node.js 20+ (only for self-hosting)
> **Note**: Works only with .docx files (not compatible with older .doc format)
#### API Access
- **OpenAI**: Obtain an API key from [OpenAI Platform](https://platform.openai.com/account/api-keys)
- **Azure OpenAI**: Apply for access at [Azure OpenAI Service](https://go.microsoft.com/fwlink/?linkid=2222006)
- **Google Gemini**: Request API access from [Google AI Studio](https://developers.generativeai.google/)
- **Groq**: Get your API key from [Groq Console](https://console.groq.com/keys)
## 💻 Installation
Choose the method that best suits your needs:
### Method 1: Instant Use (Recommended)
*Best for most users. No coding required.*
1. Download `release/instant-use/manifest.xml` [manifest.xml](https://github.com/Kuingsmile/word-GPT-Plus/blob/master/release/instant-use/manifest.xml).
2. Save it to a dedicated folder on your computer (e.g., `C:\Users\username\Documents\WordGPT`).
3. Proceed to the [Add-in Installation Guide](#add-in-installation-guide).
> **Note for users in China**: If you experience connectivity issues, try adding `msq.pub` to your proxy rules or use the self-hosted option.
### Method 2: Self-Hosted (Advanced)
*For developers or those requiring a private backend.*
Docker Deployment
1. Pull and run the Docker image:
```bash
docker pull kuingsmile/word-gpt-plus
docker run -d -p 3000:80 kuingsmile/word-gpt-plus
```
2. Download [manifest.xml](https://github.com/Kuingsmile/word-GPT-Plus/blob/master/release/self-hosted/manifest.xml).
3. Edit `manifest.xml`: Replace all instances of `http://localhost:3000` with your server's address.
4. Proceed to the [Add-in Installation Guide](#add-in-installation-guide).
Build from Source
*Requires Node.js 20+*
1. Clone and start the project:
```bash
git clone https://github.com/Kuingsmile/Word-GPT-Plus.git
cd Word-GPT-Plus
yarn
yarn build
yarn run serve
```
2. Use the [self-hosted manifest.xml](https://github.com/Kuingsmile/word-GPT-Plus/blob/master/release/self-hosted/manifest.xml).
3. Proceed to the [Add-in Installation Guide](#add-in-installation-guide).
Deploy to Tencent EdgeOne
[](https://edgeone.ai/pages/new?repository-url=https%3A%2F%2Fgithub.com%2FKuingsmile%2FWord-GPT-Plus%2Ftree%2Fmaster&build-command=npm%20run%20build&output-directory=.%2Fdist&install-command=yarn%20install)
## Add-in Installation Guide
To get started with Word GPT Plus, you will need to sideload the add-in into Microsoft Word.
You can find instructions provided by MicroSoft at the following link: [sideload office add-ins](https://learn.microsoft.com/en-us/office/dev/add-ins/testing/create-a-network-shared-folder-catalog-for-task-pane-and-content-add-ins)
1. Go to the folder where you saved the `manifest.xml` file, for example `C:\Users\username\Documents\WordGPT`.
2. Open the context menu for the folder(right-click the folder) and select **Properties**.
3. Within the **Properties** dialog box, select the **Sharing** tab, and then select **Share**.
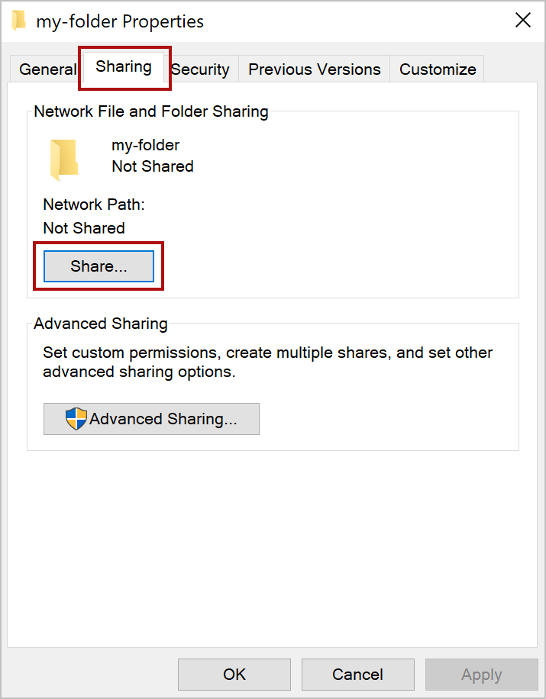
4. Within the **Network access** dialog box, add yourself and any other users you want to share, choose the **Share** button, When you see confirmation that Your folder is shared, note the **full network path** that's displayed immediately following the folder name.
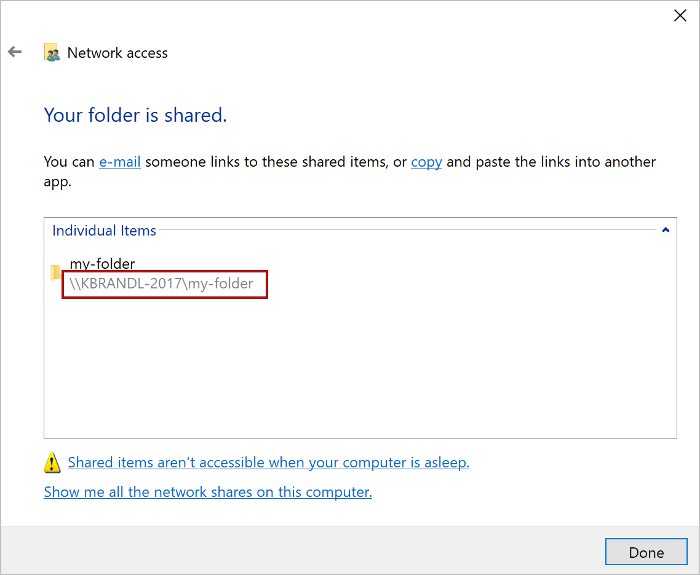
5. Open a new document in Word, choose the **File** tab, and then choose **Options**.
6. Choose **Trust Center**, and then choose the **Trust Center Settings** button.
7. Choose **Trusted Add-in Catalogs**.
8. In the **Catalog Url** box, enter the **full network path** and then choose **Add Catalog**.
9. Select the **Show in Menu** check box, and then choose **OK**.
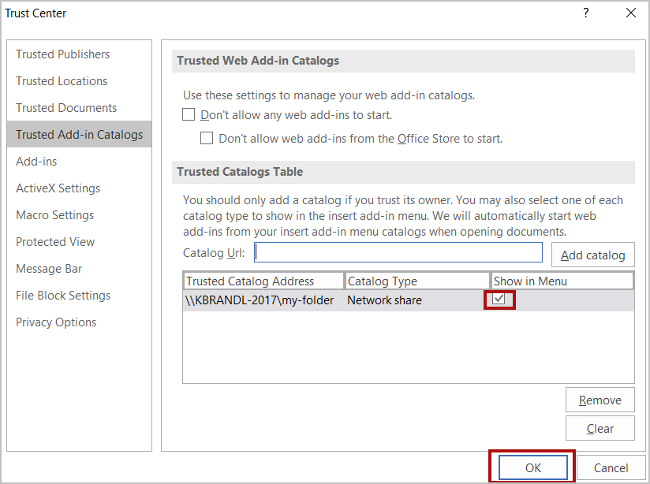
10. Close and then restart Word.
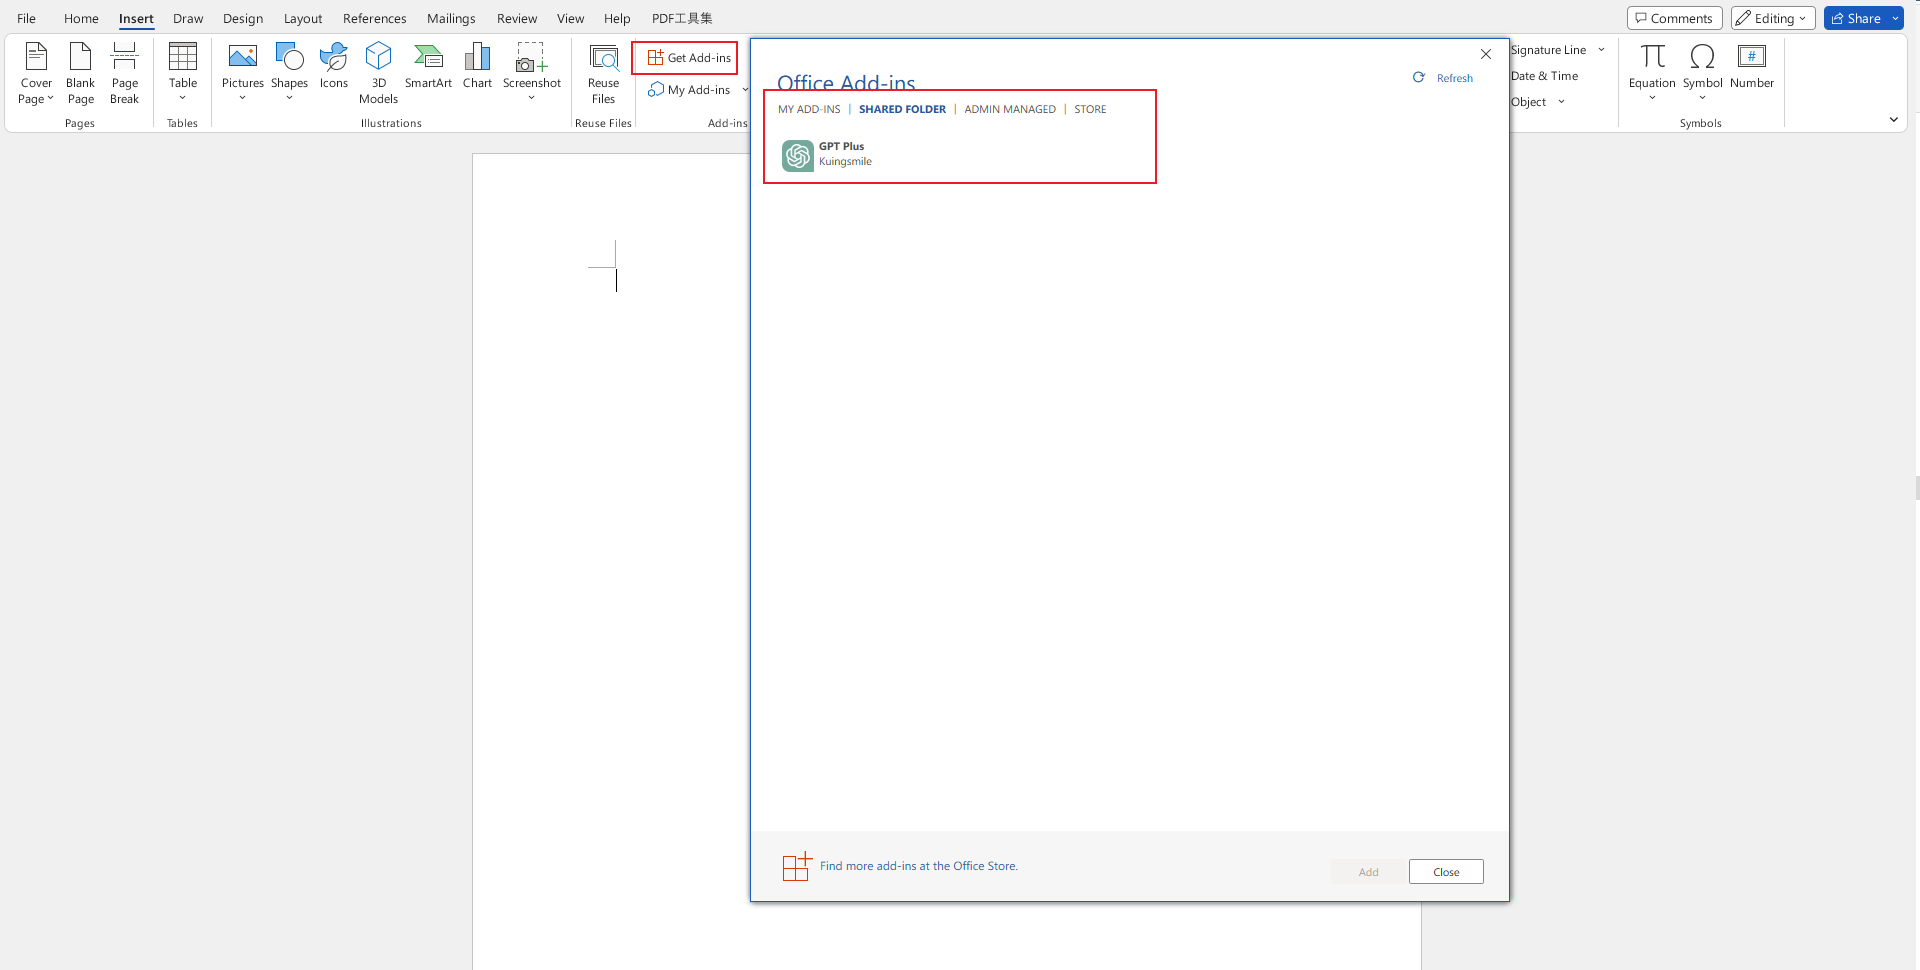
11. Click **Insert** > **My Add-ins** > **Shared Folder**, choose **GPT Plus**, and then choose **Add**.
12. Enjoy it!
## 📖 Usage
### Getting Started
After entering Word GPT Plus, click the `Settings` button on the homepage to configure your preferred AI provider and API key.
### Modes
#### Chat Mode
Use the chat mode for:
- Quick Q&A and information queries
- Content generation and brainstorming
- Language translation
- Text improvement and polishing
Simply type your message and press Enter. Use the quick action buttons for common tasks.
#### Agent Mode
Agent mode gives the AI direct access to your Word document through 25+ specialized tools:
**General Tools:**
- Web search and access
- Numerical calculations
- Date retrieval
**Document Reading Tools:**
- Get selected text or full document content
- Search for specific text
- Get document properties and table information
**Document Writing Tools:**
- Insert, replace, or append text at specific locations
- Create formatted paragraphs with styles
- Insert tables and lists
- Add bookmarks and content controls
**Document Formatting Tools:**
- Apply bold, italic, underline, and other formatting
- Change font names and styles
- Clear formatting
- Search and replace text patterns
**Example Agent Prompts:**
- "Read the entire document and create a summary at the beginning"
- "Format all section headings as Heading 2 and make them blue"
- "Insert a paragraph after the first heading explaining the main topic"
### Quick Actions
Click the quick action buttons for instant operations:
- **🌐 Translate**: Translate selected text to your preferred language
- **✨ Polish**: Improve writing quality and clarity
- **📚 Academic**: Enhance for academic writing
- **📝 Summarize**: Create concise summaries
- **✔️ Grammar**: Check and correct grammar
### Custom Models
For each AI provider, you can add custom models:
1. Go to Settings → Provider tab
2. Select your provider
3. Enter custom model name and click Add
4. The model will appear in the model dropdown
### Configuration Tips
- **Temperature**: Lower (0.3-0.5) for factual tasks, higher (0.7-1.0) for creative tasks
- **Max Tokens**: Increase for longer responses, decrease for concise answers
- **Custom Base URL**: Use for OpenAI-compatible services like DeepSeek
## 🔒 Privacy & Security
- **Local Storage**: Your API keys and custom prompts are stored in browser local storage (within the Word add-in environment). They are never sent to our servers.
- **Direct Connection**: The add-in communicates directly with AI providers (OpenAI, Azure, etc.) or your local Ollama instance. There are no intermediary servers handling your data unless you use a custom proxy.
## Contributing
If you have a suggestion that would make this better, please fork the repo and create a pull request.
## License
MIT License
## Show your support
Give a ⭐️ if this project helped you!