# 2024 年 vim 的 C/C++ 配置
* [前言](#前言)
* [入门 vim](#入门-vim)
* [Language Server Protocal](#language-server-protocal)
* [Async](#async)
* [Treesitter](#treesitter)
* [为什么我不再使用 coc.nvim](#为什么我不再使用-cocnvim)
* [为什么应该使用 neovim 而不是 vim](#为什么应该使用-neovim-而不是-vim)
* [安装](#安装)
* [终端代理](#终端代理)
* [git 代理](#git-代理)
* [安装各种依赖](#安装各种依赖)
* [安装 nvim](#安装-nvim)
* [安装 nerdfonts](#安装-nerdfonts)
* [安装 bear](#安装-bear)
* [安装各种 lsp](#安装各种-lsp)
* [安装本配置](#安装本配置)
* [手动编译一些插件](#手动编译一些插件)
* [checkhealth 检查](#checkhealth-检查)
* [基本操作](#基本操作)
* [退出](#退出)
* [复制粘贴](#复制粘贴)
* [从远程 server 上复制粘贴本地的剪切板中](#从远程-server-上复制粘贴本地的剪切板中)
* [符号搜索](#符号搜索)
* [定义和引用](#定义和引用)
* [注释](#注释)
* [格式化](#格式化)
* [重命名](#重命名)
* [字符串搜索和替换](#字符串搜索和替换)
* [file tree](#file-tree)
* [window](#window)
* [window resize](#window-resize)
* [buffer](#buffer)
* [文件搜索](#文件搜索)
* [导航](#导航)
* [代码段](#代码段)
* [代码补全](#代码补全)
* [Git 集成](#git-集成)
* [调试](#调试)
* [vim cmdline 自动补全](#vim-cmdline-自动补全)
* [终端](#终端)
* [一键运行代码](#一键运行代码)
* [一键注释代码](#一键注释代码)
* [markdown 集成](#markdown-集成)
* [Session](#session)
* [快速移动](#快速移动)
* [本配置源代码解释](#本配置源代码解释)
* [FAQ](#faq)
* [vim 的小技巧](#vim-的小技巧)
* [值得一看的配置](#值得一看的配置)
* [值得关注的插件](#值得关注的插件)
* [有趣的插件](#有趣的插件)
* [学习](#学习)
* [找资源](#找资源)
* [高级话题](#高级话题)
* [衍生](#衍生)
| 整体效果 |
| -------------------------------- |
| 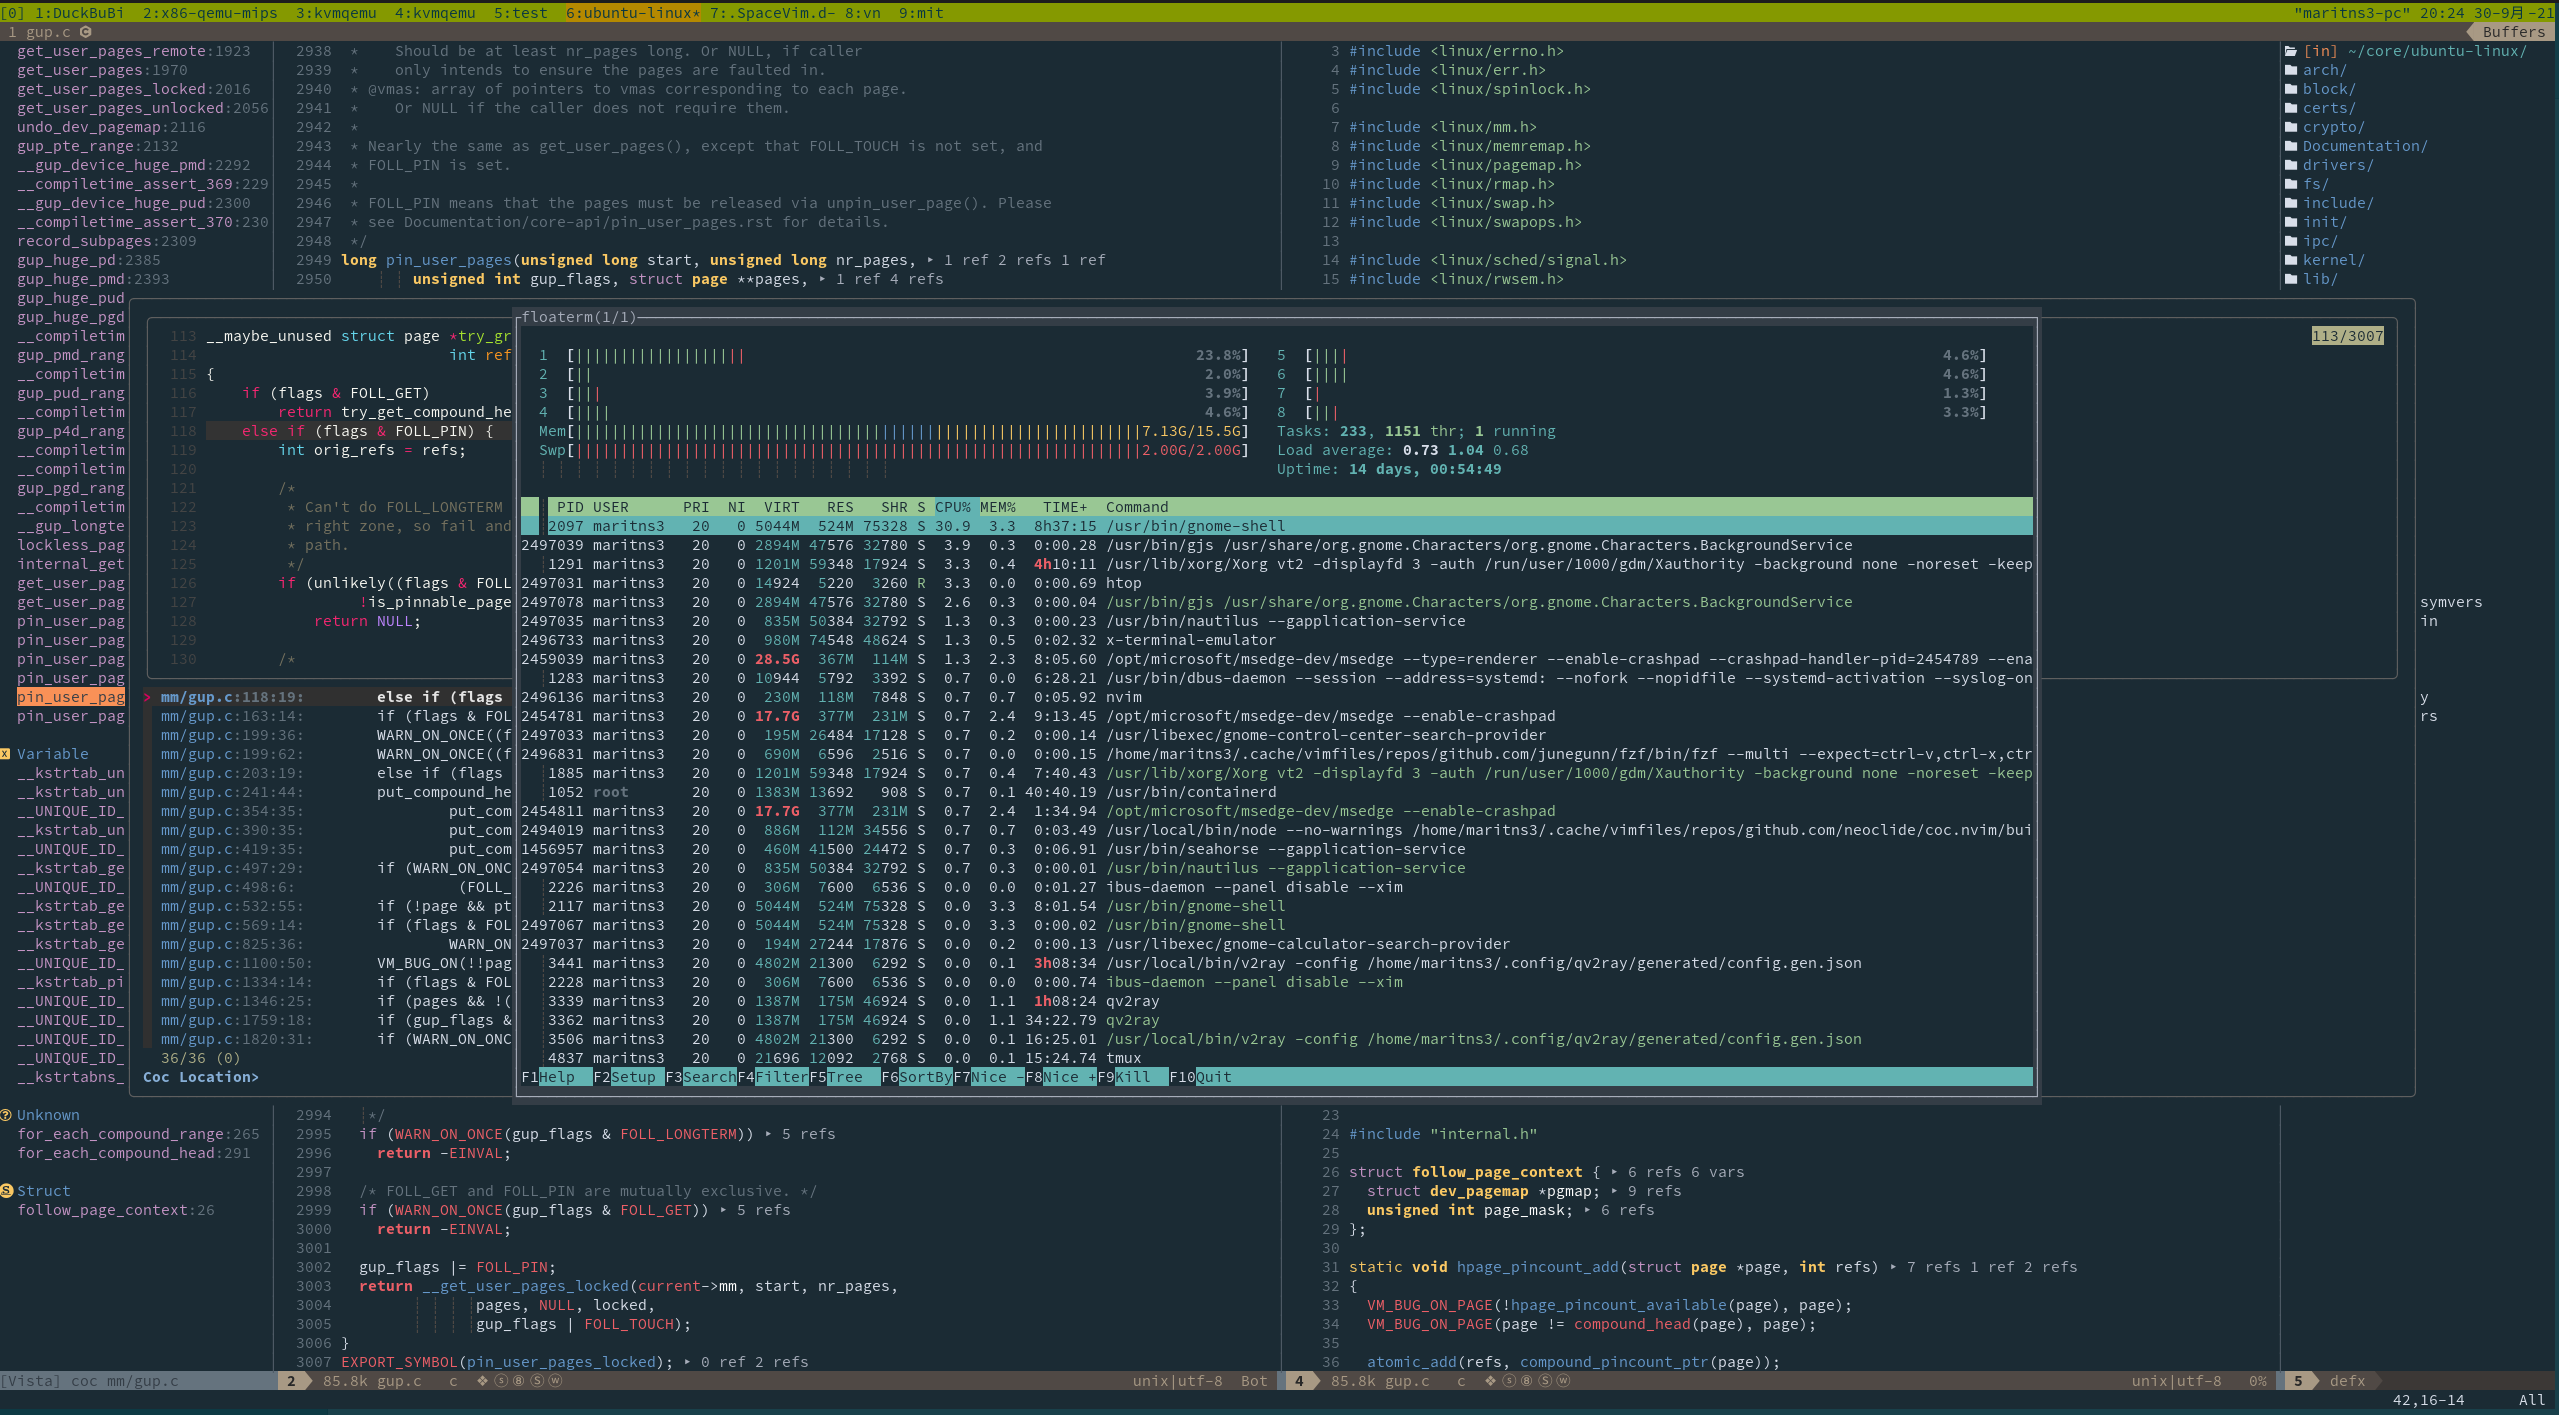 |
## 前言
本文的目标观众:
1. vim 新手
2. 正在使用 [cscope](http://cscope.sourceforge.net/) / [ctags](https://github.com/universal-ctags/ctags) / [gtags](https://github.com/SpaceVim/SpaceVim/issues/4389) / [nerdtree](https://github.com/preservim/nerdtree) / [YCM](https://github.com/ycm-core/YouCompleteMe) 的 vimer
3. 不了解 [Language Server Protocal](https://microsoft.github.io/language-server-protocol/) (下简称 lsp ) 等新特性的 vimer
4. 没有使用过 [Treesitter](https://github.com/nvim-treesitter/nvim-treesitter)
本项目不是在于要大家使用我的这个配置,而是让大家知道 vim 正在飞速进步 ,拥抱 lsp, async, treesitter 等新特性,vim 一定的比你想象的酷炫。
任何问题, 欢迎[issue](https://github.com/Martins3/My-Linux-config/issues?q=is%3Aissue)。
## 入门 vim
其实关于 vim 的基本知识教程有很多,这里我推荐两个网站
1. [OpenVim](https://openvim.com): 交互式的学习 vim
2. [vim check sheet](https://vim.rtorr.com/lang/zh_cn): vim 常用快捷键清单
如果完全没有基础,建议使用 openvim 打牢基础之后,然后就直接将 vim 用于实战中间,因为这些快捷键都是肌肉记忆,无非多熟悉一下而已。当你知道 hjkl 之类的操作之后,之后可以
使用 vim check sheet 来强化补充一下,不要指望一次全部背下来,也没有必要全部记住,一次学几个,学最能提高你工作效率的那几个。
vim 的学习曲线陡峭主要就是在最开始的 hjkl 这些快捷键的记忆,但是最多几天,之后就学习曲线就非常平缓了,无非是装装插件,重新映射一下快捷键之类的事情。实不相瞒,我用 vim 好几年,至今不会写超过 5 行的 vimscript 。
## Language Server Protocal
lsp 是微软开发 VSCode 提出的,其定义了一套标准编辑器和 language server 之间的规范。
1. 不同的语言需要不同的 Language Server,比如 C/C++ 需要 [clangd](https://clangd.llvm.org/), Rust 语言采用 [rust analyzer](https://github.com/rust-analyzer/rust-analyzer), 官方列举了很多 [lsp servers](https://microsoft.github.io/language-server-protocol/implementors/servers/)。
2. 不同的编辑按照 lsp 的规范和 language server 通信
他们大致的关系如下, 通过统一的接口,大大的减少了重复开发,lsp 定义的查找引用,定义,格式化代码功能只需要安装对应的 language server 支持就是开箱即用,再也无需从各种插件哪里东拼西凑这些功能。
```txt
+------------------------+ +---------------+
| Editor | |Language Server|
+------------------------+ +---------------+
| Emacs | | |
| Neovim +--> | clangd |
| Visual Studio Code | | |
+------------------------+ +---------------+
```
## Async
async 的效果当然就是快,当一个插件存在其 async 的版本,那么毫无疑问,就应该使用 async 版本。
文件树插件,我之前一直都是使用 nerdtree 的,直到有一天我用 vim 打开 Linux kernel,我发现光标移动都非常的困难,我开始以为是终端的性能问题,但是在 htop 中发现 vim 的 CPU 利用率很高,
直到将 nerdtree 替换为 [nvim-tree](https://github.com/kyazdani42/nvim-tree.lua) 之类的
关于 nerdtree 为什么不支持 async 可以参考 [why nerdtree doesn't support async](https://github.com/preservim/nerdtree/issues/1170)。
## Treesitter
[treesitter](https://github.com/tree-sitter/tree-sitter) 通过语法分析,而不是词法分析,这让很多事情都非常精确。
1. 更加的智能和高效的高亮。原始的 vim 中只能按照正则匹配来高亮关键字,但是 treesitter 可以区分什么是函数,成员,类,宏等定义。
2. 如果想要跳转到函数头,在 vim 中使用默认提供 [`[``m`](https://stackoverflow.com/questions/2109503/how-to-jump-to-the-beginning-of-the-current-function-body-in-vim),但是这是根据词法规则实现的,要么跳转到第一个匹配的 { ,要么跳转到最外层的 { ,因此
对于文件的格式有要求,但是如果使用上 [nvim-treesitter-textobjects](https://github.com/nvim-treesitter/nvim-treesitter-textobjects),这个问题就不存在了,你总是可以跳转到函数的开始位置。
3. 精确的拼写检查。[spellsitter](https://www.reddit.com/r/neovim/comments/x7k7r7/spellsitter_merged_to_neovim_core/) 可以让拼写检查仅仅检查注释中内容,而默认的检查会检查所有的单词,包括各种缩写函数名,那些检查大部分都是误报。
通过 Treesitter ,[有的插件](https://github.com/ThePrimeagen/refactoring.nvim)可以做到超乎想象的事情,甚至是将《重构,改善既有代码》的操作集成到 vim 中。
## 为什么我不再使用 coc.nvim
最开始的时候,vim / neovim 都是没有内置 lsp 功能的,在 vim 下想要使用 lsp 就要靠 [coc.nim](https://github.com/neoclide/coc.nvim) 这种插件,类似的工具官方列举了很多 [lsp tools](https://microsoft.github.io/language-server-protocol/implementors/tools/),
coc.nvim 的宗旨就是*full language server protocol support as VSCode*, 虽然后来 neovim 内置了,但是到目前为止,我还是认为内置的 lsp 和 coc.nvim 的完善度还是存在一些差距。
reddit 上的一些老哥目前[认为 coc.nvim 的自动补全做的更好,开箱即用。](https://www.reddit.com/r/neovim/comments/p3ji6d/nvimlspconfig_or_cocnvim/)
但是到了 2023 年,虽然我认为 fannheyward 的 [Thoughts on coc.nvim](https://fann.im/blog/2021/08/01/thoughts-on-coc.nvim/) 分析地很深刻,但是现在 native lsp 的易用程度和 coc.nvim 已经很小了,[但是社区的人几乎都倒向了 native lsp](https://www.reddit.com/r/neovim/comments/14pvyo4/why_is_nobody_using_coc_anymore/)。
虽然充满了不舍,但是还是从 coc.nvim 切换为 native lsp 了。对于使用上来说,几乎没有区别,只是现在配置内容变复杂了很多 :( 。
当然,也可能我端午节的时候太清闲了。
## 为什么应该使用 neovim 而不是 vim
其实 vim 还有一个祖先叫做 vi, vim 全称为 vi improve, 但是 vim 在很长一段时间更新的不大,neovim 的作者提交了一个很大的 patch 给 vim,但是被 vim 的作者拒绝了,
因为这个 patch 太大了,改动太多,然后 neovim 的作者就开始自立门户搞了一个 neovim,很多 vim 特性都是被 neovim 逼出来的,
[neovim 推出之后,vim 的更新速度大大加快了](https://www.contextualize.ai/mpereira/20-years-of-vim-ef9acae9)
总体来说,neovim 相较于 vim :
1. 更新更快, 添加的新功能更多,例如内置 lsp, lua 语言的支持。
2. 社区更活跃。这个你对比一下 vim 和 neovim 的开发者数量就可以知道了,vim 很长时间都只有一个人开发的。
3. 很多插件依赖 neovim 新特性,或者只能在 vim 上勉强使用。
4. neovim 支持 lua 语言配置。
根据 stackoverflow 的报告指出 [Neovim is the most loved editor it is the 10th most wanted editor](https://insights.stackoverflow.com/survey/2021#section-most-loved-dreaded-and-wanted-collaboration-tools)
## 安装
安装成功需要注意两点:
1. **代理** : 实现代理的方法在 github 上有很多教程。如果你无法解决**终端**和**git**的代理,这个配置几乎不可能安装成功。
2. 软件版本 : 有的 Linux Distribution 为了稳定性,是锁版本的,例如 Ubuntu,一旦推出 22.04 之后,其上的软件版本几乎都是不变的,这意味着有的软件没有被 apt 收录进去,有的版本太低,这导致有的几个软件需要手动编译。
当然滚动更新的 Linux Distribution,类似 Arch 或者 Fedora 一般不会存在这些问题。
整个环境的安装主要是 neovim ccls,下面说明一下安装主要步骤以及其需要注意的一些小问题。对于新手,安装过程并不简单,遇到问题多 Google,或者 issue 直接和我讨论。
虽然我自己不用 Ubuntu,考虑到大多数新手使用的是 Ubuntu ,这里给出一个基于 Ubuntu 的安装介绍。
### 终端代理
在执行命令的终端执行如下命令,修改环境代理相关的环境变量:
```sh
export https_proxy=http://10.0.0.2:8889
export http_proxy=http://10.0.0.2:8889
export HTTPS_PROXY=http://10.0.0.2:8889
export HTTP_PROXY=http://10.0.0.2:8889
export ftp_proxy=http://10.0.0.2:8889
export FTP_PROXY=http://10.0.0.2:8889
```
这里的 10.0.0.2 和 8889 是你的代理配置的结果,使用 wget www.google.com 来做测试:
如果配置正常,应该是这样的结果:
```txt
🧀 wget www.google.com
Prepended http:// to 'www.google.com'
--2025-01-06 12:23:06-- http://www.google.com/
Connecting to 10.0.0.2:8889... connected.
Proxy request sent, awaiting response... 200 OK
Length: unspecified [text/html]
Saving to: ‘index.html’
index.html 0 --.-KB/s index.html 19.39K --.-KB/s in 0.06s
2025-01-06 12:23:07 (342 KB/s) - ‘index.html’ saved [19852]
```
### git 代理
在 ~/.gitconfig 中添加如下配置,当 git clone 走 https 的时候,会使用代理。
当然,这里的 10.0.0.2 和 8889 也需要替换为你的代理配置。
```txt
[http]
proxy = "http://10.0.0.2:8889"
[https]
proxy = "http://10.0.0.2:8889"
```
如果需要配置不同的机器使用不同的 git 代理,可以在 ~/.gitconfig 中添加如下内容
```txt
[include]
path = ~/.gitconfig-local
```
然后 ~/.gitconfig-local 中配置代理信息。
### 安装各种依赖
```sh
sudo apt update
# 基本工具
sudo apt install -y gcc wget iputils-ping python3-pip git bear tig shellcheck ripgrep fzf npm yarn
# neovim 的各种依赖 https://github.com/neovim/neovim/wiki/Building-Neovim#build-prerequisites
sudo apt install -y ninja-build gettext libtool libtool-bin autoconf automake cmake g++ pkg-config unzip curl doxygen
```
### 安装 nvim
- 当前配置需要 neovim 0.10 以上的版本,手动安装[参考这里](https://github.com/neovim/neovim/wiki/Installing-Neovim)
其实也就是下面几条命令:
获取到源码,并且 checkout 到最新的 release :
```sh
git clone https://github.com/neovim/neovim && cd neovim
git branch -a
git checkout release-0.10 # 2025-01-06 的最新 release 是 2025
```
编译并且安装:
```sh
make CMAKE_BUILD_TYPE=Release -j16
sudo make install
```
### 安装 nerdfonts
注意,需要修改 terminal 的字体为 nerdfonts 中才不会出现乱码。
nerd-fonts 版本和字体可以到 [releases](https://github.com/ryanoasis/nerd-fonts/releases/) 界面选择
假如需要 FiraCode ,在 Linux 下也就是这几条命令:
```sh
wget https://github.com/ryanoasis/nerd-fonts/releases/download/v3.3.0/FiraCode.zip
unzip FiraCode.zip -d ~/.fonts
fc-cache -fv
```
### 安装 bear
clangd/ccls 需要通过 [bear](https://github.com/rizsotto/Bear) 生成的 `compile_commands.json` 来构建索引数据。
```sh
sudo apt install bear
```
注:使用 bear 生成 `compile_commands.json` 是一种通用的方法,但是不同的 build 工具和项目还存在一些捷径可走:
1. linux 内核使用自带的脚本 `scripts/clang-tools/gen_compile_commands.py`,具体可以参考[这里](https://patchwork.kernel.org/patch/10717125/),这样的话就不用更改一次 .config 就重新编译整个内核。
2. QEMU 项目使用 meson 构建的,其会自动在 build 文件夹中生成 `compile_commands.json`, 直接拷贝到项目的顶层目录就可以了。
3. [cmake](https://stackoverflow.com/questions/23960835/cmake-not-generating-compile-commands-json) 和 [ninja](https://ninja-build.org/manual.html) 都有生成 `compile_commands.json` 的脚本
4. see [ccls documentation](https://github.com/MaskRay/ccls/wiki/Project-Setup) for more
一个工程只要生成 `compile_commands.json`,那么一切就大功告成了。
注: 如果在 `bear -- make` 的时候遇到了 rpc 相关的报错,可以尝试取消一下代理,也就是
```sh
export https_proxy=
export http_proxy=
```
### 安装各种 lsp
通过 [mason](https://github.com/williamboman/mason.nvim) 可以自动的安装各种 lsp,
在 neovim 中执行 `:Mason` 可以检查各种插件的执行状态。
对于 mason 不支持的 lsp,就需要手动安装了,目前只有 ccls ,例如 `sudo apt install ccls`
- [ccls](https://github.com/MaskRay/ccls/wiki/Install)
C/C++ 默认使用 `clangd`,并通过 `--clang-tidy` 启用 clang-tidy 诊断。需要确保
`clangd` 在 `PATH` 中;`clangd` 会读取项目里的 `compile_commands.json` 和
`.clang-tidy`。Linux kernel 源码树例外,会自动使用 `ccls`。
### 安装本配置
nvim 的配置在 ~/.config/nvim 中,
```sh
mv ~/.config/nvim ~/.config/nvim.bak # 保存原有配置
cd ~ # 保证在根目录下
```
```sh
git clone --depth=1 https://github.com/martins3/My-Linux-config .dotfiles # 随便什么名字
ln -s ~/.dotfiles/nvim ~/.config/nvim # 创建一个软链接指向此处
nvim --headless +qall # 不去打开 nvim 的界面,仅仅显示 nvim 的安装插件的日志
```
然后打开 nvim,nvim 会检查包管理器 lazy.nvim 是否存在,如果不存在,那么首先安装 lazy.nvim ,然后 lazy.nvim 会自动安装所有的插件.
### 手动编译一些插件
一般来说,安装插件是可以自动构建好的,但是我发现有两个插件很多时候并不能,给搭建带来很多困扰,所以可以手动构建
```sh
# markdown-preview.nvim
cd ~/.local/share/nvim/lazy/markdown-preview.nvim/app && npm install
```
### checkhealth 检查
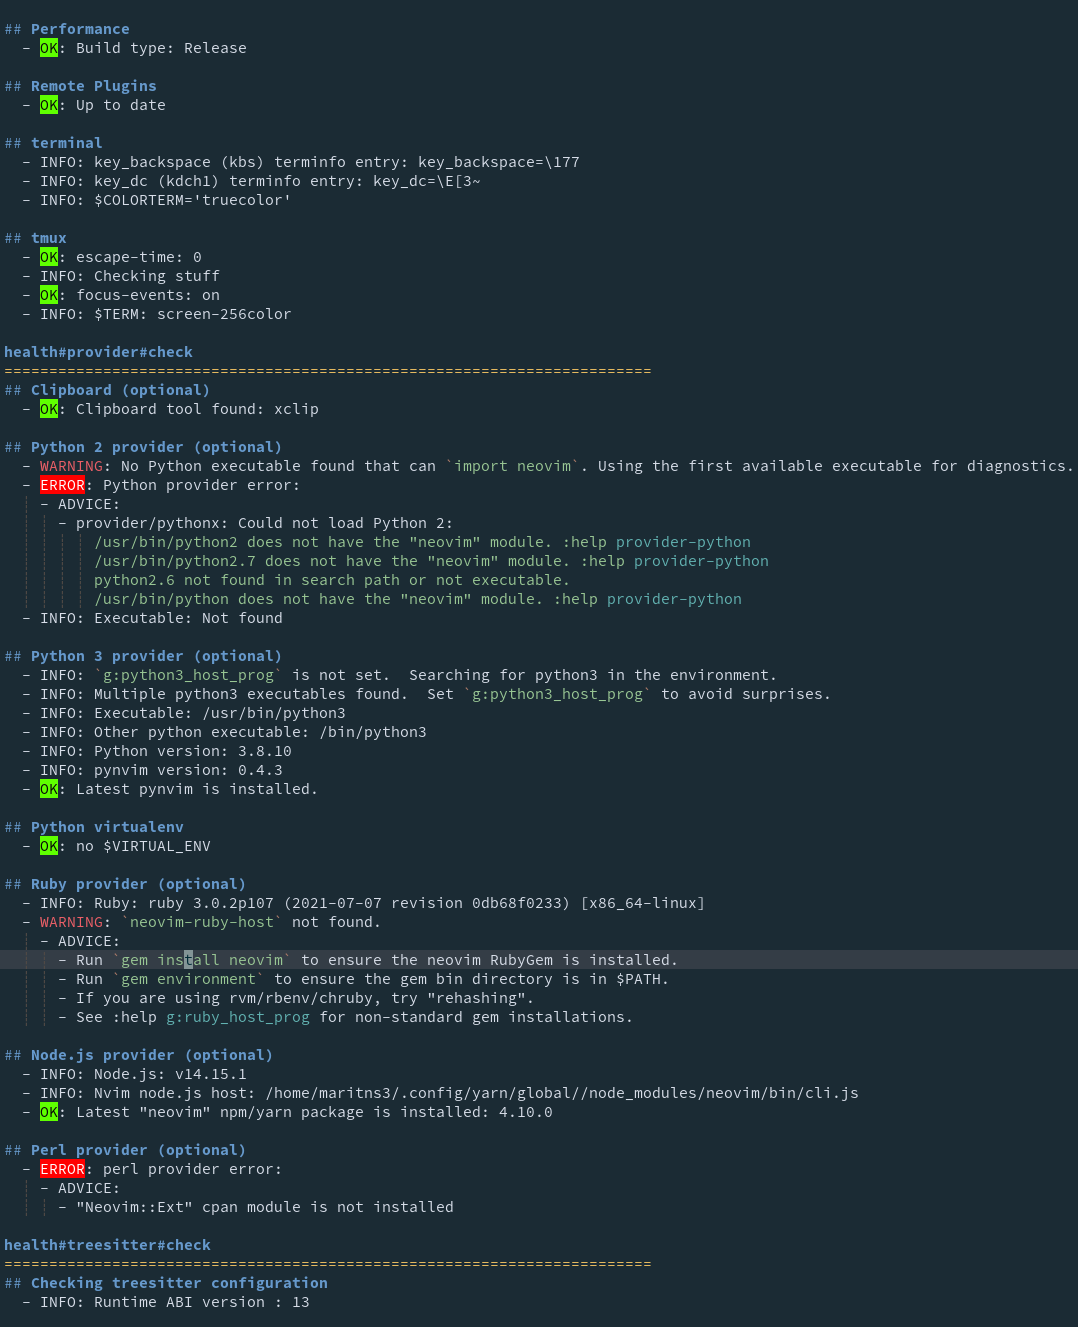
在 nvim 中间执行 `checkhealth` 命令,其会提醒需要安装的各种依赖, **比如 xclip 没有安装,那么和系统的 clipboard 和 vim 的 clipboard 之间复制会出现问题**。neovim 的 python 的没有安装可能导致一些插件不可用。
| 我的配置的截图 |
| ----------------------------------- |
|
|
## 前言
本文的目标观众:
1. vim 新手
2. 正在使用 [cscope](http://cscope.sourceforge.net/) / [ctags](https://github.com/universal-ctags/ctags) / [gtags](https://github.com/SpaceVim/SpaceVim/issues/4389) / [nerdtree](https://github.com/preservim/nerdtree) / [YCM](https://github.com/ycm-core/YouCompleteMe) 的 vimer
3. 不了解 [Language Server Protocal](https://microsoft.github.io/language-server-protocol/) (下简称 lsp ) 等新特性的 vimer
4. 没有使用过 [Treesitter](https://github.com/nvim-treesitter/nvim-treesitter)
本项目不是在于要大家使用我的这个配置,而是让大家知道 vim 正在飞速进步 ,拥抱 lsp, async, treesitter 等新特性,vim 一定的比你想象的酷炫。
任何问题, 欢迎[issue](https://github.com/Martins3/My-Linux-config/issues?q=is%3Aissue)。
## 入门 vim
其实关于 vim 的基本知识教程有很多,这里我推荐两个网站
1. [OpenVim](https://openvim.com): 交互式的学习 vim
2. [vim check sheet](https://vim.rtorr.com/lang/zh_cn): vim 常用快捷键清单
如果完全没有基础,建议使用 openvim 打牢基础之后,然后就直接将 vim 用于实战中间,因为这些快捷键都是肌肉记忆,无非多熟悉一下而已。当你知道 hjkl 之类的操作之后,之后可以
使用 vim check sheet 来强化补充一下,不要指望一次全部背下来,也没有必要全部记住,一次学几个,学最能提高你工作效率的那几个。
vim 的学习曲线陡峭主要就是在最开始的 hjkl 这些快捷键的记忆,但是最多几天,之后就学习曲线就非常平缓了,无非是装装插件,重新映射一下快捷键之类的事情。实不相瞒,我用 vim 好几年,至今不会写超过 5 行的 vimscript 。
## Language Server Protocal
lsp 是微软开发 VSCode 提出的,其定义了一套标准编辑器和 language server 之间的规范。
1. 不同的语言需要不同的 Language Server,比如 C/C++ 需要 [clangd](https://clangd.llvm.org/), Rust 语言采用 [rust analyzer](https://github.com/rust-analyzer/rust-analyzer), 官方列举了很多 [lsp servers](https://microsoft.github.io/language-server-protocol/implementors/servers/)。
2. 不同的编辑按照 lsp 的规范和 language server 通信
他们大致的关系如下, 通过统一的接口,大大的减少了重复开发,lsp 定义的查找引用,定义,格式化代码功能只需要安装对应的 language server 支持就是开箱即用,再也无需从各种插件哪里东拼西凑这些功能。
```txt
+------------------------+ +---------------+
| Editor | |Language Server|
+------------------------+ +---------------+
| Emacs | | |
| Neovim +--> | clangd |
| Visual Studio Code | | |
+------------------------+ +---------------+
```
## Async
async 的效果当然就是快,当一个插件存在其 async 的版本,那么毫无疑问,就应该使用 async 版本。
文件树插件,我之前一直都是使用 nerdtree 的,直到有一天我用 vim 打开 Linux kernel,我发现光标移动都非常的困难,我开始以为是终端的性能问题,但是在 htop 中发现 vim 的 CPU 利用率很高,
直到将 nerdtree 替换为 [nvim-tree](https://github.com/kyazdani42/nvim-tree.lua) 之类的
关于 nerdtree 为什么不支持 async 可以参考 [why nerdtree doesn't support async](https://github.com/preservim/nerdtree/issues/1170)。
## Treesitter
[treesitter](https://github.com/tree-sitter/tree-sitter) 通过语法分析,而不是词法分析,这让很多事情都非常精确。
1. 更加的智能和高效的高亮。原始的 vim 中只能按照正则匹配来高亮关键字,但是 treesitter 可以区分什么是函数,成员,类,宏等定义。
2. 如果想要跳转到函数头,在 vim 中使用默认提供 [`[``m`](https://stackoverflow.com/questions/2109503/how-to-jump-to-the-beginning-of-the-current-function-body-in-vim),但是这是根据词法规则实现的,要么跳转到第一个匹配的 { ,要么跳转到最外层的 { ,因此
对于文件的格式有要求,但是如果使用上 [nvim-treesitter-textobjects](https://github.com/nvim-treesitter/nvim-treesitter-textobjects),这个问题就不存在了,你总是可以跳转到函数的开始位置。
3. 精确的拼写检查。[spellsitter](https://www.reddit.com/r/neovim/comments/x7k7r7/spellsitter_merged_to_neovim_core/) 可以让拼写检查仅仅检查注释中内容,而默认的检查会检查所有的单词,包括各种缩写函数名,那些检查大部分都是误报。
通过 Treesitter ,[有的插件](https://github.com/ThePrimeagen/refactoring.nvim)可以做到超乎想象的事情,甚至是将《重构,改善既有代码》的操作集成到 vim 中。
## 为什么我不再使用 coc.nvim
最开始的时候,vim / neovim 都是没有内置 lsp 功能的,在 vim 下想要使用 lsp 就要靠 [coc.nim](https://github.com/neoclide/coc.nvim) 这种插件,类似的工具官方列举了很多 [lsp tools](https://microsoft.github.io/language-server-protocol/implementors/tools/),
coc.nvim 的宗旨就是*full language server protocol support as VSCode*, 虽然后来 neovim 内置了,但是到目前为止,我还是认为内置的 lsp 和 coc.nvim 的完善度还是存在一些差距。
reddit 上的一些老哥目前[认为 coc.nvim 的自动补全做的更好,开箱即用。](https://www.reddit.com/r/neovim/comments/p3ji6d/nvimlspconfig_or_cocnvim/)
但是到了 2023 年,虽然我认为 fannheyward 的 [Thoughts on coc.nvim](https://fann.im/blog/2021/08/01/thoughts-on-coc.nvim/) 分析地很深刻,但是现在 native lsp 的易用程度和 coc.nvim 已经很小了,[但是社区的人几乎都倒向了 native lsp](https://www.reddit.com/r/neovim/comments/14pvyo4/why_is_nobody_using_coc_anymore/)。
虽然充满了不舍,但是还是从 coc.nvim 切换为 native lsp 了。对于使用上来说,几乎没有区别,只是现在配置内容变复杂了很多 :( 。
当然,也可能我端午节的时候太清闲了。
## 为什么应该使用 neovim 而不是 vim
其实 vim 还有一个祖先叫做 vi, vim 全称为 vi improve, 但是 vim 在很长一段时间更新的不大,neovim 的作者提交了一个很大的 patch 给 vim,但是被 vim 的作者拒绝了,
因为这个 patch 太大了,改动太多,然后 neovim 的作者就开始自立门户搞了一个 neovim,很多 vim 特性都是被 neovim 逼出来的,
[neovim 推出之后,vim 的更新速度大大加快了](https://www.contextualize.ai/mpereira/20-years-of-vim-ef9acae9)
总体来说,neovim 相较于 vim :
1. 更新更快, 添加的新功能更多,例如内置 lsp, lua 语言的支持。
2. 社区更活跃。这个你对比一下 vim 和 neovim 的开发者数量就可以知道了,vim 很长时间都只有一个人开发的。
3. 很多插件依赖 neovim 新特性,或者只能在 vim 上勉强使用。
4. neovim 支持 lua 语言配置。
根据 stackoverflow 的报告指出 [Neovim is the most loved editor it is the 10th most wanted editor](https://insights.stackoverflow.com/survey/2021#section-most-loved-dreaded-and-wanted-collaboration-tools)
## 安装
安装成功需要注意两点:
1. **代理** : 实现代理的方法在 github 上有很多教程。如果你无法解决**终端**和**git**的代理,这个配置几乎不可能安装成功。
2. 软件版本 : 有的 Linux Distribution 为了稳定性,是锁版本的,例如 Ubuntu,一旦推出 22.04 之后,其上的软件版本几乎都是不变的,这意味着有的软件没有被 apt 收录进去,有的版本太低,这导致有的几个软件需要手动编译。
当然滚动更新的 Linux Distribution,类似 Arch 或者 Fedora 一般不会存在这些问题。
整个环境的安装主要是 neovim ccls,下面说明一下安装主要步骤以及其需要注意的一些小问题。对于新手,安装过程并不简单,遇到问题多 Google,或者 issue 直接和我讨论。
虽然我自己不用 Ubuntu,考虑到大多数新手使用的是 Ubuntu ,这里给出一个基于 Ubuntu 的安装介绍。
### 终端代理
在执行命令的终端执行如下命令,修改环境代理相关的环境变量:
```sh
export https_proxy=http://10.0.0.2:8889
export http_proxy=http://10.0.0.2:8889
export HTTPS_PROXY=http://10.0.0.2:8889
export HTTP_PROXY=http://10.0.0.2:8889
export ftp_proxy=http://10.0.0.2:8889
export FTP_PROXY=http://10.0.0.2:8889
```
这里的 10.0.0.2 和 8889 是你的代理配置的结果,使用 wget www.google.com 来做测试:
如果配置正常,应该是这样的结果:
```txt
🧀 wget www.google.com
Prepended http:// to 'www.google.com'
--2025-01-06 12:23:06-- http://www.google.com/
Connecting to 10.0.0.2:8889... connected.
Proxy request sent, awaiting response... 200 OK
Length: unspecified [text/html]
Saving to: ‘index.html’
index.html 0 --.-KB/s index.html 19.39K --.-KB/s in 0.06s
2025-01-06 12:23:07 (342 KB/s) - ‘index.html’ saved [19852]
```
### git 代理
在 ~/.gitconfig 中添加如下配置,当 git clone 走 https 的时候,会使用代理。
当然,这里的 10.0.0.2 和 8889 也需要替换为你的代理配置。
```txt
[http]
proxy = "http://10.0.0.2:8889"
[https]
proxy = "http://10.0.0.2:8889"
```
如果需要配置不同的机器使用不同的 git 代理,可以在 ~/.gitconfig 中添加如下内容
```txt
[include]
path = ~/.gitconfig-local
```
然后 ~/.gitconfig-local 中配置代理信息。
### 安装各种依赖
```sh
sudo apt update
# 基本工具
sudo apt install -y gcc wget iputils-ping python3-pip git bear tig shellcheck ripgrep fzf npm yarn
# neovim 的各种依赖 https://github.com/neovim/neovim/wiki/Building-Neovim#build-prerequisites
sudo apt install -y ninja-build gettext libtool libtool-bin autoconf automake cmake g++ pkg-config unzip curl doxygen
```
### 安装 nvim
- 当前配置需要 neovim 0.10 以上的版本,手动安装[参考这里](https://github.com/neovim/neovim/wiki/Installing-Neovim)
其实也就是下面几条命令:
获取到源码,并且 checkout 到最新的 release :
```sh
git clone https://github.com/neovim/neovim && cd neovim
git branch -a
git checkout release-0.10 # 2025-01-06 的最新 release 是 2025
```
编译并且安装:
```sh
make CMAKE_BUILD_TYPE=Release -j16
sudo make install
```
### 安装 nerdfonts
注意,需要修改 terminal 的字体为 nerdfonts 中才不会出现乱码。
nerd-fonts 版本和字体可以到 [releases](https://github.com/ryanoasis/nerd-fonts/releases/) 界面选择
假如需要 FiraCode ,在 Linux 下也就是这几条命令:
```sh
wget https://github.com/ryanoasis/nerd-fonts/releases/download/v3.3.0/FiraCode.zip
unzip FiraCode.zip -d ~/.fonts
fc-cache -fv
```
### 安装 bear
clangd/ccls 需要通过 [bear](https://github.com/rizsotto/Bear) 生成的 `compile_commands.json` 来构建索引数据。
```sh
sudo apt install bear
```
注:使用 bear 生成 `compile_commands.json` 是一种通用的方法,但是不同的 build 工具和项目还存在一些捷径可走:
1. linux 内核使用自带的脚本 `scripts/clang-tools/gen_compile_commands.py`,具体可以参考[这里](https://patchwork.kernel.org/patch/10717125/),这样的话就不用更改一次 .config 就重新编译整个内核。
2. QEMU 项目使用 meson 构建的,其会自动在 build 文件夹中生成 `compile_commands.json`, 直接拷贝到项目的顶层目录就可以了。
3. [cmake](https://stackoverflow.com/questions/23960835/cmake-not-generating-compile-commands-json) 和 [ninja](https://ninja-build.org/manual.html) 都有生成 `compile_commands.json` 的脚本
4. see [ccls documentation](https://github.com/MaskRay/ccls/wiki/Project-Setup) for more
一个工程只要生成 `compile_commands.json`,那么一切就大功告成了。
注: 如果在 `bear -- make` 的时候遇到了 rpc 相关的报错,可以尝试取消一下代理,也就是
```sh
export https_proxy=
export http_proxy=
```
### 安装各种 lsp
通过 [mason](https://github.com/williamboman/mason.nvim) 可以自动的安装各种 lsp,
在 neovim 中执行 `:Mason` 可以检查各种插件的执行状态。
对于 mason 不支持的 lsp,就需要手动安装了,目前只有 ccls ,例如 `sudo apt install ccls`
- [ccls](https://github.com/MaskRay/ccls/wiki/Install)
C/C++ 默认使用 `clangd`,并通过 `--clang-tidy` 启用 clang-tidy 诊断。需要确保
`clangd` 在 `PATH` 中;`clangd` 会读取项目里的 `compile_commands.json` 和
`.clang-tidy`。Linux kernel 源码树例外,会自动使用 `ccls`。
### 安装本配置
nvim 的配置在 ~/.config/nvim 中,
```sh
mv ~/.config/nvim ~/.config/nvim.bak # 保存原有配置
cd ~ # 保证在根目录下
```
```sh
git clone --depth=1 https://github.com/martins3/My-Linux-config .dotfiles # 随便什么名字
ln -s ~/.dotfiles/nvim ~/.config/nvim # 创建一个软链接指向此处
nvim --headless +qall # 不去打开 nvim 的界面,仅仅显示 nvim 的安装插件的日志
```
然后打开 nvim,nvim 会检查包管理器 lazy.nvim 是否存在,如果不存在,那么首先安装 lazy.nvim ,然后 lazy.nvim 会自动安装所有的插件.
### 手动编译一些插件
一般来说,安装插件是可以自动构建好的,但是我发现有两个插件很多时候并不能,给搭建带来很多困扰,所以可以手动构建
```sh
# markdown-preview.nvim
cd ~/.local/share/nvim/lazy/markdown-preview.nvim/app && npm install
```
### checkhealth 检查
在 nvim 中间执行 `checkhealth` 命令,其会提醒需要安装的各种依赖, **比如 xclip 没有安装,那么和系统的 clipboard 和 vim 的 clipboard 之间复制会出现问题**。neovim 的 python 的没有安装可能导致一些插件不可用。
| 我的配置的截图 |
| ----------------------------------- |
|  |
## 基本操作
基本操作是所有人都需要的比如,`h` `j` `k` `l` `e` `w` `b` `g` 等等就不说了。下面说明的内容只是我的常用操作,更多详细的操作请移步到 [which-key.lua](../nvim/lua/usr/which-key.lua)对应的插件的文档。
三个最核心的 leader 键:
| `` | `c` | `` |
| ---------- | ------------- | --------------------------------- |
| 搜索相关 | window 相关的 | 其他的各种操作使用 space 作为开始 |
其中 `` 被映射为 `,`
```c
let g:mapleader = ','
```
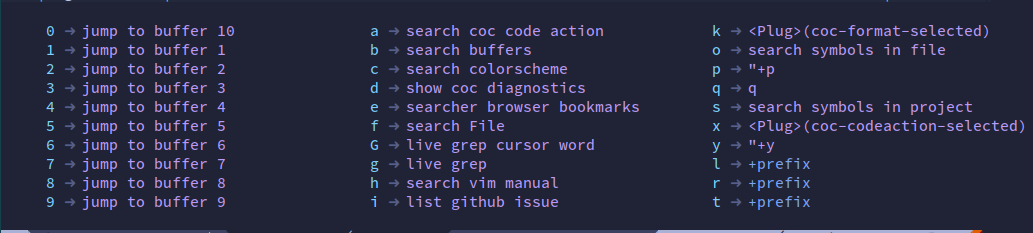
快捷键的配置使用 [which-key.nvim](https://github.com/folke/which-key.nvim),
| 当按下 `,` 之后,经过 `timeoutlen` 之后, 弹出下面的窗口显示下一步的按键 |
| ------------------------------------------------------------------------ |
|
|
## 基本操作
基本操作是所有人都需要的比如,`h` `j` `k` `l` `e` `w` `b` `g` 等等就不说了。下面说明的内容只是我的常用操作,更多详细的操作请移步到 [which-key.lua](../nvim/lua/usr/which-key.lua)对应的插件的文档。
三个最核心的 leader 键:
| `` | `c` | `` |
| ---------- | ------------- | --------------------------------- |
| 搜索相关 | window 相关的 | 其他的各种操作使用 space 作为开始 |
其中 `` 被映射为 `,`
```c
let g:mapleader = ','
```
快捷键的配置使用 [which-key.nvim](https://github.com/folke/which-key.nvim),
| 当按下 `,` 之后,经过 `timeoutlen` 之后, 弹出下面的窗口显示下一步的按键 |
| ------------------------------------------------------------------------ |
|  |
### 退出
虽然我使用了很长时间的 vim,但是两个东西我依旧觉得非常坑,那就是退出和复制。关于 vim 如何退出,闹出很多笑话,比如有人创建一个[仓库](https://github.com/hakluke/how-to-exit-vim)用于收集各种退出的方法。stackoverflow 的报告说,其帮助了一百万人次如何退出 vim 。
1. 使用命令 `:q` 可以退出一个窗口,这个命令被映射为 `q`。
2. 我使用命令 `:xa` 退出 vim。 `x` 表示保存并且关闭 buffer,`a`表示运用于所有的。这个命令被在配置中被映射为 `` `q` 了。
### 复制粘贴
vim 支持多个剪切板,系统剪切板只是 vim 剪切板中的一个
通过 ":h registers" 可以看到 `"*` and `"+` 是对应的系统剪切板
> 8. Selection registers `"*` and `"+`
> Use these registers for storing and retrieving the selected text for the GUI.
> See |quotestar| and |quoteplus|. When the clipboard is not available or not
> working, the unnamed register is used instead. For Unix systems and Mac OS X,
> see |primary-selection|.
当在浏览器中复制的内容,实际上被存放到了 `+` 这个 register 中了,
为了粘贴到 vim 中,就需要使用 `"` `+` `p` 了,其含义为:
1. `"` : 使用寄存器
2. `+` : 选择系统剪切板这个寄存器
3. `p` : 粘贴
由于本配置使用了 [which-key.nvim](https://github.com/folke/which-key.nvim),所以可以
在 normal mode 中使用 `"` 或者在 insert mode 中使用 `` 来展示 register 的内容。
为了加快这个操作,可以重新映射一些键位。
```vim
map y "+y
map p "+p
map d "+d
```
所以现在可以使用,`,` `y` 和 `,` `p` 实现复制粘贴,`,` `d` 删除到系统剪切板中。
#### 从远程 server 上复制粘贴本地的剪切板中
假如你在一台 windows 系统的电脑中 ssh 到一台 Linux server 上,在 server 中使用复制,默认会复制到 server 的剪切板中。
neovim 在 0.10 中增加了一个新功能 oscyank,通过该功能可以直接复制到你在使用的 windows 电脑的剪切板中。
如果 0.10 之前的版本, 使用插件 [ojroques/vim-oscyank](https://github.com/ojroques/vim-oscyank)
如果是在 tmux 中使用,那么 tmux 中需要添加如下配置:
```txt
# Allow clipboard with OSC-52 work, see https://github.com/tmux/tmux/wiki/Clipboard
set -s set-clipboard on
```
原理上参考:
- https://news.ycombinator.com/item?id=32037489
- https://github.com/ojroques/vim-oscyank/issues/24
### 符号搜索
利用 [telescope](https://github.com/nvim-telescope) 快速搜索 file,buffer,function 等
| key binding | function |
| ----------- | ------------------------ |
| `,` `o` | 在当前文件中间搜索该符号 |
| `,` `s` | 整个工程中间搜索该符号 |
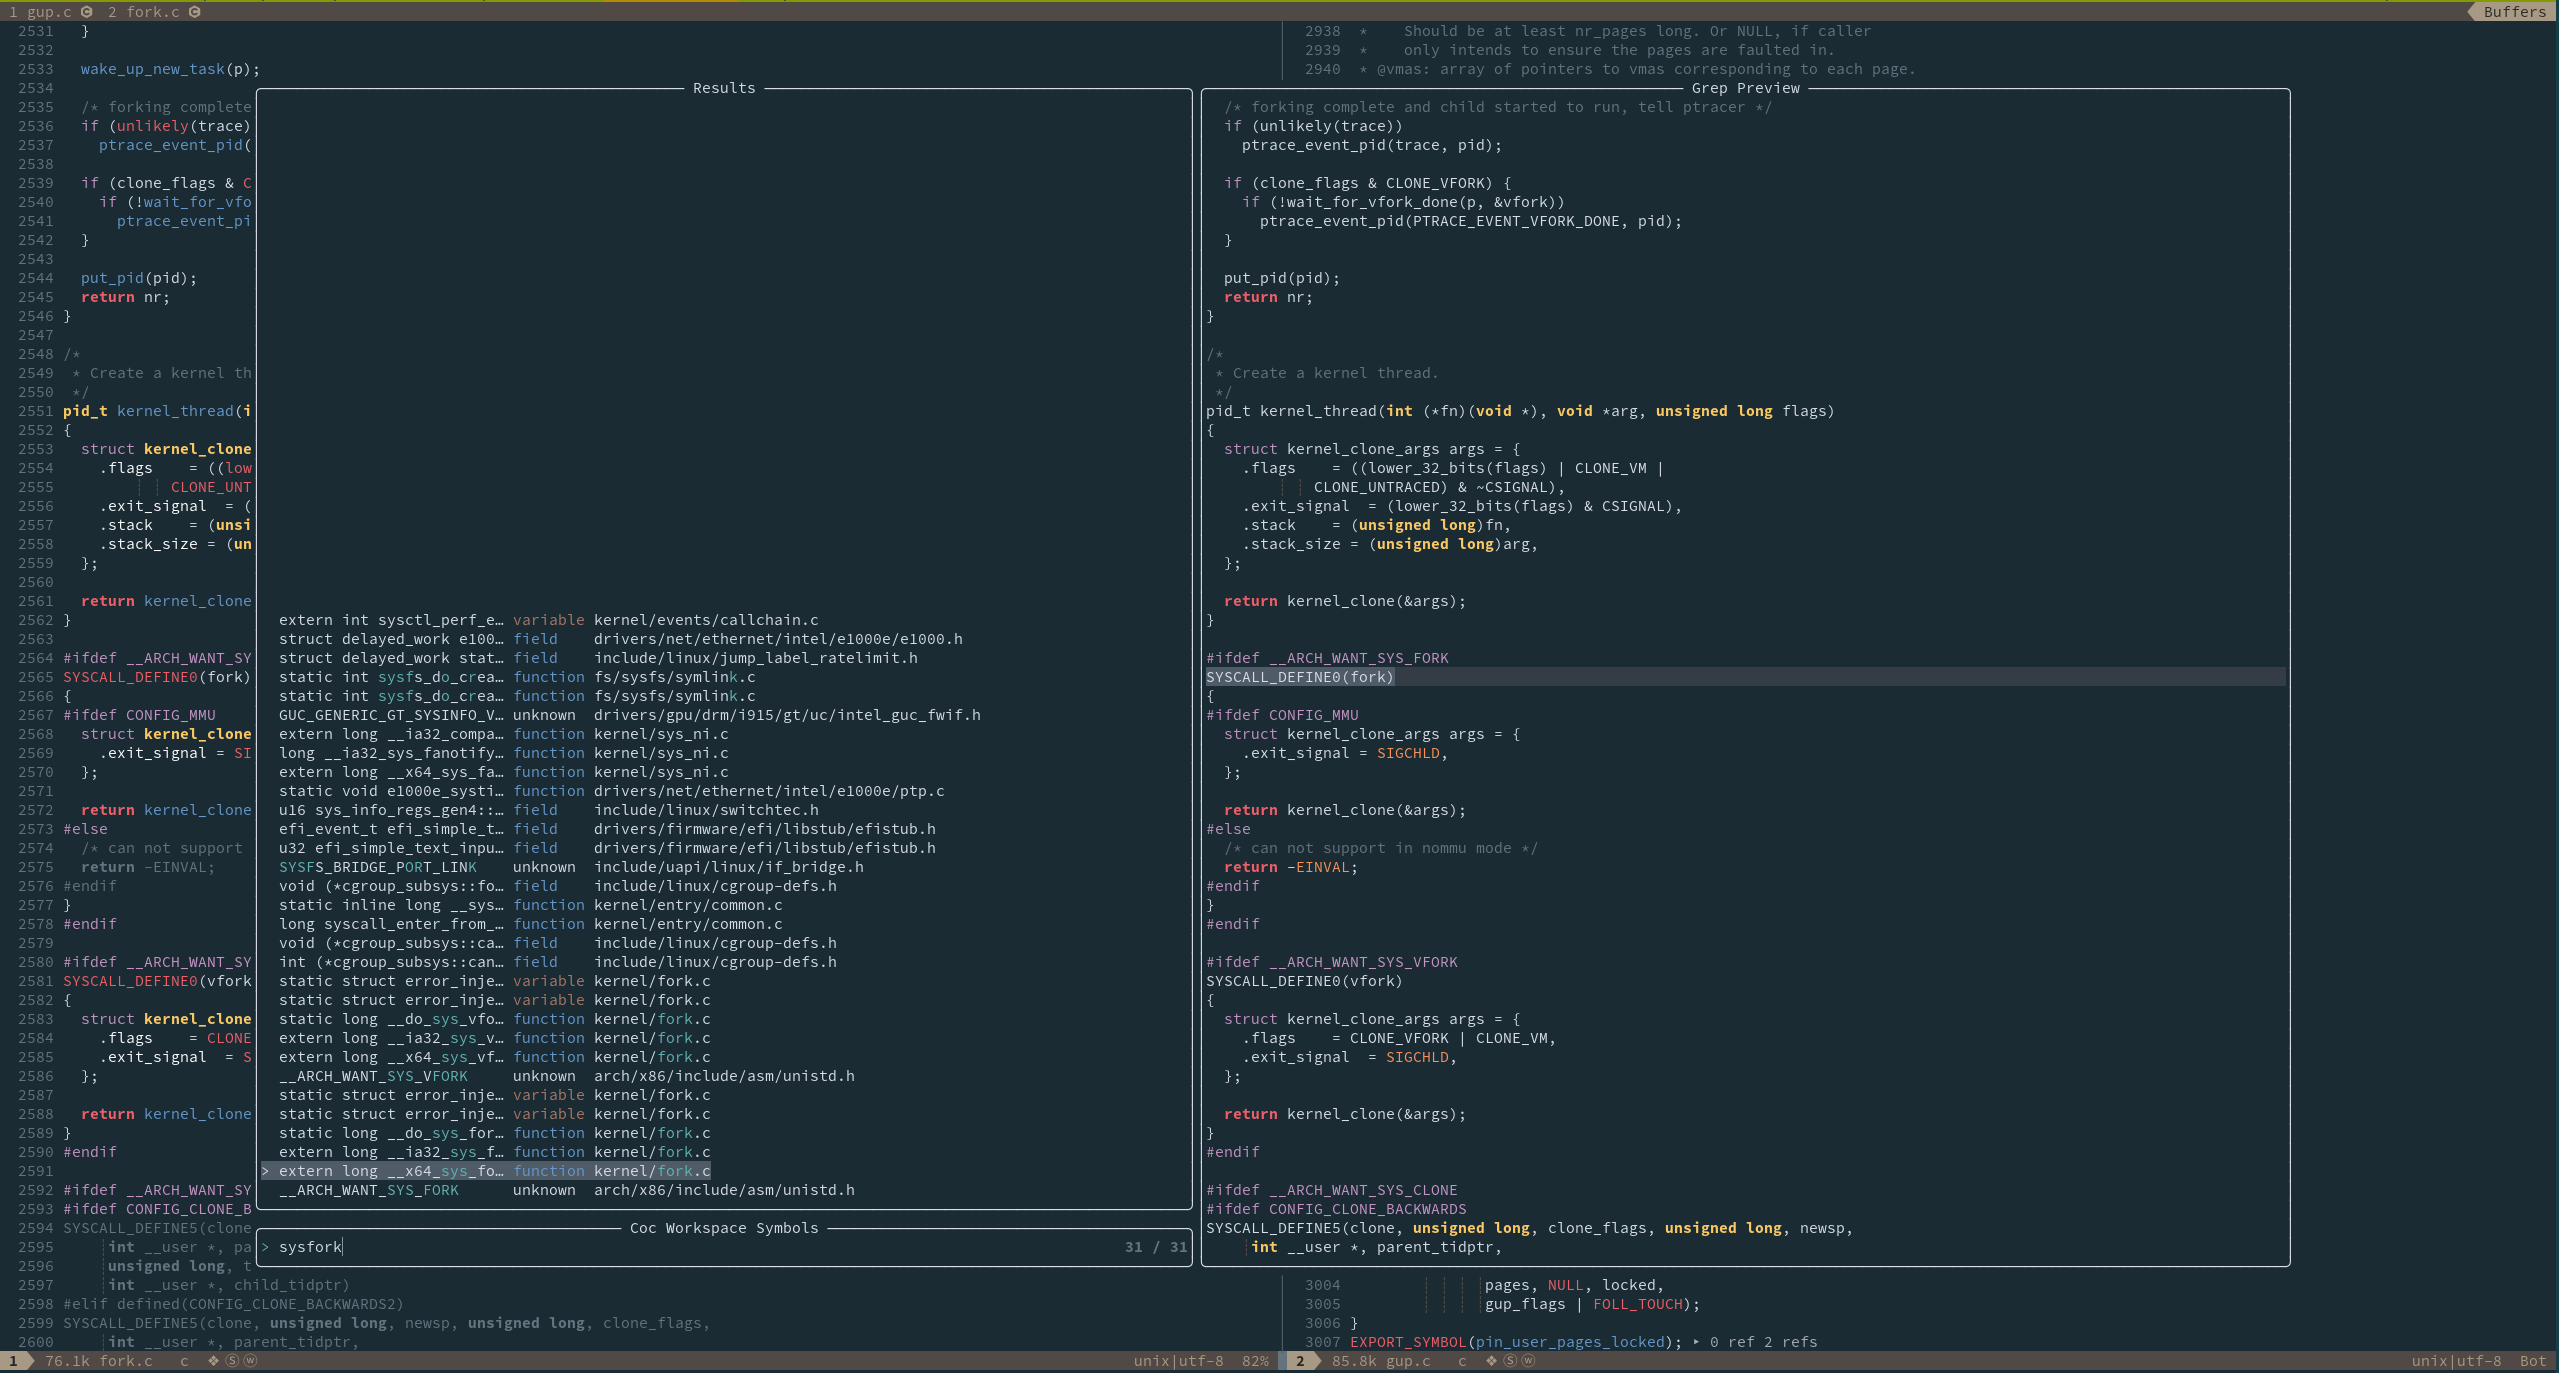
| 在 fork.c 中间搜索 `_x64_sys_fork` 这个符号 |
| ------------------------------------------- |
|
|
### 退出
虽然我使用了很长时间的 vim,但是两个东西我依旧觉得非常坑,那就是退出和复制。关于 vim 如何退出,闹出很多笑话,比如有人创建一个[仓库](https://github.com/hakluke/how-to-exit-vim)用于收集各种退出的方法。stackoverflow 的报告说,其帮助了一百万人次如何退出 vim 。
1. 使用命令 `:q` 可以退出一个窗口,这个命令被映射为 `q`。
2. 我使用命令 `:xa` 退出 vim。 `x` 表示保存并且关闭 buffer,`a`表示运用于所有的。这个命令被在配置中被映射为 `` `q` 了。
### 复制粘贴
vim 支持多个剪切板,系统剪切板只是 vim 剪切板中的一个
通过 ":h registers" 可以看到 `"*` and `"+` 是对应的系统剪切板
> 8. Selection registers `"*` and `"+`
> Use these registers for storing and retrieving the selected text for the GUI.
> See |quotestar| and |quoteplus|. When the clipboard is not available or not
> working, the unnamed register is used instead. For Unix systems and Mac OS X,
> see |primary-selection|.
当在浏览器中复制的内容,实际上被存放到了 `+` 这个 register 中了,
为了粘贴到 vim 中,就需要使用 `"` `+` `p` 了,其含义为:
1. `"` : 使用寄存器
2. `+` : 选择系统剪切板这个寄存器
3. `p` : 粘贴
由于本配置使用了 [which-key.nvim](https://github.com/folke/which-key.nvim),所以可以
在 normal mode 中使用 `"` 或者在 insert mode 中使用 `` 来展示 register 的内容。
为了加快这个操作,可以重新映射一些键位。
```vim
map y "+y
map p "+p
map d "+d
```
所以现在可以使用,`,` `y` 和 `,` `p` 实现复制粘贴,`,` `d` 删除到系统剪切板中。
#### 从远程 server 上复制粘贴本地的剪切板中
假如你在一台 windows 系统的电脑中 ssh 到一台 Linux server 上,在 server 中使用复制,默认会复制到 server 的剪切板中。
neovim 在 0.10 中增加了一个新功能 oscyank,通过该功能可以直接复制到你在使用的 windows 电脑的剪切板中。
如果 0.10 之前的版本, 使用插件 [ojroques/vim-oscyank](https://github.com/ojroques/vim-oscyank)
如果是在 tmux 中使用,那么 tmux 中需要添加如下配置:
```txt
# Allow clipboard with OSC-52 work, see https://github.com/tmux/tmux/wiki/Clipboard
set -s set-clipboard on
```
原理上参考:
- https://news.ycombinator.com/item?id=32037489
- https://github.com/ojroques/vim-oscyank/issues/24
### 符号搜索
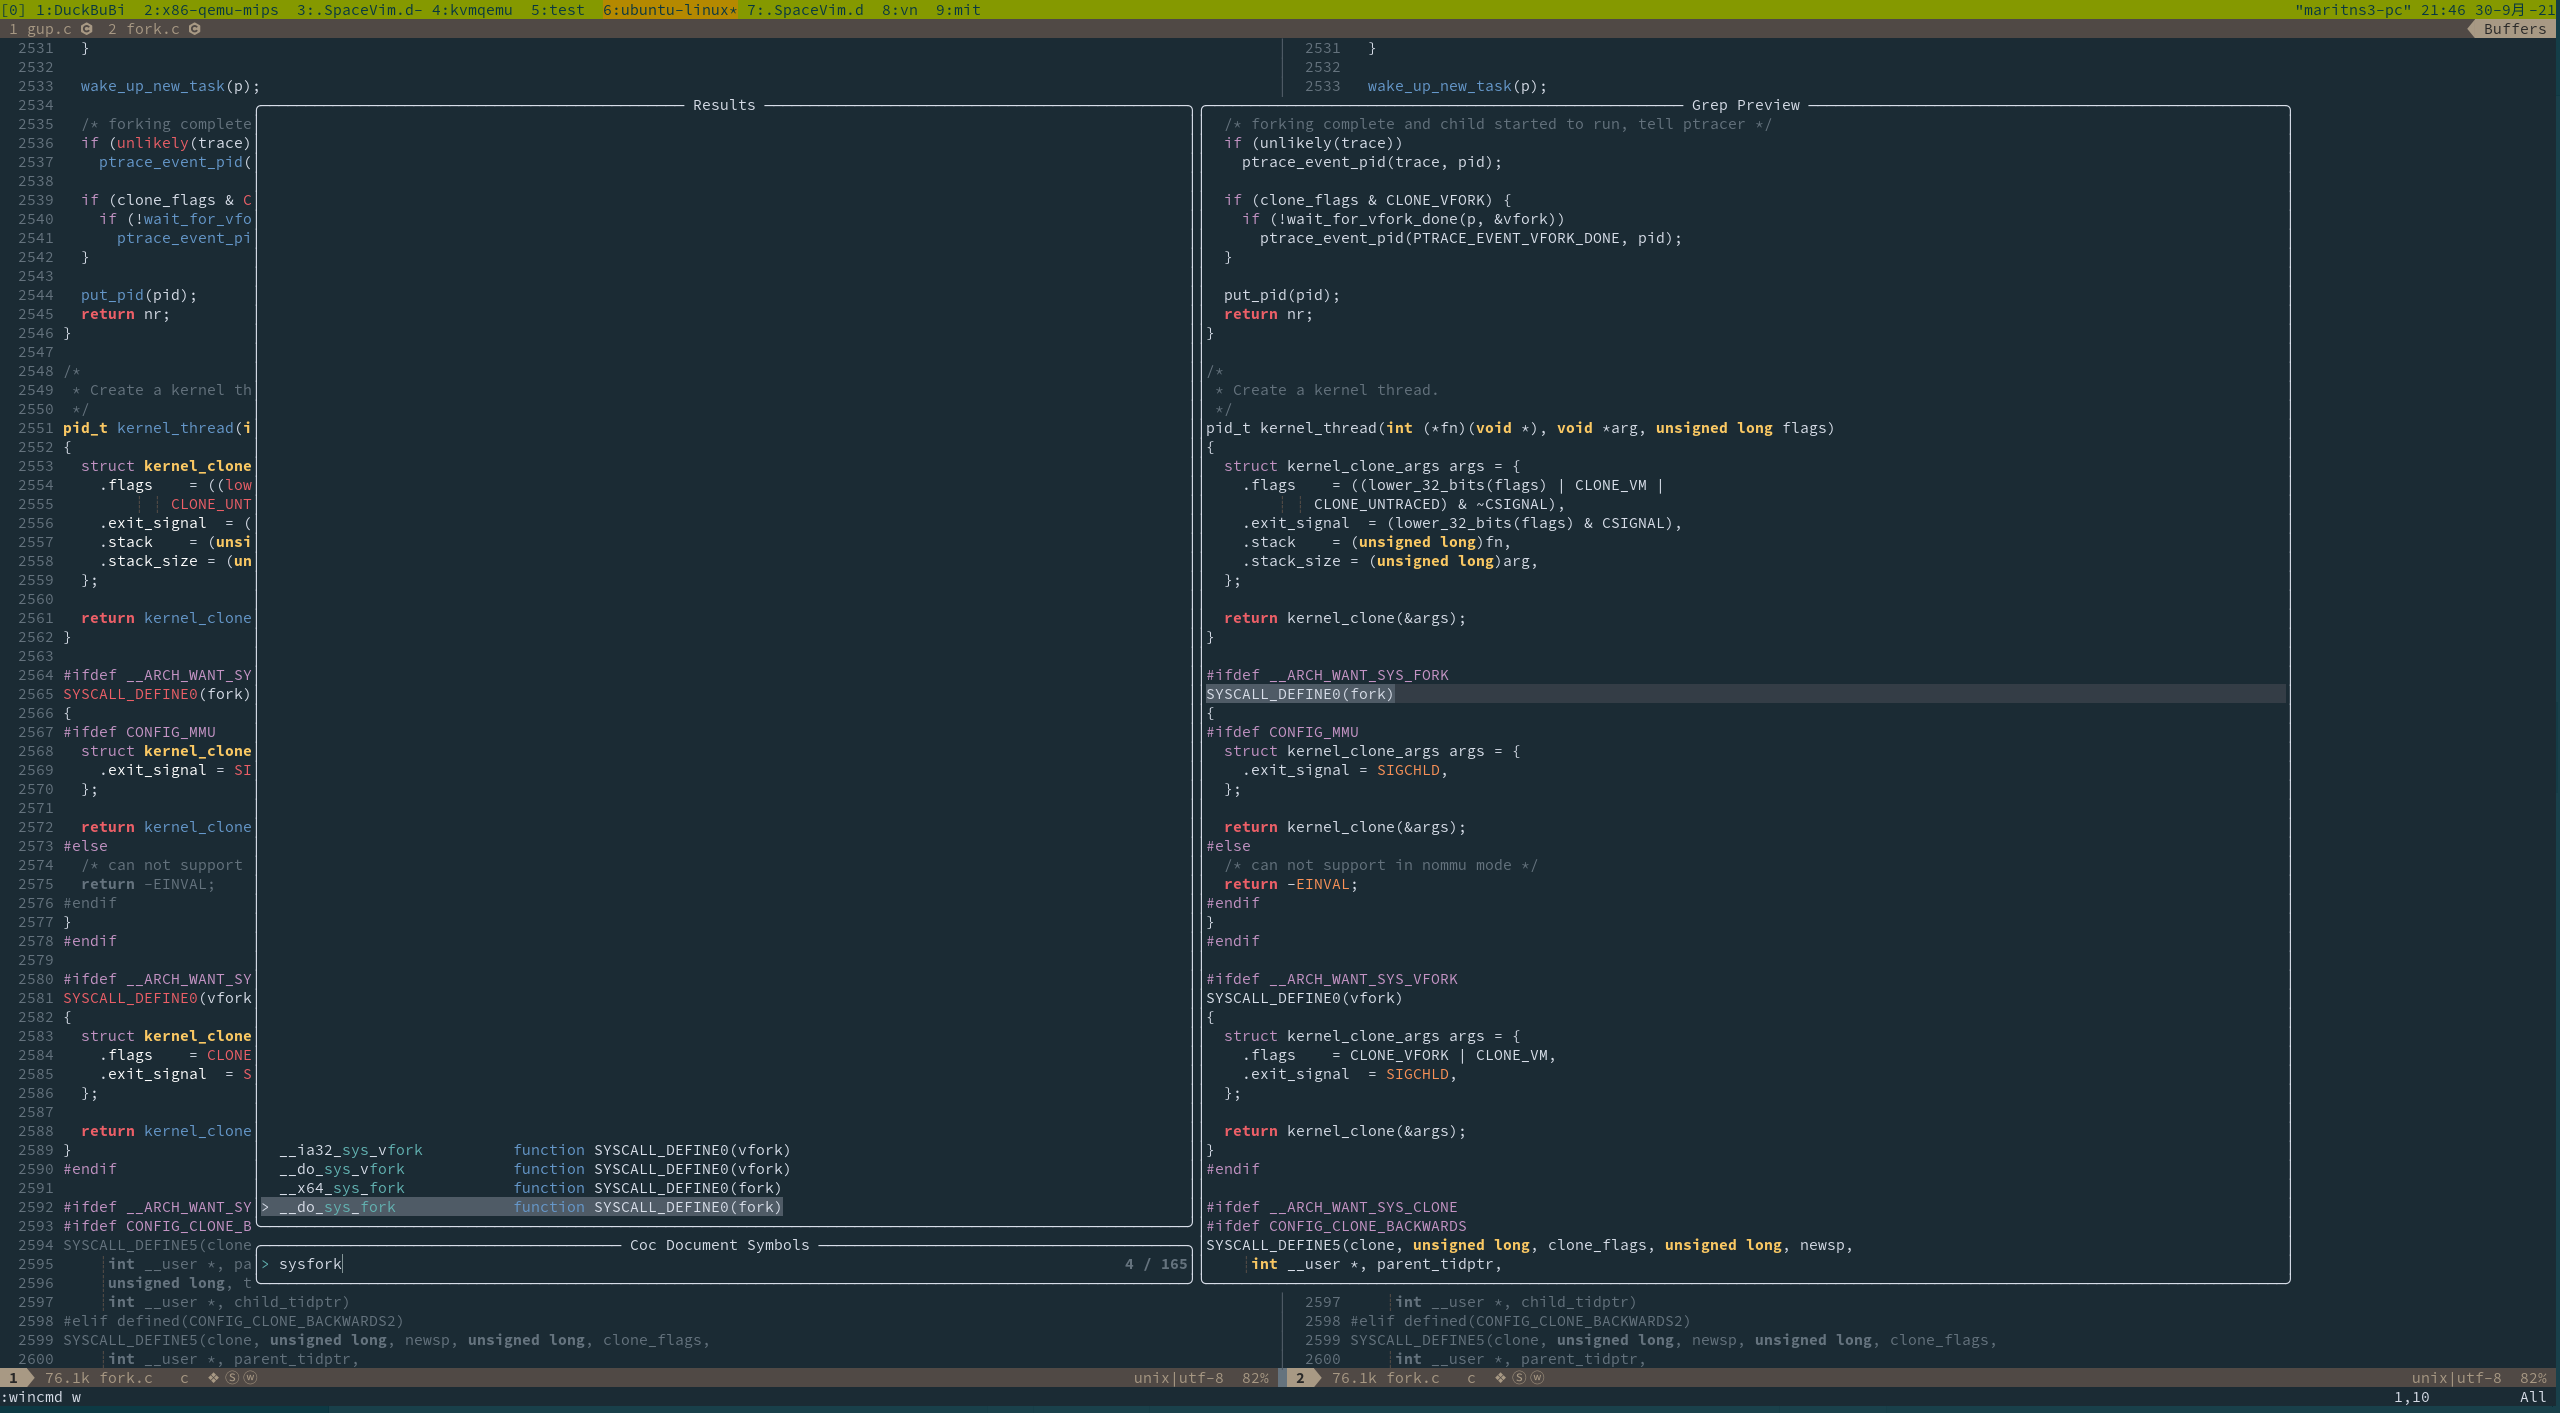
利用 [telescope](https://github.com/nvim-telescope) 快速搜索 file,buffer,function 等
| key binding | function |
| ----------- | ------------------------ |
| `,` `o` | 在当前文件中间搜索该符号 |
| `,` `s` | 整个工程中间搜索该符号 |
| 在 fork.c 中间搜索 `_x64_sys_fork` 这个符号 |
| ------------------------------------------- |
|  |
| 在整个 Linux 工程中间搜索 sysclone 这个符号 |
| ------------------------------------------- |
|
|
| 在整个 Linux 工程中间搜索 sysclone 这个符号 |
| ------------------------------------------- |
|  |
### 定义和引用
| key binding | function |
| ----------- | ----------------------------------------------------------------------------- |
| `g` `d` | 跳转到定义 |
| `g` `r` | 当只有一个 ref 的时候,直接跳转,当存在多个的时候,显示如下窗口,可以逐个选择 |
### 注释
| key binding | function |
| ----------- | ---------------------------------------------------- |
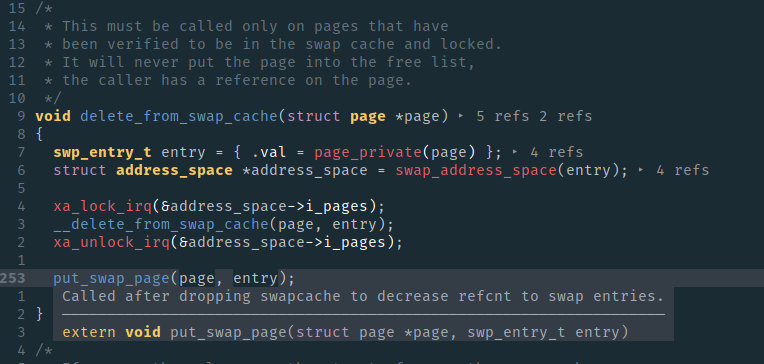
| `K` | 可以查询函数,变量,宏等,注释将会显示在悬浮窗口上。 |
| 展示 `put_swap_page` 的注释 |
| ------------------------------- |
|
|
### 定义和引用
| key binding | function |
| ----------- | ----------------------------------------------------------------------------- |
| `g` `d` | 跳转到定义 |
| `g` `r` | 当只有一个 ref 的时候,直接跳转,当存在多个的时候,显示如下窗口,可以逐个选择 |
### 注释
| key binding | function |
| ----------- | ---------------------------------------------------- |
| `K` | 可以查询函数,变量,宏等,注释将会显示在悬浮窗口上。 |
| 展示 `put_swap_page` 的注释 |
| ------------------------------- |
|  |
### 格式化
| key binding | function |
| ----------------- | ------------------------------------------------ |
| `` `l` `f` | 格式化当前文件,支持 C/C++ , Rust 和 Python 等。 |
可以通过一个工程的目录下的 `.clang-format` 来实现配置 C/C++ 的格式样式:
1. https://github.com/MaskRay/ccls/blob/master/.clang-format : 将代码格式为 LLVM 风格
2. https://github.com/torvalds/linux/blob/master/.clang-format : 代码格式为 linux kernel 风格
很多 lsp 内置了格式化能力,但是有的 lsp 不行,对于那些后者,可以通过 [conform.nvim](https://github.com/stevearc/conform.nvim) 来解决。
### 重命名
有时候,写了一个函数名,然后多次调用,最后发现函数名的单词写错了,一个个的修改非常的让人窒息。使用 `` `l` `n` 在需要重命名的元素上,即可批量重命名。
### 字符串搜索和替换
vim 内置了强大的搜索替换功能
- `/` `?` 分别向前和向后搜索
- 在 visual block 中可以使用 norm 来进行插入或者使用宏
- 替换的语法 `%s/pattern/replace/g`
上面说明的都是单文件的,通过插件,可以容易的实现多文件的搜索和替换。
| key binding | function |
| ---------------- | ----------------------------------------------- |
| `leader` `s` `p` | 在整个工程中搜索替换该字符串 |
| `leader` `s` `P` | 在整个工程中搜索替换**对于光标所在**字符串 |
| `leader` `g` | 实时动态搜索(grep on the fly) |
| `leader` `G` | 实时动态搜索(grep on the fly)**光标所在**字符串 |
### file tree
| key binding | function |
| --------------- | ----------------------------------------------------- |
| `space` `f` `o` | 将当前的文件显示在 filetree 中间 |
| `space` `f` `t` | 打开关闭文件树 |
| `r` | 相当于 shell 中间的 mv 命令,实现文件的重命名或者移动 |
| `d` | 删除 |
| `j` | 向下移动 |
| `k` | 向上移动 |
| `h` | 移动到上一个目录 |
| `l` | 打开目录或者文档 |
| `a` | 创建文件(如果输入的名称结尾有 / ,那么就是创建文件夹) |
### window
因为 window leader 键位被我重新映射为 `c`
| key binding | function |
| ----------- | -------------- |
| `` | 进入下一个窗口 |
| `c` `g` | 水平拆分窗口 |
| `c` `s` | 垂直拆分窗口 |
| `q` | 关闭窗口 |
| `c` `m` | 当前窗口最大化 |
#### window resize
nvim 提供了原生的命令来自动一个 windows 的大小,例如可以使用 `vertical resize +10`
将增大 10 个单位。如果想要调整多次,那么需要执行多次这个命令:
利用 [nvimtools/hydra.nvim](https://github.com/nvimtools/hydra.nvim) ,可以先
`c` `a` 两个键,进入到调整模式,然后使用 `j` `k` 调整 windows 的大小。
### buffer
| key binding | function |
| ----------------- | ------------------------------ |
| `,` `b` | 搜索 buffer |
| `,` num | 切换当前窗口到第 num 个 buffer |
| `` `b` `c` | 关闭其他已经保存的 buffer |
| `` `b` `d` | 关闭当前 buffer |
### 文件搜索
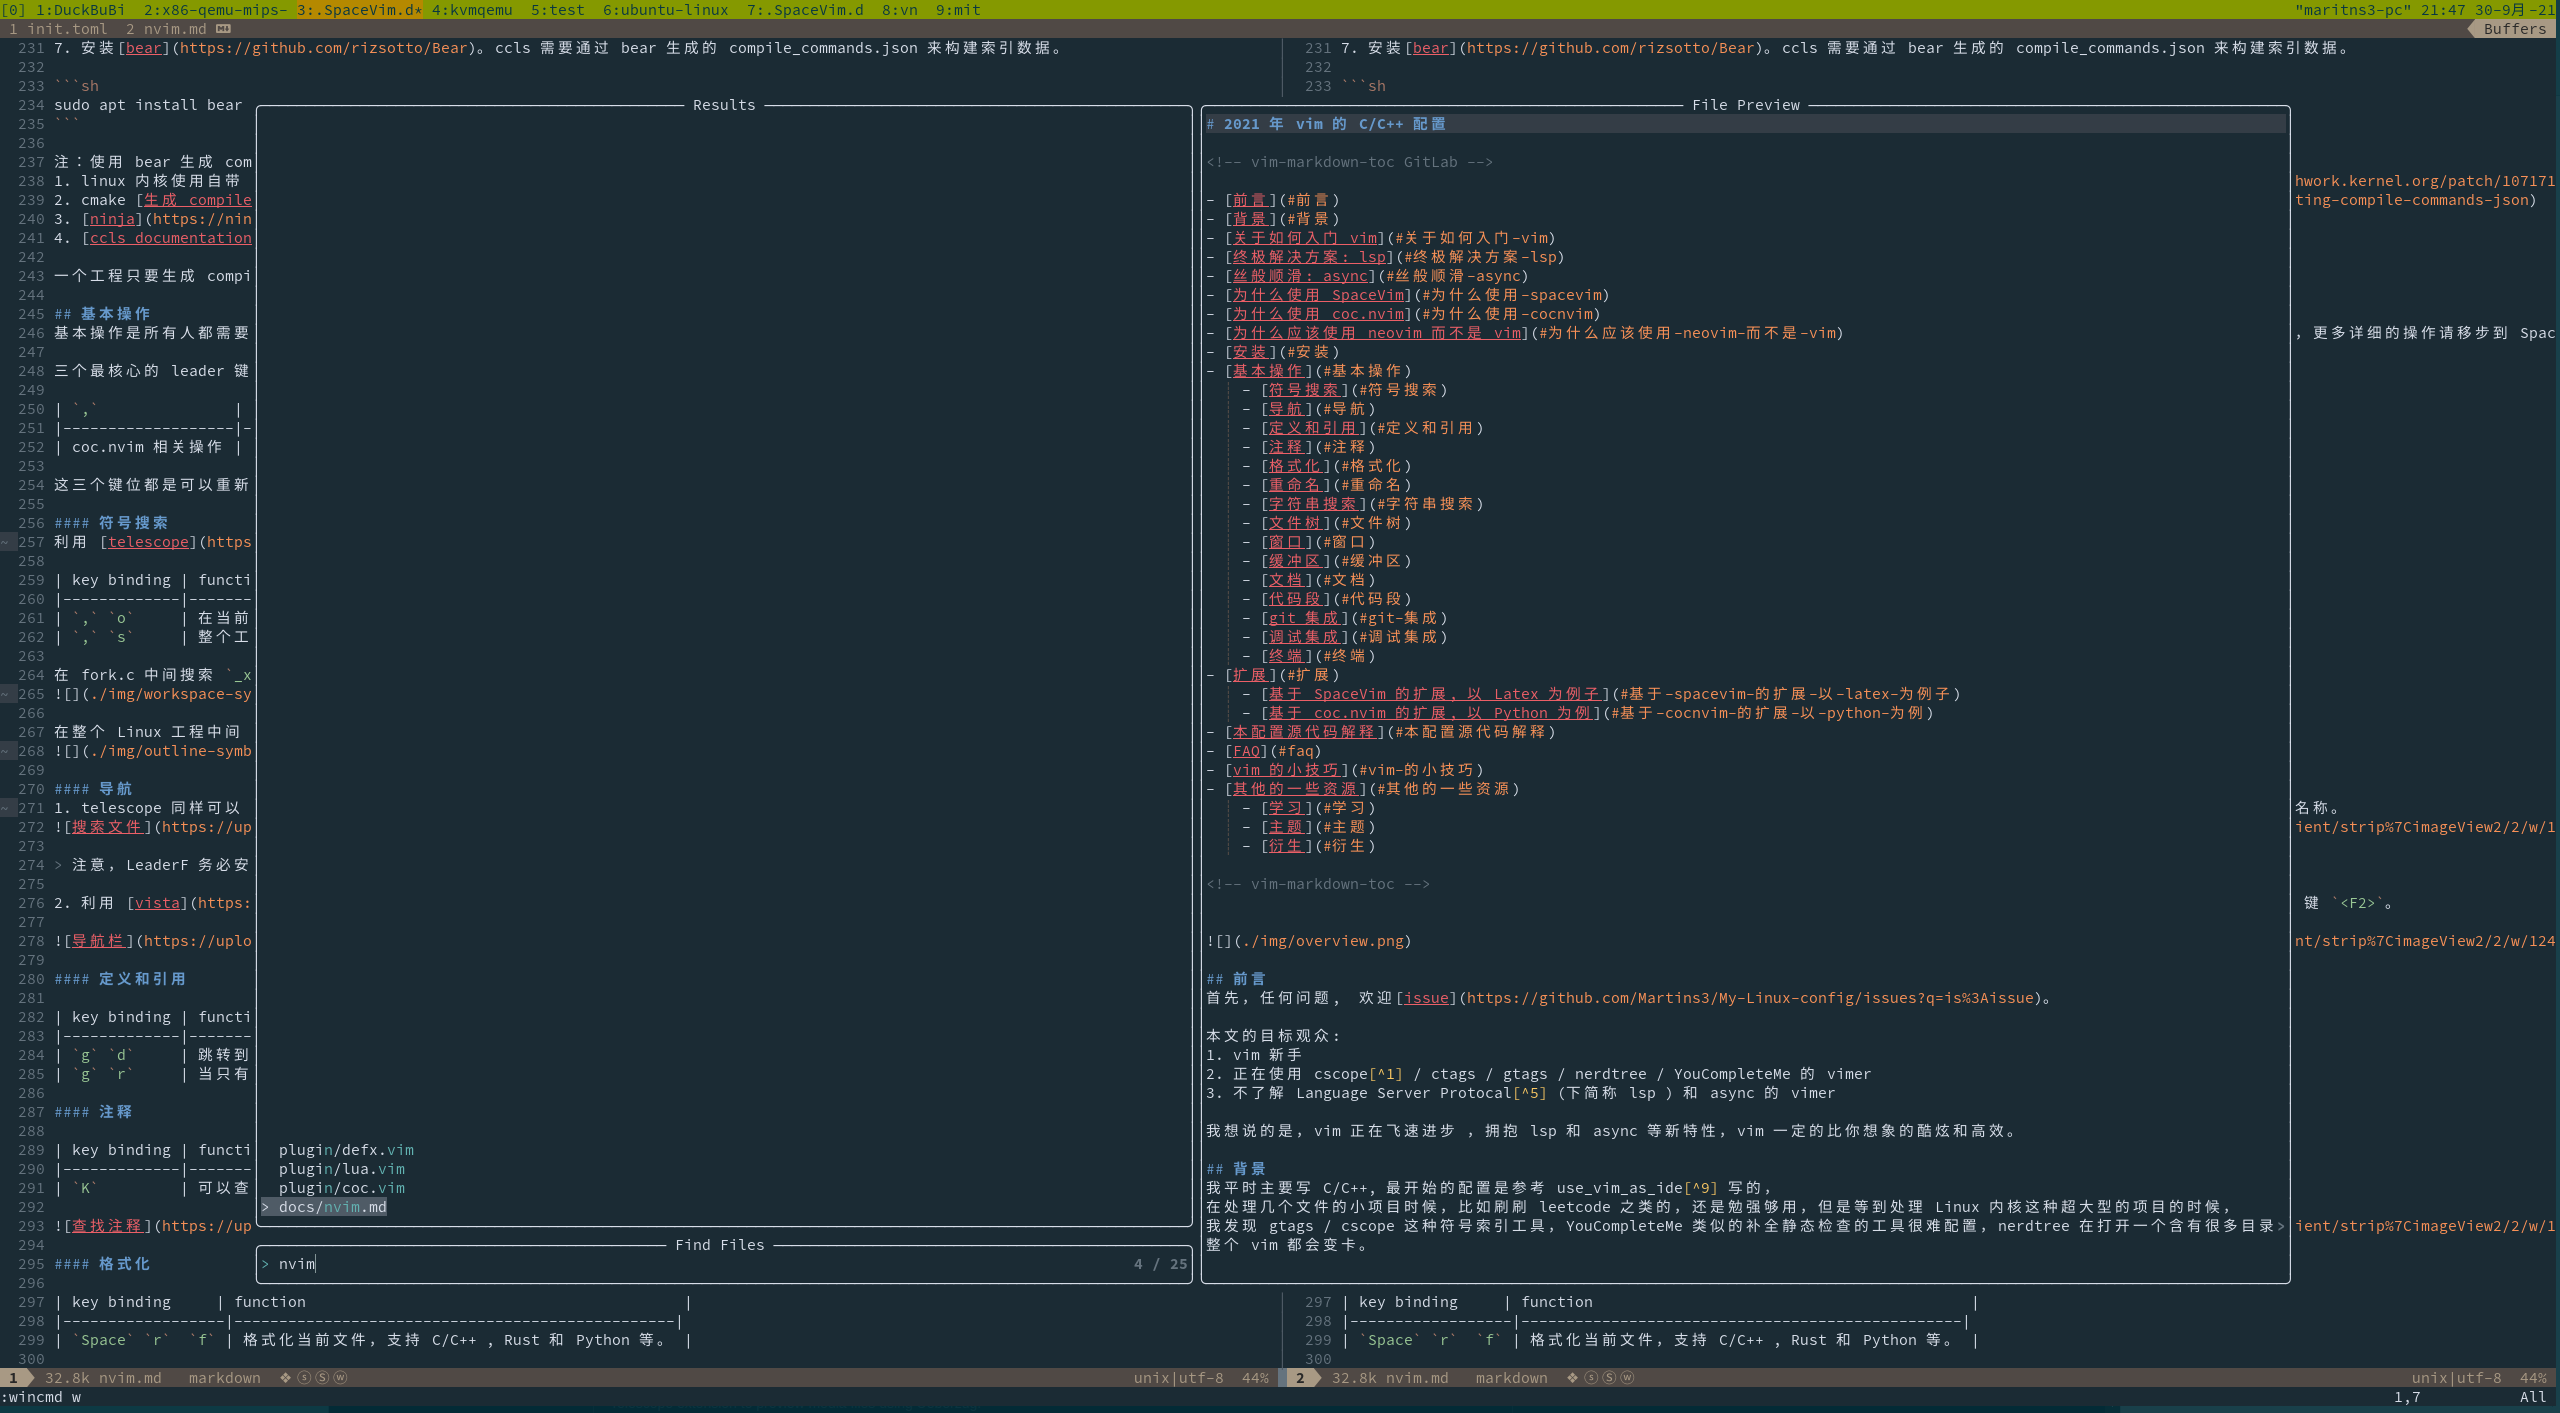
telescope 同样可以用于搜索文件使用 `,` `f` + 文件名
| 文件搜索 |
| ------------------------------------ |
|
|
### 格式化
| key binding | function |
| ----------------- | ------------------------------------------------ |
| `` `l` `f` | 格式化当前文件,支持 C/C++ , Rust 和 Python 等。 |
可以通过一个工程的目录下的 `.clang-format` 来实现配置 C/C++ 的格式样式:
1. https://github.com/MaskRay/ccls/blob/master/.clang-format : 将代码格式为 LLVM 风格
2. https://github.com/torvalds/linux/blob/master/.clang-format : 代码格式为 linux kernel 风格
很多 lsp 内置了格式化能力,但是有的 lsp 不行,对于那些后者,可以通过 [conform.nvim](https://github.com/stevearc/conform.nvim) 来解决。
### 重命名
有时候,写了一个函数名,然后多次调用,最后发现函数名的单词写错了,一个个的修改非常的让人窒息。使用 `` `l` `n` 在需要重命名的元素上,即可批量重命名。
### 字符串搜索和替换
vim 内置了强大的搜索替换功能
- `/` `?` 分别向前和向后搜索
- 在 visual block 中可以使用 norm 来进行插入或者使用宏
- 替换的语法 `%s/pattern/replace/g`
上面说明的都是单文件的,通过插件,可以容易的实现多文件的搜索和替换。
| key binding | function |
| ---------------- | ----------------------------------------------- |
| `leader` `s` `p` | 在整个工程中搜索替换该字符串 |
| `leader` `s` `P` | 在整个工程中搜索替换**对于光标所在**字符串 |
| `leader` `g` | 实时动态搜索(grep on the fly) |
| `leader` `G` | 实时动态搜索(grep on the fly)**光标所在**字符串 |
### file tree
| key binding | function |
| --------------- | ----------------------------------------------------- |
| `space` `f` `o` | 将当前的文件显示在 filetree 中间 |
| `space` `f` `t` | 打开关闭文件树 |
| `r` | 相当于 shell 中间的 mv 命令,实现文件的重命名或者移动 |
| `d` | 删除 |
| `j` | 向下移动 |
| `k` | 向上移动 |
| `h` | 移动到上一个目录 |
| `l` | 打开目录或者文档 |
| `a` | 创建文件(如果输入的名称结尾有 / ,那么就是创建文件夹) |
### window
因为 window leader 键位被我重新映射为 `c`
| key binding | function |
| ----------- | -------------- |
| `` | 进入下一个窗口 |
| `c` `g` | 水平拆分窗口 |
| `c` `s` | 垂直拆分窗口 |
| `q` | 关闭窗口 |
| `c` `m` | 当前窗口最大化 |
#### window resize
nvim 提供了原生的命令来自动一个 windows 的大小,例如可以使用 `vertical resize +10`
将增大 10 个单位。如果想要调整多次,那么需要执行多次这个命令:
利用 [nvimtools/hydra.nvim](https://github.com/nvimtools/hydra.nvim) ,可以先
`c` `a` 两个键,进入到调整模式,然后使用 `j` `k` 调整 windows 的大小。
### buffer
| key binding | function |
| ----------------- | ------------------------------ |
| `,` `b` | 搜索 buffer |
| `,` num | 切换当前窗口到第 num 个 buffer |
| `` `b` `c` | 关闭其他已经保存的 buffer |
| `` `b` `d` | 关闭当前 buffer |
### 文件搜索
telescope 同样可以用于搜索文件使用 `,` `f` + 文件名
| 文件搜索 |
| ------------------------------------ |
|  |
### 导航
基于 [lspsaga](https://nvimdev.github.io/lspsaga/outline/)

### 代码段
基于[friendly-snippets](https://github.com/rafamadriz/friendly-snippets/blob/main/snippets/c/c.json) 可以自己向 UltiSnips/c.snippets,
UltiSnips/cpp.snippets 中间添加 C/C++ 的自己定义代码段。
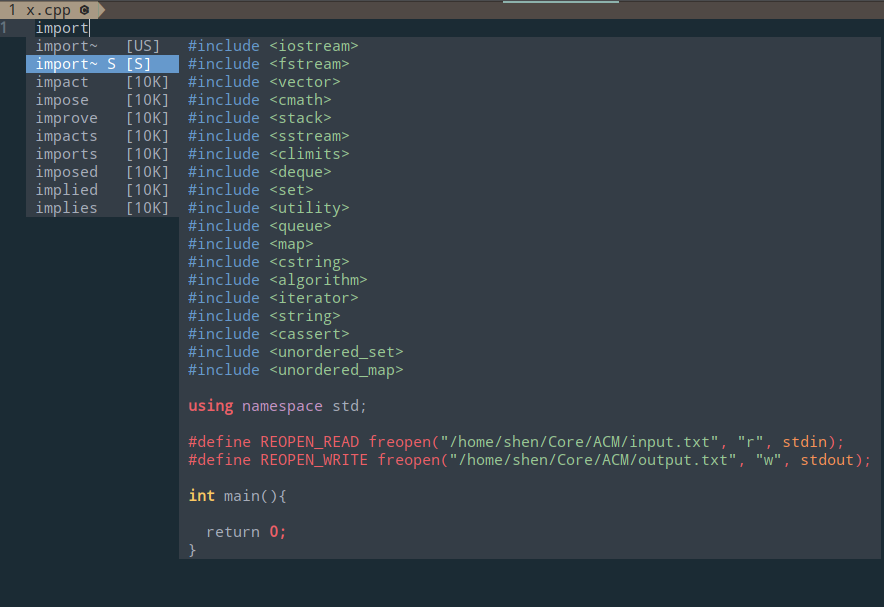
以前刷 OJ 的时候每次都不知道要加入什么头文件,然后就写了一个自定义 snippet,一键加入所有常用的头文件。
```snippets
snippet import
#include
// #include "../dbg.hpp"
using namespace std;
#define REOPEN_READ freopen("/home/maritns3/test/cpp/input.txt", "r", stdin);
int main(int argc, char *argv[]){https://github.com/rafamadriz/friendly-snippets/blob/main/snippets/c/c.json
${0}
return 0;
}
```
| 输入 import 这些内容就自动补全 |
| ------------------------------- |
|
|
### 导航
基于 [lspsaga](https://nvimdev.github.io/lspsaga/outline/)

### 代码段
基于[friendly-snippets](https://github.com/rafamadriz/friendly-snippets/blob/main/snippets/c/c.json) 可以自己向 UltiSnips/c.snippets,
UltiSnips/cpp.snippets 中间添加 C/C++ 的自己定义代码段。
以前刷 OJ 的时候每次都不知道要加入什么头文件,然后就写了一个自定义 snippet,一键加入所有常用的头文件。
```snippets
snippet import
#include
// #include "../dbg.hpp"
using namespace std;
#define REOPEN_READ freopen("/home/maritns3/test/cpp/input.txt", "r", stdin);
int main(int argc, char *argv[]){https://github.com/rafamadriz/friendly-snippets/blob/main/snippets/c/c.json
${0}
return 0;
}
```
| 输入 import 这些内容就自动补全 |
| ------------------------------- |
|  |
### 代码补全
| 代码补全 |
| ------------------------------------ |
|
|
### 代码补全
| 代码补全 |
| ------------------------------------ |
| 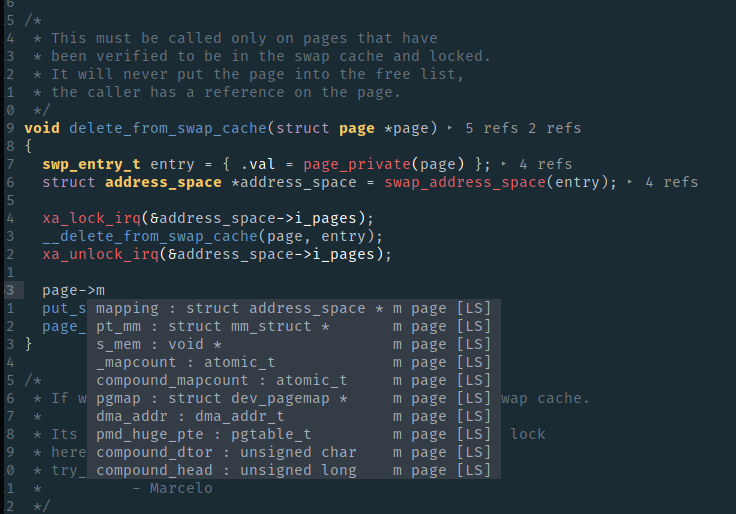 |
使用 `enter` 来确认选择,使用 `tab` 选择下一个。
### Git 集成
包含了一些 git 常见操作,快捷键都是 `` `g` 开始的,当然 git 本身就是一个非常复杂的工具,主要使用三个工具:
1. [tig](https://github.com/jonas/tig),利用 [floaterm](https://github.com/voldikss/vim-floaterm),在 vim 中间运行。
2. [GitMessenger](https://github.com/voldikss/vim-floaterm)可以显示所在行的 git blame 信息。
3. [vim-fugitive](https://github.com/tpope/vim-fugitive) : 查看每一行的 blame, 提交代码等
### 调试
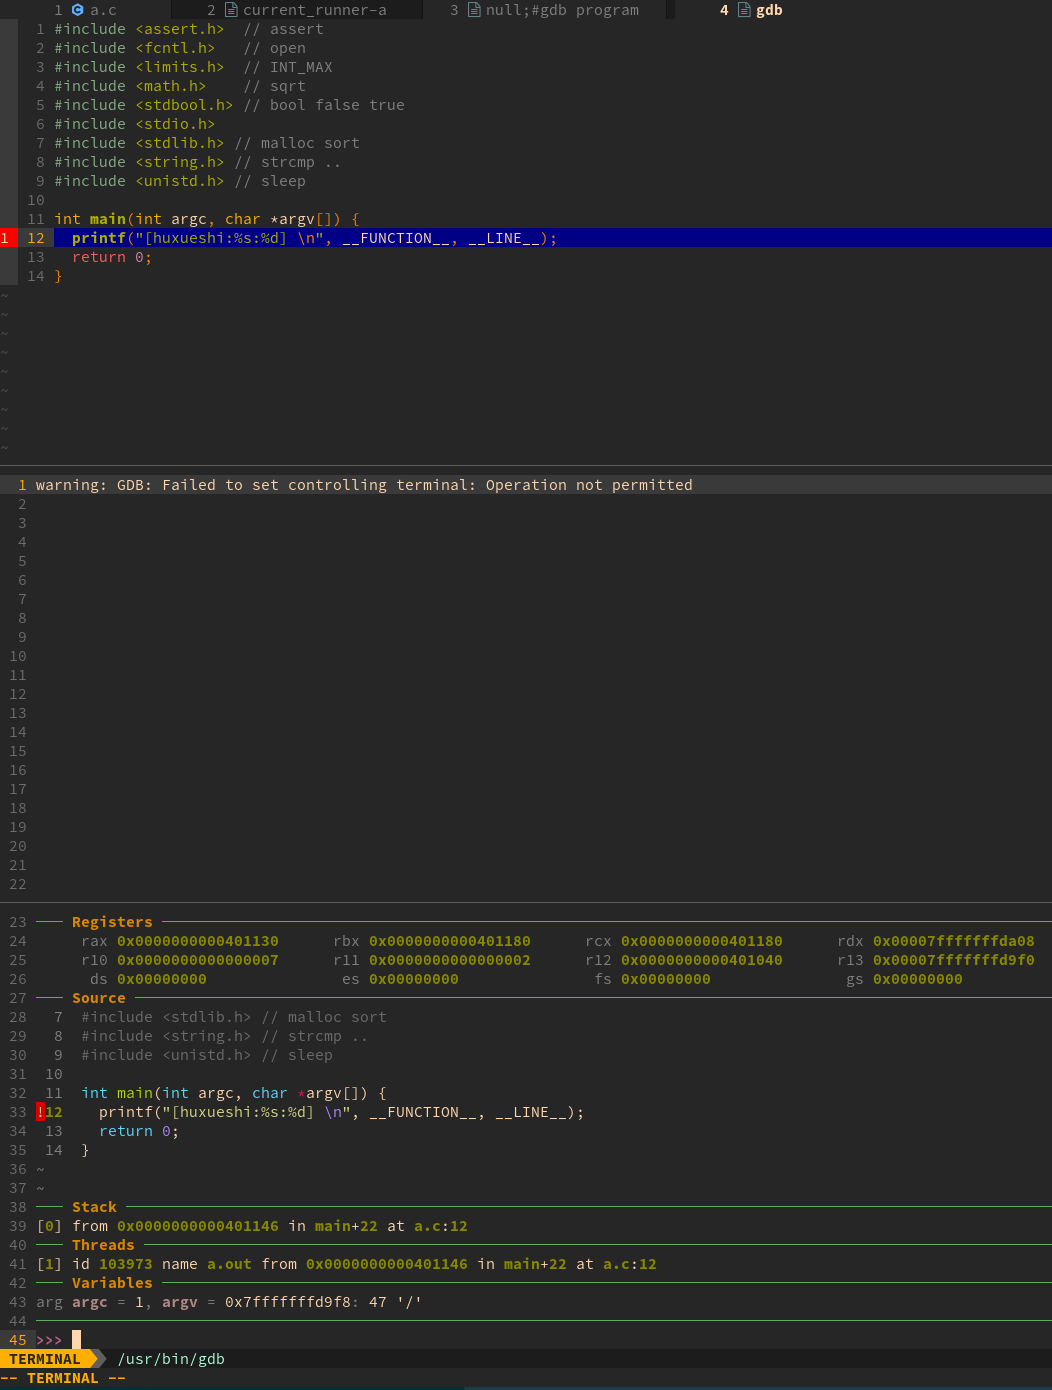
我一般使用 [gdb-dashboard](https://github.com/cyrus-and/gdb-dashboard),不使用额外的 vim 配置。
neovim 中有内置调试功能 [Termdebug](https://fzheng.me/2018/05/28/termdebug/),但是感觉功能比较初级。
| 使用内置的 Termdebug 进行调试 |
| ----------------------------- |
|
|
使用 `enter` 来确认选择,使用 `tab` 选择下一个。
### Git 集成
包含了一些 git 常见操作,快捷键都是 `` `g` 开始的,当然 git 本身就是一个非常复杂的工具,主要使用三个工具:
1. [tig](https://github.com/jonas/tig),利用 [floaterm](https://github.com/voldikss/vim-floaterm),在 vim 中间运行。
2. [GitMessenger](https://github.com/voldikss/vim-floaterm)可以显示所在行的 git blame 信息。
3. [vim-fugitive](https://github.com/tpope/vim-fugitive) : 查看每一行的 blame, 提交代码等
### 调试
我一般使用 [gdb-dashboard](https://github.com/cyrus-and/gdb-dashboard),不使用额外的 vim 配置。
neovim 中有内置调试功能 [Termdebug](https://fzheng.me/2018/05/28/termdebug/),但是感觉功能比较初级。
| 使用内置的 Termdebug 进行调试 |
| ----------------------------- |
|  |
一种更强大的方法是通过 [nvim-dap](https://github.com/mfussenegger/nvim-dap) 来构建,具体配置参考,我目前兴趣不大:
- https://www.johntobin.ie/blog/debugging_in_neovim_with_nvim-dap/
- https://github.com/microsoft/vscode-cpptools
此外还有插件 [nvim-gdb](https://github.com/sakhnik/nvim-gdb) ,也许可以勉强维持生活。
[gdb-frontend](https://oguzhaneroglu.com/projects/gdb-frontend/) 看上去不错,利用浏览器提供了一个相当精致的界面
但是无论如何,使用 debugger 来找 bug 不是一个好习惯,应该是靠清晰的代码结构和单元测试[^2]。
### vim cmdline 自动补全
通过 [hrsh7th/cmp-cmdline](https://github.com/hrsh7th/cmp-cmdline) 可以让 vim cmdline 实现模糊搜索。
| 在命令模式自动补全 |
|----------------------------------------------------------------------------------------------------------------|
|
|
一种更强大的方法是通过 [nvim-dap](https://github.com/mfussenegger/nvim-dap) 来构建,具体配置参考,我目前兴趣不大:
- https://www.johntobin.ie/blog/debugging_in_neovim_with_nvim-dap/
- https://github.com/microsoft/vscode-cpptools
此外还有插件 [nvim-gdb](https://github.com/sakhnik/nvim-gdb) ,也许可以勉强维持生活。
[gdb-frontend](https://oguzhaneroglu.com/projects/gdb-frontend/) 看上去不错,利用浏览器提供了一个相当精致的界面
但是无论如何,使用 debugger 来找 bug 不是一个好习惯,应该是靠清晰的代码结构和单元测试[^2]。
### vim cmdline 自动补全
通过 [hrsh7th/cmp-cmdline](https://github.com/hrsh7th/cmp-cmdline) 可以让 vim cmdline 实现模糊搜索。
| 在命令模式自动补全 |
|----------------------------------------------------------------------------------------------------------------|
|  |
### 终端
- `Ctrl` `t` : toggle terminal ,如果当前在 terminal 中,那么就关闭,否则在右侧打开一个。
- `Ctrl` `n` : 打开新的 terminal
- `Ctrl` `p` : 使用 Telescope 搜索已经打开的 terminal
在屏幕打开一个 window 来实现 terminal :
|
### 终端
- `Ctrl` `t` : toggle terminal ,如果当前在 terminal 中,那么就关闭,否则在右侧打开一个。
- `Ctrl` `n` : 打开新的 terminal
- `Ctrl` `p` : 使用 Telescope 搜索已经打开的 terminal
在屏幕打开一个 window 来实现 terminal :
 搜索 terminal :
 为什么不直接用现成的 terminal 插件,
1. `voidkiss/floaterm` 的更加稳定,功能更多。但是有严重的性能问题,例如编译内核的过程中,产生的 log 可能导致 nvim 卡死。
2. `akinsho/toggleterm.nvim` 项目更加新,使用 lua 写的,在 UI 上更加灵活,但是存在一些细微的 bug 和功能缺失。
- 如果同时使用多个终端,其管理难度简直逆天。
- 没有简洁的 voidkiss 中 FloatermNew 的功能,需要写一些配置文件。
3. 逛 reddit 偶然发现 [nvzone/floaterm](https://www.reddit.com/r/neovim/comments/1lbzm1z/floaterm_beautiful_terminal_buffer_manager/)
看上去满足我的多 terminal 管理的需求,但是不成熟。
2024-11-02 ,升级 nvim 0.10.1 之后,FloatermNew 已经不可以用了,所以还是
使用 akinsho/toggleterm.nvim 了
2025-07-04 ,借助 deepseek 的辅助,用 64 行就写了一个 terminal 配置,基本达到我的需求
### 一键运行代码
在 VSCode 中有一个非常有名的插件叫 [Code Runner](https://marketplace.visualstudio.com/items?itemName=formulahendry.code-runner)
vim 中利用 [`code_runner.nvim`](https://github.com/CRAG666/code_runner.nvim) 可以实现类似的功能。
| binding | function |
| ----------------- | ------------------------ |
| `` `l` `r` | 根据文件类型,执行该文件 |
| C 语言文件一键运行 |
| ----------------------------------- |
|
为什么不直接用现成的 terminal 插件,
1. `voidkiss/floaterm` 的更加稳定,功能更多。但是有严重的性能问题,例如编译内核的过程中,产生的 log 可能导致 nvim 卡死。
2. `akinsho/toggleterm.nvim` 项目更加新,使用 lua 写的,在 UI 上更加灵活,但是存在一些细微的 bug 和功能缺失。
- 如果同时使用多个终端,其管理难度简直逆天。
- 没有简洁的 voidkiss 中 FloatermNew 的功能,需要写一些配置文件。
3. 逛 reddit 偶然发现 [nvzone/floaterm](https://www.reddit.com/r/neovim/comments/1lbzm1z/floaterm_beautiful_terminal_buffer_manager/)
看上去满足我的多 terminal 管理的需求,但是不成熟。
2024-11-02 ,升级 nvim 0.10.1 之后,FloatermNew 已经不可以用了,所以还是
使用 akinsho/toggleterm.nvim 了
2025-07-04 ,借助 deepseek 的辅助,用 64 行就写了一个 terminal 配置,基本达到我的需求
### 一键运行代码
在 VSCode 中有一个非常有名的插件叫 [Code Runner](https://marketplace.visualstudio.com/items?itemName=formulahendry.code-runner)
vim 中利用 [`code_runner.nvim`](https://github.com/CRAG666/code_runner.nvim) 可以实现类似的功能。
| binding | function |
| ----------------- | ------------------------ |
| `` `l` `r` | 根据文件类型,执行该文件 |
| C 语言文件一键运行 |
| ----------------------------------- |
| 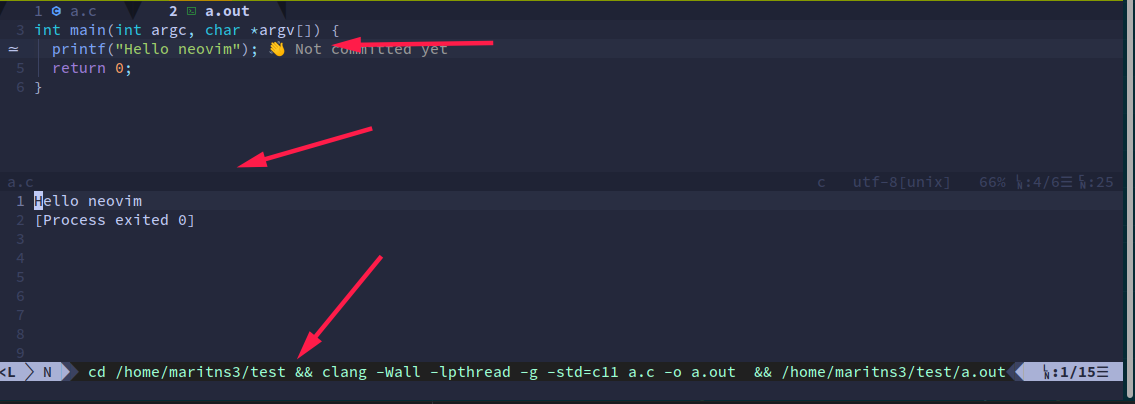 |
从上到下三个箭头分别指向:
- 源代码
- 运行结果
- 运行使用的命令
### 一键注释代码
| binding | function |
| ----------------- | -------------------------------- |
| `` `l` `c` | 根据文件类型,自动注释选中的区间 |
### markdown 集成
| binding | function |
| ----------------- | -------------------- |
| `` `t` `m` | 开启表格快捷编辑模式 |
| `` `x` | 预览 |
### Session
在每一个文件夹会自动创建 session,这样当 nvim 重新打开的时候,window 还是上次关闭的样子.
使用命令 SessionDelete 可以删除掉保存的 session 。
如果想要清理所有 sessions ,使用如下命令。
```sh
rm -r ~/.local/share/nvim/sessions
```
### 快速移动
vim 基本的移动技术,例如 e b w G gg 之类的就不说了, 下面简单说明一些有趣的的技术:
在我使用 [ggandor/leap.nvim](https://github.com/ggandor/leap.nvim) 之后,有种全新的体验,跳转到任何位置,之需要按下 `s`,然后连续按下该位置开始的两个字符,
接下来会提示按什么就可以直接跳转到该位置。
| 例子 |
| ----------------------------------------------------------------------------------------------- |
|
|
从上到下三个箭头分别指向:
- 源代码
- 运行结果
- 运行使用的命令
### 一键注释代码
| binding | function |
| ----------------- | -------------------------------- |
| `` `l` `c` | 根据文件类型,自动注释选中的区间 |
### markdown 集成
| binding | function |
| ----------------- | -------------------- |
| `` `t` `m` | 开启表格快捷编辑模式 |
| `` `x` | 预览 |
### Session
在每一个文件夹会自动创建 session,这样当 nvim 重新打开的时候,window 还是上次关闭的样子.
使用命令 SessionDelete 可以删除掉保存的 session 。
如果想要清理所有 sessions ,使用如下命令。
```sh
rm -r ~/.local/share/nvim/sessions
```
### 快速移动
vim 基本的移动技术,例如 e b w G gg 之类的就不说了, 下面简单说明一些有趣的的技术:
在我使用 [ggandor/leap.nvim](https://github.com/ggandor/leap.nvim) 之后,有种全新的体验,跳转到任何位置,之需要按下 `s`,然后连续按下该位置开始的两个字符,
接下来会提示按什么就可以直接跳转到该位置。
| 例子 |
| ----------------------------------------------------------------------------------------------- |
|  |
按 s 开始跳转,然后搜索第一个字母 m,会出现三种选择:
- me : 两个都是白色,此时再按 e,那么可以直接跳转到其上
- mes : 需要按 es 才可以,原因是存在多个满足 m?s 形式的字符。
- met : 其 t 被高亮的,直接按 t 就可以了,无需按 s ,因为 met 的三个字母是唯一的。
进行跳转的时候,前两个字符可以直接敲下去,而第三个字符需要看 easy mothion 的设置。
如果想要让自己彻底的移除掉低效移动的坏习惯,还是得靠 [m4xshen/hardtime.nvim](https://github.com/m4xshen/hardtime.nvim)
| binding | function |
| -------- | --------------------------------------------------------------------------- |
| `CTRL-o` | 跳转的位置的回溯 |
| `g;` | 跳转到刚刚编辑的位置 |
| `gi` | 跳转到刚刚编辑的位置,并且进入到插入模式 |
| `gf` | 打开光标所在文件 |
| `%` | 跳转到包围的 ([{}]) 或者在匹配的 `#if`, `#ifdef`, `#else`, `#elif`, `#endif` 之间跳转 |
## 本配置源代码解释
总体来说,本配置的代码就是从上面介绍的各个项目提供的标准配置的组合,然后添加我的一些微调。
nvim 配置在仓库的位置为 ./nvim 中,其他的目录不用管,那是关于 vim 其他的配置。
- init.vim : 基础选项设置,然后加载 lua 配置
- lua/usr
- init.lua : 加载其他的 lua 配置
- lazy.lua : 安装的插件,按照作用放到一起,每一个插件是做什么的都有注释。
- which-key.lua : 快捷键的配置
- nvim-tree.lua ... : 一些插件的默认配置的调整,都非常短。
- lsp : lsp server 相关的配置,自动加载
- snippets/ : 自定义的代码段,主要是 bash 相关的
如何添加一个新的语言的支持,这里使用 typst 作为例子:
1. 找到该语言公认比较好的 lsp ,发现是 tinymist
2. 找到关于 neovim 的配置,也就是 https://myriad-dreamin.github.io/tinymist/frontend/neovim.html
3. 修改 mason.lua ,添加配置文件到 lua/lsp 下,也就是:
```diff
diff --git a/nvim/lsp/tinymist.lua b/nvim/lsp/tinymist.lua
new file mode 100644
index 000000000000..862d4bd69dfb
--- /dev/null
+++ b/nvim/lsp/tinymist.lua
@@ -0,0 +1,7 @@
+return {
+ settings = {
+ formatterMode = "typstyle",
+ exportPdf = "onType",
+ semanticTokens = "disable"
+ }
+}
diff --git a/nvim/lua/usr/mason.lua b/nvim/lua/usr/mason.lua
index d7ad28d583cf..4c46c2f7f32c 100644
--- a/nvim/lua/usr/mason.lua
+++ b/nvim/lua/usr/mason.lua
@@ -16,6 +16,7 @@ local servers = {
"vimls",
"yamlls",
"perlnavigator",
+ "tinymist",
-- "typos_lsp",
-- "tsserver",
}
```
## FAQ
- 为什么不使用 IDE,比如 [CLion](https://www.jetbrains.com/clion/)?
- 恰恰相反,我反对新手一开始就折腾 vim ,刚开始学编程,CLion 我认为是最好的 IDE 。[Code::Blocks](https://www.codeblocks.org/) 过于陈旧,[Visual Studio](https://visualstudio.microsoft.com/zh-hans/) 是 Windows 平台独占。而 CLion 保持了 jetbrains 的一贯高水平,简单易用,不要需要掌握太多 gcc 工具链的知识,只要点击一下 绿色的小三角就可以运行代码,而且使用校园邮箱是可以申请免费使用的。 但是,对于老司机,IDE 提供了太多了太多我们不需要的功能,可定制太差,如果我同时想要写多门语言,那么就要同时购买多个 IDE 。
- 我认为当你掌握了一门语言,比如 C 语言,可以写超过千行的项目的时候,是入手的好时间。
- 为什么不使用 VS Code ?
- VS Code 比 Sublime 功能更强,比 [Atom](https://atom.io/) 性能更高,而且 VSCode 可以集成 vim 。因为 VSCode 是基于 electron 的,甚至可以在一个 window 中编辑 markdown, 一个 window 实时预览 markdown 。
- 但是 vim 可以更加简洁, 灵活和高效。
- 我应该使用这个配置吗 ?
- 我认为仓库的意义是让大家使用上 vim 新特性,其实还有很多的其他的配置也非常不错,但是一些常年没有更新,以及使用老旧插件的配置就不用看。
比如 [use_vim_as_ide](https://github.com/yangyangwithgnu/use_vim_as_ide), [exvim](https://exvim.github.io/), [spf13-vim](https://github.com/spf13/spf13-vim), [The Ultimate vimrc](https://github.com/amix/vimrc) 之类的。
- 支持什么操作系统和架构?
- 支持 Windows ,但是需要少量的调整,主要是安装方面。
- 对于 x86 Linux / Mac 完整的支持。
- [龙芯架构 Linux](https://martins3.github.io/loongarch/neovim.html) 基本支持。
- 使用 clangd 还是 ccls
- 两个都用过,但是我推荐 ccls,具体原因看[这里](./ccls-vs-clangd.md)
## vim 的小技巧
- 翻滚屏幕
| key binding | function |
| ----------- | -------------------------------------- |
| H | 保持屏幕内容不动, 移动到屏幕最上方 |
| M | 保持屏幕内容不动, 移动到屏幕中间 |
| L | 保持屏幕内容不动, 移动到屏幕最下面 |
| zt | 将当前行移动到屏幕最上方 |
| zz | 将当前行移动到屏幕中间 |
| zb | 将当前行移动到屏幕最下方 |
| Ctrl + f | 向前滚动一屏,但是光标在顶部 |
| Ctrl + d | 向前滚动一屏,光标在屏幕的位置保持不变 |
| Ctrl + b | 向后滚动一屏,但是光标在底部 |
| Ctrl + u | 向后滚动半屏,光标在屏幕的位置保持不变 |
| Ctrl + e | 丝般顺滑地向上滚动 |
| Ctrl + y | 丝般顺滑地向下滚动 |
- vim 下的 Man 命令打开的 manual 是带高亮和符号跳转的,比在终端中间直接使用 man 好多了
- 在最后一行添加相同的字符 `Ctrl + v` `$` `A` `string appended`,[参考](https://stackoverflow.com/questions/594448/how-can-i-add-a-string-to-the-end-of-each-line-in-vim)。
- 在 Esc 是 vim 中间使用频率非常高的键位,为了不让自己的左手小拇指被拉长,可以将 CapsLock 键映射为 Esc 键,一种修改方法为在 ~/.profile 中加入。这个方法存在一个小问题,就是需要打开一个终端窗口才可以加载这个,应为 .profile 在 login 的时候才会被执行一次。
```txt
setxkbmap -option caps:swapescape
```
- `:w !sudo tee %` 来保存一个 readonly 文件
- `:g/pattern/command` 可以用于对于匹配的模式操作
- `:g!/pattern/command` 对于不匹配的操作
- `?` 是向后搜索,`/` 是向前搜索
- `:put =range(1, 10)` 插入 1 到 10 的数值
- 对于选中的 visual block `S` `str` 可以在 visual block 两侧添加 `str`. ([ref](https://github.com/tpope/vim-surround/issues/220))
- [获取历史命令](https://stackoverflow.com/questions/13405959/how-do-i-get-a-list-of-the-history-of-all-the-vim-commands-i-ran) `,``q``:`
- 使用 `[` `{` `(` 快速移动
| binding | function |
| ----------- | ------------------------------ |
| `{` / `}` | 分别向上向下跳转到空行 |
| `{` / `}` | 分别向上向下跳转到空格 |
| `[[` / `]]` | 分别向上或向下跳转最外层的 `{` |
- 在 vim 中可以通过`:help v_g_CTRL-A` 输入连续的数字
- text-object
- 动词 : c(hange) d(elete)
- 副词 : i(nside) a(round) t(o) f(orward)
- 名词 : w(ord) s(entence) p(aragraph) t(ag) \` ' " [ ( {
- tag 是 markup 语言中的 tag,例如 `
|
按 s 开始跳转,然后搜索第一个字母 m,会出现三种选择:
- me : 两个都是白色,此时再按 e,那么可以直接跳转到其上
- mes : 需要按 es 才可以,原因是存在多个满足 m?s 形式的字符。
- met : 其 t 被高亮的,直接按 t 就可以了,无需按 s ,因为 met 的三个字母是唯一的。
进行跳转的时候,前两个字符可以直接敲下去,而第三个字符需要看 easy mothion 的设置。
如果想要让自己彻底的移除掉低效移动的坏习惯,还是得靠 [m4xshen/hardtime.nvim](https://github.com/m4xshen/hardtime.nvim)
| binding | function |
| -------- | --------------------------------------------------------------------------- |
| `CTRL-o` | 跳转的位置的回溯 |
| `g;` | 跳转到刚刚编辑的位置 |
| `gi` | 跳转到刚刚编辑的位置,并且进入到插入模式 |
| `gf` | 打开光标所在文件 |
| `%` | 跳转到包围的 ([{}]) 或者在匹配的 `#if`, `#ifdef`, `#else`, `#elif`, `#endif` 之间跳转 |
## 本配置源代码解释
总体来说,本配置的代码就是从上面介绍的各个项目提供的标准配置的组合,然后添加我的一些微调。
nvim 配置在仓库的位置为 ./nvim 中,其他的目录不用管,那是关于 vim 其他的配置。
- init.vim : 基础选项设置,然后加载 lua 配置
- lua/usr
- init.lua : 加载其他的 lua 配置
- lazy.lua : 安装的插件,按照作用放到一起,每一个插件是做什么的都有注释。
- which-key.lua : 快捷键的配置
- nvim-tree.lua ... : 一些插件的默认配置的调整,都非常短。
- lsp : lsp server 相关的配置,自动加载
- snippets/ : 自定义的代码段,主要是 bash 相关的
如何添加一个新的语言的支持,这里使用 typst 作为例子:
1. 找到该语言公认比较好的 lsp ,发现是 tinymist
2. 找到关于 neovim 的配置,也就是 https://myriad-dreamin.github.io/tinymist/frontend/neovim.html
3. 修改 mason.lua ,添加配置文件到 lua/lsp 下,也就是:
```diff
diff --git a/nvim/lsp/tinymist.lua b/nvim/lsp/tinymist.lua
new file mode 100644
index 000000000000..862d4bd69dfb
--- /dev/null
+++ b/nvim/lsp/tinymist.lua
@@ -0,0 +1,7 @@
+return {
+ settings = {
+ formatterMode = "typstyle",
+ exportPdf = "onType",
+ semanticTokens = "disable"
+ }
+}
diff --git a/nvim/lua/usr/mason.lua b/nvim/lua/usr/mason.lua
index d7ad28d583cf..4c46c2f7f32c 100644
--- a/nvim/lua/usr/mason.lua
+++ b/nvim/lua/usr/mason.lua
@@ -16,6 +16,7 @@ local servers = {
"vimls",
"yamlls",
"perlnavigator",
+ "tinymist",
-- "typos_lsp",
-- "tsserver",
}
```
## FAQ
- 为什么不使用 IDE,比如 [CLion](https://www.jetbrains.com/clion/)?
- 恰恰相反,我反对新手一开始就折腾 vim ,刚开始学编程,CLion 我认为是最好的 IDE 。[Code::Blocks](https://www.codeblocks.org/) 过于陈旧,[Visual Studio](https://visualstudio.microsoft.com/zh-hans/) 是 Windows 平台独占。而 CLion 保持了 jetbrains 的一贯高水平,简单易用,不要需要掌握太多 gcc 工具链的知识,只要点击一下 绿色的小三角就可以运行代码,而且使用校园邮箱是可以申请免费使用的。 但是,对于老司机,IDE 提供了太多了太多我们不需要的功能,可定制太差,如果我同时想要写多门语言,那么就要同时购买多个 IDE 。
- 我认为当你掌握了一门语言,比如 C 语言,可以写超过千行的项目的时候,是入手的好时间。
- 为什么不使用 VS Code ?
- VS Code 比 Sublime 功能更强,比 [Atom](https://atom.io/) 性能更高,而且 VSCode 可以集成 vim 。因为 VSCode 是基于 electron 的,甚至可以在一个 window 中编辑 markdown, 一个 window 实时预览 markdown 。
- 但是 vim 可以更加简洁, 灵活和高效。
- 我应该使用这个配置吗 ?
- 我认为仓库的意义是让大家使用上 vim 新特性,其实还有很多的其他的配置也非常不错,但是一些常年没有更新,以及使用老旧插件的配置就不用看。
比如 [use_vim_as_ide](https://github.com/yangyangwithgnu/use_vim_as_ide), [exvim](https://exvim.github.io/), [spf13-vim](https://github.com/spf13/spf13-vim), [The Ultimate vimrc](https://github.com/amix/vimrc) 之类的。
- 支持什么操作系统和架构?
- 支持 Windows ,但是需要少量的调整,主要是安装方面。
- 对于 x86 Linux / Mac 完整的支持。
- [龙芯架构 Linux](https://martins3.github.io/loongarch/neovim.html) 基本支持。
- 使用 clangd 还是 ccls
- 两个都用过,但是我推荐 ccls,具体原因看[这里](./ccls-vs-clangd.md)
## vim 的小技巧
- 翻滚屏幕
| key binding | function |
| ----------- | -------------------------------------- |
| H | 保持屏幕内容不动, 移动到屏幕最上方 |
| M | 保持屏幕内容不动, 移动到屏幕中间 |
| L | 保持屏幕内容不动, 移动到屏幕最下面 |
| zt | 将当前行移动到屏幕最上方 |
| zz | 将当前行移动到屏幕中间 |
| zb | 将当前行移动到屏幕最下方 |
| Ctrl + f | 向前滚动一屏,但是光标在顶部 |
| Ctrl + d | 向前滚动一屏,光标在屏幕的位置保持不变 |
| Ctrl + b | 向后滚动一屏,但是光标在底部 |
| Ctrl + u | 向后滚动半屏,光标在屏幕的位置保持不变 |
| Ctrl + e | 丝般顺滑地向上滚动 |
| Ctrl + y | 丝般顺滑地向下滚动 |
- vim 下的 Man 命令打开的 manual 是带高亮和符号跳转的,比在终端中间直接使用 man 好多了
- 在最后一行添加相同的字符 `Ctrl + v` `$` `A` `string appended`,[参考](https://stackoverflow.com/questions/594448/how-can-i-add-a-string-to-the-end-of-each-line-in-vim)。
- 在 Esc 是 vim 中间使用频率非常高的键位,为了不让自己的左手小拇指被拉长,可以将 CapsLock 键映射为 Esc 键,一种修改方法为在 ~/.profile 中加入。这个方法存在一个小问题,就是需要打开一个终端窗口才可以加载这个,应为 .profile 在 login 的时候才会被执行一次。
```txt
setxkbmap -option caps:swapescape
```
- `:w !sudo tee %` 来保存一个 readonly 文件
- `:g/pattern/command` 可以用于对于匹配的模式操作
- `:g!/pattern/command` 对于不匹配的操作
- `?` 是向后搜索,`/` 是向前搜索
- `:put =range(1, 10)` 插入 1 到 10 的数值
- 对于选中的 visual block `S` `str` 可以在 visual block 两侧添加 `str`. ([ref](https://github.com/tpope/vim-surround/issues/220))
- [获取历史命令](https://stackoverflow.com/questions/13405959/how-do-i-get-a-list-of-the-history-of-all-the-vim-commands-i-ran) `,``q``:`
- 使用 `[` `{` `(` 快速移动
| binding | function |
| ----------- | ------------------------------ |
| `{` / `}` | 分别向上向下跳转到空行 |
| `{` / `}` | 分别向上向下跳转到空格 |
| `[[` / `]]` | 分别向上或向下跳转最外层的 `{` |
- 在 vim 中可以通过`:help v_g_CTRL-A` 输入连续的数字
- text-object
- 动词 : c(hange) d(elete)
- 副词 : i(nside) a(round) t(o) f(orward)
- 名词 : w(ord) s(entence) p(aragraph) t(ag) \` ' " [ ( {
- tag 是 markup 语言中的 tag,例如 ` hi
`
| Old text | Command | New text |
| ------------------- | ------- | ---------------- |
| 'hello/wo\*rld' | ci' | '' |
| \<\*h2\> hi \ | dit | \<\*h2\> \ |
- 通过 [nvim-surround](https://github.com/kylechui/nvim-surround) 插件,可以增加 surround 语义,表中的 \* 表示光标的位置:
> | Old text | Command | New text |
> | ------------------------------ | --------- | ------------------------- |
> | surr\*ound_words | ysiw) | (surround_words) |
> | \*make strings | ys$" | "make strings" |
> | [delete ar*ound me!] | ds] | delete around me! |
> | remove \HTML t\*ags\` | dst | remove HTML tags |
> | 'change quot\*es' | cs'" | "change quotes" |
> | \or tag\* types\ | csth1 | \or tag types\ |
> | delete(functi\*on calls) | dsf | function calls |
其中 y 是增加,d 删除,c 修改 的语义。
以上技巧,部分参考:
- [https://thevaluable.dev/vim-advanced/](https://thevaluable.dev/vim-advanced/)
## 值得一看的配置
- [NvChad](https://github.com/NvChad/NvChad) : 个人推荐
- [LazyVim](https://github.com/LazyVim/LazyVim) : folke 大神写的 nvim 配置
- [kickstart.nvim](https://github.com/nvim-lua/kickstart.nvim) 这绝对是开始使用 lua 来配置的 nvim 开始的好地方。强烈推荐。
- [LunarVim](https://github.com/LunarVim/LunarVim) 超过 18k star 的 IDE 配置
- [jdhao/nvim-config](https://github.com/jdhao/nvim-config) : jdhao 的配置
- [nyoom.nvim](https://github.com/nyoom-engineering/nyoom.nvim) : 纯 fennel
## 值得关注的插件
- [lspsaga](https://github.com/glepnir/lspsaga.nvim) : 提升 lsp 体验
- [trouble.nvim](https://github.com/folke/trouble.nvim) : 提升 lsp 体验
- [neodev](https://github.com/folke/neodev.nvim) neovim 开发 lua 插件环境
- [conflict-marker.vim](https://github.com/rhysd/conflict-marker.vim) : 在 vim 中如何高效解决 git conflict
- [nvim-ufo](https://github.com/kevinhwang91/nvim-ufo) 更加智能的折叠
- [nvim-example-lua-plugin](https://github.com/jacobsimpson/nvim-example-lua-plugin) : 插件模板,打造你的第一个插件
- [codeium](https://github.com/Exafunction/codeium.vim) : Copilot 替代品
- [nvim-metals](https://github.com/scalameta/nvim-metals) : 芯片前端开发必备
- [vs-tasks.nvim](https://github.com/EthanJWright/vs-tasks.nvim) : Code Runner
- [NeoComposer](https://github.com/ecthelionvi/NeoComposer.nvim) : 更好地使用 macro
- [gesture.nvim](https://github.com/notomo/gesture.nvim) : nvim 中鼠标还可以这样用?
- [legendary.nvim](https://github.com/mrjones2014/legendary.nvim) : 据说比 which-key 好用
- [neodim](https://github.com/zbirenbaum/neodim) : 降低 没有引用的函数、变量亮度 (这个功能 coc.nvim 本来有,只可惜我换掉了 coc.nvim)
- [neotest](https://github.com/nvim-neotest/neotest) : 单元测试插件
## 有趣的插件
- [zone.nvim](https://github.com/tamton-aquib/zone.nvim) : 屏保
- [cellular-automaton.nvim](https://github.com/Eandrju/cellular-automaton.nvim) : 细胞自动机
- [OXY2DEV/markview.nvim](https://github.com/OXY2DEV/markview.nvim) : markdown 的预览
- [NStefan002/screenkey.nvim](https://github.com/NStefan002/screenkey.nvim) : 展示在 vim 中敲下的键
- https://github.com/nvzone/showkeys
## 学习
1. [neovimcraft](https://neovimcraft.com/) : neovim 插件教程学习导航网站
2. [vim galore](https://github.com/mhinz/vim-galore)
3. [devhints](https://devhints.io/vimscript) : 另一个 vim checksheet
4. :help lua-guide
## 找资源
1. [vimcolorschemes](https://vimcolorschemes.com/) vim 主题网站
2. [awesome neovim](https://github.com/rockerBOO/awesome-neovim)
## 高级话题
- [高级话题](./nvim-advantace.md),至少对于我来说比较高级 🤣
## 衍生
1. [vim cube](https://github.com/oakes/vim_cubed) : 让 vim 在三维中显示
2. [vim.wasm](https://github.com/rhysd/vim.wasm) : 在 vim 在网页中间使用
3. [neovide](https://github.com/Kethku/neovide) : 一个酷炫的 GUI 客户端
4. [vimium-c](https://github.com/gdh1995/vimium-c) : 在浏览器中使用 vim 快捷键跳转和移动 :star:
5. [firenvim](https://github.com/glacambre/firenvim) : 在浏览器的输入框中使用 vim 输入
6. [qutebrowser](https://github.com/qutebrowser/qutebrowser) : 基于 Python 和 Qt 构建的 vim 快捷键的浏览器
7. [helix](https://github.com/helix-editor/helix) : 和 neovim 类似,号称更加 modern 的编辑器
8. [vim-keybindings-everywhere-the-ultimate-list](https://github.com/erikw/vim-keybindings-everywhere-the-ultimate-list) : 在其他程序中使用 vim 的键位映射。
9. [nyoom.nvim](https://github.com/nyoom-engineering/nyoom.nvim) : 纯 fennel nvim 配置
10. [Haystack](https://news.ycombinator.com/item?id=41068719) : 一个基于 canvas 的编辑器
[^2]: [I do not use a debugger](https://lemire.me/blog/2016/06/21/i-do-not-use-a-debugger/)
[^3]: [The normal command](https://www.reddit.com/r/vim/comments/tbz449/norm_macros_are_great/)
[^7]: [stack overflow helping one million developers exit vim](https://stackoverflow.blog/2017/05/23/stack-overflow-helping-one-million-developers-exit-vim/)
[^8]: [what is the purpose of swap files](https://vi.stackexchange.com/questions/177/what-is-the-purpose-of-swap-files)
本站所有文章转发 **CSDN** 将按侵权追究法律责任,其它情况随意。