| [docs](..) / [using](.) / base-policy.md
|:---|
# Creating a new Base WDAC Policy
This document outlines the steps to create a new App Control policy while using one of the three available CI templates
as a starting point. The tool enables users to configure the policy rules, its signing rules and its attributes.
The [official App Control documentation](https://learn.microsoft.com/windows/security/application-security/application-control/app-control-for-business/design/appcontrol-wizard-create-base-policy) outlines the base policy creation steps.
## 1. Select the Policy Creator from the start menu, then Base Policy ##
If the default setting (see [Settings Page](using/settings-page.md)) is enabled, the base policy option will be pre-selected. Otherwise, select the base policy option.
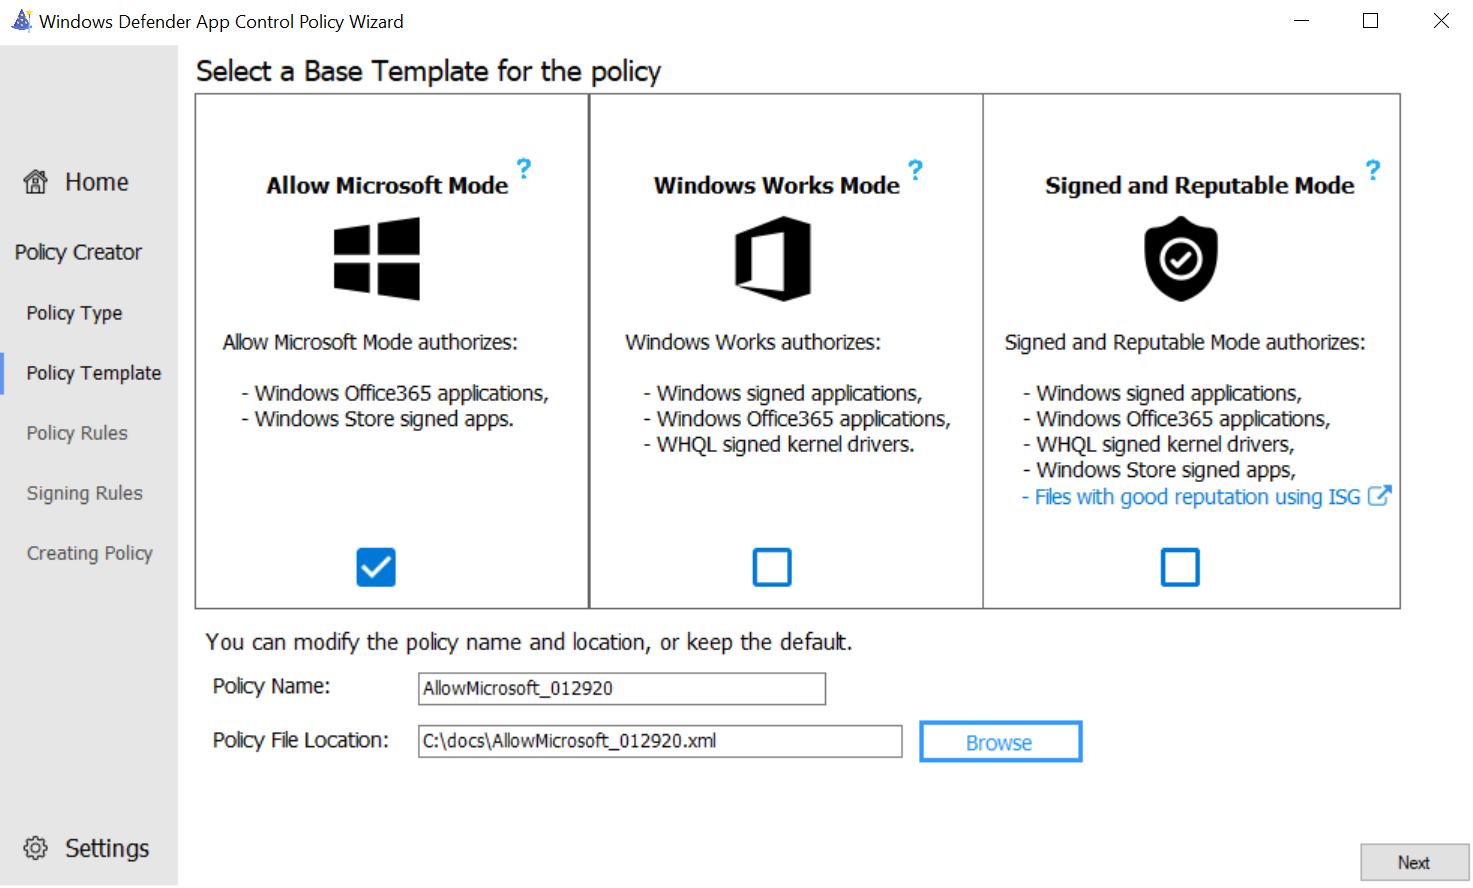
## 2. Select from one of the default template policies ##
Each of the template policies has a unique set of policy allow list rules that will affect the circle-of-trust and security model of the policy. The following table lists the policies in increasing order of trust and freedom. For instance, the Default Windows mode policy trusts fewer application publishers and signers than the Signed and Reputable mode policy. The Default Windows policy will have a smaller circle-of-trust with better security than the Signed and Reputable policy, but at the expense of compatibility.
| Template Base Policy | Description |
|---------------------------------|-------------------------------------------------------------------|
| **Default Windows Mode** | Default Windows mode will authorize the following components: - Windows operating components - any binary installed by a fresh install of Windows
- Apps installed from the Microsoft Store
- Microsoft Office365 apps, OneDrive, and Microsoft Teams
- Third-party [Windows Hardware Compatible drivers](https://docs.microsoft.com/windows-hardware/drivers/install/whql-release-signature)
|
| **Allow Microsoft Mode** | Allow mode will authorize the following components: - Windows operating components - any binary installed by a fresh install of Windows
- Apps installed from the Microsoft Store
- Microsoft Office365 apps, OneDrive, and Microsoft Teams
- Third-party [Windows Hardware Compatible drivers](https://docs.microsoft.com/windows-hardware/drivers/install/whql-release-signature)
- *All Microsoft-signed software*
|
| **Signed and Reputable Mode** | Signed and Reputable mode will authorize the following components: - Windows operating components - any binary installed by a fresh install of Windows
- Apps installed from the Microsoft Store
- Microsoft Office365 apps, OneDrive, and Microsoft Teams
- Third-party [Windows Hardware Compatible drivers](https://docs.microsoft.com/windows-hardware/drivers/install/whql-release-signature)
- All Microsoft-signed software
- *Files with good reputation per [Microsoft Defender's Intelligent Security Graph technology](https://learn.microsoft.com/windows/security/application-security/application-control/app-control-for-business/design/use-appcontrol-with-intelligent-security-graph)*
|
*Italicized content denotes the changes in the current policy with respect to the policy prior.*
The policy name and file location will default based on the template policy selected. The policy name and file location can be set be selecting the textbox and typing the desired string. At any time during the workflow, you can choose to return to the default template page by selecting the `Policy Template` button on the left-hand menu.
**NOTE:** Returning to the template page will remove the configured policy rule options as well as the custom signing rules.
## 3. Configure the policy rule options ##
Upon page launch, policy rule options will be automatically enabled/disabled depending on the chosen template from the previous page. Choose to enable or disable the desired policy rule options by pressing the slider button next to
the policy rule titles.
Hovering the mouse over the policy rule names will display a short description of the rule
at the bottom of the page. More information about each of the policy rules can be located at the [App Control policy rules](https://learn.microsoft.com/windows/security/application-security/application-control/app-control-for-business/design/select-types-of-rules-to-create#windows-defender-application-control-policy-rules) page.
Selecting the `+ Advanced Options` button will reveal the advanced policy rule options panel. This grouping of rules contains additional policy rule options which are less common to a majority of users.
Lastly, **Audit Mode** is enabled by default for all of the templates. We recommend leaving the Audit Mode policy rule option enabled until users have sufficiently understood how the policy and signing rules will affect their scenario.
Disabling Audit Mode will result in the policy running in enforced mode after the policy is deployed. For more information on deploying App Control policies see [Deploying App Control Policies](https://learn.microsoft.com/windows/security/application-security/application-control/app-control-for-business/deployment/appcontrol-deployment-guide).
## 4. Creating policy signing rules ##
The Signing Rules List on the left-hand side of the page document the pre-set signing rules of the template as well as the exceptions.
#### Creating Custom Signing Rules ####
Selecting the `+ Custom Rules` button will open the Custom Rules panel. Four types of custom rules conditions can be defined.
| Rule Condition | Usage Scenario |
| - | - |
| Publisher | To use a publisher condition, the files must be digitally signed by the software publisher, or you must sign with an internal certificate. |
| File Path | Any file can be assigned this rule condition; however, because path rules specify locations within the file system, any subdirectory will also be affected by the rule (unless explicitly exempted).|
| Folder Path | Any folder and subfolder can be assigned this rule condition (unless explicitly exempted).|
| File Hash | Any file can be assigned this rule condition; however, the rule must be updated each time a new version of the file is released because the hash value is based in part upon the version.|
1. **Publisher Rules** - select the Publisher option from the Rule Type combobox. Next choose to Allow or Deny the publisher, and select a reference file signed by the software publisher off which to base the rule.
By default, the publisher is set to apply to all files signed by the publisher, with the specific product name and file name with a version at or above the one specified. The restrictiveness of the rule can be modified using the slider.
The text below the slider documents outlines the how the rule will be interpreted.
The table below shows the relationship between the slider placement, the corresponding App Control rule level and its description. The lower the placement on the table and the UI slider, the greater the specificity of the rule.
| Rule Condition | App Control Rule Level | Description |
| - | - | - |
| **Publisher** | PCACertificate | Highest available certificate is added to the signers. This is typically the PCA certificate, one level below the root certificate. Any file signed by this certificate will be affected. |
| **Product name** | Publisher | This rule is a combination of the PCACertificate rule and the common name (CN) of the leaf certificate. Any file signed by a major CA but with a leaf from a specific company, for example a device driver corp, is affected. |
| **File name** | SignedVersion | This rule is a combination of PCACertificate, Publisher and a version number. Anything from the specified publisher with a version at or above the one specified is affected. |
| **Version** | FilePublisher | Most specific. Combination of the file name, publisher and PCA certificate as well as a minimum version number. Files from the publisher with the specified name and greater or equal to the specified version are affected. |
2. **Path Rules** - select the Path option from the Rule Type combobox. Next choose to Allow or Deny the path, and select either a File or Folder rule using the radiobutton below the Browse button. Lastly, select the reference file
or folder off which to base the rule.
3. **Hash Rules** - select the File Hash option from the Rule Type combobox. Next choose to Allow or Deny the hash, and select the file off which to base the rule.
#### Deleting Signing Rules ####
Template signing rules and custom rules can be deleted from the policy by selecting the rule from the rules list dataviewer. Once the rule is highlighted, selecting the delete button underneath the table will prompt for additional confirmation. Select `Yes` to remove the rule from the policy and the rules table.
## 5. Building the policy ##
The policy build page will monitor the progress of the App Control policy creation process. Depending on the number and complexity of the custom signing rules, the build process could take several minutes.
Once the build process is complete, selecting the policy path link will open the policy XML file for review. The binary file is also written to the same path for manual deployment, if the **Convert policy to binary after xml creation** setting is selected. Steps for manual deployment can be reviewed here [Deploying App Control Policies](https://docs.microsoft.com/windows/security/threat-protection/windows-defender-application-control/windows-defender-application-control-deployment-guide).