
 ----------
 #Explore and Challenge:#
##The Pi-Stop Traffic Light Sequence##
#Explore and Challenge:#
##The Pi-Stop Traffic Light Sequence##
 >
>  > **SEE ALSO:**
>
> [**Discover: The Pi-Stop**](Discover-PiStop.md): For more information about Pi-Stop and how to use it.
>
> [**Setup: Scratch GPIO**](Setup-ScratchGPIO.md): For instructions on how to setup Scratch GPIO with Pi-Stop *(which is needed for this section)*.
>
> [**Explore and Challenge Scratch GPIO: Pi-Stop First Steps**](ExploreScratchGPIO-PiStopTrafficSequence.md): If you've not used Scratch before, this will provide a quick introduction to building your first Scratch GPIO program.
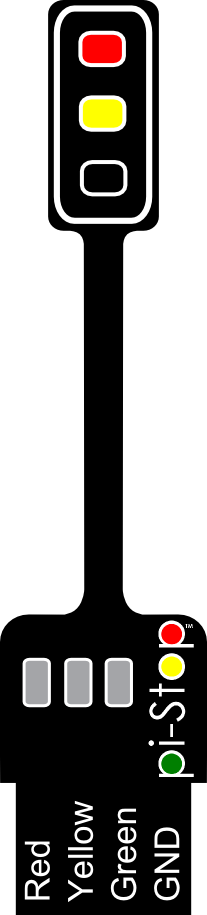
In this guide we make use of Scratch GPIO produce a standard traffic light sequence with the Pi-Stop.
###Getting Started###
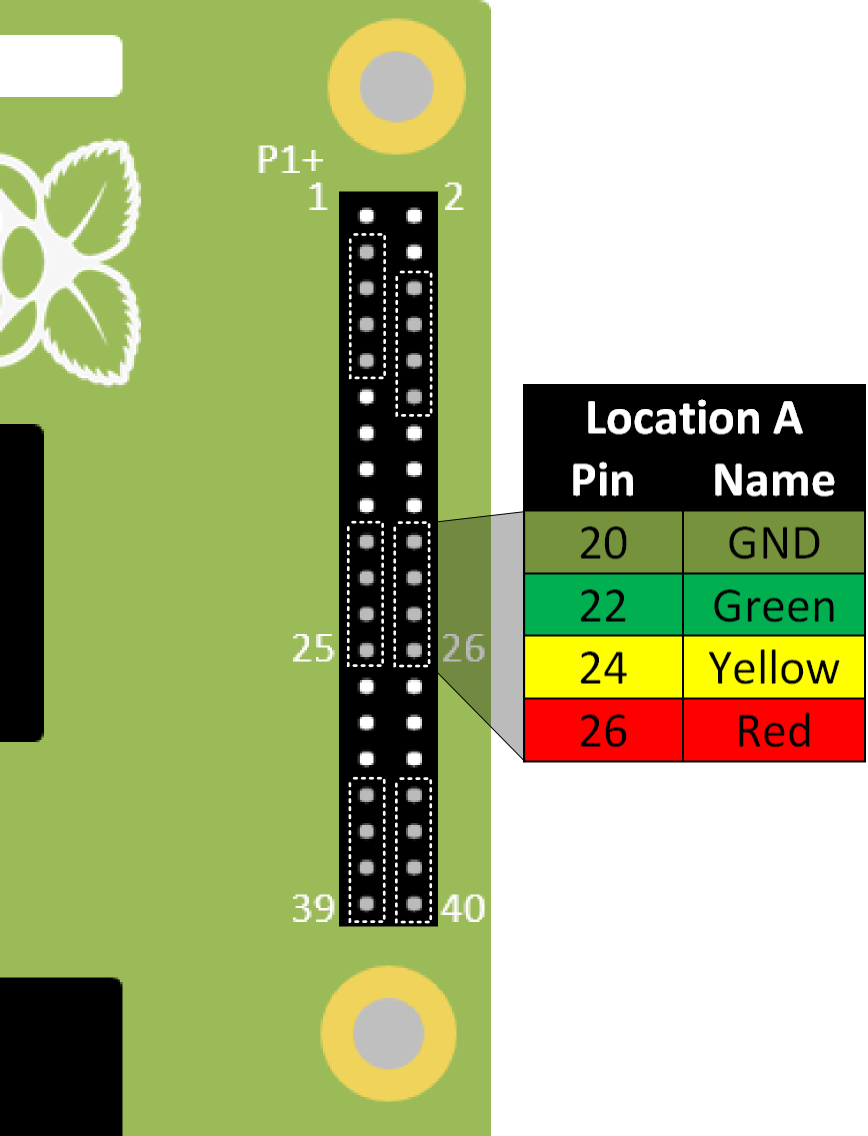
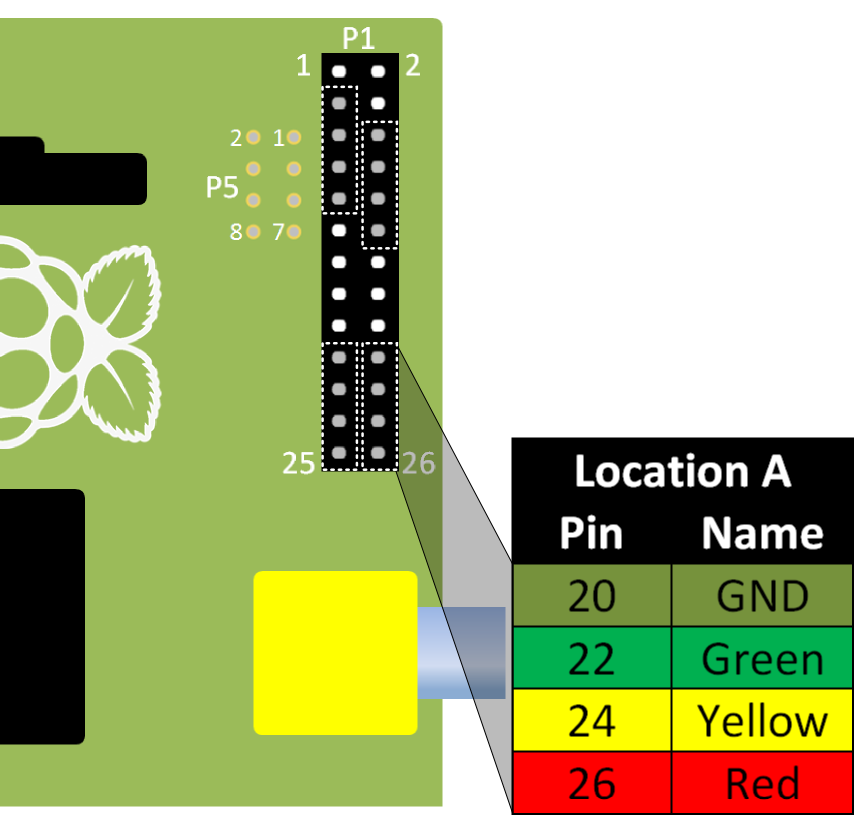
The Pi-Stop should be connected to the Raspberry Pi in Location A, as follows:
**Location A for Model A+, B+ or Raspberry Pi 2 (purchased after July 2014)**
> **SEE ALSO:**
>
> [**Discover: The Pi-Stop**](Discover-PiStop.md): For more information about Pi-Stop and how to use it.
>
> [**Setup: Scratch GPIO**](Setup-ScratchGPIO.md): For instructions on how to setup Scratch GPIO with Pi-Stop *(which is needed for this section)*.
>
> [**Explore and Challenge Scratch GPIO: Pi-Stop First Steps**](ExploreScratchGPIO-PiStopTrafficSequence.md): If you've not used Scratch before, this will provide a quick introduction to building your first Scratch GPIO program.
In this guide we make use of Scratch GPIO produce a standard traffic light sequence with the Pi-Stop.
###Getting Started###
The Pi-Stop should be connected to the Raspberry Pi in Location A, as follows:
**Location A for Model A+, B+ or Raspberry Pi 2 (purchased after July 2014)**
**Location A for Model A or B (purchased before July 2014)**
 With the Pi-Stop fitted in the correct position you can now power up your Raspberry Pi.
###Run Scratch GPIO###
If you are still in the Raspberry Pi terminal, start the desktop environment using:
`startx
`
Open Scratch GPIO from the desktop using the Scratch GPIO icon (we do not need the *ScratchGPIO 7 Plus*):
With the Pi-Stop fitted in the correct position you can now power up your Raspberry Pi.
###Run Scratch GPIO###
If you are still in the Raspberry Pi terminal, start the desktop environment using:
`startx
`
Open Scratch GPIO from the desktop using the Scratch GPIO icon (we do not need the *ScratchGPIO 7 Plus*):
 **Scratch GPIO 7** is the standard version, while **Scratch GPIO 7 plus** provides additional support for several add-on boards.
>
> **NOTE:** If you are using **X-Forwarding**, you can run Scratch GPIO with the following commands:
>
sudo cp ~/.Xauthority ~root/
sudo /opt/scratchgpio7/./scratchgpio7.sh
###Get ready###
In this example we will use the following blocks, all of which are located in the **control** section:
**Scratch GPIO 7** is the standard version, while **Scratch GPIO 7 plus** provides additional support for several add-on boards.
>
> **NOTE:** If you are using **X-Forwarding**, you can run Scratch GPIO with the following commands:
>
sudo cp ~/.Xauthority ~root/
sudo /opt/scratchgpio7/./scratchgpio7.sh
###Get ready###
In this example we will use the following blocks, all of which are located in the **control** section:
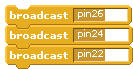
 We will use one or more of the following:
- **broadcast** blocks
We will use one or more of the following:
- **broadcast** blocks
 - **wait** blocks
 - **when I receive** blocks
 - **forever** block
>
> **NOTE:** For more information on the **broadcast**, **wait** and **forever** blocks see
> [**Explore and Challenge Scratch GPIO: Pi-Stop First Steps**](ExploreScratchGPIO-PiStopFirstSteps.md) which introduced them for the first time.
###Designing our traffic sequence###
Before we go any further we should take some time to work out what the correct sequence of lights a traffic light should show. This way we can design our program and then test to see if it behaves as we wanted.
####The STOP Sequence####
- **forever** block
>
> **NOTE:** For more information on the **broadcast**, **wait** and **forever** blocks see
> [**Explore and Challenge Scratch GPIO: Pi-Stop First Steps**](ExploreScratchGPIO-PiStopFirstSteps.md) which introduced them for the first time.
###Designing our traffic sequence###
Before we go any further we should take some time to work out what the correct sequence of lights a traffic light should show. This way we can design our program and then test to see if it behaves as we wanted.
####The STOP Sequence####
 **QUESTION:** When a traffic light is ***GREEN (GO)*** and starts to change, what lights will be lit as it changes to ***STOP*** the traffic?

![]()
![]()

 **WORKSHEET:** On your worksheet colour in the correct traffic light sequence, starting with ***GREEN*** (as shown above) and ending with the light showing ***STOP***.
**WORKSHEET:** On the broadcast blocks fill in the required commands to switch **on** or **off** the appropriate LEDs (by switching **on** or **off** the pins),
####The GO Sequence####
**QUESTION:** When a traffic light is ***RED (STOP)*** and changes to ***GO***, what is the normal sequence of lights?
Again, fill in the required **broadcast** commands.
**WORKSHEET:** On your worksheet colour in the correct traffic light sequence, starting with ***GREEN*** (as shown above) and ending with the light showing ***STOP***.
**WORKSHEET:** On the broadcast blocks fill in the required commands to switch **on** or **off** the appropriate LEDs (by switching **on** or **off** the pins),
####The GO Sequence####
**QUESTION:** When a traffic light is ***RED (STOP)*** and changes to ***GO***, what is the normal sequence of lights?
Again, fill in the required **broadcast** commands.

![]()
![]()
**WORKSHEET:** On your worksheet colour in the correct traffic light sequence, starting with ***RED*** and ending with the light showing GO.
**WORKSHEET:** Again, complete the required broadcast blocks to switch each of the lights on or off.
*Great work!*
*You can now create each of the **broadcast** blocks in Scratch and click on them to test each step.*
###Putting the blocks together###
We will now create a new **broadcast** group of blocks to recreate the required LED sequence.
####The broadcast STOP Block####
Start the group with a **when I receive** block called **STOP**:
 Add our first light change:
Add a wait block (so the lights do not change instantly):
Add our second light change:
####Broadcast GO Block####
Simply do the same with the other light changes, but call this **when I receive** block **GO**:
***Excellent!*** *Now you can test these blocks by clicking on them directly and see if we have our correct traffic light sequences!*
**WORKSHEET:** Tick the checkbox marked **"I've created the Pi-Stop STOP and GO sequences"**
Add our first light change:
Add a wait block (so the lights do not change instantly):
Add our second light change:
####Broadcast GO Block####
Simply do the same with the other light changes, but call this **when I receive** block **GO**:
***Excellent!*** *Now you can test these blocks by clicking on them directly and see if we have our correct traffic light sequences!*
**WORKSHEET:** Tick the checkbox marked **"I've created the Pi-Stop STOP and GO sequences"**
##The Final Program - Changing Lights##
At the moment our program will not do anything unless we click on it.
Just like we did in the previous guide ([**Explore and Challenge Scratch GPIO: Pi-Stop First Steps**](ExploreScratchGPIO-PiStopFirstSteps.md)) we will use a **forever** block to repeat our sequence.
 We will also add a **when green flag clicked** block to kick off our sequence (allowing you to use the small flag in the top right to **start**, and the red circle to **stop**.
 For our traffic lights we want them to start by changing to **GO** (by broadcasting "GO") then wait for some time (for example 10 seconds) and then change to **STOP** (by broadcasting "STOP").
Putting the blocks together we end up with:
For our traffic lights we want them to start by changing to **GO** (by broadcasting "GO") then wait for some time (for example 10 seconds) and then change to **STOP** (by broadcasting "STOP").
Putting the blocks together we end up with:
 When you run the program (by clicking on the **Green Flag**) you will see each part is highlighted with a white outline while it runs through the **forever** loop and runs each of the **broadcast** group blocks **GO** and **STOP**.
**WORKSHEET:** Tick the checkbox marked **"I've created the Pi-Stop the full Traffic Light Sequence"**
Remember to save your completed work by selecting **File** and **Save As...** from the menu.
###Behold the Changing Lights!###
 ##Try your own projects...##
Now you have your very own traffic light you can use in your own projects!
*Below are some ideas, or you can move onto the next guide:*
[**Explore and Challenge Scratch GPIO: Pi-Stop Reaction Game**](ExploreScratchGPIO-PiStopReactionGame.md).
###Start a race###
##Try your own projects...##
Now you have your very own traffic light you can use in your own projects!
*Below are some ideas, or you can move onto the next guide:*
[**Explore and Challenge Scratch GPIO: Pi-Stop Reaction Game**](ExploreScratchGPIO-PiStopReactionGame.md).
###Start a race###
 **IDEA:** Fed up with unfair starts when starting a race? Why not start your races with your own starting lights!
Use the Pi-Stop to start your **Scalextric** (TM) or **Hot Wheels** (TM) races, ensuring everyone gets a fair chance.
**QUESTION:** Can you create a Formula 1 style starting lights (where each light lights up and they all go off, the race starts when the lights are off).
**QUESTION:** Can you change the program to make the light change with a random wait time (making it harder to go before they change)?
*Hint: See the next guide ([**Explore and Challenge Scratch GPIO: Pi-Stop Reaction Game**](ExploreScratchGPIO-PiStopReactionGame.md)) which makes use of random delays.*
**WORKSHEET:** Tick the checkbox marked **"Extended Task: Created a racing start light control"**
**IDEA:** Fed up with unfair starts when starting a race? Why not start your races with your own starting lights!
Use the Pi-Stop to start your **Scalextric** (TM) or **Hot Wheels** (TM) races, ensuring everyone gets a fair chance.
**QUESTION:** Can you create a Formula 1 style starting lights (where each light lights up and they all go off, the race starts when the lights are off).
**QUESTION:** Can you change the program to make the light change with a random wait time (making it harder to go before they change)?
*Hint: See the next guide ([**Explore and Challenge Scratch GPIO: Pi-Stop Reaction Game**](ExploreScratchGPIO-PiStopReactionGame.md)) which makes use of random delays.*
**WORKSHEET:** Tick the checkbox marked **"Extended Task: Created a racing start light control"**
###Control multiple Traffic Lights###
**IDEA:** Perhaps your **LEGO City** (TM) needs some traffic control.

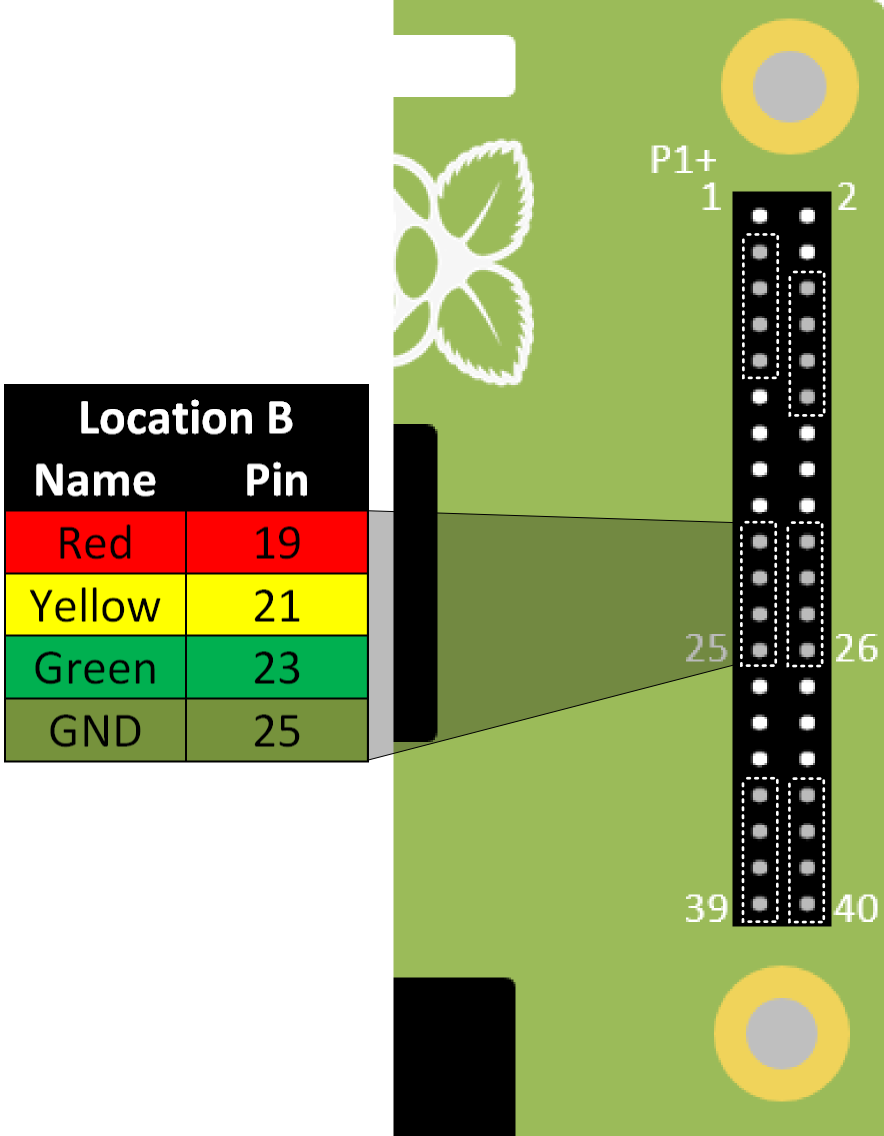
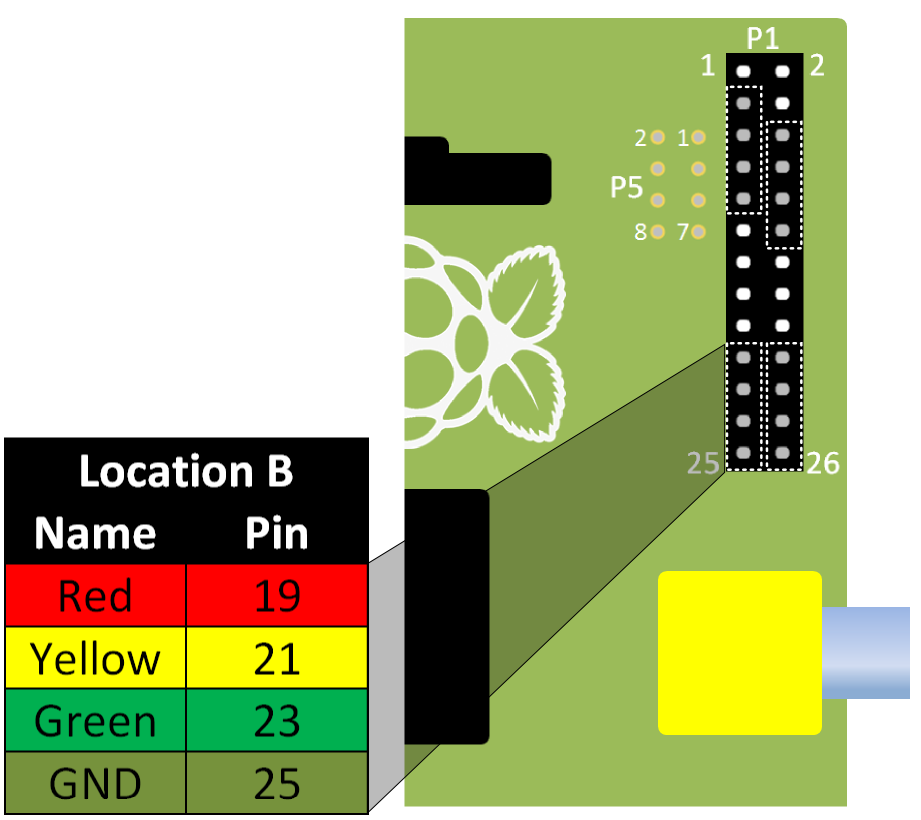
**QUESTION:** Can you extend the traffic light sequence to use a second **Pi-Stop** fitted in **Location B** so you can control traffic at a junction?
**Location B for Model A+, B+ or Raspberry Pi 2 (purchased after July 2014)**
 **Location B for Model A or B (purchased before July 2014)**
 *If you want to try this, please ask for an extra Pi-Stop to use in your project.*
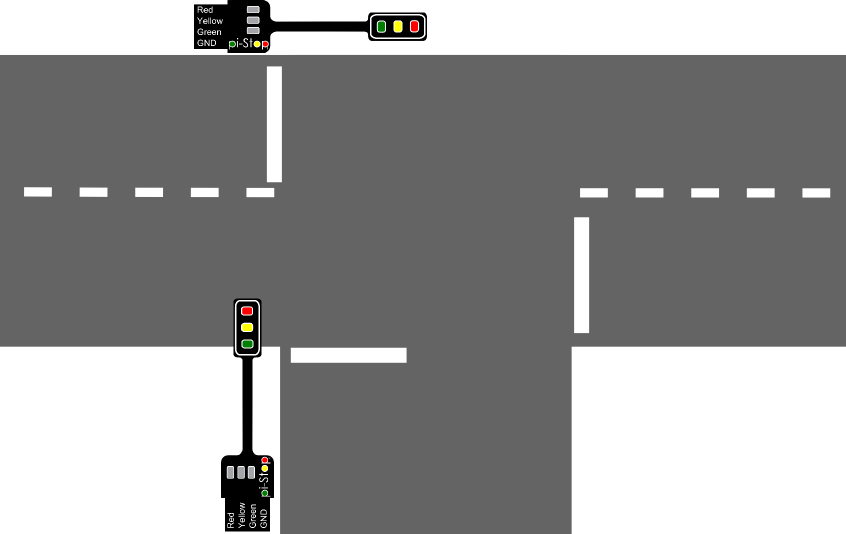 *Hint: You will need to create new **broadcast** blocks using the 2nd set of pins. Also, think about giving drivers time to react before the other set of lights turns GREEN!*
**WORKSHEET:** Tick the checkbox marked **"Extended Task: Controlled two Pi-Stops at the same time!"**
*The next guide is:*
[**Explore and Challenge Scratch GPIO: Pi-Stop Reaction Game**](ExploreScratchGPIO-PiStopReactionGame.md).