---
name: Setting up your first Bitcoin node
goal: Understanding, installing, configuring, and using a Bitcoin node
objectives:
- Understand the role and purpose of a Bitcoin node.
- Identify different hardware and software solutions available.
- Install and configure a full node (Bitcoin Core).
- Use Umbrel graphical interface and add useful applications.
- Connect a personal wallet to its own node.
- Explore advanced settings and best security practices.
---
# Become a sovereign bitcoiner
You're probably familiar with the adage "Not your keys, not your coins", which encourages self-custody of your bitcoins. Holding your own keys is indeed an essential first step, but it's not enough. To achieve true monetary sovereignty, you also need to install and use your own Bitcoin node. This course is designed to guide you through this fundamental step in your Bitcoin journey!
BTC 202 is an accessible course designed to teach you how to run your own Bitcoin node, even if you’re not a technical expert. We’ll start by defining what a Bitcoin node is, what it does, and why it’s absolutely essential to run one yourself. I’ll then guide you step by step through choosing your hardware, installing the necessary software, connecting your wallet application, and performing advanced optimizations if you want to go further.
Running a Bitcoin node is not just an option for experts; it's a necessity. It's a resilience tool that every user needs to understand and implement. This course is your starting point to becoming a sovereign bitcoiner!
+++
# Introduction
fc46ccd7-5d6d-40c3-9e9f-fbbb323c760a
## Course overview
916b1f86-38a4-4ede-bdb7-83841d5a7abe
Welcome to BTC 202, where you'll learn how to install, configure, and use a Bitcoin node easily and independently. But that's not all: you'll also learn more about the place and function of nodes in the Bitcoin system. The course alternates between theoretical explanations and guided hands-on practice.
### Part 1 - Introduction
In this first part of the course, we will clarify the basic notions and then proceed to more precise definitions. What is a node? What are the differences between a node, a wallet, and a miner? You'll then learn about Bitcoin Core and the protocol's implementations. The aim is to speak the same language, avoid confusion, and establish a solid theoretical foundation.
### Part 2 - Becoming a sovereign bitcoiner
In the second part, I'll start by explaining why it's important to run your own Bitcoin node. We'll then explore the different types of nodes that exist (complete, pruned, SPV...), how they work, and their technical implications.
We'll then provide you with an overview of the software available to run a Bitcoin node, including its advantages and disadvantages. Finally, we'll conclude with some very practical recommendations for choosing the right hardware for your needs and budget.
This section, therefore, illustrates the path of the sovereign bitcoiner: understand why it's necessary to run a node, choose the type of node, based on this choice, select the software, and, depending on the software chosen, determine the appropriate hardware.
### Part 3 - Installing a Bitcoin node easily
Once this preparation is complete, it's time to get practical with Part 3 devoted to Umbrel: the home cloud OS that simplifies self-hosting and the installation of a Bitcoin and Lightning node.
After a brief introduction to Umbrel, we'll provide a detailed tutorial to guide you through the installation and configuration process on your own DIY machine. The aim of this part is clear: to have your first fully functional and synchronized Bitcoin node.
### Part 4 - Connecting your wallet to your node
Now that you've set up a Bitcoin node, it's time to use it! In this section, you'll learn how to connect your wallet management software (like Sparrow wallet) to your own address indexer (Electrs or Fulcrum), or directly to Bitcoin Core, so you're no longer dependent on public servers.
We'll also examine the role of indexers and the various methods of connecting to your node (LAN, Tor, Tailscale, etc.). Finally, in the last chapter, we'll review the most useful applications available on Umbrel for the everyday bitcoiner.
### Part 5 - Advanced concepts and best practices
In this final part of BTC 202, the aim is to deepen your knowledge. First, we'll look at the best practices to adopt with your new Bitcoin node and how to maintain it over the long term.
We'll then take the time to review some of the theory covered earlier in the course, including understanding the IBD process and peer discovery in detail, exploring the anatomy of a node, and finally learning how to use the `bitcoin.conf` file to fine-tune your settings.
### Part 6 - Final section
As with all Plan ₿ Academy courses, in the final section, you'll find a final exam to test your knowledge of Bitcoin nodes.
So, are you ready to turn on your first Bitcoin node? Set a course for sovereignty!
## What is a Bitcoin node?
0a9fd4e0-94ab-405e-924c-023397393027
As described by its creator, [Satoshi Nakamoto](https://planb.academy/resources/glossary/nakamoto-satoshi), Bitcoin presents itself as a [peer-to-peer](https://planb.academy/resources/glossary/peertopeer-p2p) electronic cash system. This simple sentence, which is the title of the [White Paper](https://planb.academy/resources/glossary/white-paper), holds many clues to the nature of Bitcoin:
- First of all, Satoshi describes Bitcoin as a "system", in other words, a coherent set of hardware and software components that interact to provide a specific service or perform a specific function;
- Next, he explains that this system enables the use of electronic cash, i.e., a form of intangible currency;
- Finally, he points out that this system is not dependent on any central entity: it is "peer-to-peer", meaning that it is the users themselves who operate the system.
Since Bitcoin is a system, it must necessarily be run on computers. And, because of its peer-to-peer nature, it's the users themselves who take responsibility for running these machines. What we call a "[Bitcoin node](https://planb.academy/resources/glossary/node)" is precisely that computer on which software implementing the Bitcoin protocol (like [Bitcoin Core](https://planb.academy/resources/glossary/bitcoin-core), but we'll come back to that later) is running. This is what enables Bitcoin to operate without a central authority: validation is carried out in a [distributed](https://planb.academy/resources/glossary/distributed) way, by thousands of independent machines belonging to thousands of users.

Nakamoto, S. (2008). *Bitcoin: A Peer-to-Peer Electronic Cash System*. https://Bitcoin.org/Bitcoin.pdf
It is precisely these users who ensure Bitcoin's security. As Eric Voskuil explains in his book *Cryptoeconomics*, the security of Bitcoin relies neither on [blockchain](https://planb.academy/resources/glossary/blockchain), nor on [hashing power](https://planb.academy/resources/glossary/hashrate), nor on validation, decentralization, [cryptography](https://planb.academy/resources/glossary/cryptography), [open source](https://planb.academy/resources/glossary/foss), nor game theory. The security of Bitcoin depends primarily on the individuals who are willing to expose themselves to personal risk. Decentralization allows this risk to be spread over a large number of individuals, and it is only their ability to resist that ensures the system's robustness.
This principle is easy to understand: if Bitcoin depended on a single node owned by a single person, imprisoning that person would be enough to shut down the network, since they alone would assume all the risks. With tens of thousands of nodes spread around the world, the risk is disseminated: each of these operators would have to be neutralized to shut down Bitcoin.

We can thus distinguish and name several concepts to clarify things for the rest of this course:
- Bitcoin currency: the unit of account used for [transactions](https://planb.academy/resources/glossary/transaction-tx) within this system;
- The Bitcoin network: the set of all connected nodes;
- Bitcoin nodes: machines running an [implementation of Bitcoin](https://planb.academy/resources/glossary/bitcoin-implementation);
- Bitcoin implementations: software that translates the protocol into executable instructions;
- Bitcoin protocol: the set of rules governing the system's operation;
- The Bitcoin system: the coherent combination of all these elements.
### The role of the Bitcoin node
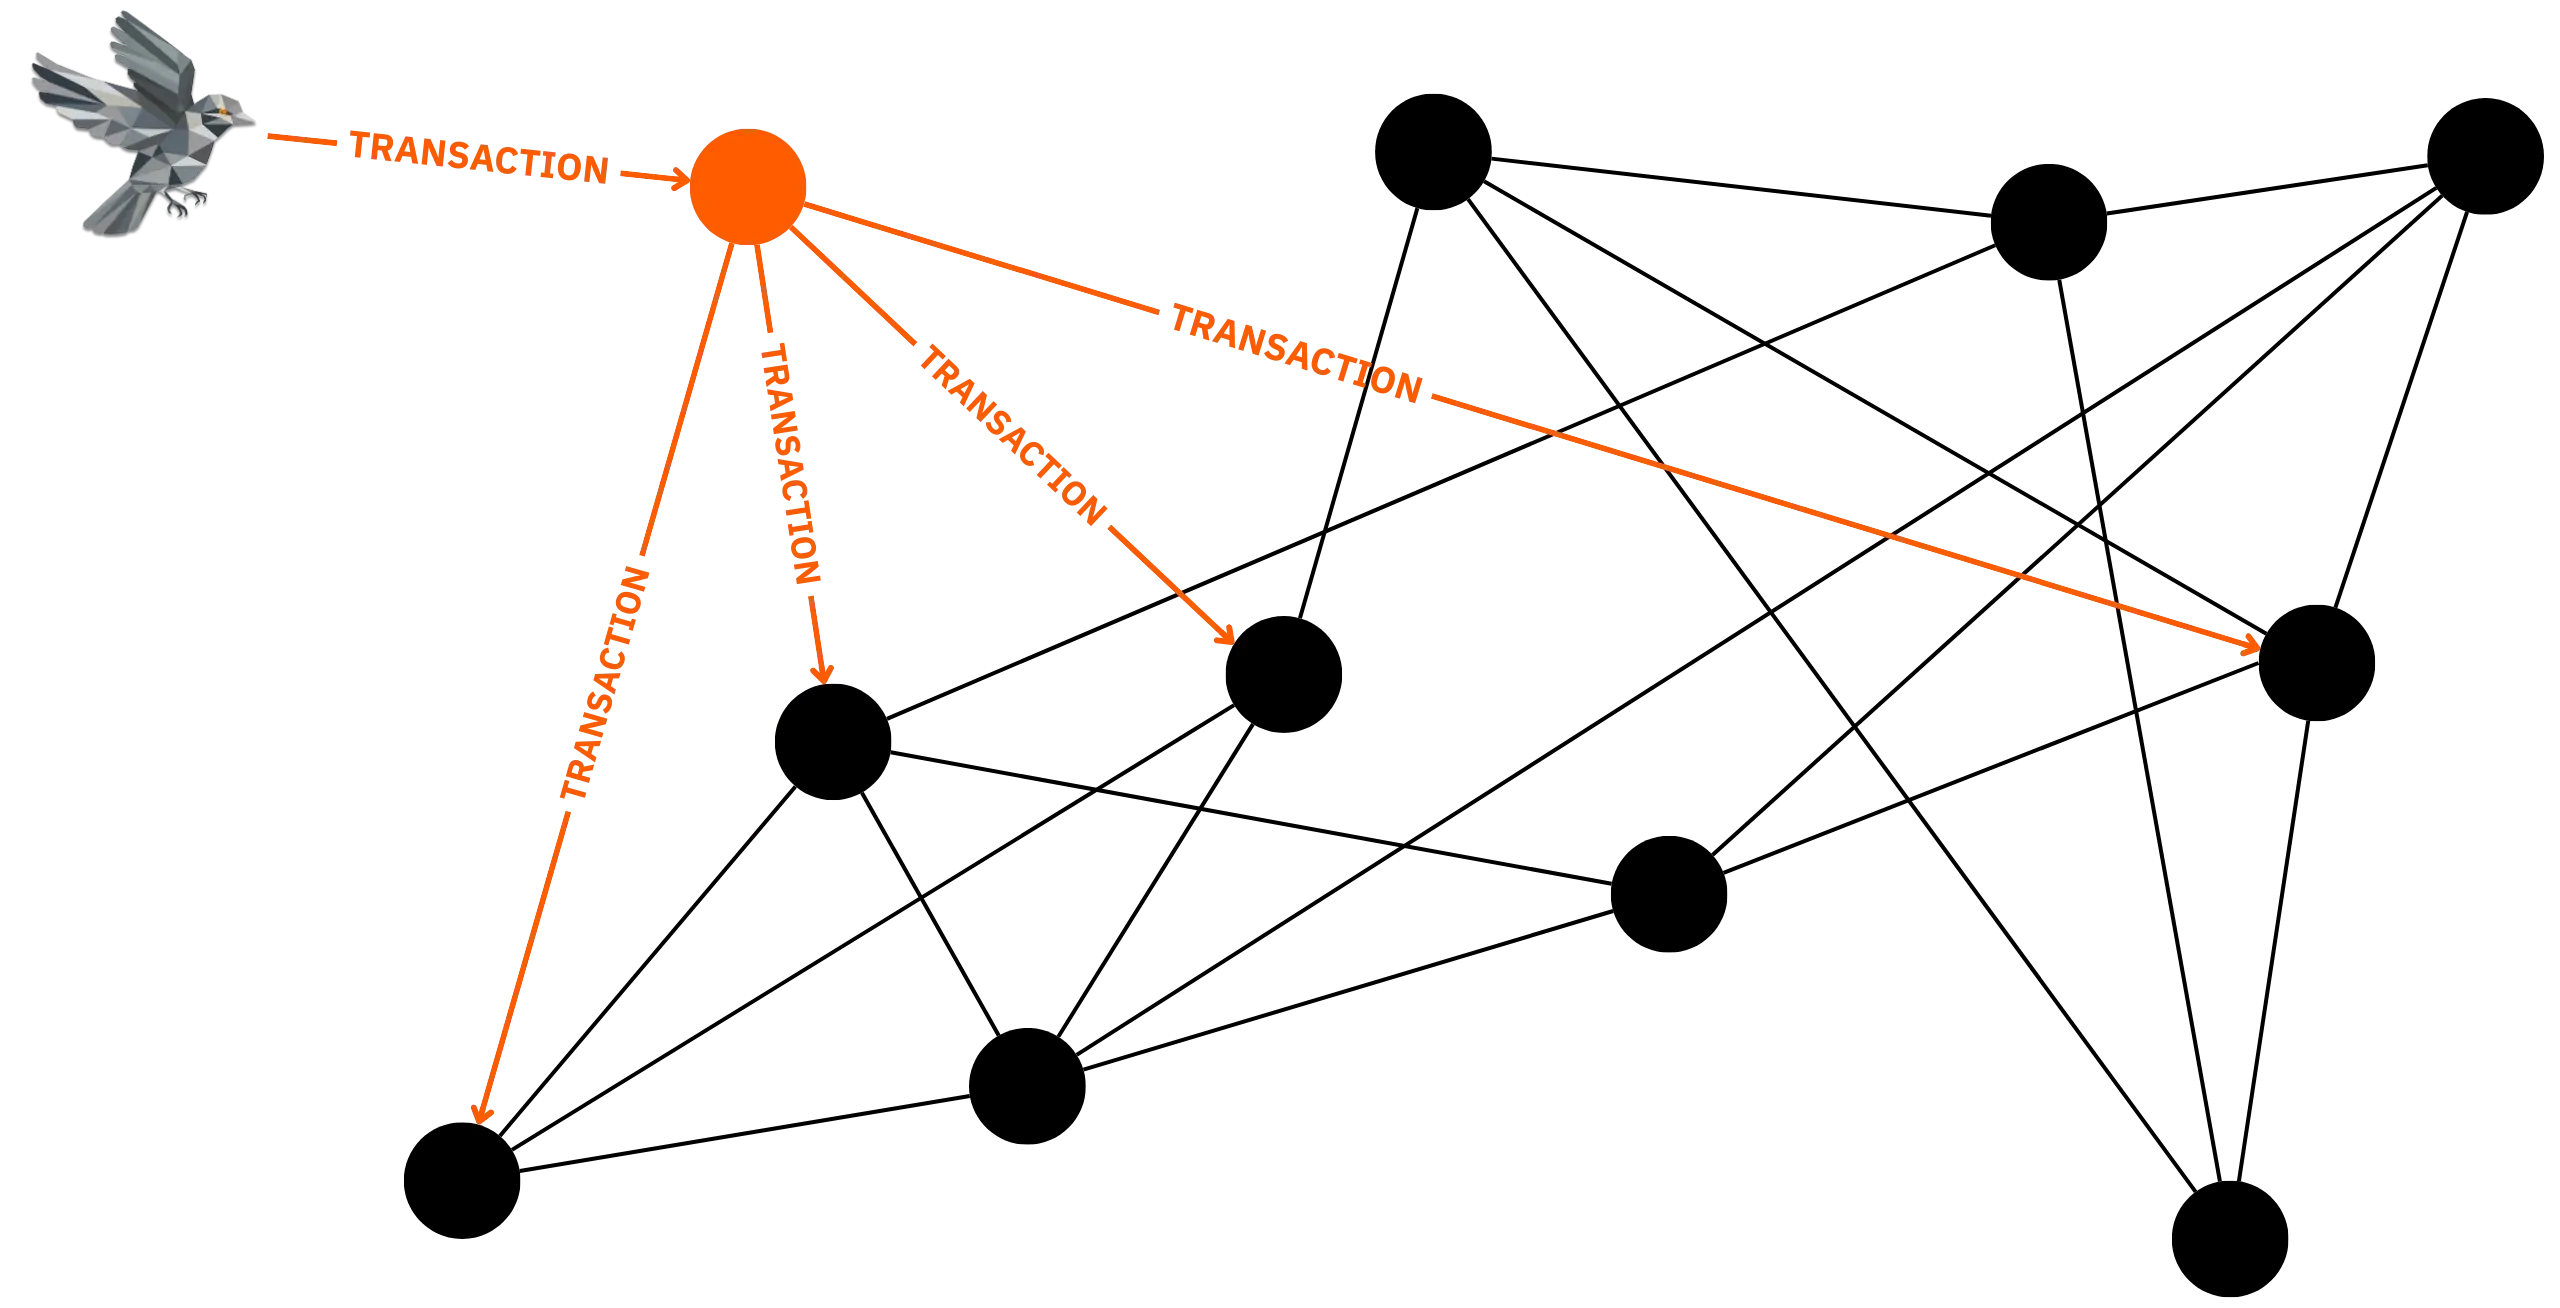
The Bitcoin nodes together form what is known as the Bitcoin network. They enable the entire system to operate autonomously, without recourse to a central authority or hierarchy of servers.
From the outset, Bitcoin was designed to allow each user to run a personal node. This case remains valid with today's Bitcoin Core software, which combines the roles of [wallet](https://planb.academy/resources/glossary/wallet) and node. But nowadays, this function is often dissociated: many modern Bitcoin wallets are just wallets that connect to external nodes (owned by the same person or not).
### Keep blockchain
The first task of a node is to maintain a local copy of the blockchain. To prevent [double-spending](https://planb.academy/resources/glossary/double-spending-attack) on Bitcoin without involving a central authority, each user must check that no transaction exists in the system. The only way to be sure of this is to know all the transactions made on Bitcoin. For this reason, all transactions are [time-stamped](https://planb.academy/resources/glossary/timestamp) and grouped into [blocks](https://planb.academy/resources/glossary/block), and each node stores the entire blockchain.
> The only way to confirm the absence of a transaction is to be aware of all transactions.
Nakamoto, S. (2008). *Bitcoin: A Peer-to-Peer Electronic Cash System*. https://Bitcoin.org/Bitcoin.pdf
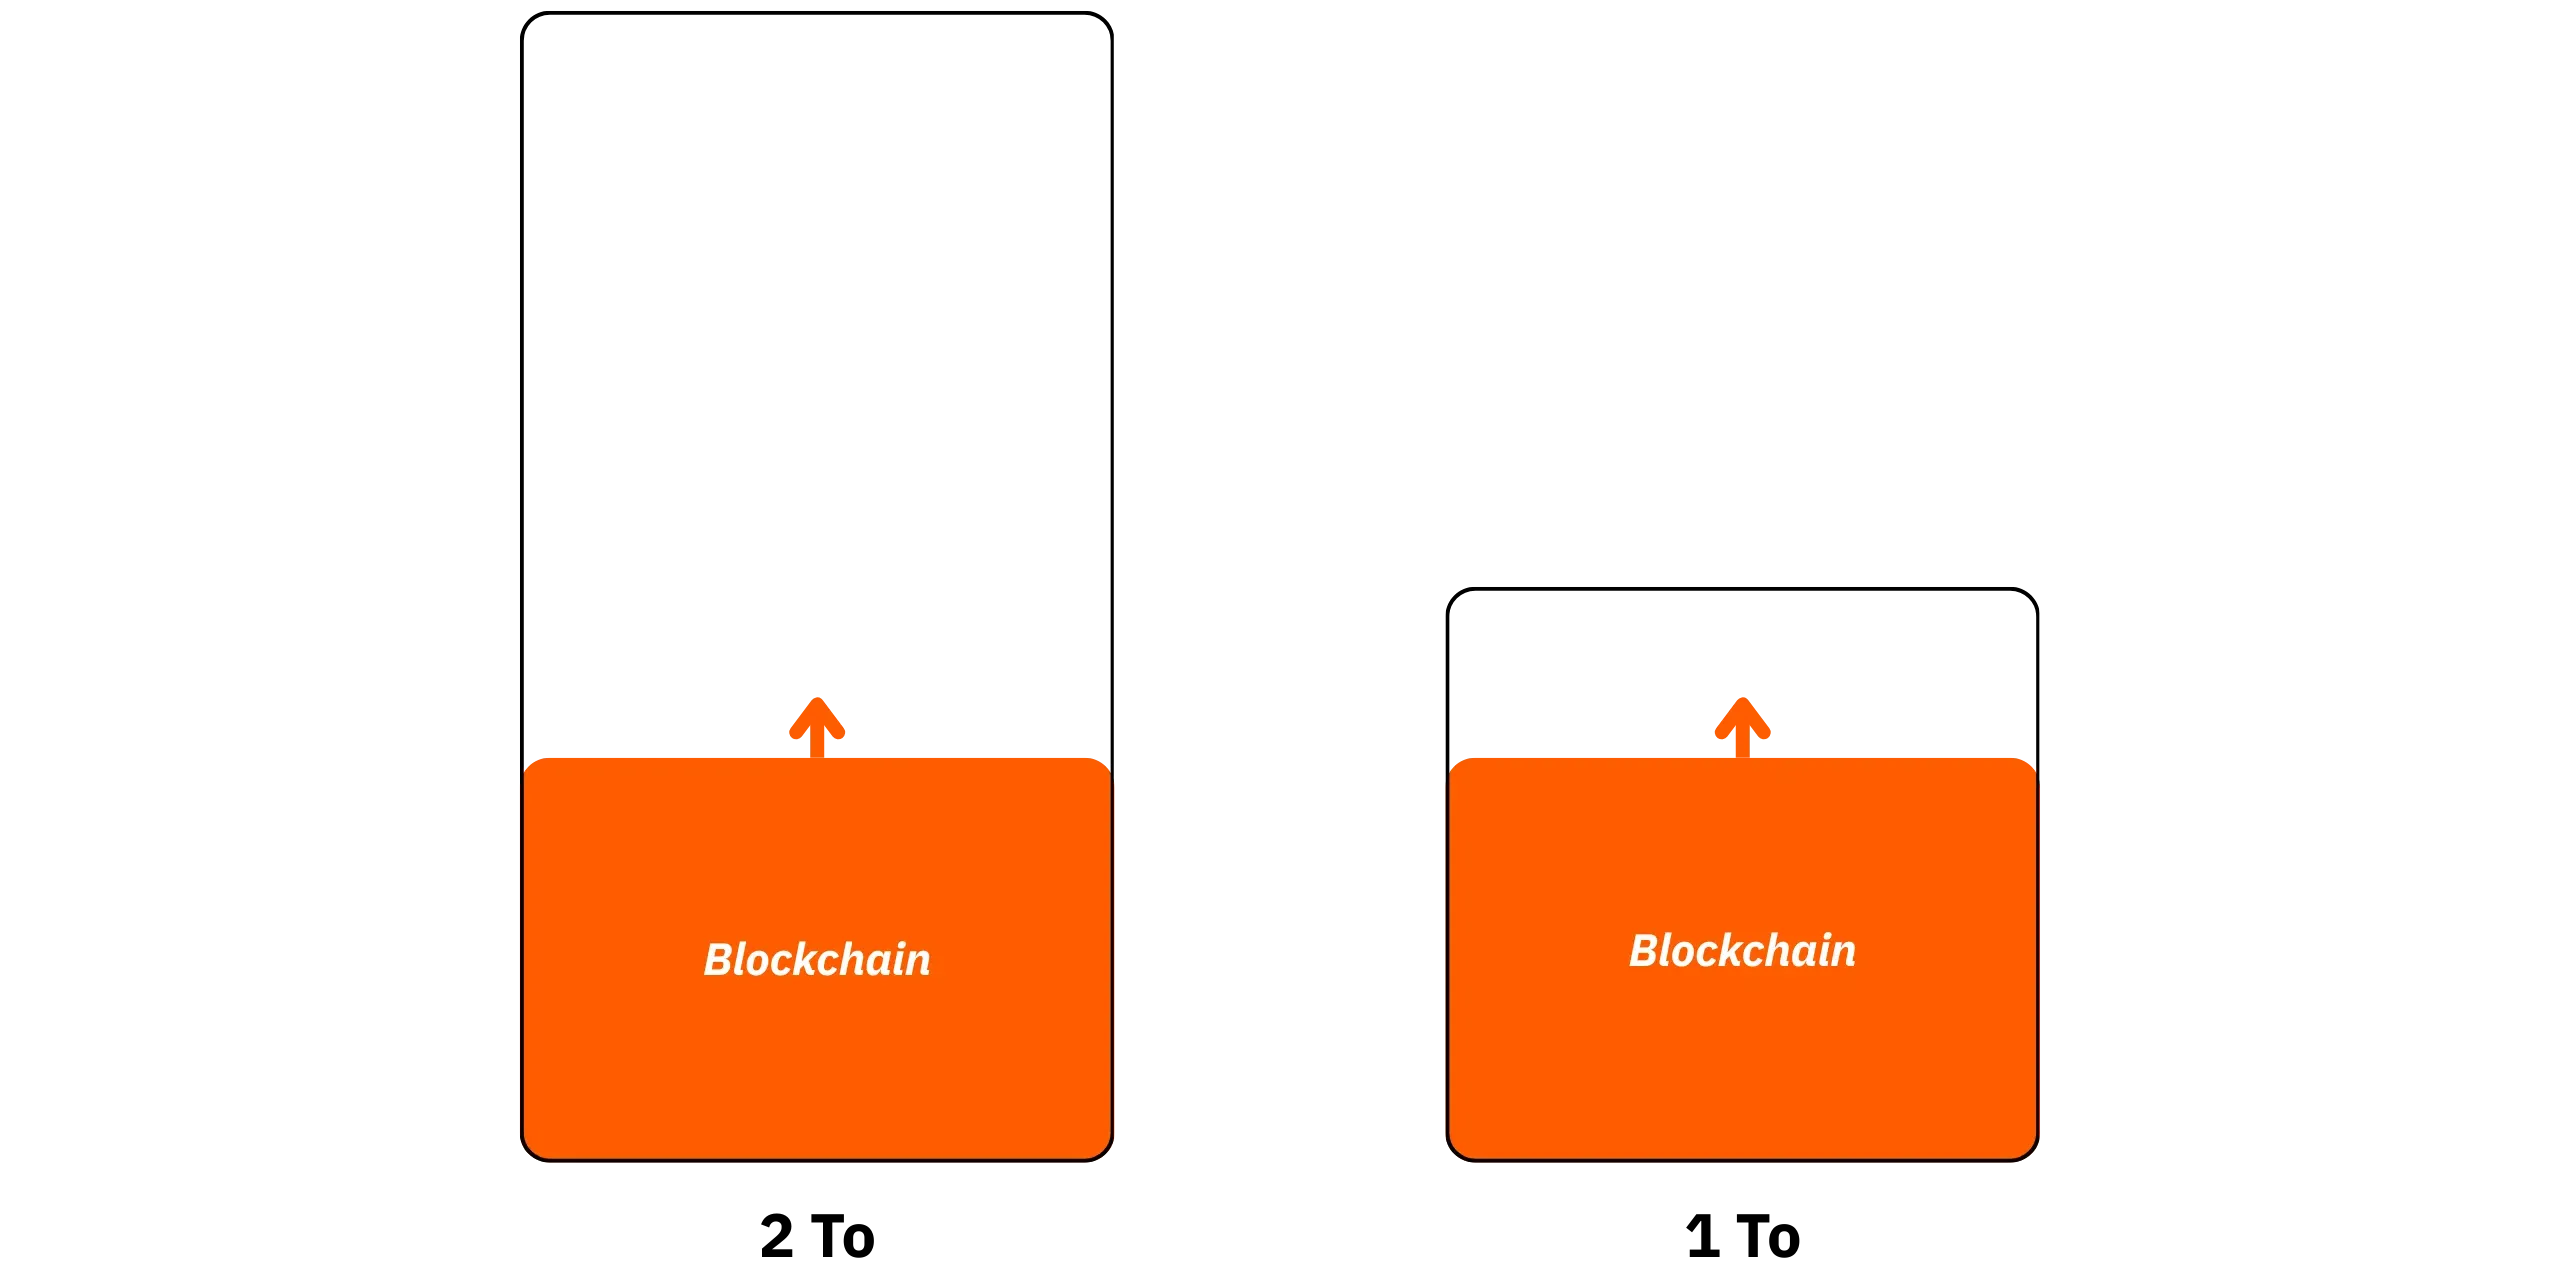
Blockchain is therefore an evolving register: each time a new block is published by a [miner](https://planb.academy/resources/glossary/miner), the node checks its validity before adding it to its own local copy of the chain. As of today (July 2025), the complete blockchain exceeds 675 GB, and this size continues to grow, as a new block is added on average every 10 minutes.

The node also maintains a local record of all [UTXOs](https://planb.academy/resources/glossary/utxo) in existence at any given time, known as the **[UTXO set](https://planb.academy/resources/glossary/utxo-set)**. This database contains all the unspent bitcoin fragments. We revisit this subject in detail in the final part of the course.
### Verify and distribute transactions
The second role of a node is to ensure the verification and propagation of transactions. When a new transaction reaches the node (either via wallet software or another node), it will check that it complies with a set of rules ([consensus rules](https://planb.academy/resources/glossary/consensus-rules) and [relay](https://planb.academy/resources/glossary/relay) rules). For example:
- spent bitcoins must exist in its UTXO set (the database of unspent [outputs](https://planb.academy/resources/glossary/output));
- the [signature](https://planb.academy/resources/glossary/digital-signature) must be valid, and all spending conditions must be met (valid [script](https://planb.academy/resources/glossary/script));
- the total amount of outputs must not exceed the total amount of [inputs](https://planb.academy/resources/glossary/input), which means that [costs](https://planb.academy/resources/glossary/transaction-fees) cannot be negative.

After validation, the transaction is stored in the node's [mempool](https://planb.academy/resources/glossary/mempool), a temporary memory space reserved for unconfirmed transactions, and then relayed to the other network peers to which it is connected. This distribution and validation mechanism continues from node to node. In this way, the transaction is propagated across the Bitcoin network, and each node stores it in mempool until it is included in a valid block by a miner, who then acts on its first [confirmation](https://planb.academy/resources/glossary/confirmation).
### Check and distribute blocks
The third role of the node involves managing mined blocks. When a miner discovers a new block with a valid [proof of work](https://planb.academy/resources/glossary/proof-of-work), it is [broadcast](https://planb.academy/resources/glossary/diffusion) on the network. The nodes receive it, check that it conforms to all the protocol rules, and then integrate it into their own local copy of the blockchain if it is valid. As with transactions, newly validated blocks are then relayed to all peers connected to the node. This process continues until all nodes on the Bitcoin network are aware of the new block.

## What's the difference between a node and a wallet?
de5af634-a628-4b90-b869-468c208e178b
It's essential to distinguish between two distinct types of software when using Bitcoin: the node and the wallet.
A Bitcoin node, as mentioned above, is a piece of software that actively participates in the peer-to-peer network. It performs three main tasks:
- backup of blockchain,
- transaction validation and relay,
- block validation and relay.
A Bitcoin wallet, on the other hand, is a piece of software designed to store and manage your private keys. These keys enable you to spend your bitcoins by satisfying the locking scripts (typically through a signature). A wallet can connect to a node (whether local or remote) in order to consult the status of the blockchain and broadcast the transactions it builds, but it is not, as such, a participant in the network.
In some cases, these two functions coexist within the same software, as is the case with Bitcoin Core, which serves as both a [full node](https://planb.academy/resources/glossary/full-node) and a wallet. However, many popular wallet programs (Sparrow, Bluewallet, etc.) require a connection to an external node (whether your own or a third party's) to broadcast transactions and determine the wallet balance.

## What's the difference between a node and a miner?
d2992614-7ab7-4bf9-81b1-f548cda67257
The notions of node and miner are often confused. Yet these two elements perform radically different functions within the system.
Initially, when Bitcoin was launched by Satoshi Nakamoto in 2009, every user was expected to participate in the network as a whole. Thus, the original Bitcoin software combined several functions at once: it acted as a wallet, a node, and also as a miner, capable of generating new blocks. At the time, the difficulty of mining was very low. All you had to do was run the Bitcoin software on your computer to find blocks and receive bitcoins as a reward.
However, with the gradual popularization of Bitcoin and the increase in the number of miners, the competitive landscape in mining has undergone a radical shift. Today, mining has become an extremely competitive activity, dominated by industrial players equipped with specialized infrastructures. The power required to mine a new block is now so great that it is virtually impossible for an individual user to achieve this using only a conventional computer. As a result, mining is now primarily carried out using specialized machines called [ASICs](https://planb.academy/resources/glossary/asic) (*Application-Specific Integrated Circuits*). These chips are optimized exclusively to run double [SHA-256](https://planb.academy/resources/glossary/sha256), the algorithm used for mining on Bitcoin.

In the face of this evolution, the roles of the Bitcoin node and the miner have become clearly distinct. As shown above, the role of a Bitcoin node is purely informational and validation-based. The role of the miner is different:
- It selects pending transactions in the mempool.
- It builds a candidate block integrating these transactions.
- He searches by trial and error for a valid proof of work.
- If it finds a valid proof, it broadcasts the block via its node to the other nodes.
A miner needs a Bitcoin node to interact with the network.
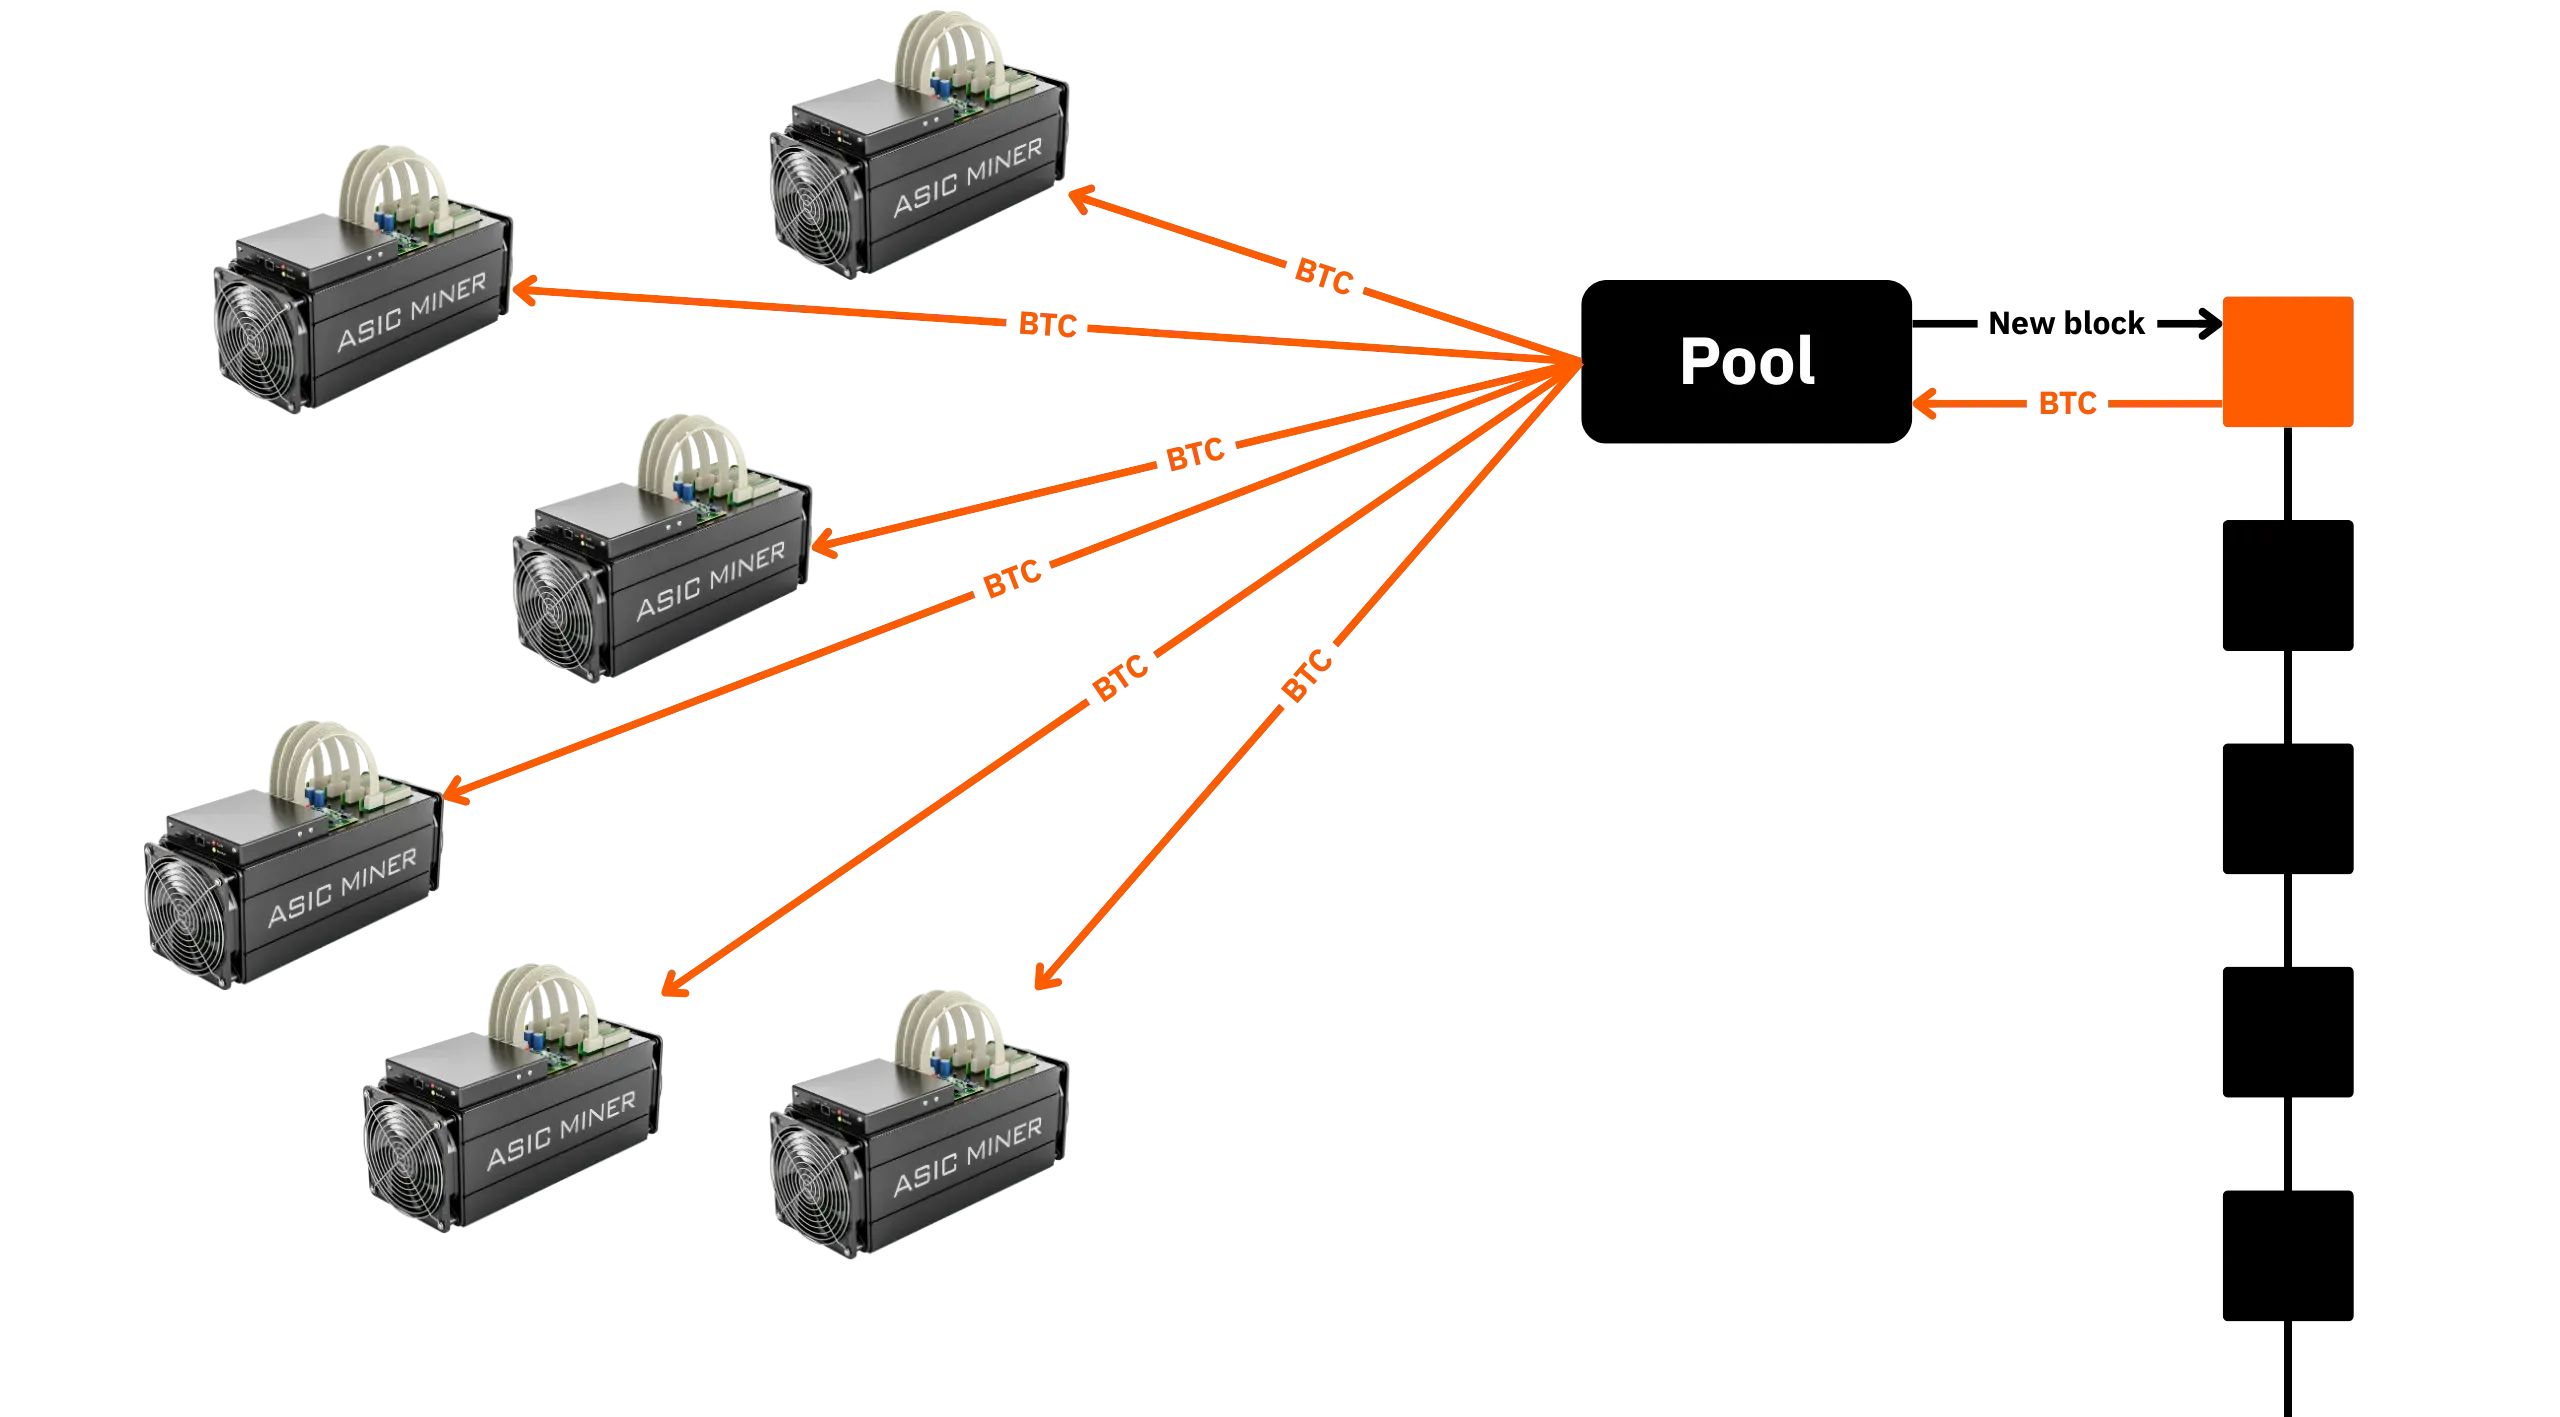
Sometimes we also differentiate the role of the miner from that of the hasher. A hasher is a machine whose task is to hash template blocks provided by the server of a [pool](https://planb.academy/resources/glossary/pool-mining), searching for hashes that meet the defined difficulty target for shares, rather than that of Bitcoin. The rest of the mining process, which includes the actual construction of blocks, transaction selection, or searching for proof of work according to the specific difficulty of Bitcoin, as well as broadcasting, is performed directly by the pools.
Finally, there is an important difference in terms of economic incentive between the miner and the node. Running a Bitcoin node provides no direct monetary benefit. On the other hand, taking part in mining brings rewards (subsidies and transaction fees) for every block found.
In Part 2, we'll explore in more detail the practical and personal benefits of installing and using a Bitcoin node, beyond the purely financial.
## Bitcoin Core and protocol implementations
72381876-9317-4faa-8d41-2b252a945b8a
The Bitcoin protocol is not software: it is a set of tacit rules shared between network users. It defines transaction validity conditions, money creation mechanisms, block format, proof-of-work conditions, and many other specifications. To interact with this protocol, users must run software that implements these rules: this is known as an **implementation** of Bitcoin.
An implementation is therefore node software: a program capable of interfacing with other machines on the Bitcoin network, downloading, verifying, storing, and propagating blocks and transactions, and locally enforcing consensus and relay rules. Each implementation is a concrete interpretation of the protocol, written in a given programming language, with its own architecture, performance, and ergonomics. Each implementation will also have its own development organization, with its own division of responsibilities.
Among these implementations, one dominates by far: **Bitcoin Core**.

### A historic implementation that has become a benchmark
Bitcoin Core is the reference software for the Bitcoin protocol. It is derived from the original code written by Satoshi Nakamoto in 2008-2009, and is a direct continuation of it. Initially known as "*Bitcoin*", then "*Bitcoin QT*" (due to the addition of a graphical interface via the Qt library), it was renamed "*Bitcoin Core*" in 2014 to clearly differentiate the software from the network. Since version 0.5, it has been distributed with two components: `Bitcoin-qt` (the graphical interface) and `bitcoind` (the command-line interface).
In theory, Bitcoin Core does not represent the Bitcoin protocol; rather, it is just one implementation among many. It is, however, distinguished by its massive adoption, its age, the robustness of its code, and the rigor of its development process. Consequently, in practice, the rules applied by Bitcoin Core are de facto those of the Bitcoin protocol: users, developers, miners, and ecosystem services refer to it almost exclusively.
### Current distribution of implementations
According to [data collected in August 2025 by Luke Dashjr](https://luke.dashjr.org/programs/Bitcoin/files/charts/software.html) (a well-known developer in the ecosystem), the distribution of implementations among the network's public nodes is as follows:
- **Bitcoin Core**: 87.3% of nodes
- **Bitcoin Knots**: 12.5
- **Other cumulative implementations**: 0.2% (btcsuite, Bcoin, BTCD...)

In other words, around 9 out of 10 public nodes are running Bitcoin Core. The rest of the network relies on more marginal clients (although Knots' share has risen sharply in recent months, not least in the wake of debates over the `OP_RETURN` size limit). These alternative implementations are often maintained by a single person or a small team.
**Note:** These figures are still estimates, however, as they are based primarily on *listening nodes*, i.e., nodes accepting incoming connections (with port 8333 open). Non-listening nodes* are much more complex to count, since it's impossible to connect to them directly: you have to wait for the initiative to come from them, in the form of an outgoing connection. Luke Dashjr's site claims to be trying to count these *non-listening nodes* too, but it remains impossible to obtain perfectly accurate data about them, and the updating of these statistics inevitably lags behind reality.
### Internal operation of Bitcoin Core
Bitcoin Core is software written in C++. It is also an open-source project maintained by a community of developers who are either volunteers or funded by various entities (often companies within the ecosystem that have an interest in ensuring that Core development proceeds favorably). [The code is hosted on GitHub](https://github.com/bitcoin/bitcoin), and development follows a rigorous model:
- **Contributors** submit proposals in the form of _pull requests_ (PR). In principle, anyone can propose a change, but it must be tested, documented, and go through a peer review process.
- The **maintainers** have the right to approve and merge PRs. They are the ones who guarantee the coherence and stability of the project. In July 2025, there are five of them: Hennadii Stepanov, Michael Ford, Andrew Chow, Gloria Zhao, and Ryan Ofsky.
- There has been no **principal maintainer** since February 2023. This role was initially held by Satoshi Nakamoto at the launch of Bitcoin, then by Gavin Andresen following Nakamoto's departure in early 2011, and finally by Wladimir J. Van Der Laan from 2014 to 2023.
The development of Bitcoin Core follows a meritocratic logic: new contributors are encouraged to review and test the code before proposing any changes themselves. Decisions are based on technical consensus, and major modifications (particularly in areas of consensus) require upstream discussions on public channels, such as mailing lists or PR review clubs.
### Other Bitcoin implementations
Although marginal in terms of adoption, other clients do exist. The main one is Bitcoin Knots, developed by Luke Dashjr, a Fork of Bitcoin Core that incorporates additional options and a more conservative approach to development. These include tighter restrictions on transaction formats.

We can also mention:
- **Libbitcoin**: a modular C++ library developed by Amir Taaki and maintained by Eric Voskuil;
- **Bcoin**: a JavaScript implementation, no longer actively maintained;
- **BTCD/btcsuite** : an implementation in Go.
These projects contribute to the diversity of the ecosystem, but their adoption remains very limited, making it difficult for Bitcoin Core to evolve independently.
### The power of Core developers
You might think that Bitcoin Core developers have direct control over Bitcoin, but this is not the case. They can't impose a change to the protocol. Their role is to propose code. It's up to each user, via their node, to decide whether or not to use this code.
This means that if a change in Bitcoin Core does not meet consensus, it can be ignored by the nodes, either by not updating Bitcoin Core or by simply changing the implementation. Conversely, if a feature desired by users is blocked in the Core development process, it is always possible to switch to another implementation or fork the project.
As we'll discuss later in this course, it's the nodes, according to their economic weight (i.e., the merchants), that confer utility on a version of the protocol (and therefore on the corresponding currency), by accepting units that respect its rules. The real power of governance over Bitcoin, therefore, lies with these merchants, not the developers.
# Becoming a sovereign bitcoiner
df64cad2-e92d-4949-9cca-14394aad0bc6
## Why run your own node?
39c0cd19-67f9-4c64-bfb3-dbd6eec0bf42
There's a widely held belief that operating a Bitcoin node is a purely altruistic act, with no personal gain, solely in the service of network decentralization. Some consider it a form of duty for bitcoiners to support the system and show their gratitude to Bitcoin.
As we have emphasized in previous chapters, running a node does not provide any direct financial gain. One might therefore think there is no personal benefit in doing so. However, operating your own node brings many individual advantages. To convince you of this, I will present in this chapter all the reasons—both technical and strategic—that should encourage you to install and use your own Bitcoin node.
### More confidential dissemination of transactions
When wallet software connects to an external node, it transmits its transactions to an infrastructure that is not under your control. This generates obvious risks of surveillance: the operator of the remote node can analyze the details of your transactions, including amounts and frequencies, and, by cross-checking certain metadata (such as IP addresses, times, and locations), potentially associate them with your identity.
Indeed, as pointed out in a previous chapter, wallets don't communicate with the Bitcoin network by magic; they must connect to a node in order to consult balances or broadcast transactions. If you've never set up your own node, this means that your wallet depends on the infrastructure of a third party (usually the company behind the software). This third party, especially if it's a company, may observe, exploit, or even disclose this data: whether for commercial reasons, under legal constraint, or as a result of piracy.
By using your own node, you broadcast your transactions directly to the network, bypassing intermediaries. Provided you secure your node properly (which we'll discuss later) or comply with certain standards, no information is exposed: neither your IP address nor the details of your transactions pass through an entity you don't control. This is a basic prerequisite for preserving your confidentiality on Bitcoin.
https://planb.academy/courses/65c138b0-4161-4958-bbe3-c12916bc959c
### Non-censurable transactions
For the same reasons mentioned above, wallet software based on a third-party node is vulnerable to censorship risk: the operator of the remote node may refuse to relay certain transactions for various reasons. It may consider them suspicious or contrary to its policy. The transaction may also be blocked if it does not comply with the node's relay rules. Finally, the operator may specifically target your IP address to block the broadcast of your transactions.
Conversely, by using your own node, you ensure the propagation of your transactions within the peer-to-peer network. This means you retain total control over the distribution of your transactions, with no dependence on an intermediary. As long as the transaction complies with the consensus and relay rules of the nodes connected to yours, it will be broadcast on the network and then, provided sufficient fees are included, integrated into a block by a miner. Having your own node guarantees neutral, permission-free confirmation of your transactions.
### Independent data verification
Without a personal node, you remain dependent on a third party for access to information, such as your address balance, transaction confirmation status, and block validity. This implies implicit trust in the accuracy and integrity of the external node.

Running a full node means you can check all the protocol rules yourself, for every transaction and every block. As a result, the balance displayed by your wallet is not data received from a remote server, but a result calculated locally from a complete copy of the blockchain, validated block by block. This approach gives full meaning to the bitcoiners' maxim:
> Don't trust, verify.
### Better distribution of system security
Each node that joins the network reinforces Bitcoin's redundancy and resilience. It facilitates the dissemination of information and enables new peers to connect with each other. Without the nodes, the system would simply be inoperable.
As we have seen, Bitcoin's security is not based on decentralization, mining, or cryptography: as with any system, it relies on individuals. More precisely, it depends on the ability of node operators to resist coercion.
What distinguishes decentralized systems like Bitcoin is the distribution of risk among all those involved in their operation. Running your own Bitcoin node means accepting a share of this risk by ensuring the security of your instance; in doing so, you also lighten the burden of risk for other node operators.
So it's not a direct personal benefit: running a node makes you partly responsible for the network's security. Above all, it's a collective benefit, because your involvement helps to spread the risk. In turn, you increase your own ability to use Bitcoin reliably.
### Deepen your understanding of the system
Installing a full node is no trivial operation. It involves installing software, understanding basic operation, monitoring synchronization, examining logs in the event of problems, and even using the terminal. This will necessarily lead you to deepen your understanding of the protocol. This is an indirect, but not insignificant advantage.
Acquiring this knowledge strengthens your confidence in the tool and can reduce the risk of errors or exposure to scams. Running your own node also means learning.
### Choosing which rules to apply
An important aspect, often misunderstood, is that operating a node allows you to choose the rules you apply locally. There are two main types of rules:
- **Consensus rules**:
These are the fundamental rules of the Bitcoin protocol, ensuring the system's integrity and establishing the criteria for validating transactions and blocks. Any transaction that does not comply with these consensus rules can never be included in a valid block. For example, a transaction with an invalid signature on one of its entries will be systematically excluded.
Changing these rules is equivalent to changing the protocol, and therefore the currency ([Hard Fork](https://planb.academy/resources/glossary/hard-fork)). However, even without trying to modify them, the simple fact of strictly applying the existing rules confers a certain power: if a block violates the rules, the node immediately rejects it.
- **Relay rules**:
These are rules specific to each Bitcoin node, which are added to the consensus rules to define the structure of unconfirmed transactions accepted in the mempool and relayed to peers. Each node configures and applies these rules locally, which explains why they may differ from one node to another. They only apply to unconfirmed transactions: a transaction deemed "non-standard" by a node will only be accepted if it already appears in a valid block. Changing these rules does not exclude the node from the Bitcoin system.
For example, a transaction with no fees is, according to the consensus rules, perfectly valid, but it will be rejected by default according to the Bitcoin Core relay policy, because the `minRelayTxFee` parameter is set to `0.00001` (in BTC/kB). However, it is possible, on your own node, to lower this threshold to relay transactions with lower fees, or, conversely, to increase the limit, for example, to 2 Sats/vB, to avoid relaying low-fee transactions.
Spinning your own node means asserting: "I validate what I choose to validate, according to the rules I myself have adopted "*. You thus become an actor in the governance of the system, able to reject an evolution that seems unacceptable to you, or to approve an update according to your own criteria.
So we can quickly try to understand how much power you have over the rules thanks to your node. And the extent of this power will depend on the type of rule.
#### For relay rules
As far as relaying rules are concerned, the essential thing is simply owning a node, regardless of its economic activity. What's at stake here is whether or not you agree to relay certain types of transactions.
If, for example, you believe that transactions with fees of less than 1 sat/vB should be accepted on Bitcoin, you can adjust this rule on your node so that it broadcasts these transactions, thus facilitating their propagation on the network until a miner eventually includes them in a valid block. Essentially, then, it's a question of power over the dissemination of transactions: each node has decision-making power, since agreeing to relay a type of transaction is tantamount to promoting its acceptance on the Bitcoin network. As a result, if you operate several nodes, you have greater influence over the relay policy, as each node has its own connections and areas of impact on the network.
Indeed, having one or more nodes configured with specific relay rules means determining which part of the network accepts to propagate a given type of transaction. Spreading a message in a peer-to-peer graph, as is the case for Bitcoin transactions, follows the logic of percolation theory. Imagine each node as a site that can be active (`p` = it relays) or inactive (`1-p`). As soon as the proportion `p` crosses a critical threshold (`p_c`), a giant component emerges: the transaction manages to traverse the network and has every chance of reaching a miner. In a network like Bitcoin, where each node maintains an average of 8 outgoing connections, the `p_c` threshold is generally set at just a few percent, even lower if some nodes have a very large number of connections.
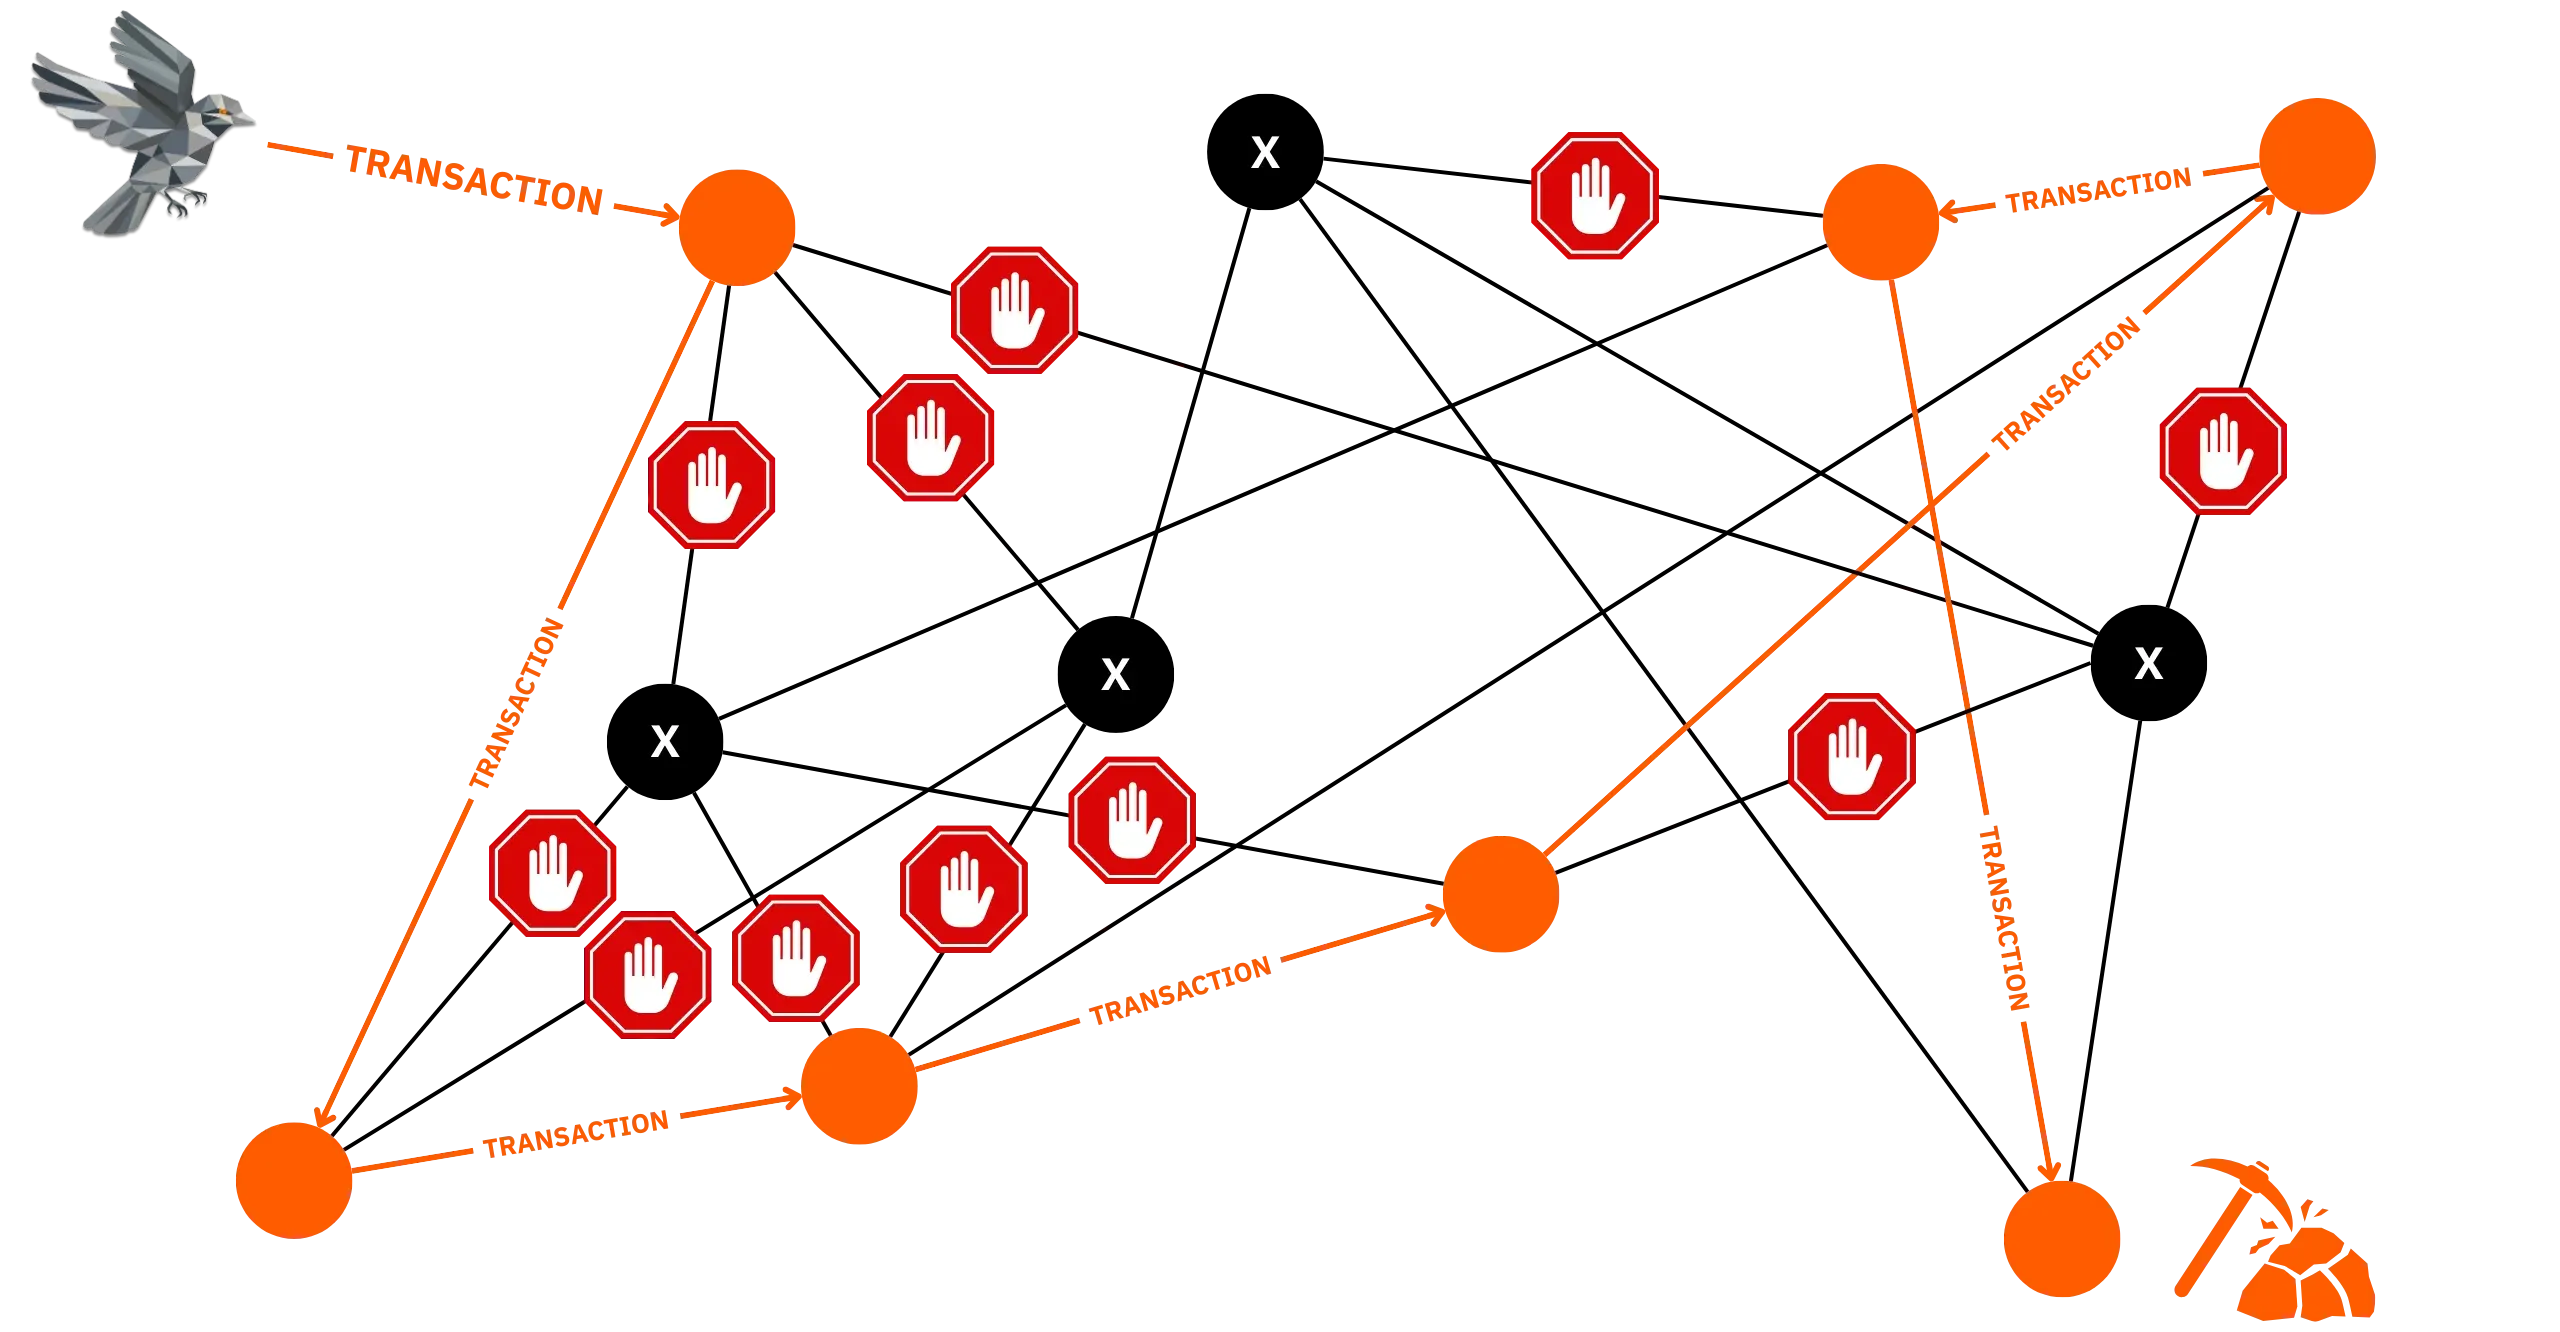
As long as `p` remains below `p_c`, a transaction remains confined to isolated pockets and does not reach a miner. As soon as this threshold is exceeded, it spreads almost instantaneously throughout the entire network.
Ultimately, it is always the miners who decide whether or not to include a transaction in a block. However, the nodes intervene upstream by influencing the distribution of transactions: they determine whether or not the miners will be aware of a given transaction. If a transaction is not relayed to the miners, it is obviously impossible for them to include it in a block.
Adding a few more nodes will therefore have only a marginal impact if the network is already in the percolation phase for a given type of transaction, but it can prove decisive as the percolation threshold approaches. Owning or influencing several nodes, especially if they are well-connected, can increase or reduce the value of `p` and, consequently, indirectly direct the relay rules that determine which transactions are seen and eventually accepted by miners.
#### For consensus rules
When it comes to your node's influence on the consensus rules, its economic weight is, above all, what will be decisive. This is a crucial concept: the value of any currency is directly related to its ability to facilitate exchange. Indeed, if an object is not accepted by anyone in exchange for goods or services, it theoretically has no monetary utility. For example, if no merchant accepts pebbles as a means of payment, they have no use as money. Of course, utility remains a subjective notion on an individual scale, but in a given territory, the greater the number of merchants accepting an object as a means of exchange, the more likely it is that this object has a monetary utility for the people living in this territory.
Let's take the example of a village where many merchants accept gold in exchange for goods: chances are that gold has a monetary utility for the villagers. This indicates that the utility of a currency depends directly on merchants' decisions to accept or reject it.
This concept is crucial for understanding the power dynamics at play in the Bitcoin system. Satoshi makes it clear: Bitcoin is an electronic cash system; in other words, it provides a service that offers a form of currency, Bitcoin (or BTC). When the protocol rules are modified in a way that is not backward compatible (Hard Fork), this amounts to creating a new system and therefore a new currency. The success or failure of this Fork then depends on the size of its economy, which in turn is determined by the number of merchants accepting this new form of currency.
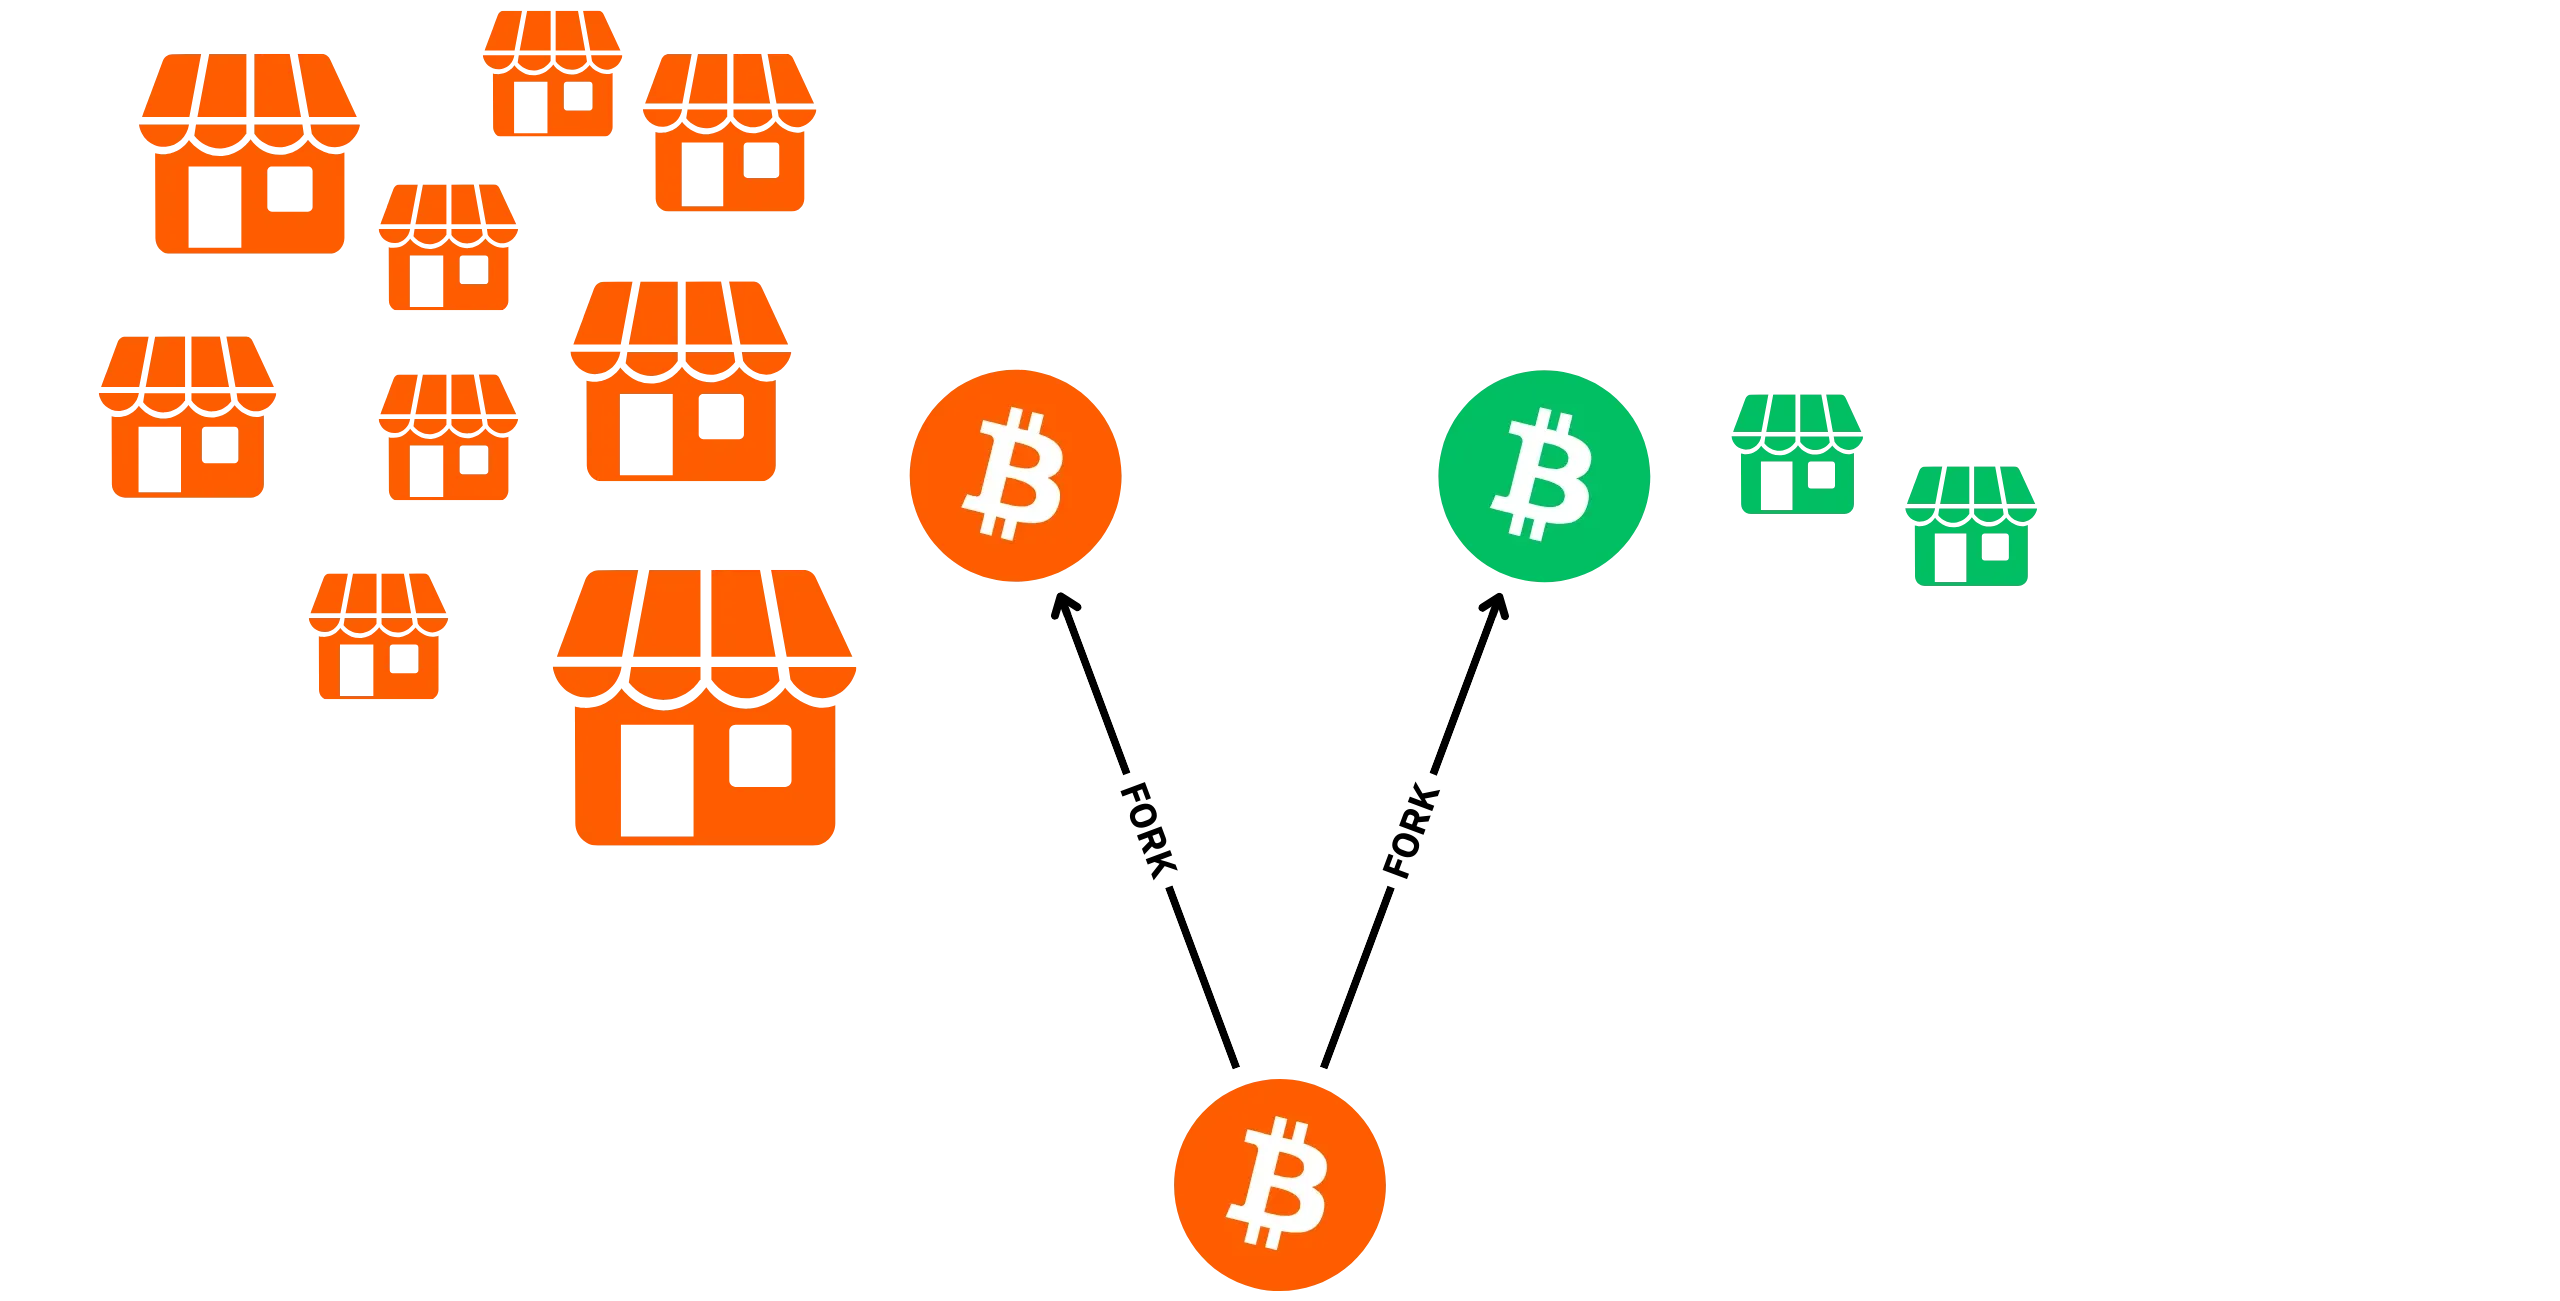
Let's take an example: let's suppose Bitcoin suffers a Hard Fork. There would then be 2 distinct forms of currency: BTC-1 (the original, unchanged version) and BTC-2 (the new currency with different consensus rules). If all the merchants who accepted BTC-1 continue to do so, but reject BTC-2, then the latter will, in theory, have very limited monetary utility. As a user, I would have no interest in keeping and using BTC-2, knowing that no merchant would want it in exchange for goods or services. Conversely, if 50% of merchants choose to accept BTC-2 exclusively and the remaining 50% take only BTC-1, then the utility of BTC-1 will, in theory, have halved. I use the term "in theory" because utility remains subjective at the individual level and depends on a multitude of factors (such as territory and consumption habits) that are difficult to comprehend on a case-by-case basis.
On Bitcoin, the role of "merchant", understood as any entity with a certain economic weight, of course includes businesses (physical stores, online sales sites, service providers, etc.), but also exchange platforms, since they accept Bitcoin in exchange for other currencies, and miners, since they accept Bitcoin via fees in exchange for the service of including a transaction in a block.
As far as consensus rules are concerned, your node allows you to direct your economic activity towards one currency or another. For example, if you have 10 full nodes at home, but no significant economic activity, your influence during a Fork will be almost nil. Conversely, a single node used to manage a chain of 200 stores accepting Bitcoin confers significant economic weight.
So it's not the number of nodes that matters, but the importance of the economic activity they support. What's more, if your economic activity depends on a node you don't control, its owner will decide what currency you use, as long as you remain connected to that node. This is why running and using your own node is particularly important in the context of system governance:
> Not your node, not your rules.
## The different types of Bitcoin nodes
be8f0baa-41f2-4b54-b011-092f4ccc93aa
A Bitcoin node is, therefore, a machine running an implementation of the Bitcoin protocol. Behind this common definition of nodes, several possible configurations exist, not all of which offer the same level of autonomy, resource consumption, and usefulness for the network. In this chapter, we'll attempt to understand these differences to help you choose a node architecture that suits your use and hardware constraints.
### The full node
A full node is simply a Bitcoin node that downloads the entire blockchain from the Genesis block, validates each block independently, and stores the history of all that blockchain locally. This is the "normal" form of a Bitcoin node, as imagined by Satoshi Nakamoto.

The full node doesn't need to trust anyone because it validates and knows all the information in the system. It's the type of node that gives you the most guarantees: you know, without relying on a third party, whether a payment is valid, whether a block is valid, whether a reorganization is legitimate, and so on.
In practice, a full node requires non-trivial resources, including several hundred gigabytes for block files, a processor capable of validating scripts, RAM for the mempool and caches, and stable bandwidth. The first synchronization (*[IBD](https://planb.academy/resources/glossary/initial-block-download-ibd)*) reads and verifies the complete history: it's intensive, but only happens once. A full node actively participates in the network, relaying blocks and transactions, and can accept incoming connections to assist other peers.
Depending on your needs, you can add an indexer to your full node. Bitcoin Core offers transaction indexing as an optional feature (deactivated by default), which can be useful for specific purposes. However, it doesn't include an address indexer, which is often the most sought-after feature for individual users. To remedy this, you can install dedicated software on your node, such as Electrs or Fulcrum, to speed up address balance verification queries from associated UTXOs. We'll come back to the role of the indexer in more detail in a separate chapter.
### The pruned node
The [pruned node](https://planb.academy/resources/glossary/pruned-node) validates everything as a full node, from the Genesis block to the head of the chain with the most work, but **only keeps the most recent part of the block files**. Once the old blocks have been checked, it gradually deletes them to stay below a space limit you can set. This configuration is ideal if you have disk space constraints: you retain the independence of block validation, without storing the complete blockchain history archive. This option is particularly useful if you simply want to install Bitcoin Core on your personal computer, without using a dedicated machine.
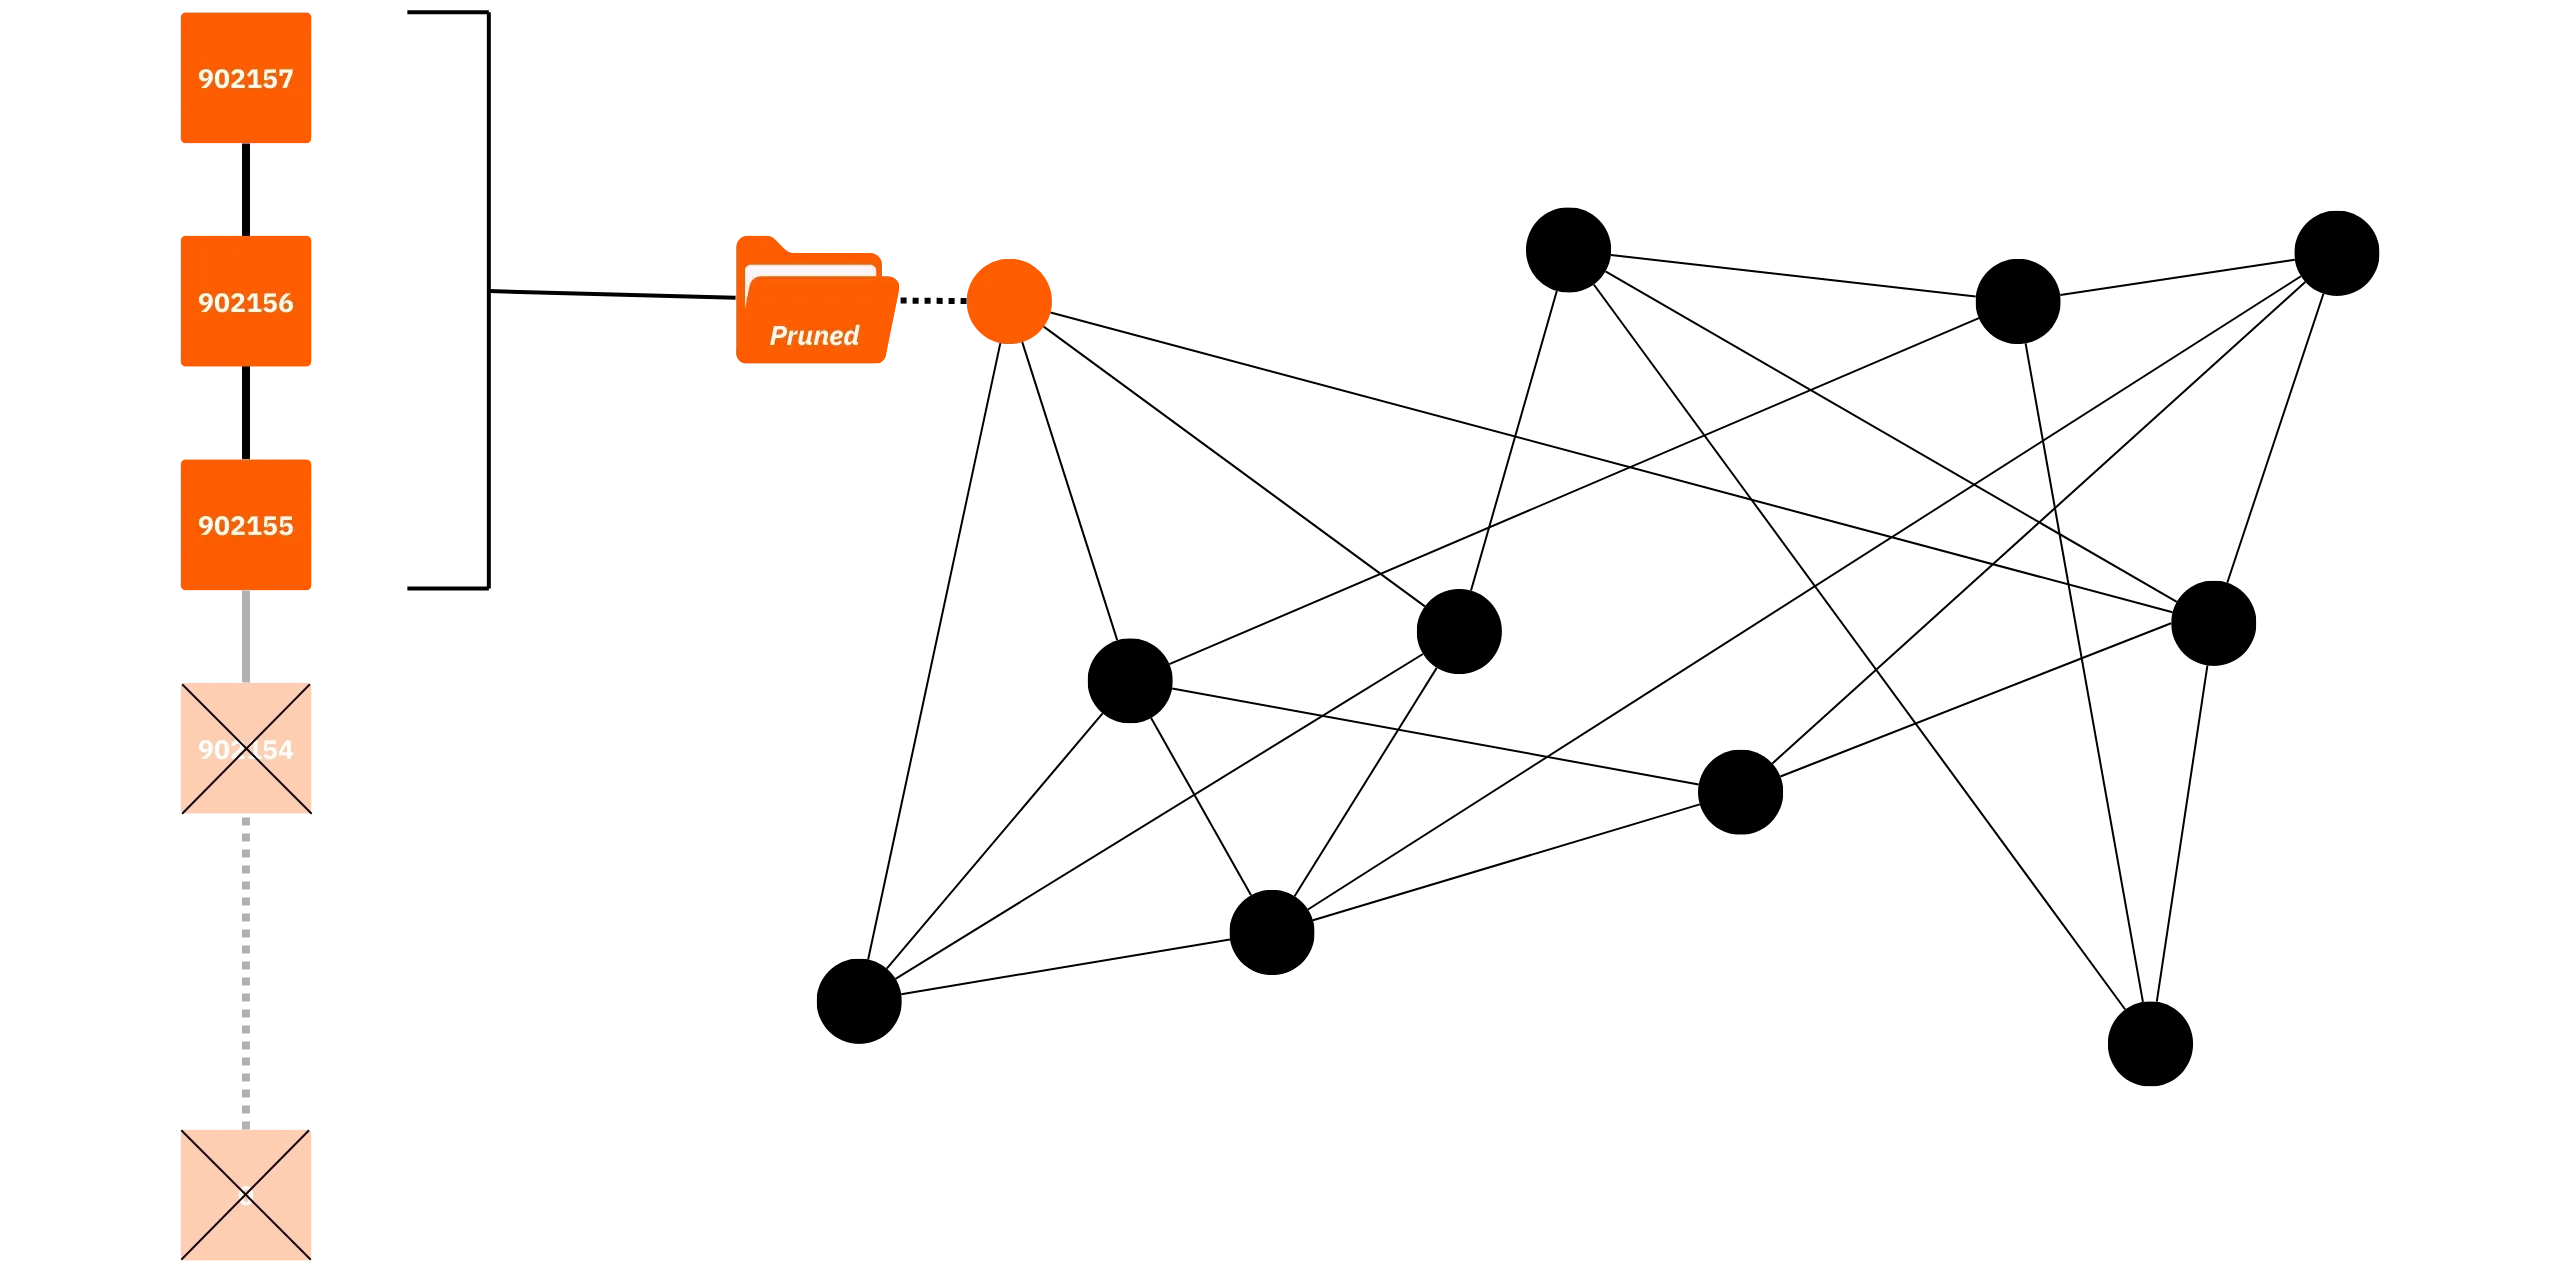
The technical implications of this option are fairly straightforward: the pruned node is perfectly capable of broadcasting your transactions, participating in the relay, verifying blocks and transactions, and tracking the chain. On the other hand, it cannot serve as a source of historical data beyond its limits for other applications (e.g., full explorers, indexers, wallets). Functions requiring the archive (or a global index) will therefore not be available.
In practical terms, you can use a pruned node to connect wallet management software such as Sparrow wallet. However, you won't be able to scan transactions on your wallet that predate the pruning limit. For example, if you have a transaction registered in block 901 458, but your node only keeps blocks from 905 402 upwards (because the oldest have been pruned), you won't be able to scan this transaction. On the other hand, if you had already scanned it when your node still had this block height, then your wallet management software will store the information and display the balance of the corresponding UTXOs correctly.
In short, wallet tracking works without a hitch on a pruned node if you create a new wallet while your software is already connected to that node. On the other hand, you may encounter difficulties if you restore an old wallet, as past transactions that are no longer retained by the node will obviously not be retrievable.
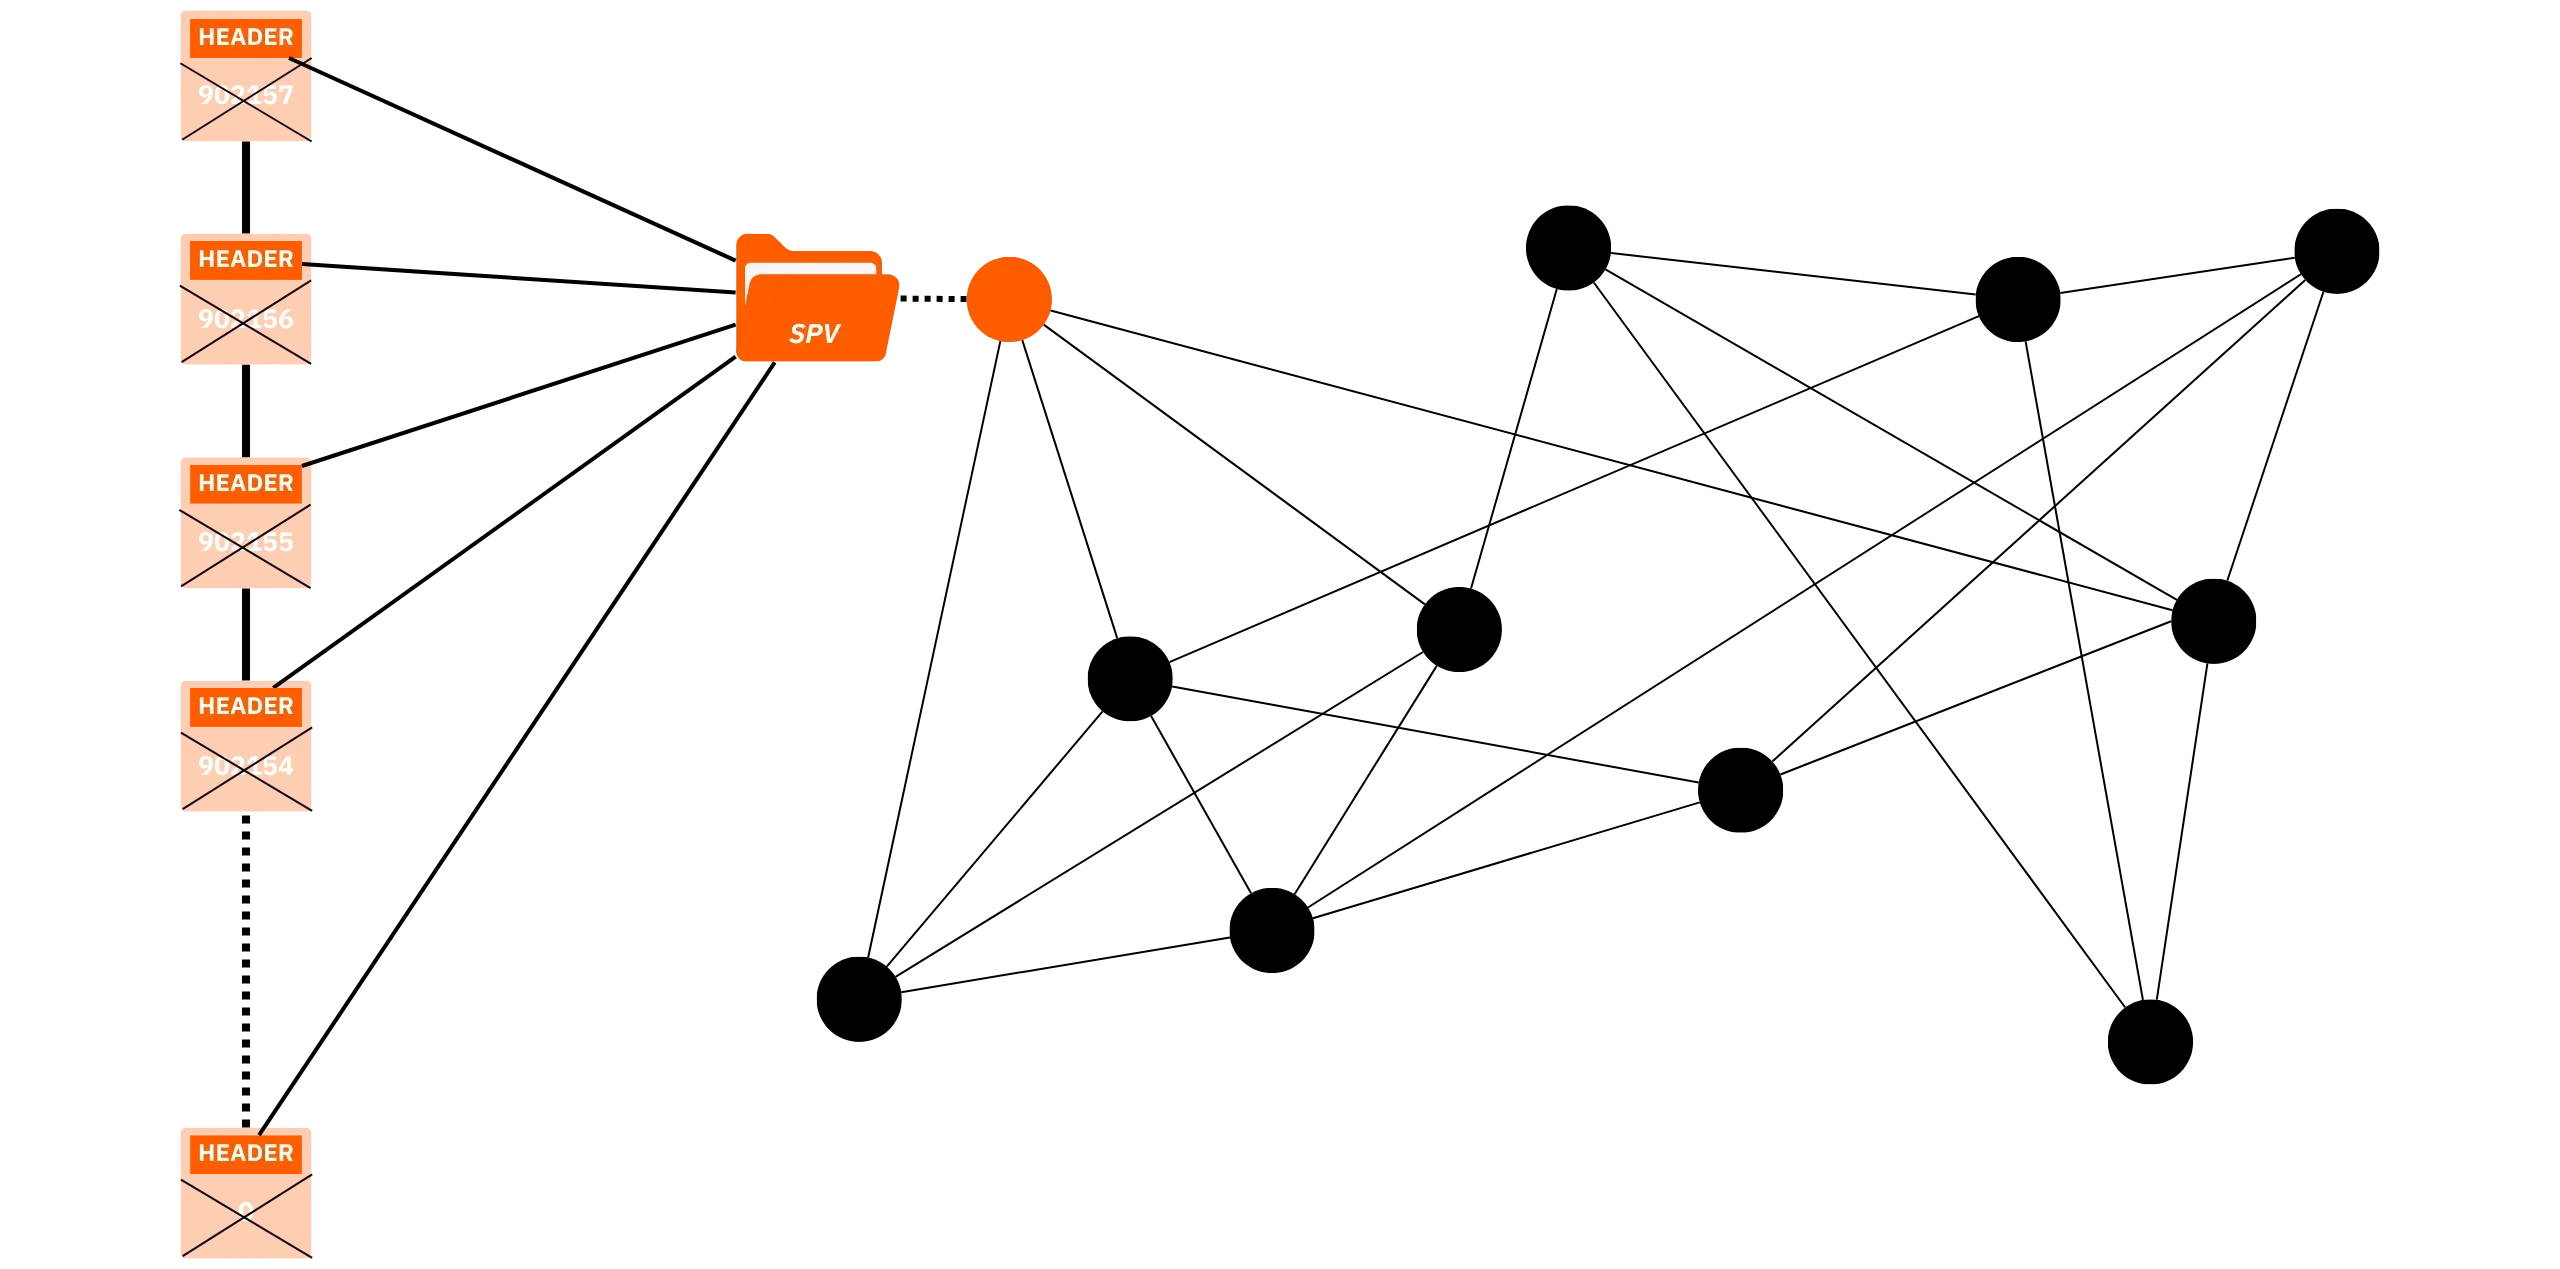
### The light node / SPV
An [SPV](https://planb.academy/resources/glossary/spv-node-light-node) (*Simplified Payment Verification*) node, or lightweight node, retains only block headers, not transaction details, and relies on other full nodes to obtain proof that a transaction is in a block ([Merkle](https://planb.academy/resources/glossary/merkle-tree) proofs via trees) for which it has the header. The concept of simplified payment verification is not new, having been proposed by Satoshi Nakamoto himself in part 8 of the White Paper.
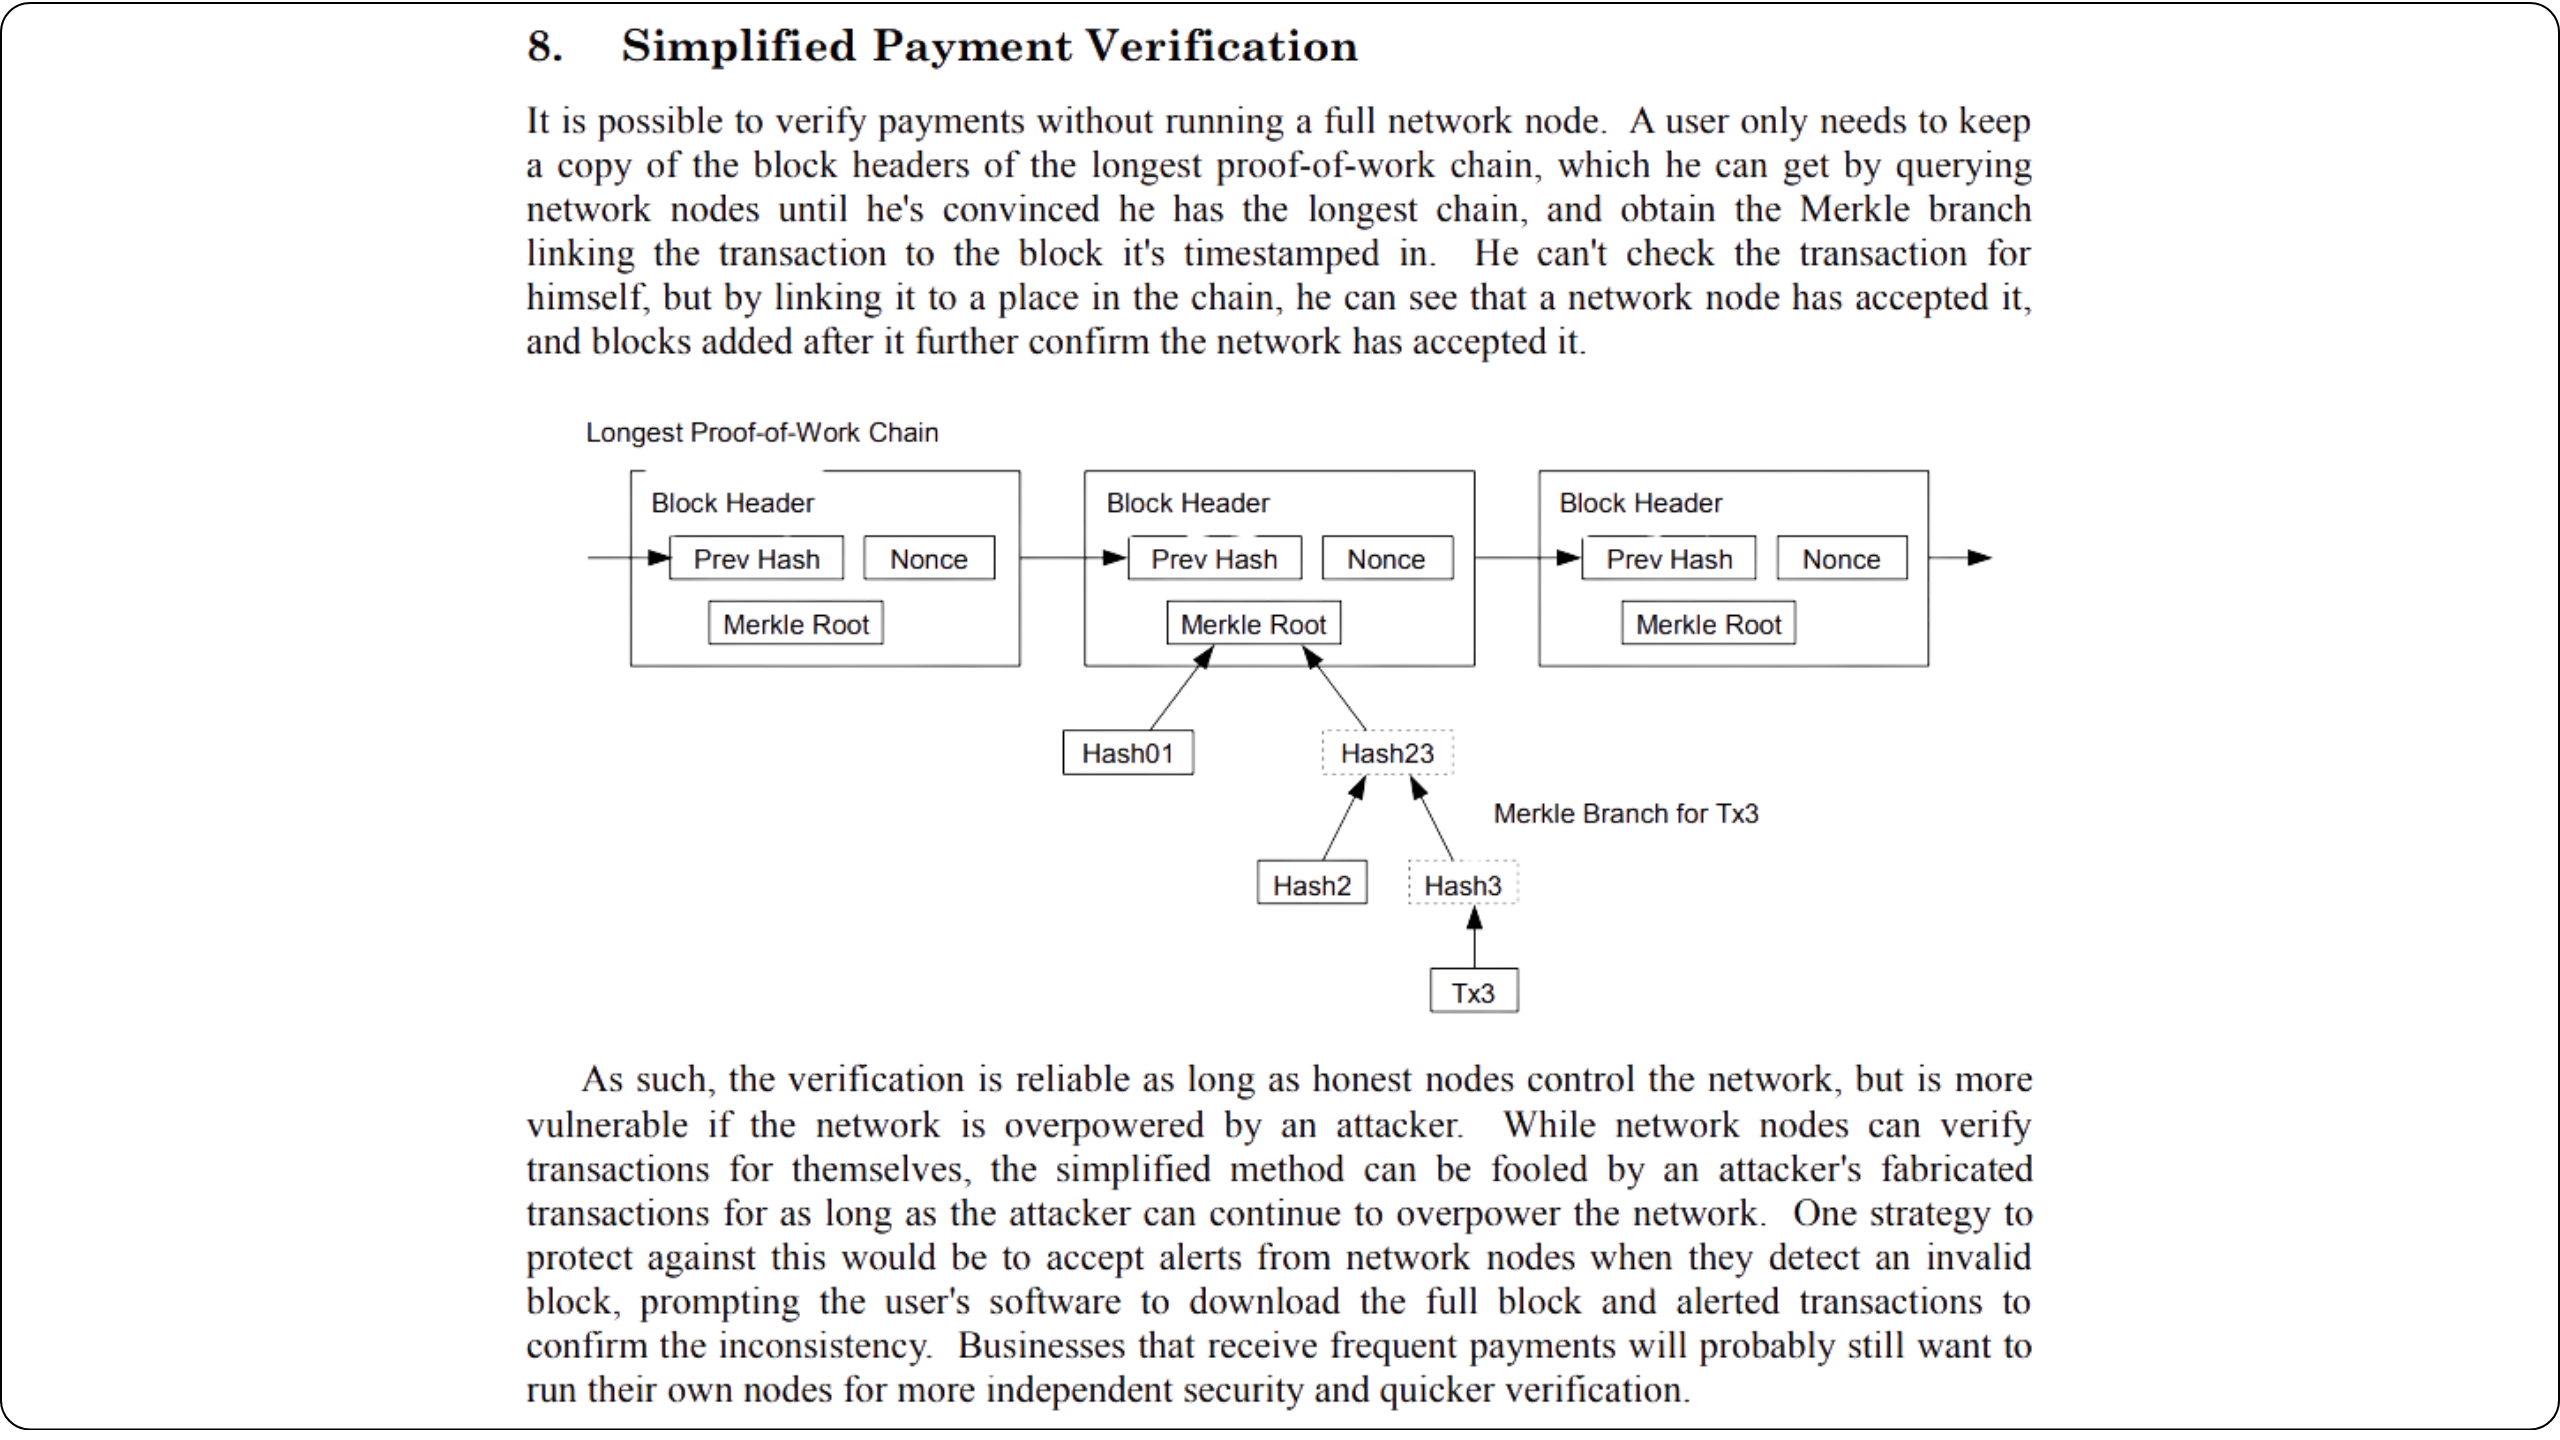
Nakamoto, S. (2008). *Bitcoin: A Peer-to-Peer Electronic Cash System*. https://Bitcoin.org/Bitcoin.pdf
This type of node is obviously much lighter in terms of storage and CPU usage than a full node or even a pruned node. The SPV node is therefore well-suited to smaller devices and intermittent connections. In fact, it is often integrated directly into the wallet, especially mobile software such as the Blockstream App.
The trade-off is trust and confidentiality: an SPV client doesn't check scripts or validation policies itself; it assumes that the chain with the most work is valid, and depends on one or more full nodes for responses. Using this type of node is therefore a better option than connecting to a third-party node; however, it is still less advantageous than having a full node or even a pruned node.
### Which node for which need?
- Mobile / beginner user
For a novice user with just a wallet on a mobile app, using an SPV node is surely the best way to get started. Installation is quick, requires few resources, and the experience is simple and fluid. This means that you can verify certain information yourself and, therefore, rely less on third-party nodes while simultaneously being more independent when it comes to broadcasting transactions.
- PC / intermediate user
An intermediate user with a PC can install a pruned node to benefit from almost all the advantages of a full node, without overloading their machine on a daily basis: full validation, moderate disk usage, and simple maintenance. It's an ideal solution for connecting your desktop wallets and remaining independent in the distribution of your transactions, without investing in a dedicated machine or overloading your disk space.
- Sovereign Bitcoiner / advanced
A full node remains the best solution if you want to be totally independent in your use of Bitcoin and not limit yourself later on to advanced uses such as an indexer, a [Lightning](https://planb.academy/resources/glossary/lightning-network) node, or even a block explorer. That's exactly what we're going to explore in this course!
## Overview of software solutions
0d48b89a-e8b5-441e-a707-537a035fc15e
On the software side, there are 2 main ways to run a Bitcoin node:
- directly install a protocol implementation, such as Bitcoin Core (recommended), or Bitcoin Knots,
- or use a turnkey distribution (often called "_node-in-a-box_") which integrates a Bitcoin implementation in the same way, but also includes an interface for system administration, an application store, and ready-to-use tools (Lightning, browsers, index servers, even self-hosting applications external to Bitcoin...).
Both approaches lead to the same goal: to have your own node, but they differ in terms of interface installation and use, maintenance, expandability, and cost. That's what we'll explore in this chapter.
### Raw Bitcoin node implementations
Installing a raw implementation means directly using the software of a Bitcoin protocol implementation (such as Core), without any additional software layer. You manage the configuration, updates, and associated services (indexing, API, Lightning, backups, etc.) yourself, according to your needs.
This is the most sovereign and flexible approach: you know exactly what's running, where the data is, and how everything works. On the other hand, it becomes more complex as soon as you want to go beyond the simple operation of a Bitcoin node. If your aim is just to have a node, the complexity is comparable to that of a node-in-a-box, or even less, since it's simply a matter of installing software.
#### Bitcoin Core (dominant client)
[Bitcoin Core](https://bitcoincore.org/) is the network's ultra-majority client. It downloads, validates, and maintains the blockchain, provides [RPC](https://planb.academy/resources/glossary/rpc-remote-procedure-call)/REST APIs, and can integrate a wallet. If you prefer standard tools and feel comfortable adding services yourself (such as Electrum server, explorer, and LND), you're better off using Core as is.
**Benefits:** Maximum stability, predictable behavior, raw experience, easy to install and configure.
**Disadvantages:** You must manually build the rest of the stack to create a complete application environment, rather than just a Bitcoin node.
https://planb.academy/tutorials/node/bitcoin/bitcoin-core-linux-568c13a6-8746-4d63-8e95-f4a61c5ae0ed
https://planb.academy/tutorials/node/bitcoin/bitcoin-core-mac-windows-9684ab02-e0af-41c9-8102-86ac7c7727f3
#### Bitcoin Knots (main alternative client)
[Bitcoin Knots is a Fork of Bitcoin Core](https://bitcoinknots.org/), maintained by Luke Dashjr. It is the main alternative client to Core for implementing the Bitcoin protocol. Fully compatible with the rest of the network (it is by no means a Hard Fork like Bitcoin Cash), it nevertheless offers additional features, including relay policy options that are absent from Core, or applied more strictly by default to limit what some consider spam.
There are 2 possible reasons for choosing Knots over Core:
- **Techniques**: Different options from Core, particularly in terms of relay management, by determining which transactions are accepted and broadcast by your node.
- **Policy**: Some people prefer to use alternative clients such as Knots for non-technical reasons, notably to support an alternative to Core and thus reduce its monopoly. If Core were ever compromised, it would be useful not only to have solid, well-maintained alternative clients but also to know how to utilize them effectively. Others use Knots for protest purposes, because they have lost confidence in Core's developers or disapprove of the majority of the client's management.
https://planb.academy/tutorials/node/bitcoin/bitcoin-knots-e04b2196-4df2-4246-86ef-c02269c29098
Personally, I recommend you choose Core, mainly to benefit from security patches more quickly. Indeed, some vulnerabilities discovered in Knots are corrected with a delay. More generally, Core's development process is solidly structured and supported by a large number of contributors, whereas Knots is maintained by a single person and has a much smaller community. On the other hand, relay rules tend to lose their usefulness today, especially when applied by only a tiny fraction of the network (as per percolation theory).
### Node-in-a-box distributions
The _node-in-a-box_ combines Bitcoin Core (or Knots) with a preconfigured operating system, a web interface, and an App Store of self-hosting services (Lightning, explorers, Electrum server, Mempool, BTCPay Server, Nextcloud, etc.). In just one click, you can install, update, and interconnect these different modules.
It's a much simpler solution for starting up and managing numerous ancillary applications on a day-to-day basis. The downside is that when a problem occurs (e.g., Docker image conflict, faulty update, corrupted database), debugging can become very complex, as you depend on the distribution's own integration. What's more, community or official support is often complicated.
So, a node-in-a-box is extremely easy to use as long as everything's working properly, but in the event of a bug, you have to be prepared to carry out lengthy searches, wait for help, and get your hands dirty.
Most of these solutions are available in two formats:
- Pre-assembled machine: a complete computer with OS already installed. These pay-as-you-go machines simply need to be plugged into the mains and connected to the Internet to be operational. If your budget allows it, this option has the advantage of being very simple to set up, often offering priority support, and contributing to the financing of development, since the business model of these companies is generally based on the sale of hardware.
- DIY: install the distribution OS on your own machine (old PC, NUC, Raspberry Pi, home server...). This is the most economical solution, as you can recycle an old machine or choose hardware that precisely matches your needs and budget. It's also the most flexible option, and the most satisfying to configure. It's this approach that we'll explore in the practical part of the course.
Here's an overview of the main node-in-a-box solutions available (in 2025):
### Umbrel (umbrelOS & Umbrel Home)
[Today, Umbrel is the leader in node-in-a-box solutions (https://umbrel.com/). Its success is largely due to the simplicity of its installation (when it was launched on a simple Raspberry Pi), its elegant and intuitive graphical interface, and an ecosystem of applications that has grown rapidly and is now extremely extensive.
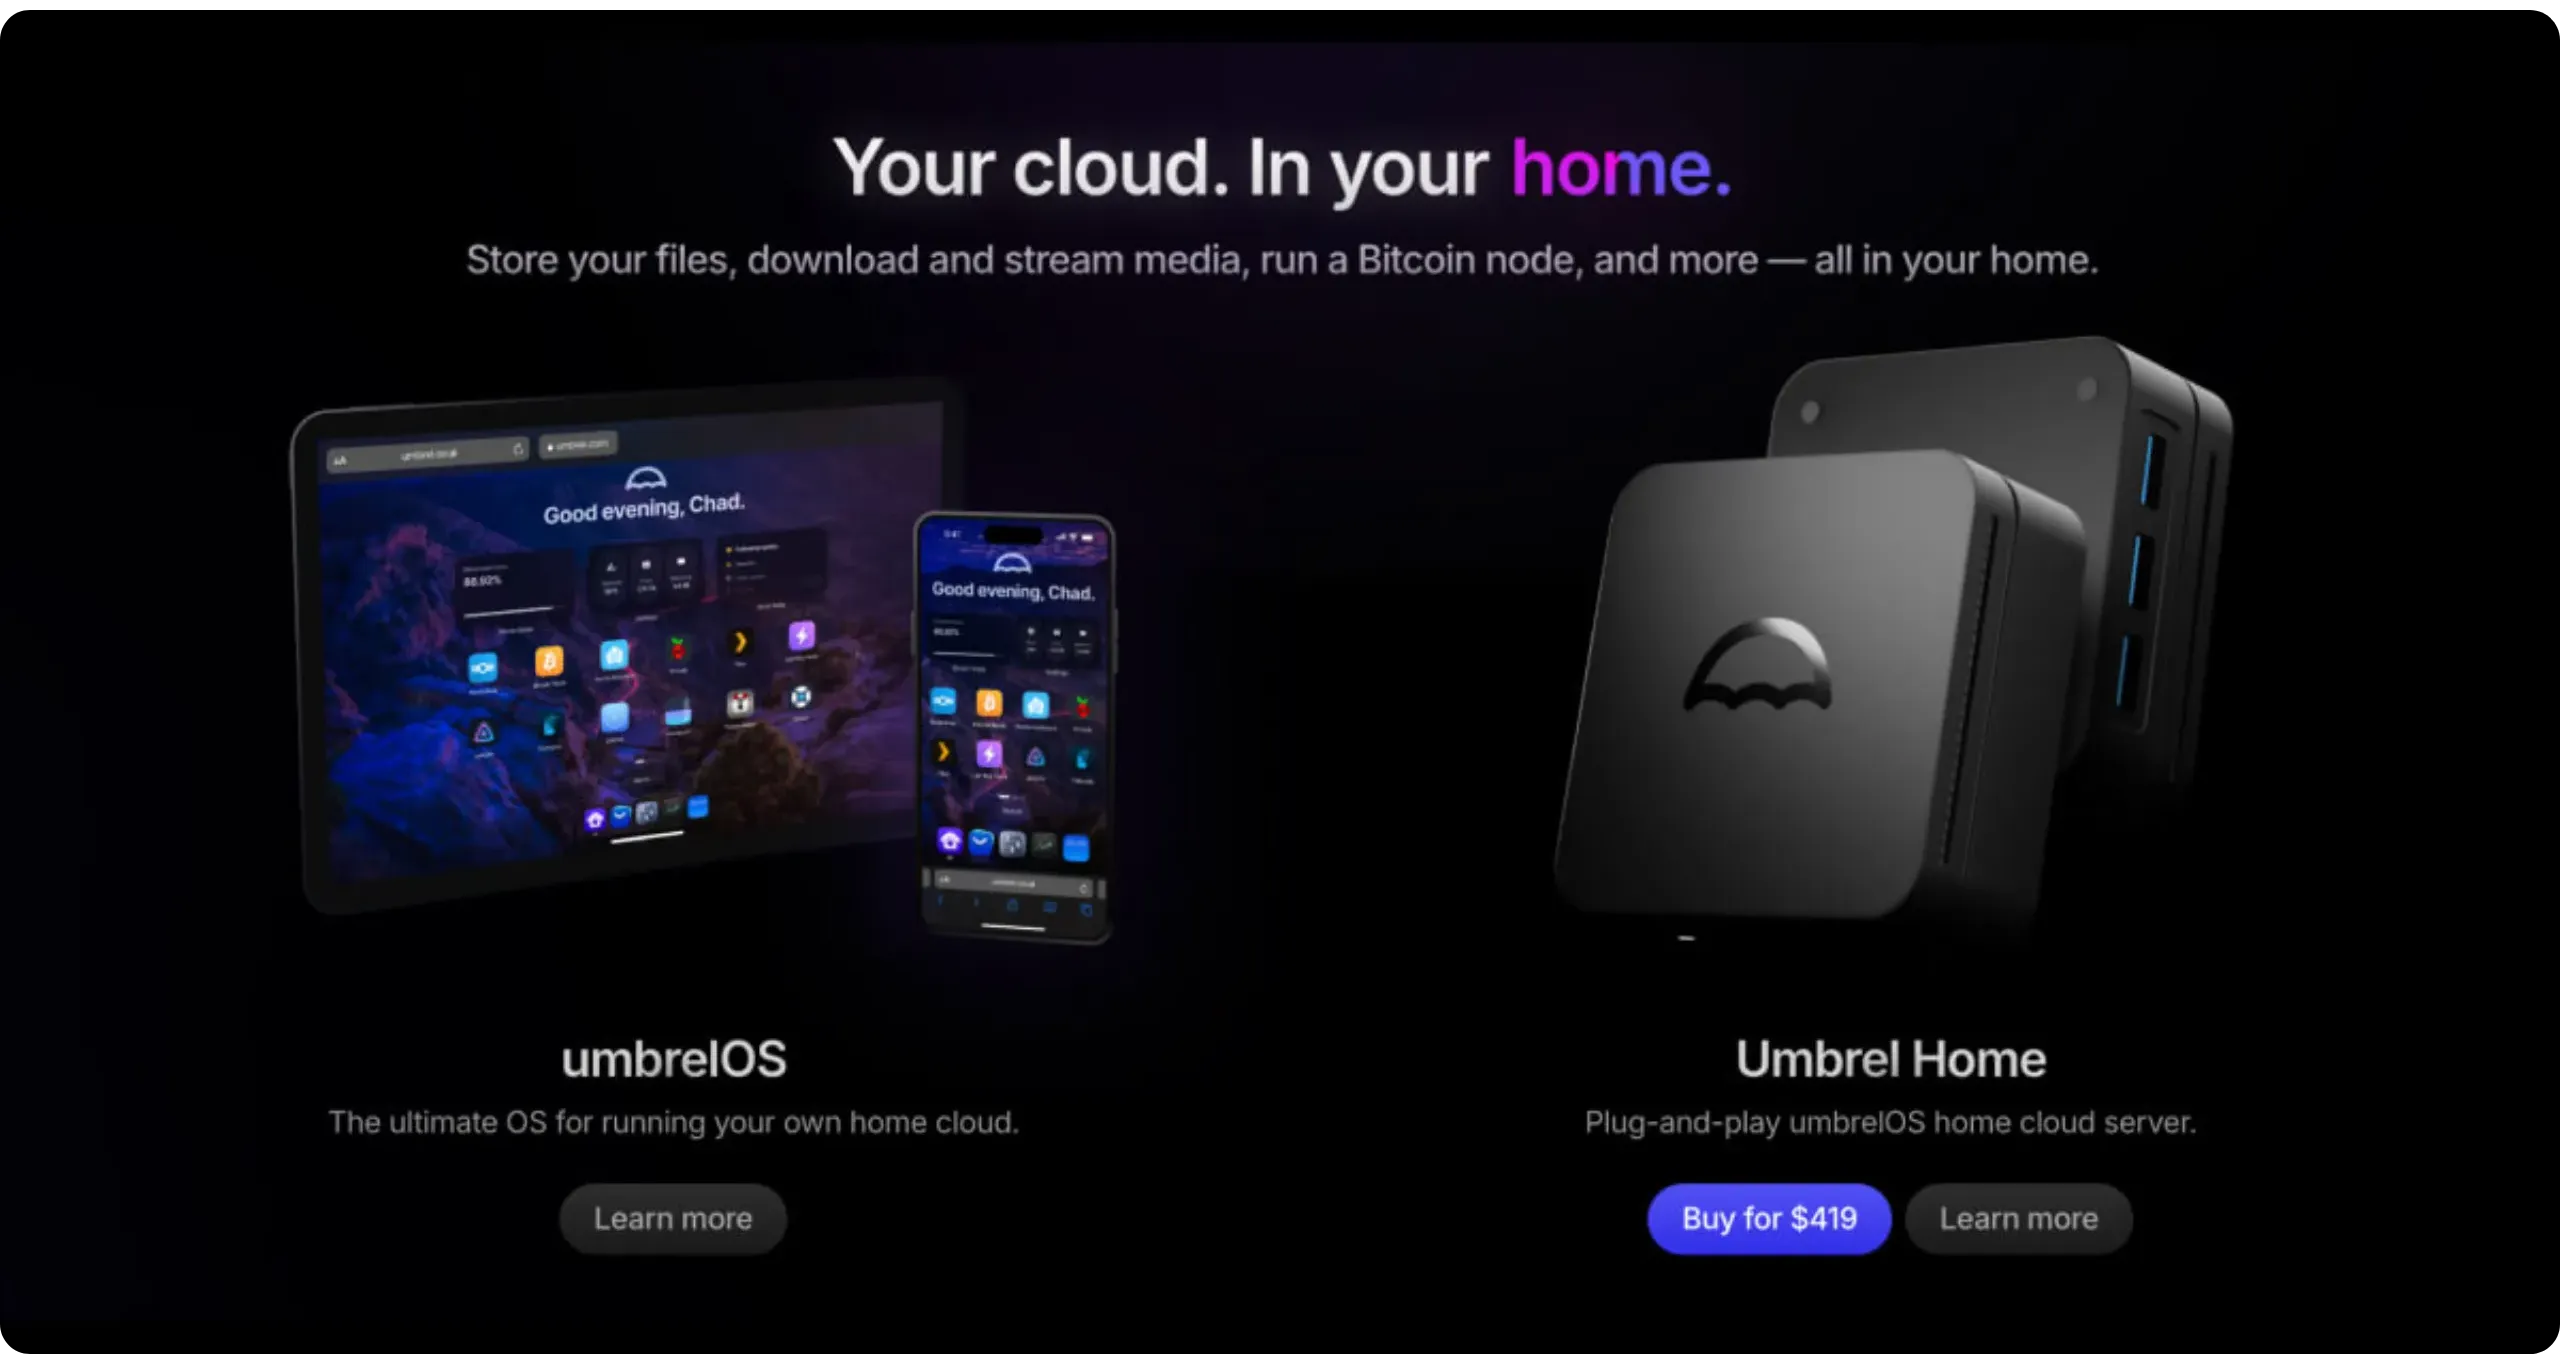
Launched in 2020 as a simple Bitcoin node accompanied by a few ancillary applications, Umbrel has gradually evolved into a full-featured, modern home cloud.
I won't go into more detail here on how it works and its specific features, as we'll examine these in greater depth in the first chapter of the next part. Indeed, for the purposes of this BTC 202 course, I have chosen to use UmbrelOS, which I believe is the best current node-in-a-box solution for beginner and intermediate users.
https://planb.academy/tutorials/node/bitcoin/umbrel-8b0e3b5b-d3cf-4a1e-8bb8-1ad2db4dd848
### Start9 (StartOS)
[Start9 offers StartOS (https://start9.com/), a system designed for "sovereign computing": the aim is for everyone to own and manage their own private server, enhanced by a marketplace of self-hosted applications. You can purchase a Start9 server (Server One at $619, Server Pure at $899) or assemble your own in DIY mode on your own machine.
On the Bitcoin side, StartOS lets you install a full node, a Lightning node, BTCPay Server, Electrs, and many other services. However, Start9's appeal extends beyond this: it offers the possibility of discovering, configuring, and exposing various software (file cloud, messaging, monitoring) in a unified manner, with complete control. The project is therefore aimed at users who want a robust self-hosting platform, not just a simple Bitcoin node. It's probably the most complete ecosystem after Umbrel.
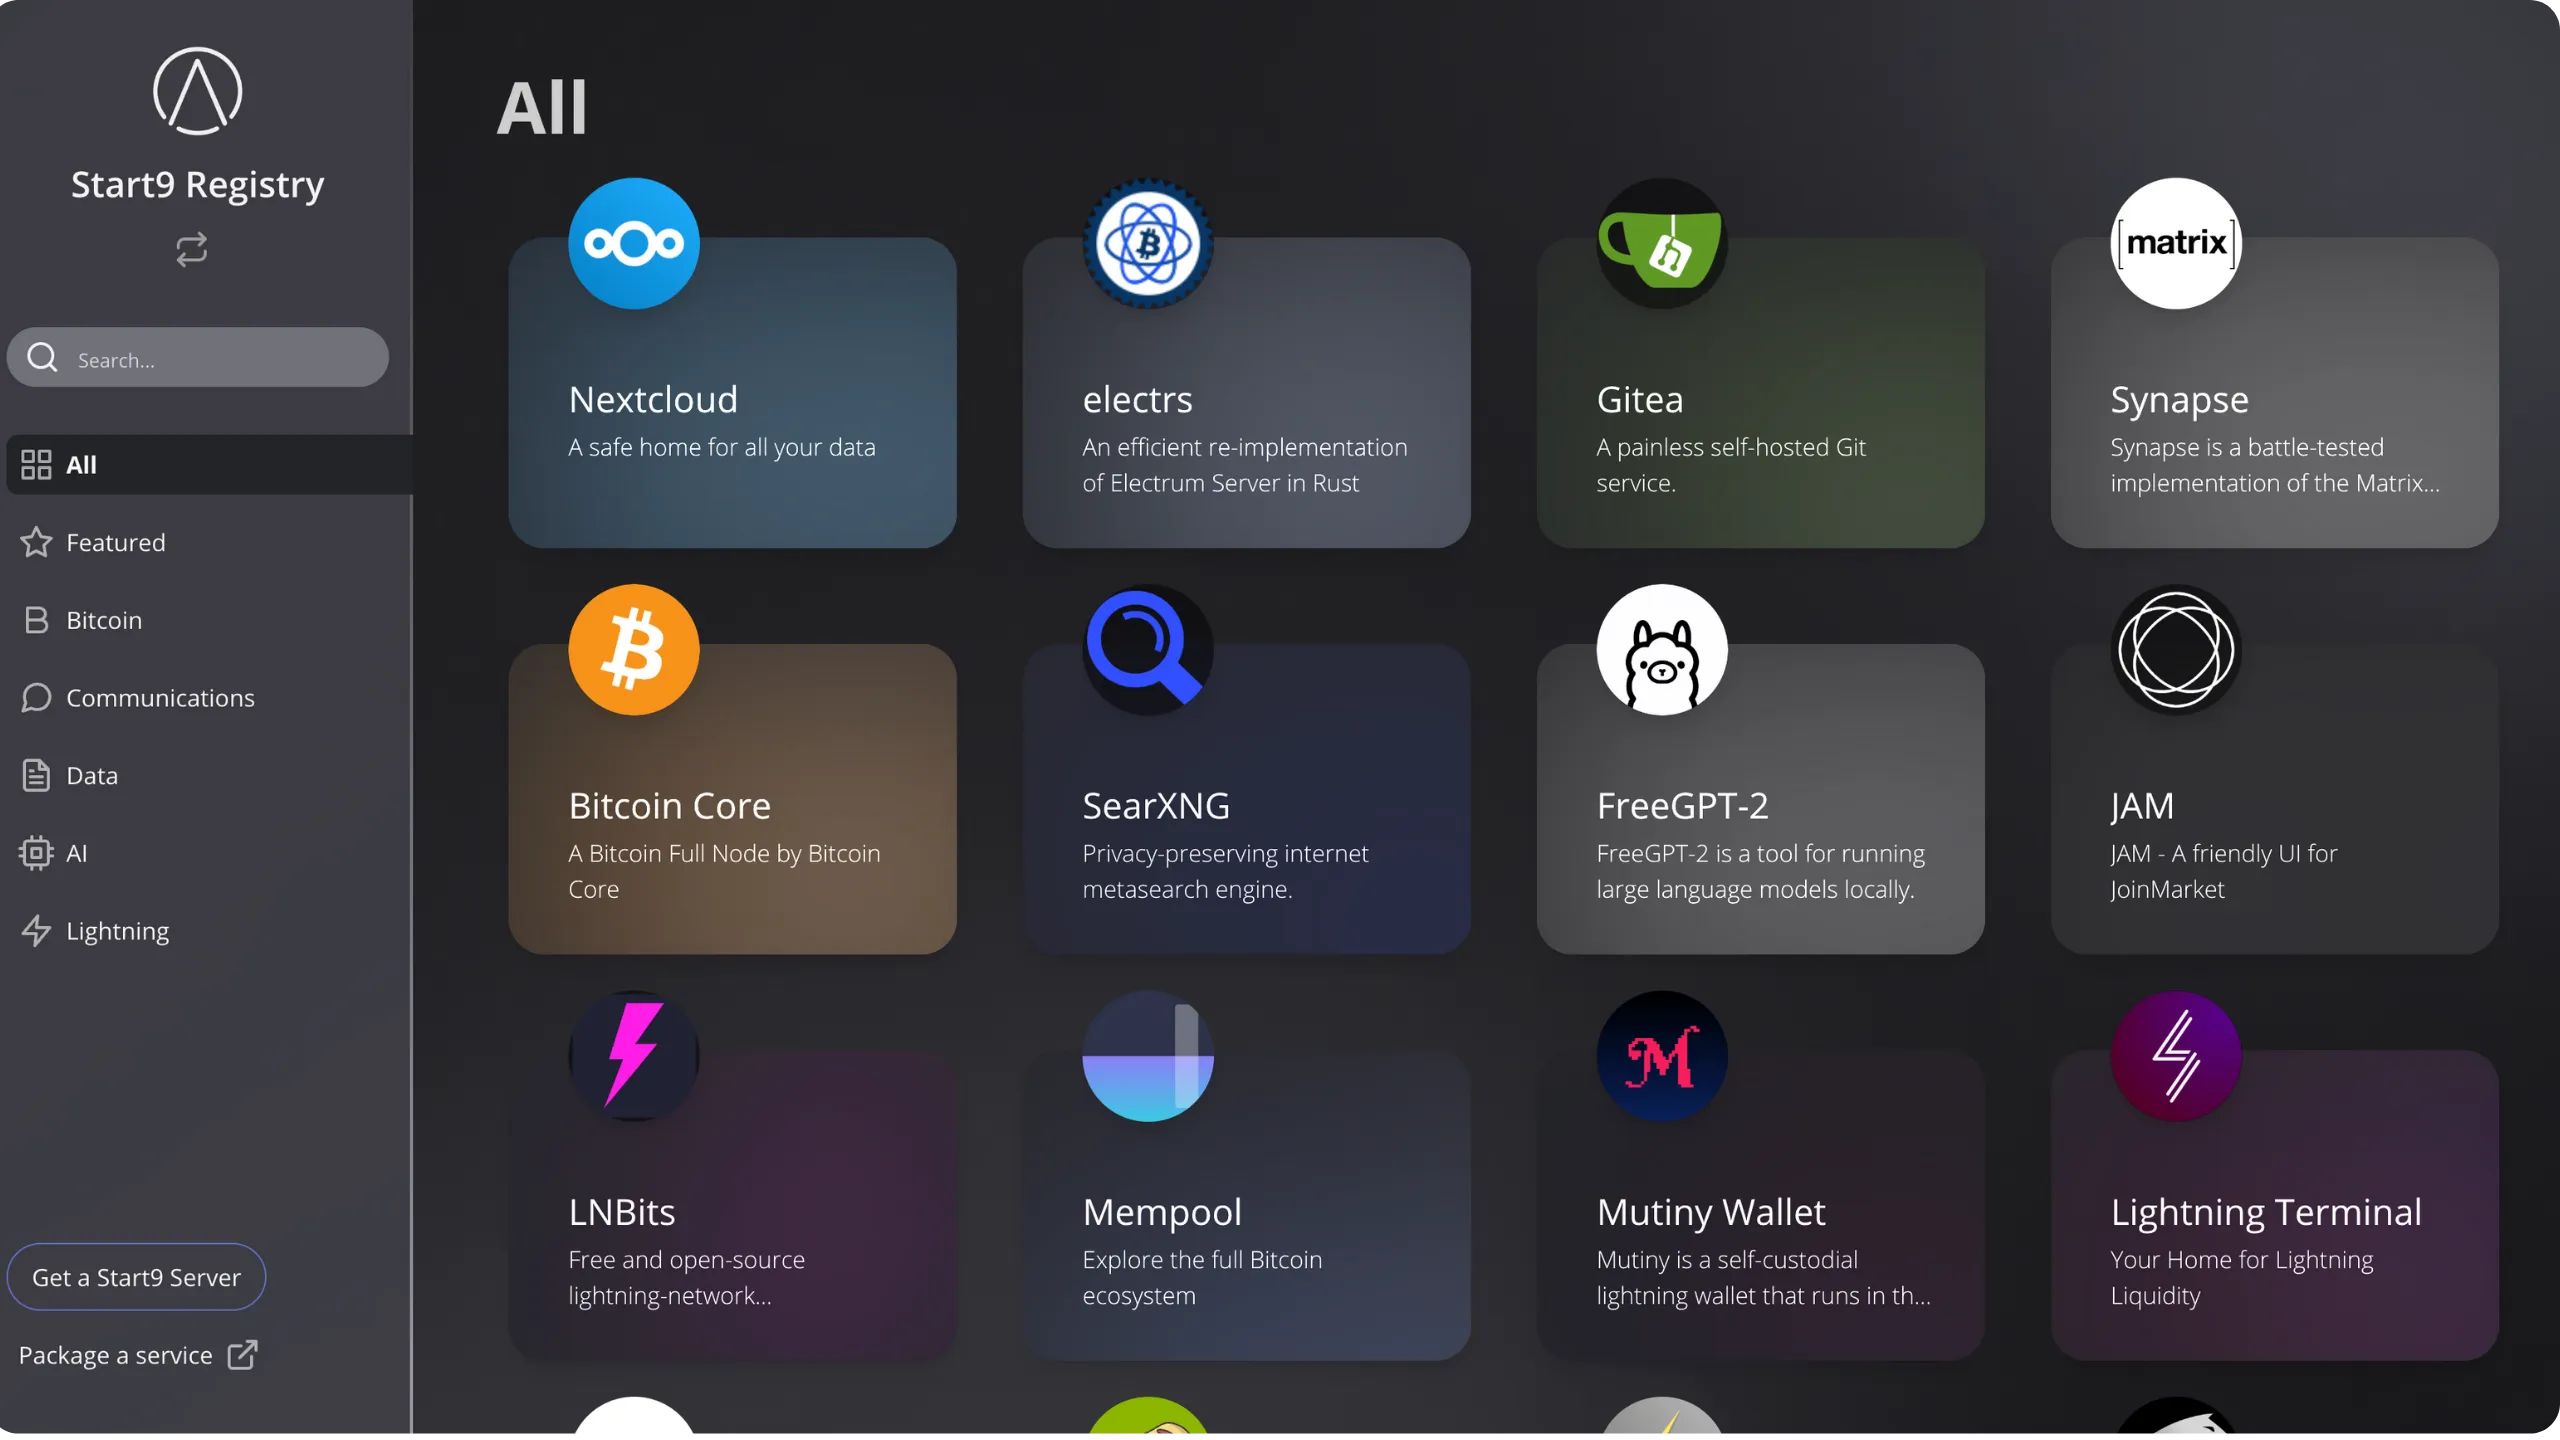
The main difference with Umbrel lies in the graphical interface. Umbrel relies on a highly polished UX, while Start9 offers a cruder, more functional interface. Start9's application ecosystem is less rich than Umbrel's, but it compensates for this with several technical advantages: access to advanced application settings is simplified, whereas Umbrel quickly becomes restrictive if the desired option is not provided by the interface. Start9 also excels in backup management: apart from Umbrel's efficient solution for LND, there is no unified mechanism, unlike Start9. What's more, it offers more accessible monitoring tools and an encrypted remote connection (`https`), whereas local access to Umbrel is via `http`.
In short, if you simply need the essential applications for Bitcoin, with no particular interest in Umbrel's very rich ecosystem, and the user's graphical interface is not a priority, then Start9 is a better option. Otherwise, Umbrel is the better choice.
https://planb.academy/tutorials/node/bitcoin/start9-8c8b6827-8423-4929-bcba-89057670ed6a
### MyNode
[MyNode is a distribution focused exclusively on Bitcoin and Lightning](https://mynodebtc.com/), offering a web interface, an application marketplace, and one-click upgrades. You can either buy ready-to-use hardware (*Model Two* available at $549) or install MyNode free of charge on your own machine. The project also offers a *Premium* version of the software ($94), which includes priority support and advanced features.
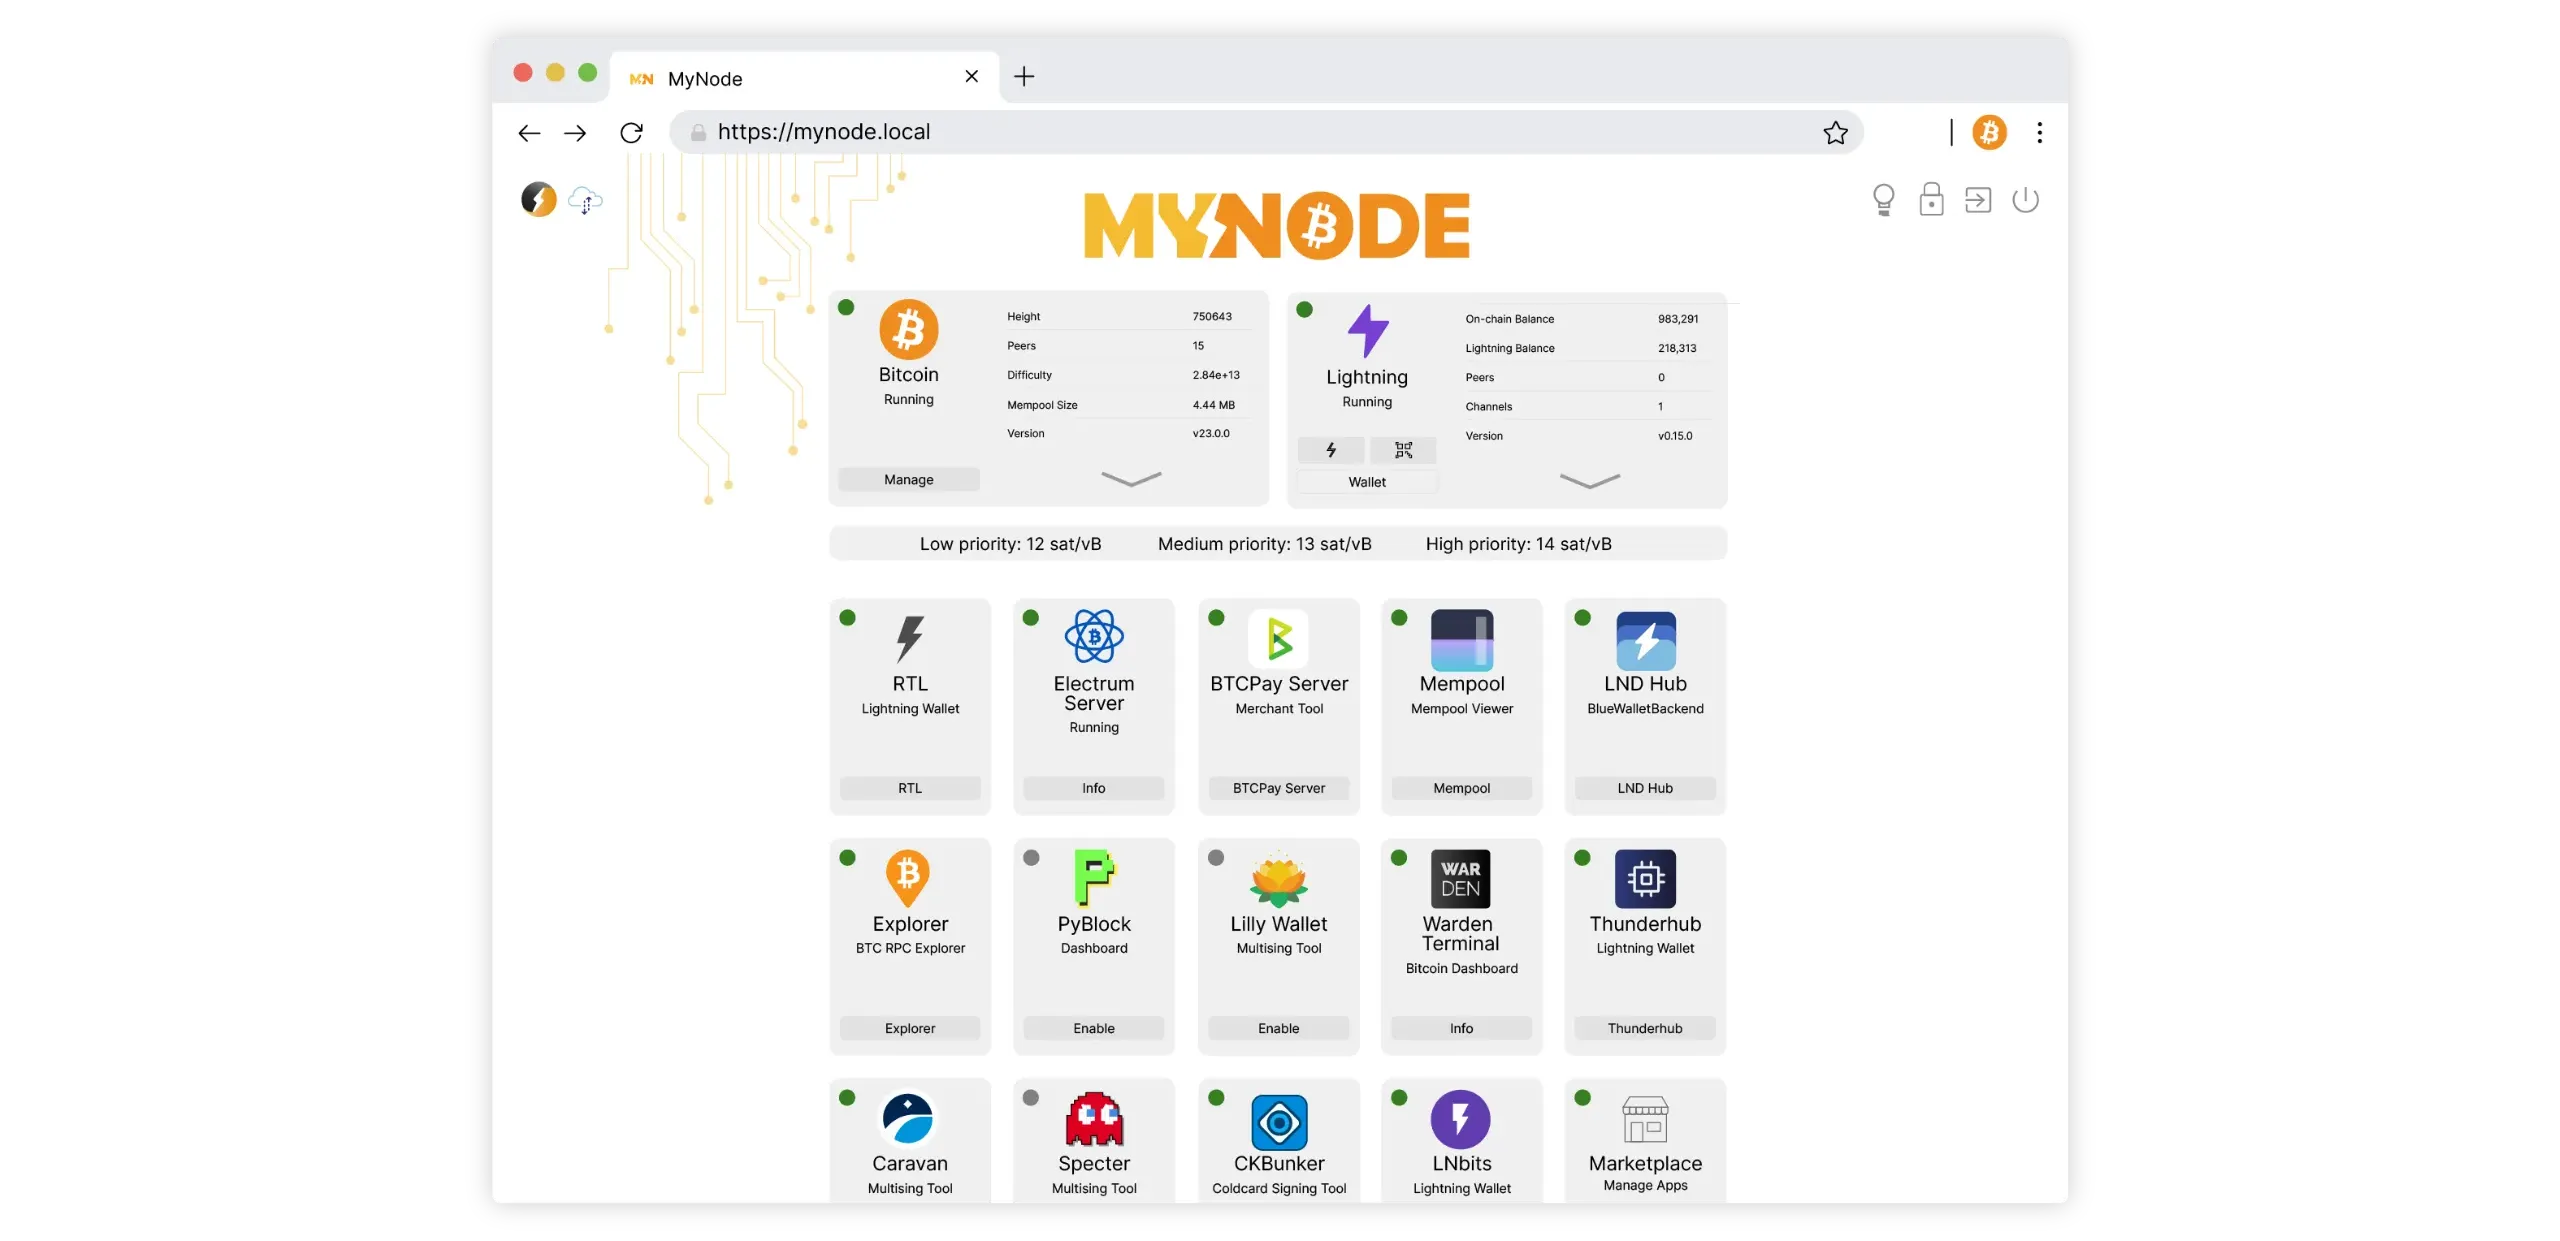
In practice, MyNode brings together all the basic building blocks needed to operate a full node, as well as the applications essential to Bitcoin users. Therefore, it's a suitable solution if you don't require applications external to the Bitcoin ecosystem, such as self-hosted apps found in Start9 and Umbrel systems.
https://planb.academy/tutorials/node/bitcoin/mynode-a481fef3-2fd3-4df3-91c0-112cffa094eb
### RaspiBlitz
[RaspiBlitz is a 100% open source project](https://docs.raspiblitz.org/) (MIT license) for mounting a Bitcoin node and a Lightning node on a Raspberry Pi. Simply download the image, boot up, then follow the wizard to have a working node-in-a-box on your Raspberry Pi. Pre-assembled kits are also available from third parties, usually between $300 and $400, depending on the hardware. RaspiBlitz also offers a range of additional, easy-to-install applications.
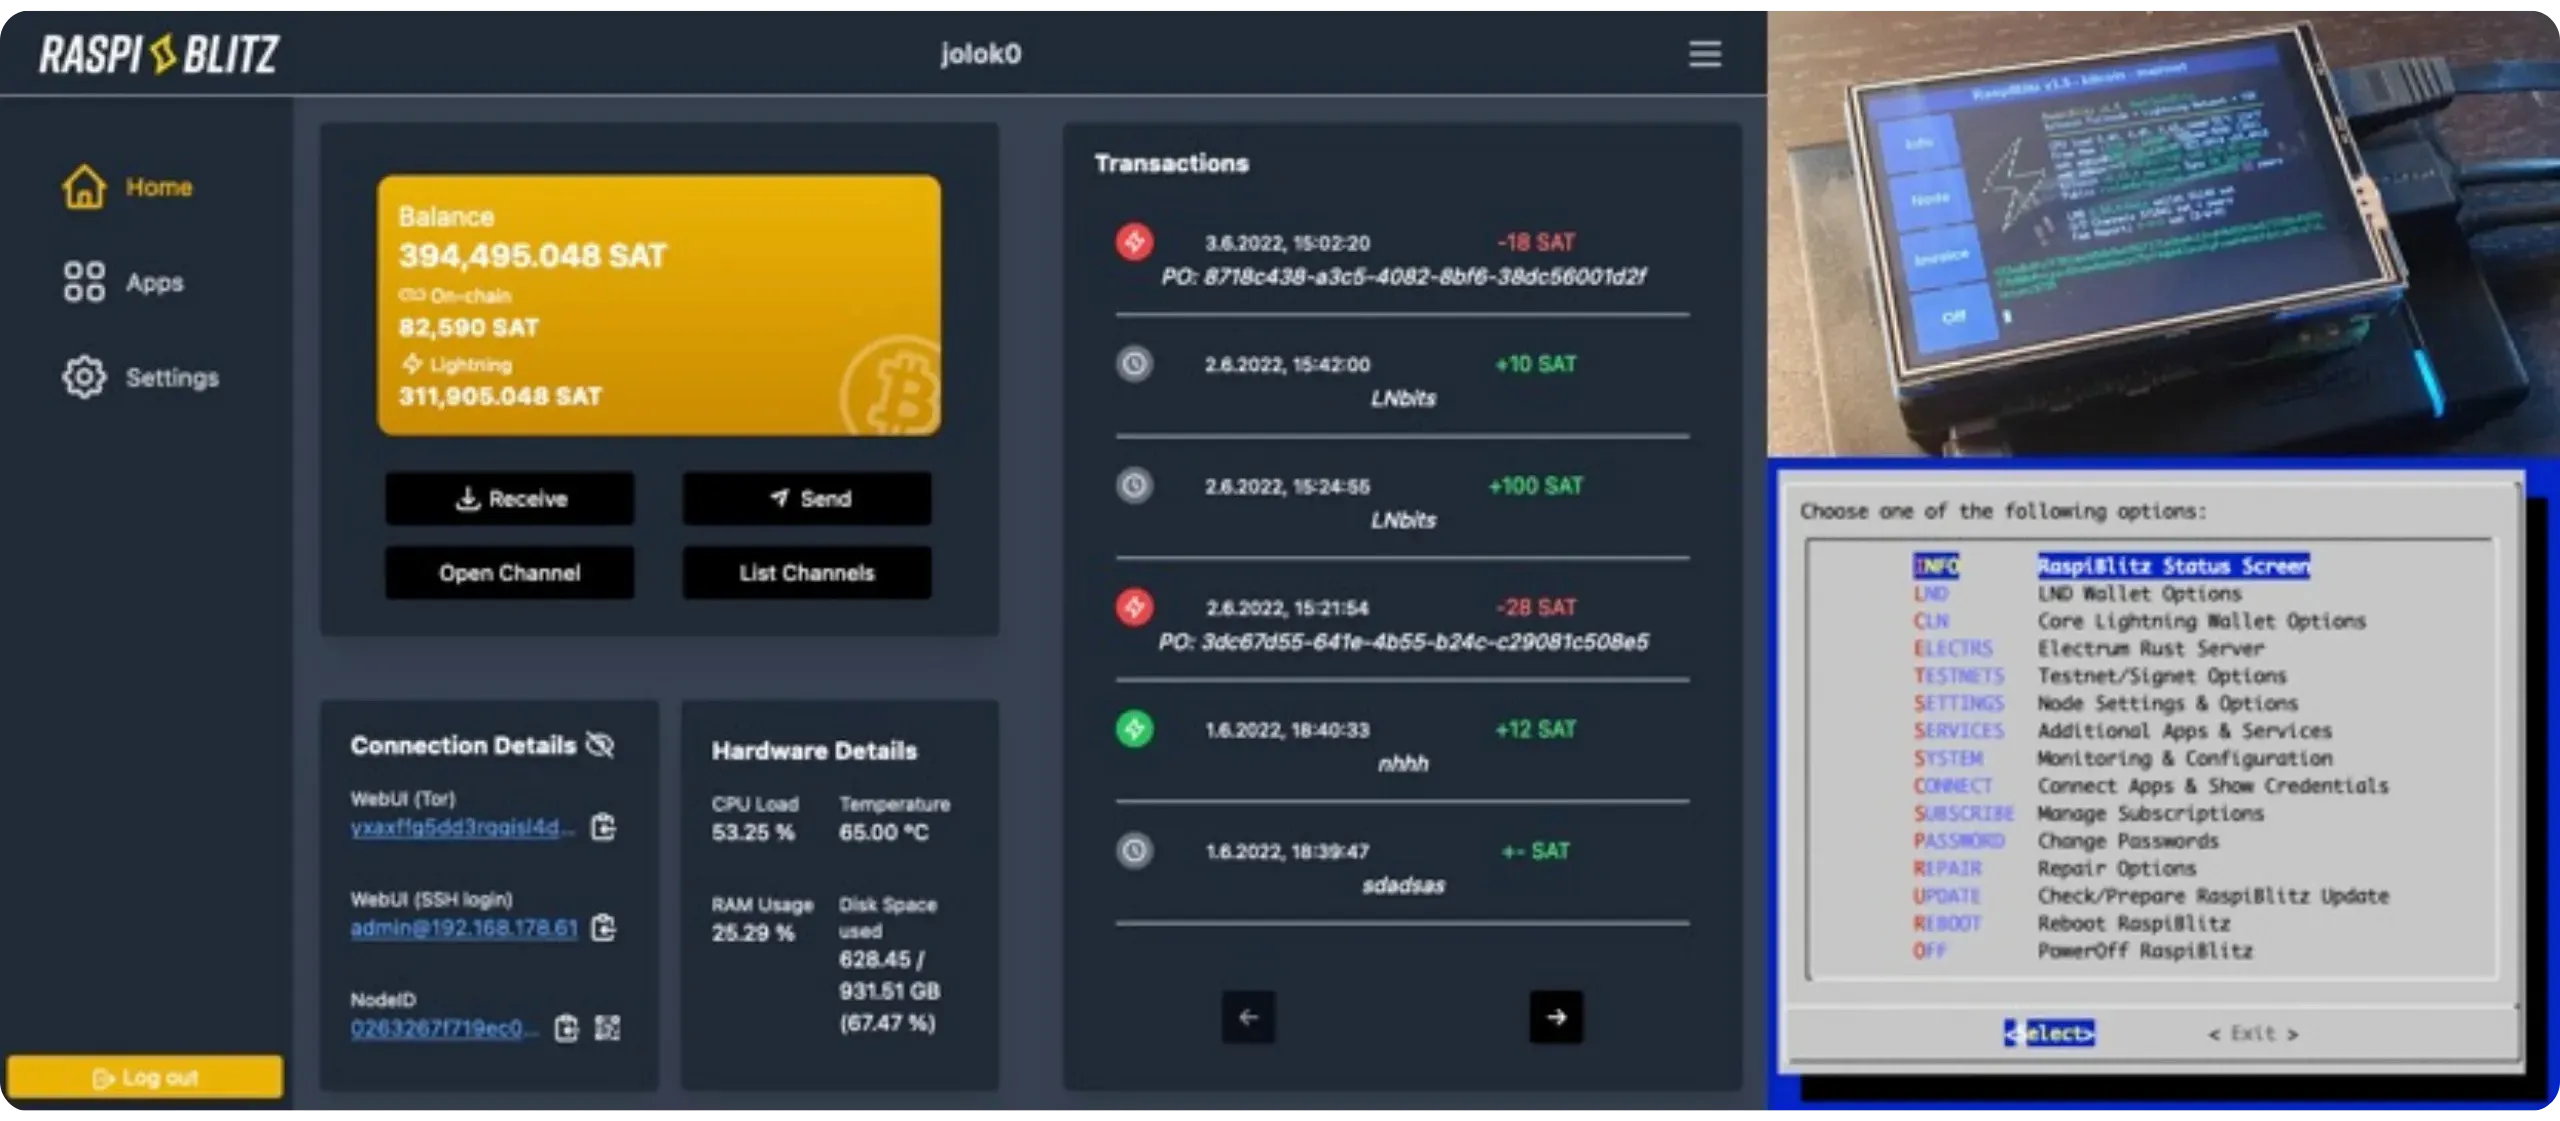
If you own a Raspberry Pi, this is an excellent option, as more complete systems like Umbrel are becoming increasingly heavy for this type of mini-PC.
https://planb.academy/tutorials/node/bitcoin/raspiblitz-d8cdba2e-a682-46cf-9fdc-d8602fbeac02
### RoninDojo
[RoninDojo is a privacy-focused node-in-a-box](https://wiki.ronindojo.io/en/home) that automates the deployment of Samurai Dojo and Whirlpool, with a dedicated interface and plugins specifically designed for the Samurai ecosystem.
The principle is simple: if you use Ashigaru wallet (the Fork successor to Samurai wallet, following the arrest of its developers) or if you want to benefit from advanced privacy tools, RoninDojo is for you.
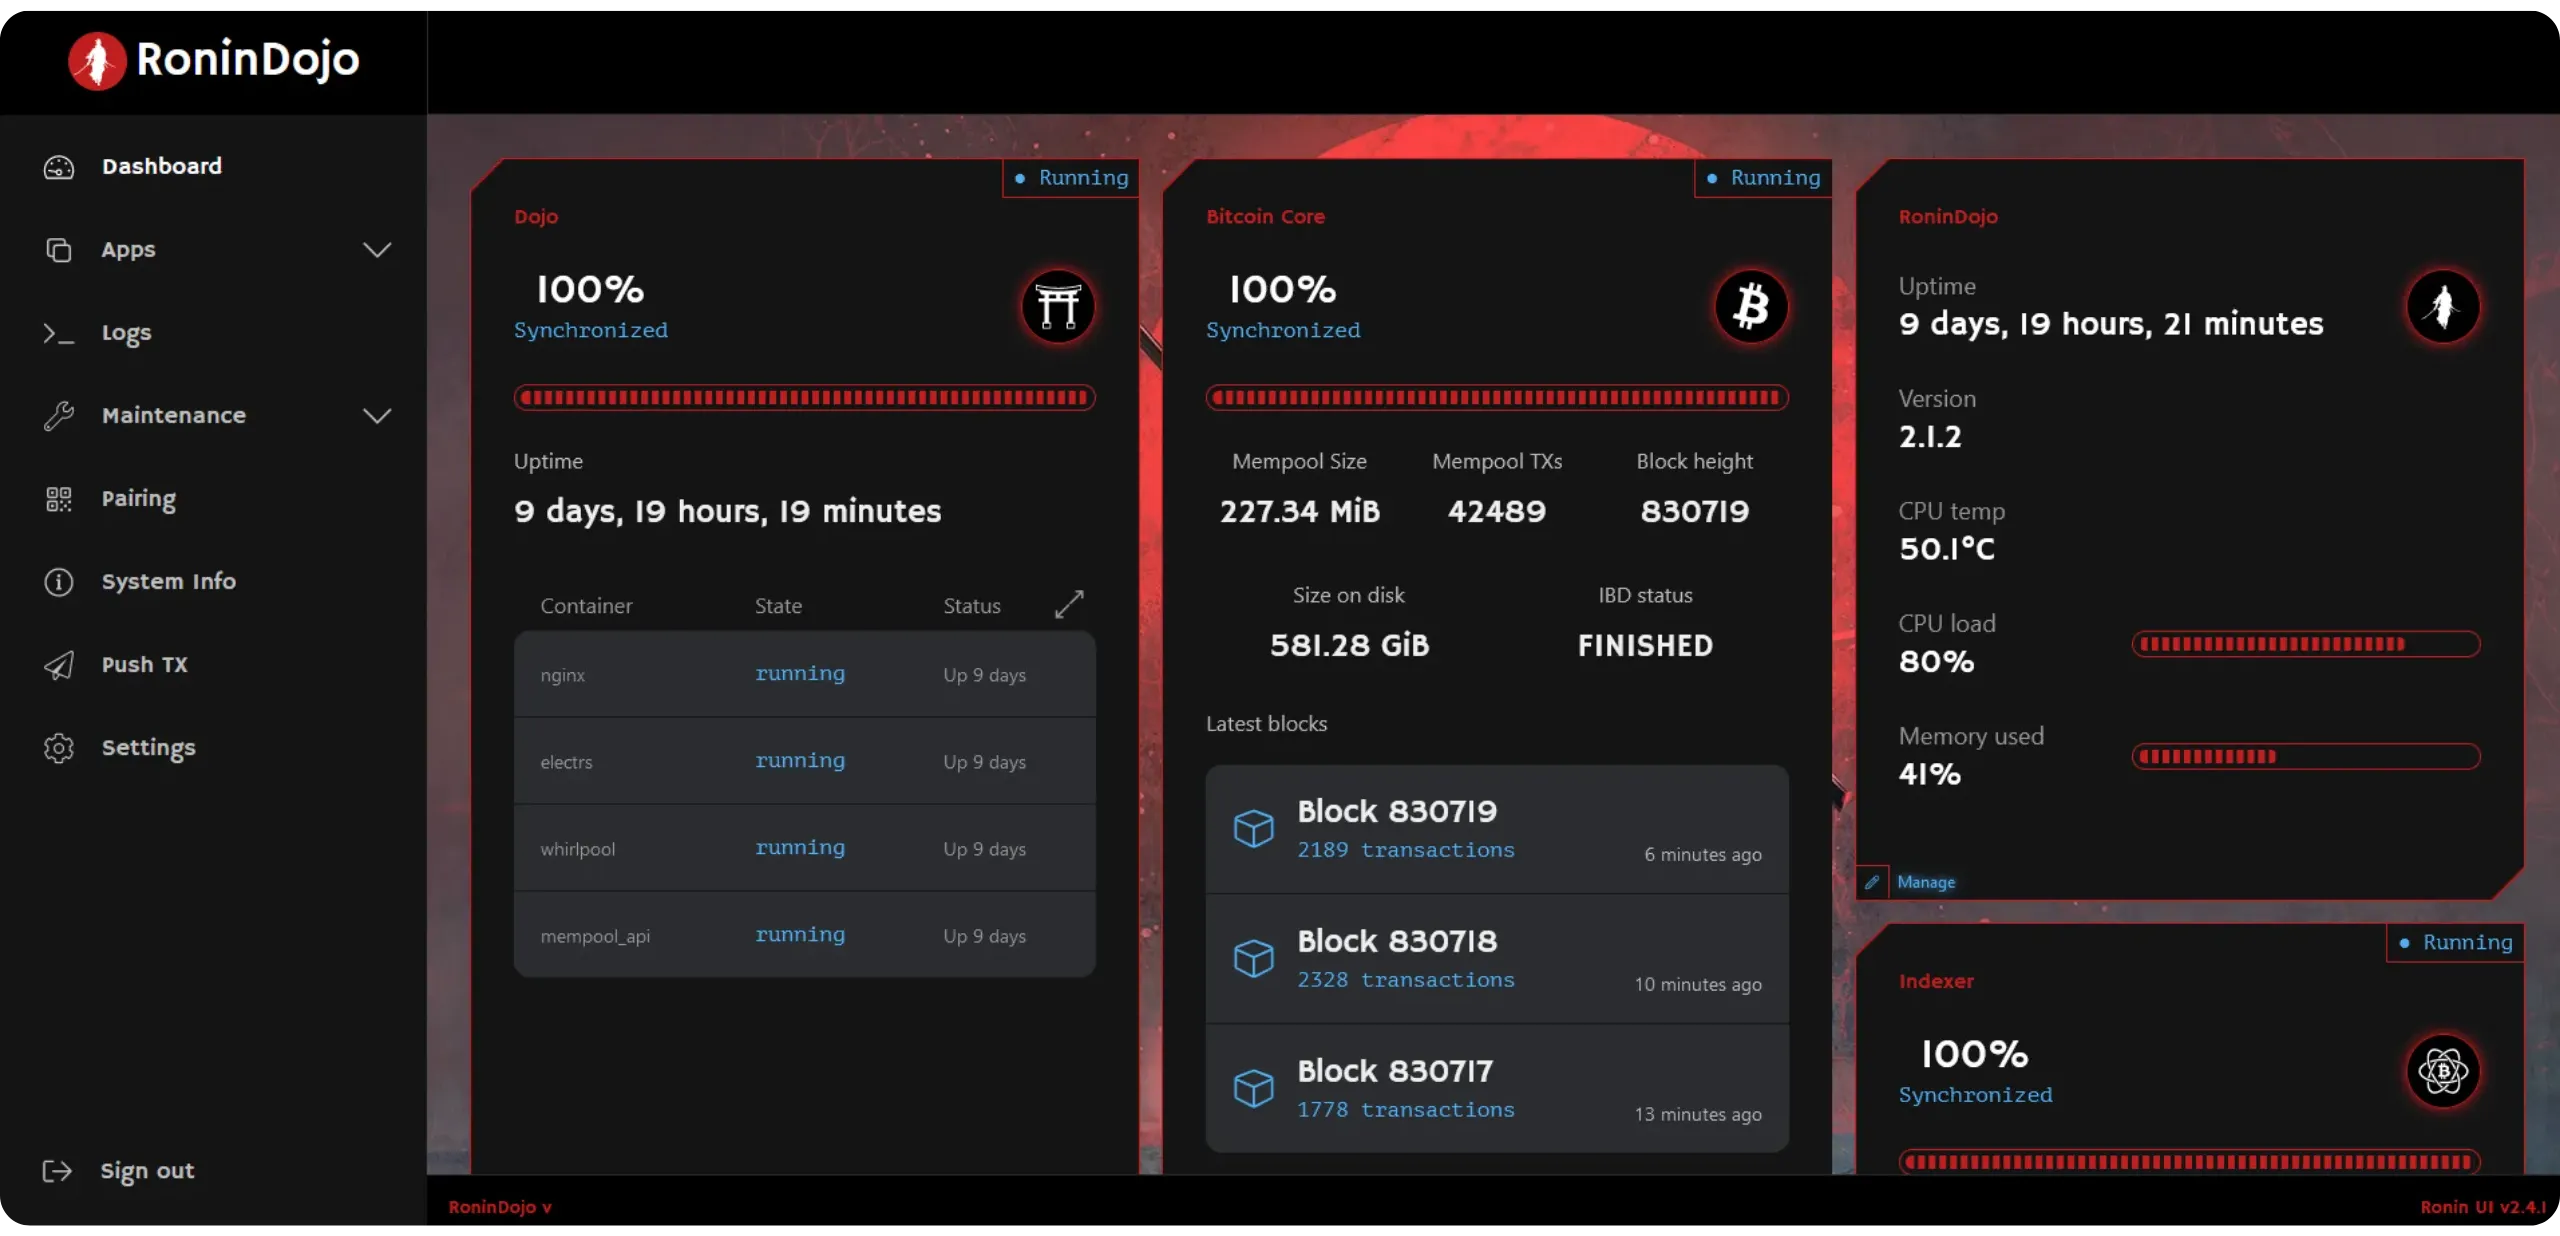
The project previously offered a pre-configured machine called the Tanto, but this is currently unavailable. It may return at a later date. In the meantime, it's possible to easily install RoninDojo on a Rock5B+ or Rockpro64, or even indirectly on a Raspberry Pi.
https://planb.academy/tutorials/node/bitcoin/ronin-dojo-v2-0ddb3854-6f38-4466-b4e2-f66c028e0dd8
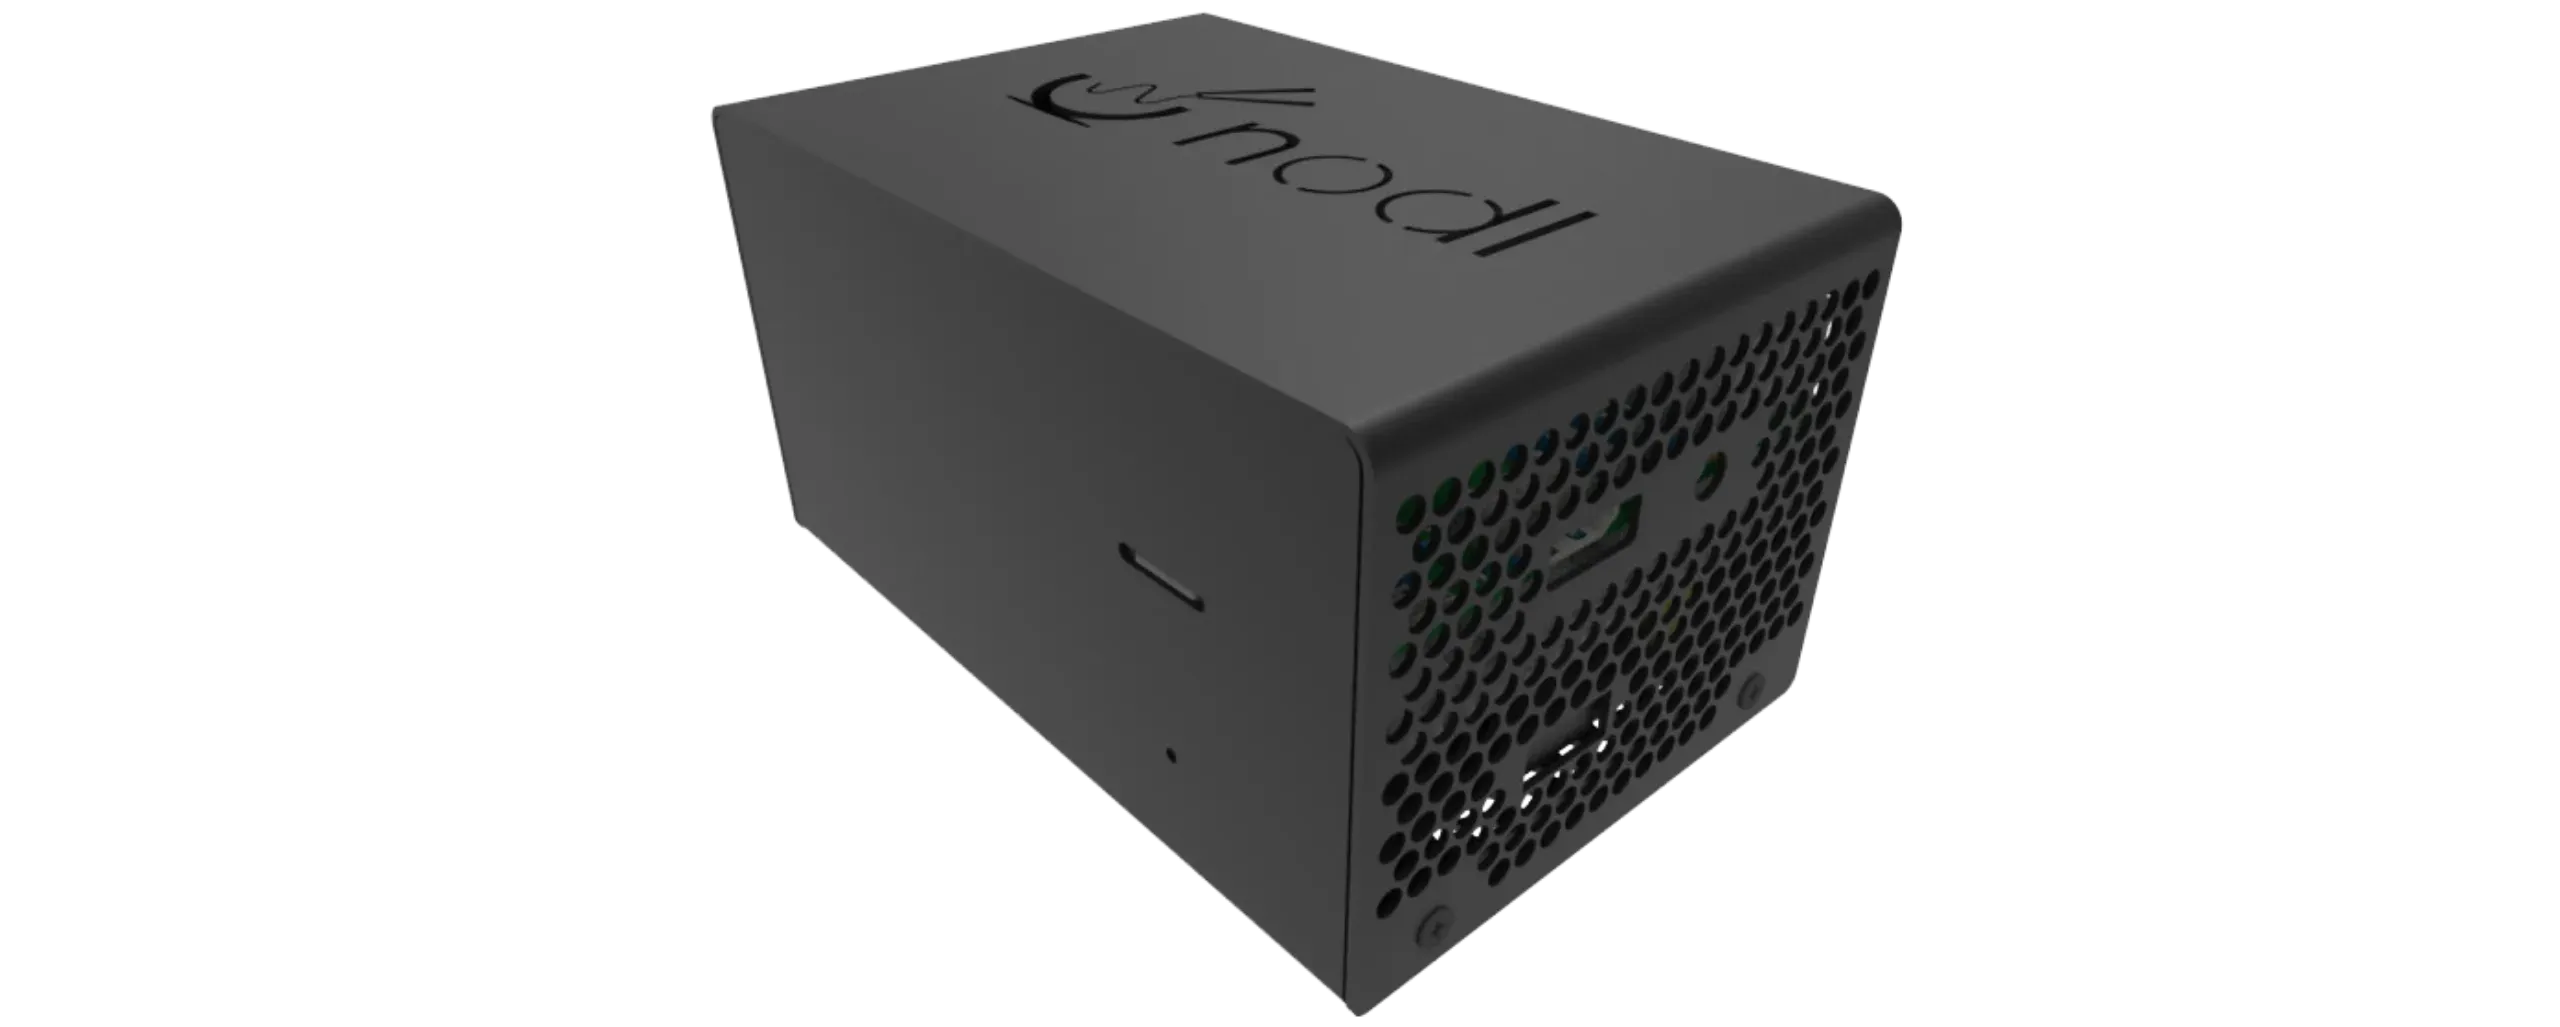
### Nodl
Another [node-in-a-box solution is Nodl](https://www.nodl.eu/). As with the previous projects, you can either buy the preconfigured hardware (between €599 and €799, depending on the model) or install it yourself in DIY mode.
On the software side, Nodl integrates Bitcoin Core, LND, BTCPay Server, Electrs, Dojo, Whirlpool, Lightning Terminal, RTL, as well as BTC RPC Explorer, all with an integrated update chain and open-source code under the MIT license.
Having explored the various software solutions, it's now time to choose the machine that will host your node!
## Overview of hardware solutions
245d6add-9cda-46b9-9343-31dcdd70456e
Now that we've explored all the software possibilities, let's focus on the hardware required for your node. I'll provide you with some concrete advice on selecting your components, along with configurations tailored to suit different budgets. Of course, this is my personal opinion and feedback: there are certainly other relevant alternatives in addition to those presented here. Furthermore, I won't revisit the pre-assembled machines offered by node-in-a-box projects, which we've already covered in the previous chapter. Here, we will focus exclusively on DIY solutions.
### Do you really need a dedicated machine?
Over the past few years, bitcoiners have become increasingly aware of a common misconception, particularly with the popularization of node-in-a-box in the early 2020s: a Bitcoin node should necessarily run on a machine dedicated exclusively to this purpose. But this is not true. You don't necessarily need a dedicated computer to run a Bitcoin node: Bitcoin Core is perfectly capable of running on your everyday PC. If you have sufficient disk space for blockchain or enable pruning, you can validate the chain, connect your wallet, and even close the program when you're done using it. The advantage of this approach is considerable: zero initial investment and minimal complexity.
That said, using a dedicated machine is often more comfortable. It can run continuously (24/7), be remotely accessible at all times, not monopolize the resources of your main machine, and, above all, isolate uses (a good security practice: if your personal PC encounters a problem, your node continues to function, and vice versa). So the question isn't "Do I need to dedicate a machine?", but rather "Do I need a node that's constantly online, accessible by other devices, and capable of evolving?" (Lightning, indexers, additional applications...). If the answer is yes, opting for a separate machine will make things much simpler.
### 3 acquisition methods: recycling, second-hand, and new
#### Recycling an old PC
It's the most economical solution. Most of us have an old PC gathering dust at home, or with friends and family: this is the perfect opportunity to bring it back into service! To adapt it for use as a Bitcoin node, simply add a 2TB SSD and, depending on your needs, replace or add RAM bars to increase the RAM. Expect to pay between €100 and €200 for a fully functional machine.
Before purchasing any hardware, check the number of disk slots available, the type of connection (M.2 or SATA), the RAM format (SODIMM or DIMM), and its generation (DDR4, etc.). You should also take the opportunity to clean the machine, especially the fan, to ensure optimum performance.
Be careful, however, if you're using a laptop: the battery can become a problem over time (more on this later in the chapter).
#### Reconditioned or used
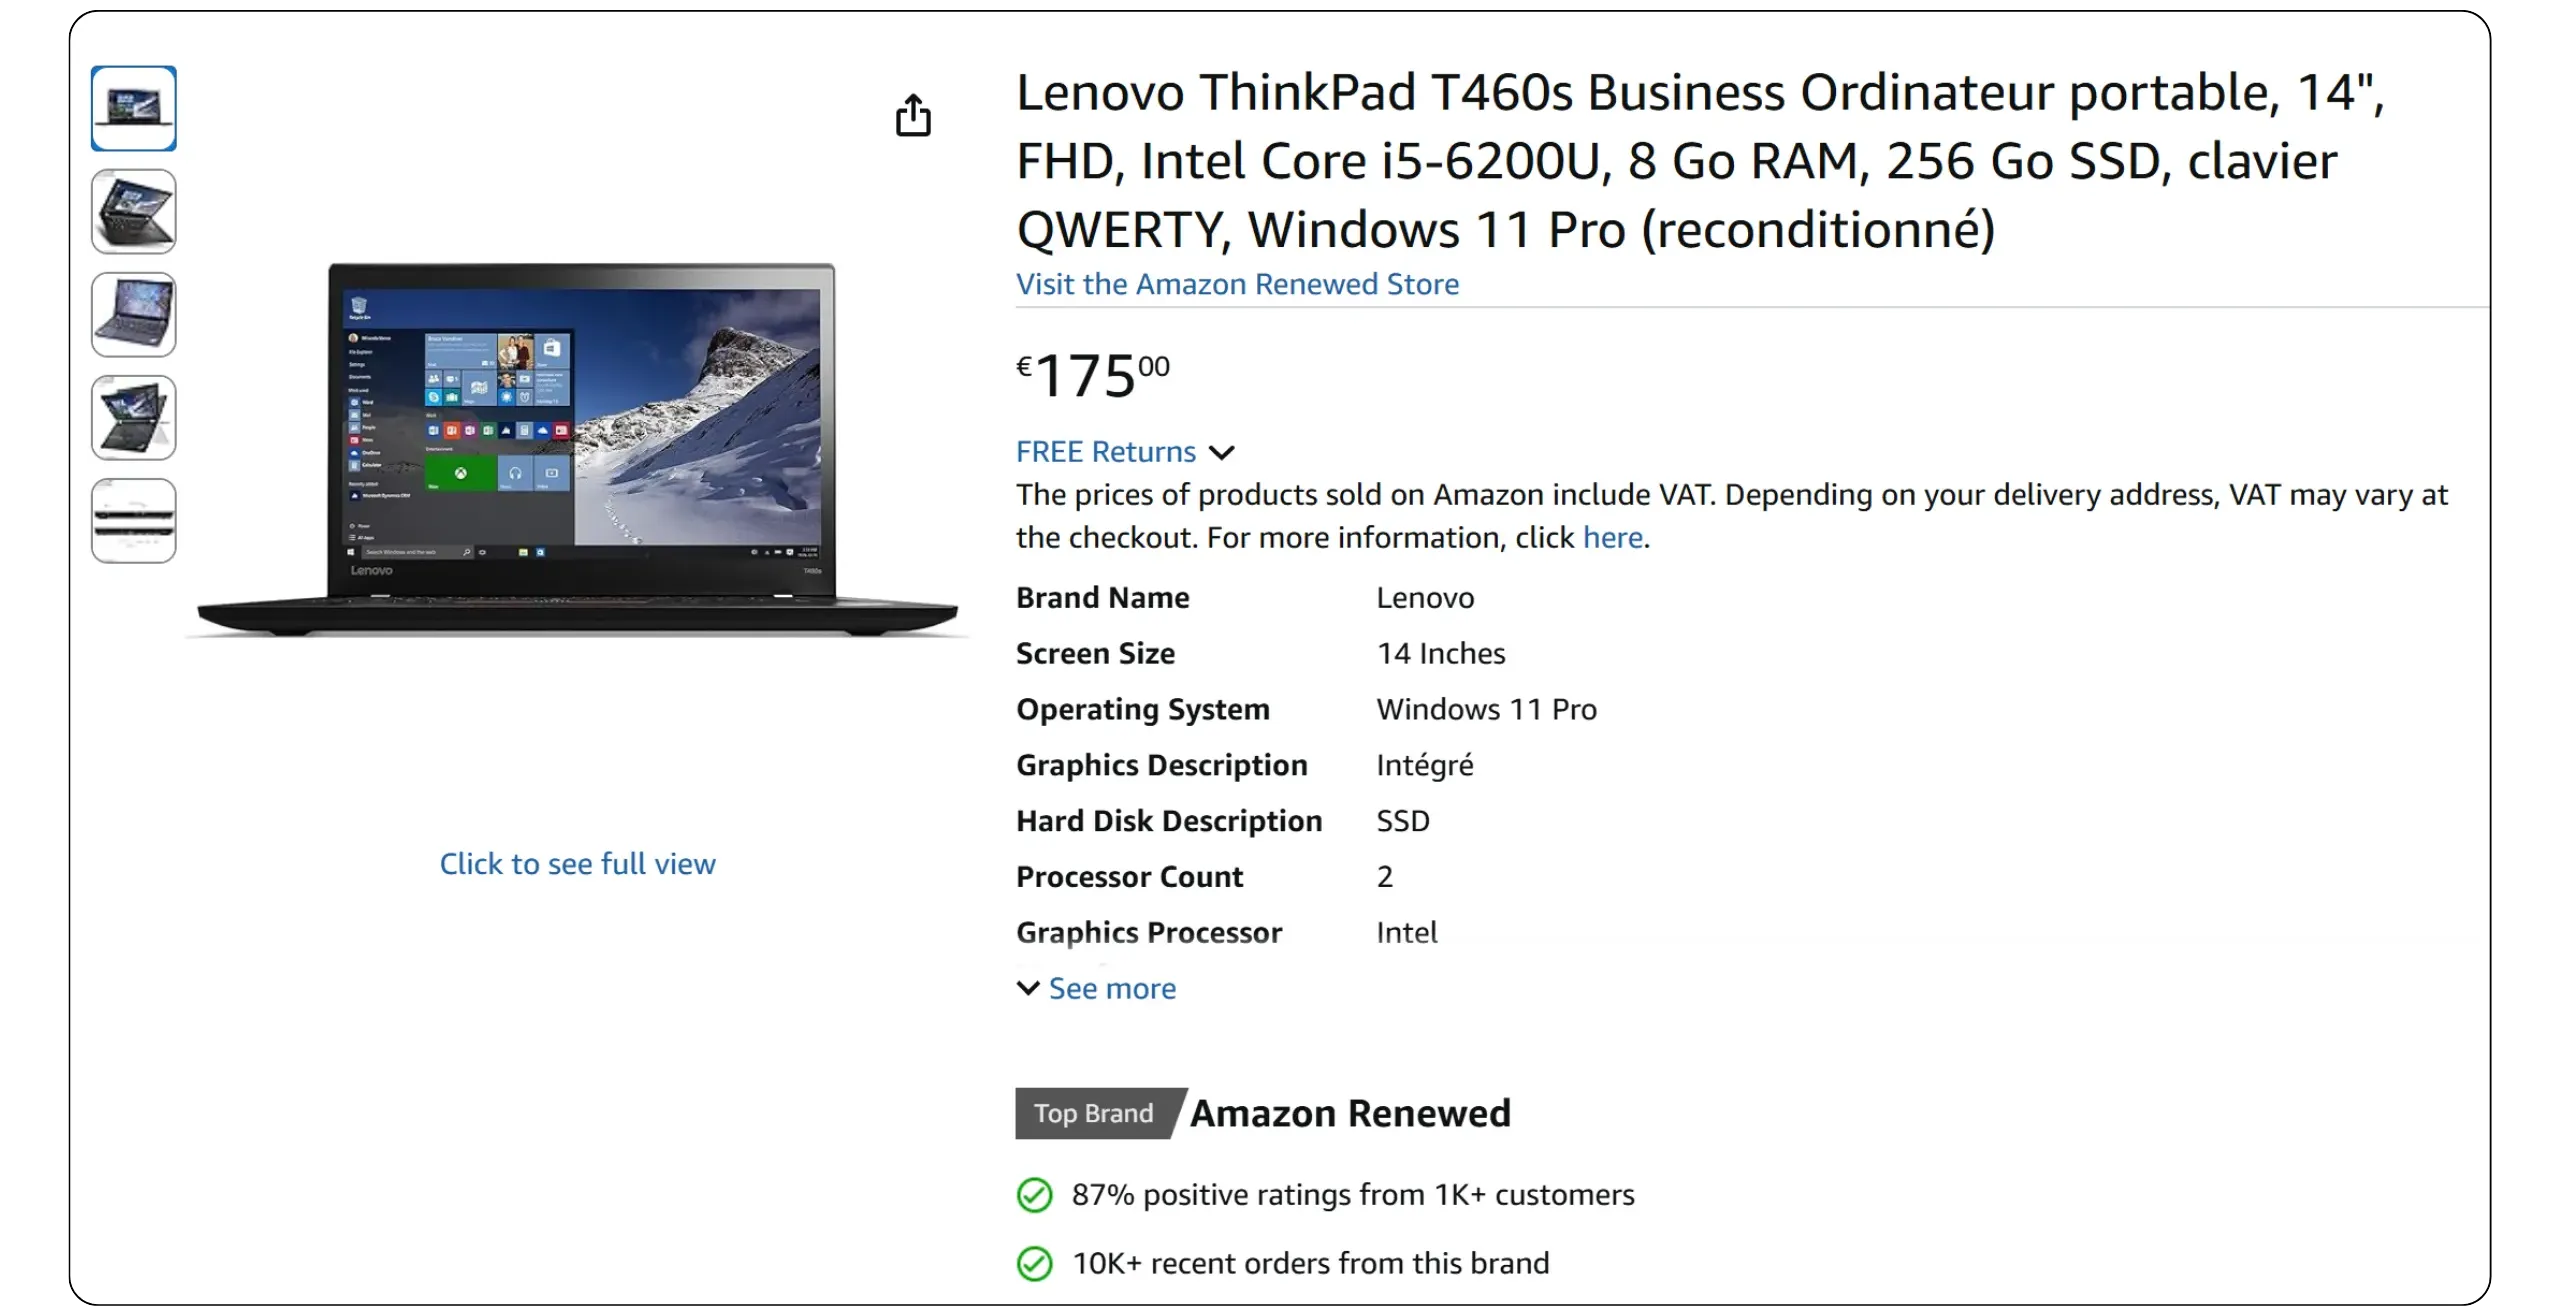
The market is full of refurbished business mini-PCs such as *Lenovo ThinkCentre Tiny*, *HP EliteDesk Mini*, or *Dell OptiPlex Micro*. These machines are solid, compact, silent, and energy-efficient. Their price is well below new, and it's easy to find models equipped with 6th to 10th generation i5/i7 processors and 8 to 16 GB RAM, all for very attractive prices, generally between €70 and €200, depending on the configuration. In my opinion, this is likely the best option if you're seeking a dedicated machine for your Bitcoin node.
It's also possible to find used PCs and laptops dating back a few years, with interesting configurations and excellent value for money.
**Note:** machines from corporate fleets, such as the *ThinkCentre Tiny*, are often only equipped with a *DisplayPort* (DP) port for the screen, with no HDMI output. So don't forget to bring an adapter or a DP-to-HDMI cable if you need one.
#### Buying new
If your budget allows, you can also opt for a new machine. This is a good option if you want to have recent hardware with good performance, especially if you plan to use Umbrel or Start9 with additional applications outside the Bitcoin ecosystem for self-hosting.
### What type of machine should I choose?
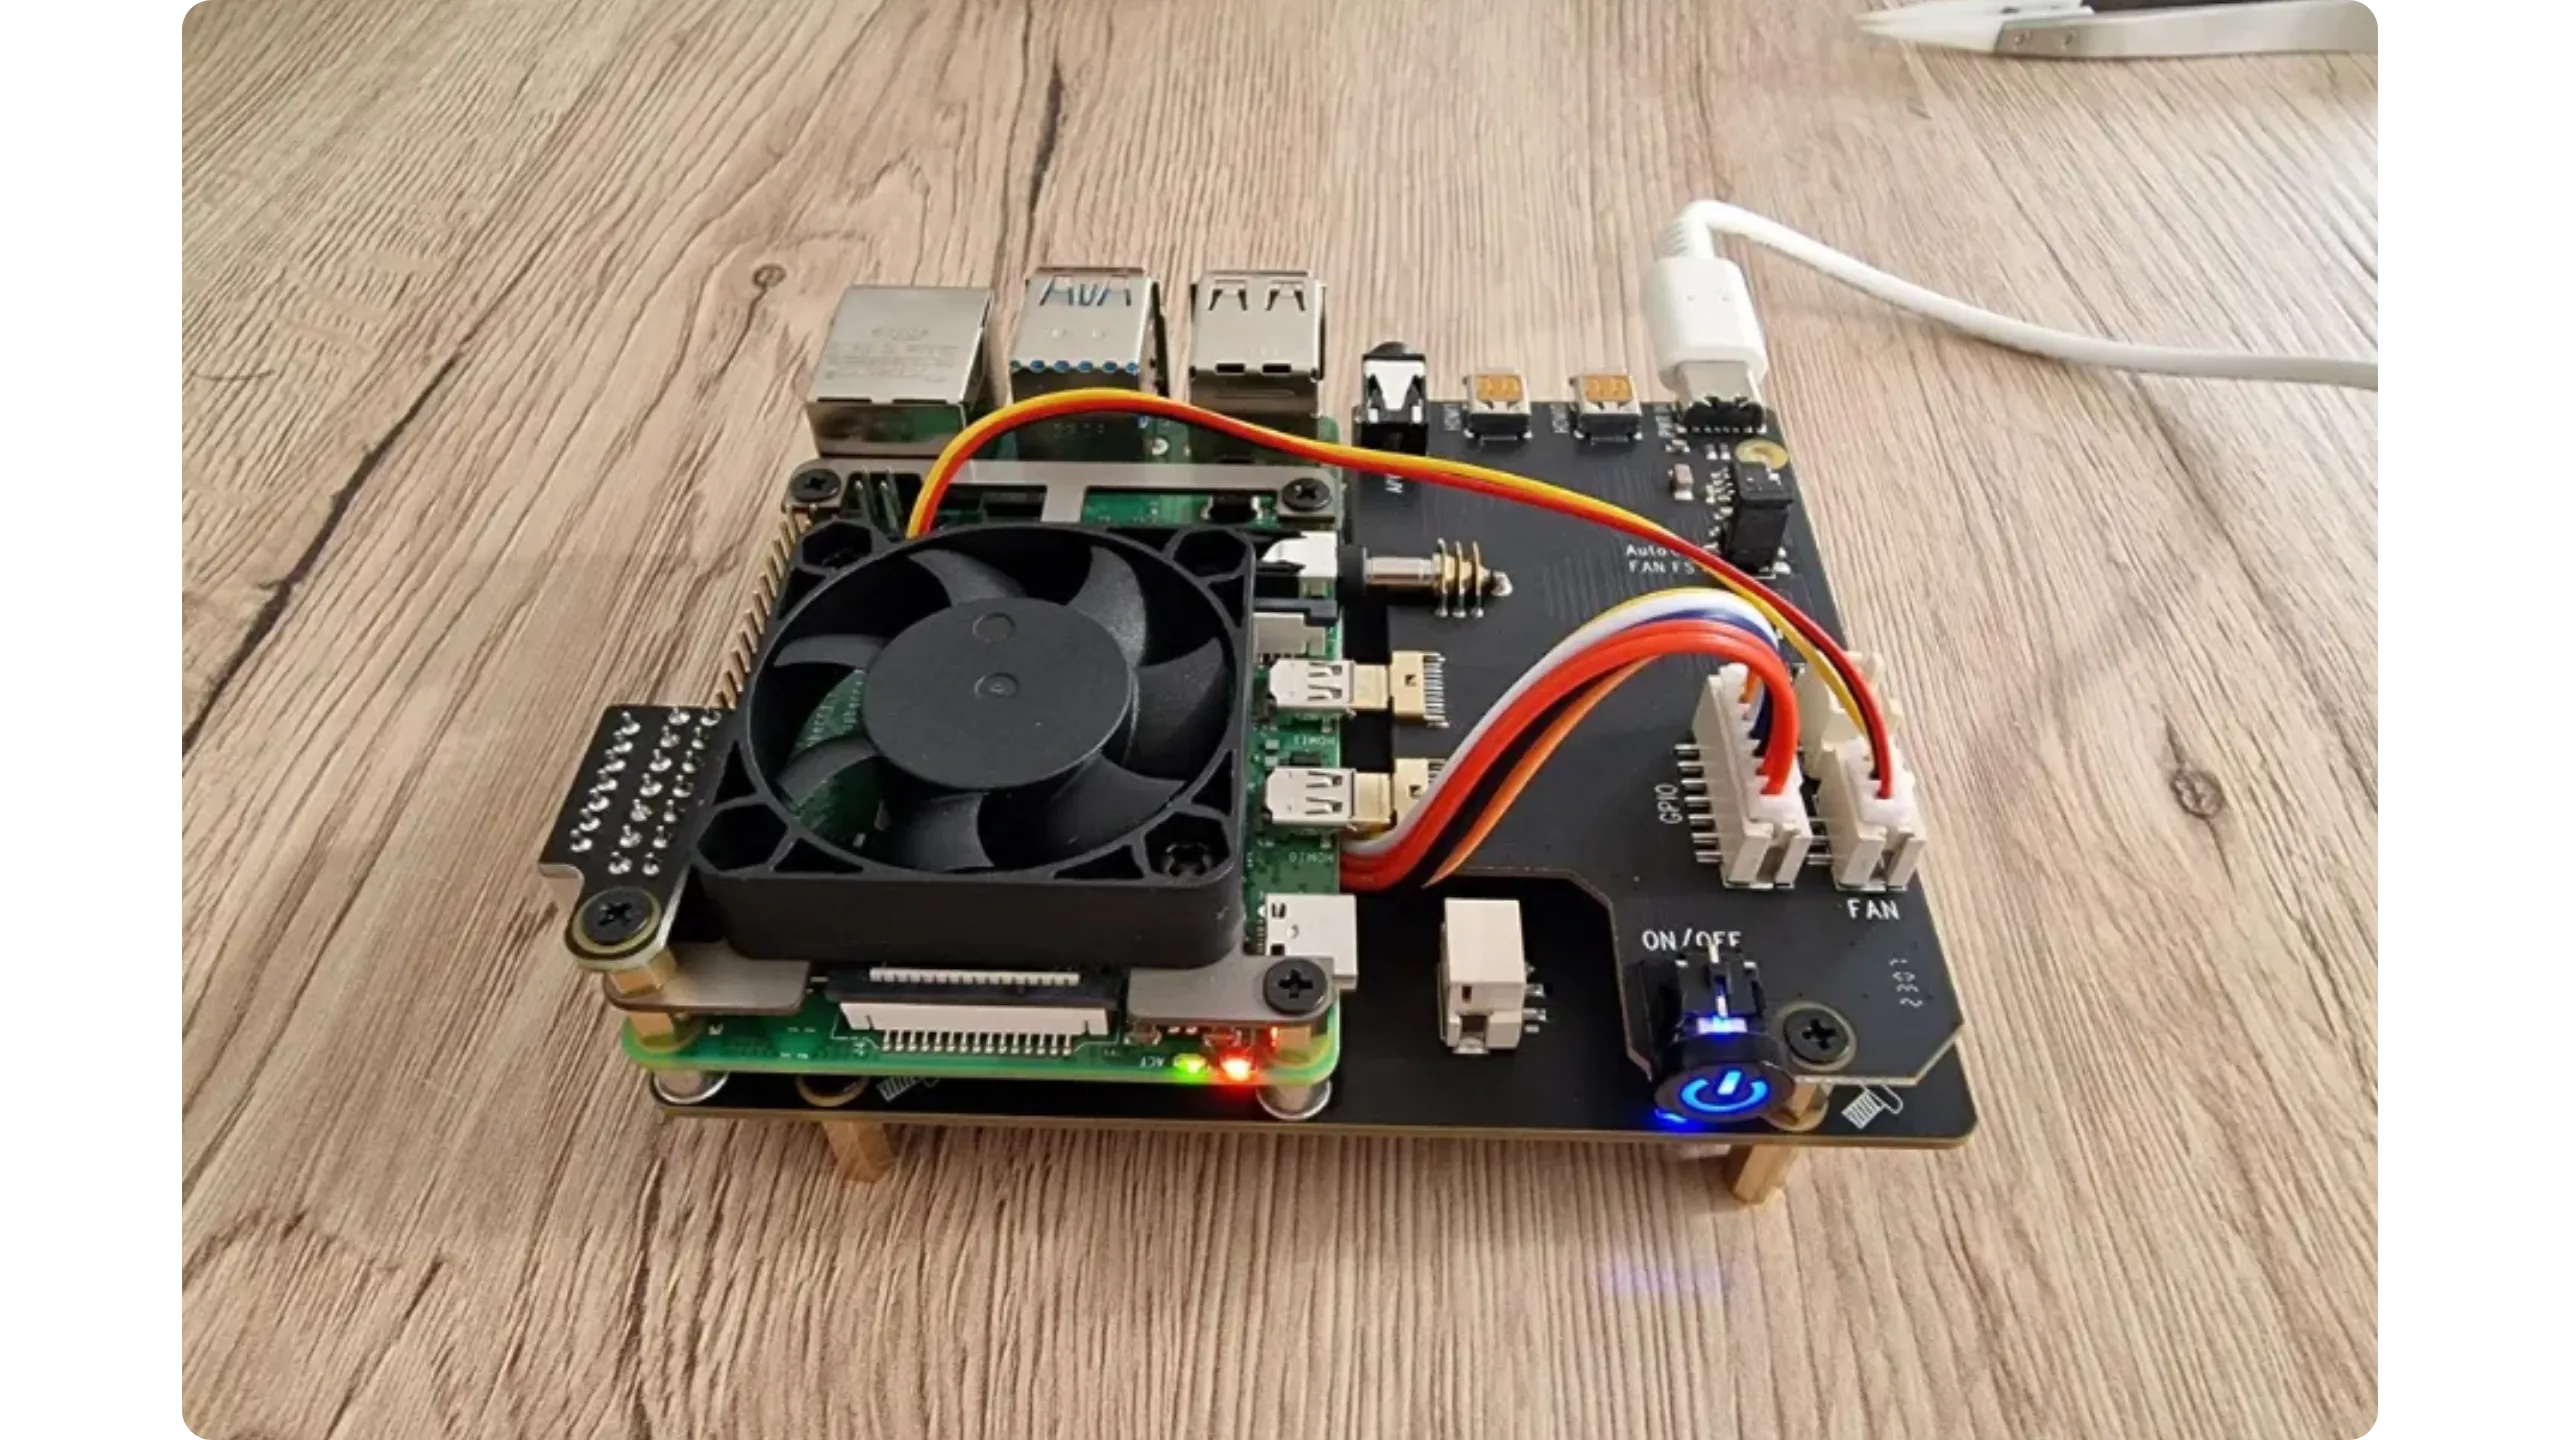
#### Mini-PC "NUC" / barebone
Mini-PCs, in my opinion, offer the best compromise for hosting a Bitcoin node at home. Space-saving, they fit easily on a shelf, consume minimal power, and lend themselves to easy hardware modifications, such as adding RAM or replacing the SSD.
Personally, I prefer the *Lenovo ThinkCentre Tiny*, which is very widespread on the second-hand market (from corporate fleets); they are particularly robust and easy to modify. There are, of course, many equivalents from other manufacturers: *Dell OptiPlex Micro*, *HP ProDesk / EliteDesk Mini / Micro*, *Intel NUC*, *Gigabyte BRIX*, *MSI Cubi*..

**Highlights:** small footprint, moderate power consumption, low noise, scalability (depending on model), and reliability.
**Weaknesses:** slightly more expensive than a Raspberry Pi-type SBC, no built-in screen (remote access or via external monitor), no battery (sudden shutdown in the event of a power cut).
#### Dedicated laptop
It's an excellent low-cost alternative to the mini-PC: today, you can find used or even new laptops at low prices, equipped with decent processors, numerous ports, as well as an integrated screen and keyboard (very practical for initial installation). Above all, the battery acts as a natural UPS: in the event of a power cut, the node doesn't shut down abruptly, and can even remain operational for several hours.
**Highlights:** All-in-one solution, the battery acts as a UPS (no blackouts), simplified installation thanks to an integrated display and keyboard, an integrated Wi-Fi card, and a wide choice on both used and new markets (which often means you can negotiate prices).
**Weaknesses:** slightly higher power consumption than a bare Mini-PC, gradual battery wear in 24/7 operation with loss of capacity, rare but real risk of battery swelling or thermal runaway with age. It's mainly this aspect that makes me consider the mini-PC a better option than the laptop: the gradual degradation of the battery and the associated risks.
If you choose this solution, I recommend keeping a close eye on the battery's condition to prevent any danger. Watch for excessive heat, unusual odors, instability, or a deformed shell. In the event of an alarm, switch off and unplug the computer immediately, then dispose of the battery at a specialized recycling facility.
**Tip:** If BIOS/UEFI or the manufacturer's tool allows it, set a load limit (e.g., 60% or 80%) to extend battery life.
#### Raspberry Pi and other SBCs: the wrong idea
In the early 2020s, with the rise of node-in-a-box software, the Raspberry Pi craze also emerged as a means to run a Bitcoin node. The idea seemed attractive: inexpensive, compact, and accessible.
In practice, if your goal is solely to run a Bitcoin node without additional applications, a Raspberry Pi may be sufficient. But as soon as you want to use Umbrel, Start9, or a richer ecosystem (block explorer, address indexer, Lightning node, self-hosting apps...), the machine quickly reaches its limits.
The Raspberry Pi has a number of disadvantages:
- processors that are too slim, with an ARM architecture that is sometimes incompatible with certain software or requires more handling;
- Soldered RAM, impossible to upgrade, with limited configurations (often a maximum of 8 GB);
- external boxes for SSDs connected by cable, frequent sources of bugs, requiring the purchase of a specific card for a stable SSD;
- tendency to heat up quickly and difficulty in ensuring correct cooling;
- need to purchase additional hardware (case, fan, SSD card, etc.);
- very limited connectivity.
Historically, the great advantage of SBCs like the Raspberry Pi was their price: for a few dozen euros, you could get a dedicated machine. However, today, prices have risen sharply, and once you've added all the essential additional hardware, the cost is approaching that of the first used or refurbished x86 mini-PCs, which, in my opinion, offer far more advantages. For this reason, I don't recommend opting for an SBC.
### Selecting components
#### Disk storage: SSD mandatory, 2 TB minimum
Technically, it is possible to run a Bitcoin node on an HDD. The problem is that everything will slow down considerably, especially the IBD, which will become extremely long due to Bitcoin Core's intensive use of the disk as a cache (especially for the UTXO set). This is why I strongly advise against using an HDD: it creates a real bottleneck, severely limits future evolution (e.g., for a Lightning node), and may even lead to a synchronization mismatch with the blockchain head. What's more, constant stress on the mechanical disk increases the risk of premature wear.
SSDs radically change your user experience: everything becomes faster and smoother, with far greater reliability. The use of an SSD is therefore (almost) mandatory for your node, and you won't regret it, especially as high-capacity models are now relatively affordable.
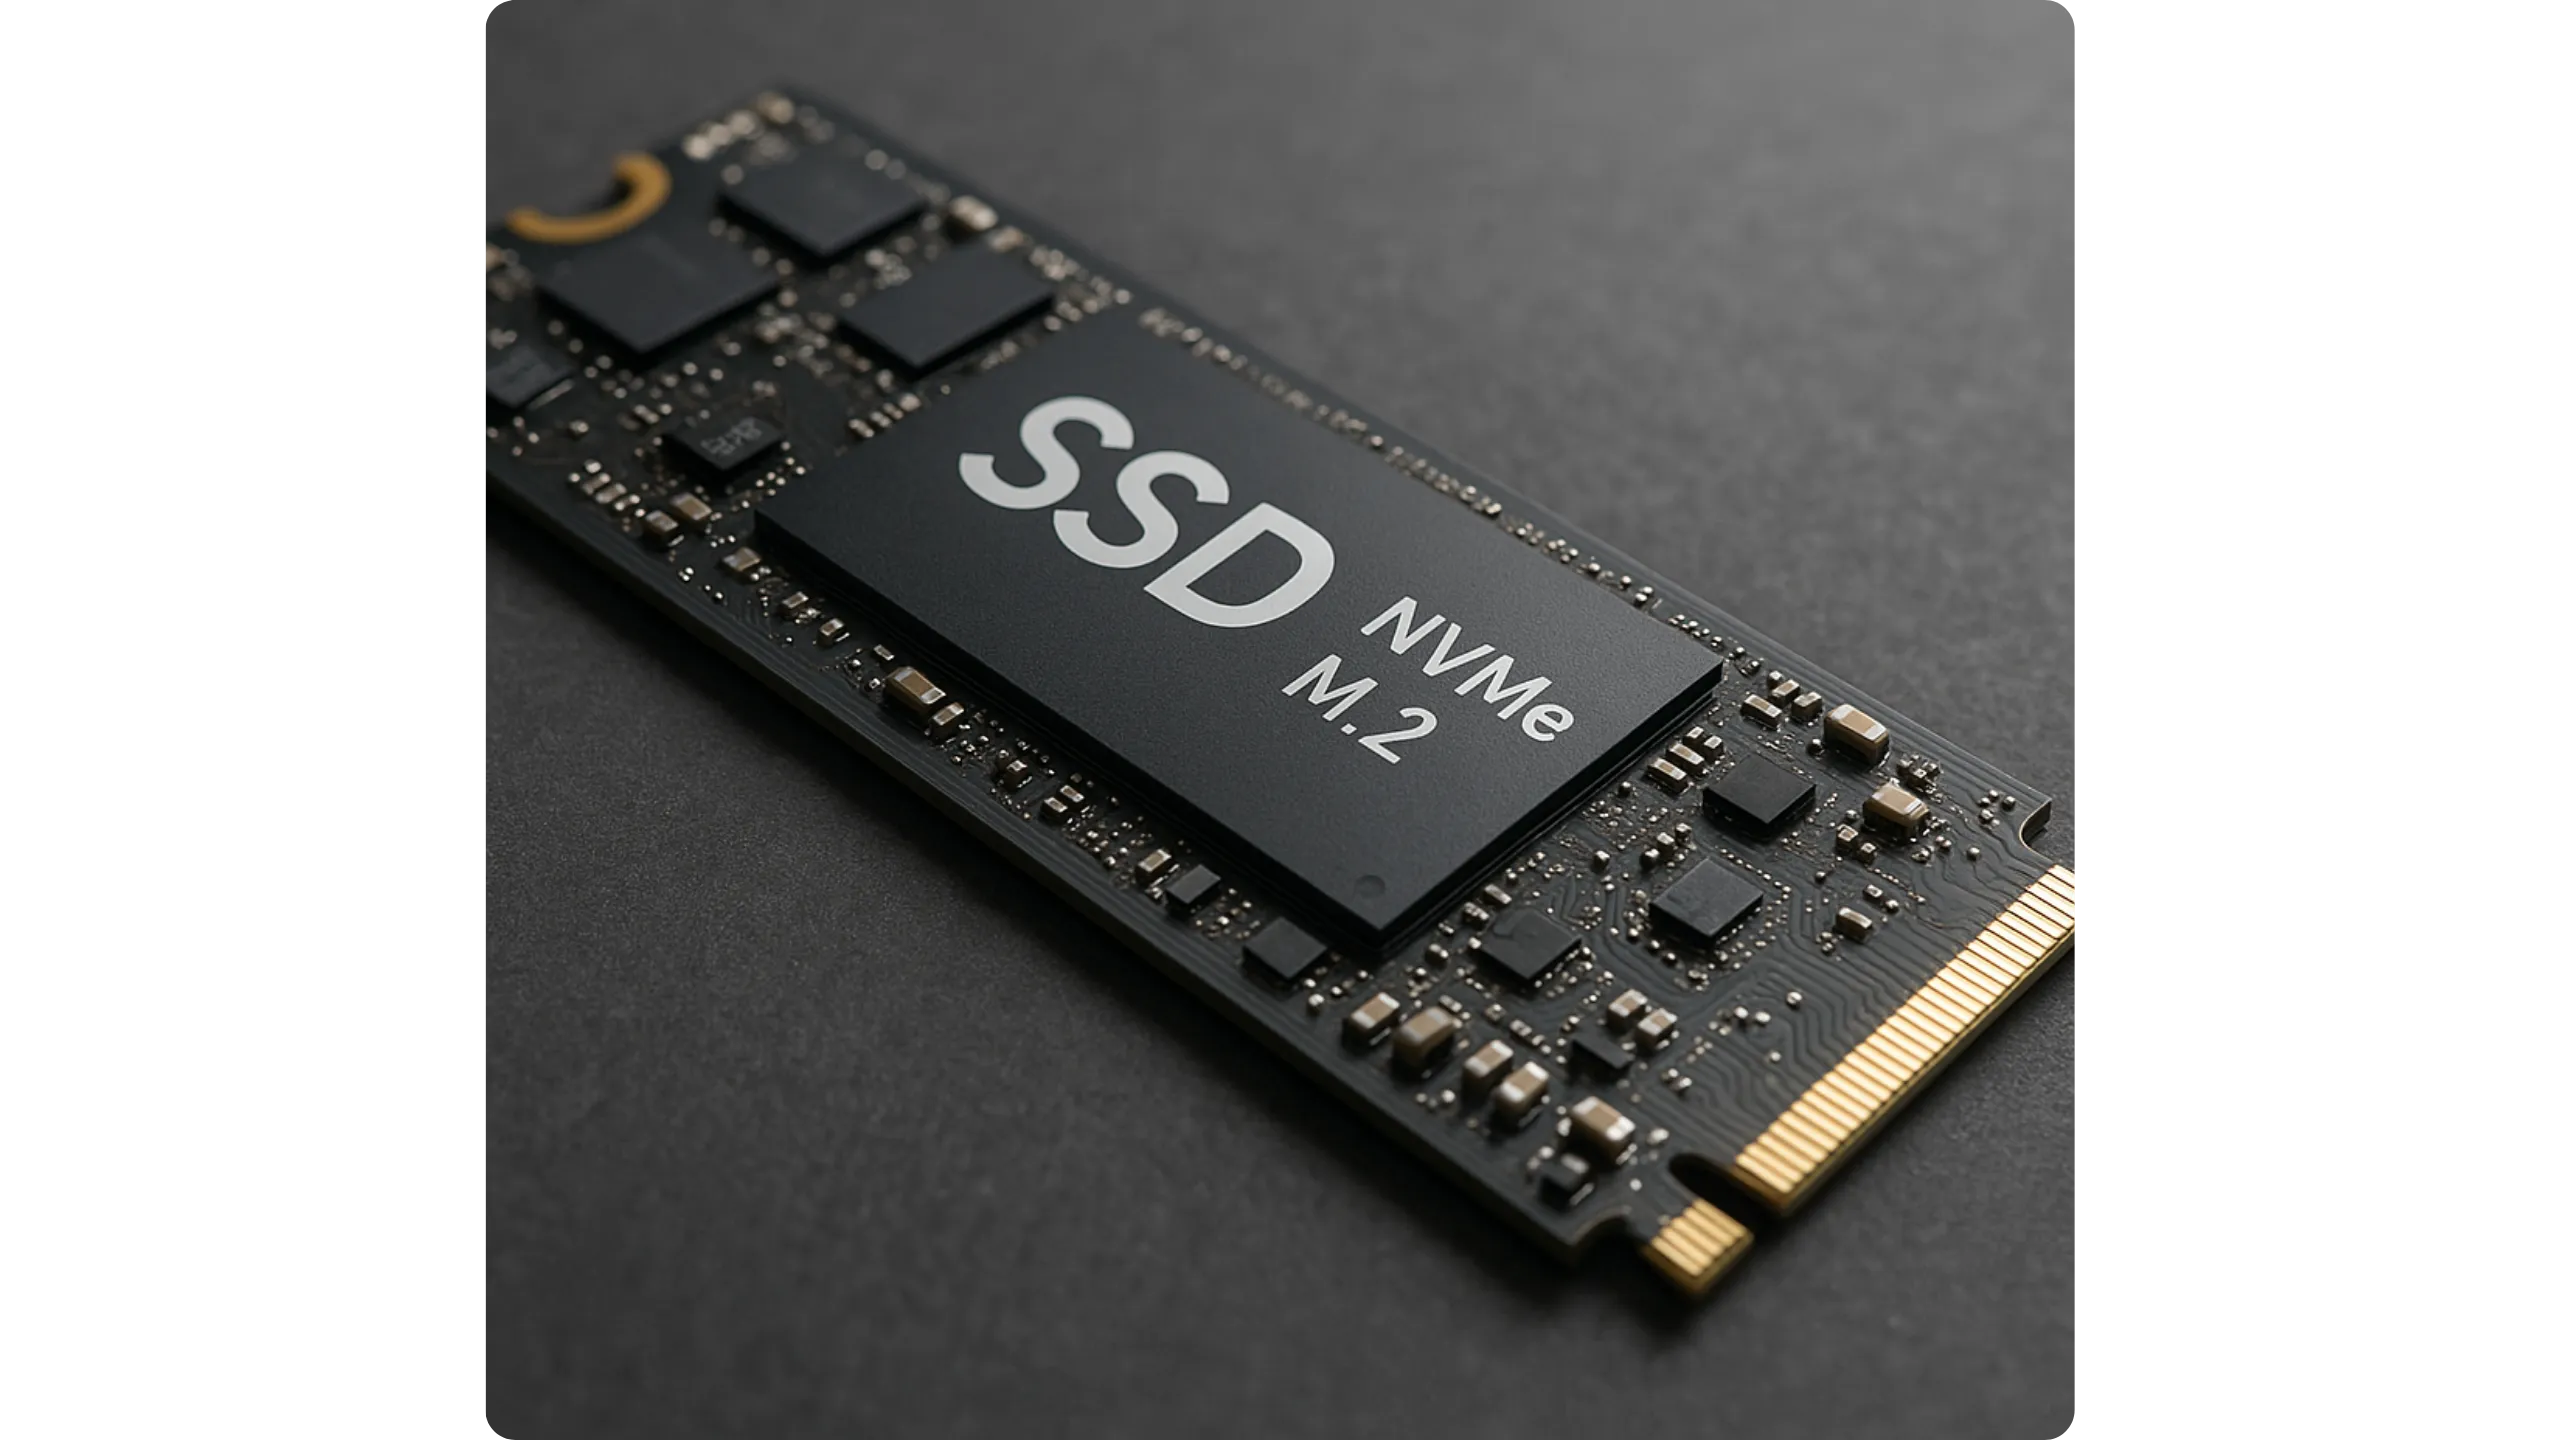
In terms of capacity, 2TB is gradually establishing itself as the new reasonable minimum. In the summer of 2025, blockchain is already approaching 700 GB, and if you add Umbrel, an address indexer, and a few applications, a 1 TB SSD will quickly be saturated. With 2TB, you have a comfortable margin for the years to come (in a broad estimate, between 5 and 15 years). You can also opt for 4TB if you plan to use many applications on Umbrel, store large files in self-hosting, or if you want to anticipate your disk space needs to a large extent.
As for the format, this will depend on the ports available on your machine; however, if possible, I recommend using an NVMe M.2 SSD.
#### Memory (RAM): 8 to 16 GB
For Bitcoin Core alone (without Umbrel overlay), developer recommendations indicate a minimum of 256 MB RAM with settings adjusted to the lowest setting, 512 MB with default settings, and 1 GB for normal use.
On the other hand, if you're using a node-in-a-box system like Umbrel or Start9, the RAM requirements are significantly higher. The Umbrel developers recommend a minimum of 4 GB RAM. This may be enough to run Core only, but you'll soon be limited. They therefore recommend 8 GB, which I also consider the minimum for a basic configuration around Bitcoin (Core, LND, indexer, and a few applications). In my experience, with Umbrel and a few additional services, 8 GB is still a bit tight. To be really comfortable and have some margin, I'd recommend 16 GB RAM.
#### Processor (CPU)
For an Umbrel node, the minimum requirement is a dual-core 64-bit processor from Intel or AMD. If you want to use a few applications in addition to Bitcoin Core, a quad-core (or higher) will make a real difference in terms of fluidity. For example, 6th to 10th generation i5/i7 processors are excellent options on the used market.
### Examples of concrete configurations
Below, I propose three concrete configurations, adapted to different budgets and needs, with precise models to support them. These choices are provided as examples to illustrate the information in this chapter; you're under no obligation to select exactly these models. As I consider the Mini-PC to be the best option in the long term, I'll be relying on this format for the three proposed configurations.
*Prices shown below are indicative only and may vary according to region, vendor, and period*
First and foremost, you need an SSD that's big enough to accommodate the blockchain, while still leaving room for manoeuvre. SSDs have a limited lifespan in terms of write cycles and total volume of data written. However, a Bitcoin node places a significant load on the disk when writing. That's why I don't recommend the entry-level models; instead, I suggest an NVMe SSD, which offers significantly better performance.
As an example, for the purposes of this course, I've chosen the following model: *Samsung 990 EVO Plus NVMe M.2 SSD 2Tb*, available for around €120 on Amazon. You can also opt for other well-known brands such as Crucial, Western Digital, or Kingston.

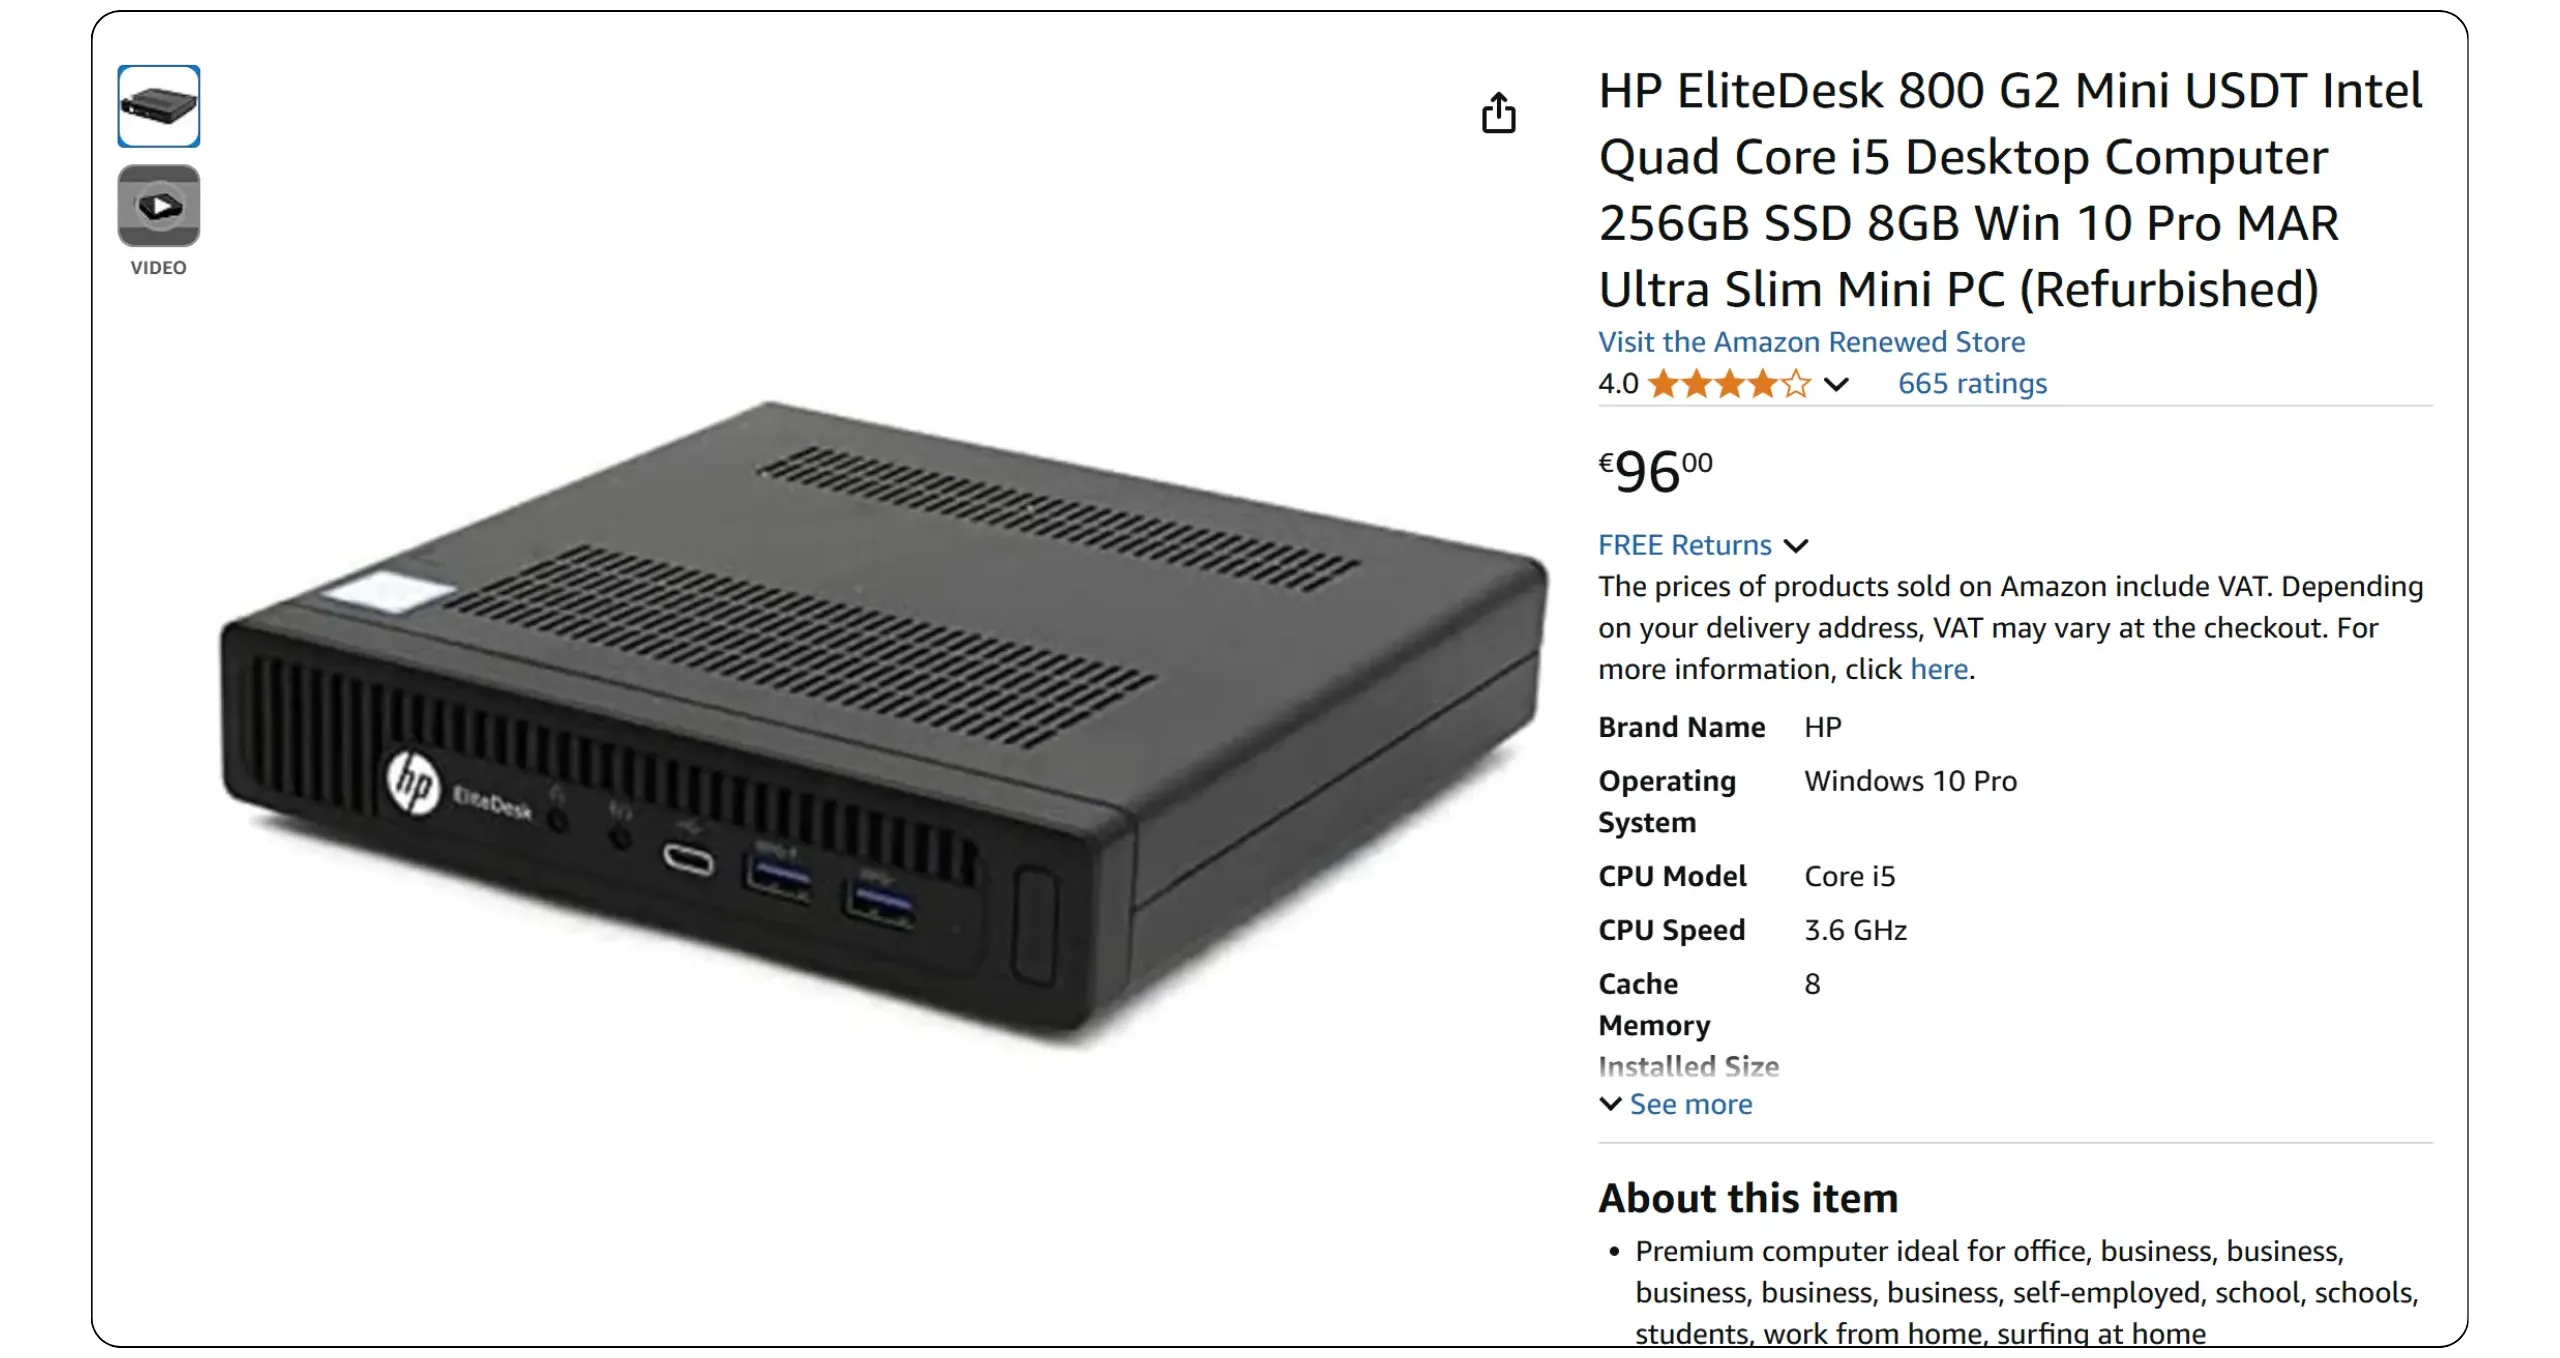
#### Low-budget configuration
Obviously, if your budget is very limited (under €200), I'd advise you not to invest in a dedicated machine, but rather to install Bitcoin Core directly on your everyday PC (in pruned mode if you're short of disk space).
Otherwise, for an entry-level budget, I recommend the *HP EliteDesk 800 G2 Mini*. I found a refurbished model for €96 on Amazon, equipped with a 6th-generation Intel Core i5 processor and 8 GB RAM. This is a particularly interesting option for beginners: this processor and this amount of memory are more than enough to run Core on Umbrel, as well as several applications simultaneously, such as an Electrs indexer, a Lightning node, and a Mempool instance, provided you don't allocate too much cache to Core. What's more, this type of mini-PC makes it easy to increase RAM to 16 GB, for example, should the need arise (expect to pay around €30-40 extra for one or two quality memory sticks).

Then simply add the SSD to the budget. Starting with the Samsung 2TB at €120, we get a total cost of €216 for a complete, functional machine.
#### Medium-budget configuration
If you have an average budget of around €300 for the machine that will host your node, I recommend a *Lenovo ThinkCentre Tiny*, for example, equipped with a high-performance processor and sufficient RAM. I found a refurbished model on Amazon for €180, featuring a 6th-generation Intel Core i7 processor and 16GB of RAM. With the addition of the 2TB SSD at €120, the total cost comes to €300.

With this machine, you have a comfortable configuration: a fast IBD and the ability to run numerous applications on your Umbrel or Start9 without difficulty. This is precisely the configuration I'm using for this BTC 202 course.
#### High-end configuration
With a larger budget, the possibilities become significantly wider. You can choose a DIY configuration, or even opt for a pre-assembled machine offered directly by a node-in-a-box project.
For example, the *ASUS NUC 14 Pro* is available new from Amazon for €540. For this price, you get an Intel Core Ultra 5 processor (recent and particularly high-performance), accompanied by 16 GB of DDR5 RAM. With such a configuration, you'll be able to complete an IBD in record time and install demanding applications without difficulty.
This is an extremely comfortable configuration, even overkill if the initial objective is simply to run a Bitcoin node. On the other hand, if you want to take full advantage of all the self-hosting applications available on Umbrel and Start9, this power level is just right for you.

Depending on your intended use, you can opt for either a 2TB SSD, as in the other configurations, or directly for a 4TB SSD at €260 if you also want to store personal files and extend your self-hosting uses. With a 2TB SSD, the total cost of the configuration is €660, while with a 4TB SSD, it reaches €800.
### A few more tips
- If you'd like to buy second-hand equipment and pay in bitcoins, come along to a meetup near you! By chatting with other participants, you're sure to find suitable equipment at a good price, while helping to keep the circular economy around Bitcoin alive. It's also an opportunity to benefit from sound advice from the community.
- For the Internet connection, you will of course need an RJ45 Ethernet cable, at least for the system installation.
- Some environments, such as Umbrel, then allow you to use Wi-Fi, but performance will generally be poorer (especially if you want to use your Lightning node remotely, as this can have an impact). If you choose Wi-Fi, ensure your machine has a built-in card or add a compatible dongle.
- Always use the original manufacturer's power supply for your machine. This is crucial to prevent damage to your equipment and to prevent the risk of starting a fire.
- If your machine doesn't have a built-in battery, it's a good idea to invest in an inverter to avoid sudden shutdowns.
- Depending on the value of your equipment and your geographical location, a lightning arrestor system may also be appropriate, either directly at the switchboard or on the power strip used.
- Finally, remember to optimize your machine's cooling: clean it regularly, and install it in a cool, well-ventilated, uncluttered place to avoid overheating, which could lead to throttling (voluntary limitation of your processor's speed).
# Installing a Bitcoin node easily
ca6cf2a5-0bcc-41d9-b556-0d38865bf98f
## Umbrel: much more than a Bitcoin node
dd4c04f1-924a-43e1-94f3-ea9fbc83dd43
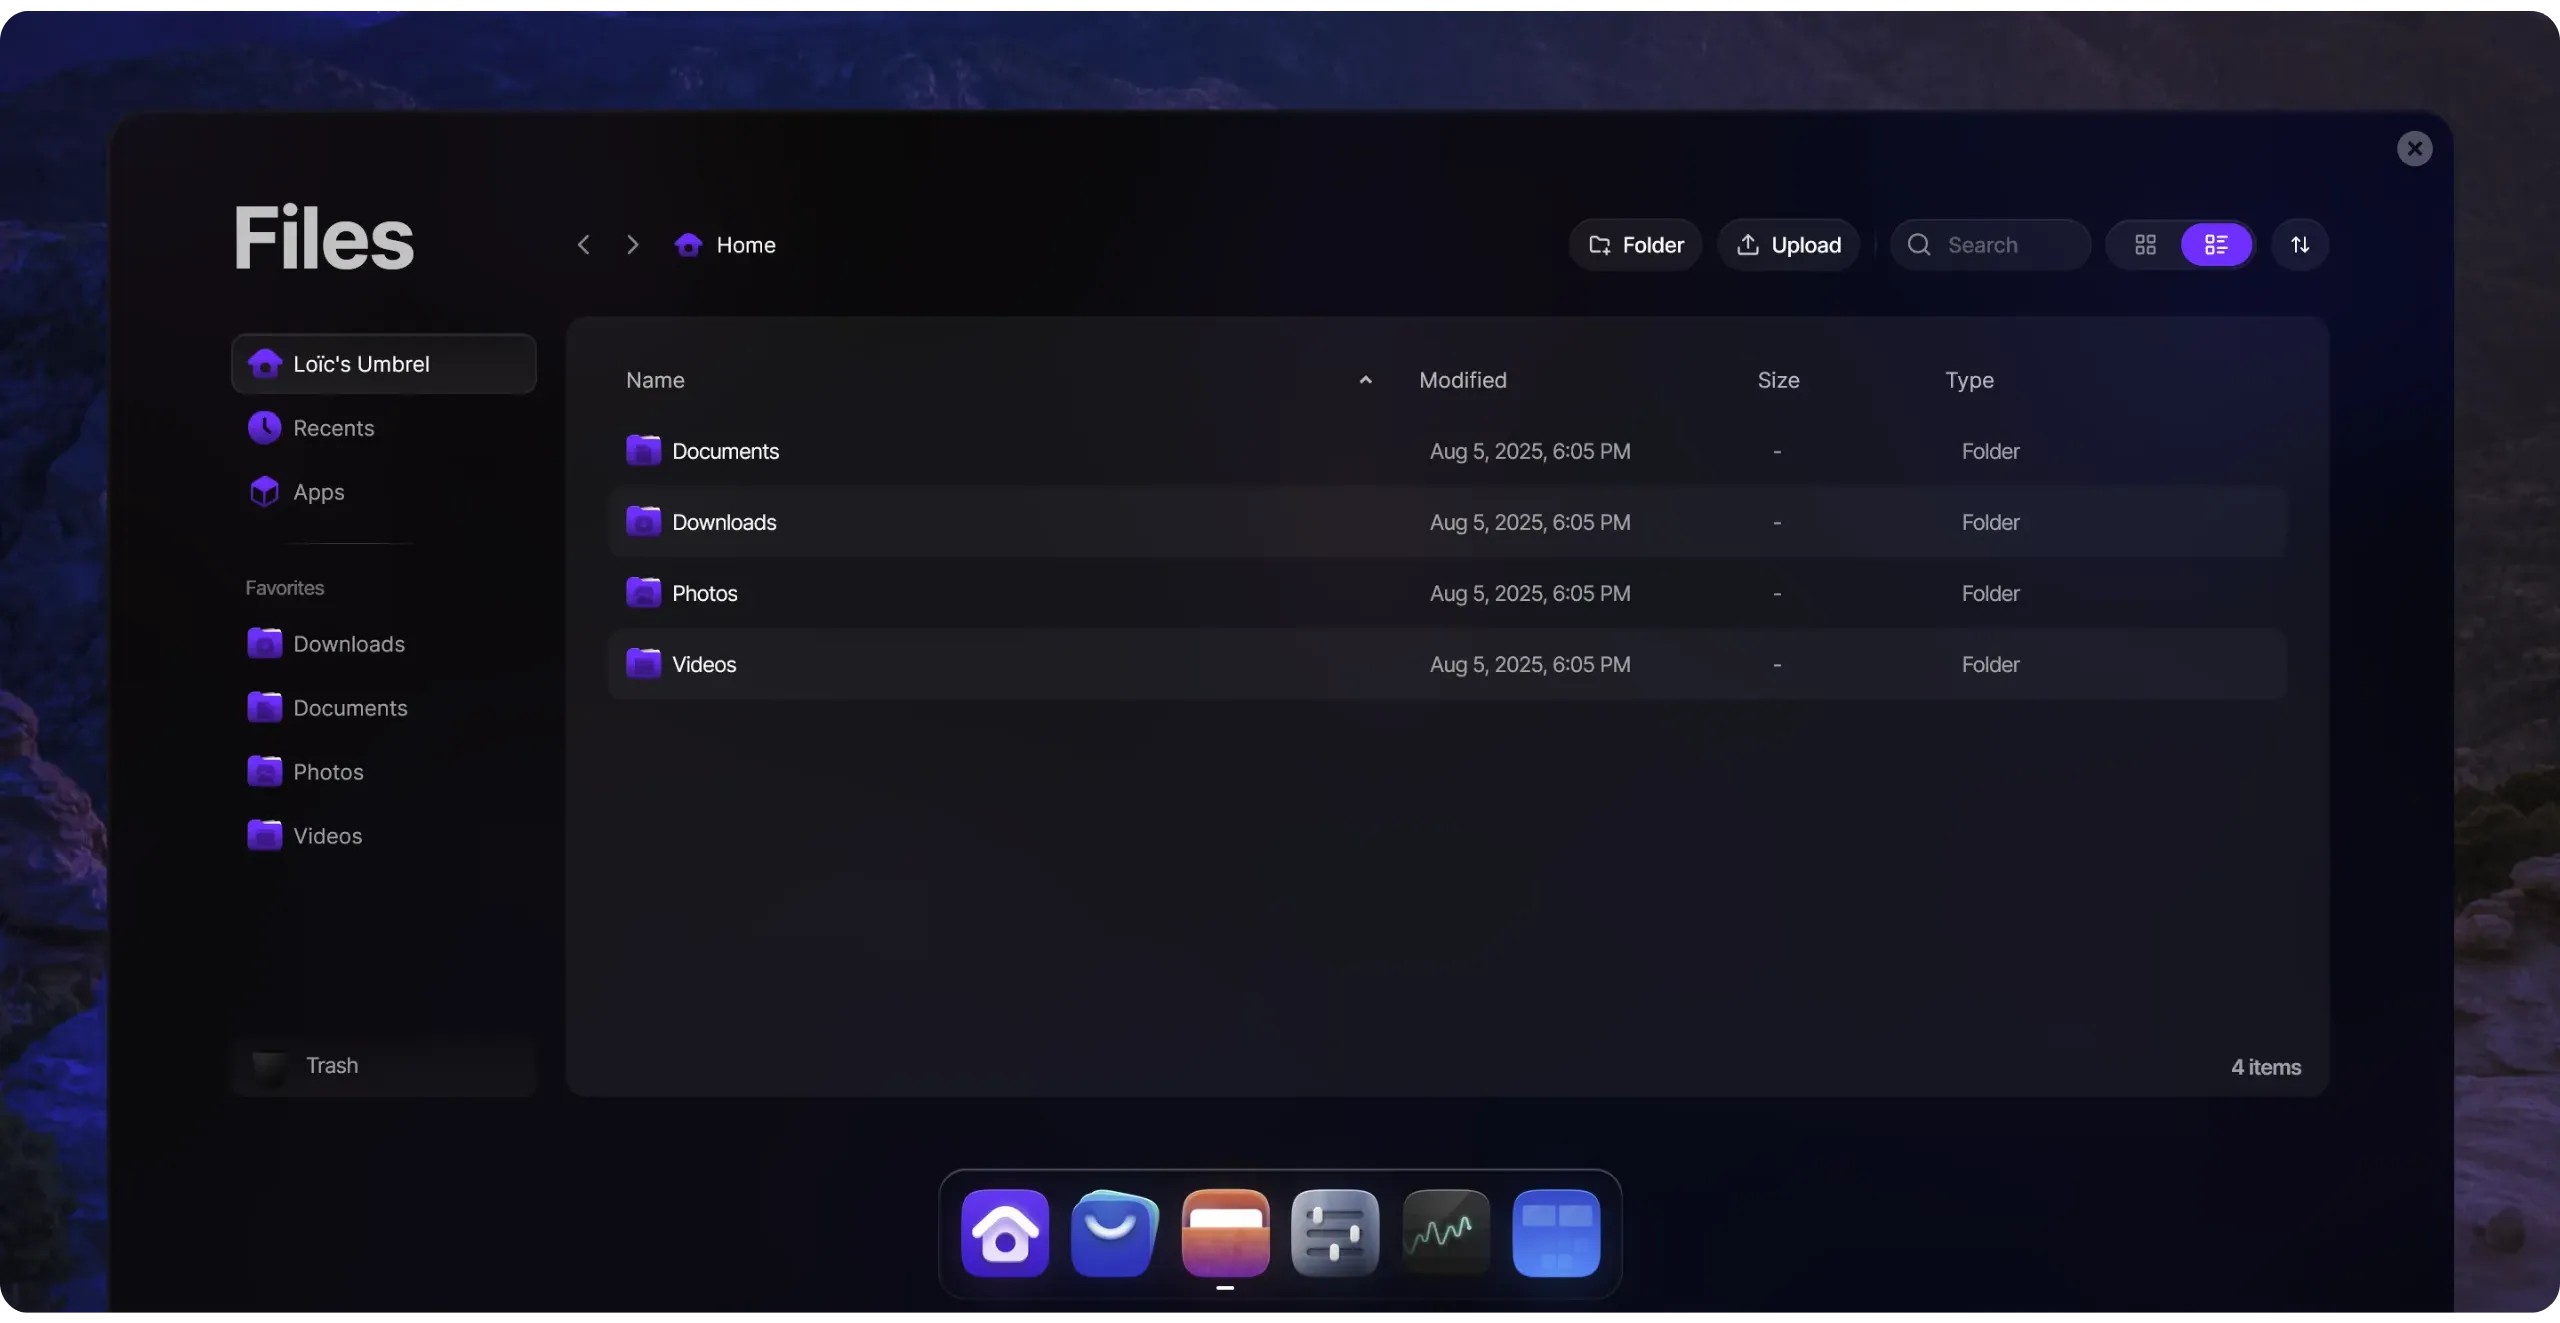
Umbrel is a personal server operating system designed to make self-hosting accessible: you install Umbrel, open a browser on `umbrel.local`, and manage everything via a simple remote interface.
The project first popularized the idea of a one-click Bitcoin and Lightning node, then expanded into a veritable "home cloud": file and photo storage, multimedia streaming, network tools, home automation, local AI, and hundreds of apps installable from an integrated App Store.
In Umbrel, each application runs in a Docker container (isolation, atomic updates, independent start/stop). The interface centralizes access to all these apps, offering single sign-on (with optional 2FA), one-click updates for OS and apps, live monitoring of the machine (CPU, RAM, temperature, storage), permissions management between apps, and an overview of their consumption.
Umbrel's aim is therefore to give you back control and confidentiality over your data, without relying on cloud services, beyond simply operating a Bitcoin node.
### Umbrel Home vs umbrelOS
Umbrel offers two distinct approaches:
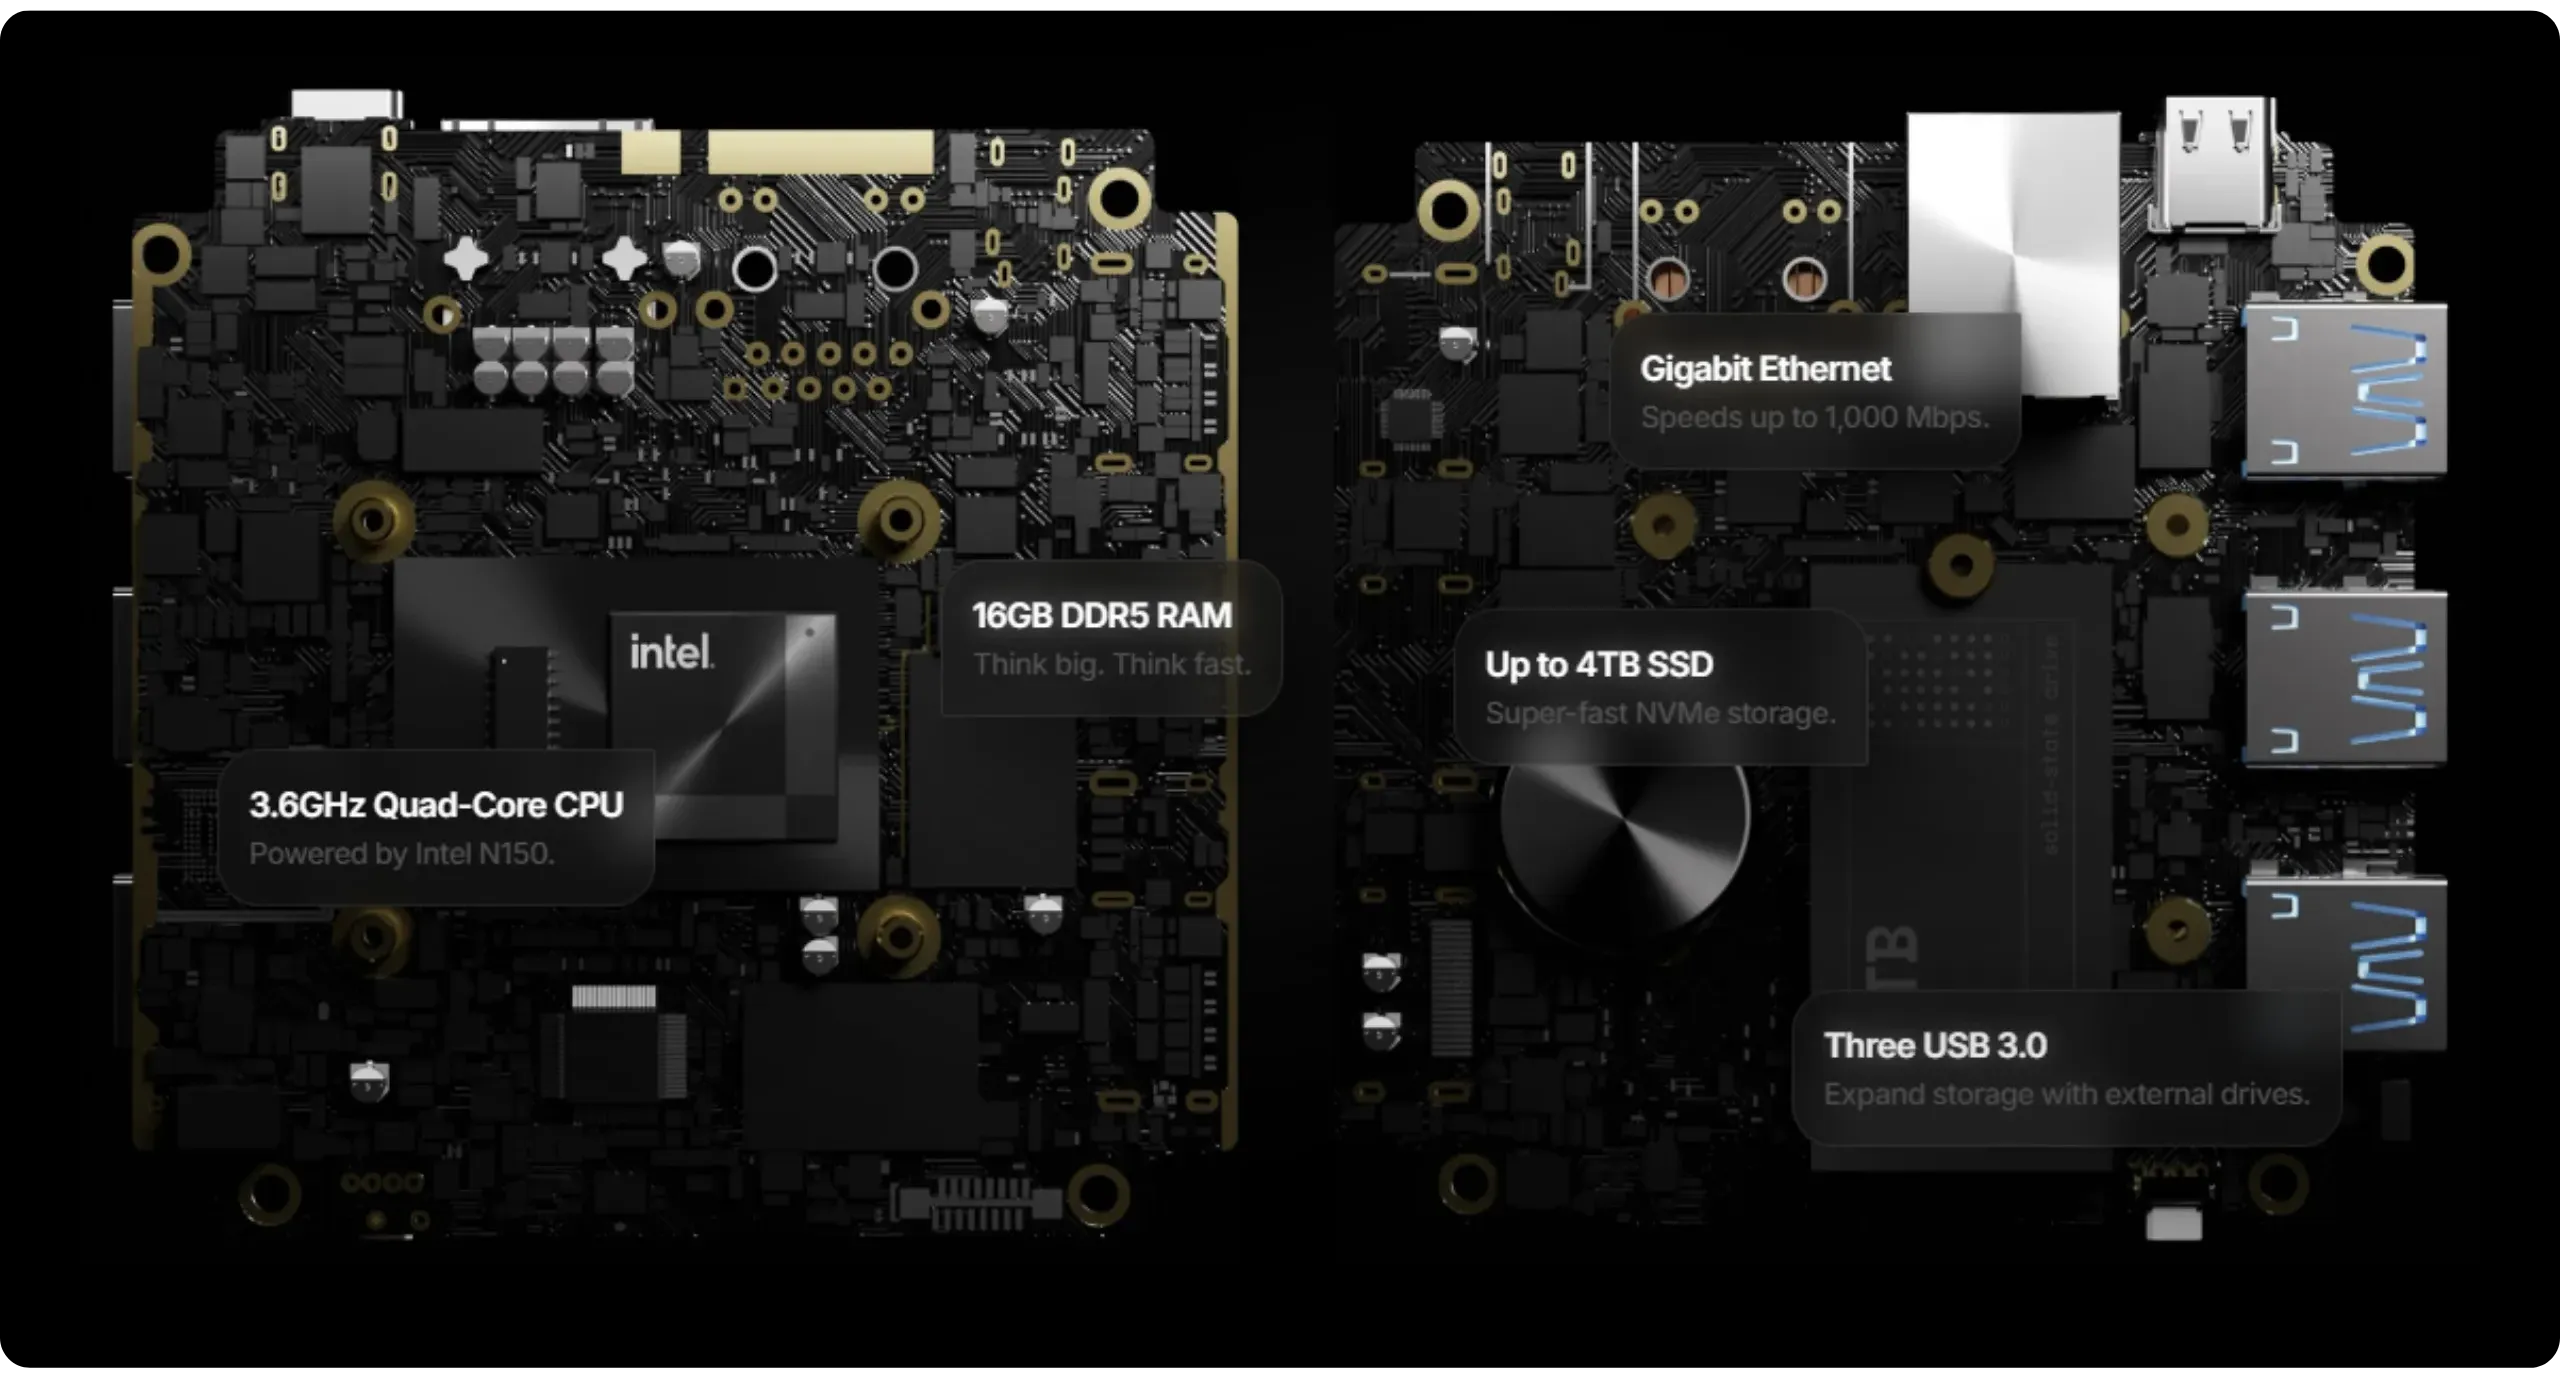
- [**Umbrel Home**](https://umbrel.com/umbrel-home): this is a ready-to-use mini-server, specially designed and optimized for umbrelOS. Compact, silent, Ethernet-connected, it's equipped with an NVMe SSD (up to 4TB optional), 16GB RAM, and a quad-core CPU. You order it, plug it in, and go to `umbrel.local`. You can have an operational Umbrel up and running in minutes. That's the plug-and-play option.

- [**umbrelOS**](https://umbrel.com/umbrelos): this is the operating system you can install yourself on your own hardware (mini-PC, NUC, tower, dedicated laptop...). You have the same interface and the same App Store as on Umbrel Home.
In both cases, the user experience is identical on the software side: browser-based administration, one-click updates, on-demand application installation... The DIY solution is often more economical than buying an Umbrel Home (depending on the machine used). However, I wouldn't necessarily recommend that you always opt for the DIY option, as **buying an Umbrel Home contributes directly to financing the project's development**, since its business model is based on the sale of hardware. And frankly, at €389 for 2TB of storage, the price remains very reasonable given the quality of the machine on offer.
In the next chapter, we'll explore how to install umbrelOS DIY on your own machine. However, you can follow this BTC 202 course in the same way if you've opted for an Umbrel Home.
### Use case: from the Bitcoin node to the home cloud
Umbrel can remain very minimalist and focused solely on Bitcoin, or evolve into a true multifunctional personal server, depending on your needs. Here are the main uses for Umbrel:
- **Simple Bitcoin node**: this is the founding use on which Umbrel has relied from the outset. You can run Bitcoin Core (or Knots), connect your wallets directly to your node, expose an Electrum server, host your mempool block explorer to view the blockchain, and estimate charges... It's these uses that we'll be focusing on in this course.
- **Lightning Network**: Umbrel also lets you deploy LND or Core Lightning, two implementations of the Lightning Network, to manage your own Lightning node. You'll be able to open channels, manage your liquidity, make payments, automate balancing, offer services, connect a remote wallet, or take advantage of advanced interface for management thanks to the many applications available. We'll be looking at this specific use case in our next LNP 202 course.
- **General self-hosting**: with Nextcloud, Immich, Jellyfin/Plex, DNS-wide ad blockers (Pi-hole/AdGuard), VPNs (WireGuard, Tailscale), home automation (Home Assistant), backups, note management, office tools, local AI (Ollama + Open WebUI)... Umbrel can become your personal server, allowing you to regain control of your data. You host the services you use every day yourself, with a polished user experience that closely resembles external solutions, while retaining total control over your data and privacy.
By deploying applications in containers, you can shape Umbrel as you wish: start with a simple Bitcoin node and a few apps linked to its ecosystem, then install a Lightning node alongside your Bitcoin node, and gradually enrich your instance with the self-hosting applications you need.
### Community and mutual aid
One of Umbrel's key advantages over its competitors is its vast and highly active user community. You can reach them mainly via [their Discord](https://discord.gg/efNtFzqtdx) and [their online forum](https://community.umbrel.com/). Here, you'll find not only practical advice but, above all, solutions for solving problems or fixing bugs. It's a great place to start, to progress, and, eventually, to help other users, so you're not left alone with your Coin.
### UmbrelOS license
Umbrel's code is publicly available (you can view, fork, and modify it), but it is not under a true open-source license. In fact, umbrelOS is distributed under the [*PolyForm Noncommercial 1.0*] license (https://polyformproject.org/licenses/noncommercial/1.0.0/), although some associated development tools are available under the MIT license.
In practical terms, you can do pretty much anything you like with umbrelOS, as long as it's for personal, non-commercial use: modification, redistribution for non-profit purposes, creation of derivatives for yourself or for non-profit organizations, provided you respect the legal notices.
However, it is forbidden to sell Umbrel or its derivatives (for example, a pre-assembled machine with umbrelOS pre-installed), to offer Umbrel-related services commercially, or to integrate its code into a product for profit.
Technically, this license does not restrict the installation, auditing, or adaptation of Umbrel for personal use. Legally, it protects the project against unauthorized resale or commercial hosting, particularly by cloud providers. Umbrel is therefore not open source, although its code remains publicly accessible.
However, each application in the Store retains its own license, often open source.
## Installing a full node with Umbrel
61bc09c7-787d-4649-b142-457ec018b0f4
Now that we have all the necessary information, it's time to delve into the details. In this tutorial, we'll show you how to install a complete Bitcoin node using UmbrelOS.
### Materials required
Here, we'll be using the UmbrelOS x86 image (more precisely, the x86_64 version). You'll be able to follow this guide on whatever machine you choose, as long as it's not equipped with an ARM architecture processor (no Apple Silicon, Raspberry Pi, etc.). This means that any computer with an Intel or AMD 64-bit processor will suffice, as long as it meets the minimum requirements, depending on how you intend to use your Umbrel (at least a dual-core processor is recommended).
If you've opted for a Raspberry Pi 5 (an option I don't recommend, as mentioned in the previous section), the installation is slightly different. You can then follow this dedicated tutorial and return to my course once on the web interface `http://umbrel.local`:
https://planb.academy/tutorials/node/bitcoin/umbrel-8b0e3b5b-d3cf-4a1e-8bb8-1ad2db4dd848
As mentioned in the previous section, I chose to run this tutorial on a small refurbished PC that I found at a good price: a *Lenovo ThinkCentre M900 Tiny* equipped with an Intel Core i7 processor and 16 GB RAM. This is a very comfortable configuration for running Umbrel, especially for a Bitcoin node. However, I chose this configuration because I want to install a Lightning node and other more demanding applications later on. I've also added a 2TB SSD to my ThinkCentre to retain the full blockchain and still have a comfortable margin. With this configuration, the total cost is €270, inclusive of all expenses.

I'm particularly fond of Lenovo's ThinkCentre Tiny range, as they are compact, quiet, and very robust machines. These computers are very popular with businesses and are therefore abundant on the second-hand market, where you can find interesting configurations between €70 and €200.
If, like me, you've opted for a PC without a monitor, **you'll need to connect a monitor and keyboard** only for the duration of the installation. Afterwards, you'll be able to access it remotely from another computer on the same network (or via other methods we'll cover in later chapters). You'll also need an RJ45 Ethernet cable to connect your machine to the local network, and a USB key of at least 4 GB to store the installation image.
To recap, here are the equipment requirements:
- Computer with x86_64 processor (minimum Dual-core, recommended Quad-core);
- RAM memory (4 GB minimum, 8 GB recommended or more for extended use);
- SSD (recommended + 2 TB);
- USB key (+ 4 GB) for UmbrelOS image installation;
- Monitor and keyboard (useful only for initial installation if the PC is not equipped with one);
- RJ45 Ethernet cable.
### Step 1 - Mounting the computer
Depending on the hardware you've chosen, the first step is to assemble the various components of your computer. For example, in my case, the original SSD had a capacity of only 256 GB, so I will recycle it for another use and replace it with a 2 TB SSD. If you also want to replace the RAM modules, now's the time to do it.
### Step 2: Prepare a bootable USB key
Before installing UmbrelOS on your machine, you'll need to create a bootable USB key containing the operating system. All the steps in step 2 must be performed on your personal computer (and not directly on the computer destined to become your node).
- Start by downloading the latest version of UmbrelOS in USB format:
Go to [the official Umbrel website to download the ISO image](https://download.umbrel.com/release/latest/umbrelos-amd64-usb-installer.iso) for installation via USB key. Ensure you select the version compatible with the x86_64 architecture (file named `umbrelos-amd64-usb-installer.iso`). Downloading may take some time, as the image is quite large.
- Install Balena Etcher:
To create the bootable USB stick, you'll use a simple, cross-platform tool called [Balena Etcher](https://www.balena.io/etcher/). Download and install it on your computer.
- Insert a blank USB key of at least 4 GB:
Plug a USB key into your computer (the one on which you've just downloaded the UmbrelOS and Balena Etcher image). **Warning: all data on the key will be deleted**. Make sure it doesn't contain any important files.
- Burn the ISO image to the USB stick with Balena Etcher:
Launch Balena Etcher and select the `umbrelos-amd64-usb-installer.iso` ISO file you've just downloaded by clicking on the "*Flash from file*" button. Then, select the USB key as the target device and click "*Flash!*" to begin writing.
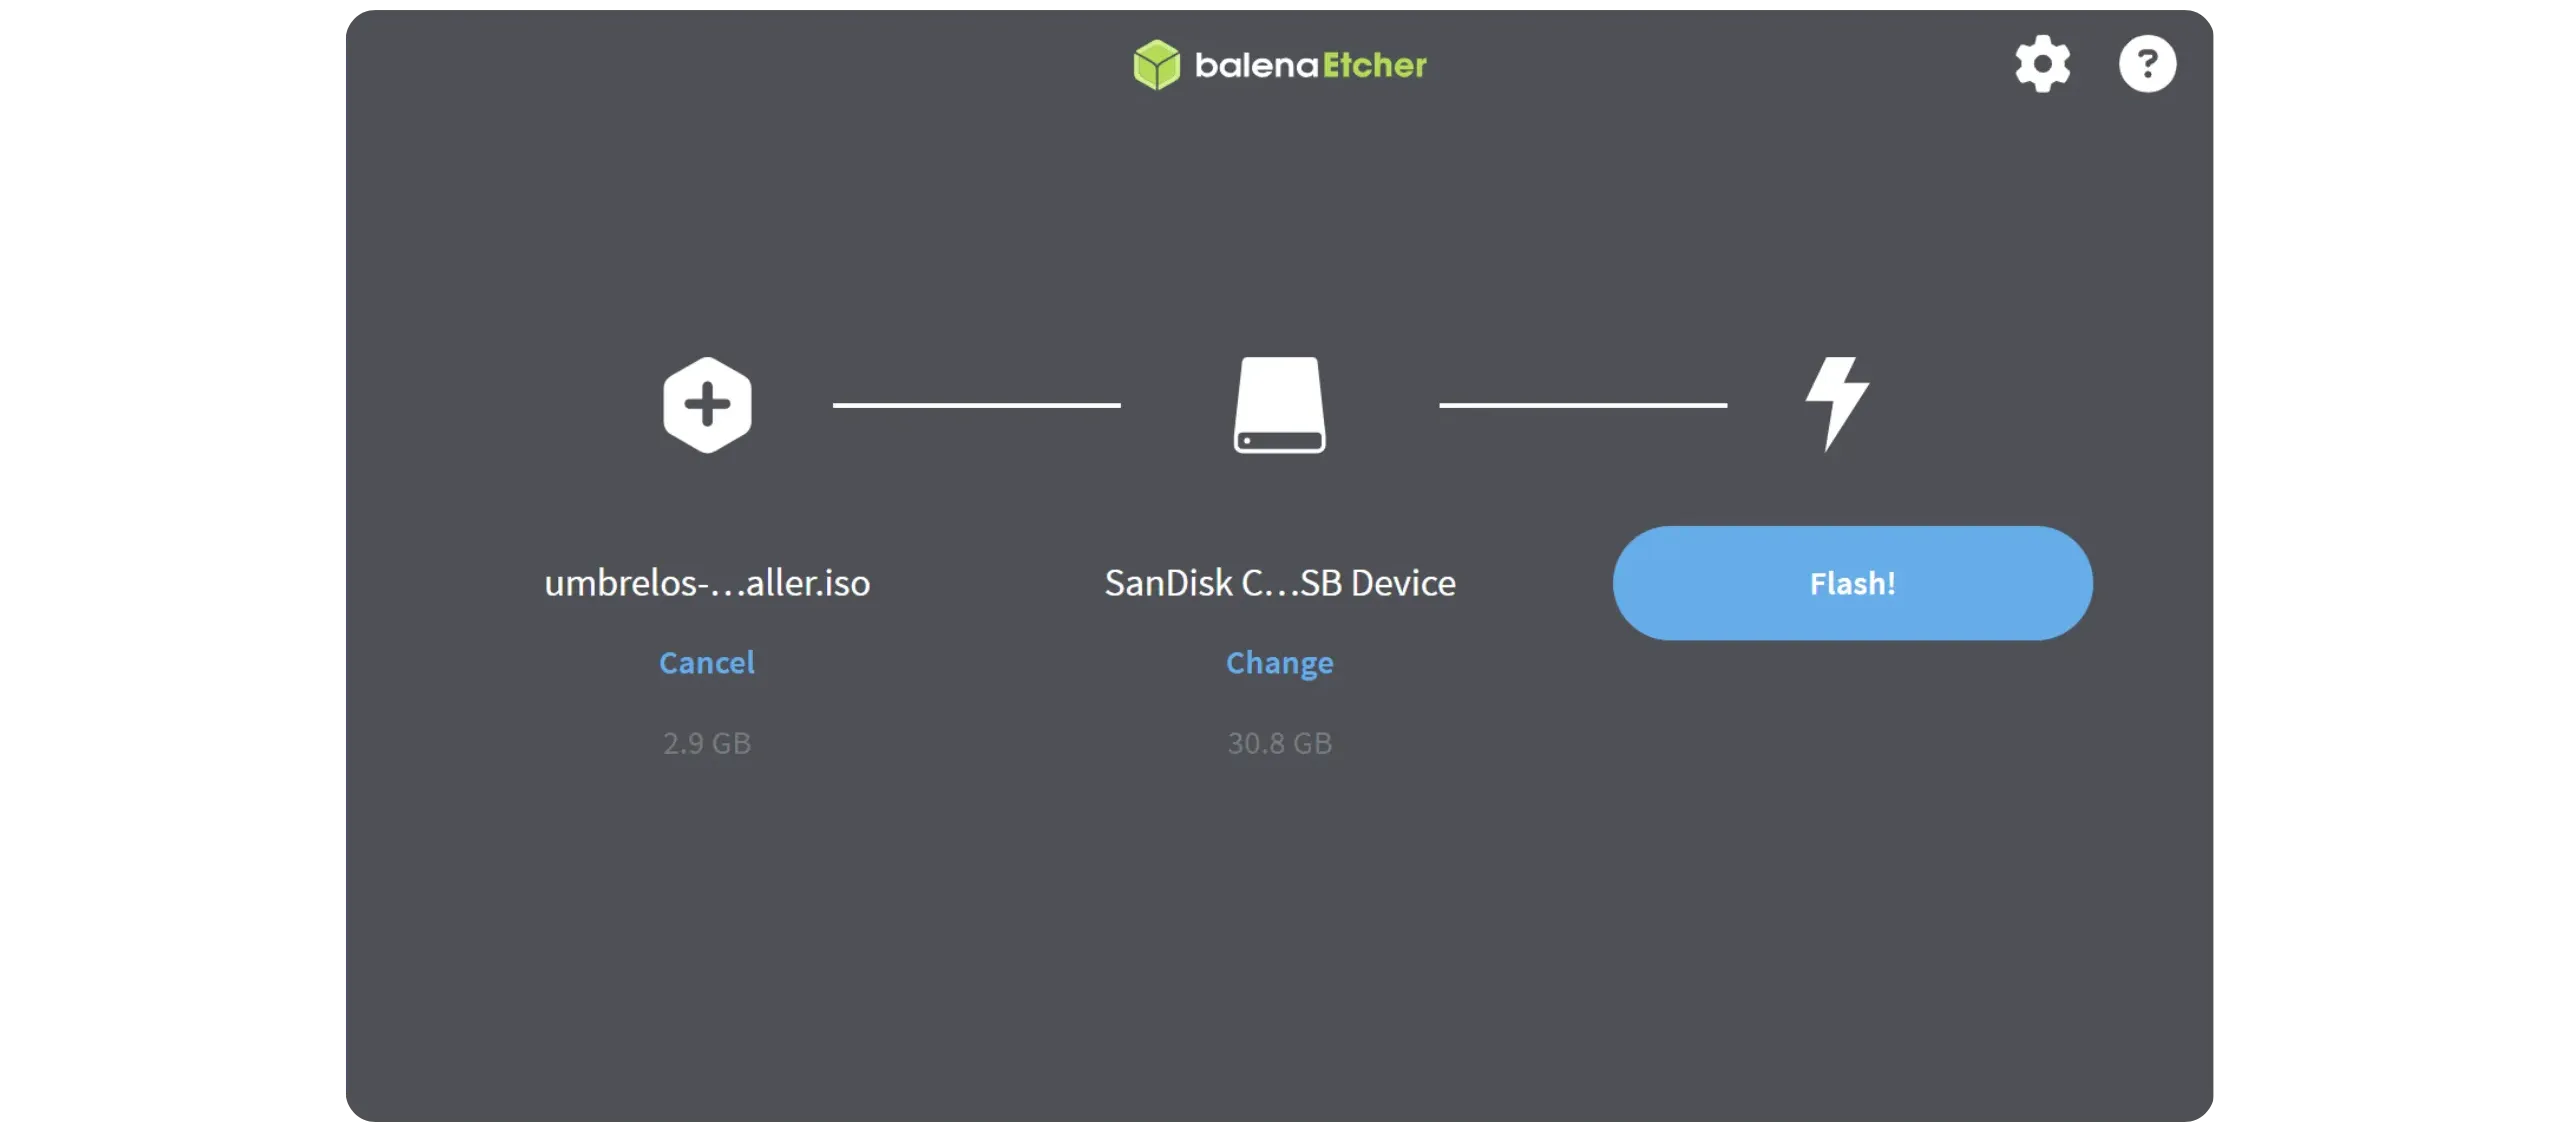
Once the operation is complete, you'll have a bootable USB key containing UmbrelOS, ready to boot and install Umbrel on your machine.
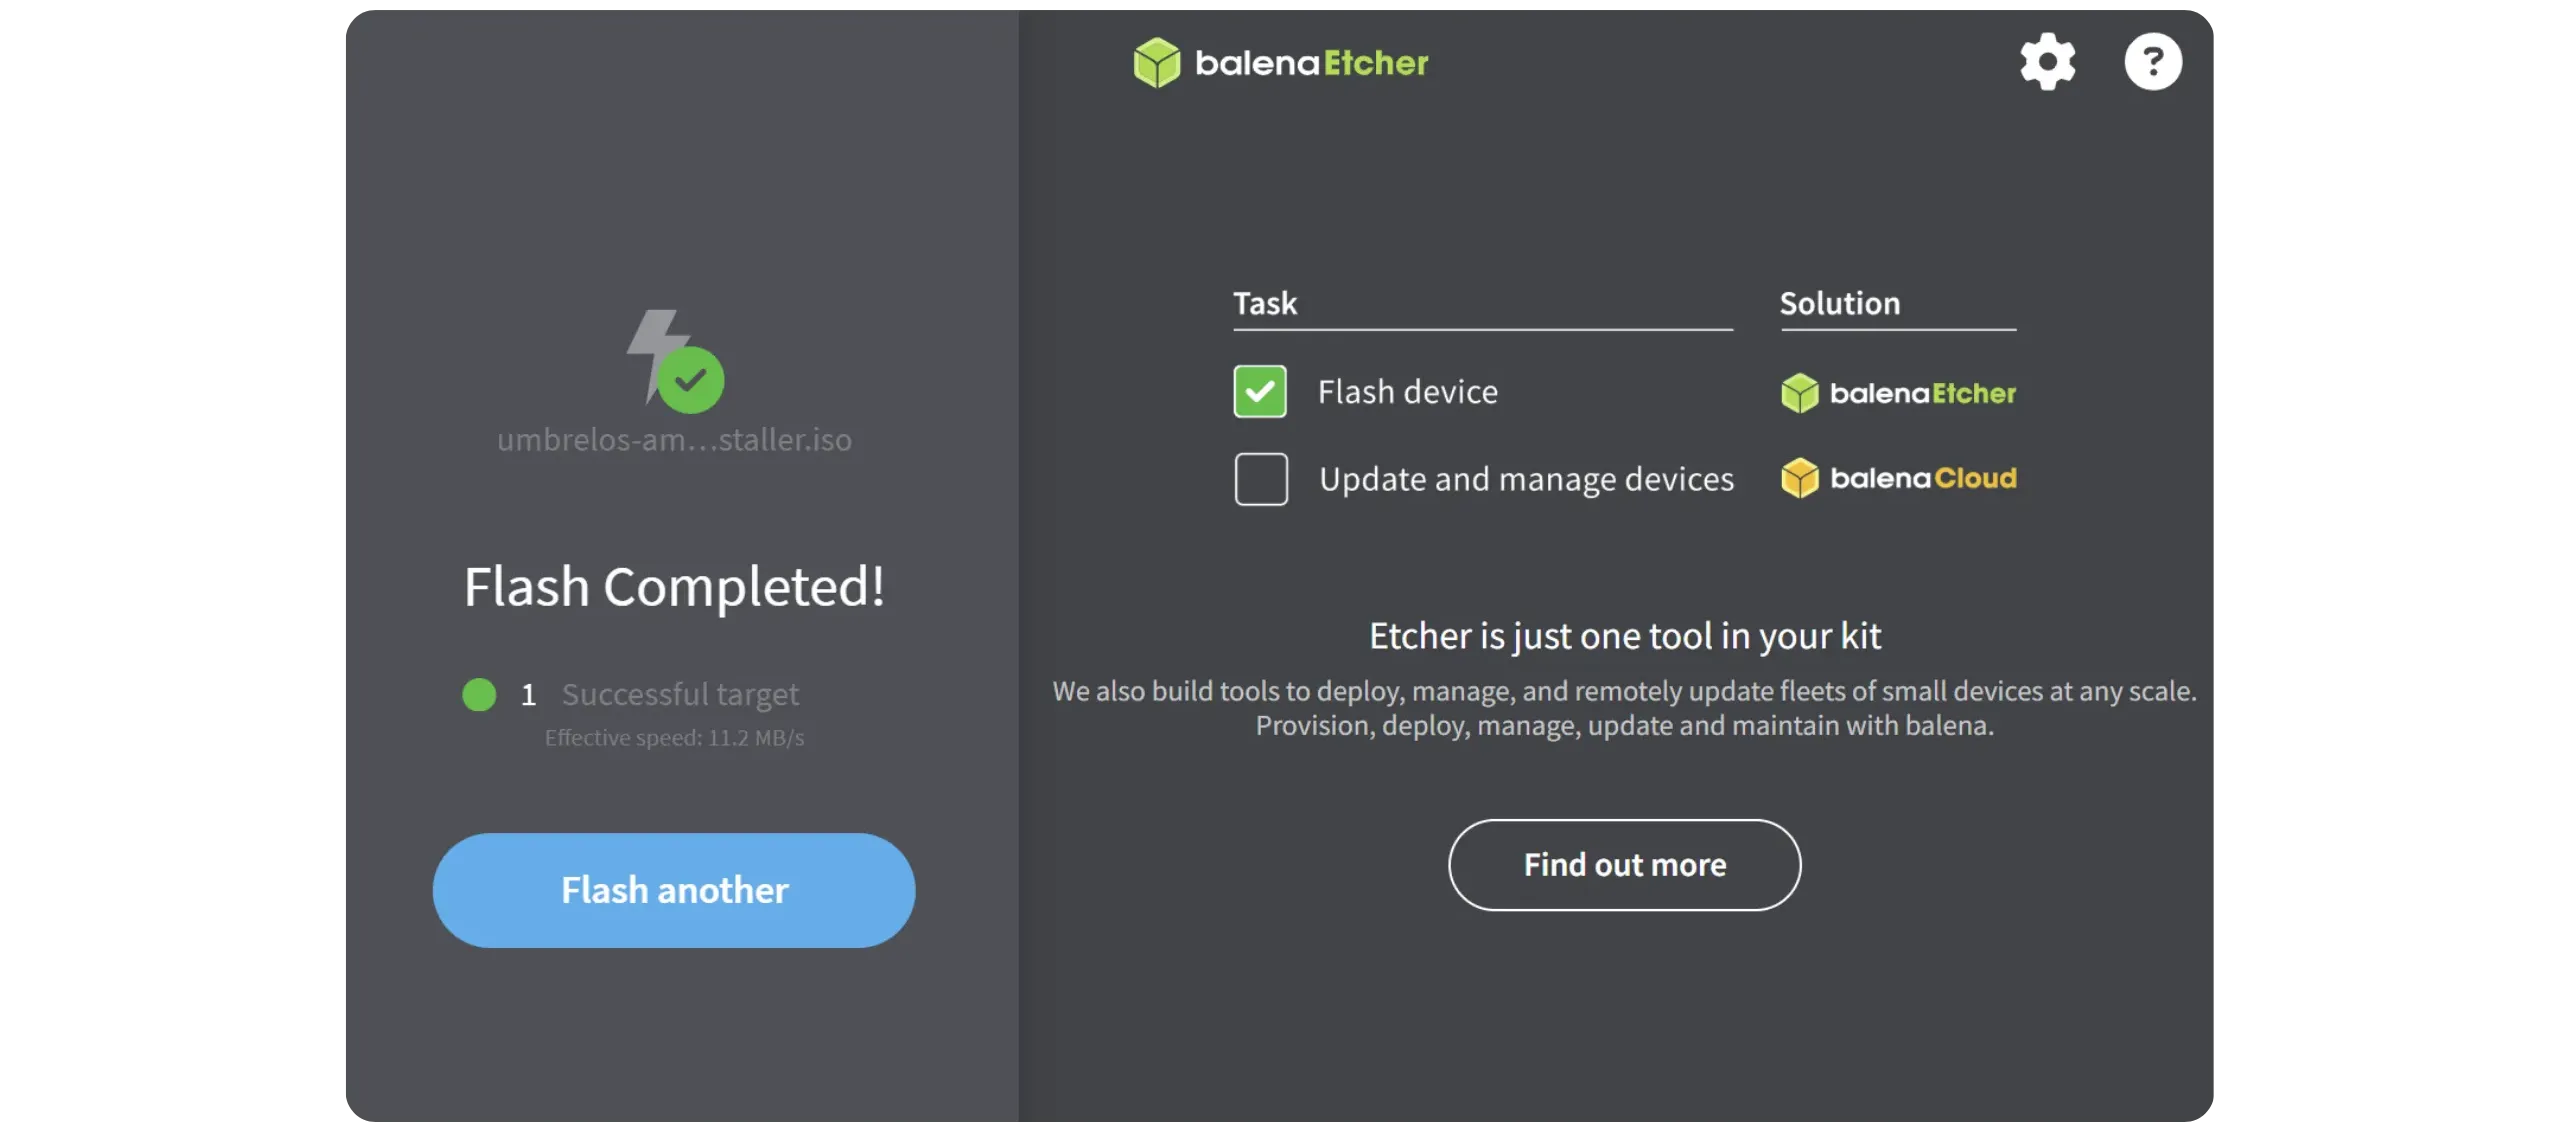
### Step 3: Booting the computer from the USB key
Now that your bootable USB stick containing UmbrelOS is ready, you can boot your computer onto it to start the system installation. Unplug the USB key from your main computer and insert it in the device on which you wish to install Umbrel and your Bitcoin node.
As explained at the start of this chapter, to complete the installation, you'll need a display device and an input device. Connect a display via HDMI (or other port, depending on your PC) and connect a keyboard via USB to your machine. These devices are only required for installation; you won't need them afterwards, as Umbrel will be accessed remotely from another computer. Connect these two devices to your PC.
**Tip:** If you don't have a peripheral screen at home, you can use your TV. With its HDMI (or other) input, it can be used as a temporary screen while you install the operating system.
Umbrel obviously requires an Internet connection. Connect the RJ45 Ethernet cable between your device and your router.
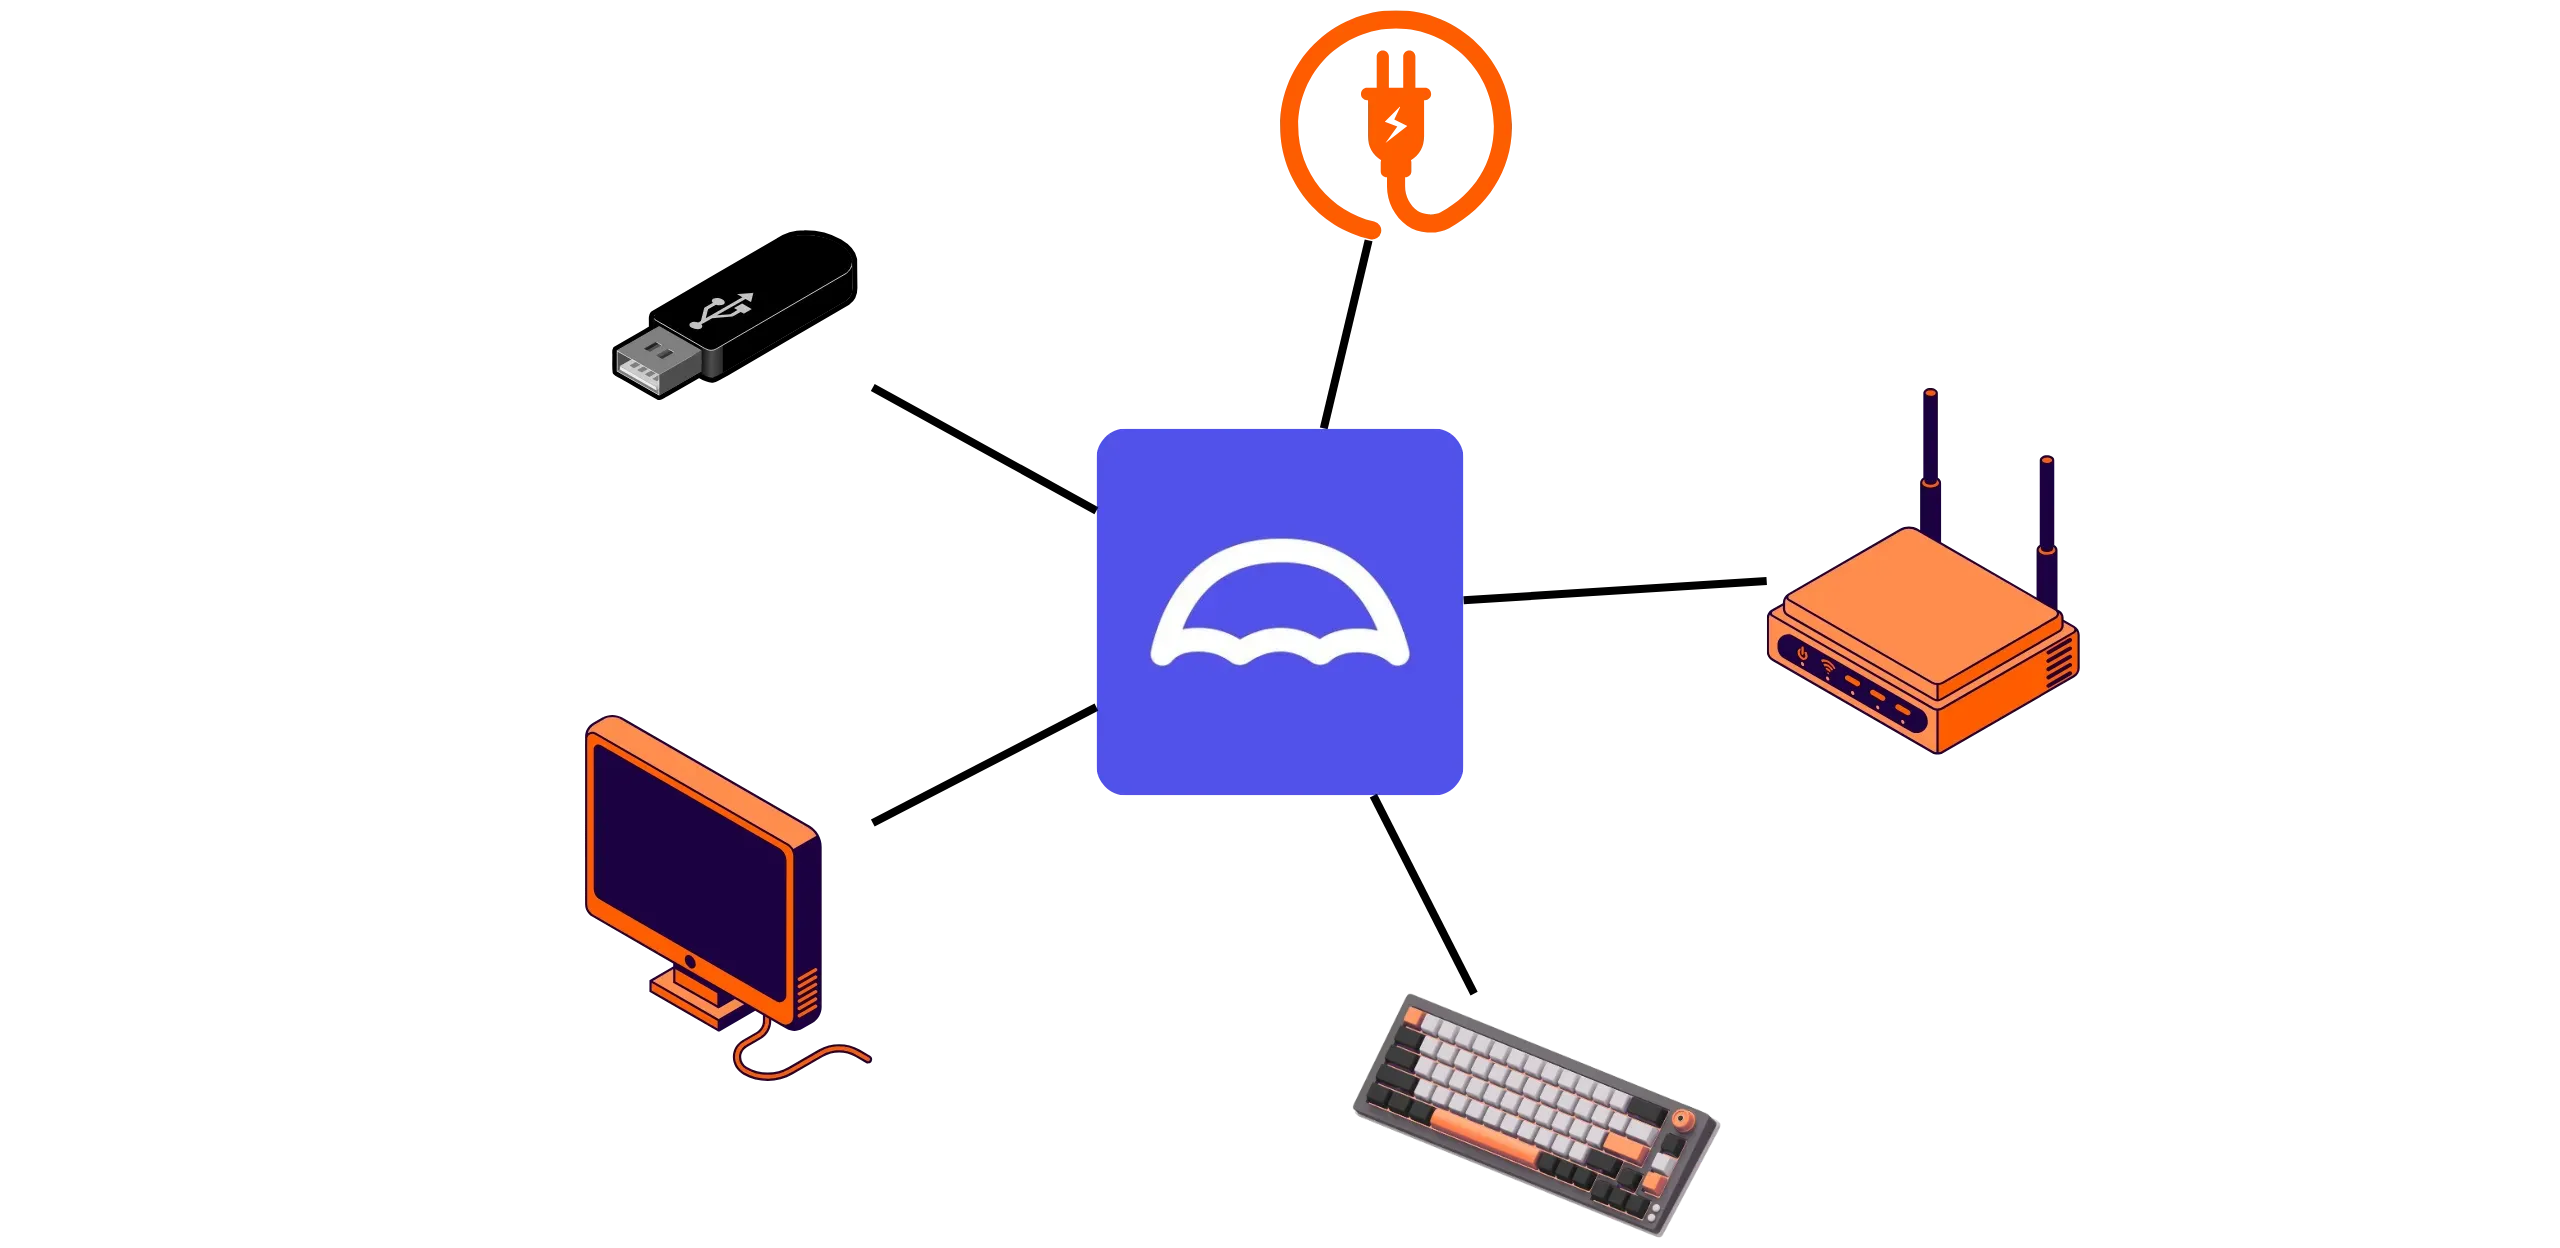
Switch on your machine. In most cases, it should automatically detect the USB key and boot from it. You'll then see the UmbrelOS installation screen appear.
If the device boots on another system or displays an error message, this probably means that it is not booting automatically from the USB key. In this case, reboot and enter the BIOS/UEFI settings (usually accessed by pressing `DEL`, `F2`, `F12`, or `ESC`, depending on the computer manufacturer). Then, change the boot order to give priority to the USB key. Then restart the device to launch UmbrelOS.
### Step 4: Install UmbrelOS on your computer
Once the device has booted from the USB stick, you'll be greeted by the UmbrelOS installation interface. This step involves installing the system directly onto your machine's internal hard disk.
The screen that appears lists all the internal storage devices detected by the computer. Each disk is accompanied by a number, a name, and a storage capacity. Locate the disk on which you wish to install Umbrel. **Warning: all files on this disk will be permanently deleted.**
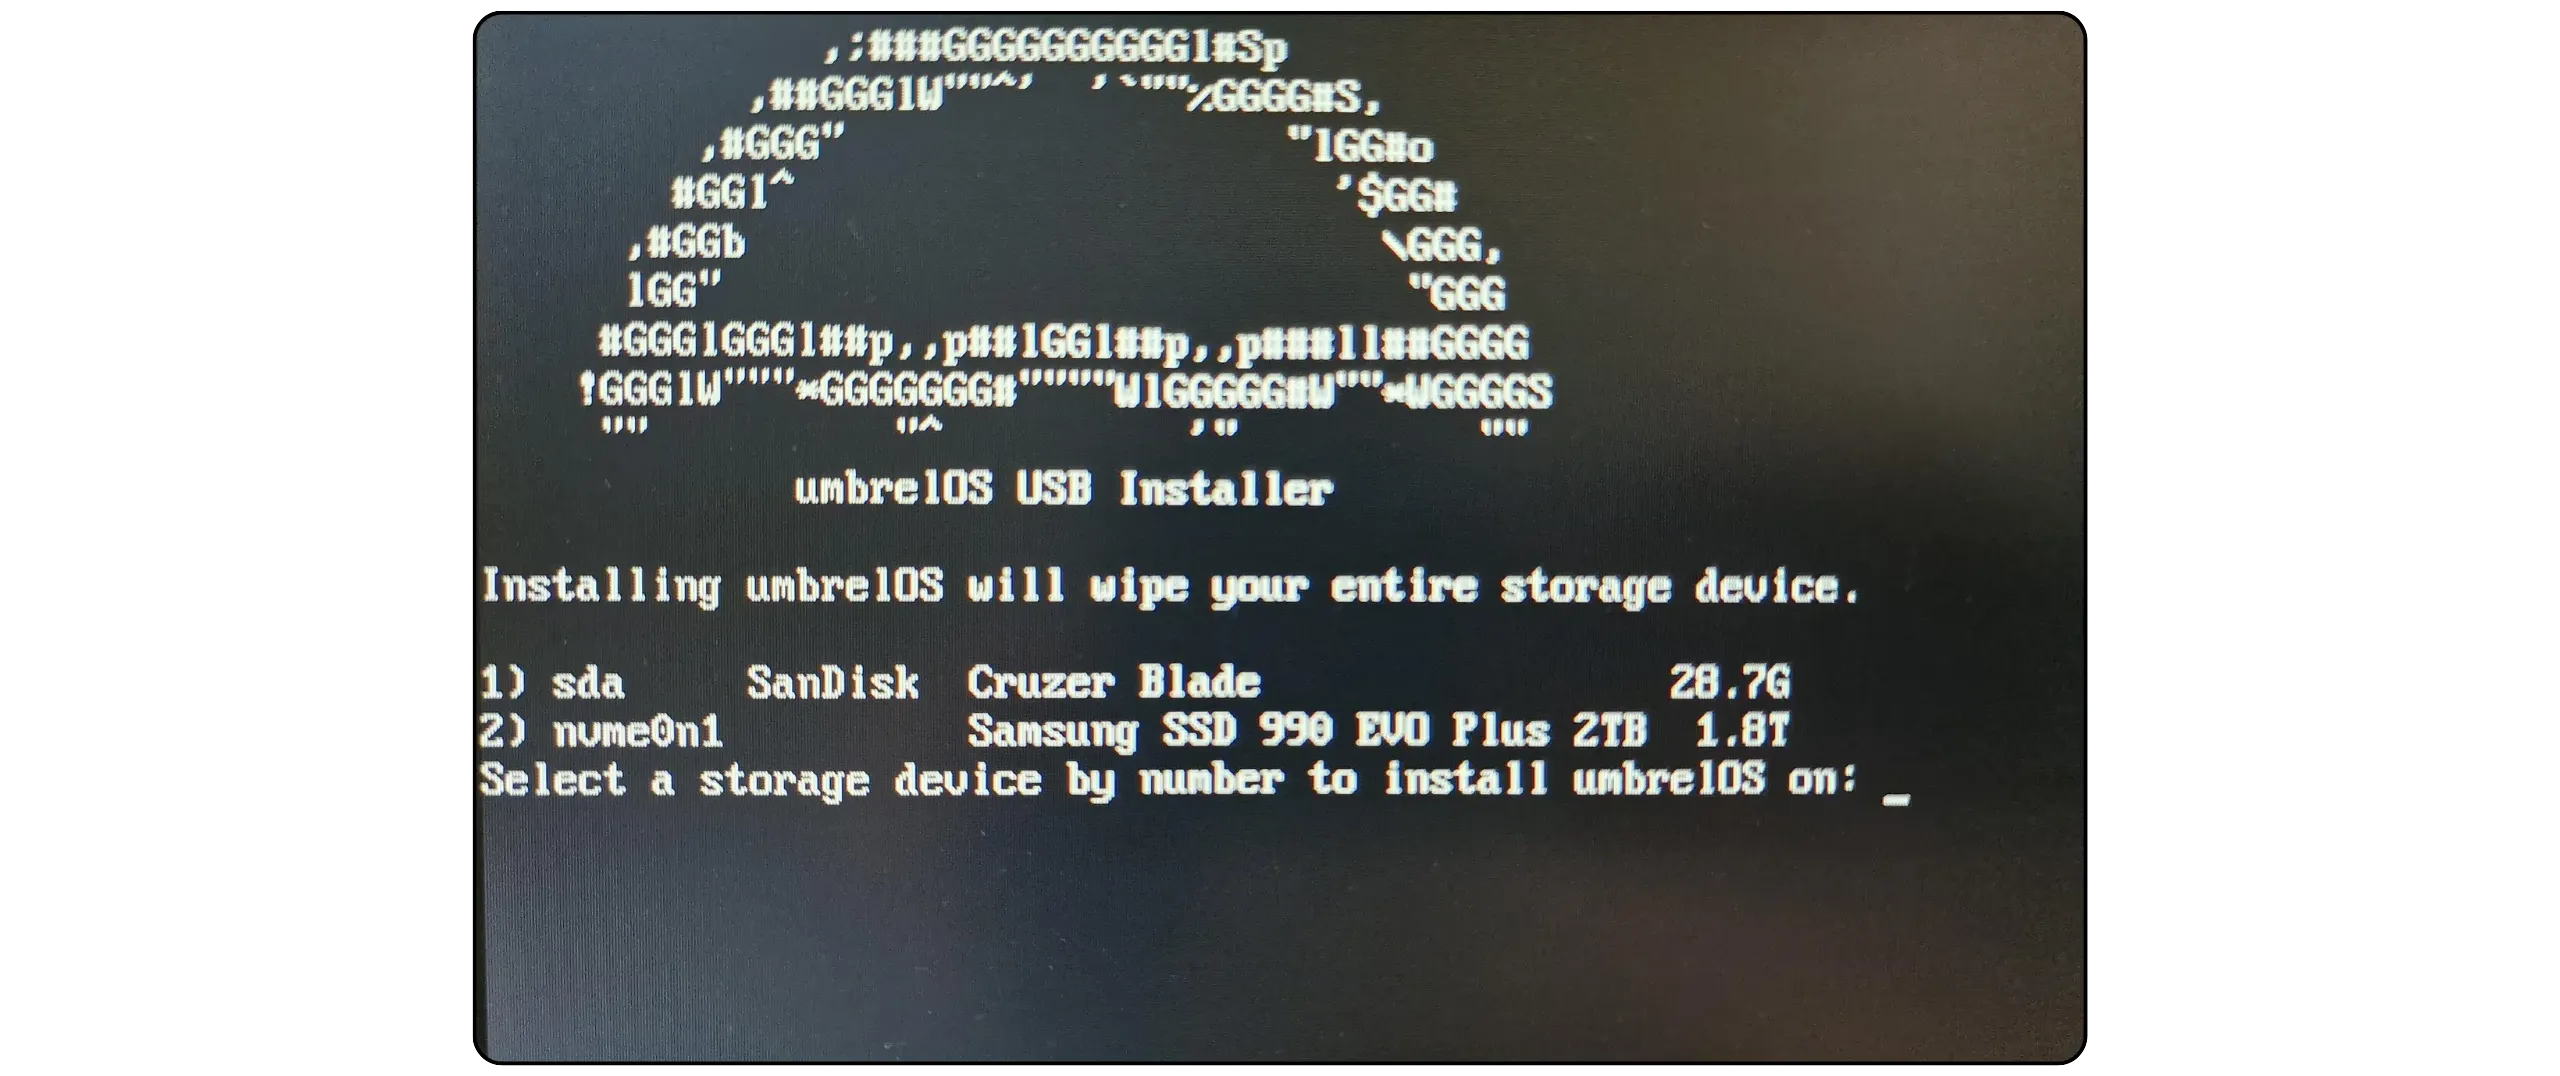
Once you've identified the correct disk (usually the one with the largest capacity, to house the blockchain), note the number assigned to it. For example, if the disk you've chosen appears under the number `2`, simply enter `2`, then press the `Enter` key on the keyboard.
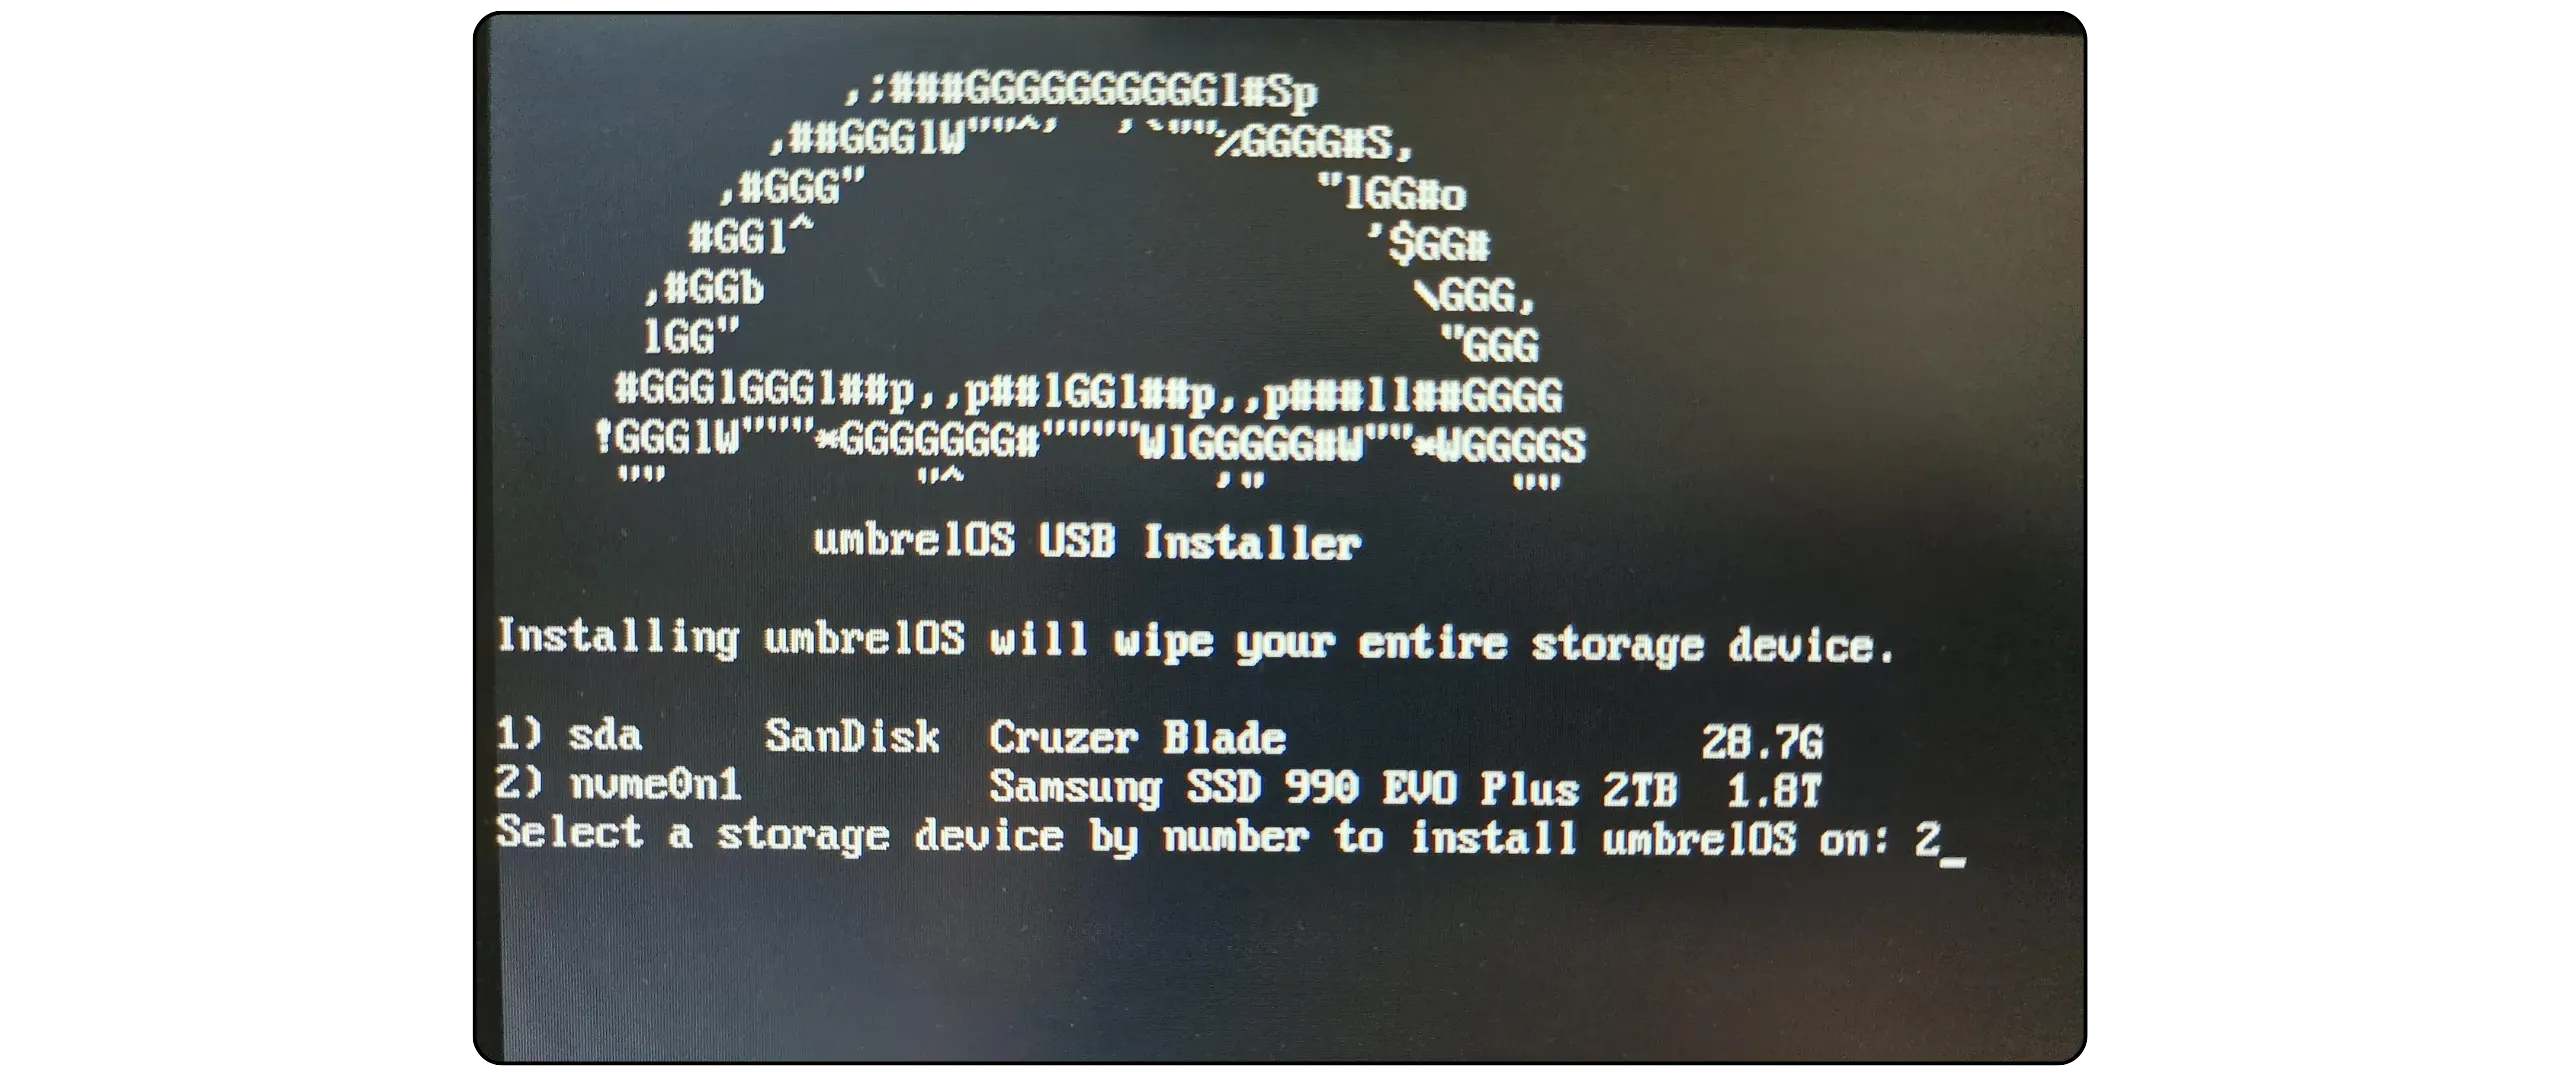
The program will format the selected disk, install UmbrelOS, and automatically configure the system. This may take a few minutes. Let the process run without interruption.
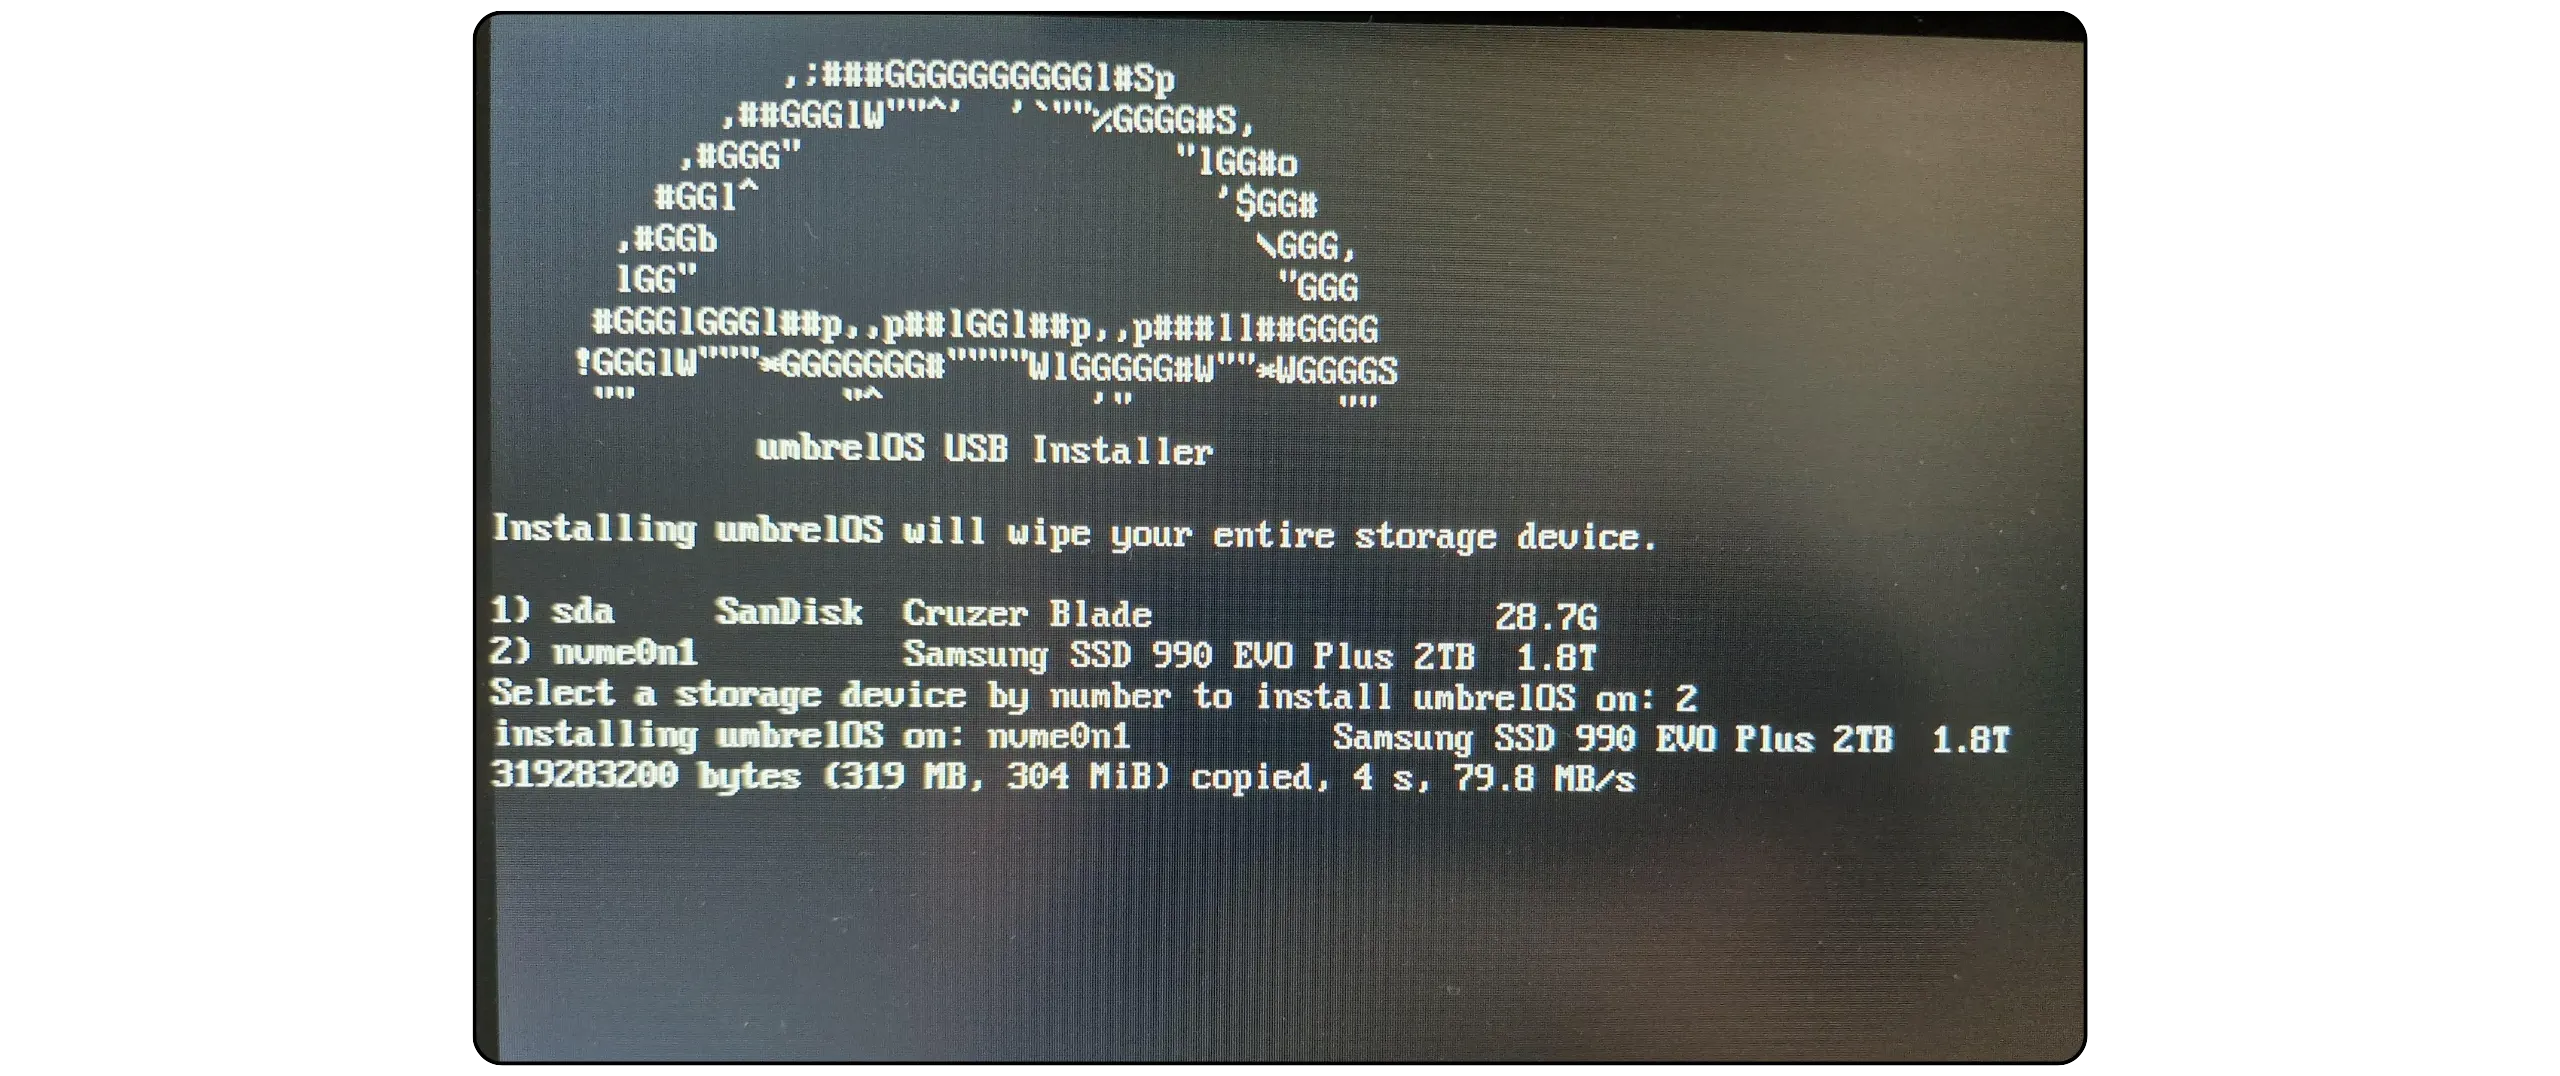
When installation is complete, you will be prompted to switch off the device. Press any key to shut down the computer.
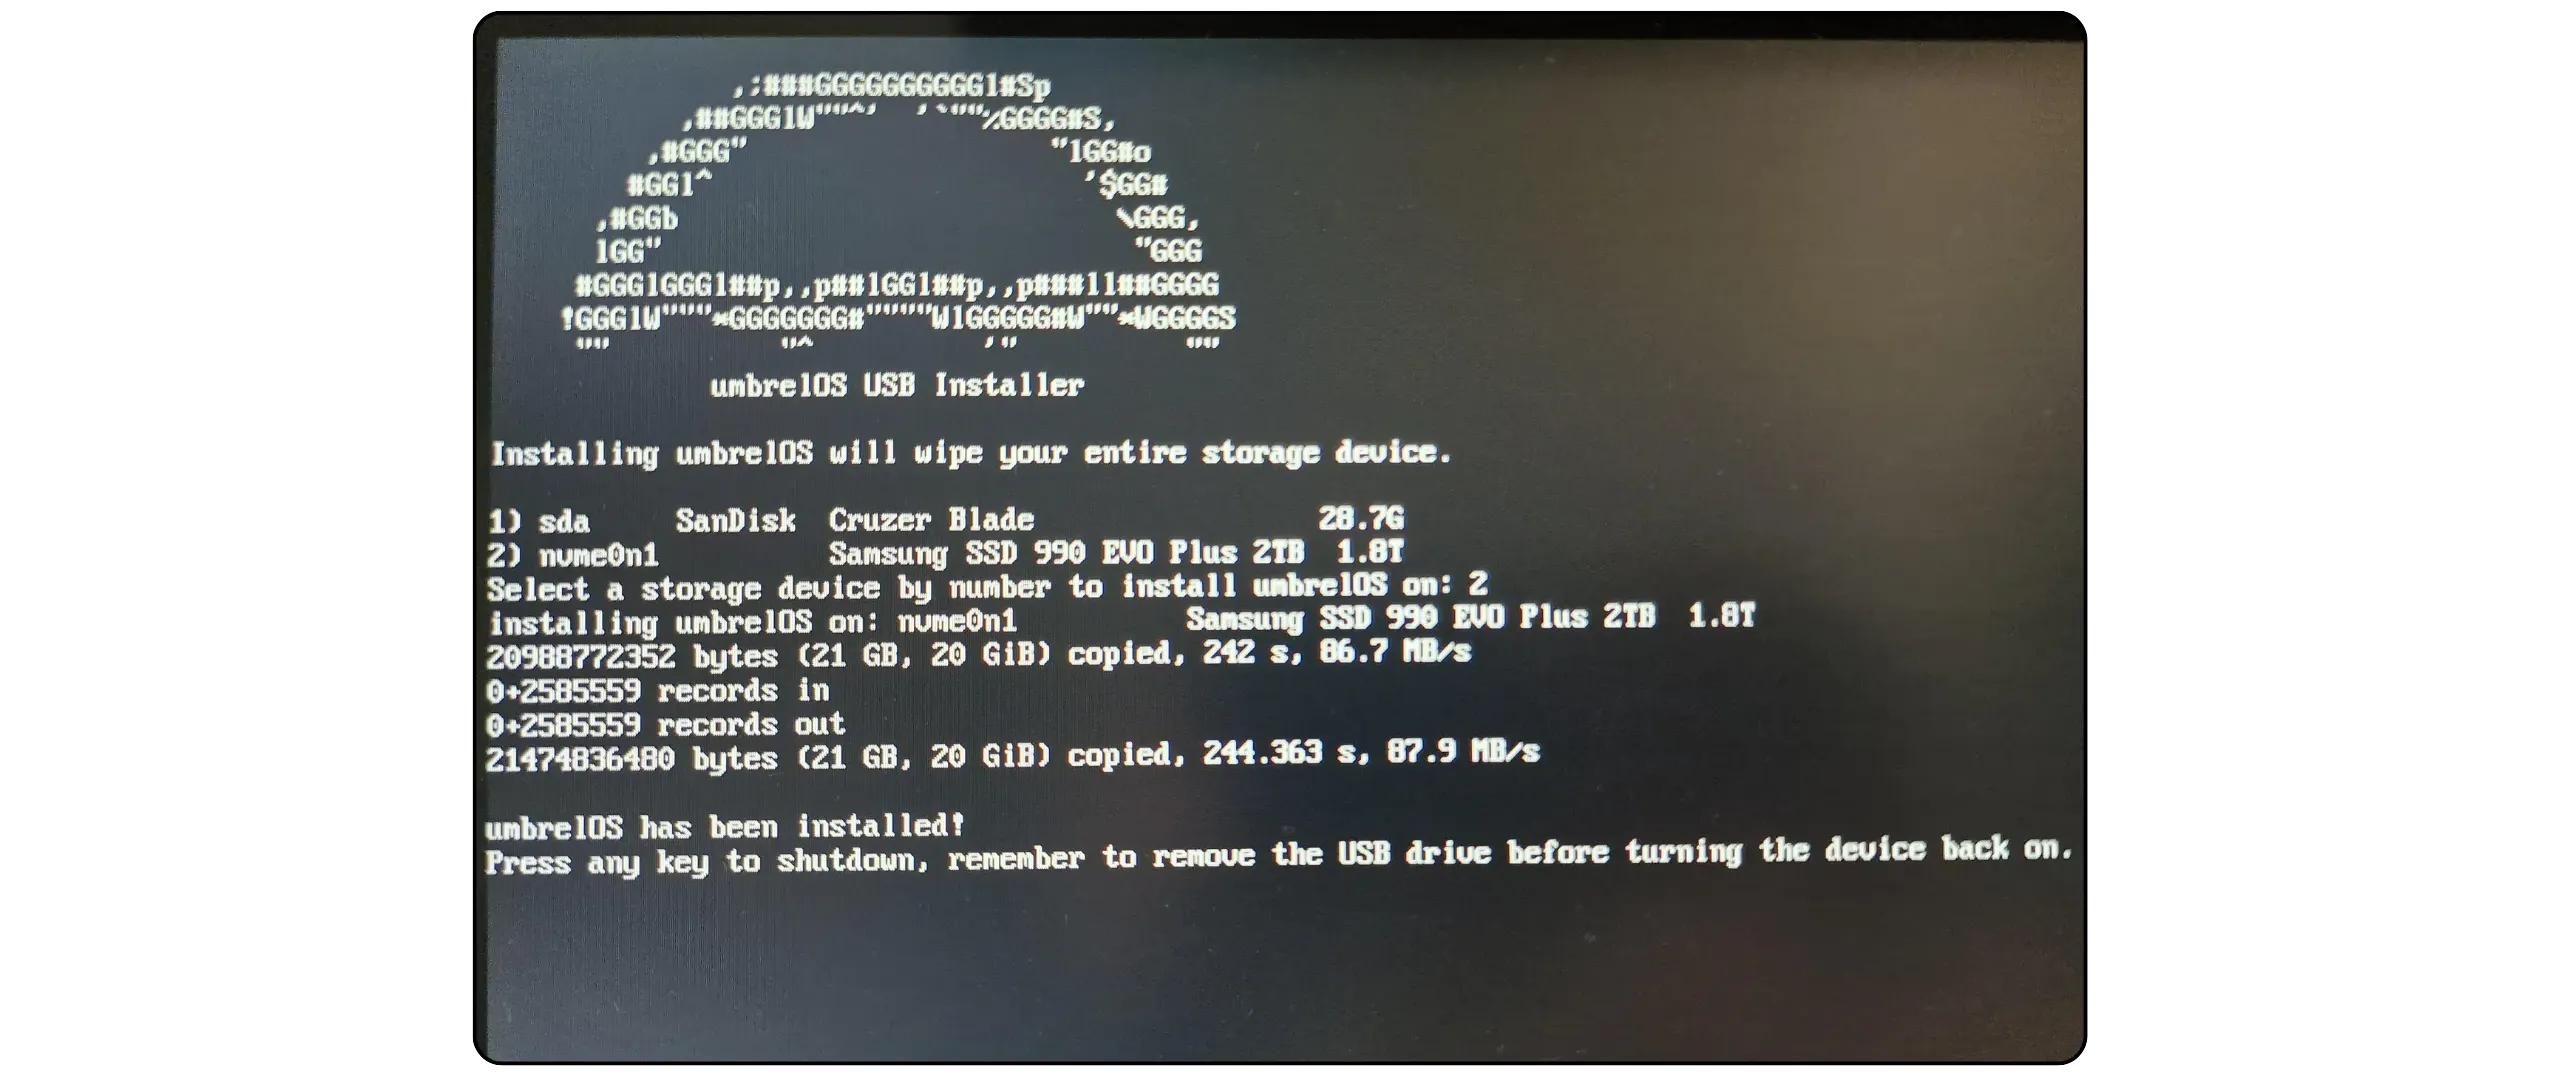
You can now remove the USB key, keyboard, and screen, which are no longer required for your Umbrel. All that remains of your node is the power supply and the RJ45 Ethernet cable.

Before restarting the device, check the following two points:
- **The USB key is unplugged**: if it remains connected, the system may reboot on it instead of the internal disk;
- **Ethernet cable is plugged in**: the device must be connected to your router to operate.
Press the power button. The system boots automatically from the internal disk where UmbrelOS was installed. The first boot may take approximately **5 minutes**. During this time, Umbrel initializes its services and interface.
From another computer (your everyday PC) connected to the **same local network**, open a web browser (Firefox, Chrome...) and go to:
```
http://umbrel.local
```
This address is used to access the Umbrel graphical user interface remotely and begin configuration.
If the address `http://umbrel.local` doesn't work on your browser after waiting at least 5 minutes, simply try:
```
http://umbrel
```
If this still doesn't work, enter your Umbrel's local IP address directly into the browser. For example (replace `42` with the number of your machine hosting Umbrel on the local network):
```
http://192.168.1.42
```
To identify your Umbrel's IP address, there are several methods, from the simplest to the most advanced:
- Access your router's administration interface and find the IP address of the Umbrel device on the local network.
- Use network scanning software such as Angry IP Scanner to detect connected devices and locate your Umbrel's IP address.
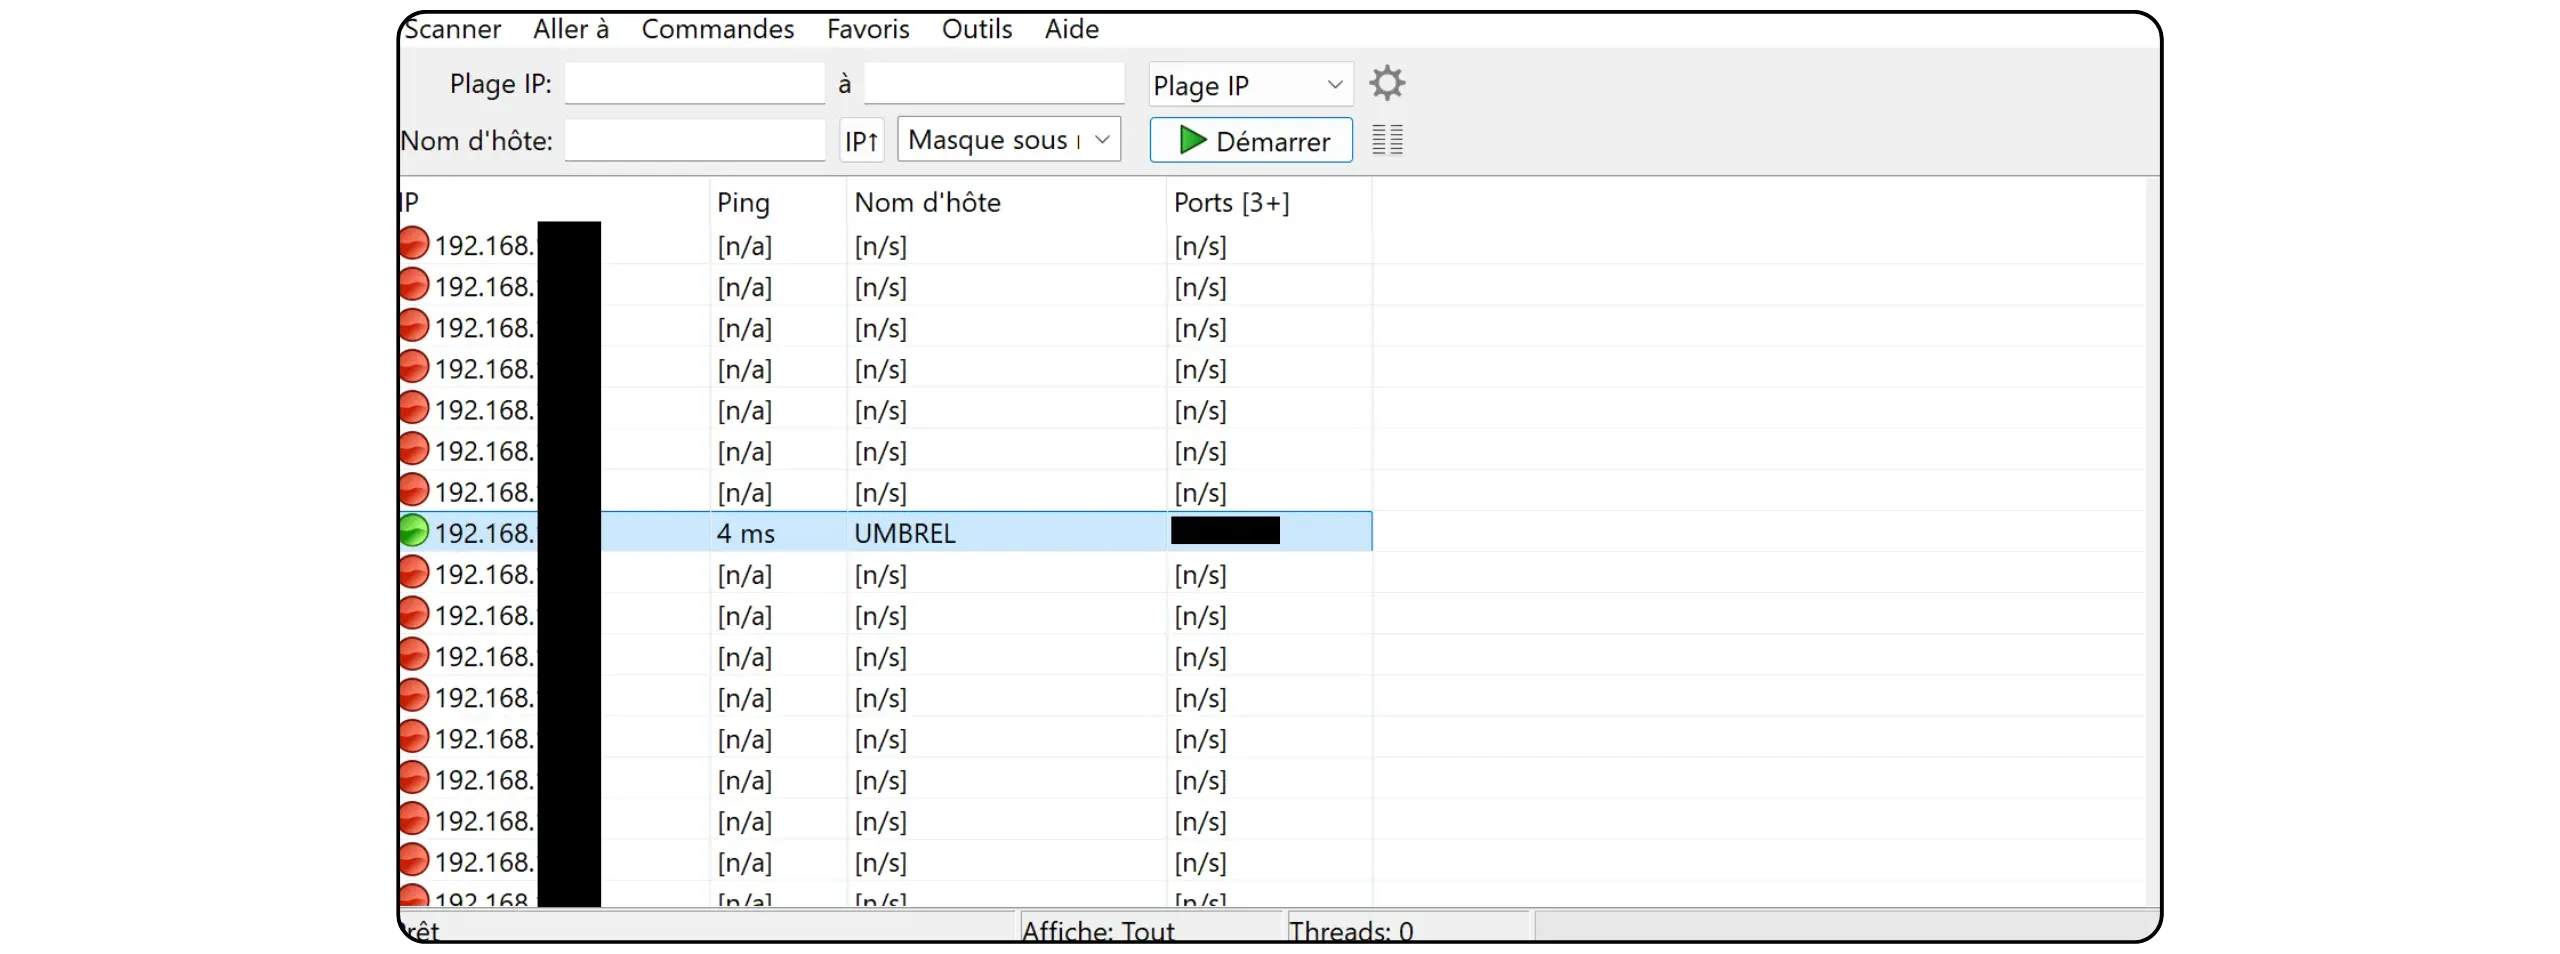
https://planb.academy/tutorials/computer-security/communication/angry-ip-scanner-47f7c943-53b7-4098-b167-4cec8e747b5d
- As a last resort, reconnect a monitor and keyboard to the device, log in (default login: `umbrel`, password: `umbrel`), then type the following command:
```
hostname -I
```
Now you're ready to use Umbrel!
### Step 5: Getting started with Umbrel
To start configuring your Umbrel, click on the "*Start*" button.
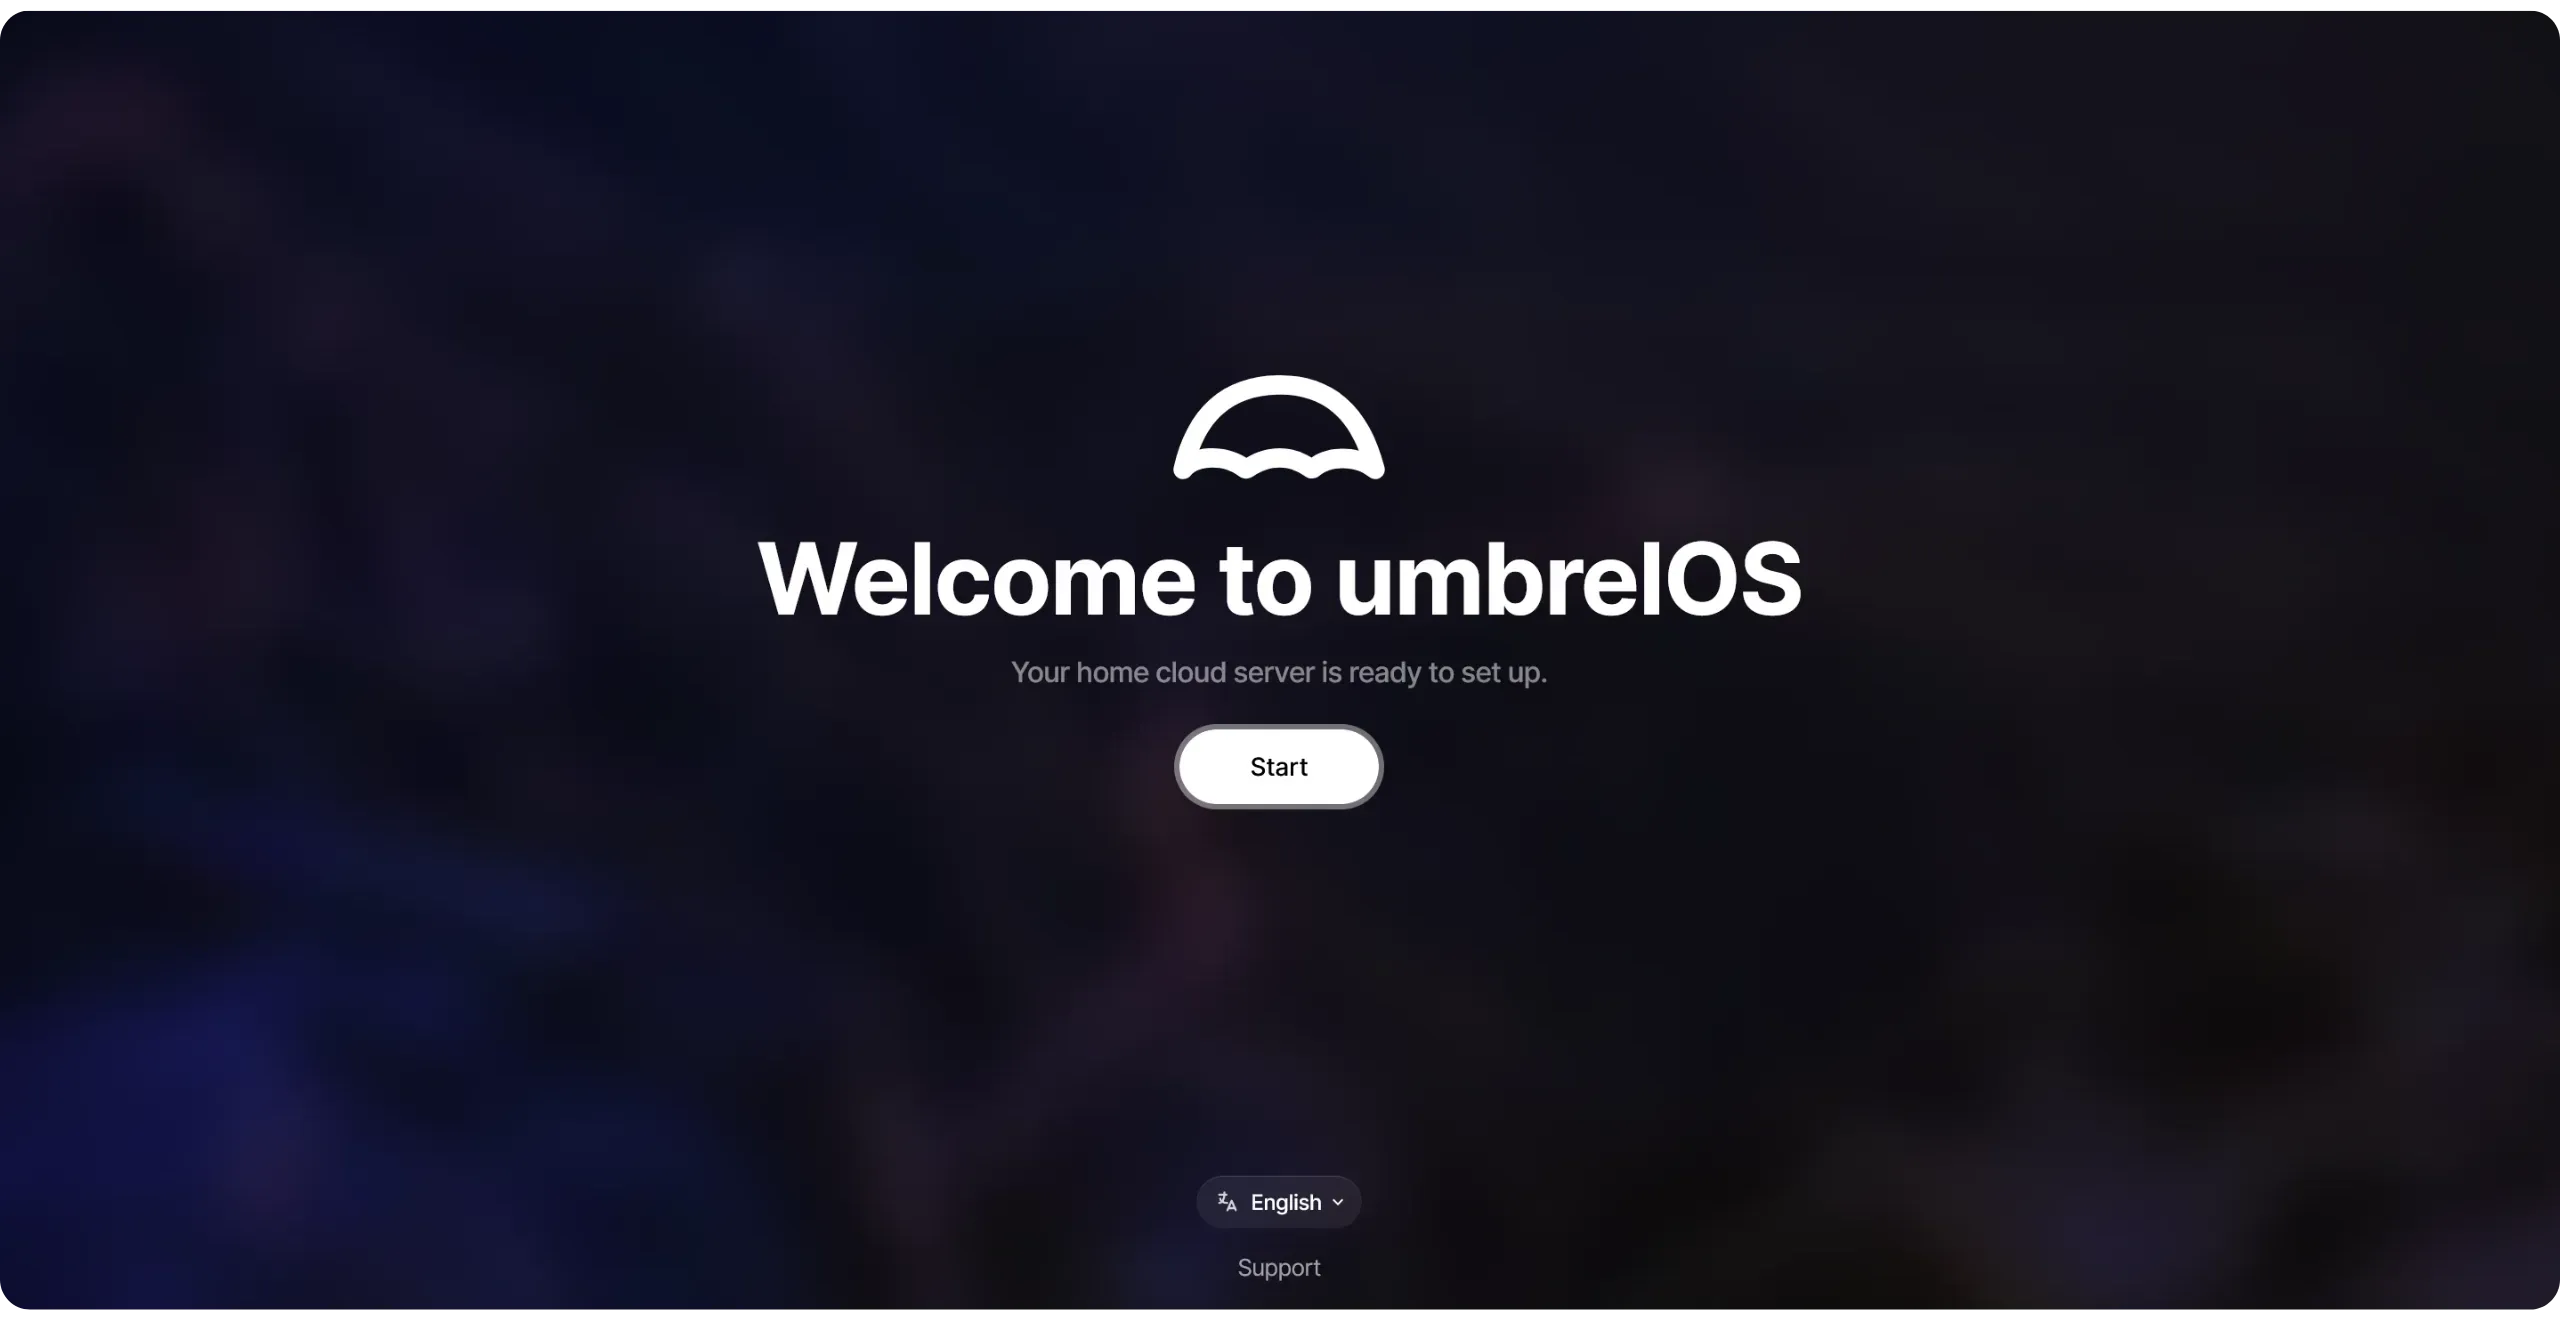
#### Create an account
Choose a pseudonym or enter your name, then set a strong password. Be careful: this password is the only barrier protecting access to your Umbrel from your network (and therefore, potentially, to your bitcoins if you run a Lightning node on Umbrel). It also protects remote access via [Tor](https://planb.academy/resources/glossary/tor) or VPN, if these services are enabled.
Choose a strong password and ensure you keep at least one backup (a password manager is recommended).
https://planb.academy/tutorials/computer-security/authentication/bitwarden-0532f569-fb00-4fad-acba-2fcb1bf05de9
https://planb.academy/tutorials/computer-security/authentication/keepass-f8073bb7-5b4a-4664-9246-228e307be246
Once you've entered your password, click on the "*Create*" button.
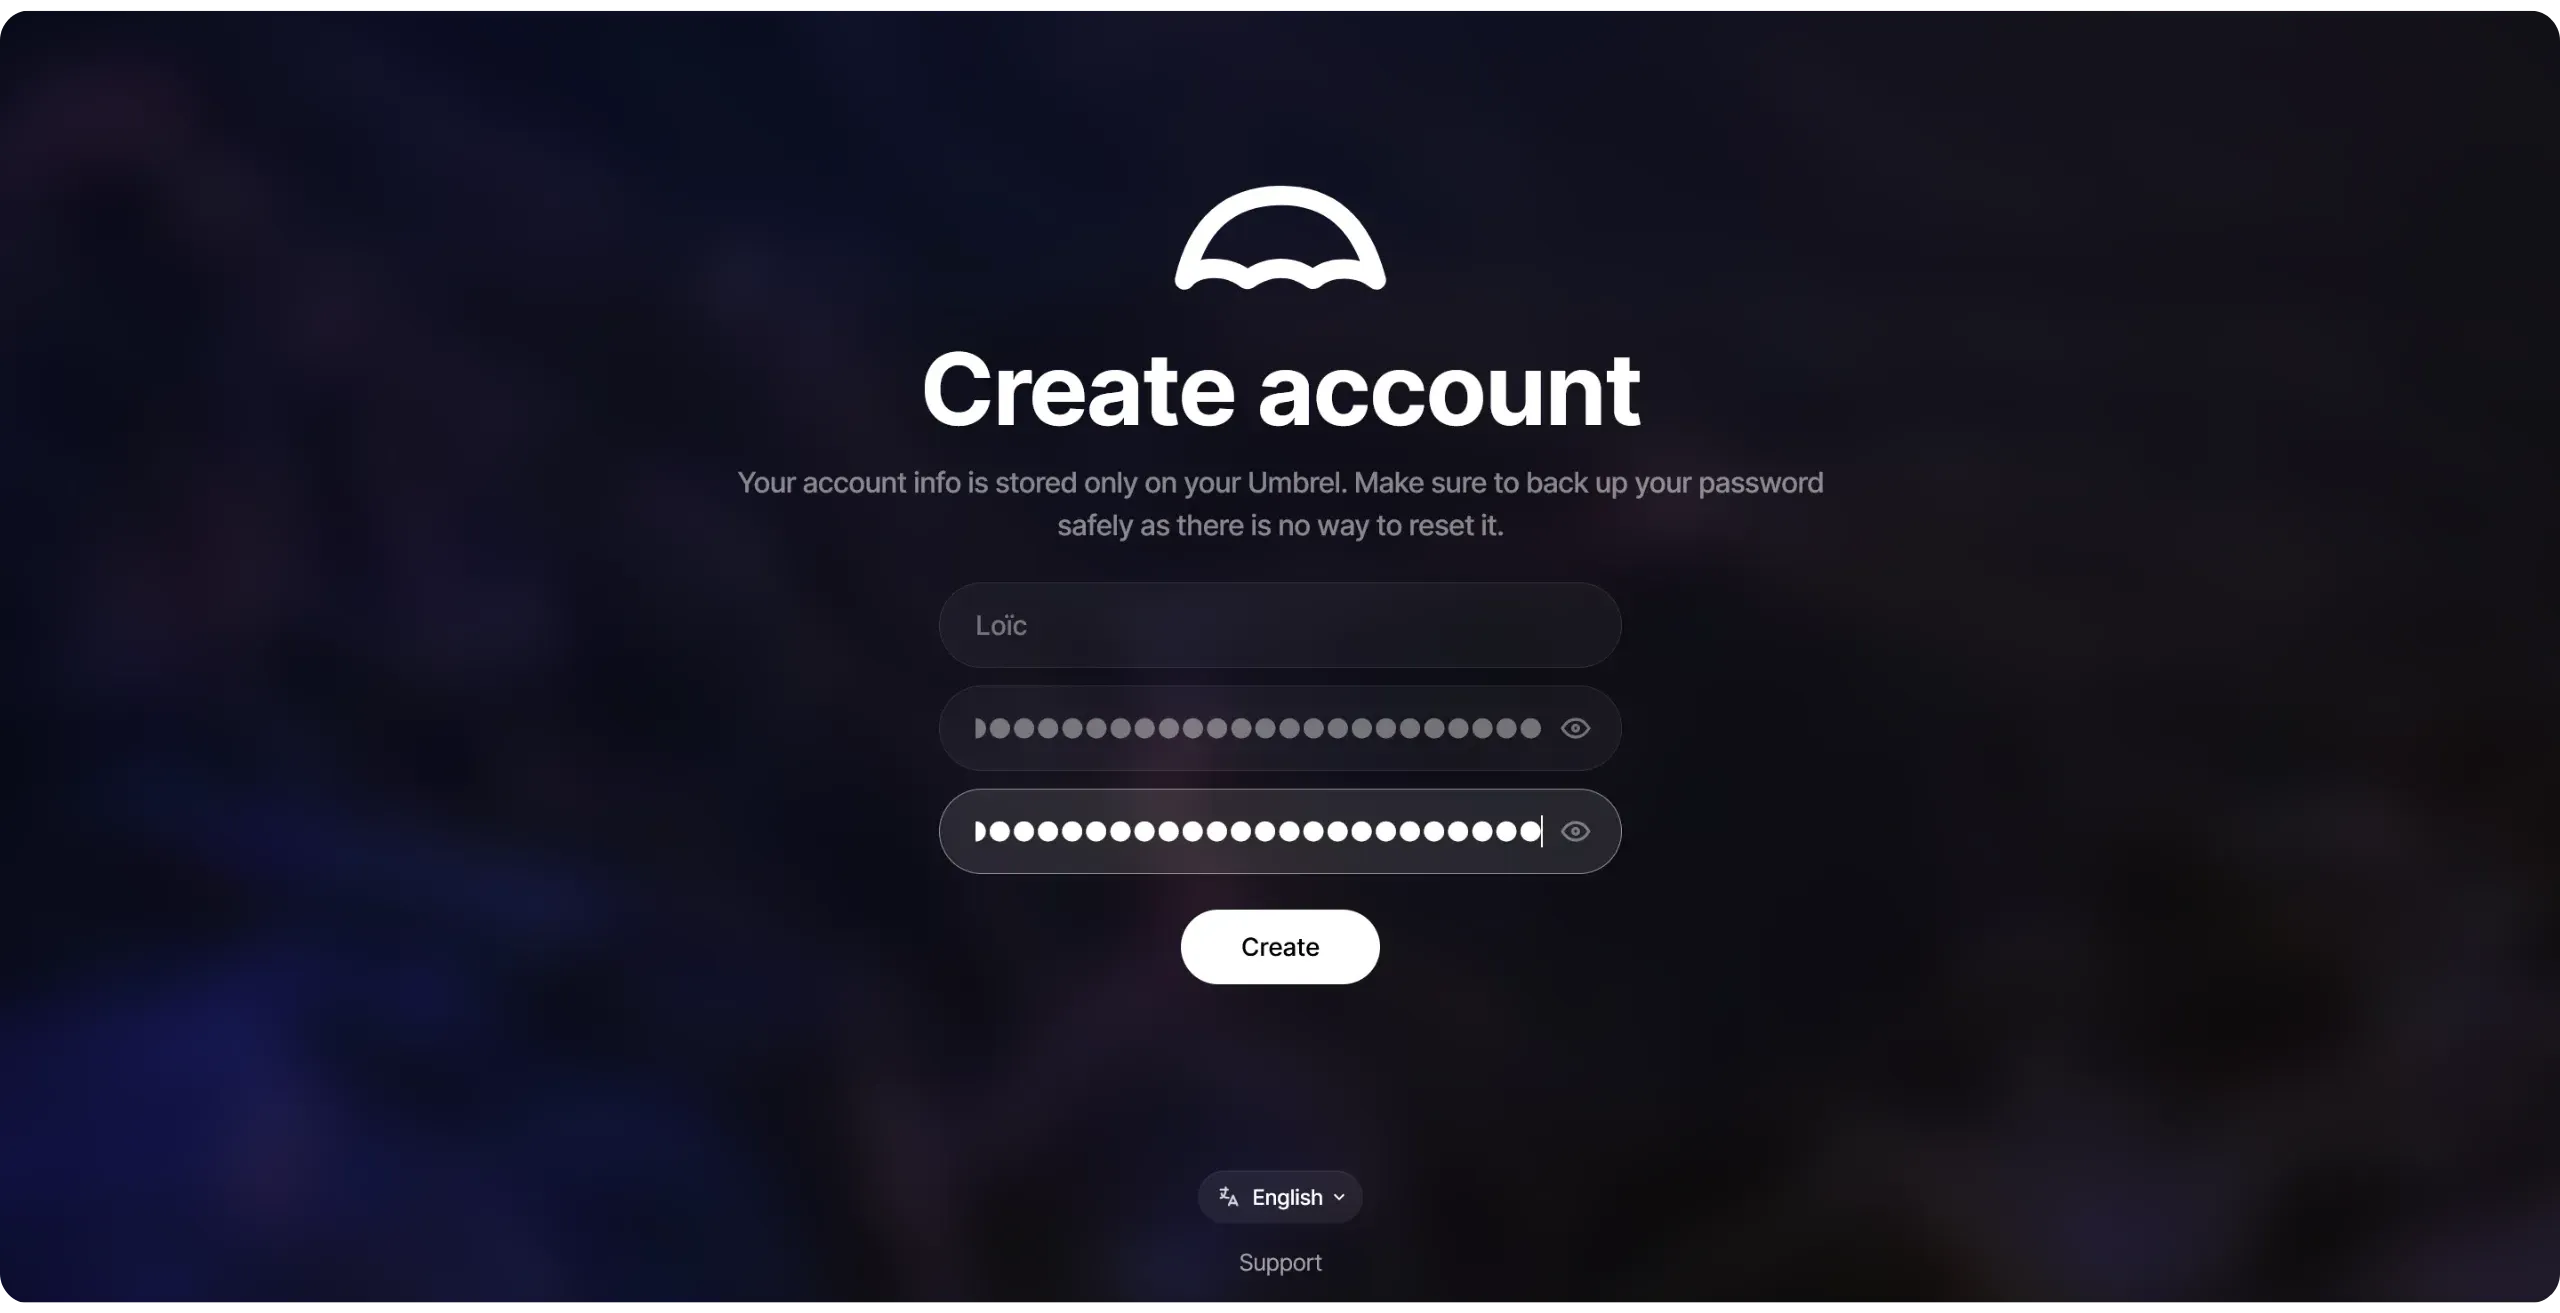
Your Umbrel configuration is now complete.
#### Discovery of interface
Umbrel's interface is quite intuitive:
- On the home page, you can view your installed applications and widgets.
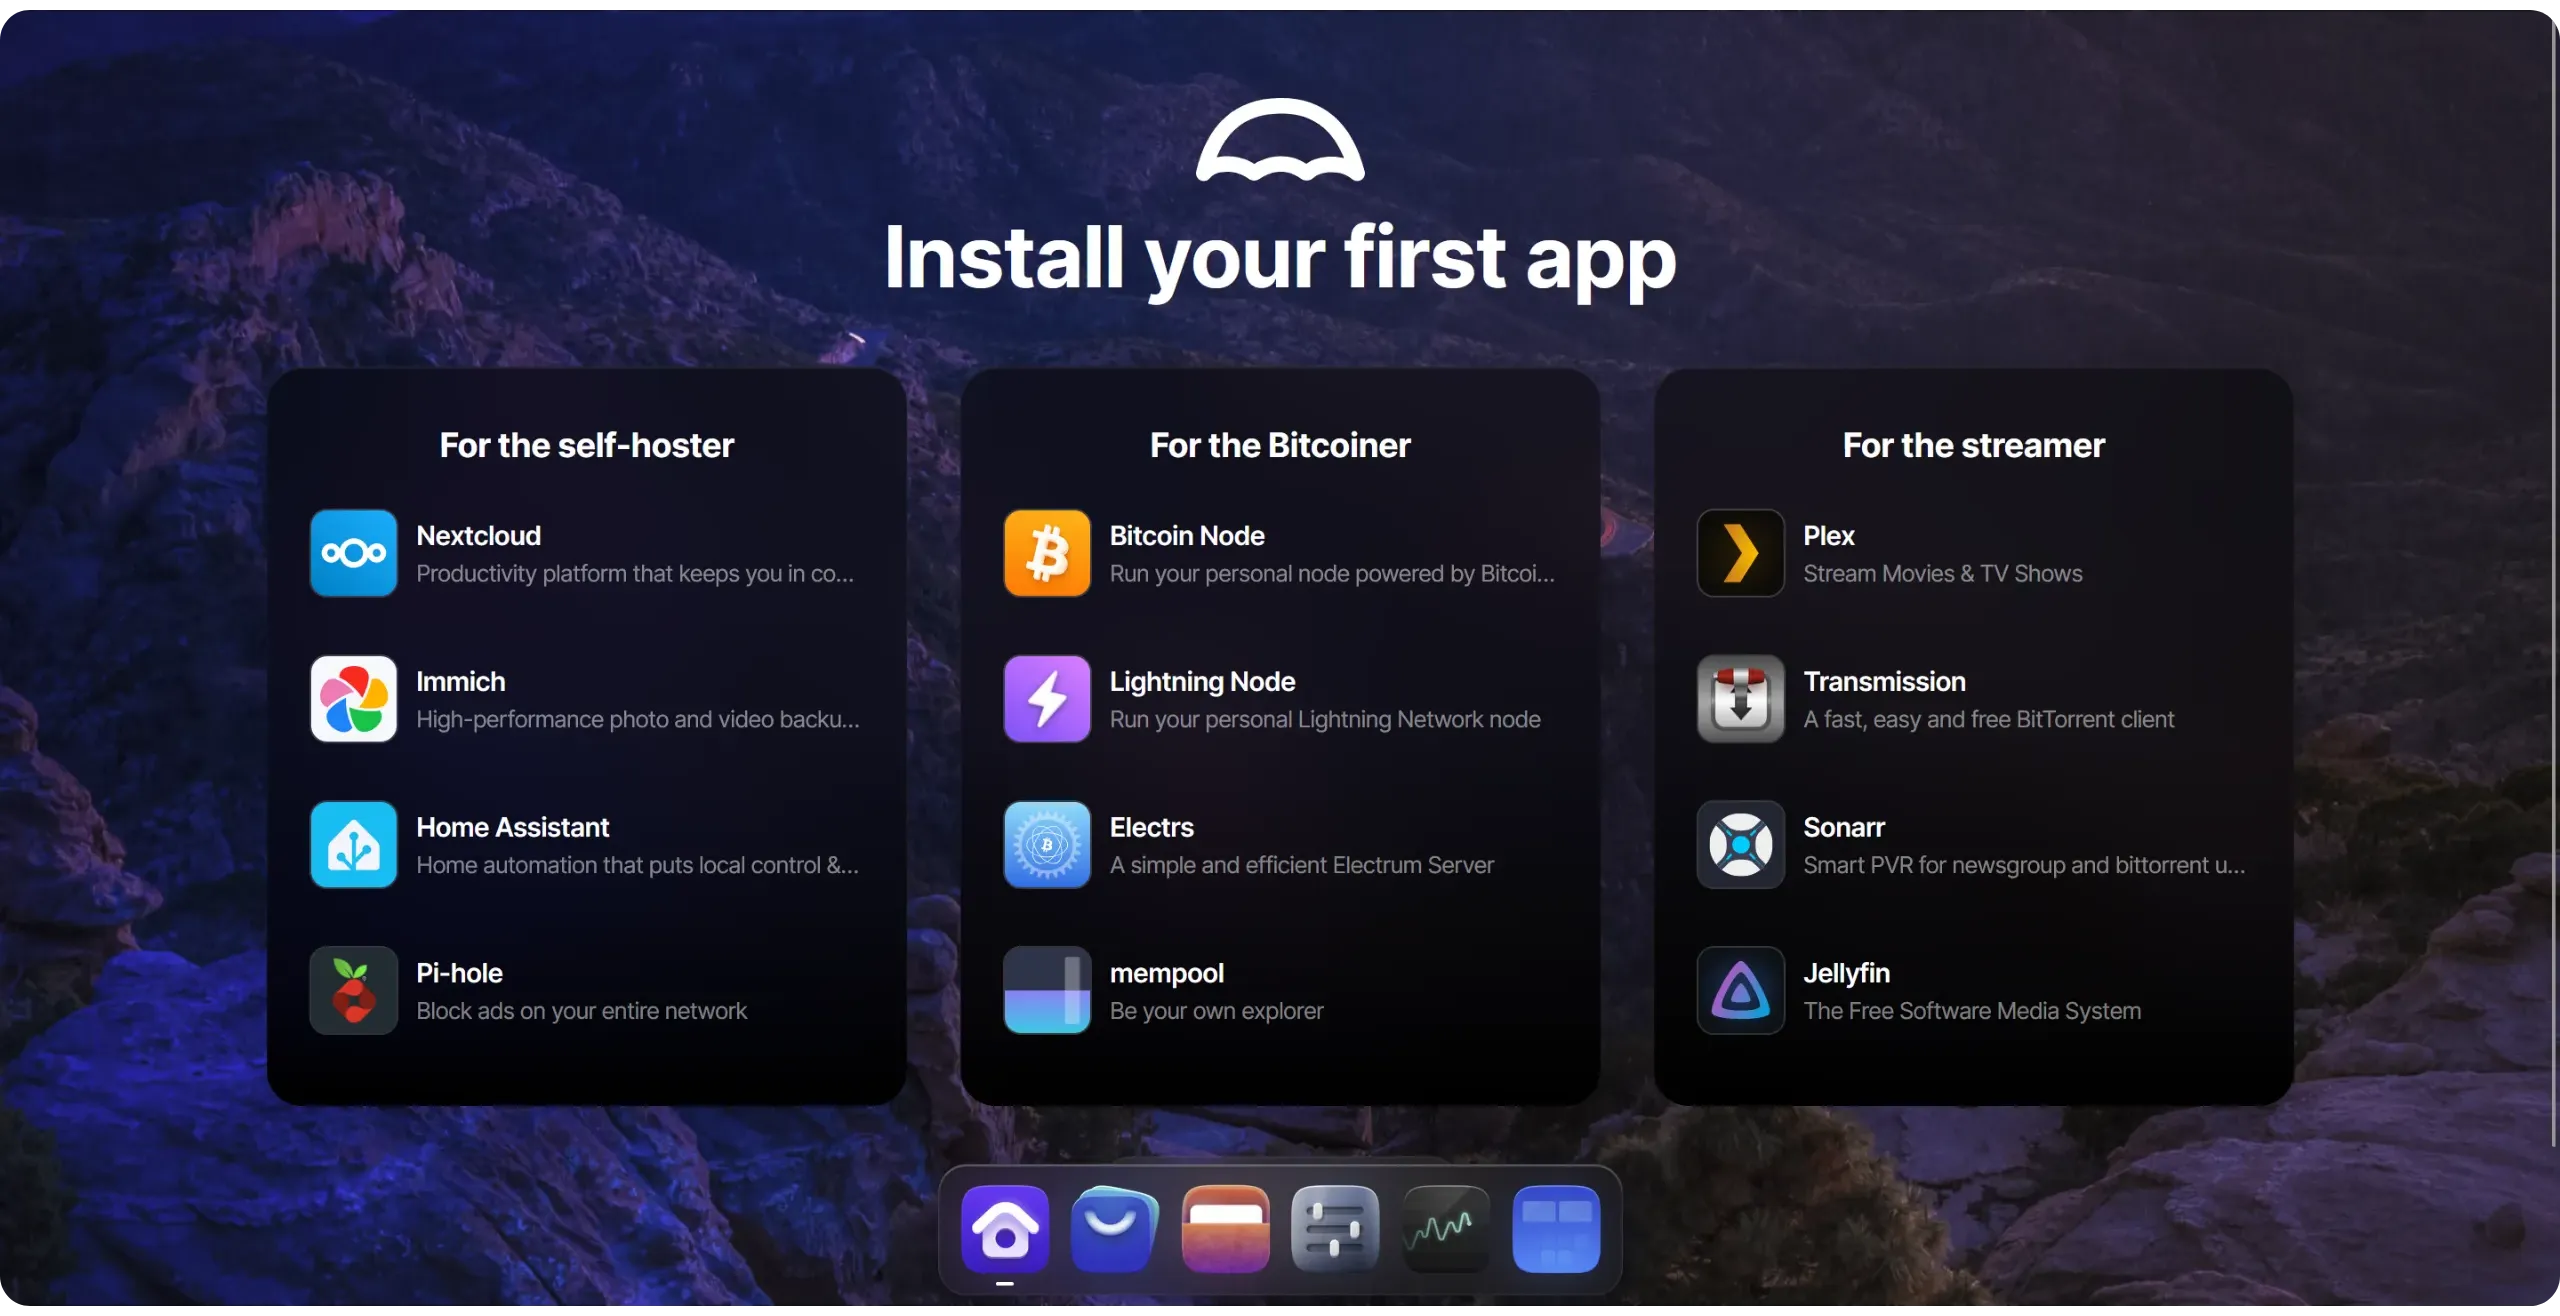
- The "*App Store*" lets you install new applications,
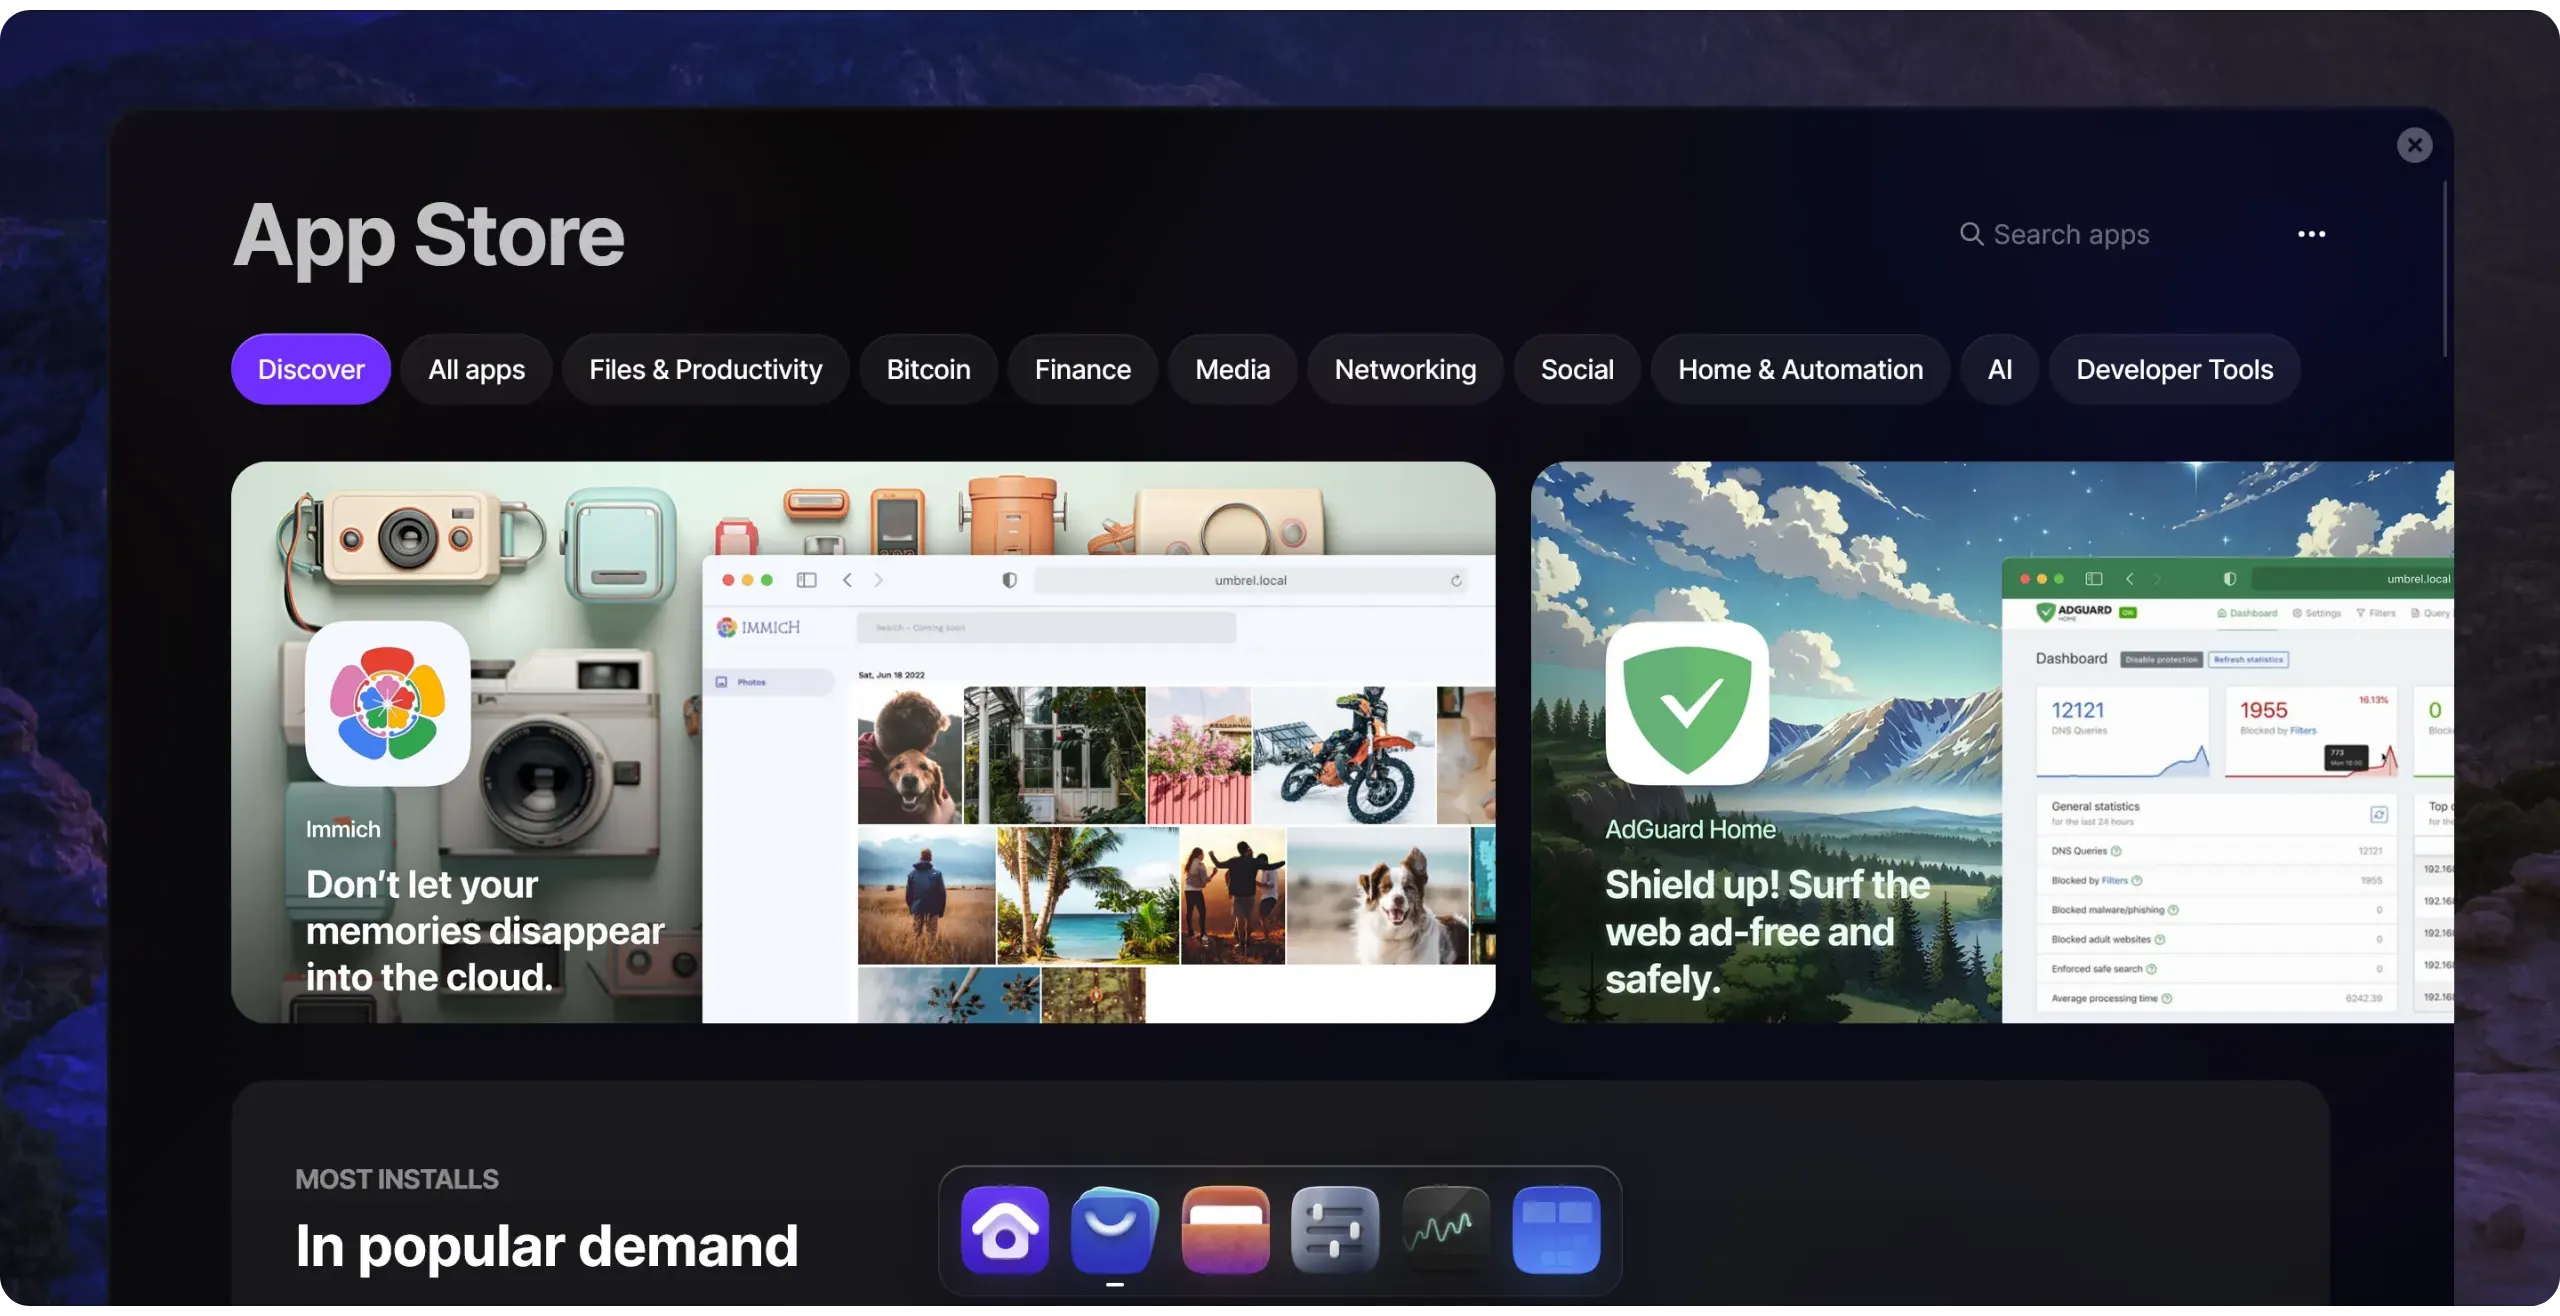
- The "*Files*" menu centralizes all the documents stored on your Umbrel.
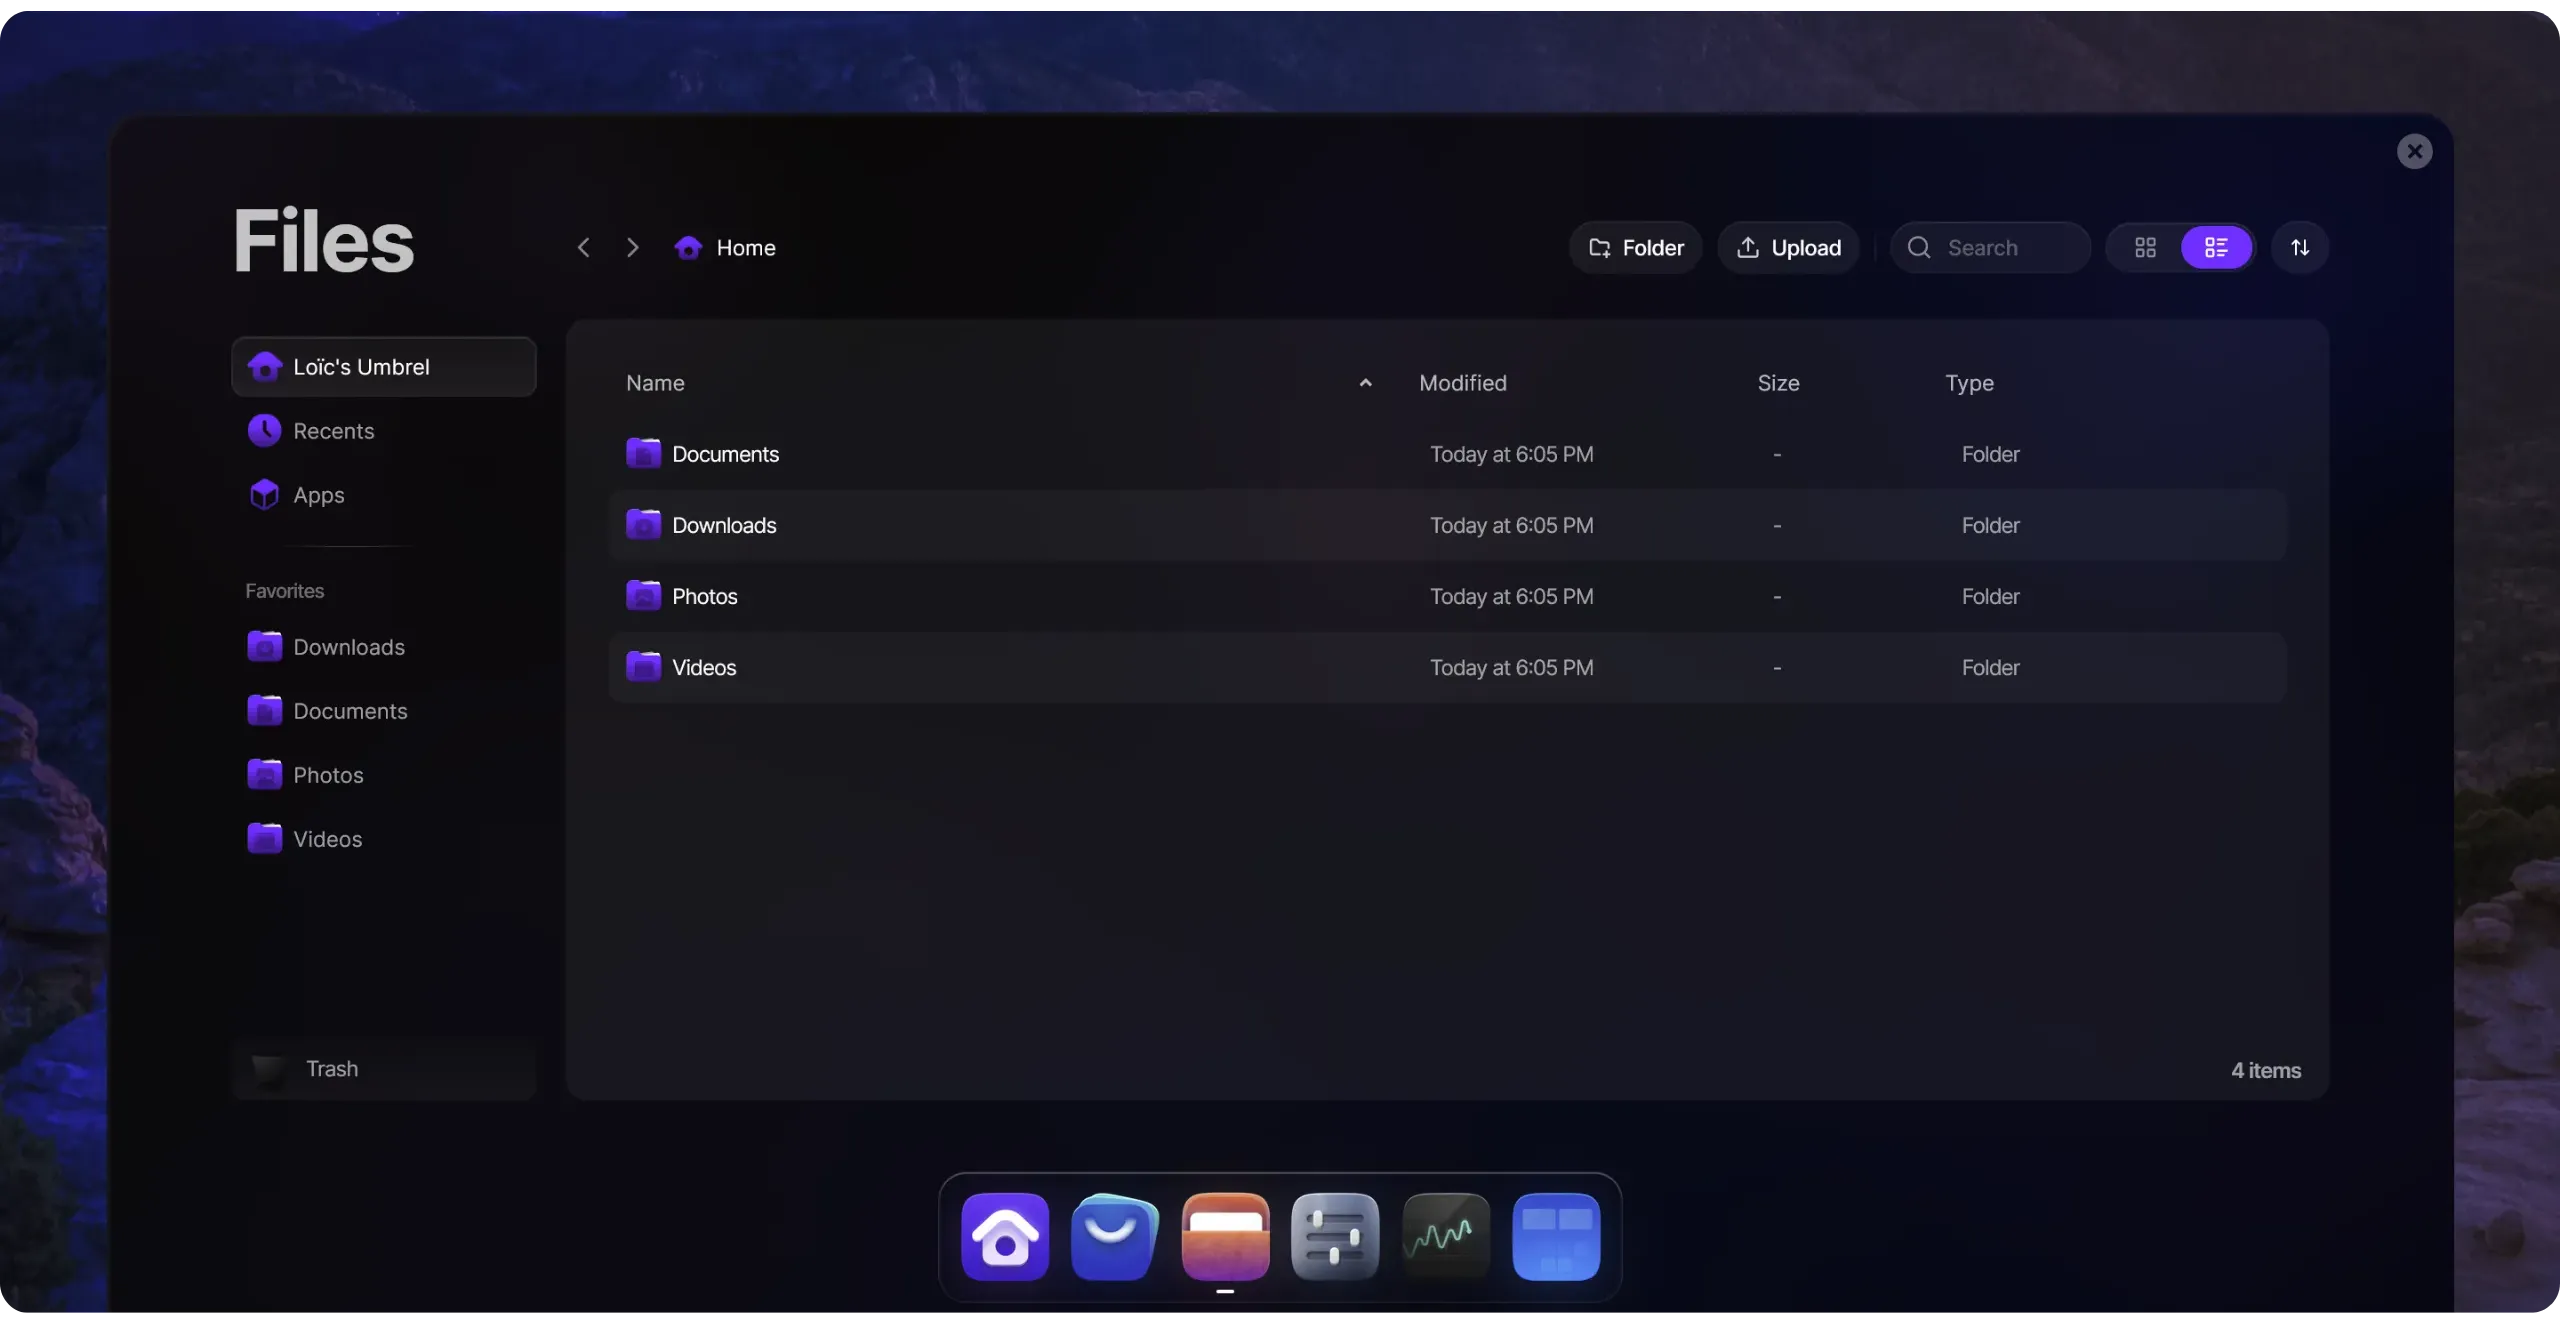
- The "*Settings*" menu lets you modify your Umbrel's settings and access its information, including:
- Update, restart, or stop your machine;
- Consult available storage space, RAM usage, and processor temperature;
- Change wallpaper;
- Manage remote access via Tor, activate Wi-Fi, or 2FA.
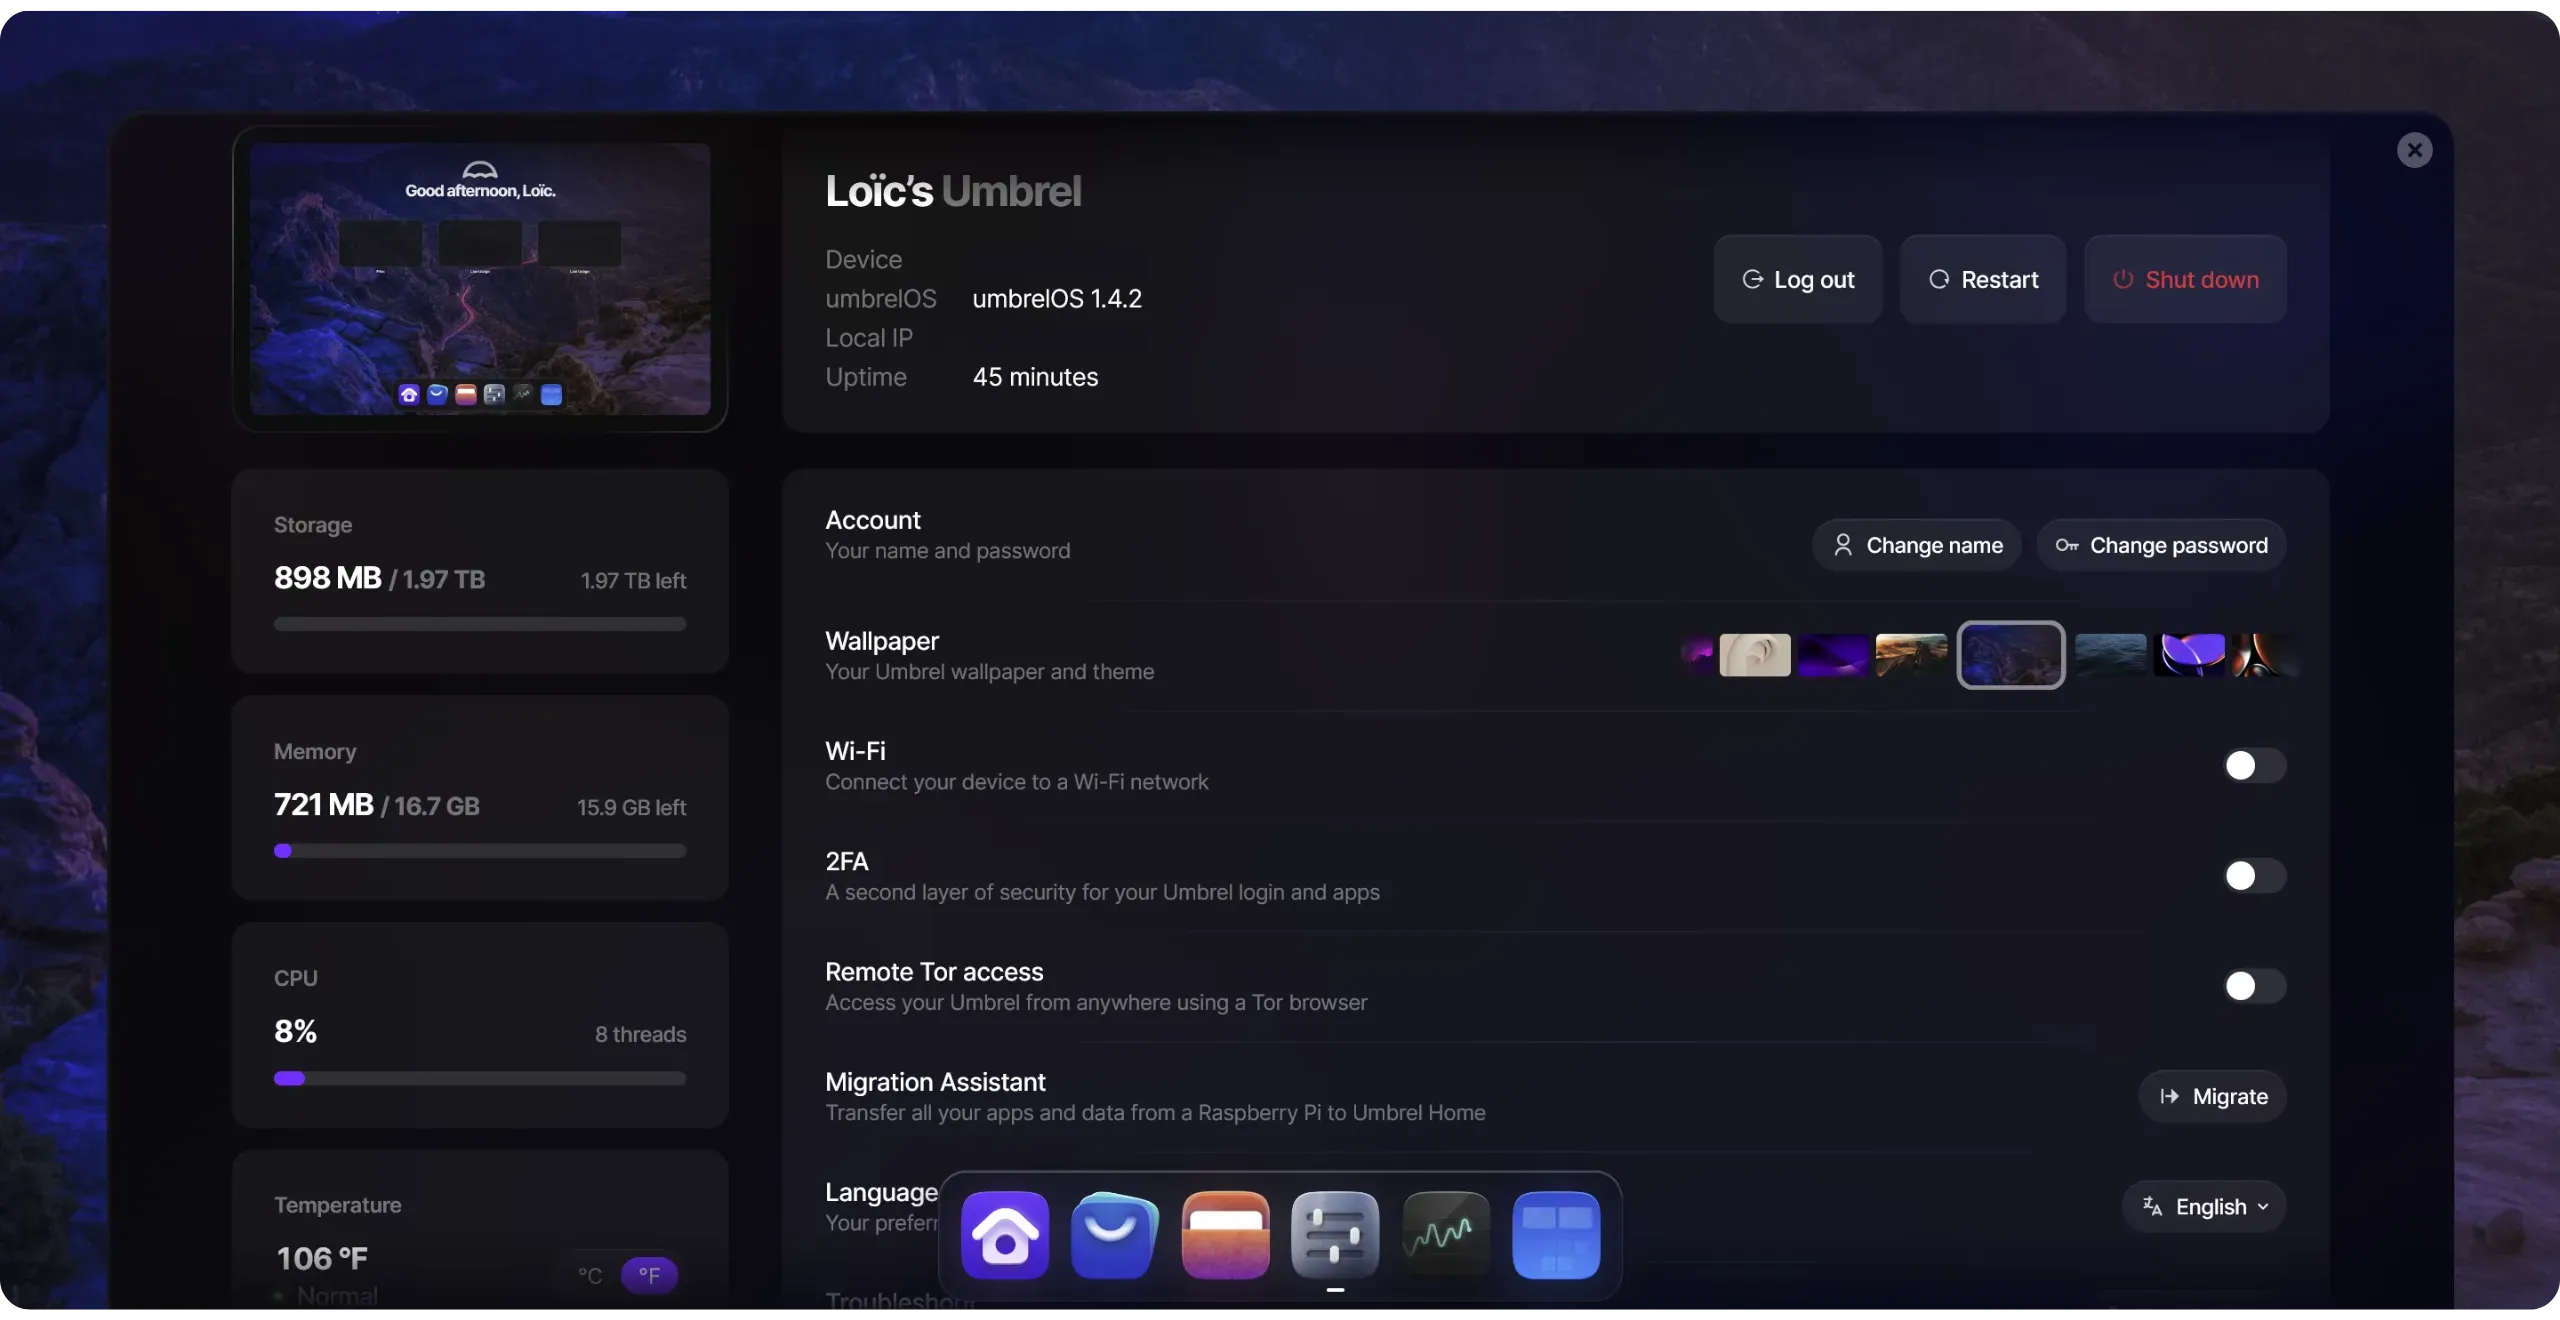
#### Security and connection settings
First and foremost, I strongly recommend enabling two-factor authentication (2FA). This adds an extra layer of security to your password. It's almost indispensable if you plan to use your Umbrel to store personal files, run a Lightning node, or perform any other sensitive activity.
https://planb.academy/tutorials/computer-security/authentication/authy-a76ab26b-71b0-473c-aa7c-c49153705eb7
To do this, click on the corresponding box in the settings.
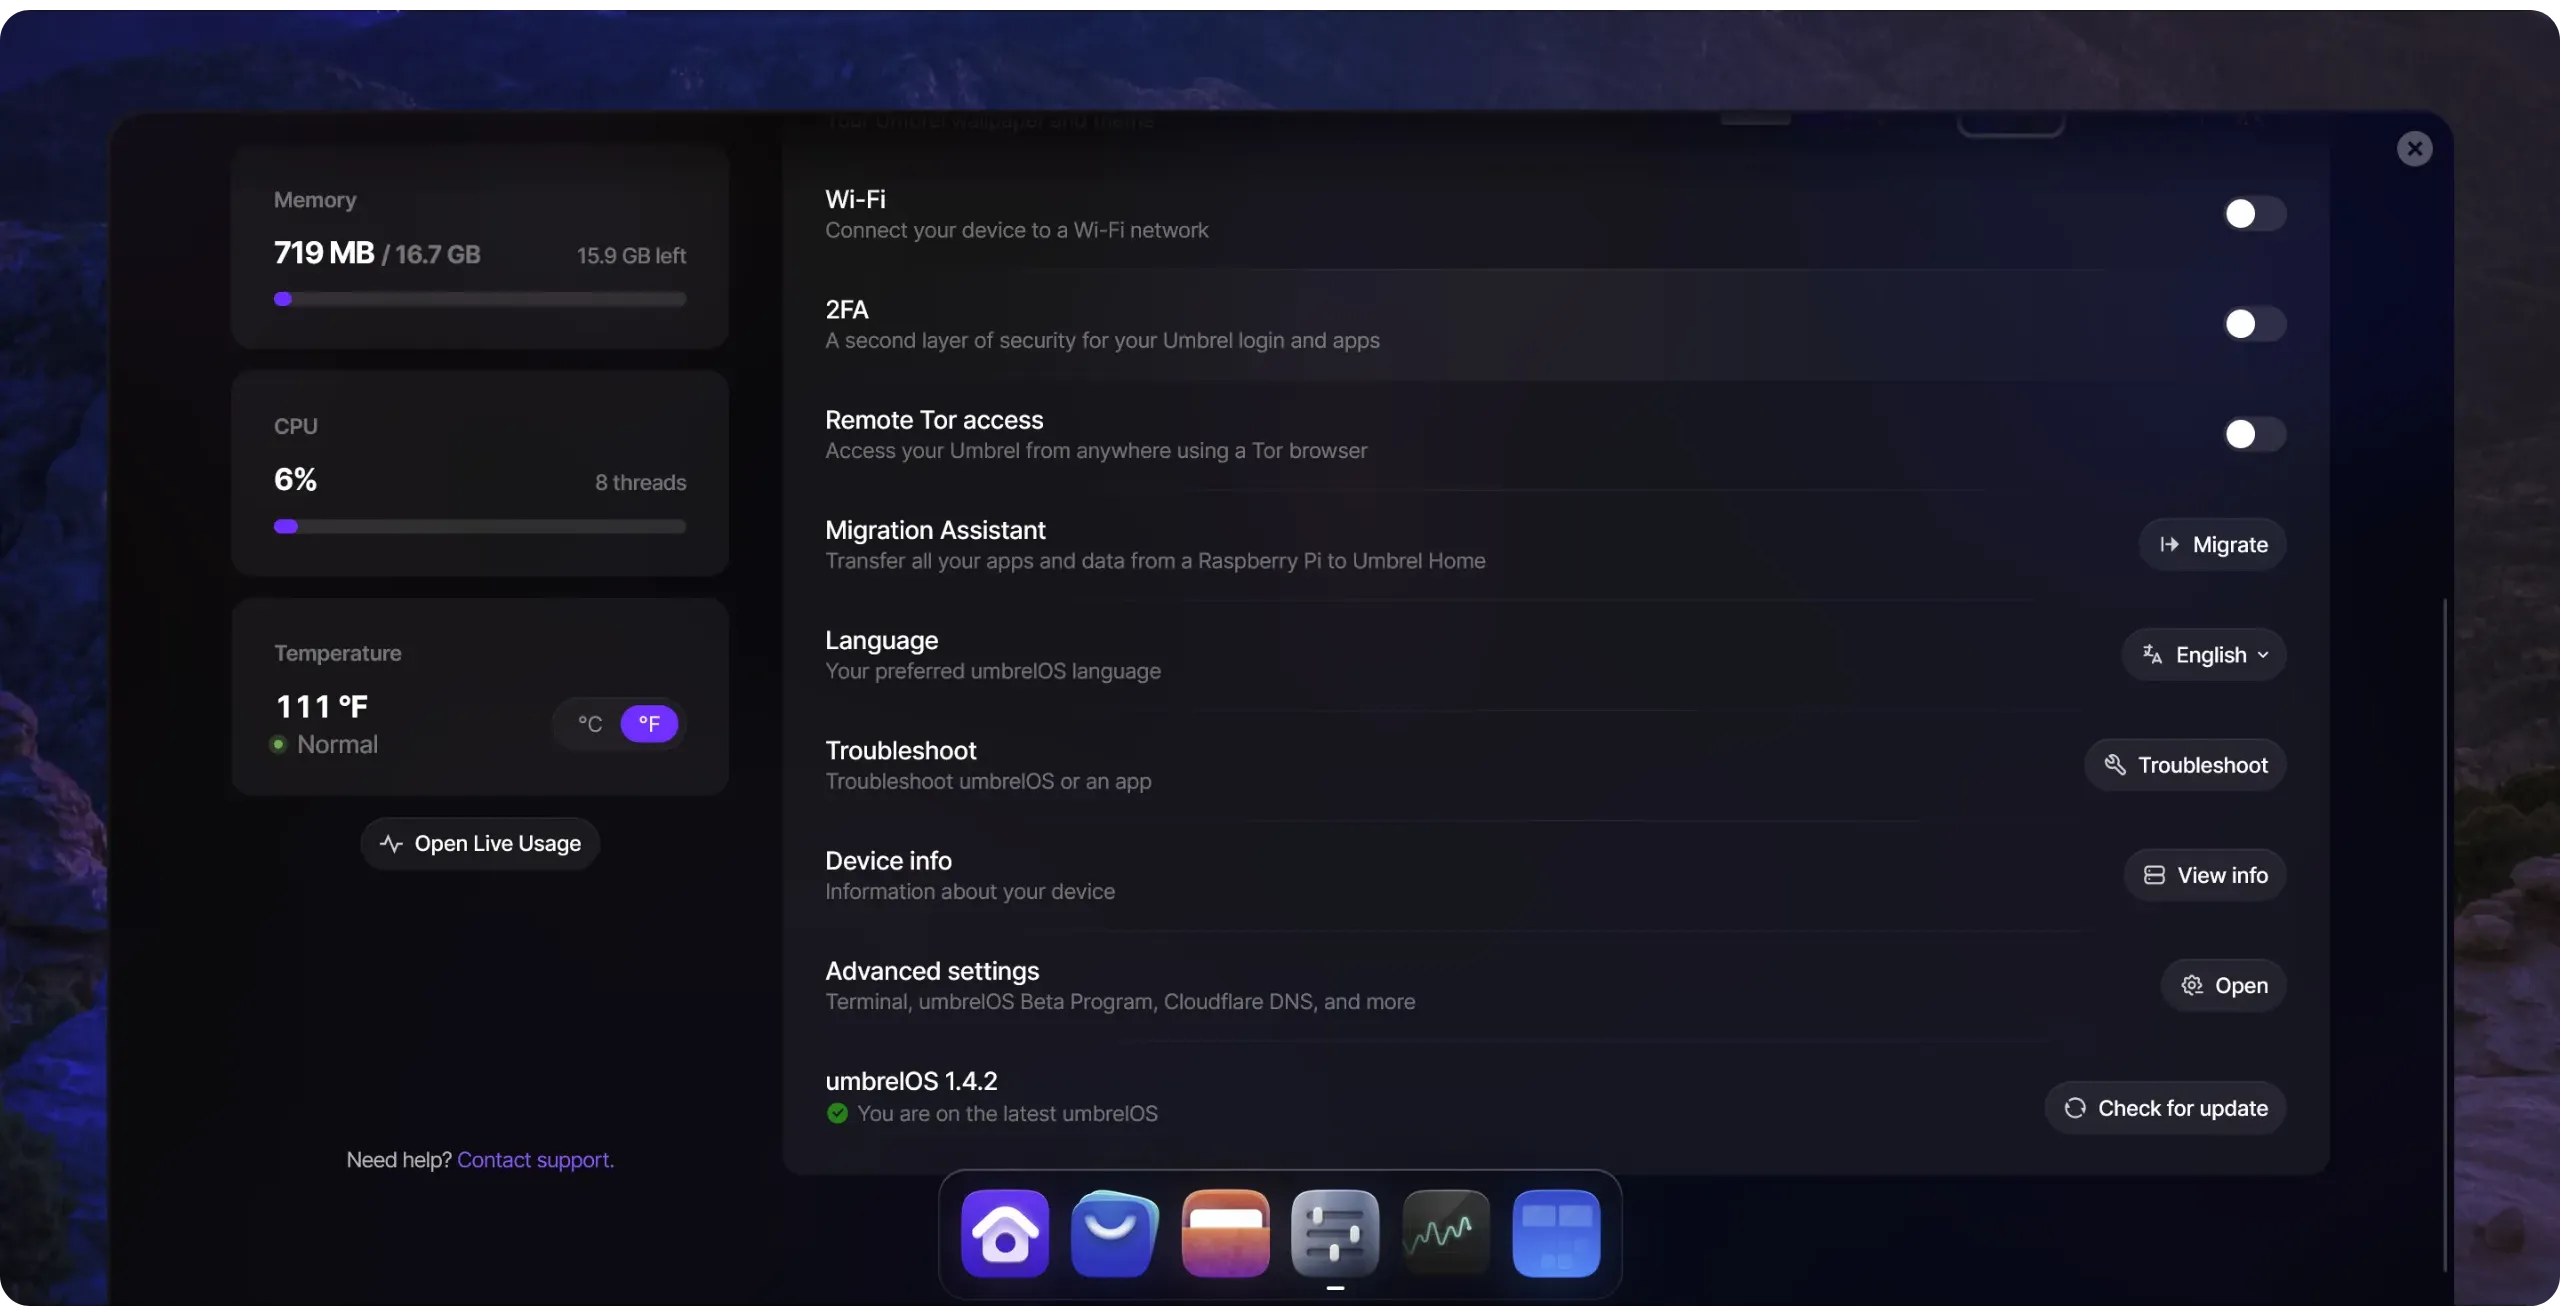
Then scan the QR code displayed using your authentication application. Then enter the 6-digit dynamic code in the field provided on your Umbrel.
From now on, every new connection to your Umbrel will require both the password and the 6-digit code generated by your two-factor authentication (2FA) application.
Regarding remote access via Tor, if you don't need it, I recommend leaving this option disabled to limit the attack surface of your Umbrel. By default, your node can only be accessed from a machine connected to the same local network. Enabling access via Tor will nevertheless allow you to manage your Umbrel on the move.
If you enable this feature, it theoretically becomes possible for any machine in the world to attempt a connection to your node, provided it knows the Tor address. However, your password and 2FA will still protect you.
If you activate this option, ensure that you have two-factor authentication (2FA) enabled, a strong password, and never disclose your Tor connection address.
Simply enter this Tor address in your Tor browser to access Umbrel's interface from any network.
Finally, on this settings page, you can also activate the Wi-Fi connection. If your machine hosting Umbrel has a Wi-Fi network card or Wi-Fi dongle, this allows you to access the Internet without using the RJ45 cable. However, depending on your configuration, this solution may slow down the connection, which may affect initial synchronization (IBD) and future use of the node (e.g., for Lightning transactions). Personally, I don't recommend this option, as a node is not intended for mobile use: it's always accessed remotely, so you might as well leave it plugged in.
### Step 6: Install a Bitcoin node on Umbrel
Now that UmbrelOS is correctly installed and configured on your machine, you can proceed with installing your Bitcoin node. Nothing could be simpler: go to the App Store, open the "*Bitcoin*" category, then select the "*Bitcoin Node*" application (it's actually Bitcoin Core).
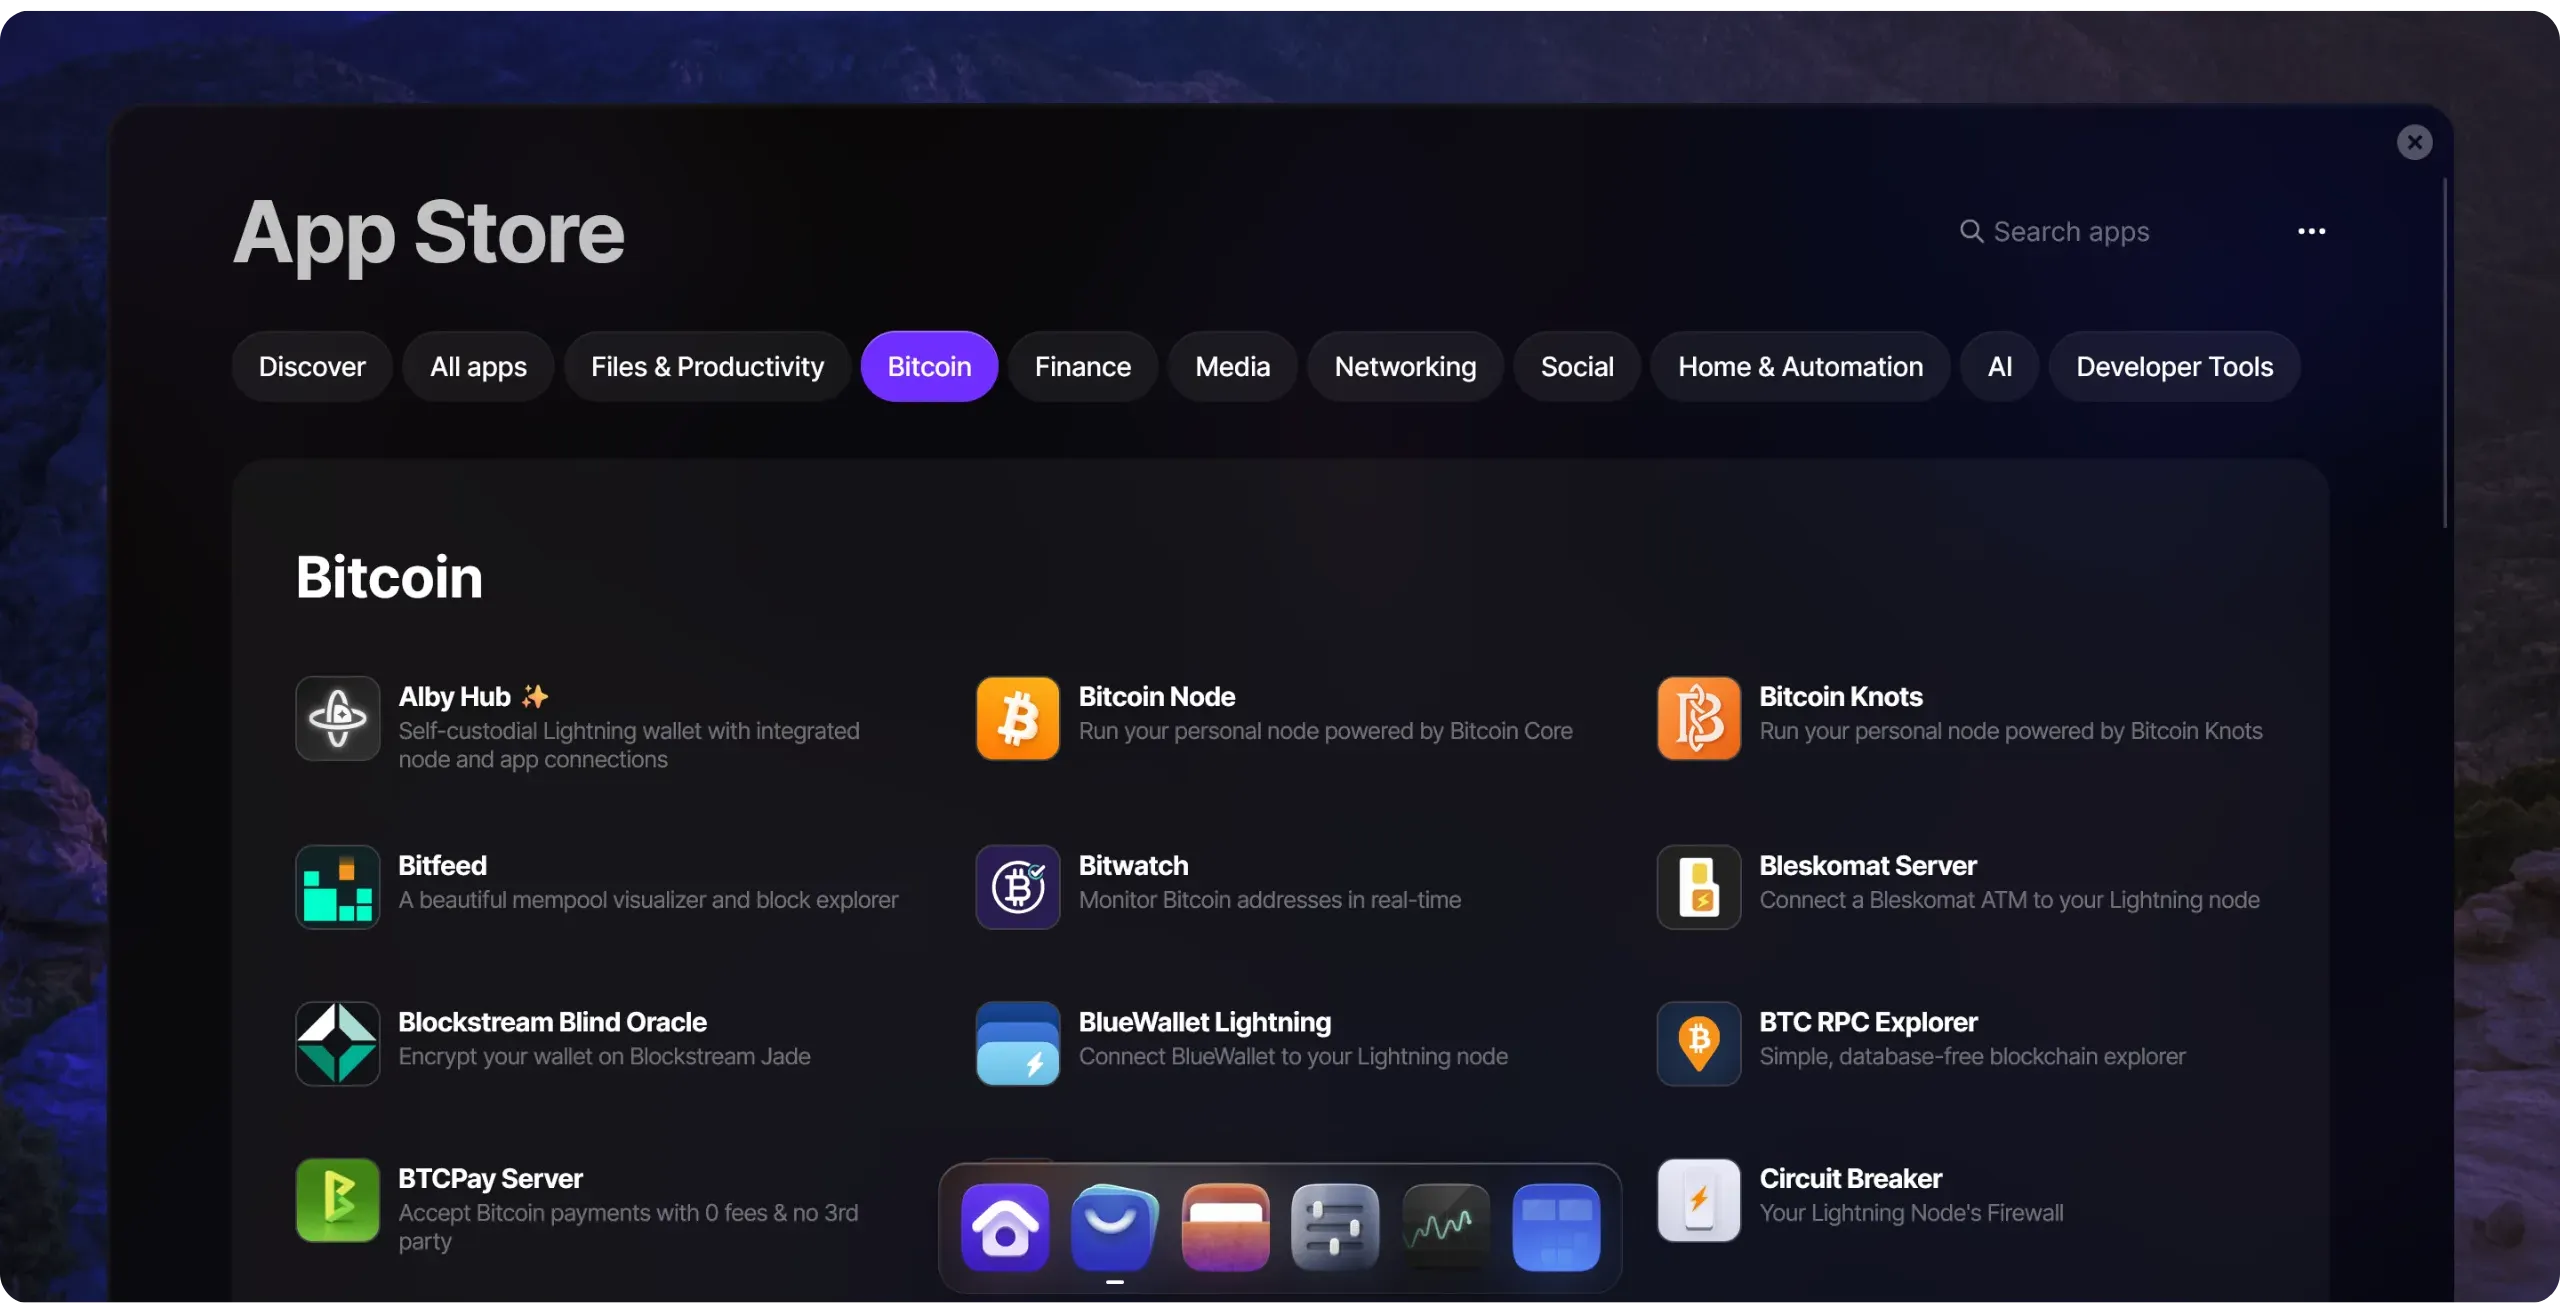
Then click on the "*Install*" button.
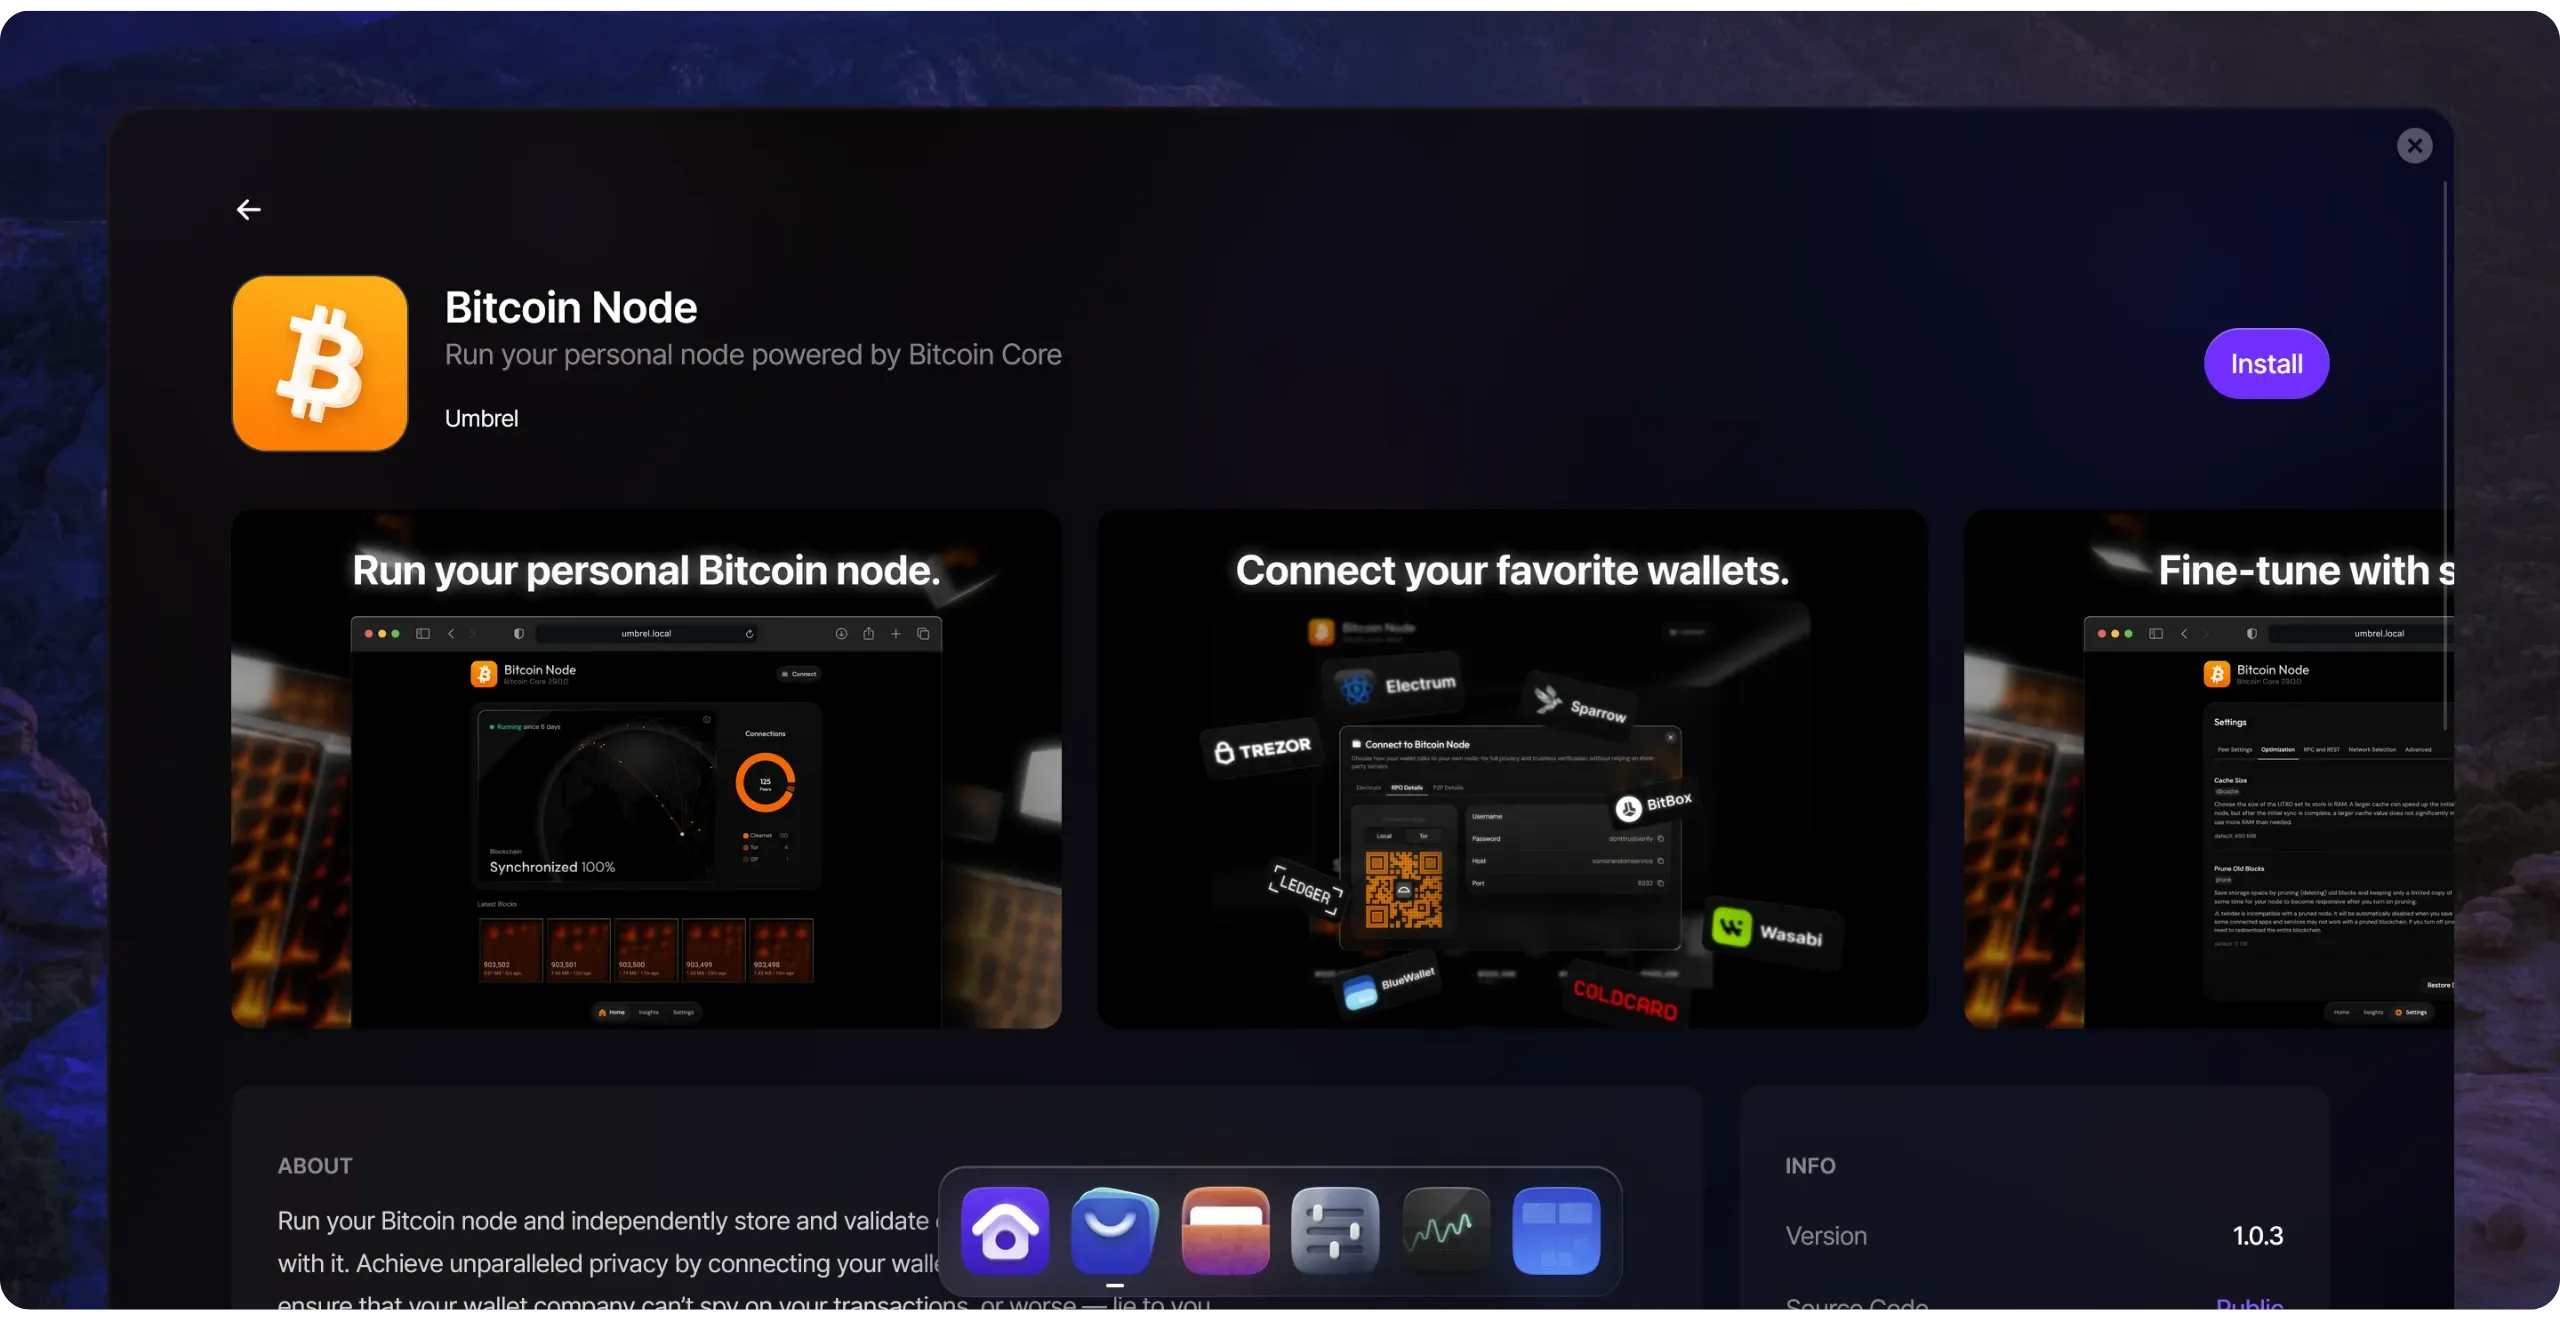
Once installation is complete, your Bitcoin node will launch its IBD (*Initial Block Download*): it will download and validate all transactions and blocks since Bitcoin was created in 2009.
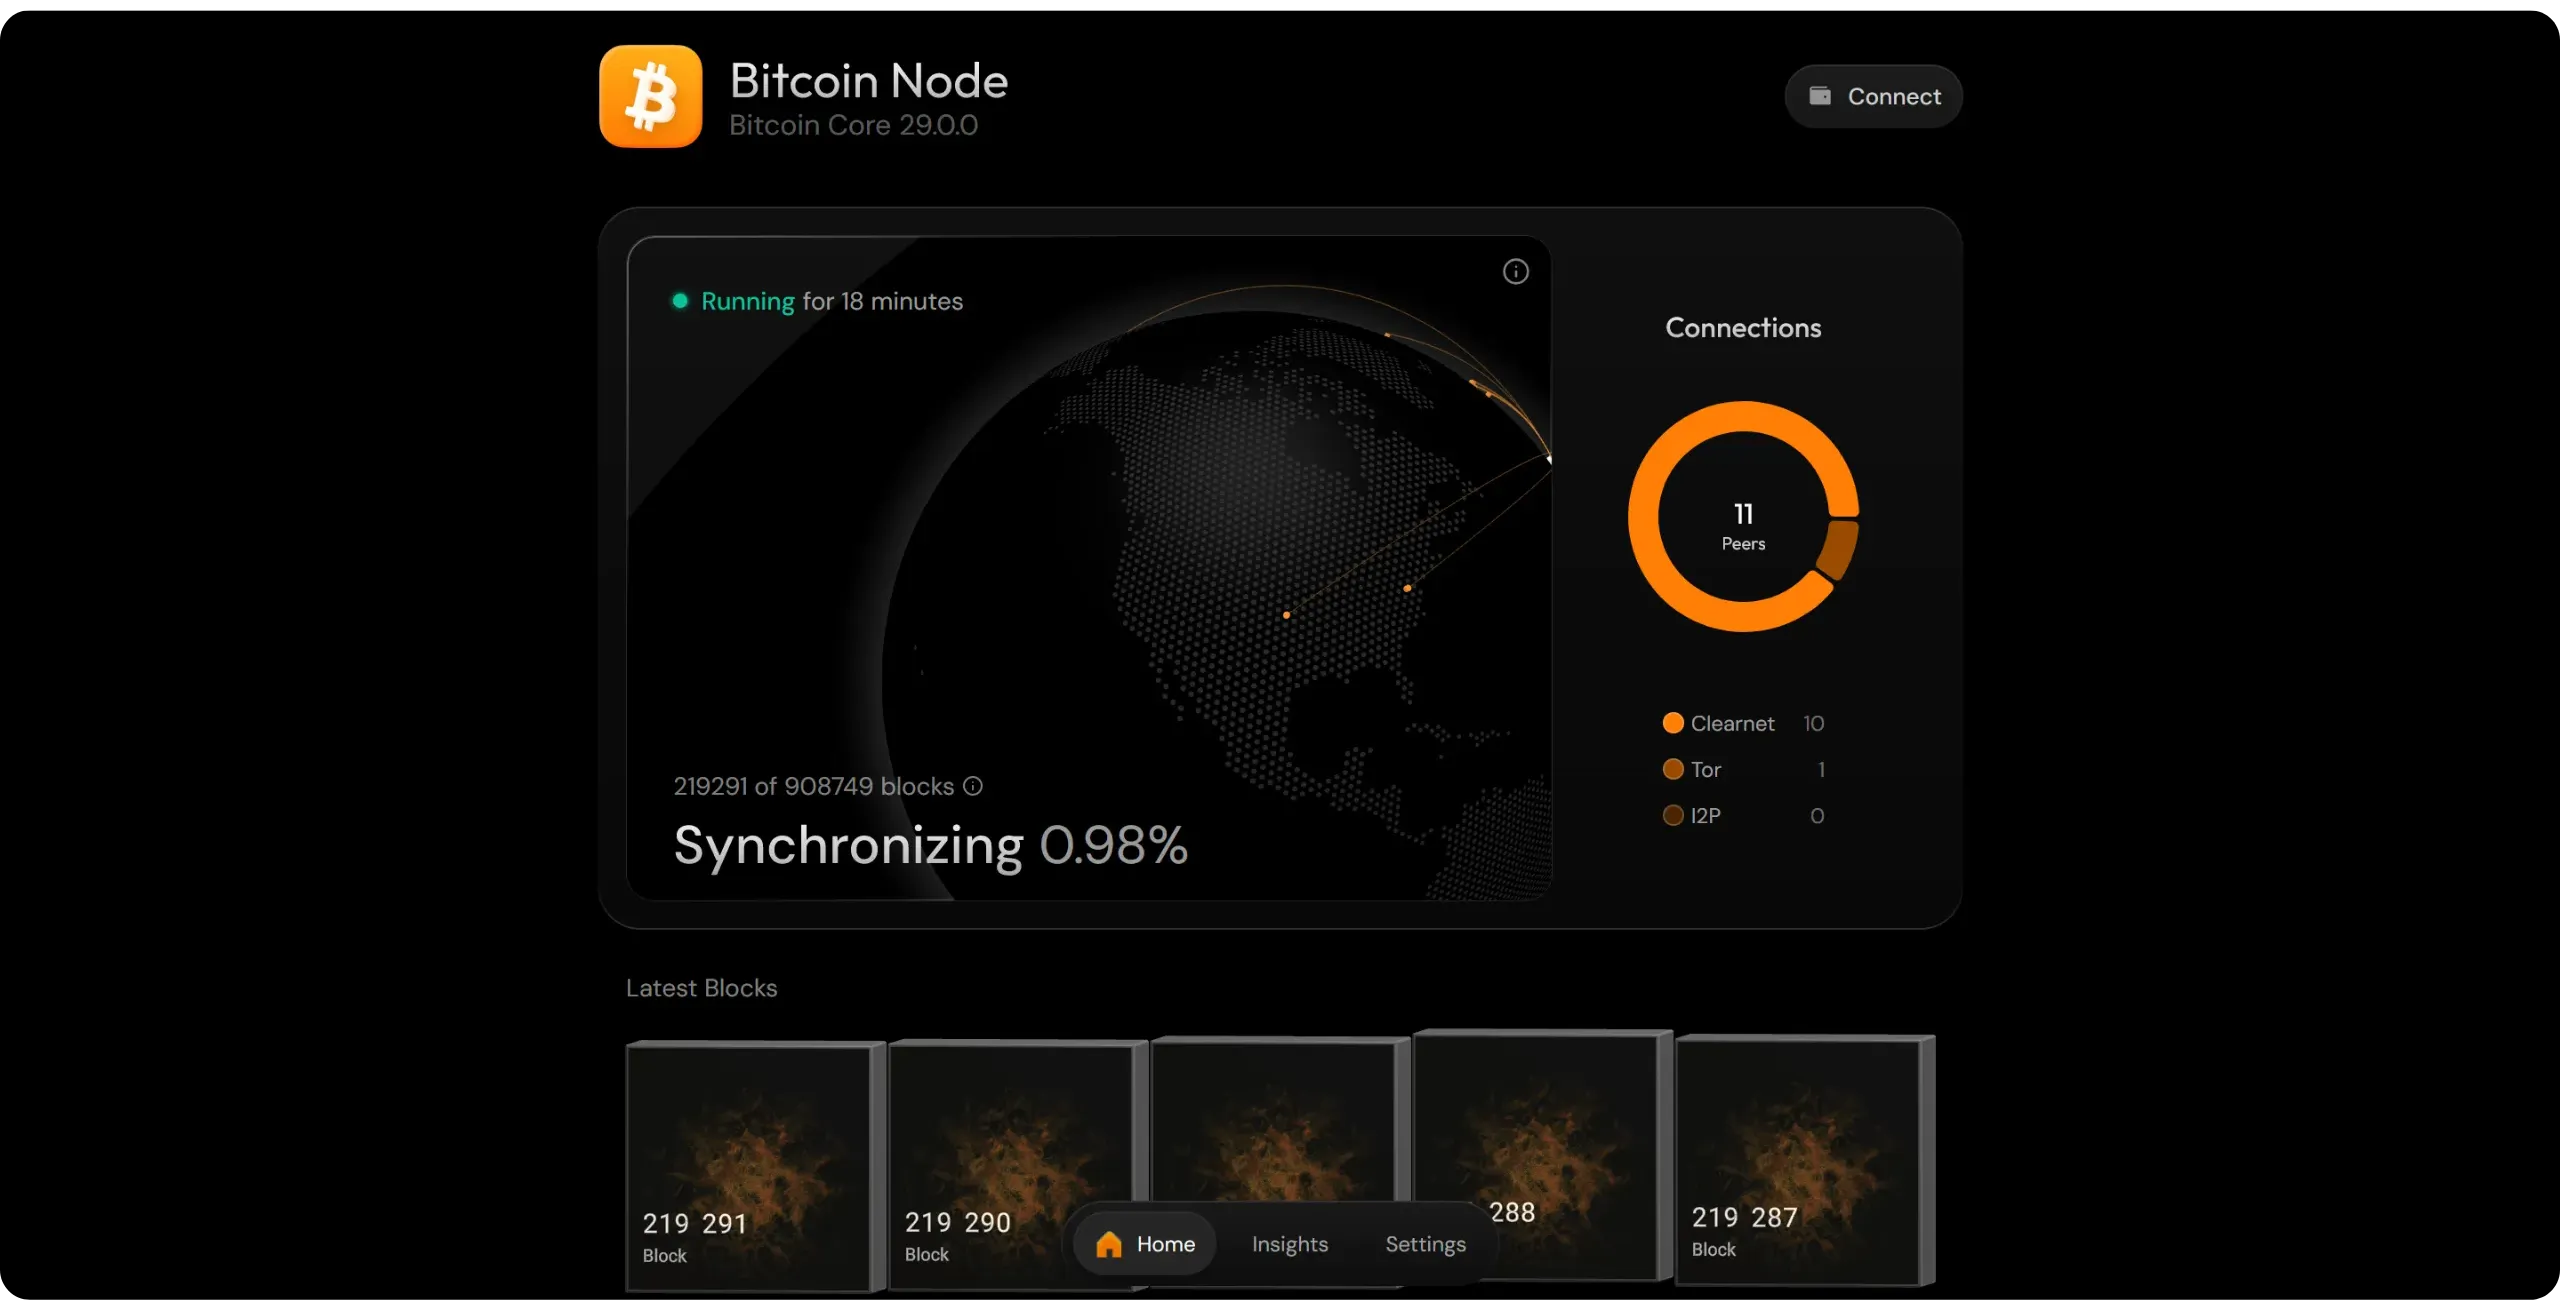
This stage is particularly time-consuming, as its duration depends on several factors, including the amount of RAM allocated to the node cache, disk speed, Internet connection speed, and processor power. The range of durations is therefore very wide, depending on the configuration. With a high-performance PC (NVMe SSD, +32 GB RAM, powerful processor, and good Internet connection), IBD can be completed in around ten hours. On the other hand, an old processor, low RAM, or, even worse, a mechanical hard disk (strongly discouraged) can extend this operation to several weeks.
With a PC of normal configuration (a decent processor, 8 to 16 GB RAM, and an SSD), it allows for around 2 to 7 days.
To speed up IBD slightly, you can increase the RAM allocated to the node cache (used primarily for the UTXO set, which we'll revisit later in the course) via the `dbcache` parameter. On Umbrel, this modification is made in your node parameters, in the "*Optimization*" tab.

By default, the value of the `dbcache` parameter in Bitcoin Core is set to 450 MiB, or around 472 MB. By increasing this value, you can slightly speed up IBD. However, I wouldn't necessarily recommend pushing this parameter too high: even setting it to 4 GiB will only make synchronization about 10% faster, and may cause you to lose time in the event of an interruption during IBD.
Be cautious not to allocate a value that is too large for your machine. If the RAM available for UmbrelOS runs out, your node may stop abruptly, interrupting the IBD and requiring you to restart it manually, resulting in a considerable loss of time.
To find out more about the impact of the `dbcache` parameter on initial synchronization, I recommend this analysis by Jameson Lopp: [*Effects of DBcache Size on Bitcoin Node Sync Speed*](https://blog.lopp.net/effects-dbcache-size-Bitcoin-node-sync-speed/)
Once the IBD of your node has been completed (100% synchronization), you now have a fully operational Bitcoin node. Congratulations, you're now an integral part of the Bitcoin network!
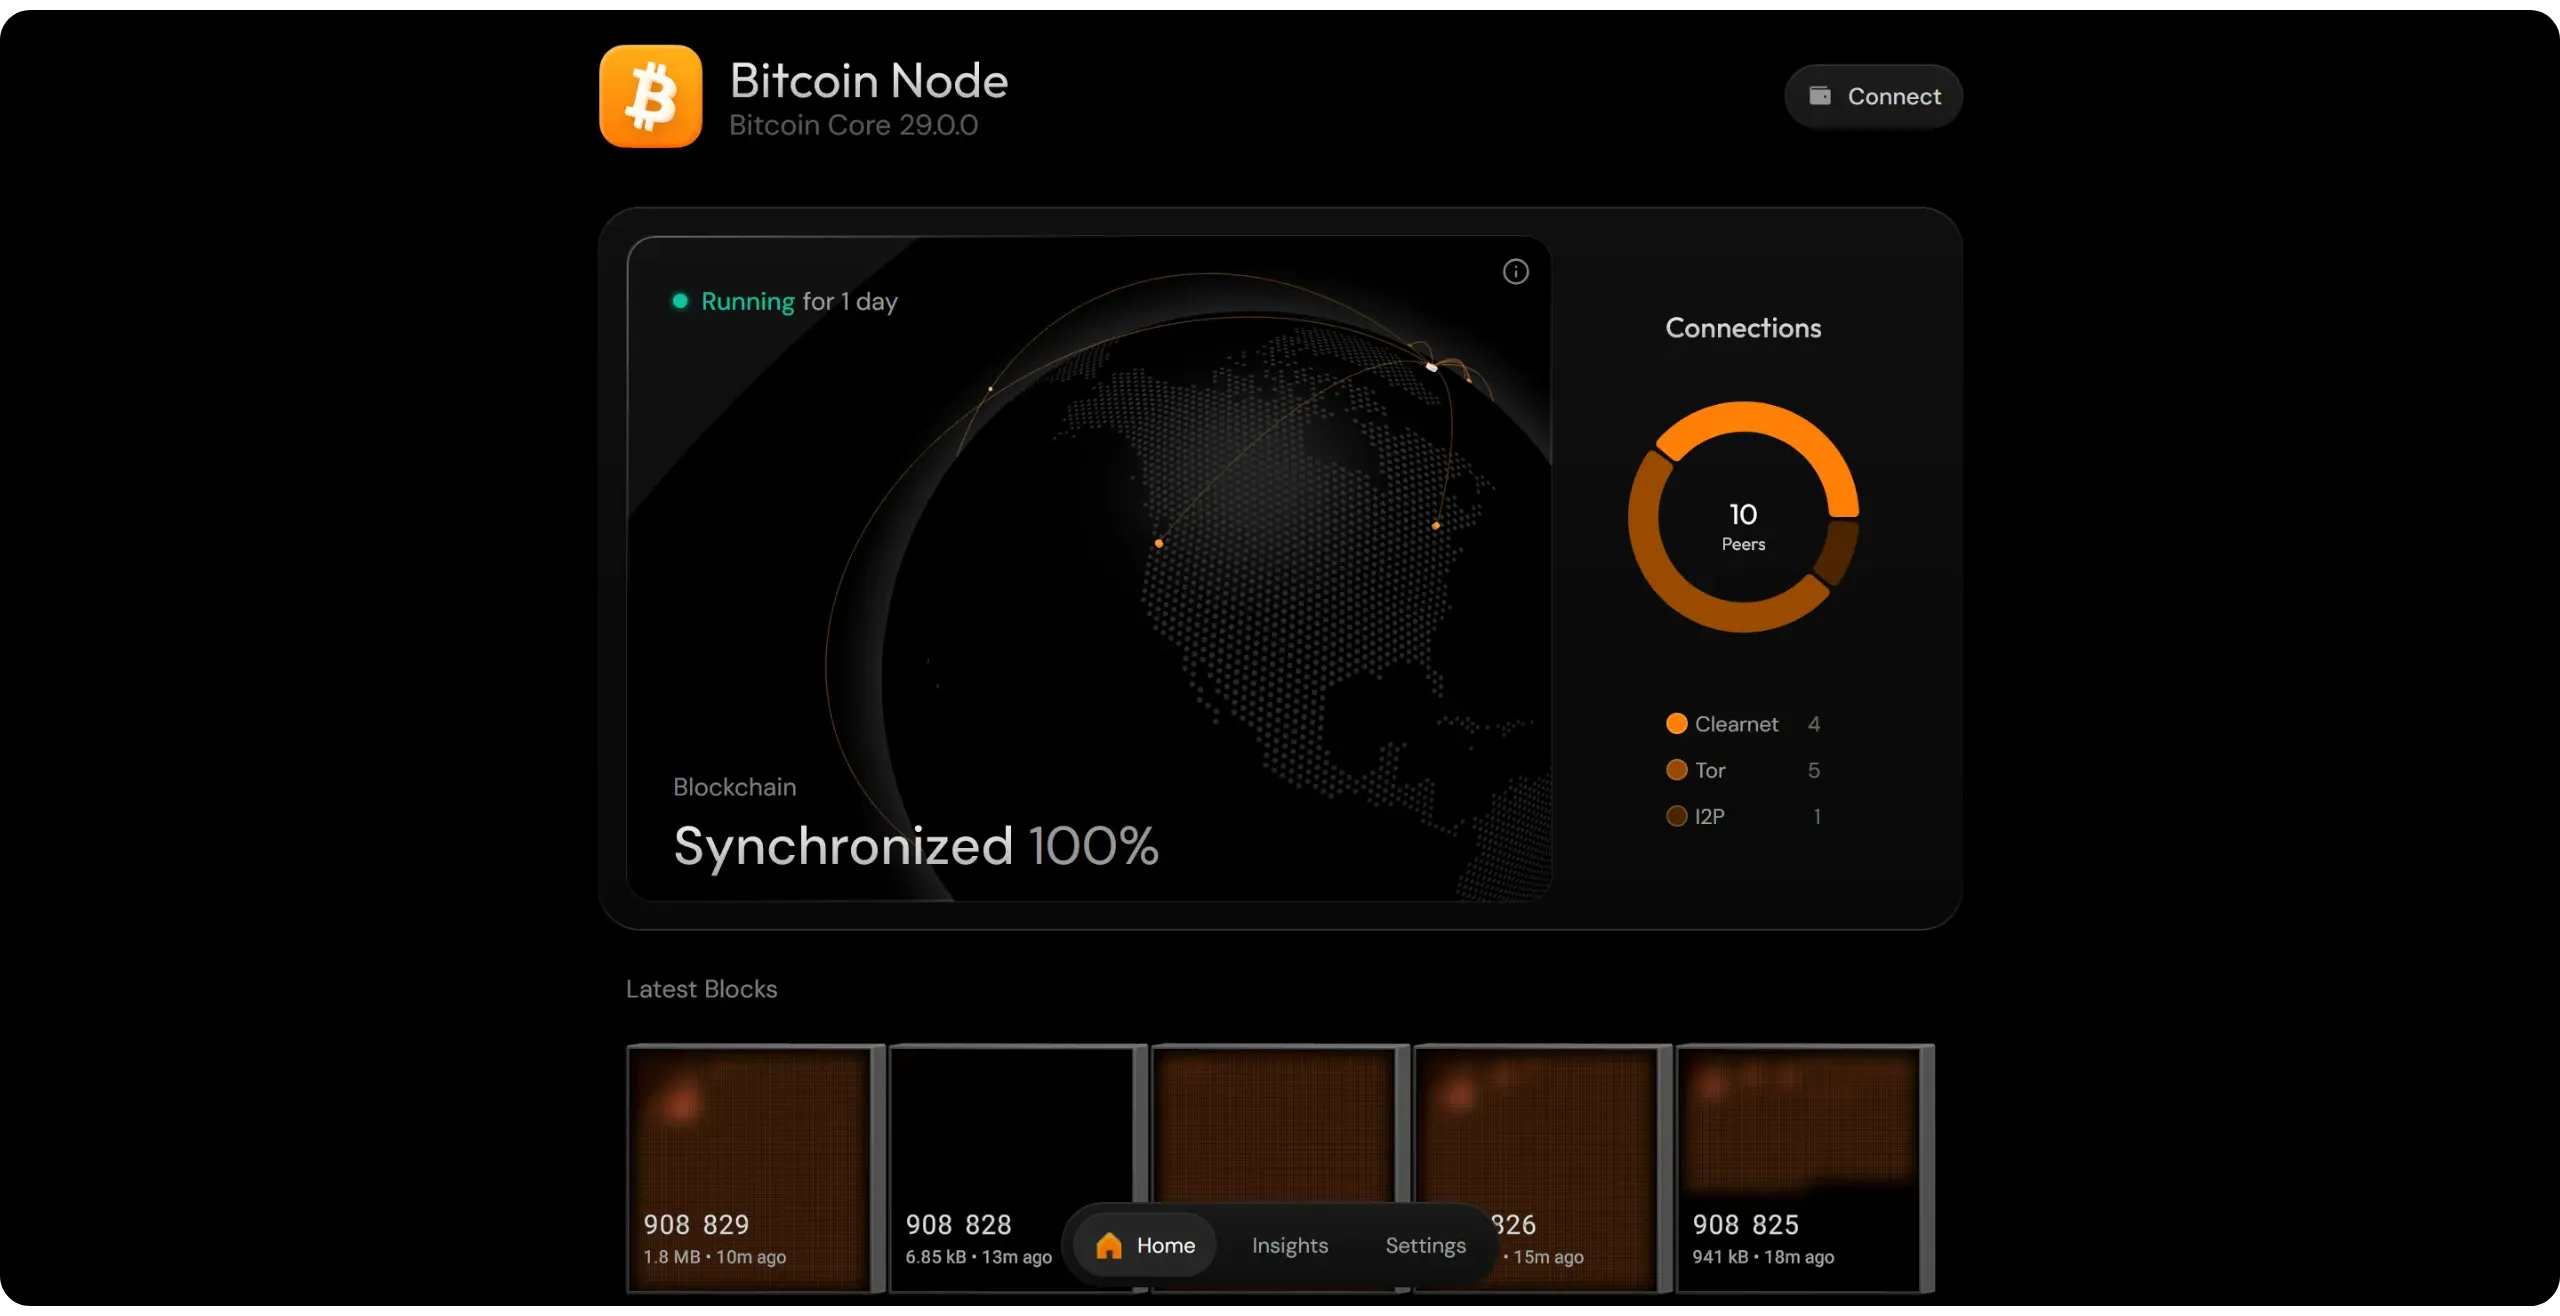
In the next part, we'll explore the practical use of your new node: how to connect your wallet to it, and what applications you should install to become a sovereign Bitcoiner.
# Connecting your wallet to your node
418d0afd-3a61-4b5a-9db4-203c0335fd29
## Indexers: role, operation, and solutions
4f93c07a-f0cb-435f-8b68-162f316d7039
If you've already explored Bitcoin nodes before taking this course, you may have encountered the term "indexer". These are tools such as Electrs or Fulcrum, which can be added to a Bitcoin Core node. But what exactly is their role? How do they work in practice? And should you install one on your new Bitcoin node? That's what we're going to explore in this chapter.
### What is an indexer?
Generally speaking, an indexer is a program that scans a set of raw data, extracts relevant keys (such as words, identifiers, and addresses), and builds an auxiliary file, called an "index", where each key refers to the exact location of the data in the corpus. This pre-processing phase utilizes CPU time and requires some disk space, but it eliminates the need to process the entire corpus each time the database is queried; simply interrogating the index yields an almost immediate response.
In layman's terms, it's the same principle as an index in a book: if you're looking for a specific piece of information, rather than rereading the whole book, you consult the index to directly find the page where the information you're looking for appears.
In a Bitcoin node, such as Bitcoin Core, blockchain data is stored in its raw, chronological form. Each block contains transactions, which in turn contain inputs and outputs, without any particular classification by address, identifier, or wallet. This linear organization is optimized for block validation, but unsuitable for targeted searches. For example, if you wanted to find all transactions linked to a specific address in a non-indexed node, you'd have to manually review the entire blockchain, block by block and transaction by transaction. This is precisely where the indexer on your Bitcoin node comes in.

An indexer is a specialized software that analyzes this mass of raw data (blockchain, mempool, UTXO set) and extracts keys, such as transaction identifiers, addresses, and block heights. From these keys, it builds its index, associating each key with the exact location of the information in the node's storage.
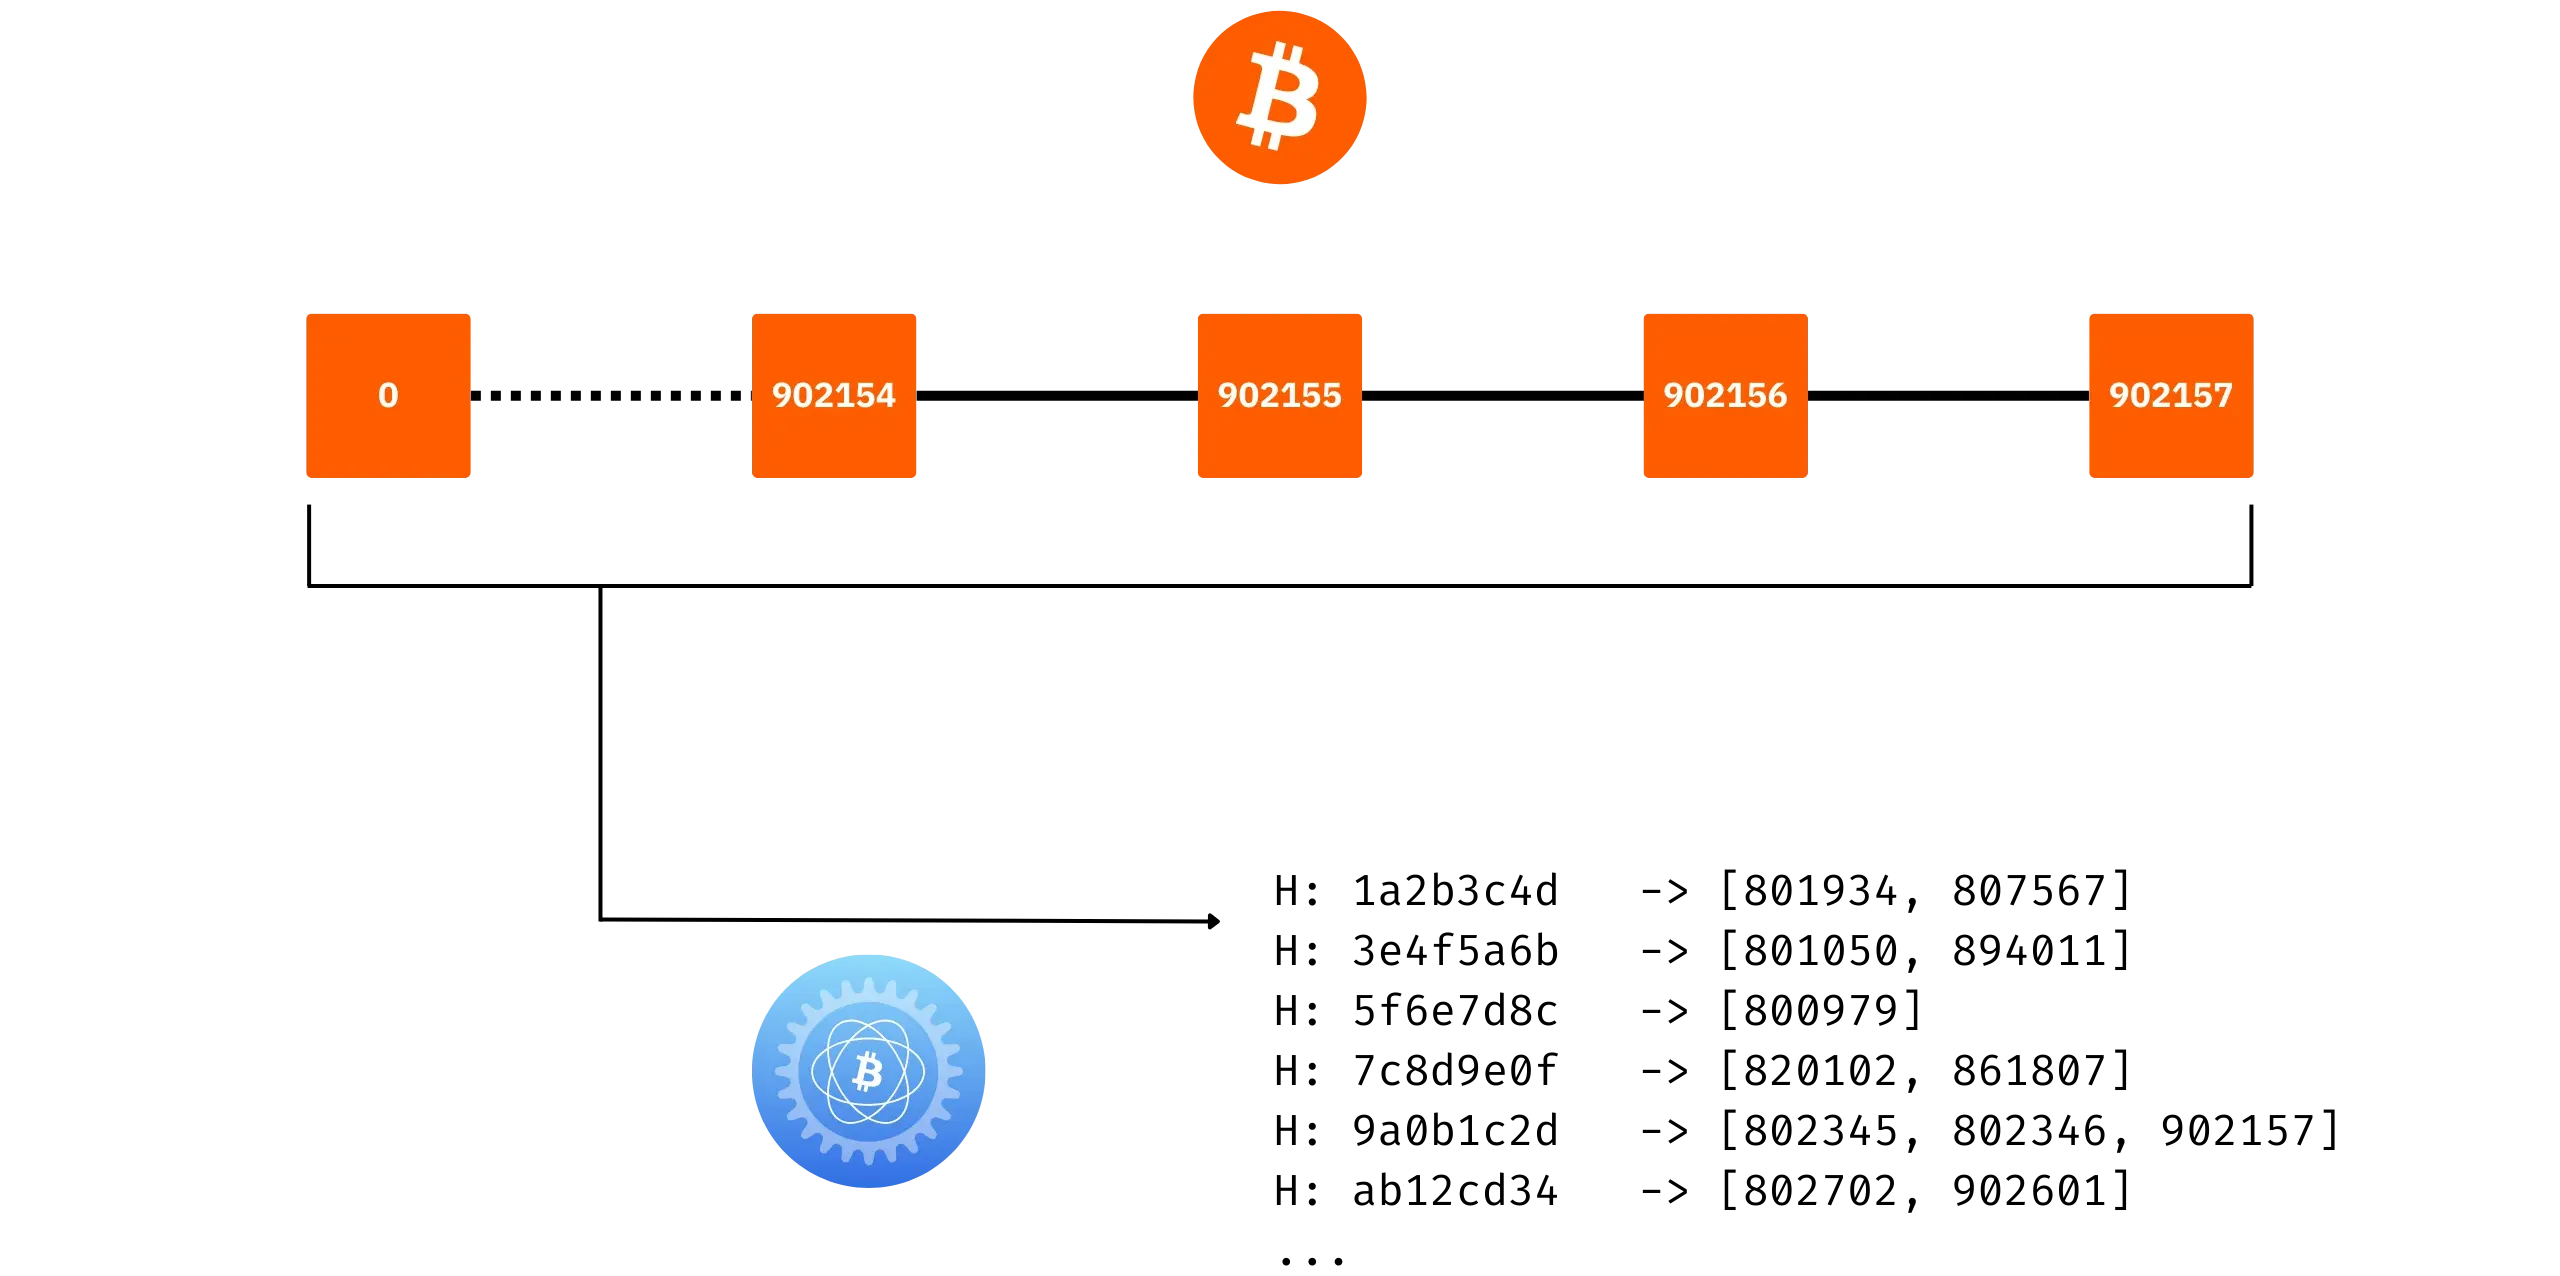
Indexing allows you to search for information on your node quickly, accurately, and efficiently. For example, when you connect a wallet like Sparrow to your node, it can display the balance of an address almost instantly. In concrete terms, it queries the indexer with a request like: "_Which UTXOs are associated with this script-hash?_" The indexer responds almost immediately, without having to reread the entire blockchain, as this data is already listed in its database.
### Does Bitcoin Core have an indexer?
Without the need for additional software, Bitcoin Core does not, strictly speaking, offer a complete address indexer comparable to those found in software such as Electrs or Fulcrum. Nevertheless, it does incorporate several internal indexing mechanisms, as well as optional options for extending its querying capabilities. To fully understand the situation, we need to take a detour into the project's history.
Until Bitcoin Core version 0.8.0, transaction validation was based on a global transaction index, known as the `txindex`. This index referenced all blockchain transactions and their outputs. When a node received a new transaction, it consulted this index to verify that the consumed outputs (in inputs) actually existed and had not already been spent. `txindex` was therefore indispensable for transaction validation at the time.
However, this approach had its limitations: it was slow, costly in terms of storage, and redundant in terms of information. To remedy this, version 0.8.0 introduces an overhaul of the validation model called ***Ultraprune***. Instead of storing everything in the form of transaction indexes, Bitcoin Core maintains a simple database dedicated solely to UTXOs, called `chainstate` (in everyday language, this is known as "UTXO set"), and updates its list as outputs are consumed and created.
This method is much faster and stores only the current state of the register, making the `txindex` indexer unnecessary. However, instead of deleting the `txindex` code, the developers have chosen to keep this functionality behind a simple parameter (`txindex=1`). By enabling this option on your node, you can query any transaction from its `txid`.
Contrary to popular belief, Bitcoin Core doesn't offer address-based indexing like Electrs or Fulcrum. There are several reasons for this choice:
- The role of Bitcoin Core is not to become a complete block explorer, nor to provide an API tailored to each use. Integrating an address-based index would imply a long-term maintenance commitment that goes beyond the software's initial scope.
- Most use cases can already be covered in other ways. For example, to estimate the balance of an address, you can use the `scantxoutset` command, which directly queries the UTXO set without requiring a full index.
- Each software program has specific requirements regarding the format or type of data to be indexed (address, hash script, proprietary tag, etc.). It's more flexible and logical to let these programs build their own customized indexes than fixing a generic solution in Bitcoin Core.
Bitcoin Core does have an optional transaction indexer (`txindex`), a vestige of its historical operation, but it does not provide an address index, nor a direct interface for complex searches. In some cases, therefore, it may be useful to add an external indexer.
### Should you add an address indexer to your node?
Adding an address indexer, such as Electrs or Fulcrum, is not mandatory; it depends on your specific needs.
If you simply want to connect a wallet, such as Sparrow, to your node to view balances and broadcast transactions, this is entirely possible directly via Bitcoin Core's RPC interface, either locally or remotely via Tor.
On the other hand, to use more advanced software, such as running mempool.space block explorer locally, the installation of an address indexer becomes essential.
The indexer requires a certain amount of synchronization time (less than the IBD) and will occupy additional disk space. If your SSD still has enough free space after downloading blockchain, you can easily add an indexer.
### Which indexer to choose?
Two software programs are commonly used to build this type of address index and make it accessible: **Electrs** and **Fulcrum**. These tools index the blockchain by script-hash (addresses) and then provide a standardized interface (the Electrum protocol), to which numerous wallets, such as Electrum wallet, Sparrow, or Phoenix, connect.

Simply put, Electrs is quite compact: it indexes blockchain faster and takes up less disk space, but performs slightly less well than Fulcrum on queries. In contrast, Fulcrum consumes more disk space and takes longer to index blockchain, but offers superior query performance.
For individual use, I recommend Electrs: it consumes less space, is well-maintained, and, although it is slightly slower on certain requests than Fulcrum, it is still more than sufficient for everyday use. If you have the time and disk space, you can also try out Fulcrum, which will perform significantly better, especially on wallets with numerous addresses to verify.
In concrete terms, in August 2025, Electrs will require approximately 56 GB of storage, compared to approximately 178 GB for Fulcrum. Your choice of indexer, therefore, also depends on your storage capacity:
- If your disk space is very limited, just use Bitcoin Core without an external address indexer.
- If you want to use an indexer, but are still constrained by capacity, opt for Electrs.
- If you have a comfortable amount of disk space, Fulcrum may be just what you're looking for.
For the rest of this BTC 202 course, I'll be using Electrs, but you can easily follow along with Fulcrum: the installation procedure is identical, as is the connection interface to the wallet, since both expose an Electrum server.
### How to install an indexer on Umbrel?
To install Electrs (or Fulcrum) on your Umbrel, the procedure is straightforward: go to the App Store, search for the relevant application (located in the Bitcoin tab), and then click the "*Install*" button.
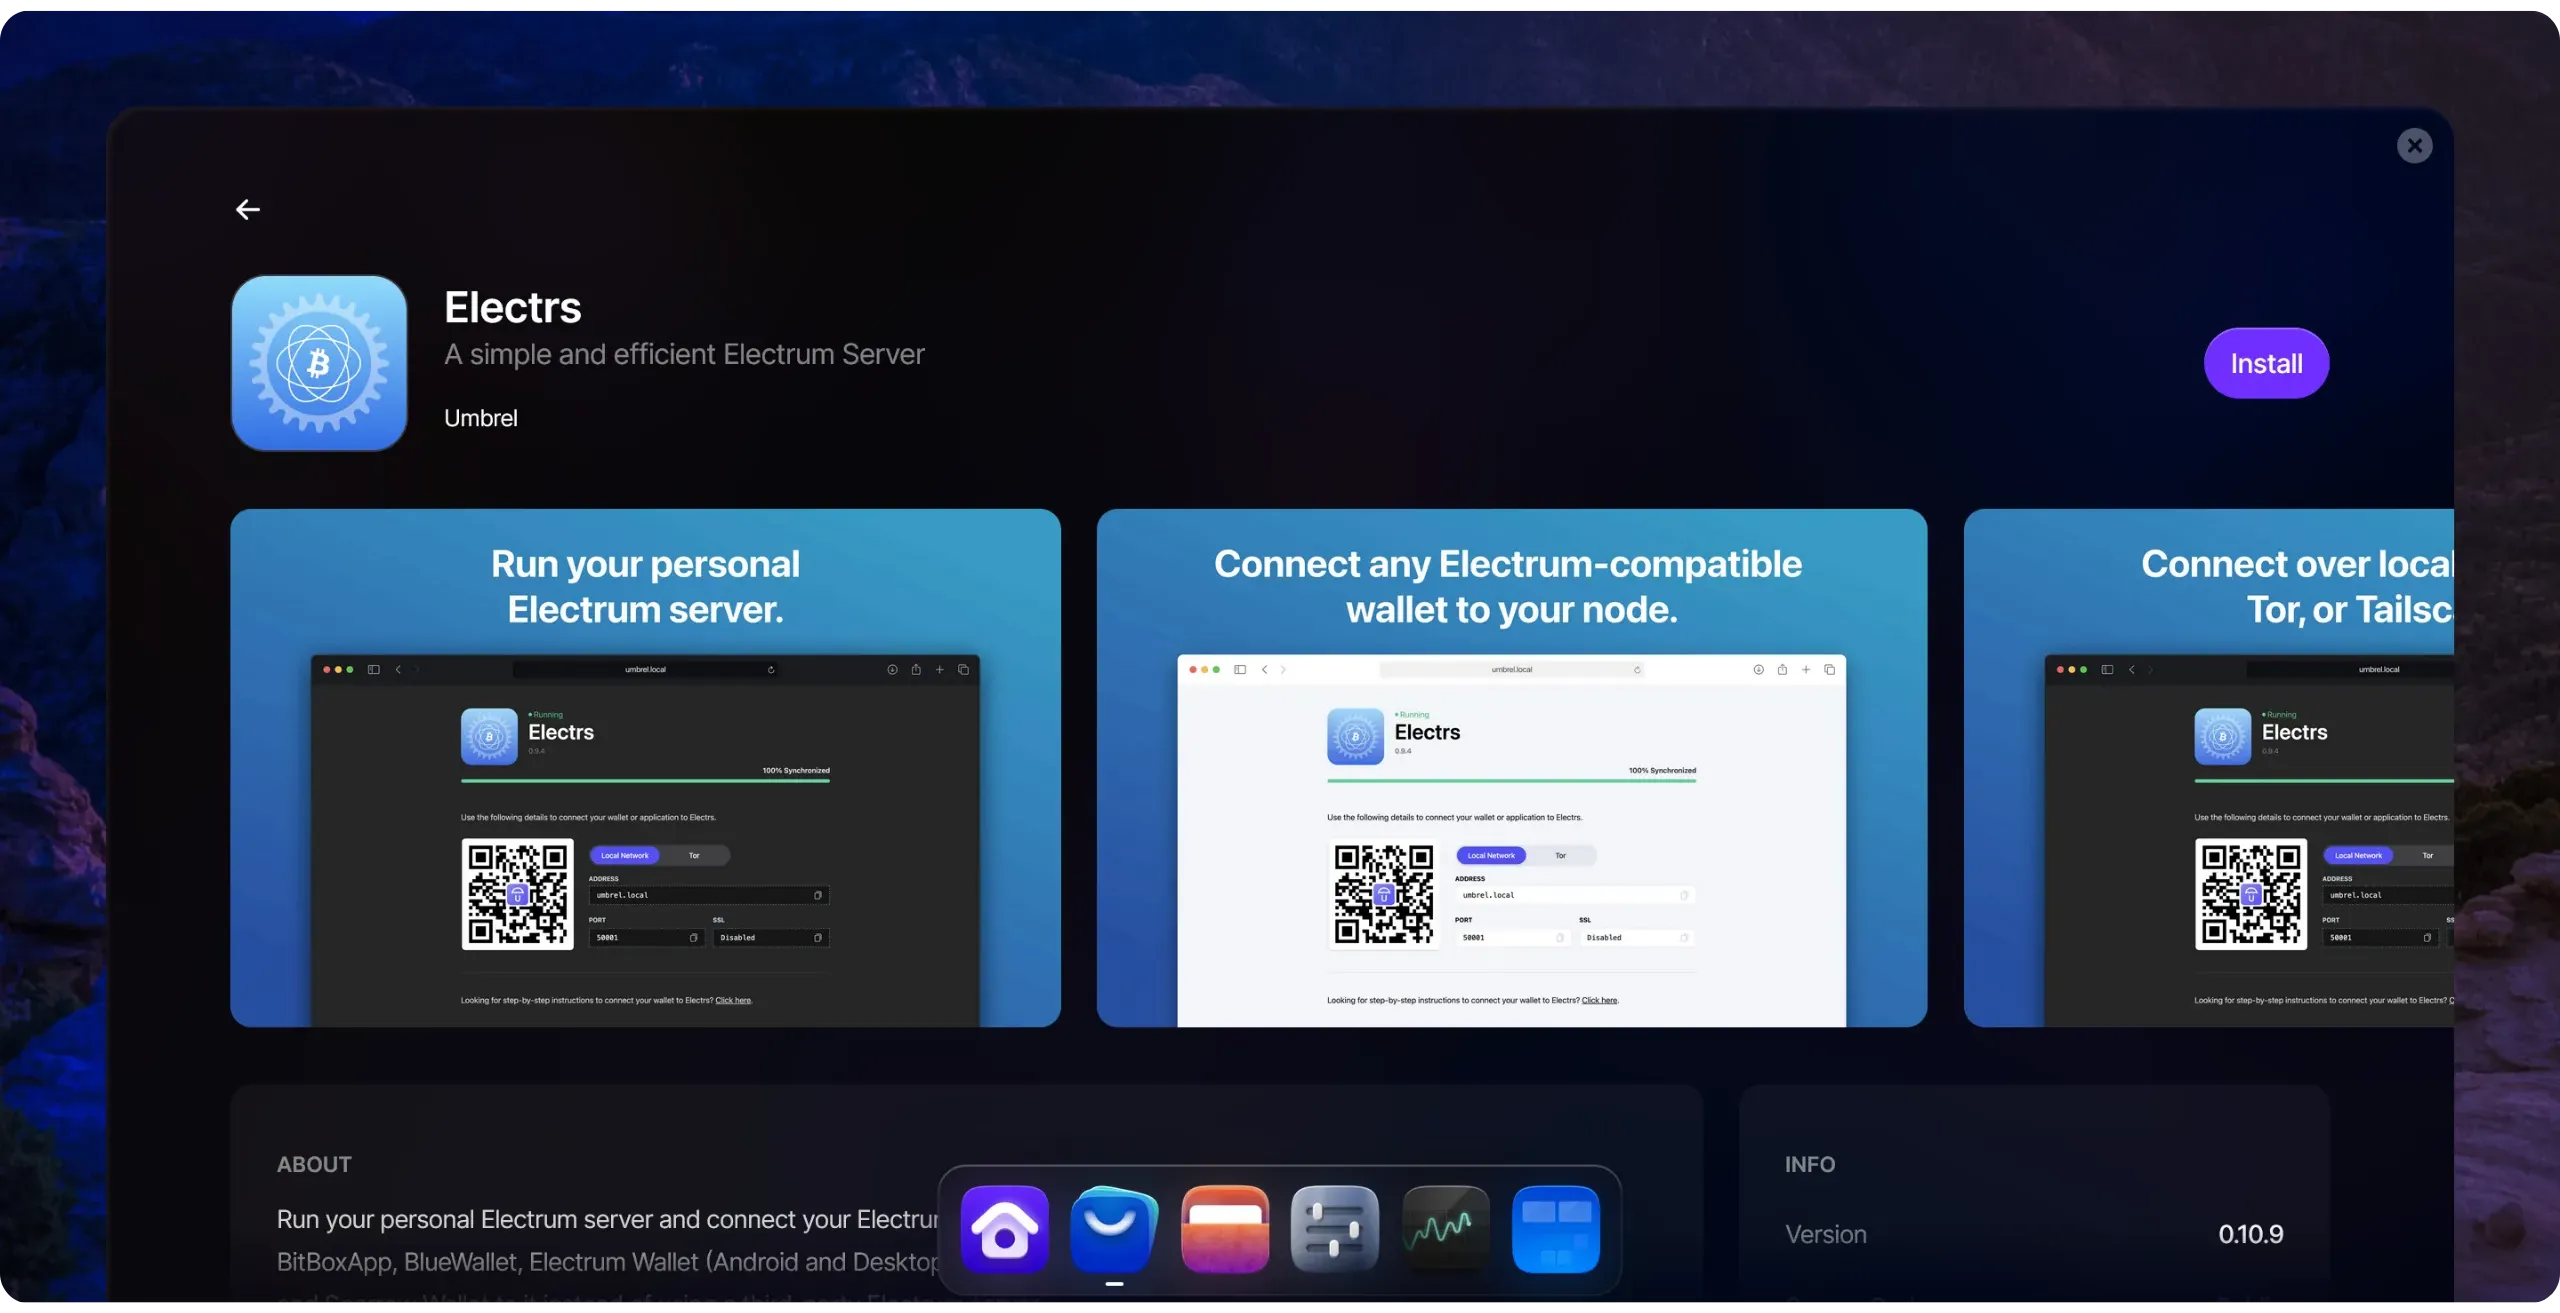
Once installation is complete, Electrs will proceed with a synchronization (indexing) phase, which can take several hours.
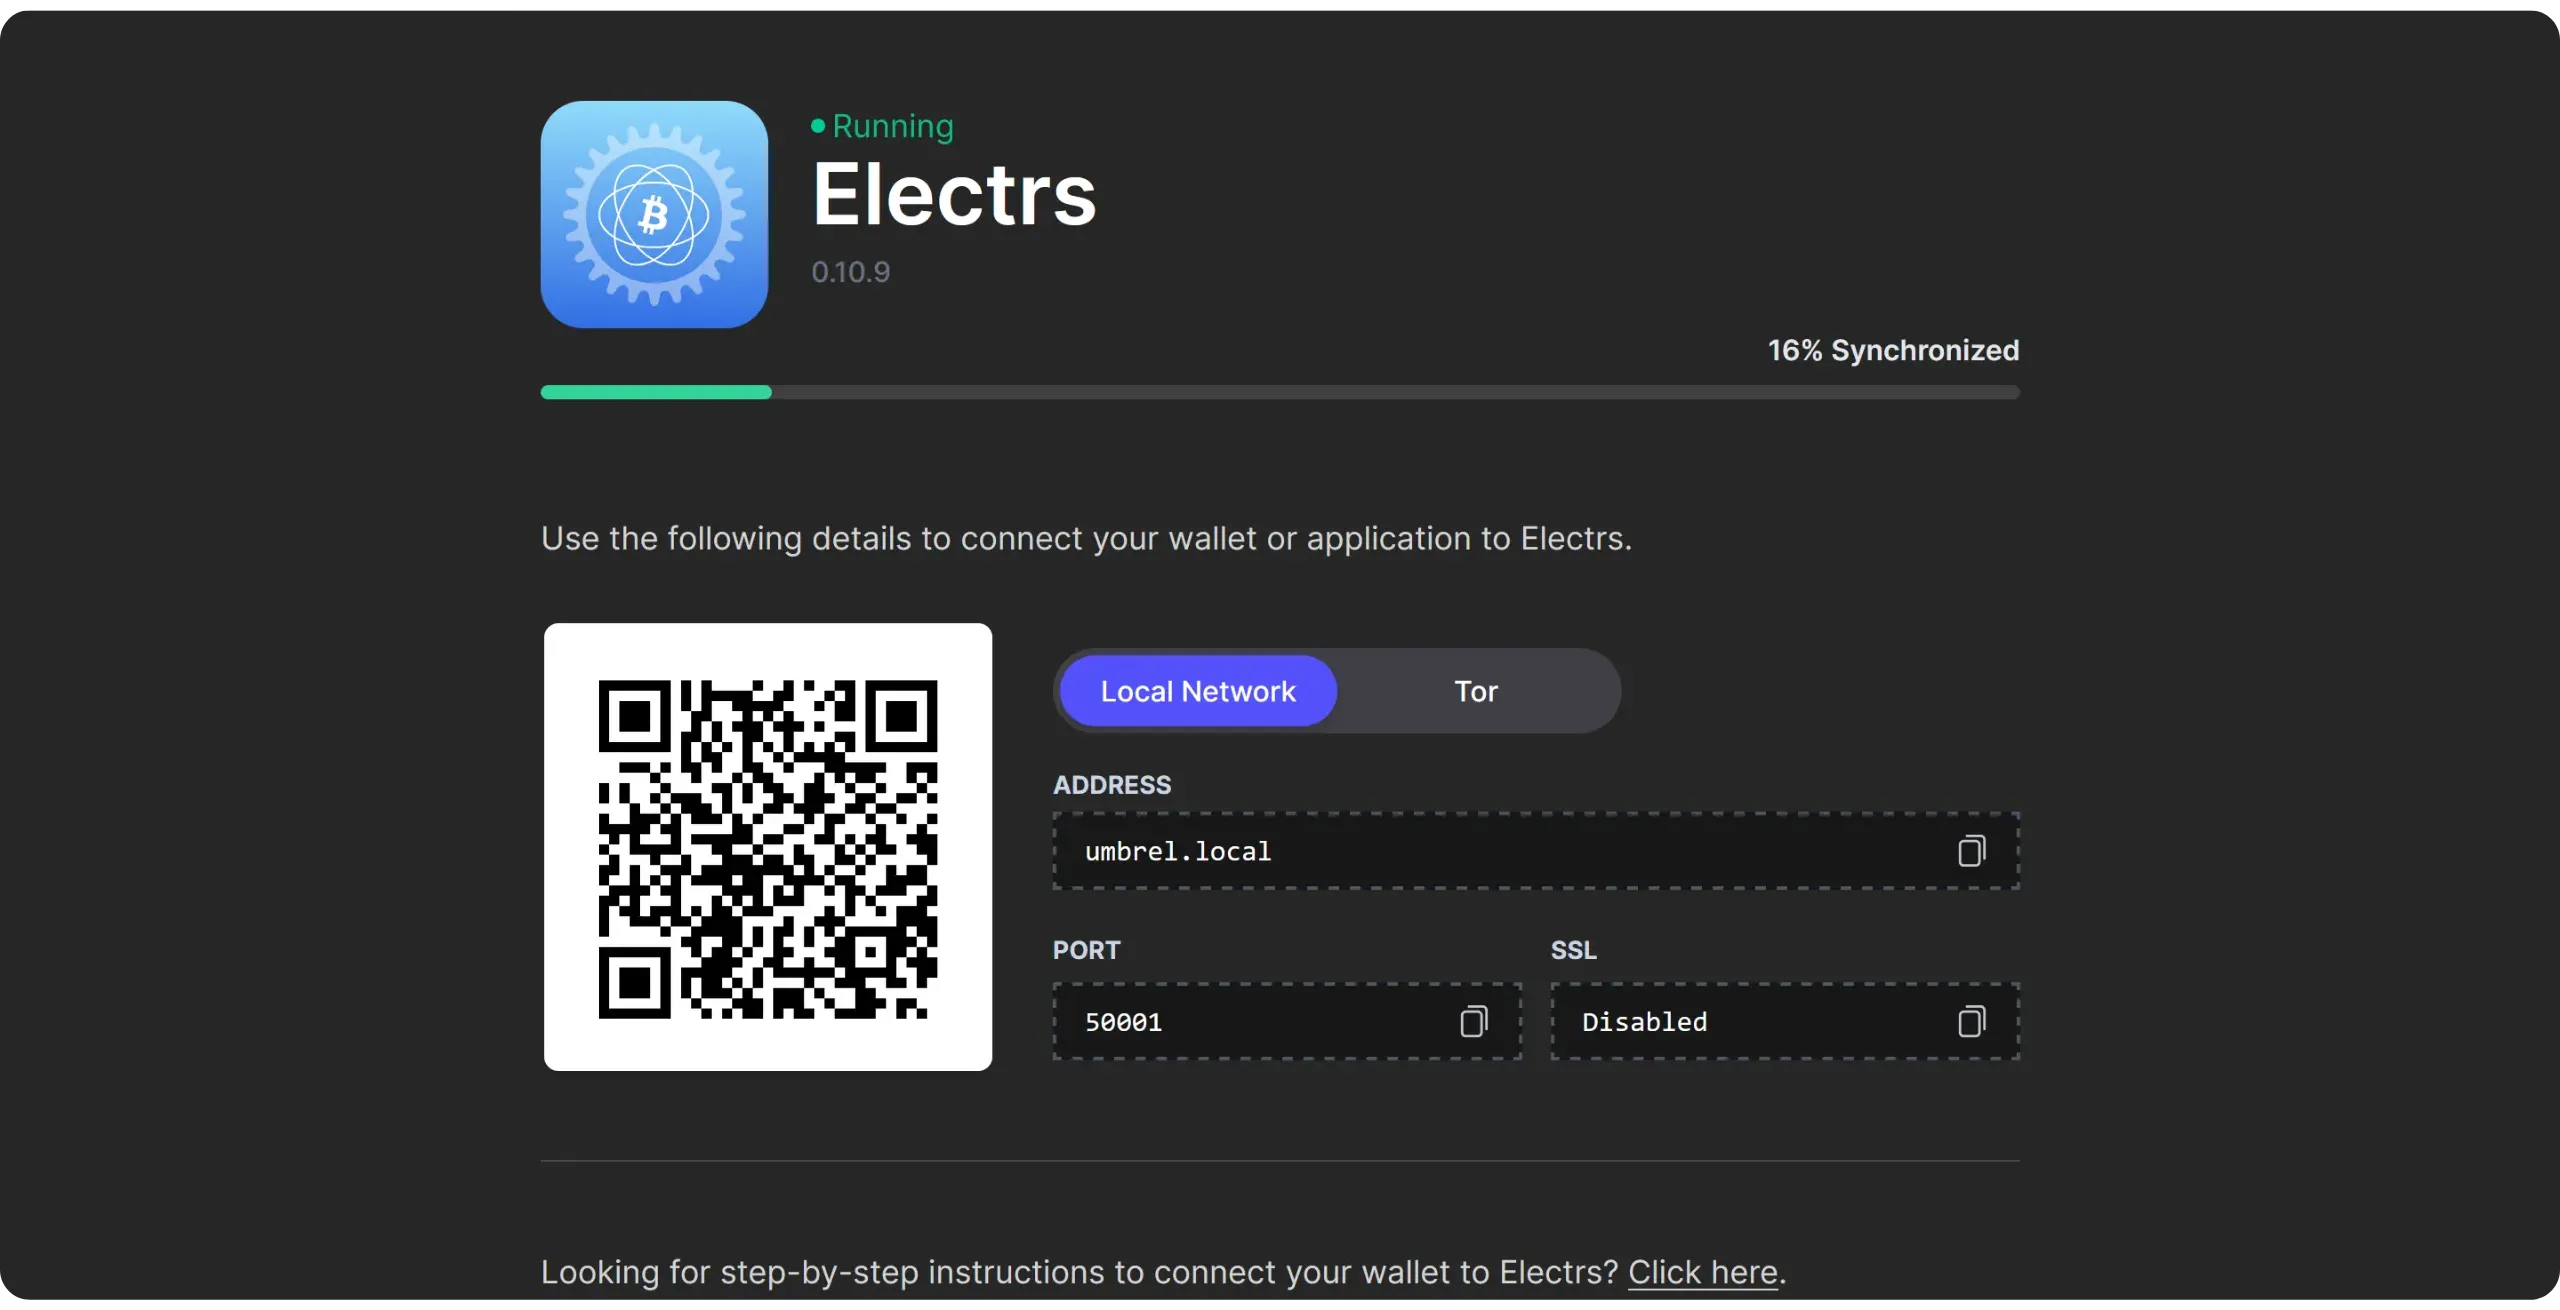
Once synchronization is complete, you can connect your software wallet to your Electrum server, which is hosted on Umbrel.
## How to connect your wallet to your Bitcoin node?
35519b1a-f681-4a69-a652-9fbe510cd17f
Now that you have a complete Bitcoin node, it's time to put it to good use! In the next chapter, we'll explore other potential uses for your Umbrel instance. However, let's begin with the basics: connecting your software wallet to use the information from your own blockchain and broadcast your transactions through your own node.
As mentioned above, there are two main connection interfaces:
- Direct connection to Bitcoin Core via RPC;
- Or connect to an Electrum server (Electrs or Fulcrum).
In this tutorial, we'll concentrate on connecting to your node via Tor, as this is both a simple and secure solution for beginners. I strongly advise against exposing your node's RPC port in the clear, as misconfiguration represents a significant risk to the security and confidentiality of your data. The main disadvantage of communications via Tor is its slowness. In the next chapter, we'll explore a fast and secure alternative to Tor for remote access to your node: VPN.
We'll use Sparrow as an example in this chapter, but the procedure is the same for all other wallet management software that support connections to Electrum servers. Simply locate the corresponding setting in your application parameters (usually in "*Server*", "*Network*", "*Node*"...).
On Sparrow, open the "*File*" tab and go to the "Settings" menu.
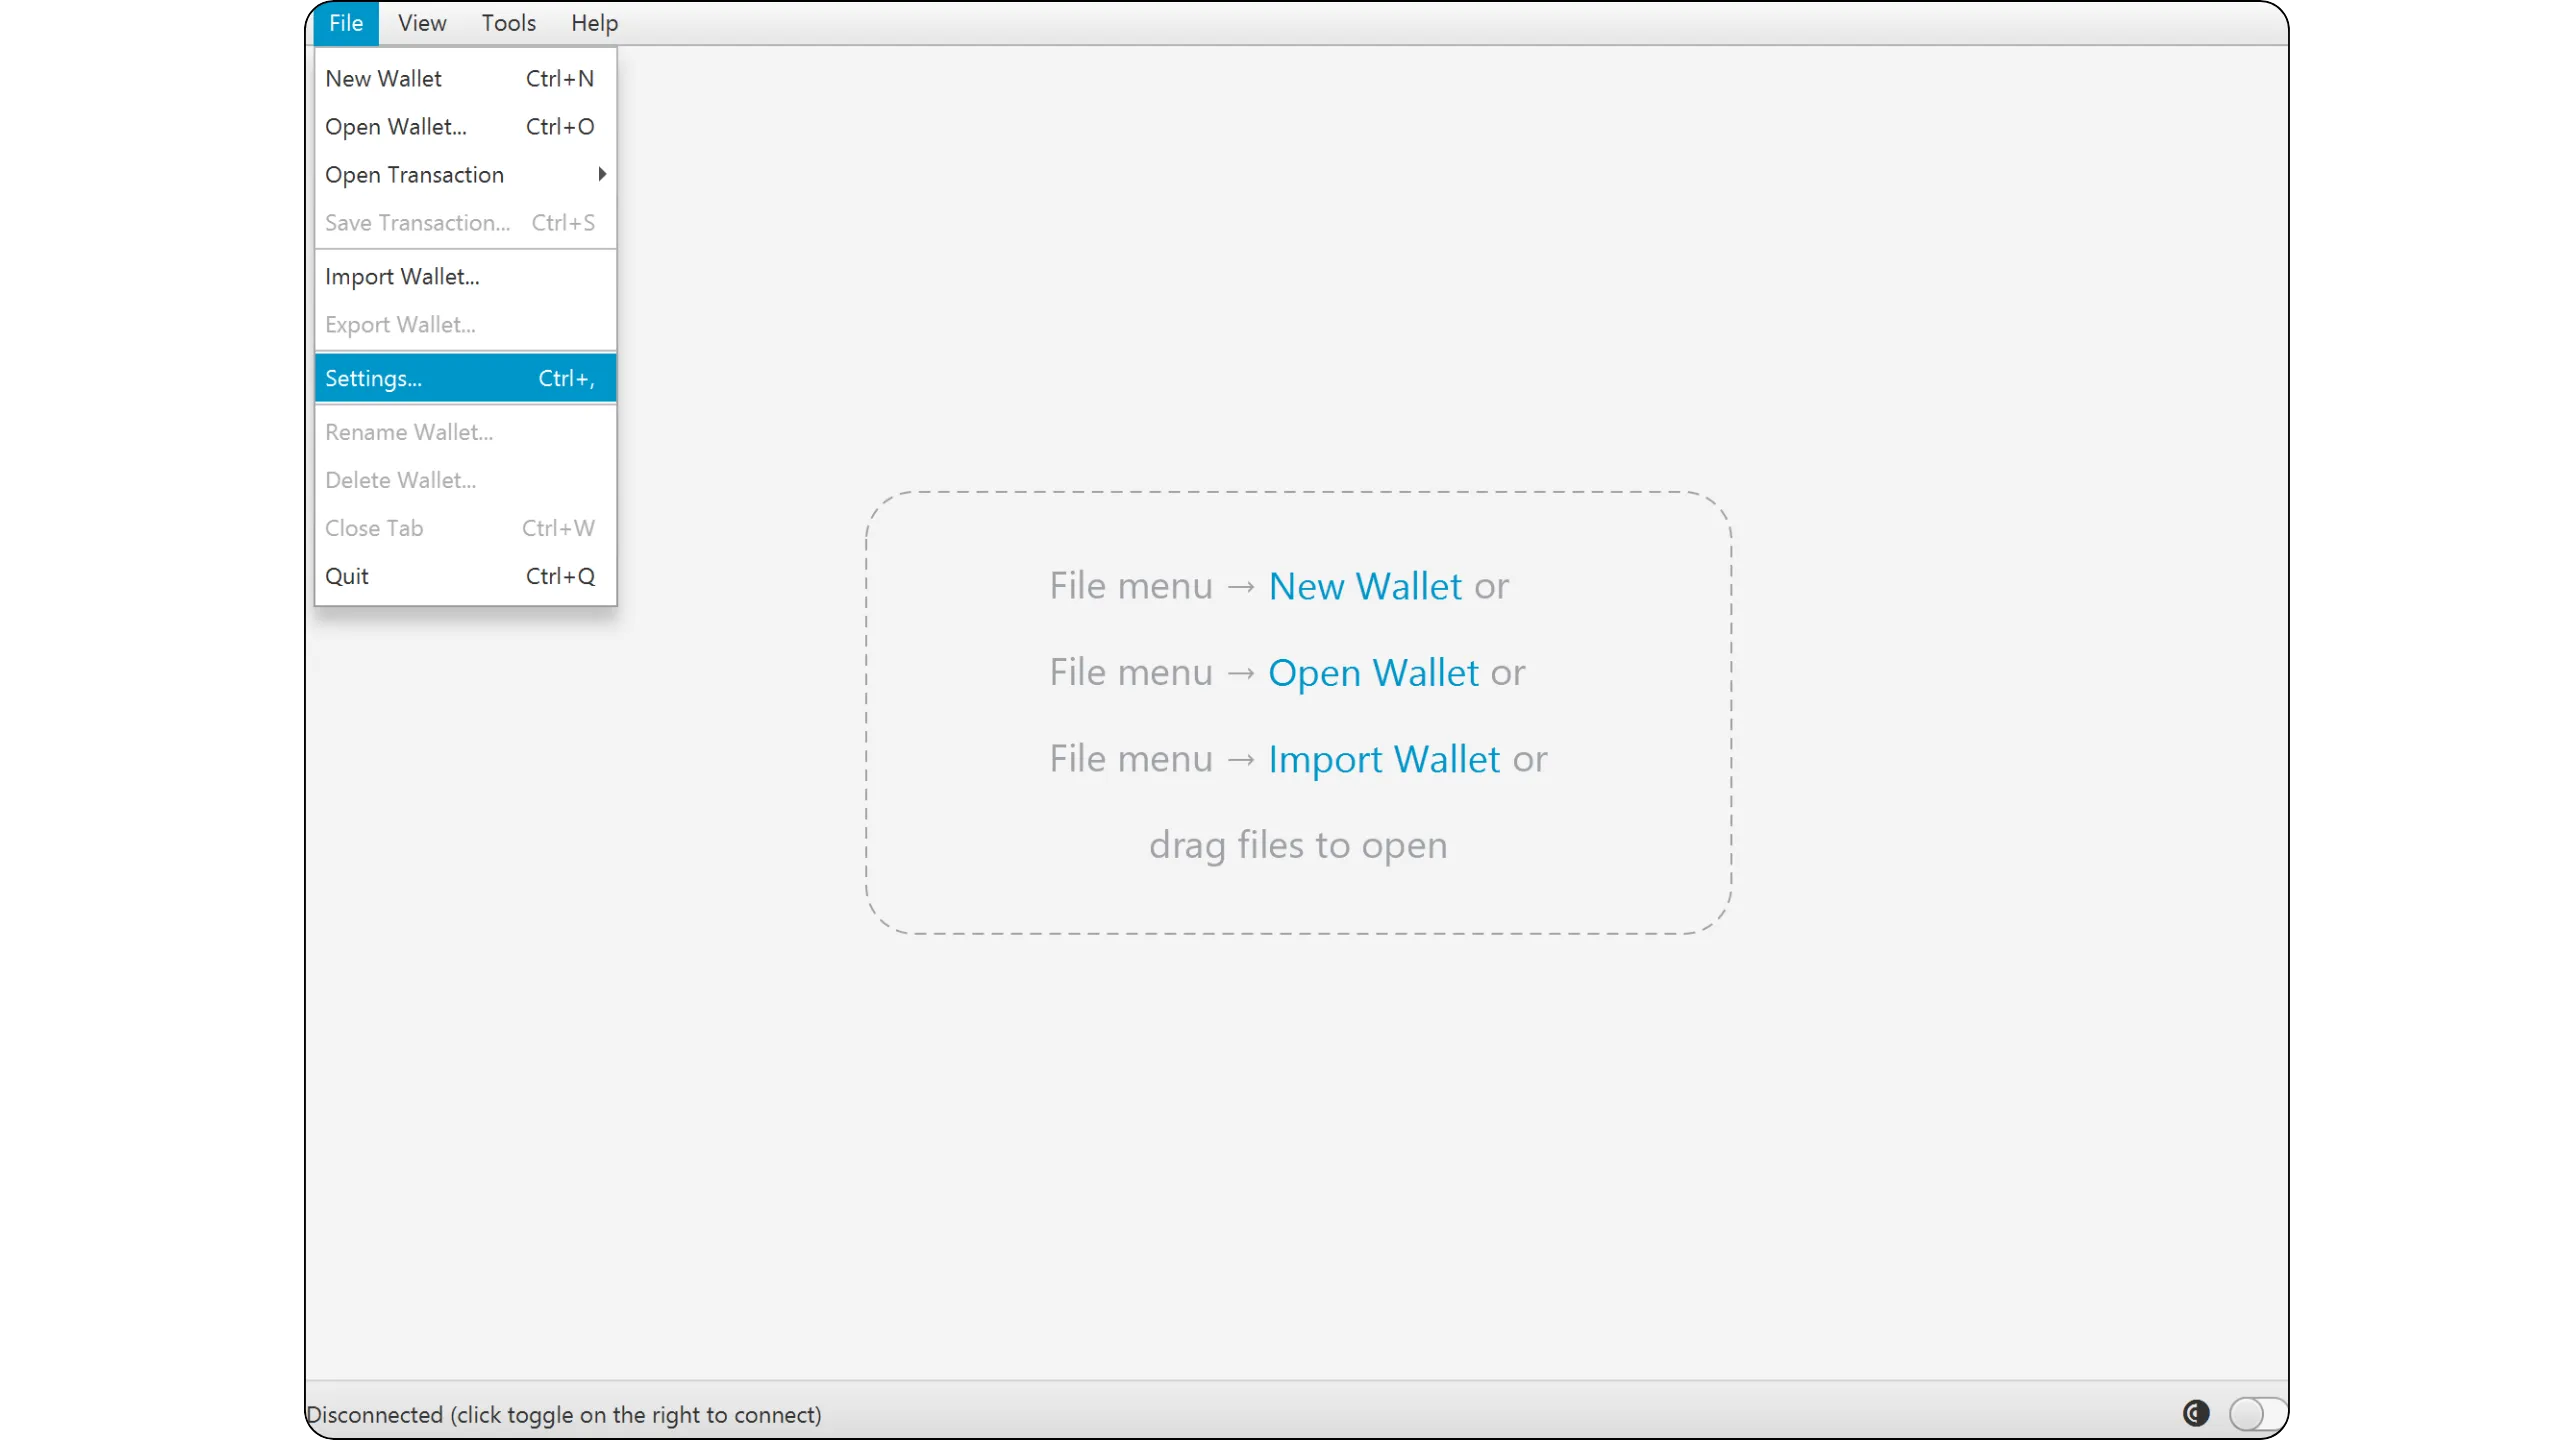
Then click on "*Server*" to access the connection parameters.
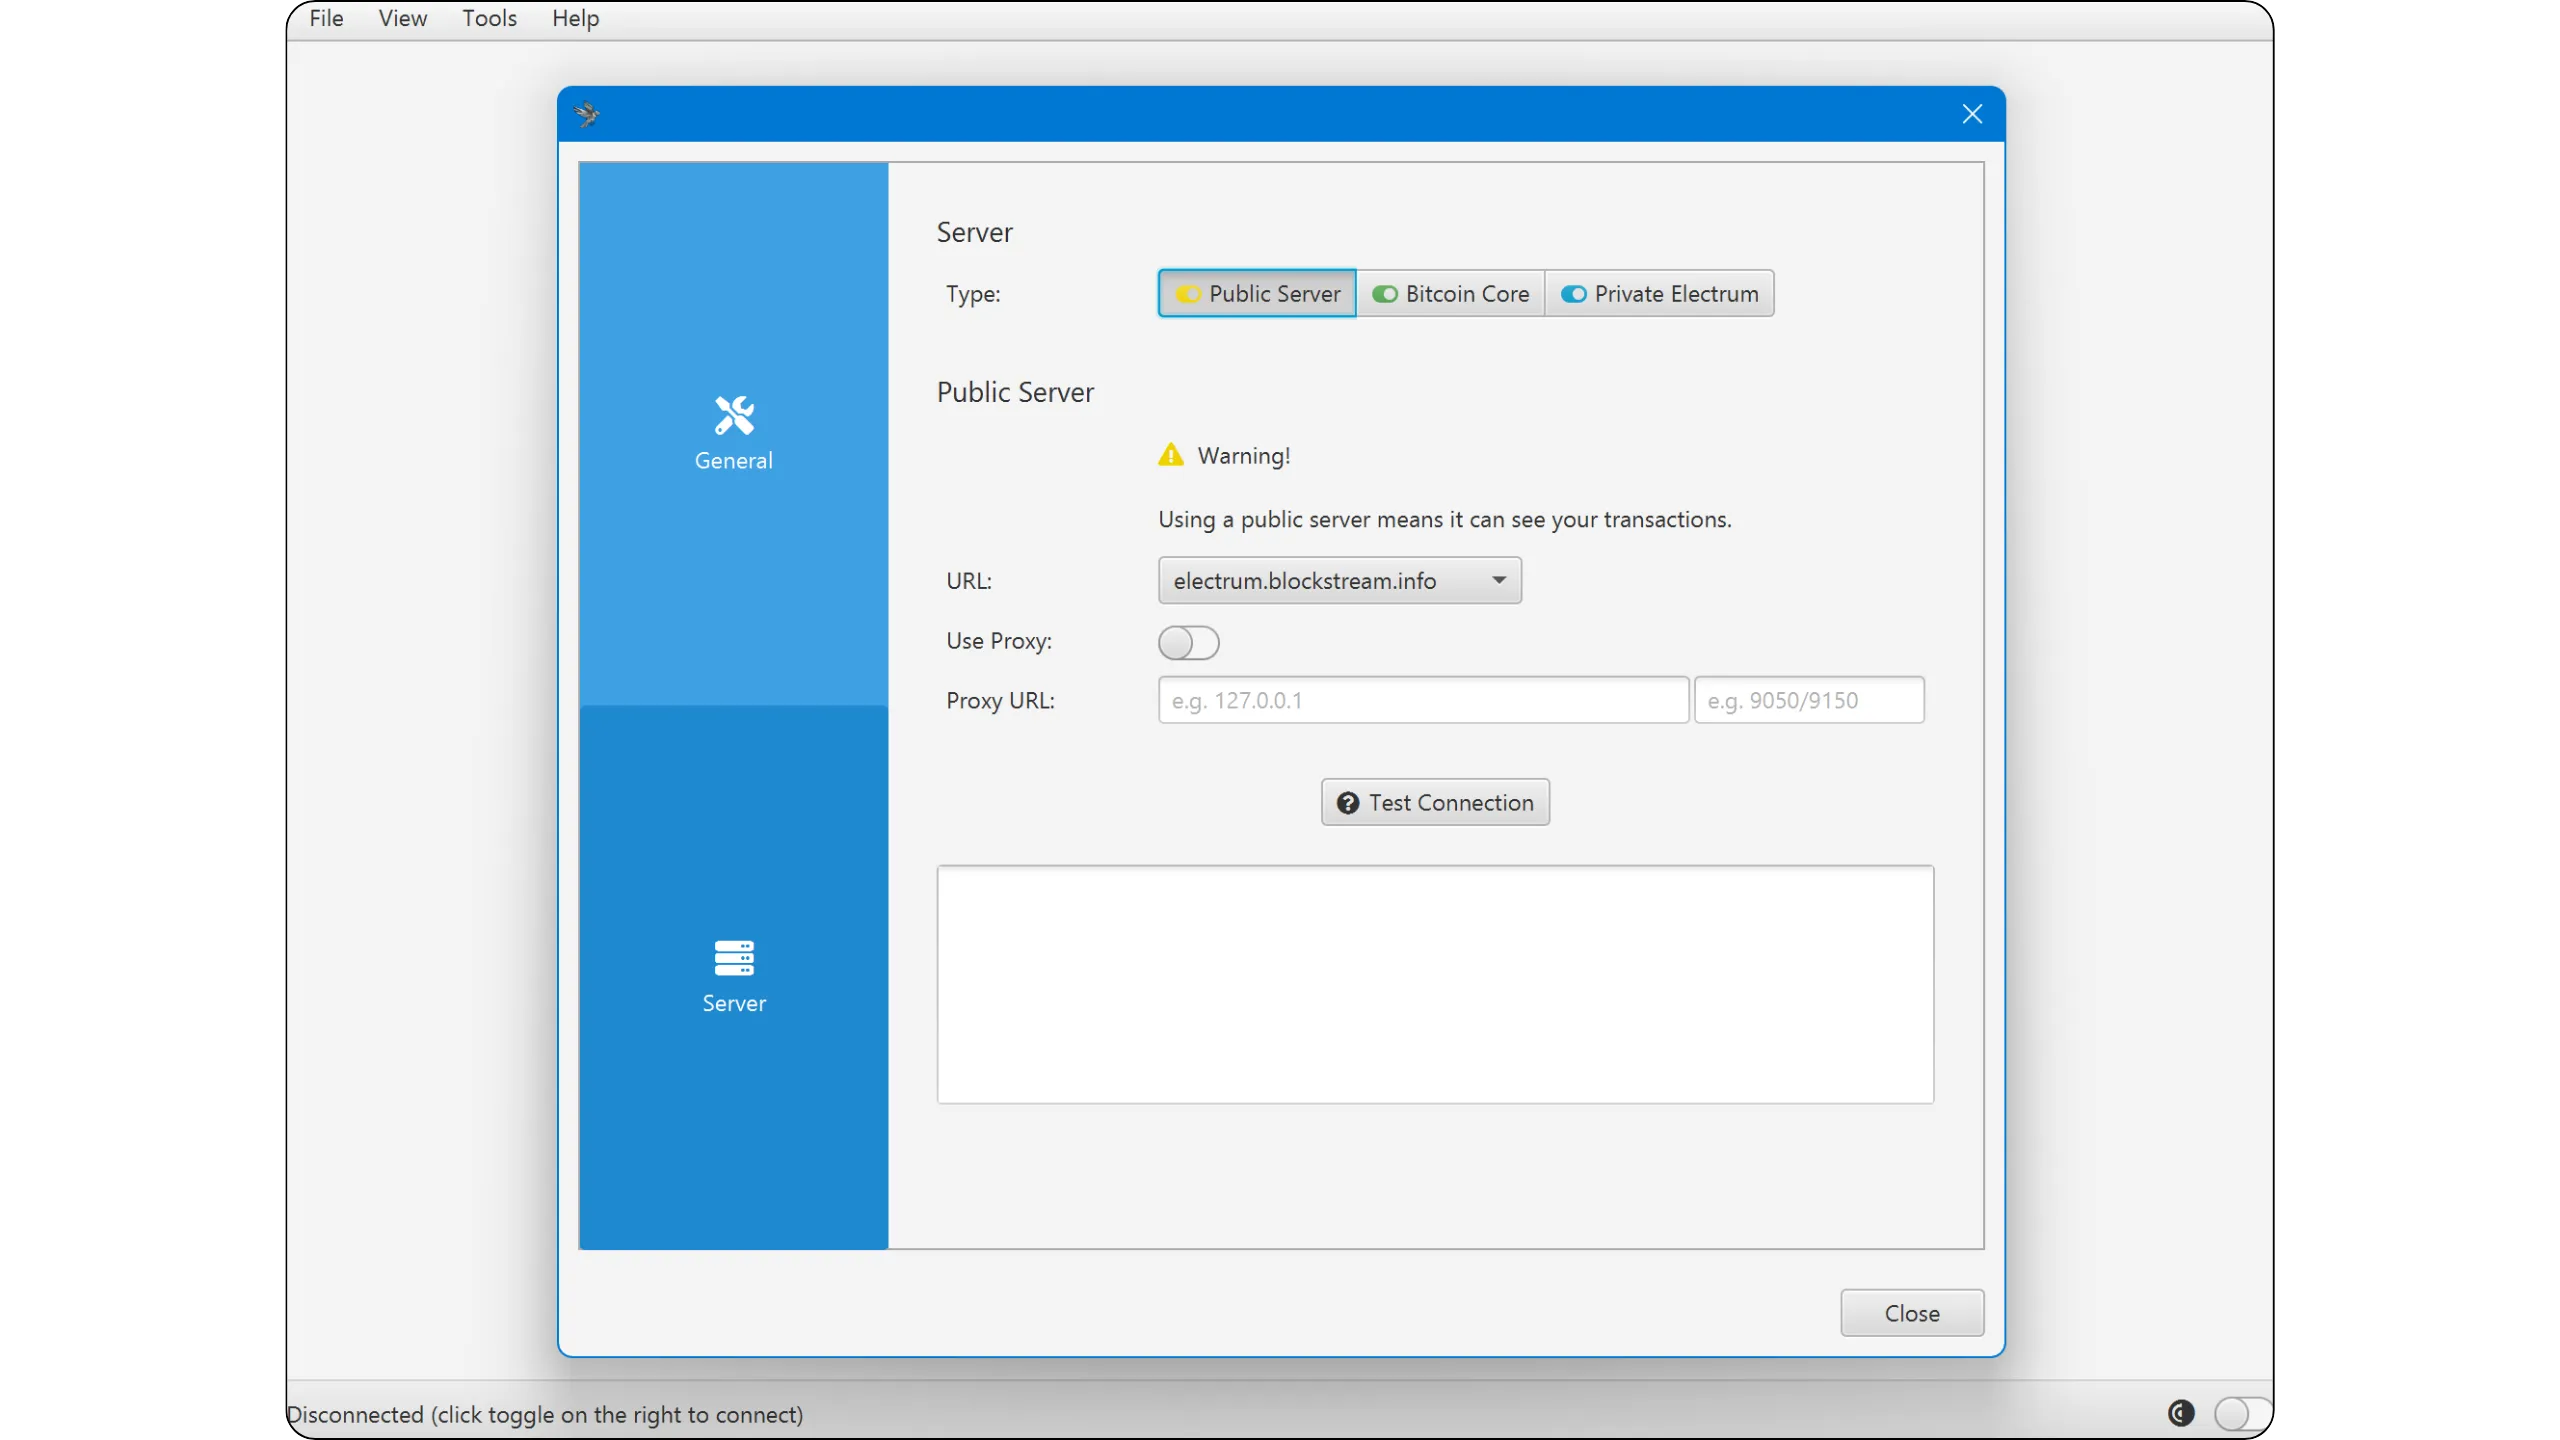
You will then discover three options for linking your software to a Bitcoin node:
- *Public Server* (yellow): by default, if you don't own a Bitcoin node, this option connects you to a public node you don't own (usually a company's). This option is not relevant here, as you have your own node on Umbrel.
- *Bitcoin Core* (green): this option corresponds to connection via RPC interface, i.e., directly to Bitcoin Core.
- *Private Electrum* (blue): this option lets you connect via your indexer's Electrum Server interface (Electrs or Fulcrum).
### Connection to Bitcoin Core RPC
If your Umbrel node doesn't have an indexer, this is the option you need to select. On Sparrow, click on "*Bitcoin Core*".
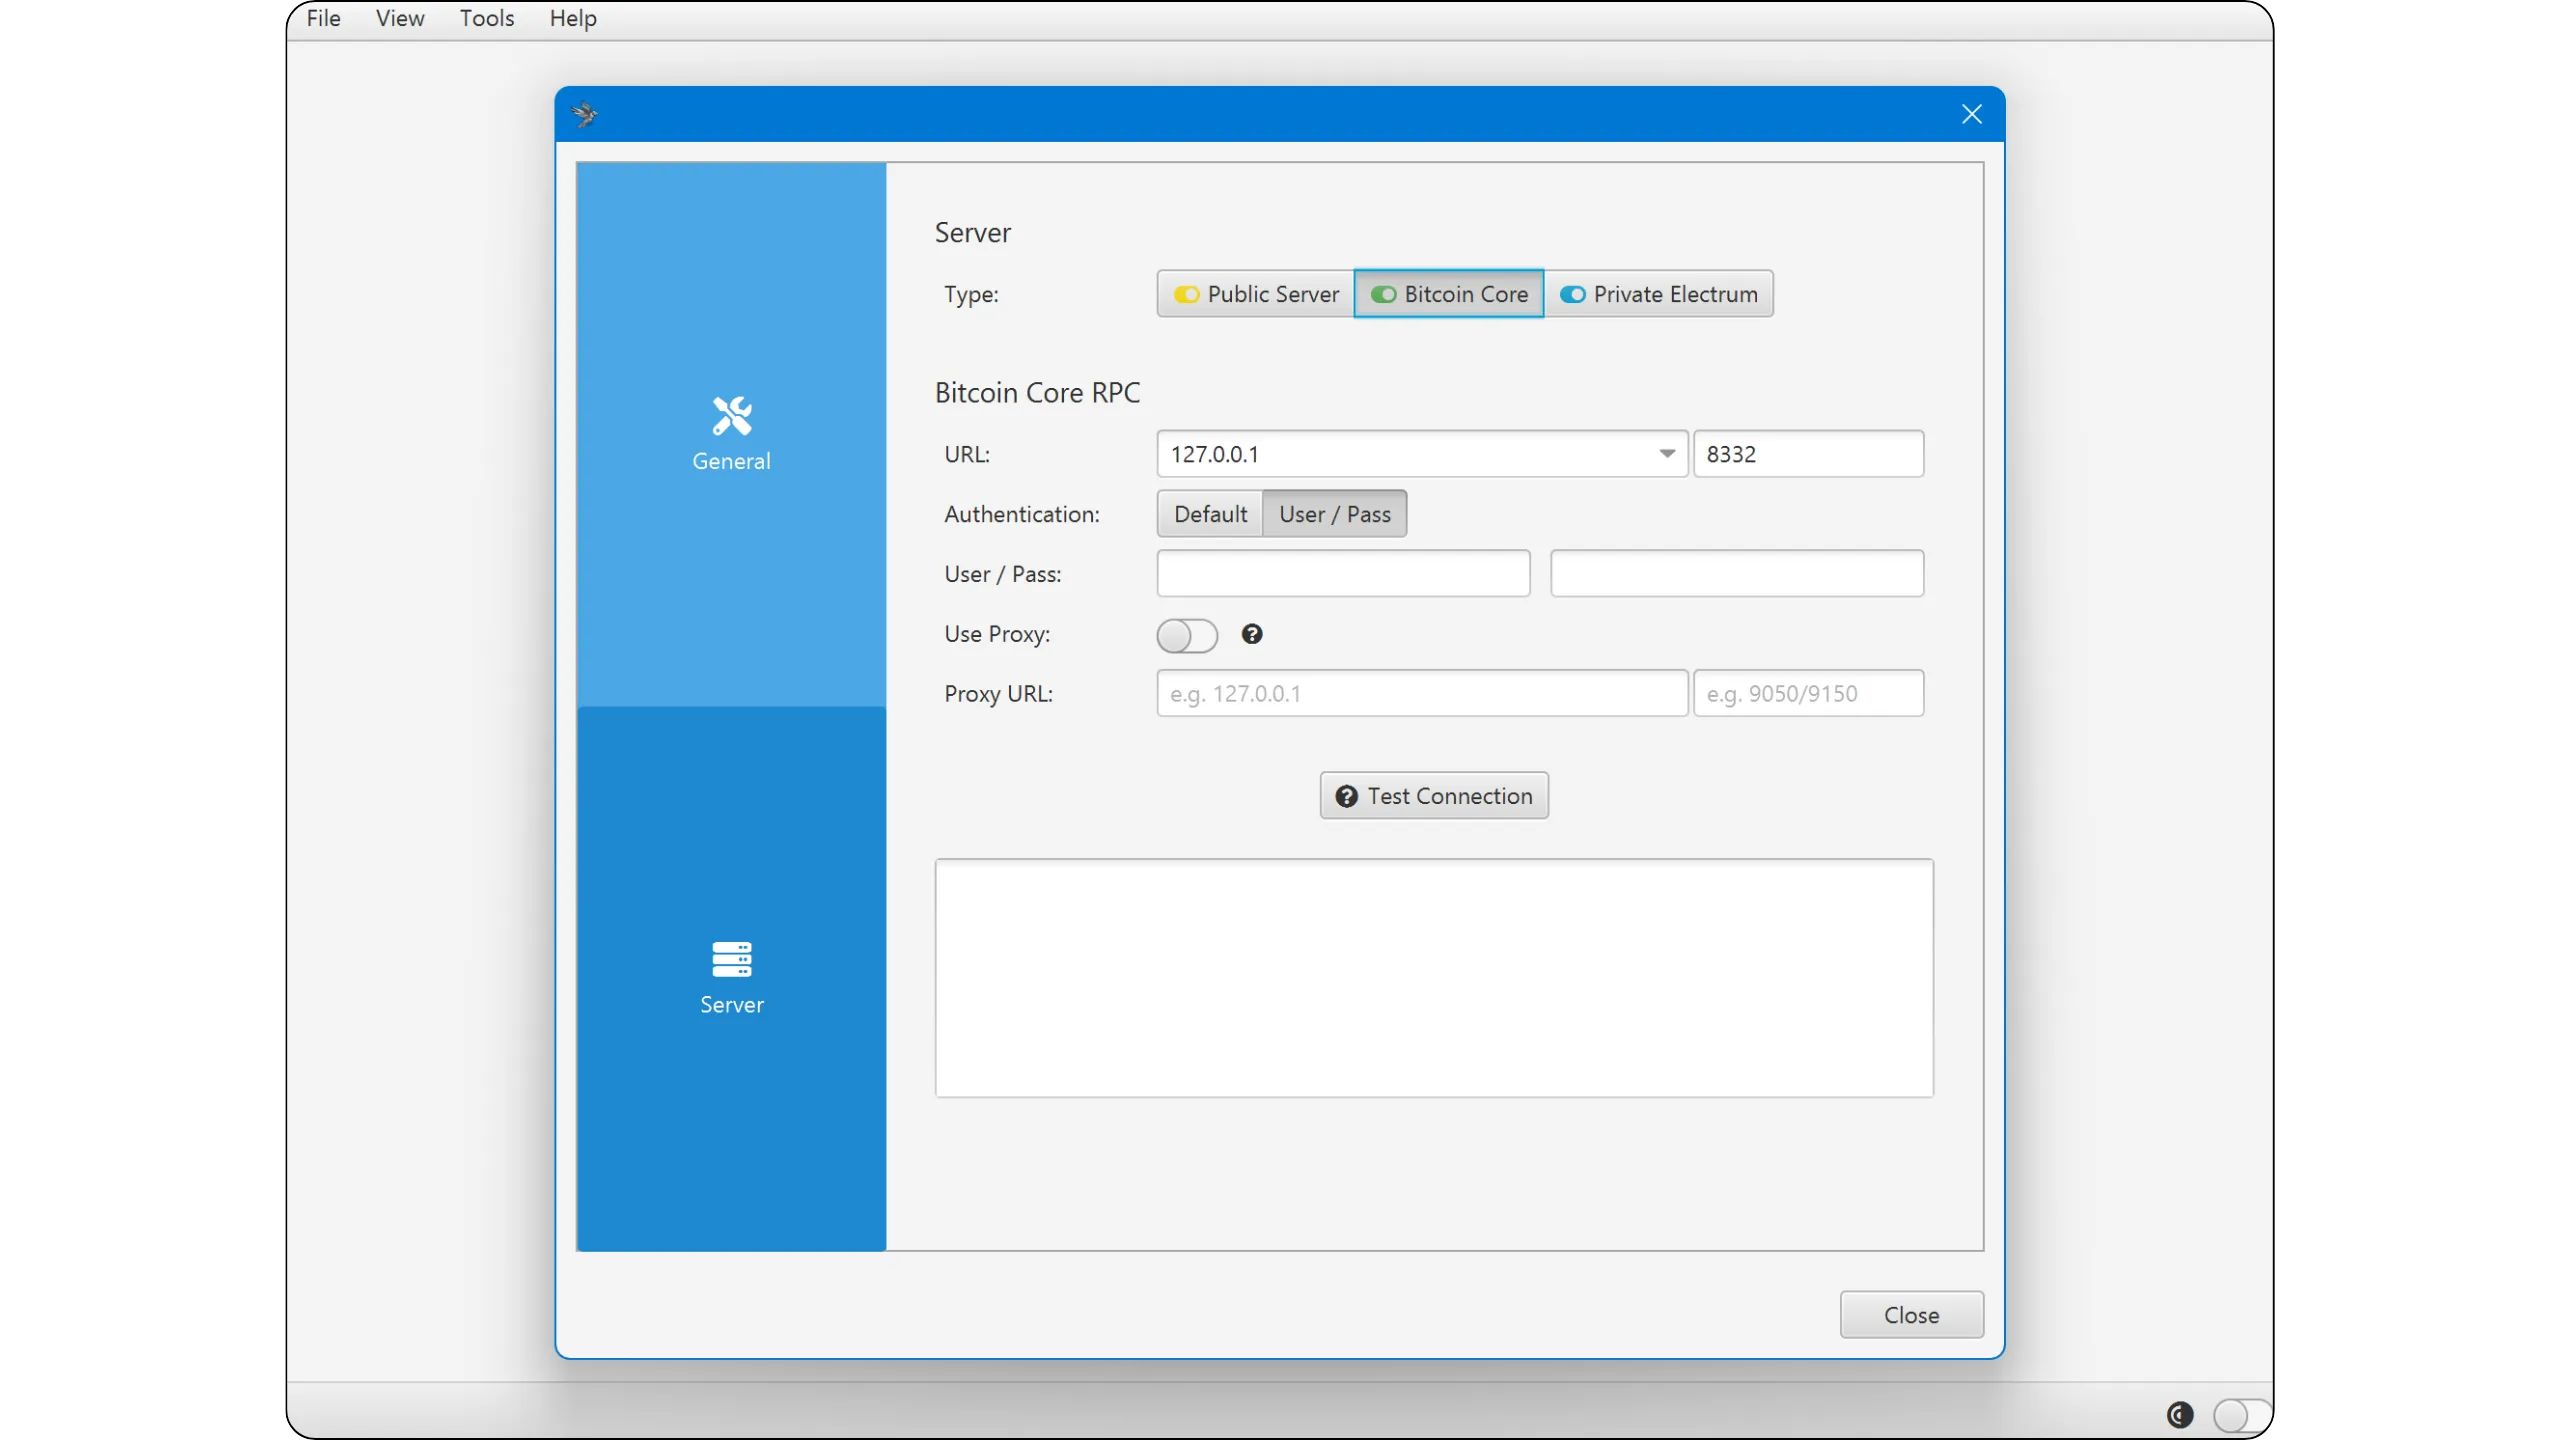
You will then need to enter several pieces of information to establish the connection to your node. All this data can be accessed from the "*Bitcoin Node*" application on Umbrel by clicking the "*Connect*" button in the top-right corner of the interface.
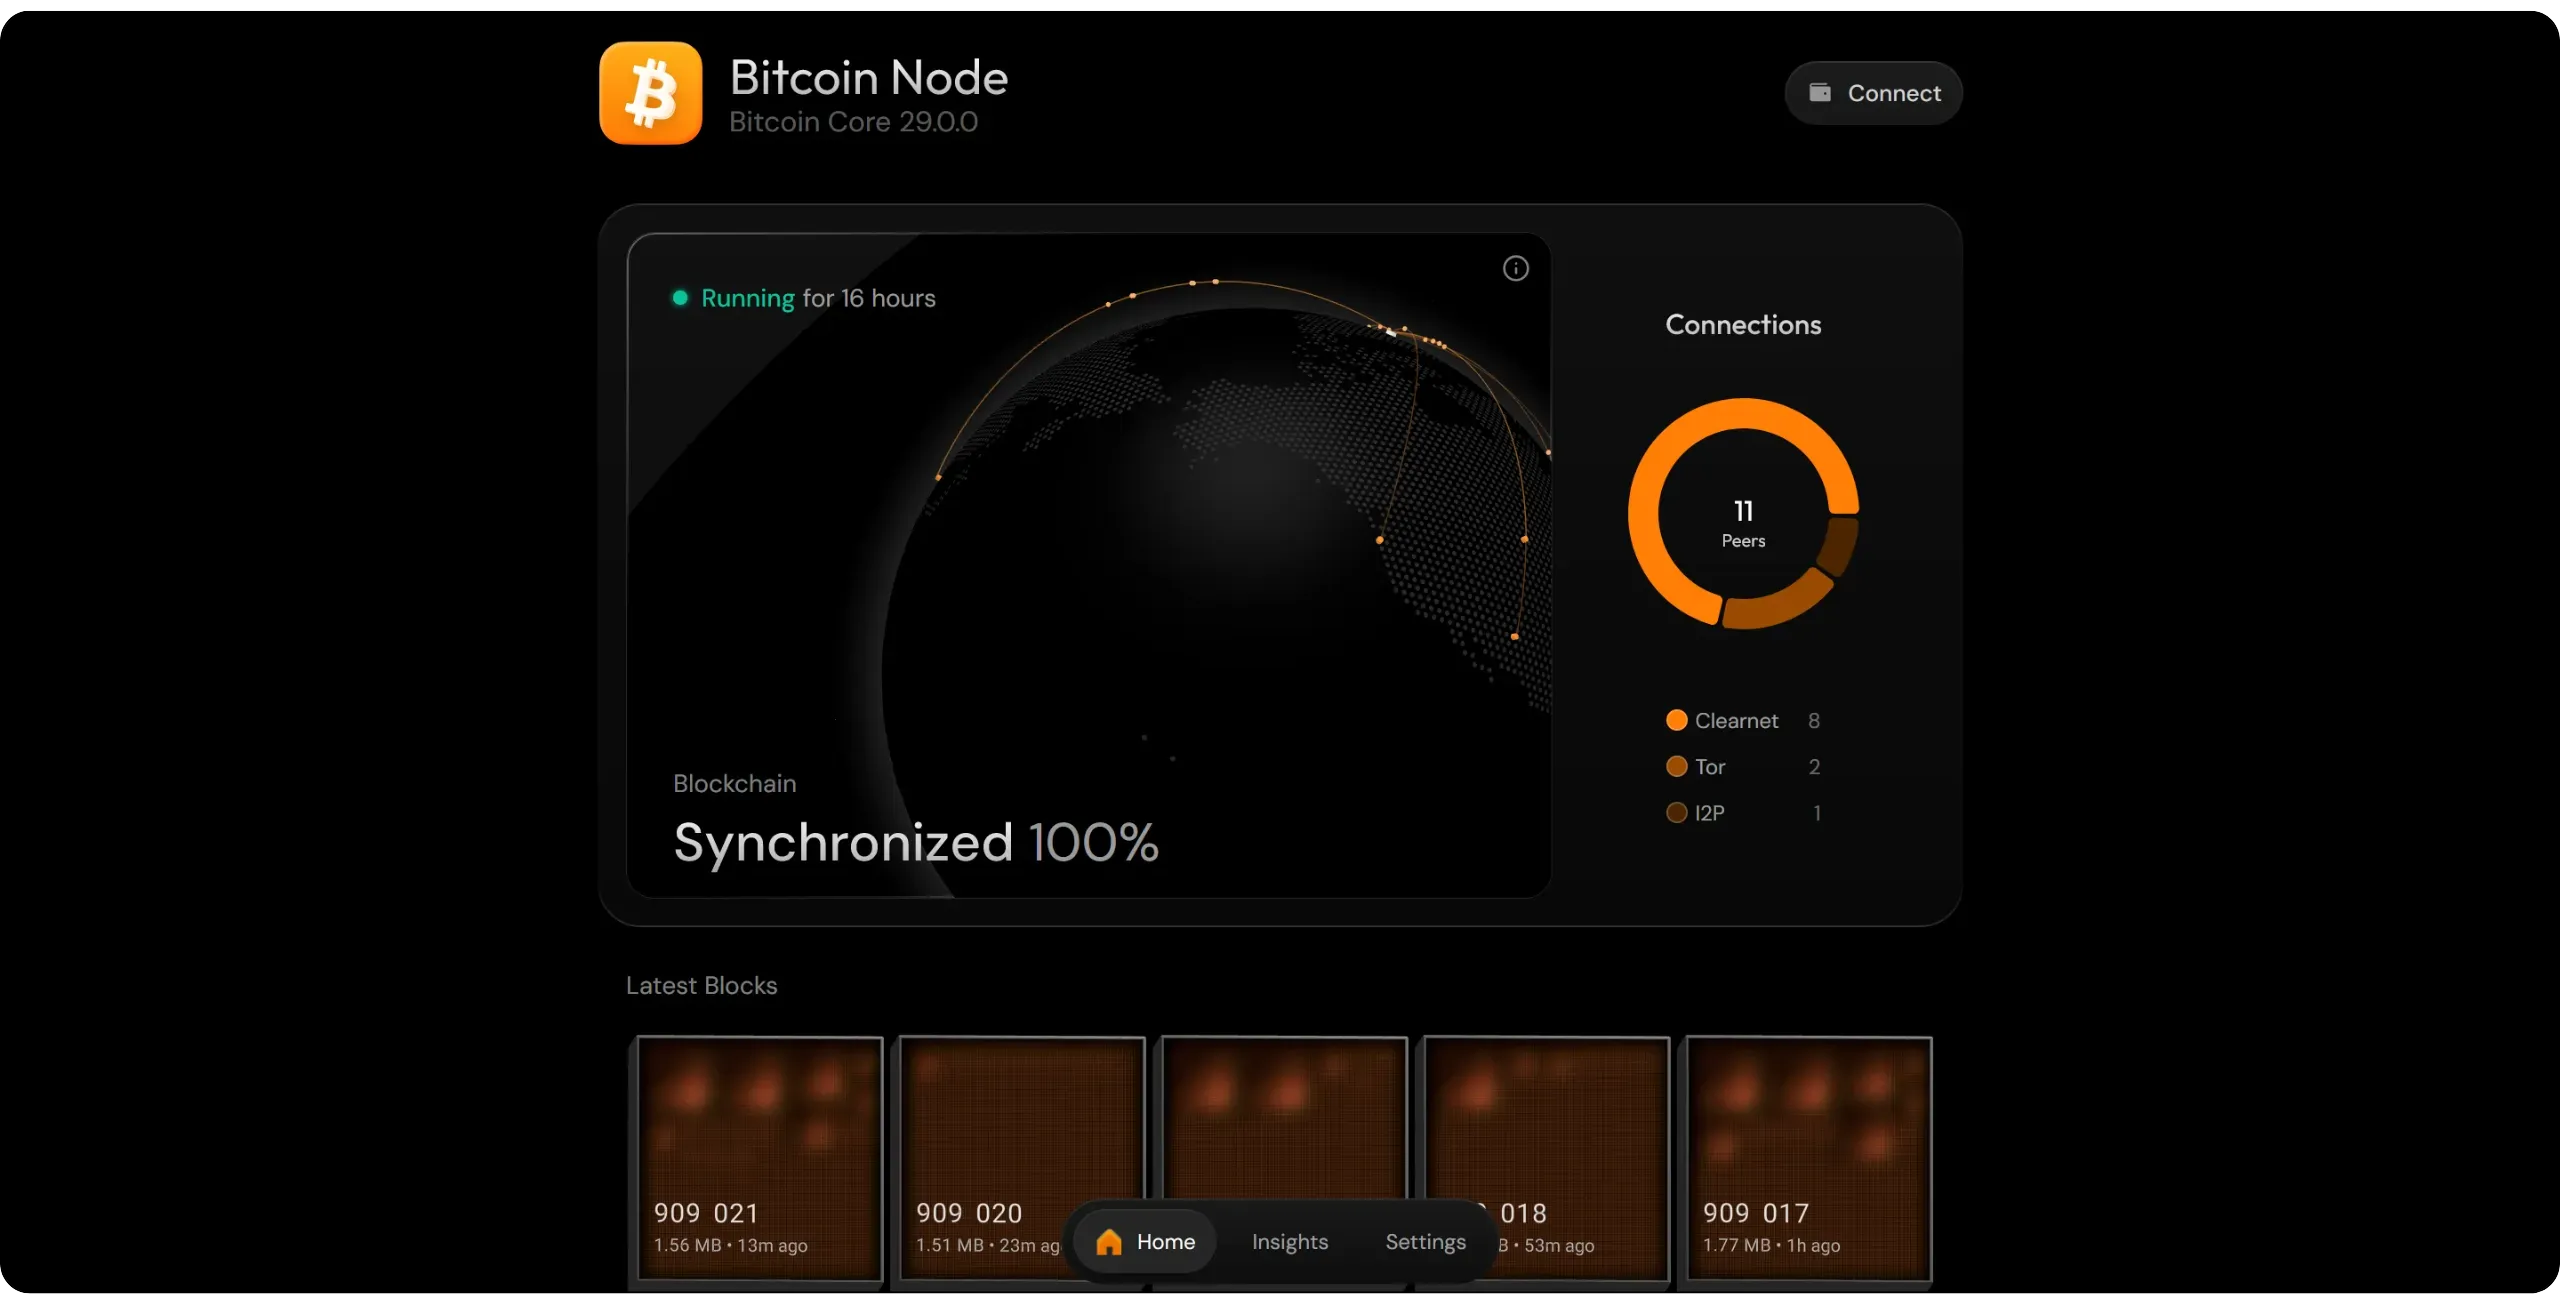
The "*RPC Details*" tab displays all the necessary information for connection. Choose to connect via Tor address (in `.onion`).
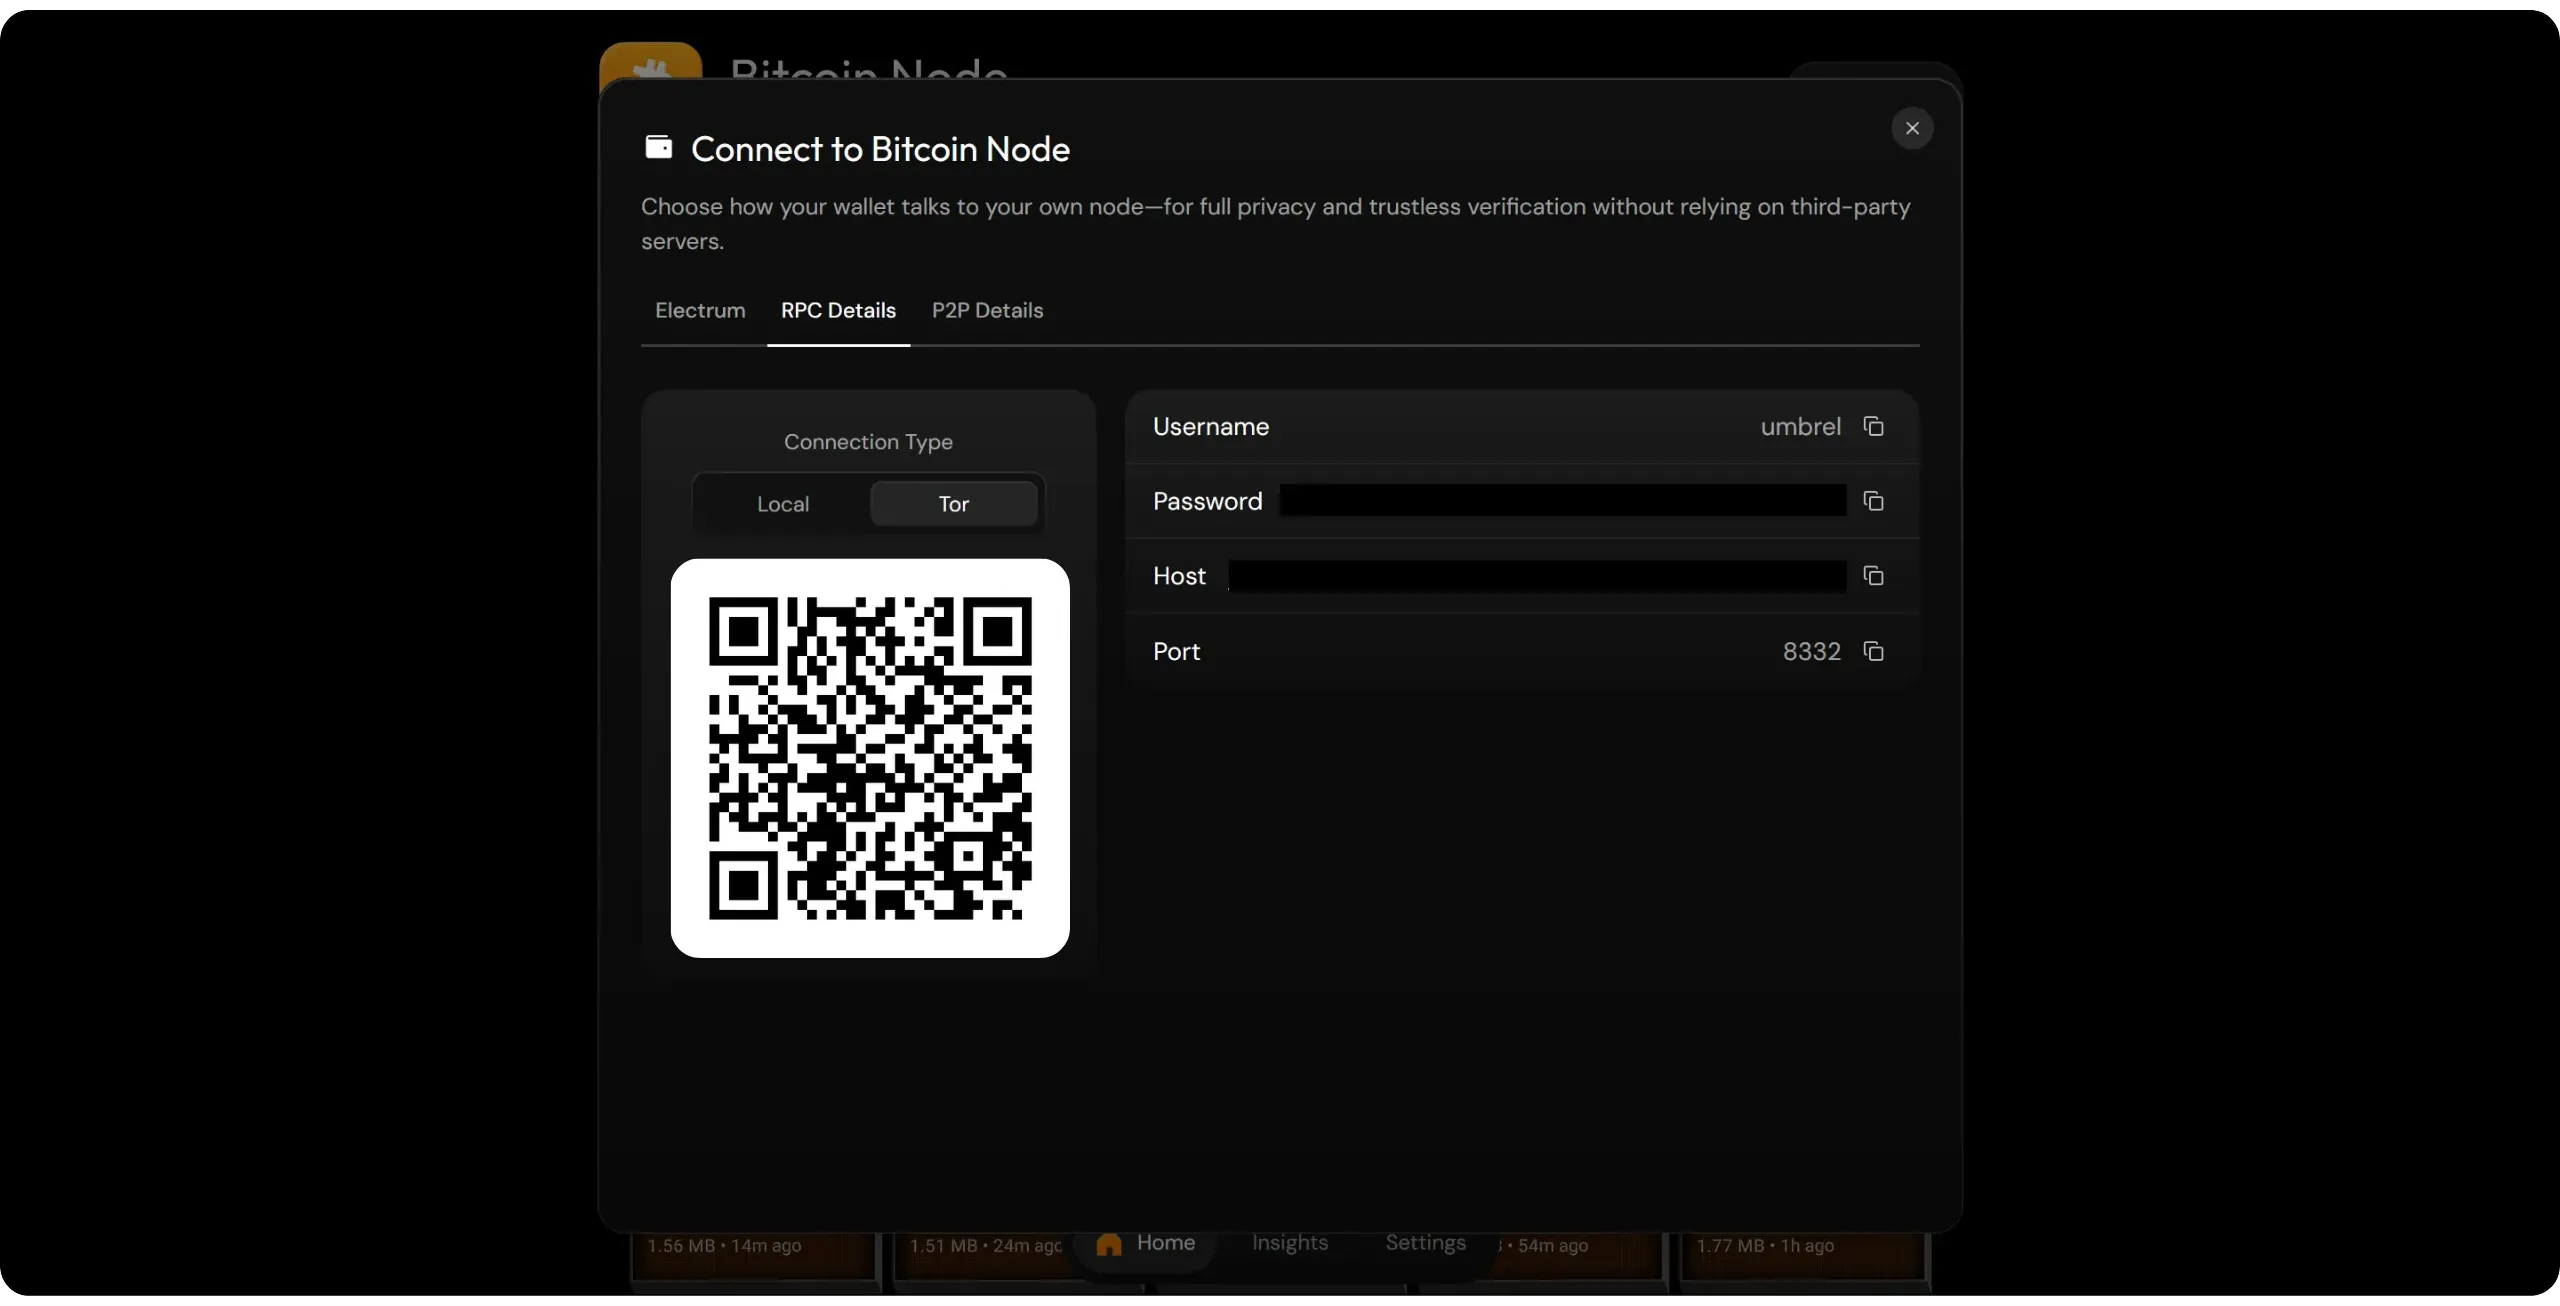
Enter these data in the corresponding fields on the Sparrow wallet, then click on the "*Test Connection*" button.
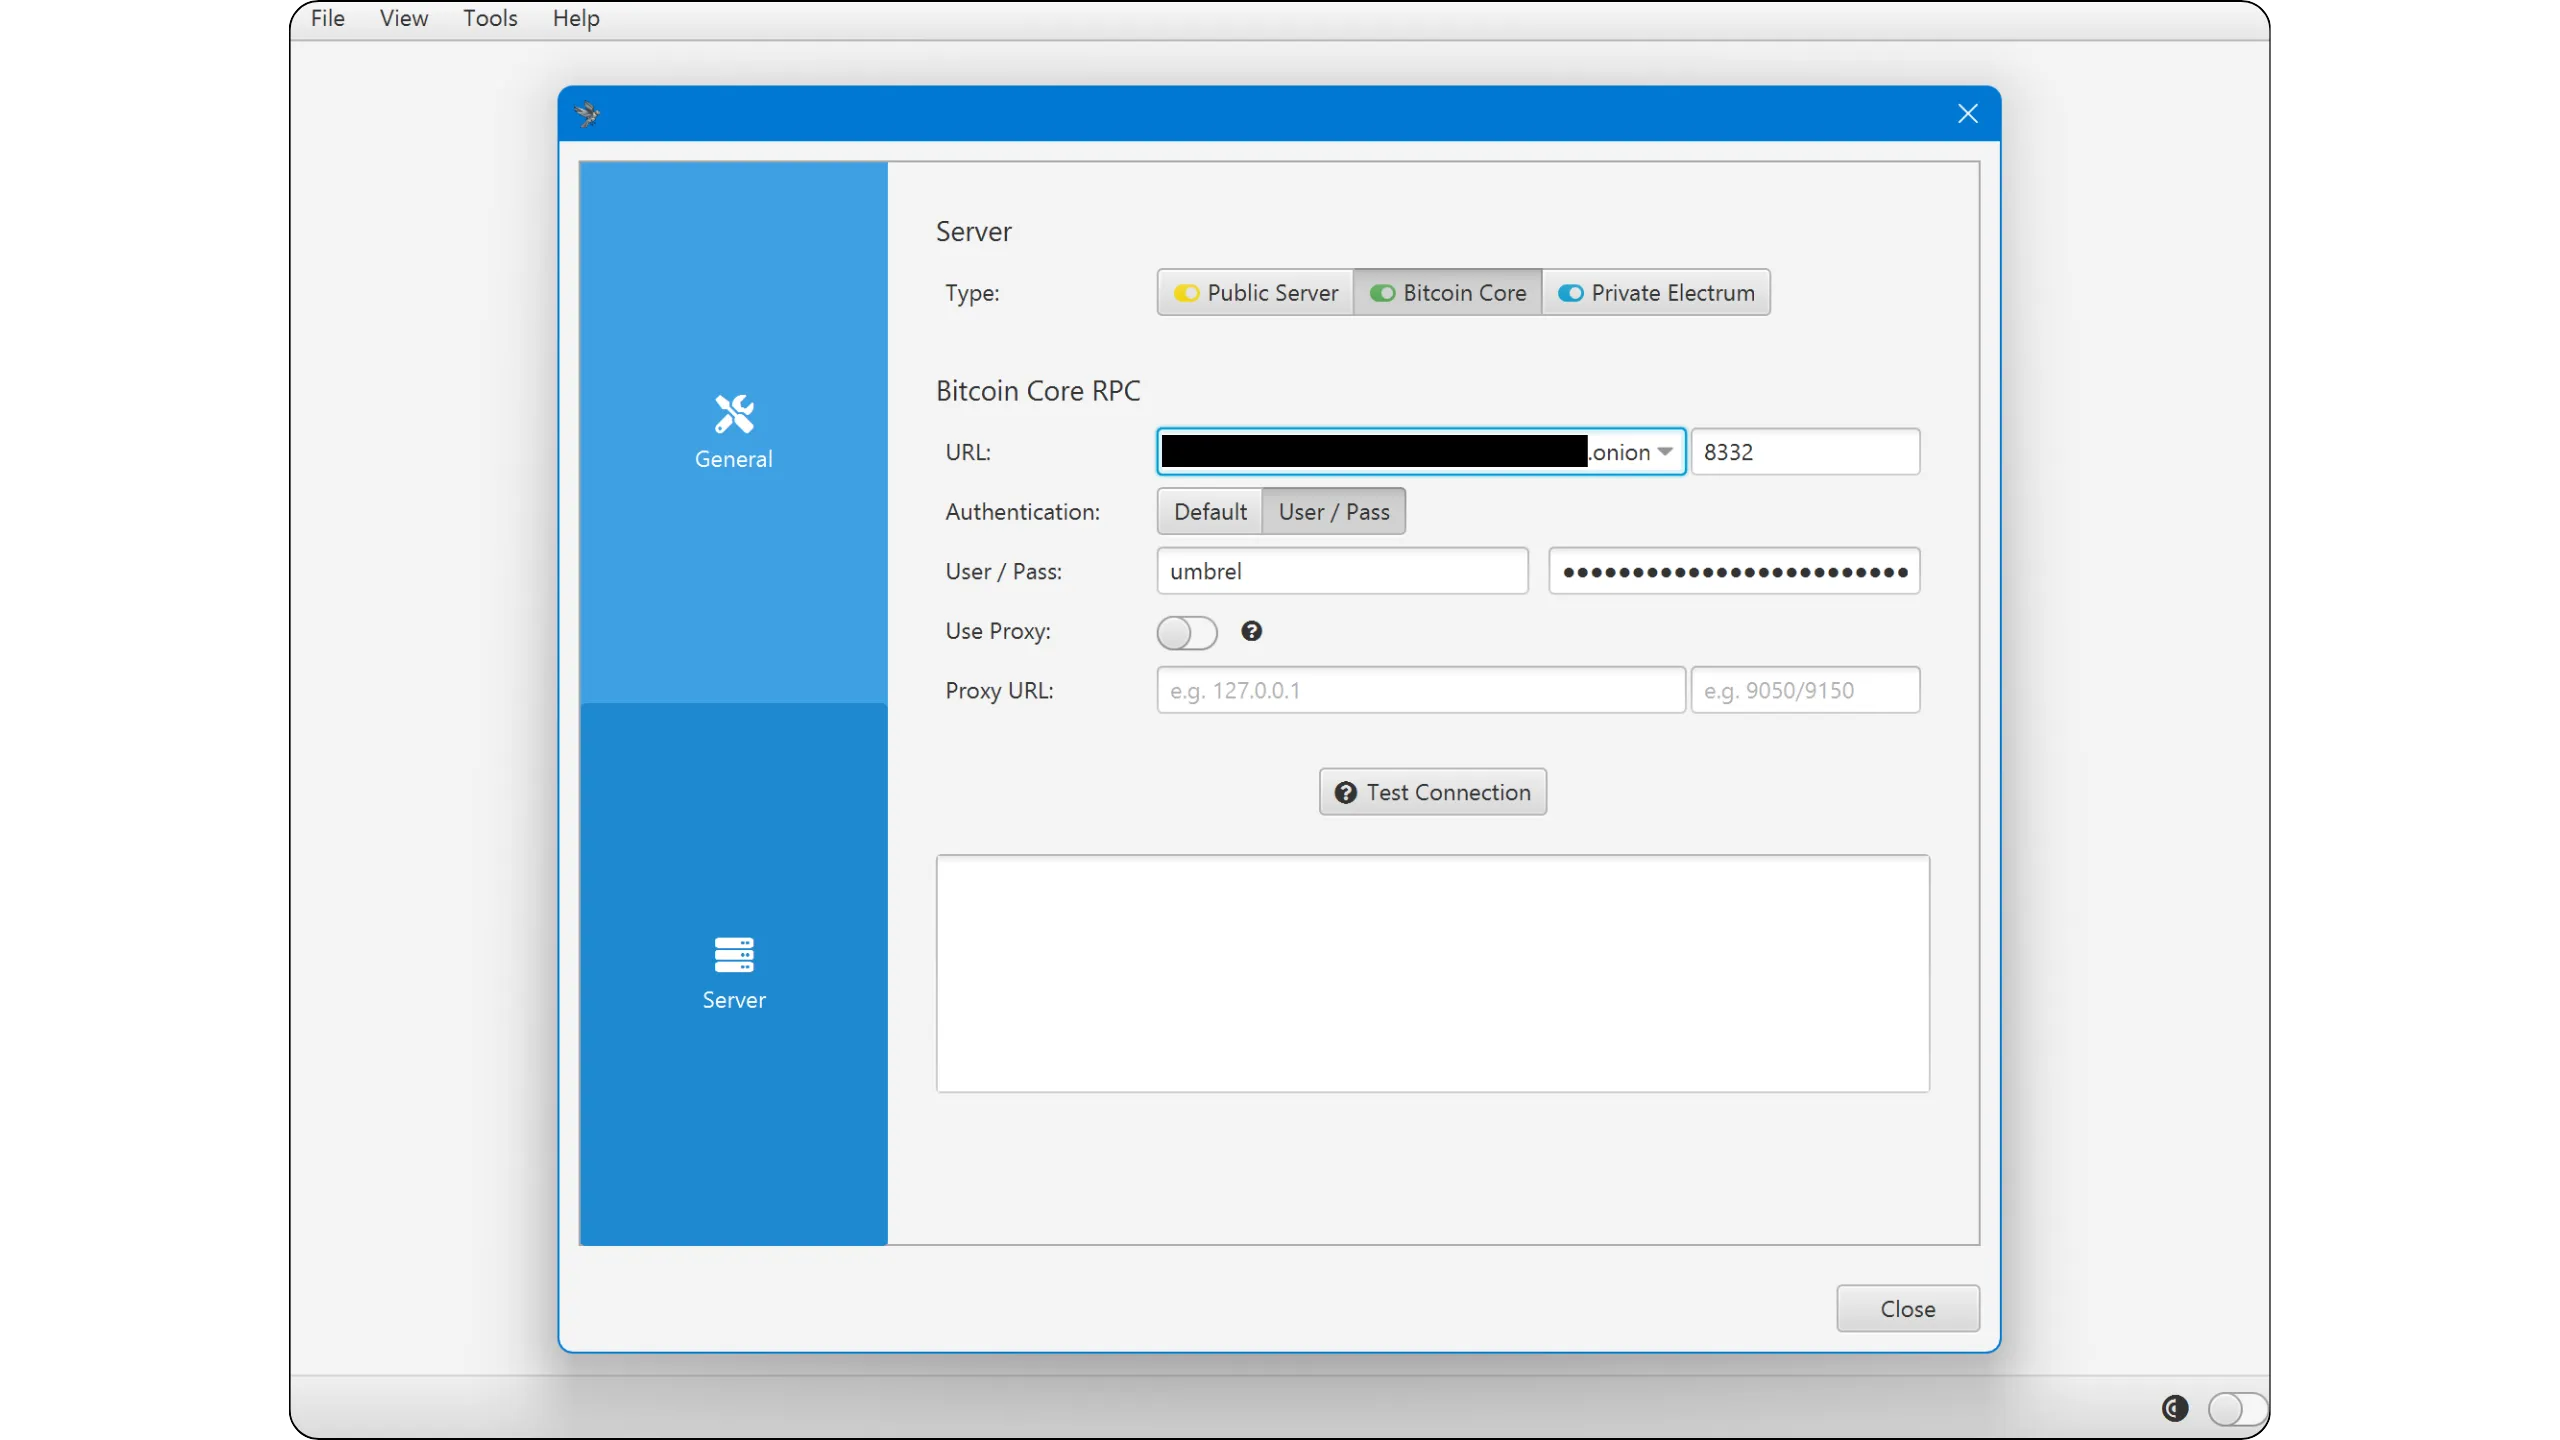
If the connection is successful, a green tick and a confirmation message will appear.

The checkmark in the bottom right corner of the Sparrow wallet interface will now be green (indicating a direct connection to Bitcoin Core).
**Note:** For the connection to succeed, your node must be 100% synchronized. If this is not the case, please wait until the end of the IBD.
### Connect to Electrs
If your node has an indexer, it's better to connect to it than to use Bitcoin Core directly, as your queries will be processed more quickly.
On Sparrow, go to the "*Private Electrum*" tab.
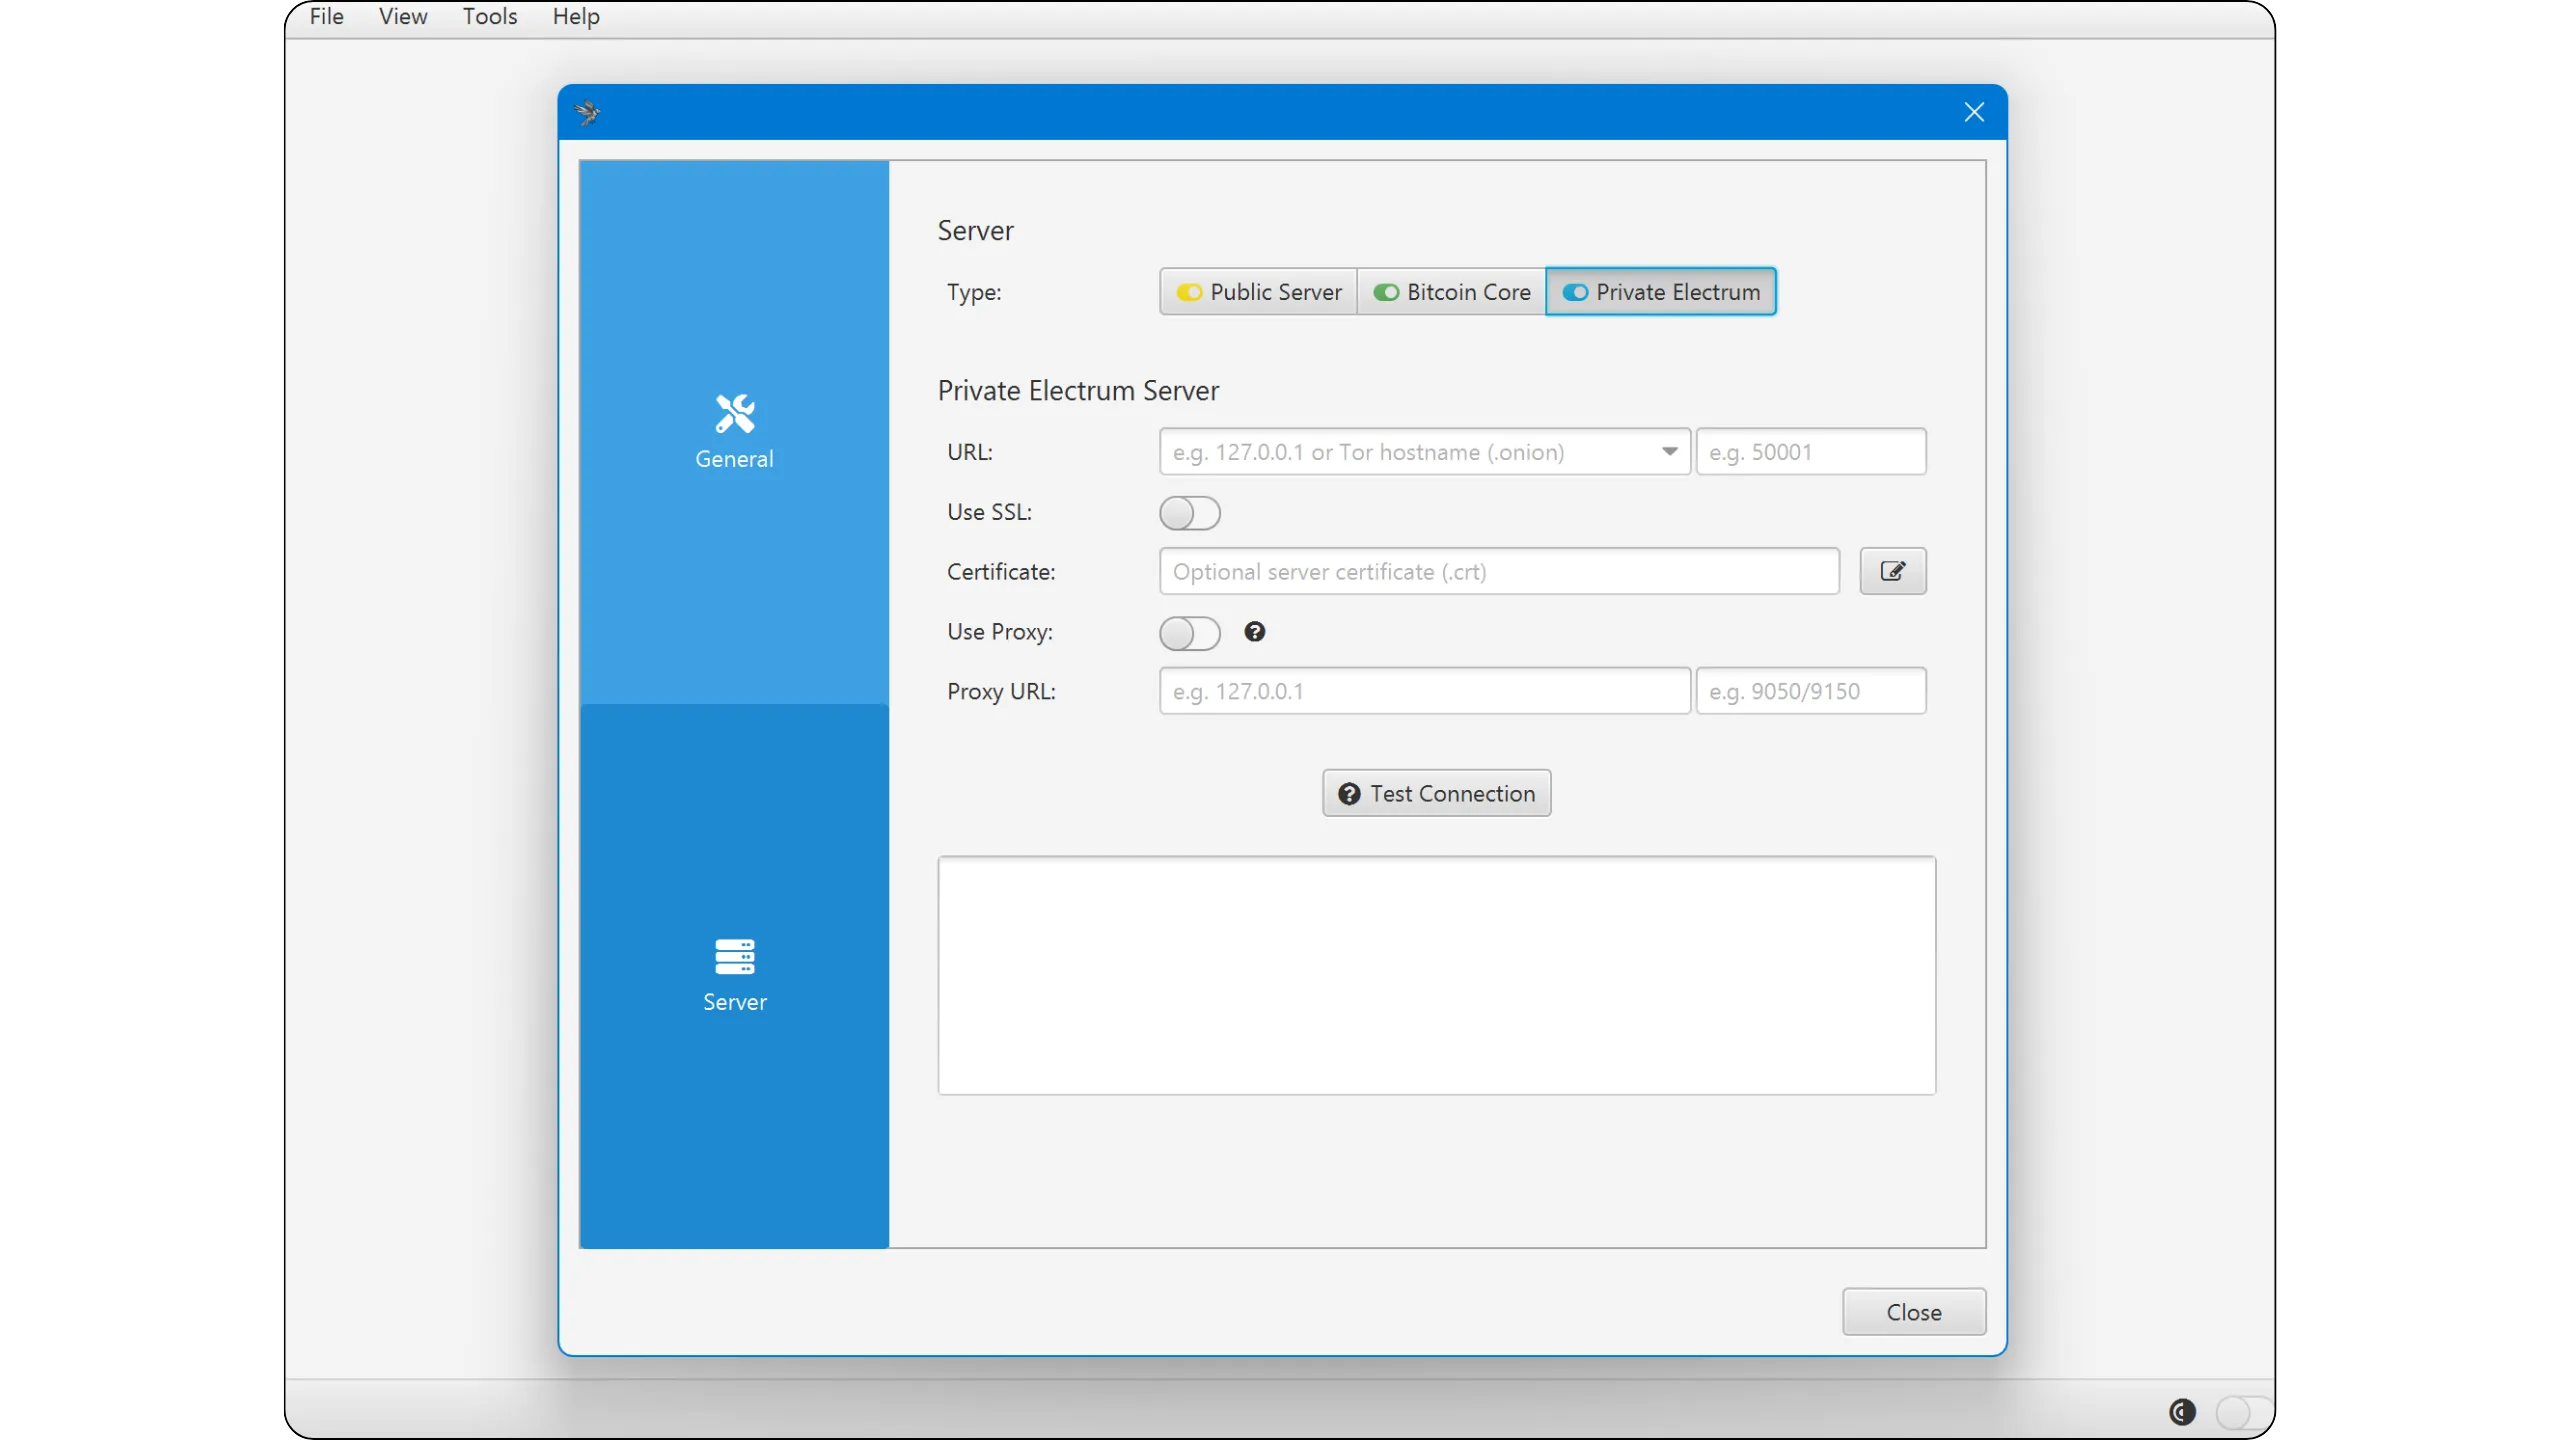
You'll then need to enter several pieces of information to establish the connection with your indexer. You'll find this data in the "*Electrs*" application (or, where applicable, "*Fulcrum*") on Umbrel.
Select the "*Tor*" tab to obtain the `.onion` connection address. If you wish to connect a mobile software wallet, you can also scan the QR code directly.
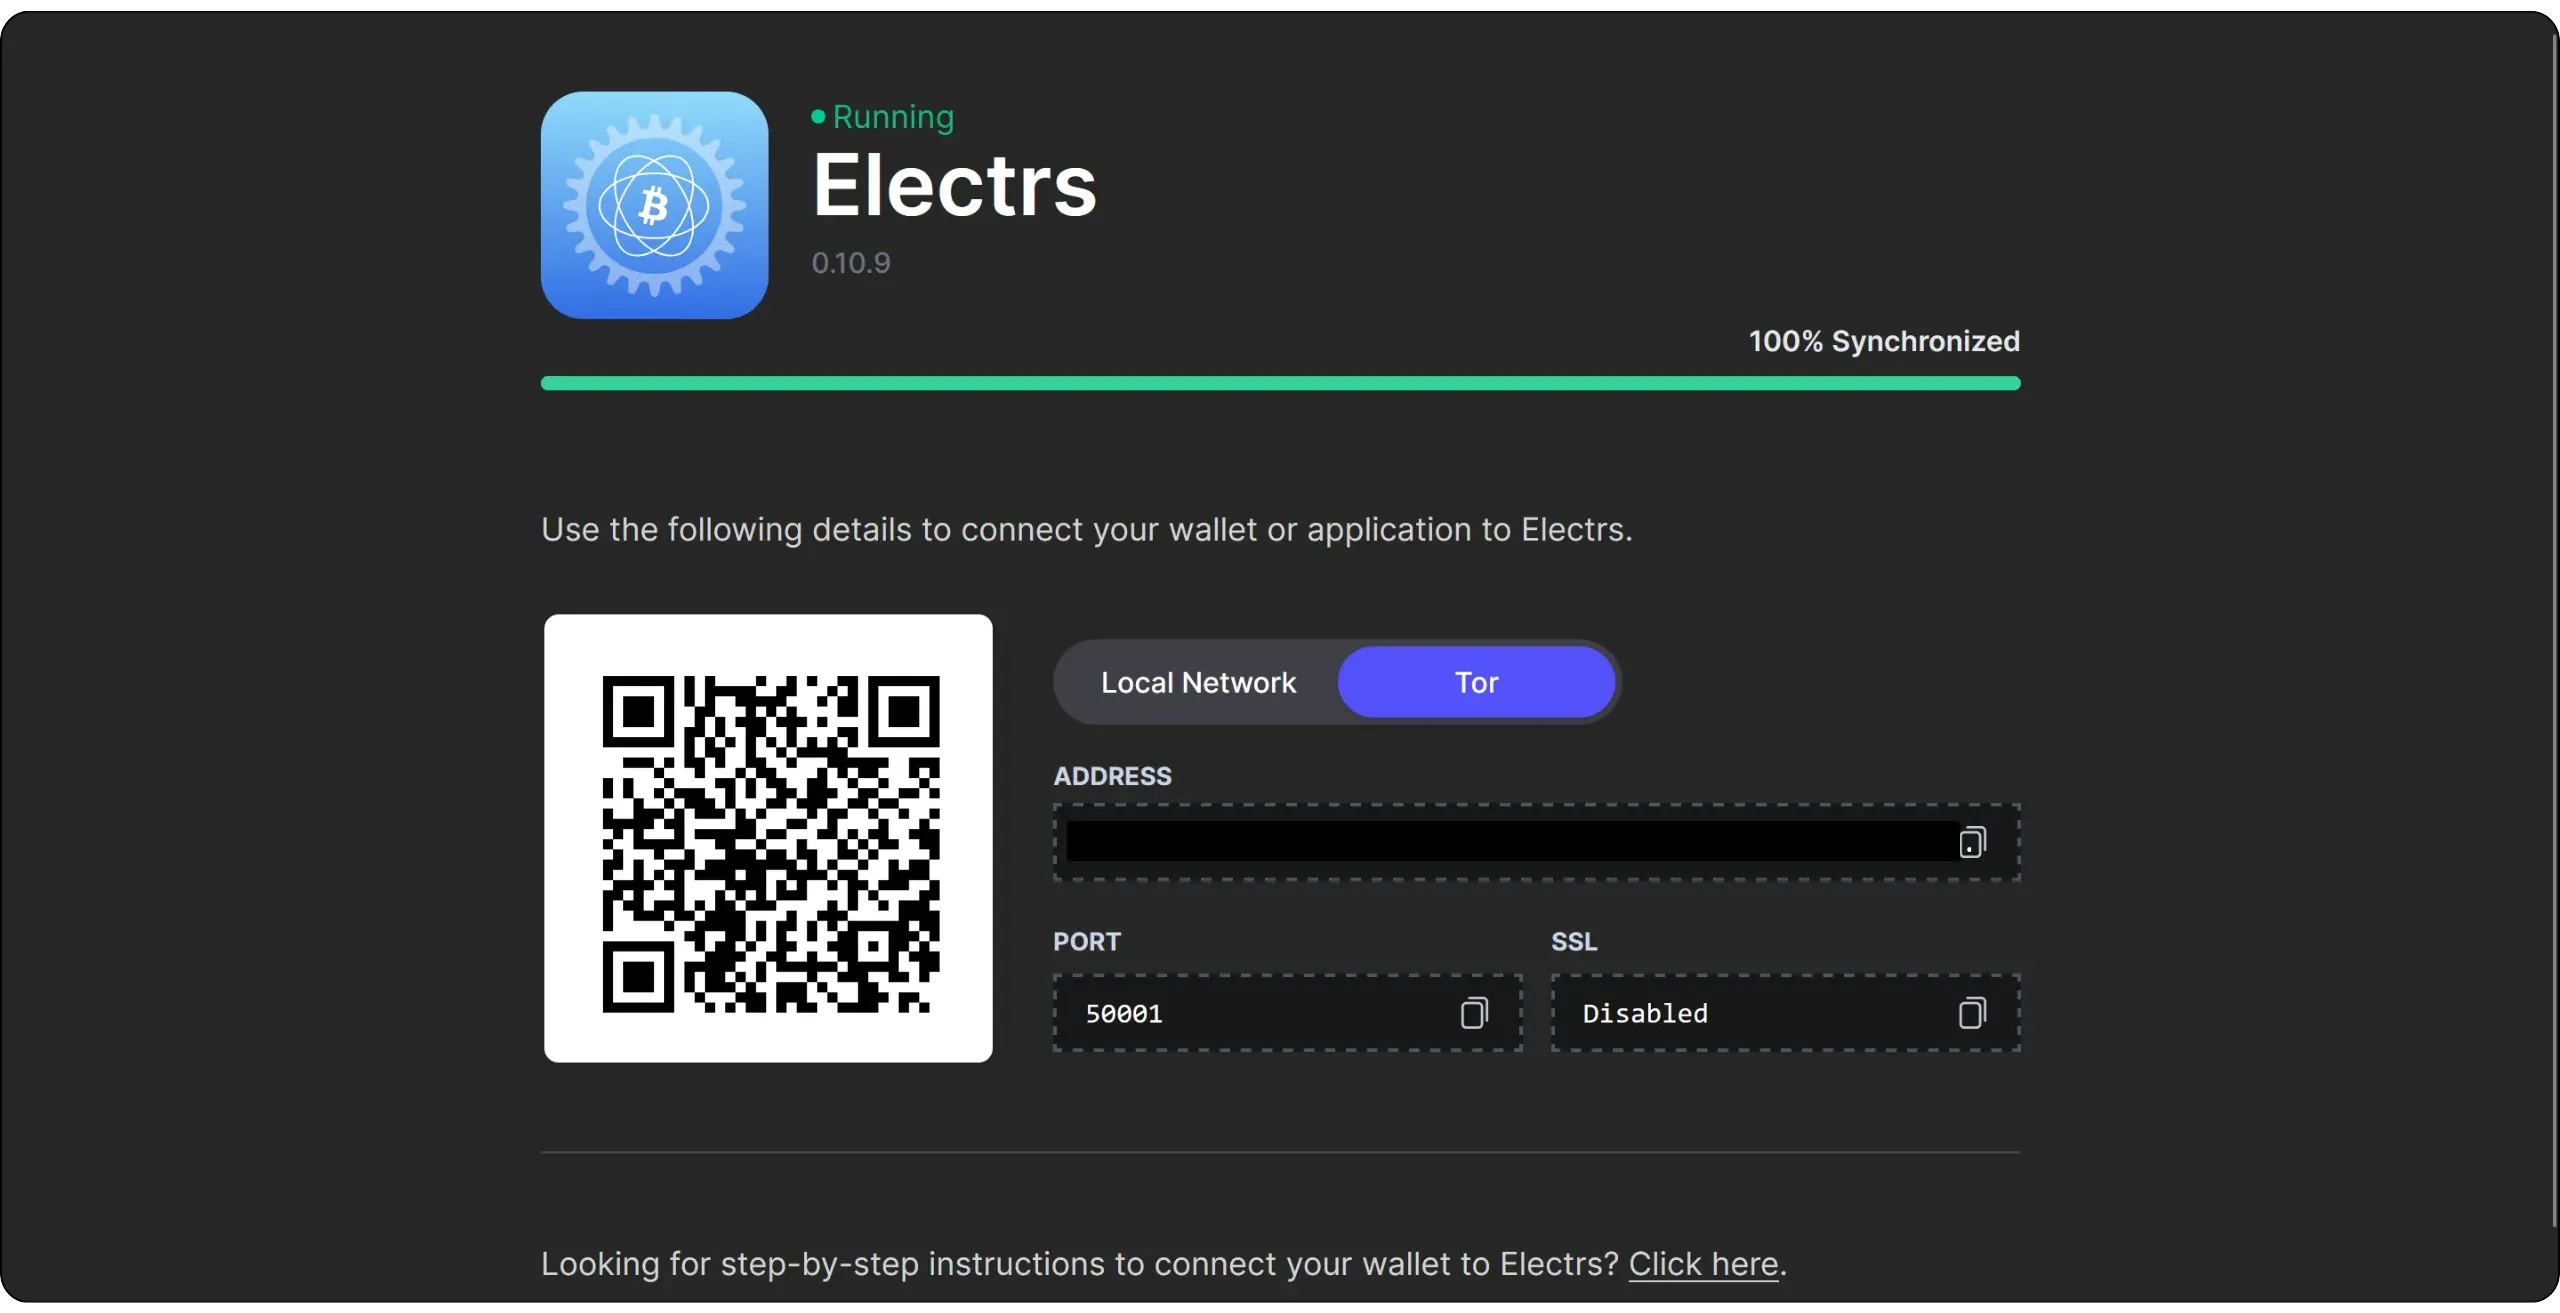
Simply enter the Tor address of your Electrum server in the "*URL*" field, then click on the "*Test Connection*" button.
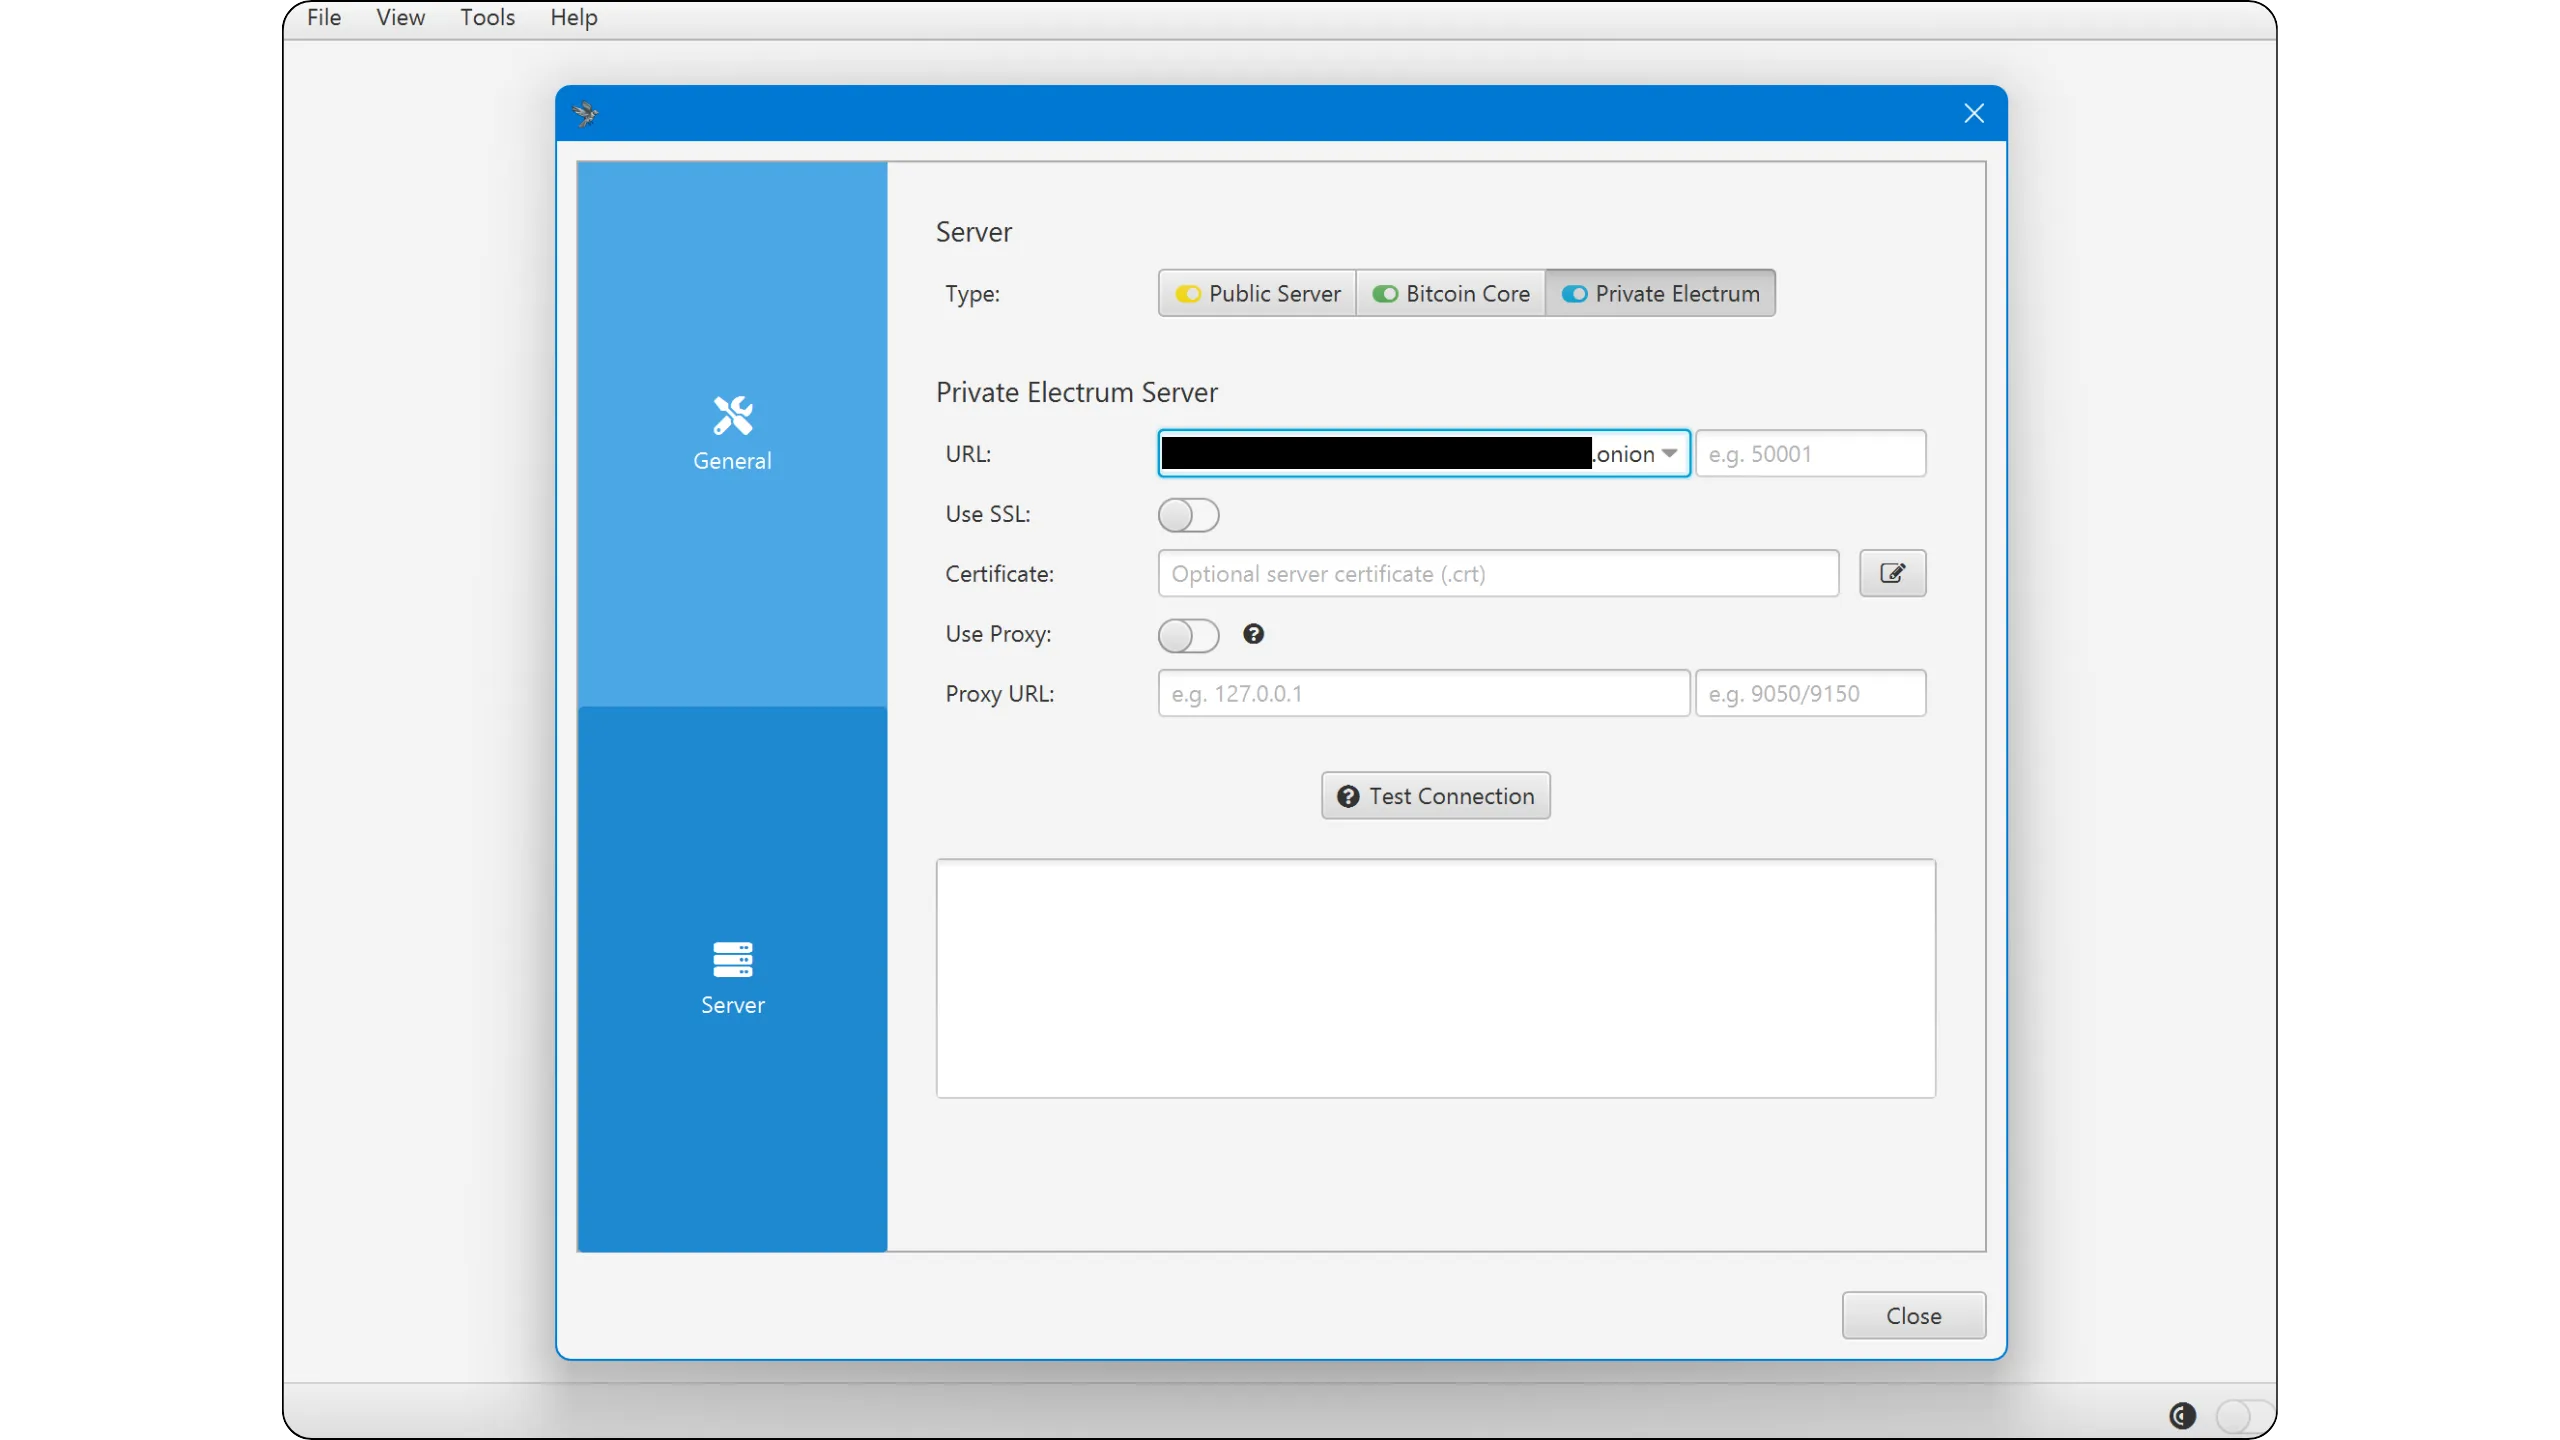
If the connection is successful, a check mark and a confirmation message will be displayed.
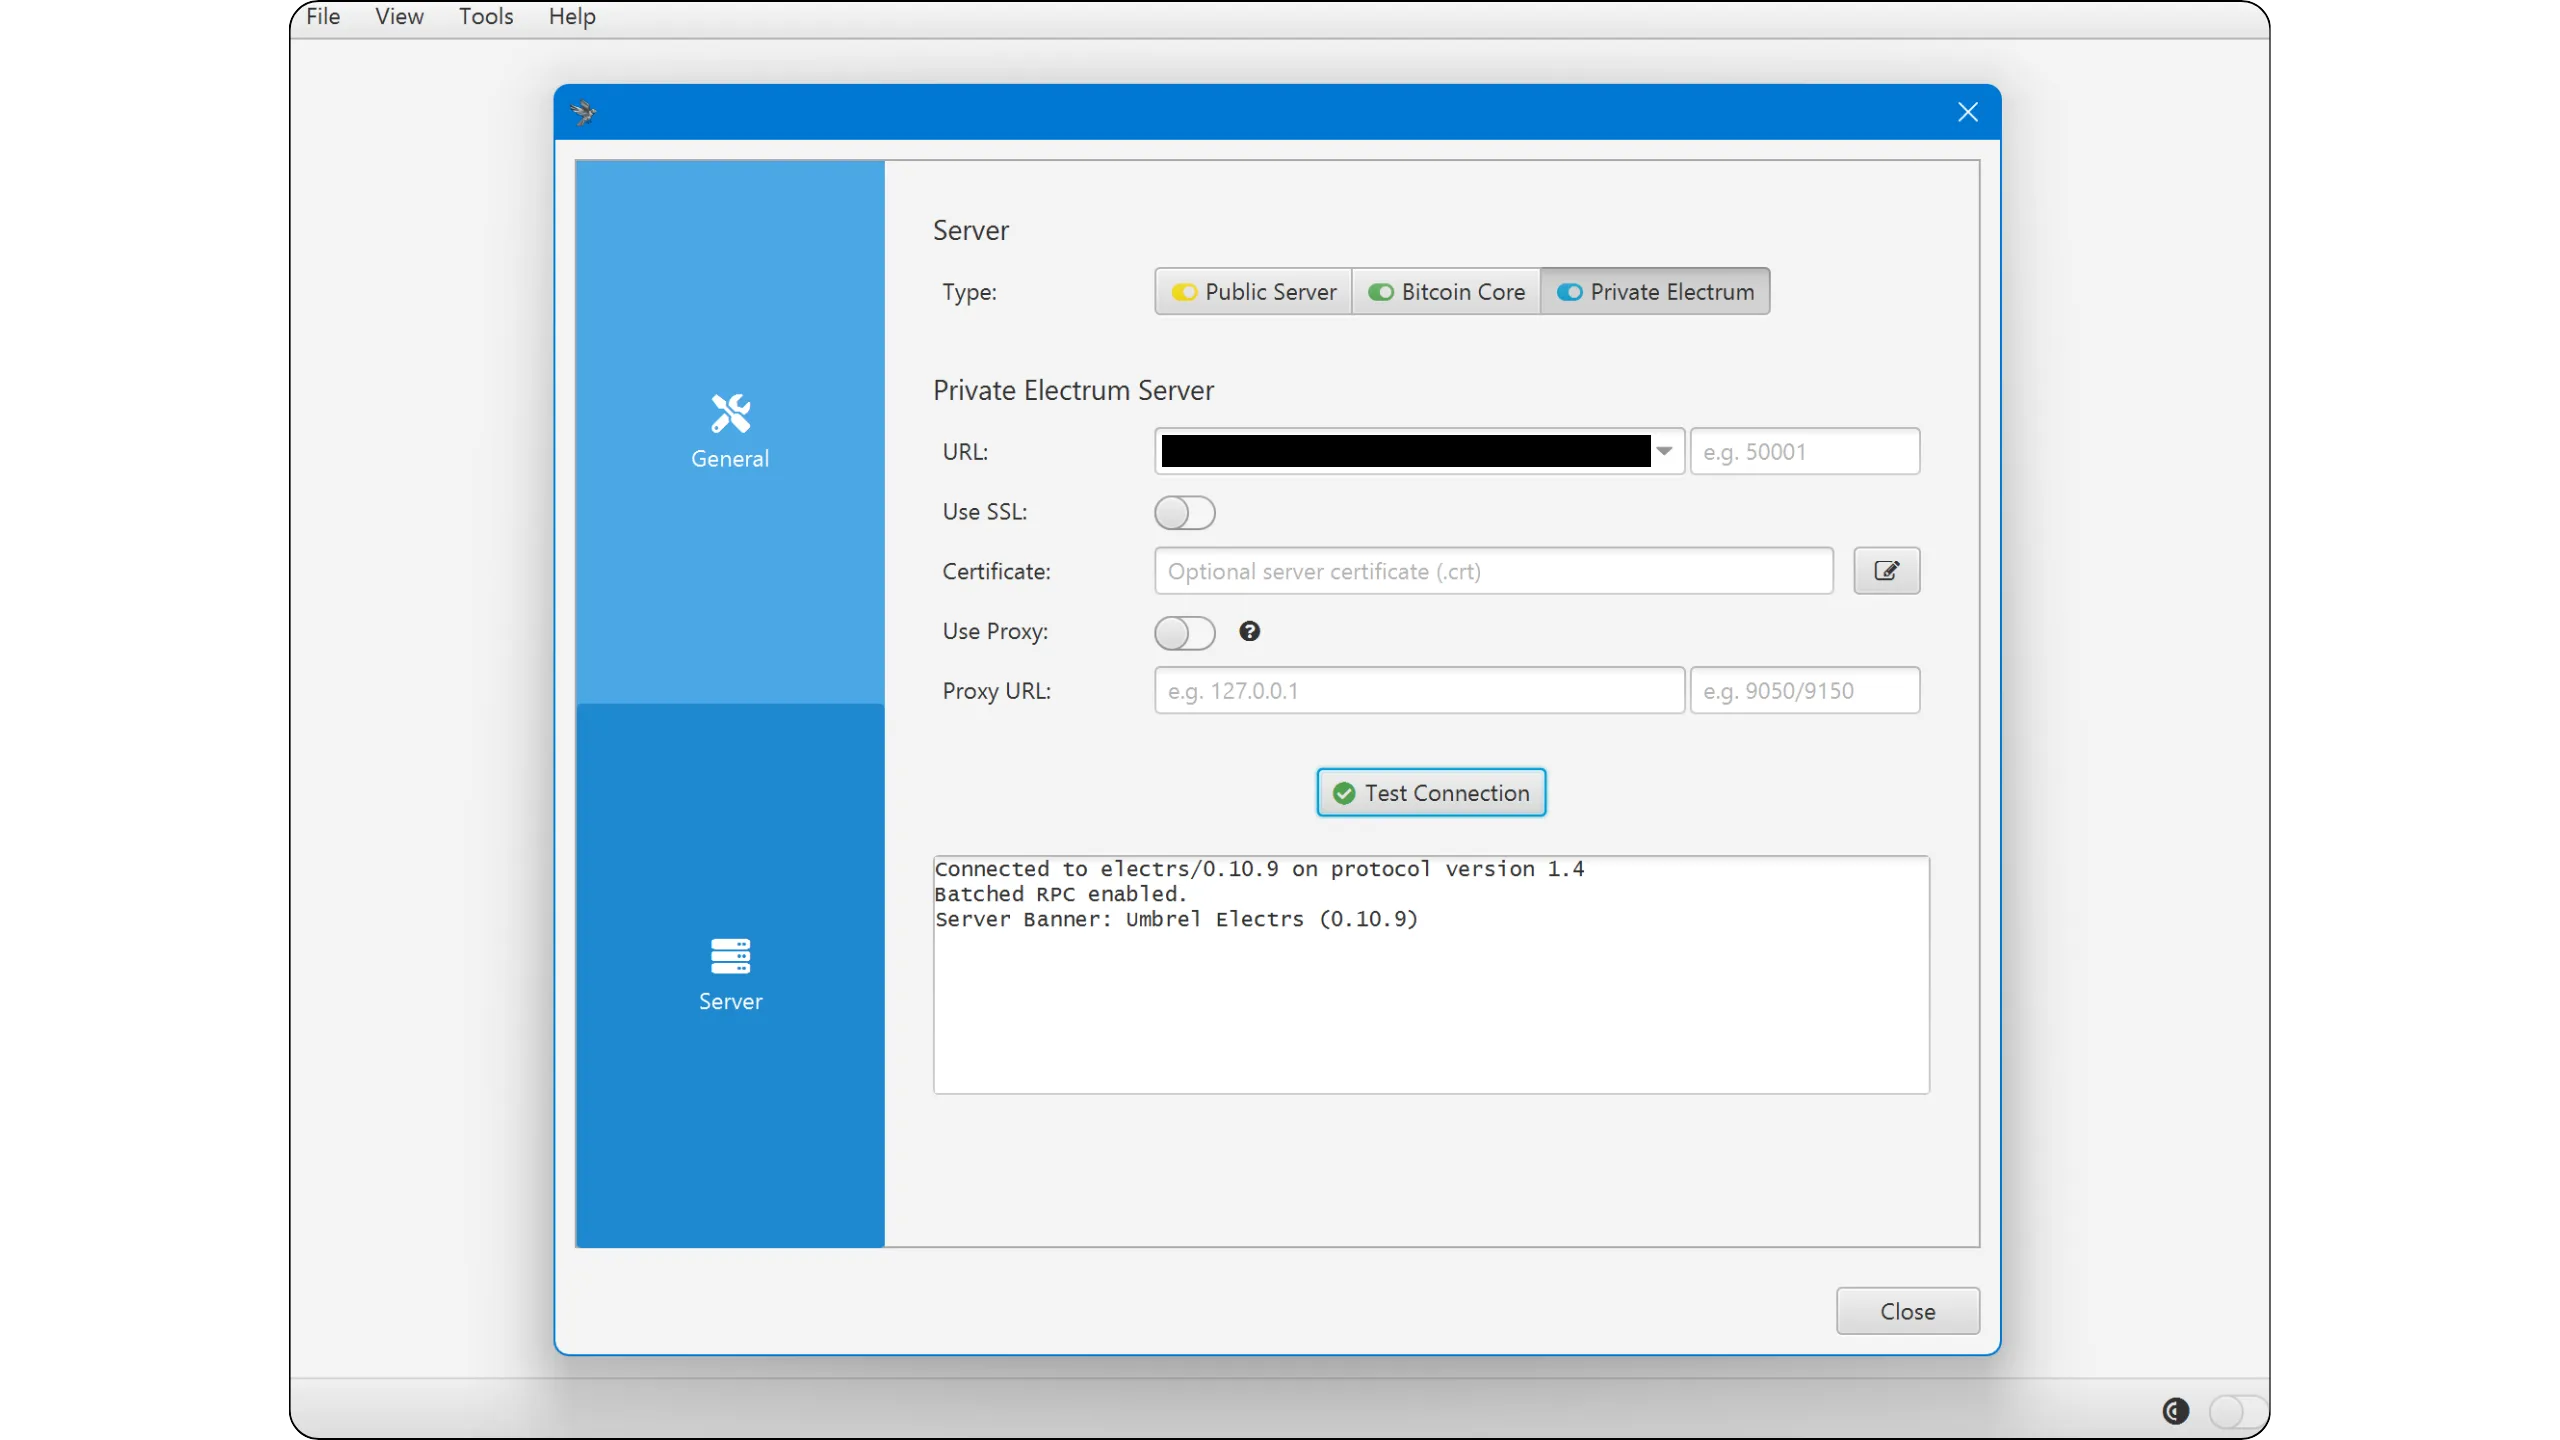
The checkmark in the bottom right-hand corner of the Sparrow wallet interface will turn blue (the color associated with connection to an Electrum server).
**Note:** For the connection to work, your indexer must be 100% synchronized. If this is not the case, wait until the indexing process is complete.
Now you know how to connect your wallet to your Bitcoin node! In the next chapter, I'll introduce you to several additional applications available on Umbrel that I'm particularly fond of, and that will enable you to enhance your daily use of Bitcoin through your node.
## Overview of available applications
2a5ccfbe-0b17-44c9-863c-b7e8cb4b4594
Umbrel offers an extensive application store. As you'll see, there are many tools related to Bitcoin, but also a wide variety of applications in very different fields: self-hosting solutions for services and files, productivity applications, more general financial tools, media management, network security and administration, development, artificial intelligence, social networking, and even home automation.
In this BTC 202 course, we'll be concentrating exclusively on Bitcoin-related applications. However, feel free to explore the rest of the catalog for tools that may be of use to you.
Of course, it would be impossible to list all the Bitcoin applications here. In this chapter, I'd like to introduce you to the essential tools that will facilitate and enrich your daily use of Bitcoin.
### Mempool.space
In the daily use of Bitcoin, if there's one tool that's truly indispensable, it's the block explorer. Whether accessible online or installed locally, it transforms blockchain's raw data into a structured, clear, and easy-to-read format. It also features a search engine that allows users to quickly locate a specific block, transaction, or address.
In concrete terms, the explorer lets you estimate the fees required for your transaction to be included in a block, then track its progress: find out whether it is likely to be included in the near future, depending on the fee market, and finally confirm that it has indeed been included in a block. It also offers the possibility of analyzing your past transactions and consulting their history. In short, it's the bitcoiner's Swiss Army Knife.
As mentioned previously, an explorer can be hosted online on a website or run locally on your machine. A major disadvantage of online services is that they can compromise your privacy. Without VPN or Tor, the server hosting the explorer can link your IP address to the transactions you're viewing, which can provide an ideal entry point for chain analysis.
https://planb.academy/courses/65c138b0-4161-4958-bbe3-c12916bc959c
What's more, your Internet Service Provider (ISP) may know that you're viewing a particular transaction via the block explorer site. This also raises a question of trust: you must rely on the online service to provide you with accurate information about your transactions, without being able to verify its veracity yourself.
That's why it's always best to use your own local block explorer. This way, no data related to your search activity will leak out, since all queries are processed directly on a machine you control, without passing through the internet. What's more, a local explorer relies on data from your own Bitcoin node, which you have validated yourself, according to your own rules, and which you can trust.
Umbrel offers several block explorers:
- Mempool.Space
- Bitfeed
- BTC RPC Explorer
I'm particularly fond of Mempool.Space, which I've installed on my node. Please note: to use most block explorers on Umbrel, an address indexer is required. You therefore need the Bitcoin Core (or Bitcoin Knots) application, which has a 100% synchronized blockchain, as well as an indexer such as Electrs or Fulcrum, which is also 100% synchronized.
Once the application is installed, simply open it to access your own explorer.
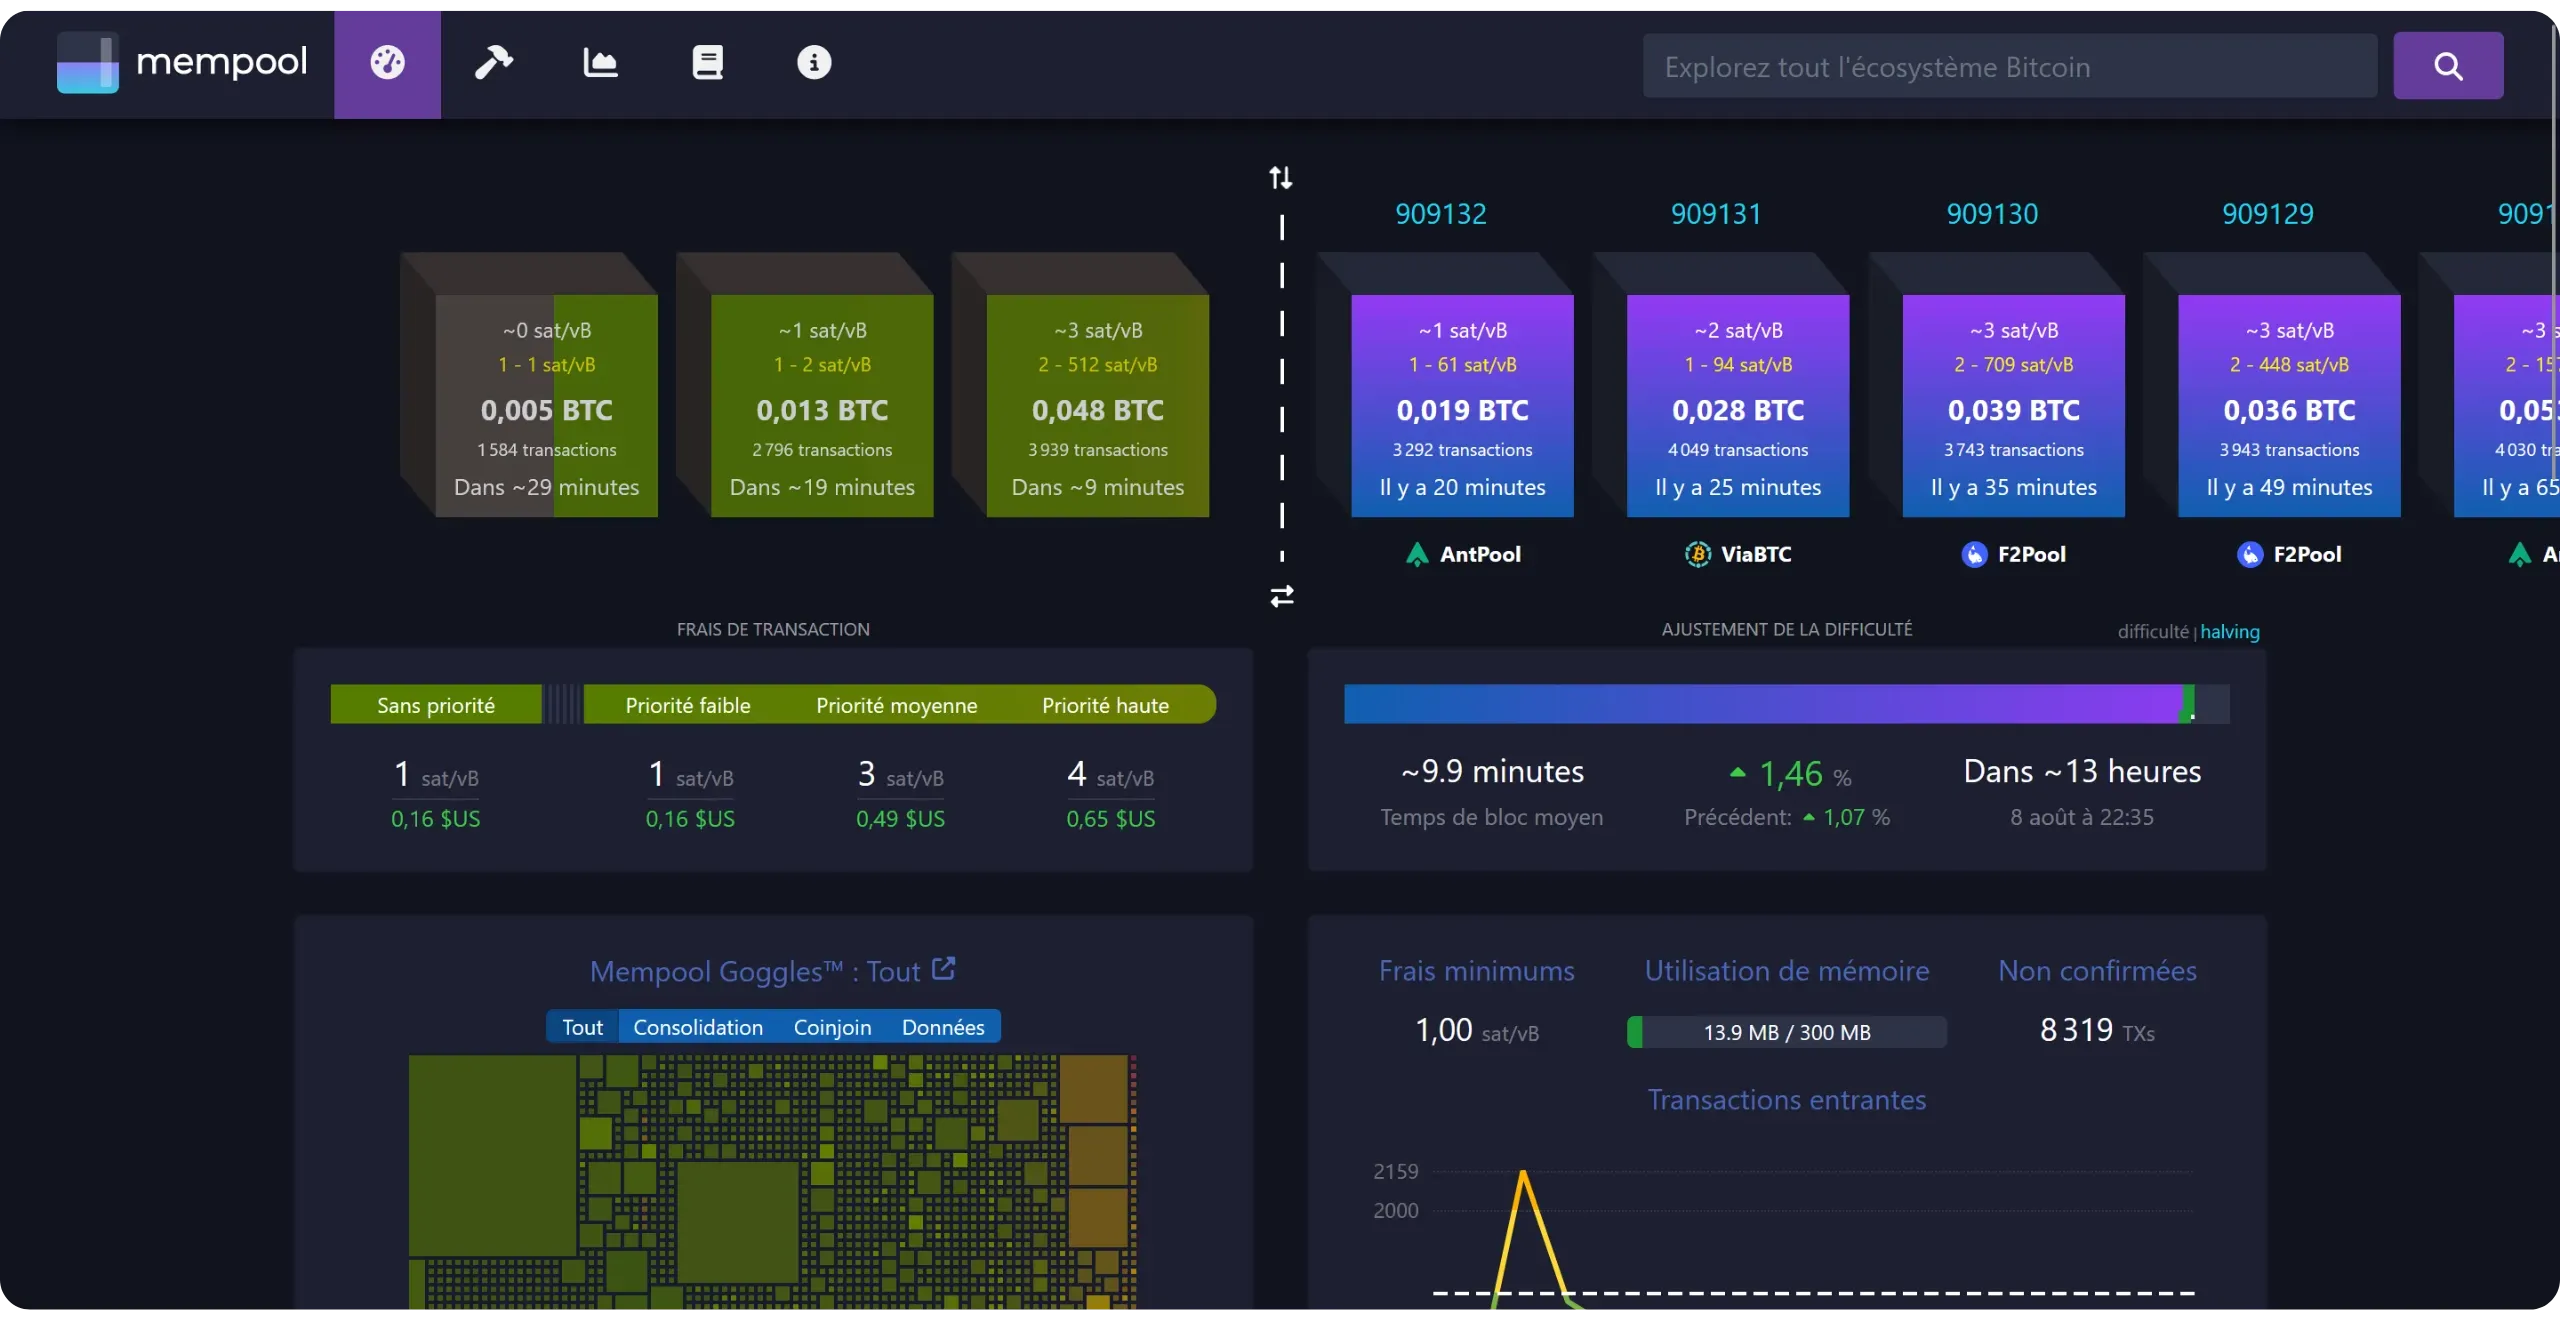
To learn more about using the Mempool.Space explorer, I recommend this comprehensive tutorial:
https://planb.academy/tutorials/privacy/explorer/mempool-space-f3e468a1-92f1-43ce-b2e4-c3298fa0e02f
### Lightning Node
Now that you have your own Bitcoin node, you can also set up your own Lightning node to carry out off-chain transactions, without relying on a third-party infrastructure.
Umbrel offers a number of applications to help you get your Lightning node up and running. You can already choose between two main implementations:
- LND, via the *Lightning Node* application;
- Core Lightning.
https://planb.academy/tutorials/node/lightning-network/umbrel-lnd-b12e0b5b-12ff-45f1-978e-62f4b4a8ba16
You can then administer your node from the main interface, or, for even greater functionality and advanced options, install *Ride The Lightning* or *ThunderHub*. These tools will provide you with a much more comprehensive web-based management system interface for your node.
https://planb.academy/tutorials/node/lightning-network/ride-the-lightning-ca007688-0653-490c-8349-81d330d744b5
https://planb.academy/tutorials/node/lightning-network/thunderhub-16909a39-2484-408e-a118-4e34e249bb9a

Finally, I recommend the *Lightning Network+* application, which allows you to find peers with whom to open channels, enabling both outgoing and incoming cash transactions.
Thanks to Umbrel, managing a personal Lightning node is simplified, but it nonetheless remains relatively complex. This is why I recommend that you take the LNP 202 course, which is the logical continuation of the BTC 202 course, and in which I guide you step by step through the setup and management of your Lightning node on Umbrel.
https://planb.academy/courses/593e483e-1785-4e83-aa7e-32b99056844c
### Tailscale
Another application I particularly like on Umbrel is Tailscale. It's a VPN application designed to simplify the creation of secure networks between multiple devices, wherever they may be in the world. Unlike traditional VPNs, which rely on centralized servers, Tailscale utilizes the WireGuard protocol to establish end-to-end encrypted connections between your various machines. This means you can deploy a working VPN in just a few minutes, without the need for complicated network configurations.
On Umbrel, Tailscale installation connects your Bitcoin node to your own virtual private network. Once configured, your node obtains a private Tailscale IP address, accessible only from other devices connected to the same Tailscale network (such as computers, smartphones, and tablets). This connection is end-to-end encrypted and does not pass through an unprotected public network, significantly enhancing security compared to an unencrypted connection.

In concrete terms, Tailscale offers you several advantages when using your Umbrel:
- You can administer the Umbrel interface or access the applications linked to your node (such as Mempool, Ride The Lightning, ThunderHub...) from anywhere, as if you were on the same local network, without exposing ports on the internet and without going through Tor, which is very slow;
- You can connect to your Electrum server (Electrs or Fulcrum) or directly to Bitcoin Core via your VPN, bypassing Tor. This provides a secure connection, comparable to using Tor, but with much higher speed and reduced latency. In short, you retain the privacy and security benefits of Tor while enjoying the speed of a clearnet connection. For an on-chain wallet, this gain may seem marginal, but if you're planning to set up your own Lightning node at a later date, the difference is considerable. Indeed, making payments via your node on the move on Tor is extremely slow due to the numerous exchanges required, whereas with Tailscale, it works perfectly.
- No need to configure NAT rules, open ports, or set up a conventional VPN server. Once the application is installed on Umbrel and your devices, the network is automatically established.
Tailscale on Umbrel is therefore a very interesting solution if you want to access your node from anywhere in the world in a secure, high-performance, and easy-to-configure way, without sacrificing privacy or security.
To install and configure Tailscale on your Umbrel, see this tutorial, section 4: "*Using Tailscale on Umbrel*":
https://planb.academy/tutorials/computer-security/communication/tailscale-9acbd7de-04d9-40f6-ab80-35f0dfedb632
### Nostr
Nostr, an acronym for "*Notes and Other Stuff Transmitted by Relays*", is an open, decentralized protocol designed to enable messages to be published and exchanged on the internet without depending on a centralized platform. Each user has a pair of cryptographic keys: the public key (`npub`), which serves as an identifier, and the private key (`nsec`), which is used to sign messages and guarantee their authenticity.
Messages are transmitted via a network of independent relays. This distributed architecture makes Nostr resistant to censorship: no single server controls access or distribution, and a user can connect to as many relays as they wish.
This protocol is very popular within the Bitcoin community because, like Bitcoin, Nostr addresses issues of digital sovereignty and data control. Its creator, Fiatjaf, is a developer already recognized in the ecosystem for his numerous contributions.
With your Umbrel, you can optimize your use of Nostr. By installing the ***Nostr Relay*** application, you can host your own private relay directly on your machine, ensuring that all your posts and interactions on Nostr are saved locally and can't be lost due to deletion by public relays.
Nostr clients ***noStrudel*** or ***Snort*** are also available on Umbrel. Thanks to these applications, you can publish, read, search for profiles, and interact with the Nostr ecosystem directly from the web interface on your Umbrel.
Finally, there is the ***Nostr Wallet Connect*** application on Umbrel, which allows native Lightning payments within Nostr. Specifically, you can link your future Lightning node to your Nostr clients to send micro-payments, called "*zaps*", to reward content or interact in a monetized way, without going through a third-party service. These payments are sent directly from your personal node via your channels.
To find out how to use all these applications, I recommend you take a look at this complete tutorial:
https://planb.academy/tutorials/node/others/umbrel-nostr-7ae147e8-f5cd-46e1-861b-17c2ea1e08fd
### BTCPay Server
[BTCPay Server](https://planb.academy/resources/glossary/btcpay-server) is a free, open-source payment processor that enables you to accept payments via Bitcoin and Lightning Network without intermediaries, while retaining [self-custody](https://planb.academy/resources/glossary/selfcustody) of funds.
BTCPay Server's architecture is based on a Bitcoin node and, for Lightning, on a compatible implementation (LND, Core Lightning...), making it one of the few totally non-custodial PoS solutions. It's also the most comprehensive software for tracking and accounting.
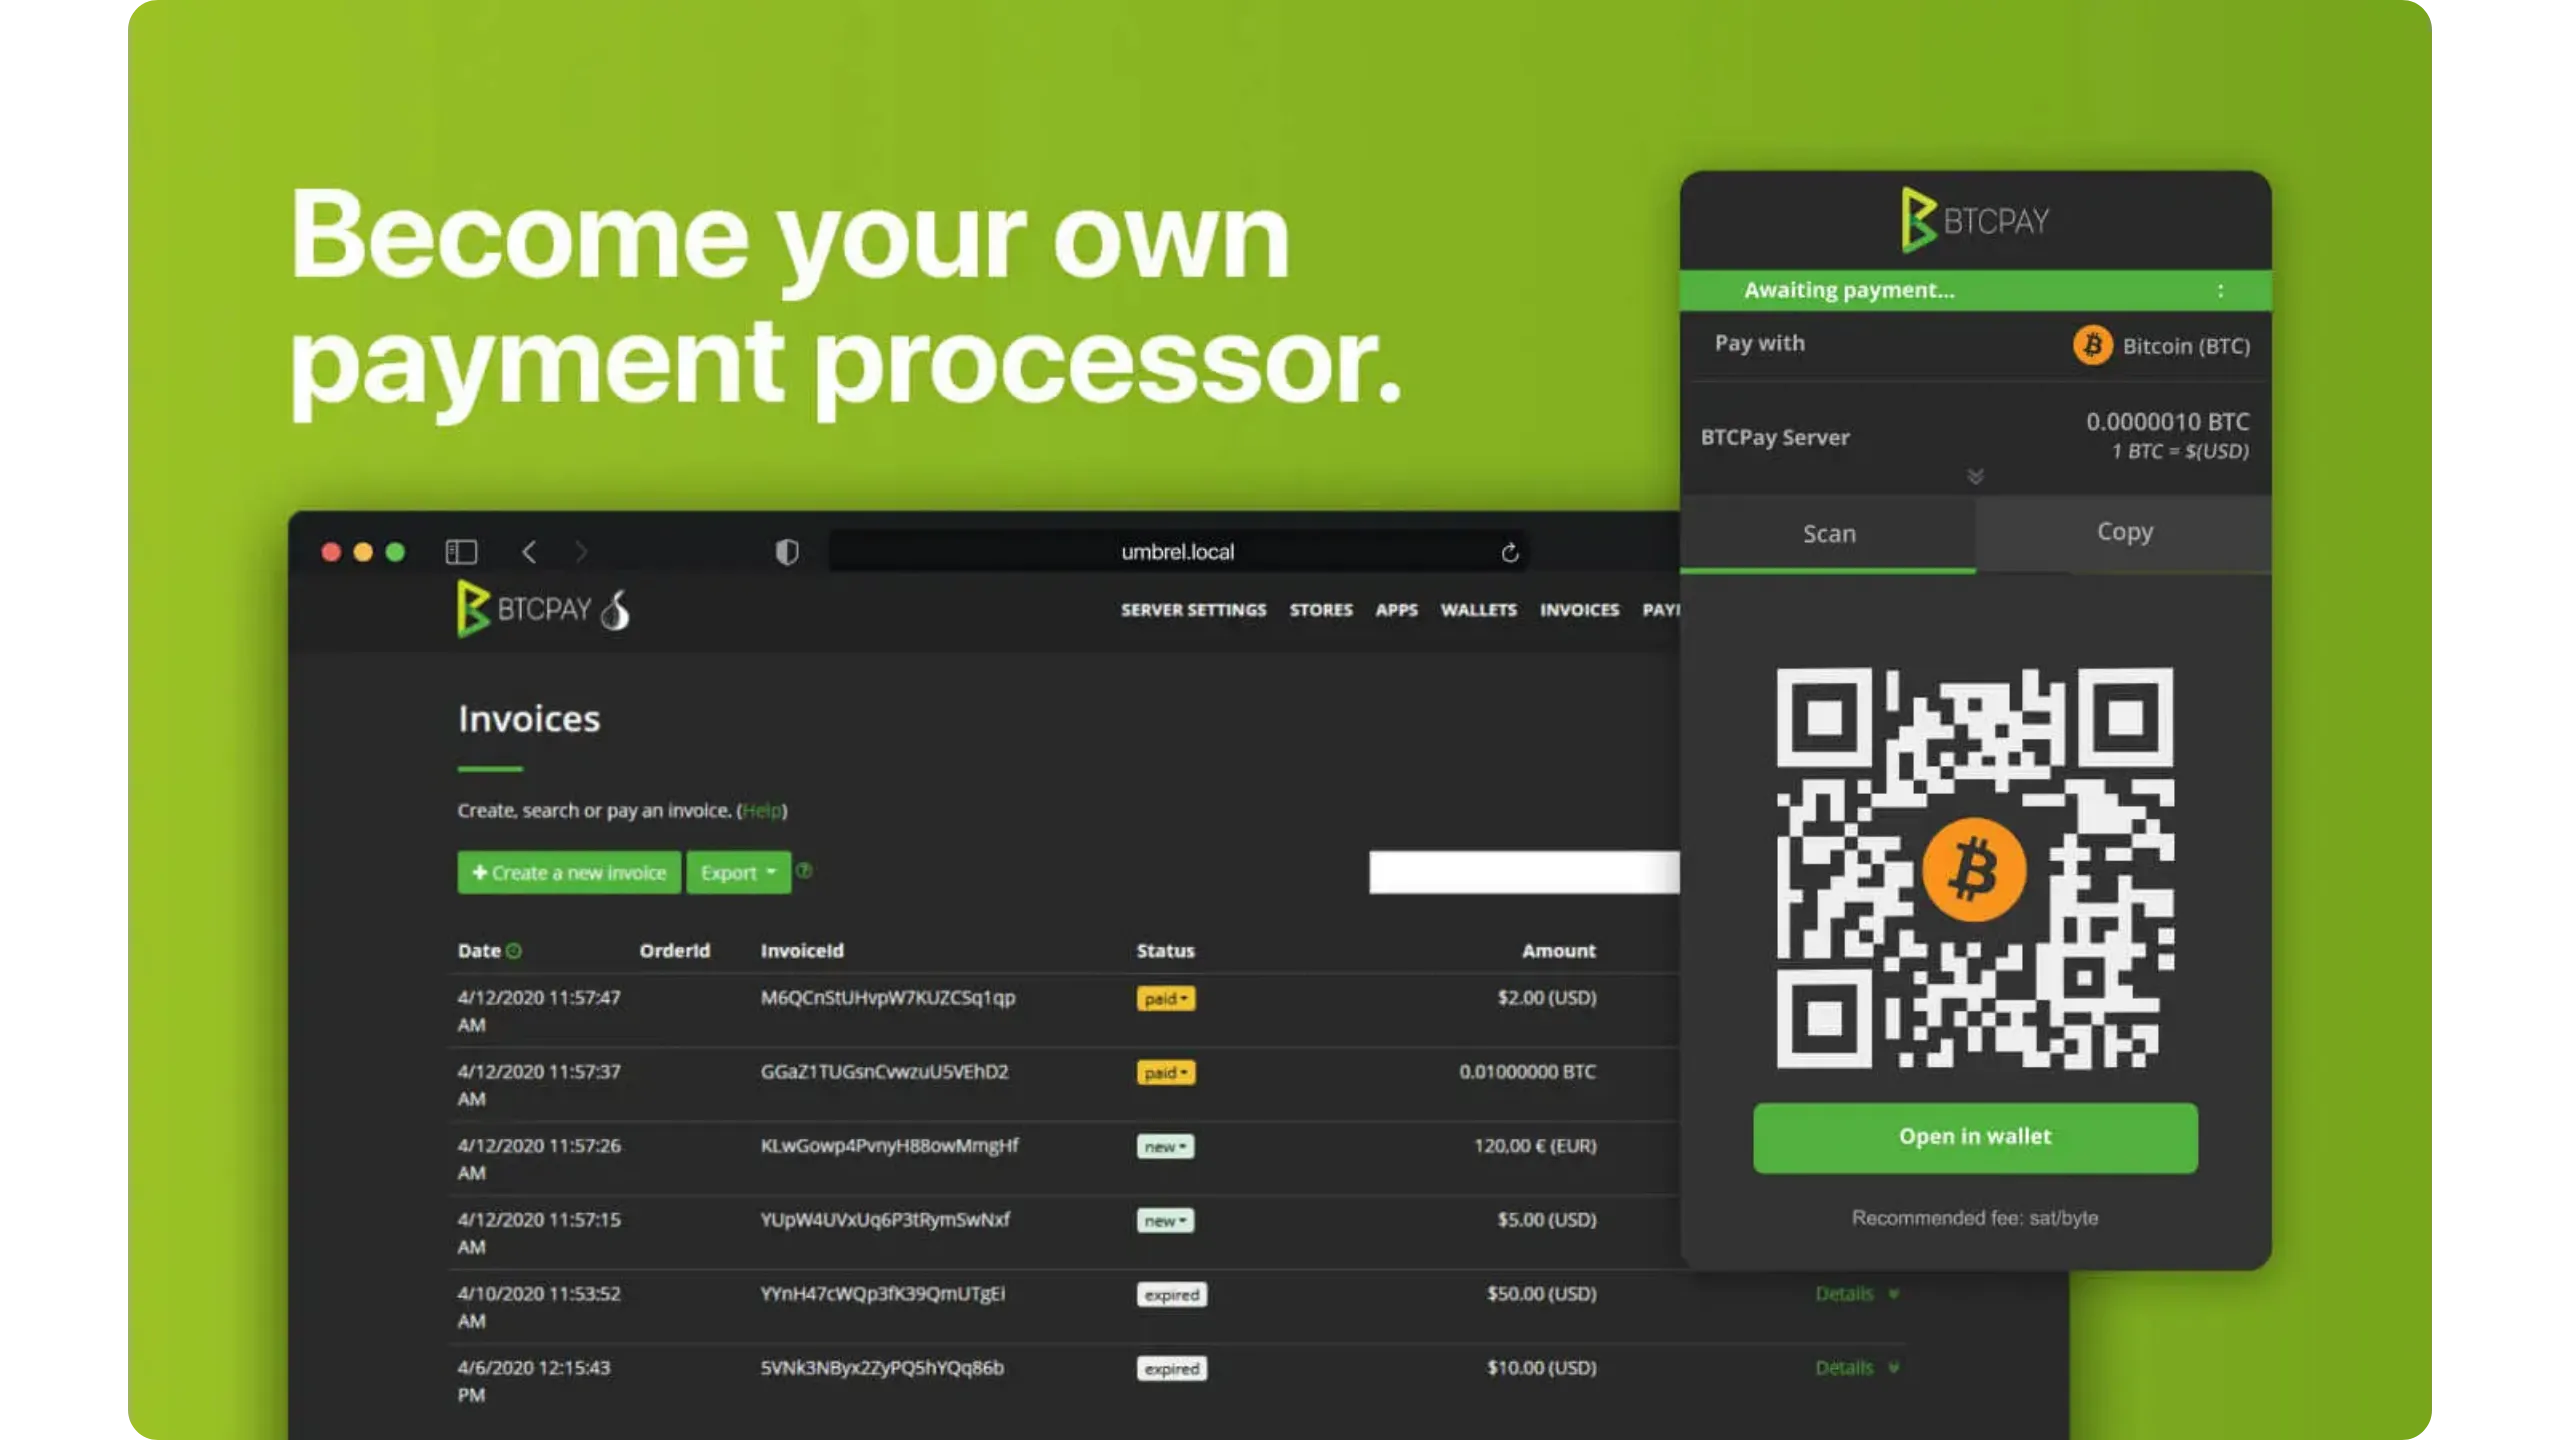
If you own a business and would like to accept bitcoin payments directly via your Umbrel node, the BTCPay Server application is ideal for you. To find out more on this subject, I recommend you consult the following resources:
- The BIZ 101 course on using Bitcoin in your business:
https://planb.academy/courses/a804c4b6-9ff5-4a29-a530-7d2f5d04bb7a
- The POS 305 course on using BTCPay Server:
https://planb.academy/courses/6fc12131-e464-4515-9d3f-9255365d5fa1
- The BTCPay Server tutorial:
https://planb.academy/tutorials/business/point-of-sale/btcpay-server-928eb01e-824b-4b57-a3e8-8727633beddc
# Advanced concepts and best practices
fc77a62a-8d9f-4144-9080-3057b04db2c6
## Maintaining your Umbrel node
06d77d09-bf24-4555-b2ba-c08bbda477c7
To kick off this final section, and before moving on to more advanced theory, I'd like to examine the best practices and concrete actions you can take once your Umbrel node is installed, synchronized, and correctly configured. How do you maintain it on a daily basis?
### Keeping equipment healthy
A reliable node starts with stable hardware. Ensure the machine housing your node is properly ventilated, dust-free, and installed in a dry environment, away from any sources of heat and humidity. Avoid cramming it into a confined space and opt for a well-ventilated location.
On Raspberry Pi and mini-PCs, dust eventually clogs the heatsinks, raising the temperature and leading to throttling (voluntary limitation of resource use), which in turn results in a drop in your node's efficiency. That's why I recommend cleaning the air intake and fan periodically, ideally every few months.
Ensure you use a high-quality power supply, as unstable voltage can lead to system corruption and even pose a fire hazard. Ideally, you should use the original power supply supplied by the manufacturer of your machine. Also, beware of overheating due to the Joule effect on power strips: always respect the maximum permissible power and never connect several power strips in cascade.
I also recommend investing in a UPS. This protects your node from sudden shutdowns, enables Umbrel to shut down cleanly in the event of an outage, and ensures continuity of operation during micro outages or short-term failures.
On the storage side, keep an eye on progress: if the disk is approaching saturation, consider freeing up space (uninstall unused apps, adjust the indexer settings) or migrate to a larger SSD. The disadvantage of a full Bitcoin node is that its storage requirements increase continuously, as a new block is generated every 10 minutes and old blocks can't be deleted (unless the node is pruned). I therefore advise you to plan for a sufficiently large capacity when purchasing your hardware (2 TB minimum).
### Updates
Node updates are important for three main reasons: first, security (vulnerability patches, network hardening, and DoS protection); second, compatibility (relay policy changes, format changes, and protocol upgrades); and third, reliability and performance (bug fixes, resource consumption, and other improvements). So check periodically that UmbrelOS and your apps are up to date:
- To update the system: Open the settings menu, then click on the "*Check for Update*" button next to the "*UmbrelOS*" parameter.
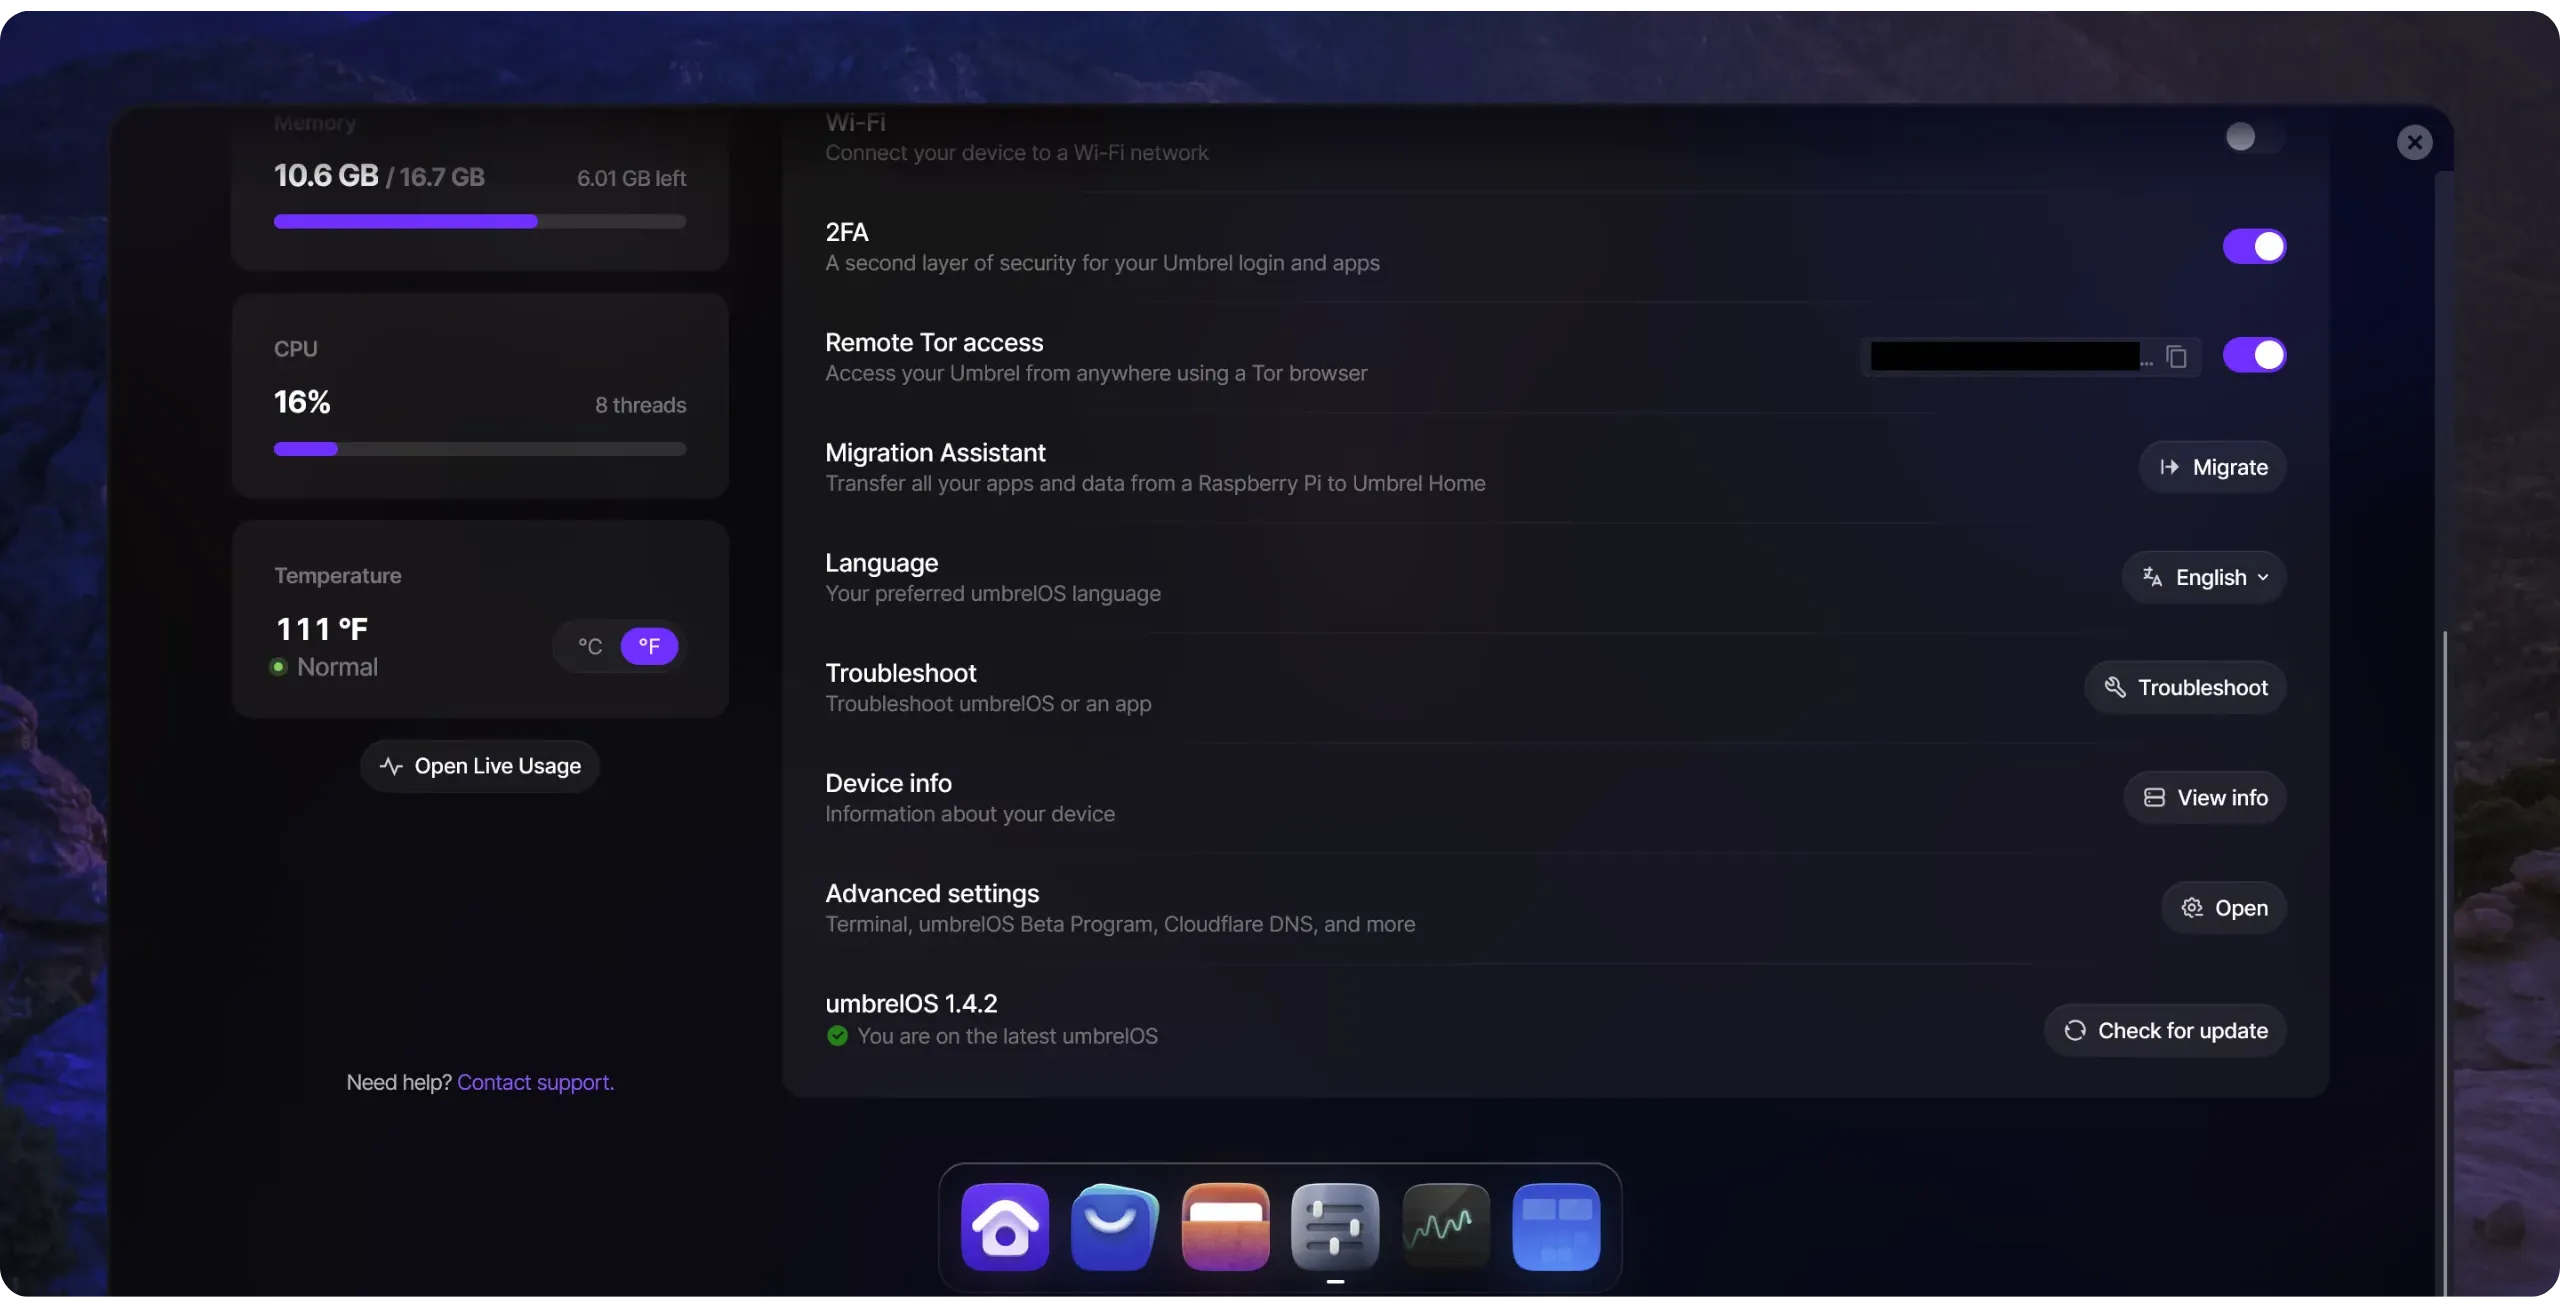
- To update applications: Go to the App Store. If any of your applications require updating, a button with a red bubble will appear in the top right-hand corner of the graphical interface. Simply click on it, then update each application.
Perform this operation regularly to keep your operating system and applications up to date.
### Backups
If you only use your Bitcoin node to validate and distribute your transactions, but your wallets are managed outside Umbrel (e.g., with a hardware wallet and Sparrow wallet), there's nothing to back up directly to Umbrel. In this case, the essential backup remains that of the recovery phrase and descriptor of your external wallet, and this applies whether you use your own node or not. So nothing changes from your previous configuration.
On the other hand, depending on the additional applications you use on Umbrel, further backups may be required. This is particularly the case if you operate a Lightning node on Umbrel. In this case, it is absolutely essential to back up the seed provided when you installed your Lightning node. In addition to the seed, you need an up-to-date ***Static Channel Backup (SCB)*** to be able to restore your Lightning node in the event of a problem. SCB allows you to recover your funds by forcibly closing channels. If either the seed or the SCB is missing, it is impossible to restore a Lightning node.
Umbrel also offers the option of automatically and dynamically backing up this SCB on their servers, via Tor, to ensure that an up-to-date file is always available. In this case, only the seed is needed to restore the node.
We'll revisit these aspects in detail in the next LNP202 course.
### Day-to-day operational safety
In terms of security, use a long, unique, and random password for Umbrel interface, and remember to activate two-factor authentication (2FA). For applications that offer both password and 2FA protection, always activate both and change the default passwords.
Never expose the dashboard to the internet without using a secure gateway (such as a VPN, Tor, or local access only). Limit the number of applications you install, and regularly delete those you no longer need, to reduce the attack surface.
To deepen your knowledge of computer security in general, I highly recommend you check out this other free course:
https://planb.academy/courses/4ba0e3de-e67f-4ea1-a514-f111206810d1
### Diagnosis and self-help
In the event of a bug on your Umbrel, first generate a diagnostics bundle via the troubleshooting section of UmbrelOS or the application concerned, then cleanly restart the application. If necessary, also attempt a full system reboot.
If the problem persists, I recommend that you [join the Umbrel user community on their Discord](https://discord.gg/efNtFzqtdx). Begin by doing a search to determine if anyone has already encountered the same difficulty and found a solution. If not, you can post a message in the `general-support` channel. You can also use [the Umbrel forum](https://community.umbrel.com/).
These areas will enable you not only to follow security announcements and updates, but also to ask questions and, ultimately, to help other users. It's often in these exchanges that best practices are discovered.
With these simple habits, your Umbrel node will remain stable, safe, and useful, both for you and for the Bitcoin network.
## Understanding IBD and the peer discovery process
175ac9d1-ea23-45d9-9918-d3e7352435cd
Your Bitcoin node starts up without any prior knowledge of transaction history. Initially, it's just a computer running software (Bitcoin Core or similar). To become a fully synchronized and operational Bitcoin node, it must locally reconstruct the state of the ledger by checking all blocks published since the [Genesis block](https://planb.academy/resources/glossary/genesis-block) (block 0, published by Satoshi Nakamoto on January 3, 2009). This step is called **IBD (_Initial Block Download_)**.
IBD consists of downloading and verifying each block and transaction individually, applying the consensus rules, to build its own version of the blockchain. The aim is not simply to retrieve a copy of unverified data, but to arrive at the same conclusion completely independently, as the honest majority of the network.
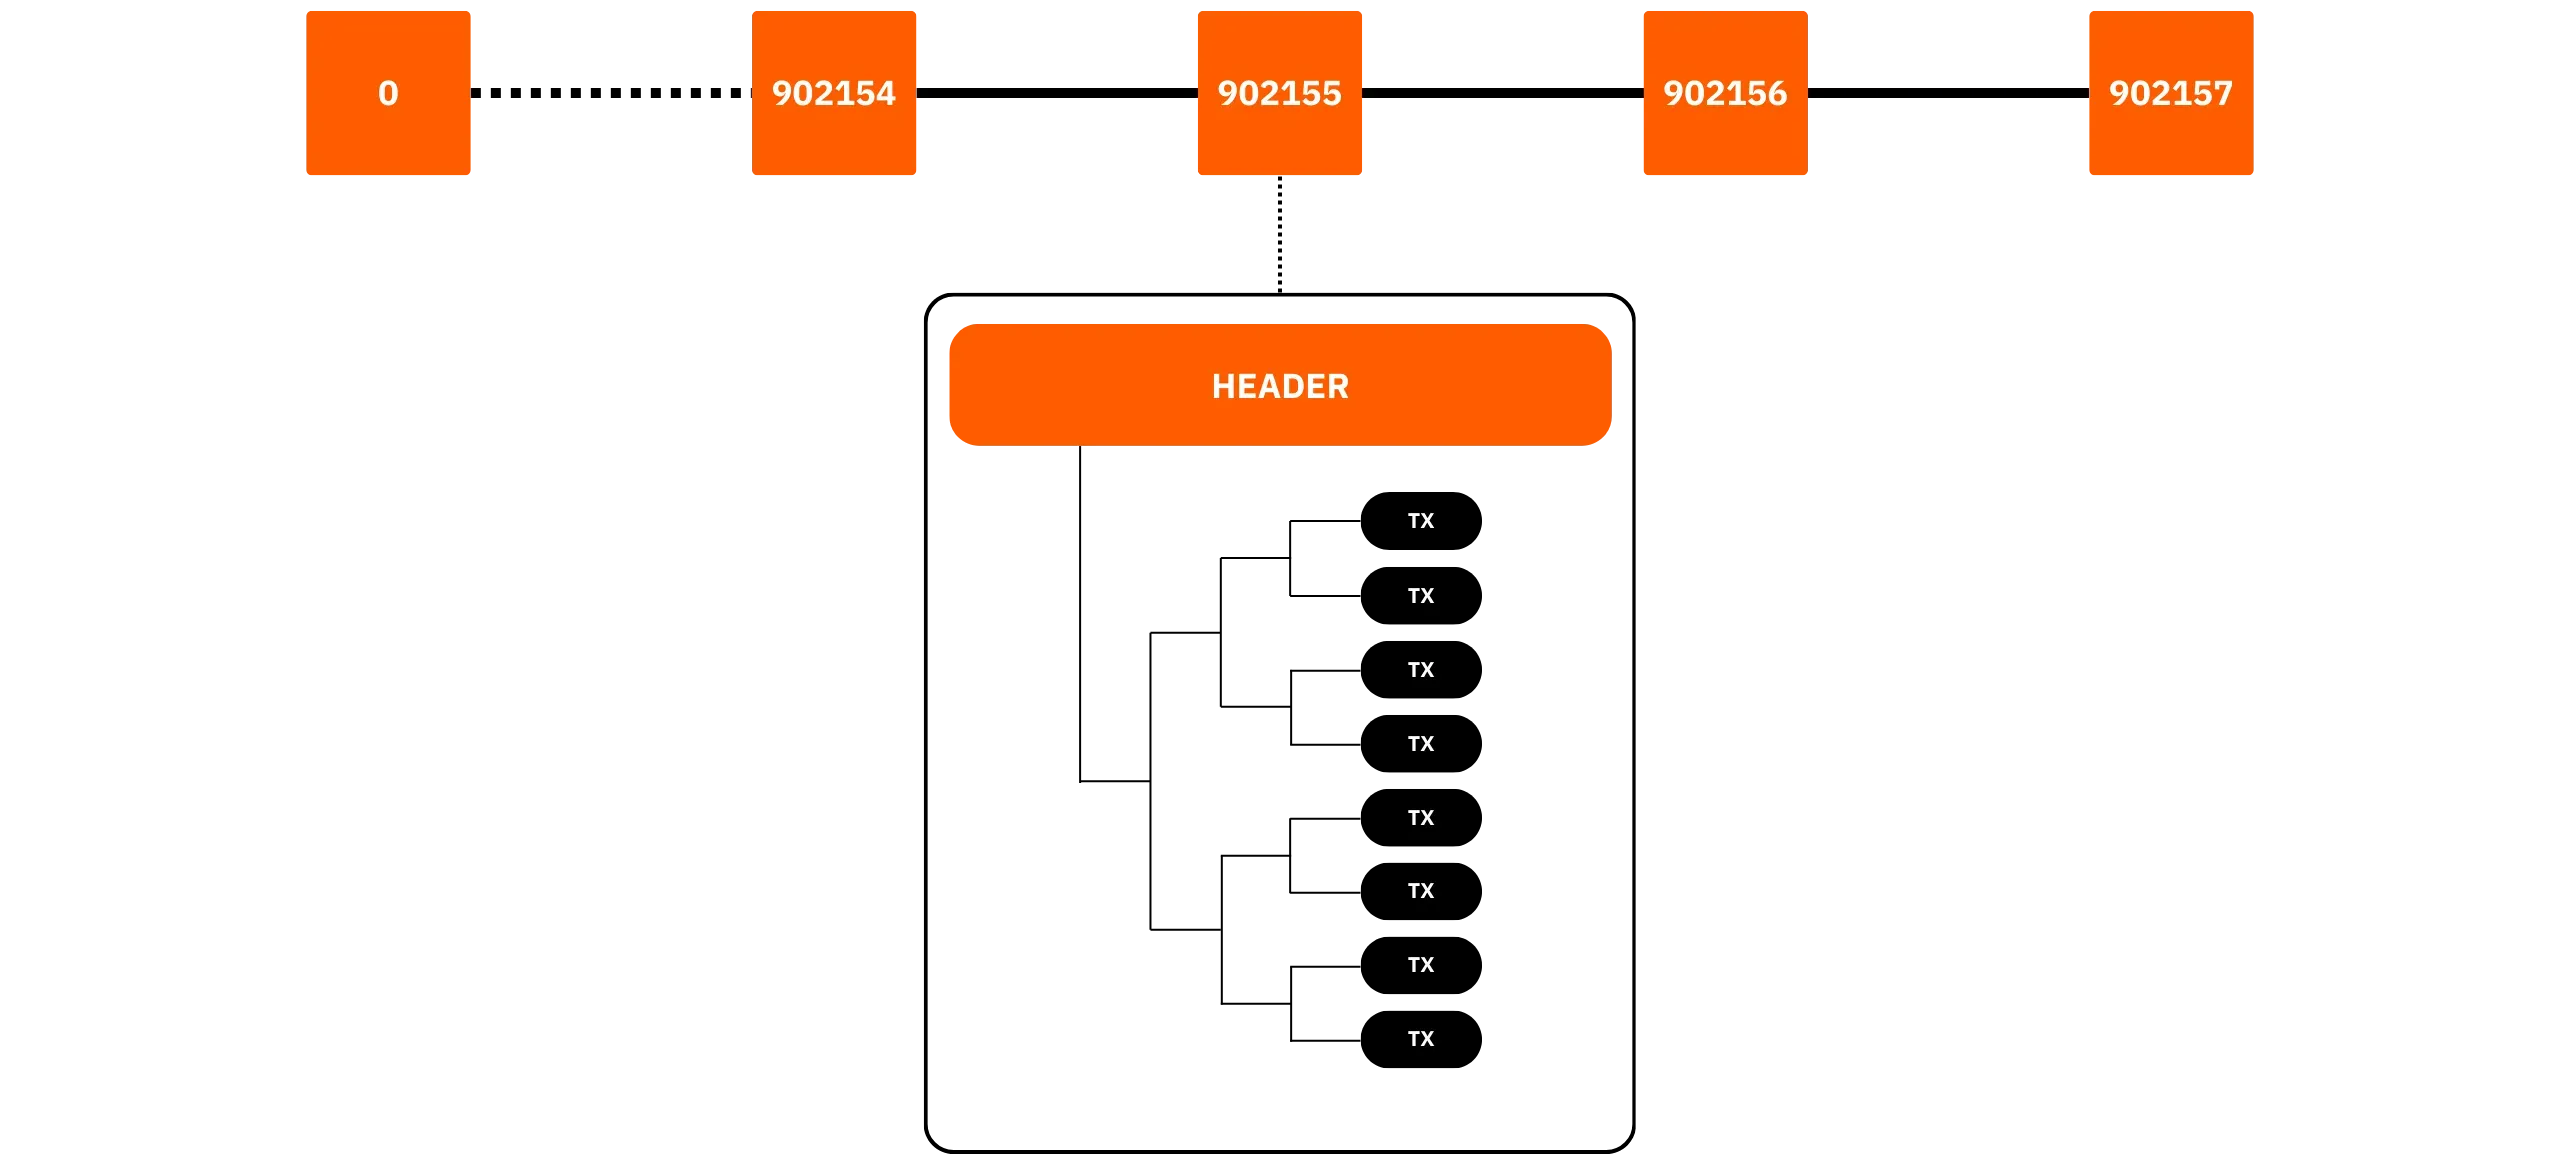
### IBD milestones
Synchronization begins with the _**headers-first**_ step. Your node requests the sequence of block headers from several peers and, for each of them, verifies proof of work, [difficulty adjustment](https://planb.academy/resources/glossary/difficulty-adjustment), syntax, as well as timestamp and version number rules. In short, it ensures that each header received complies with the consensus rules.
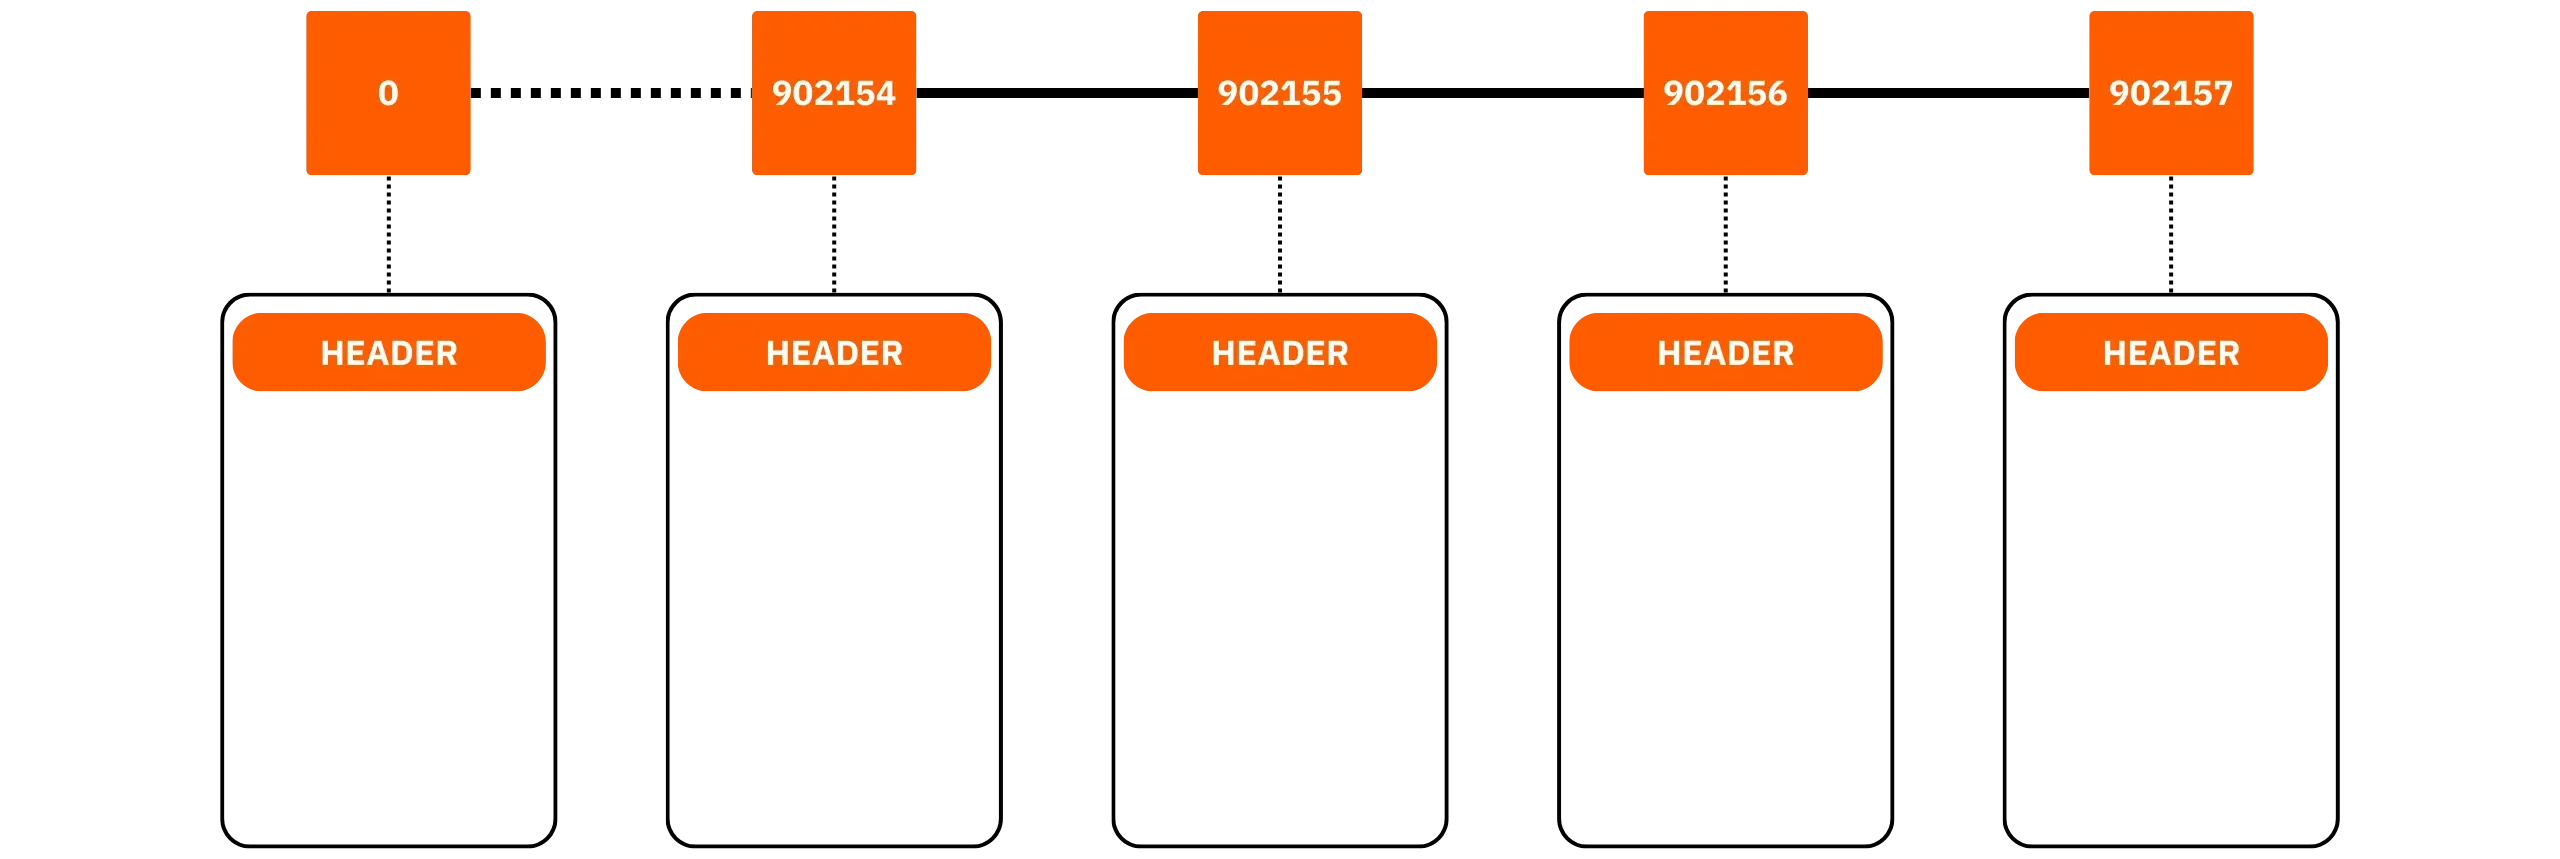
As a reminder, a Bitcoin block consists of an 80-byte header and a list of transactions. The block's fingerprint is obtained by applying a double SHA-256 hash to this header, which contains 6 fields:
- version
- hash of previous block
- Merkle root of transactions
- timestamp (greater than the median time of the previous 11 blocks)
- difficulty target
- [Nonce](https://planb.academy/resources/glossary/nonce)

Transactions are committed to a Merkle tree. This is a structure that summarizes a large set of data (in this case, all the transactions in the block) by aggregating their hashes progressively two by two down to a single "root", thus proving that an element belongs to the set (and detecting any modification). In this way, any modification to a transaction also modifies the root of the Merkle tree and therefore the block header's fingerprint. [SegWit](https://planb.academy/resources/glossary/segwit) has introduced a separate additional commitment for the witness (signatures), placed in the coinbase.
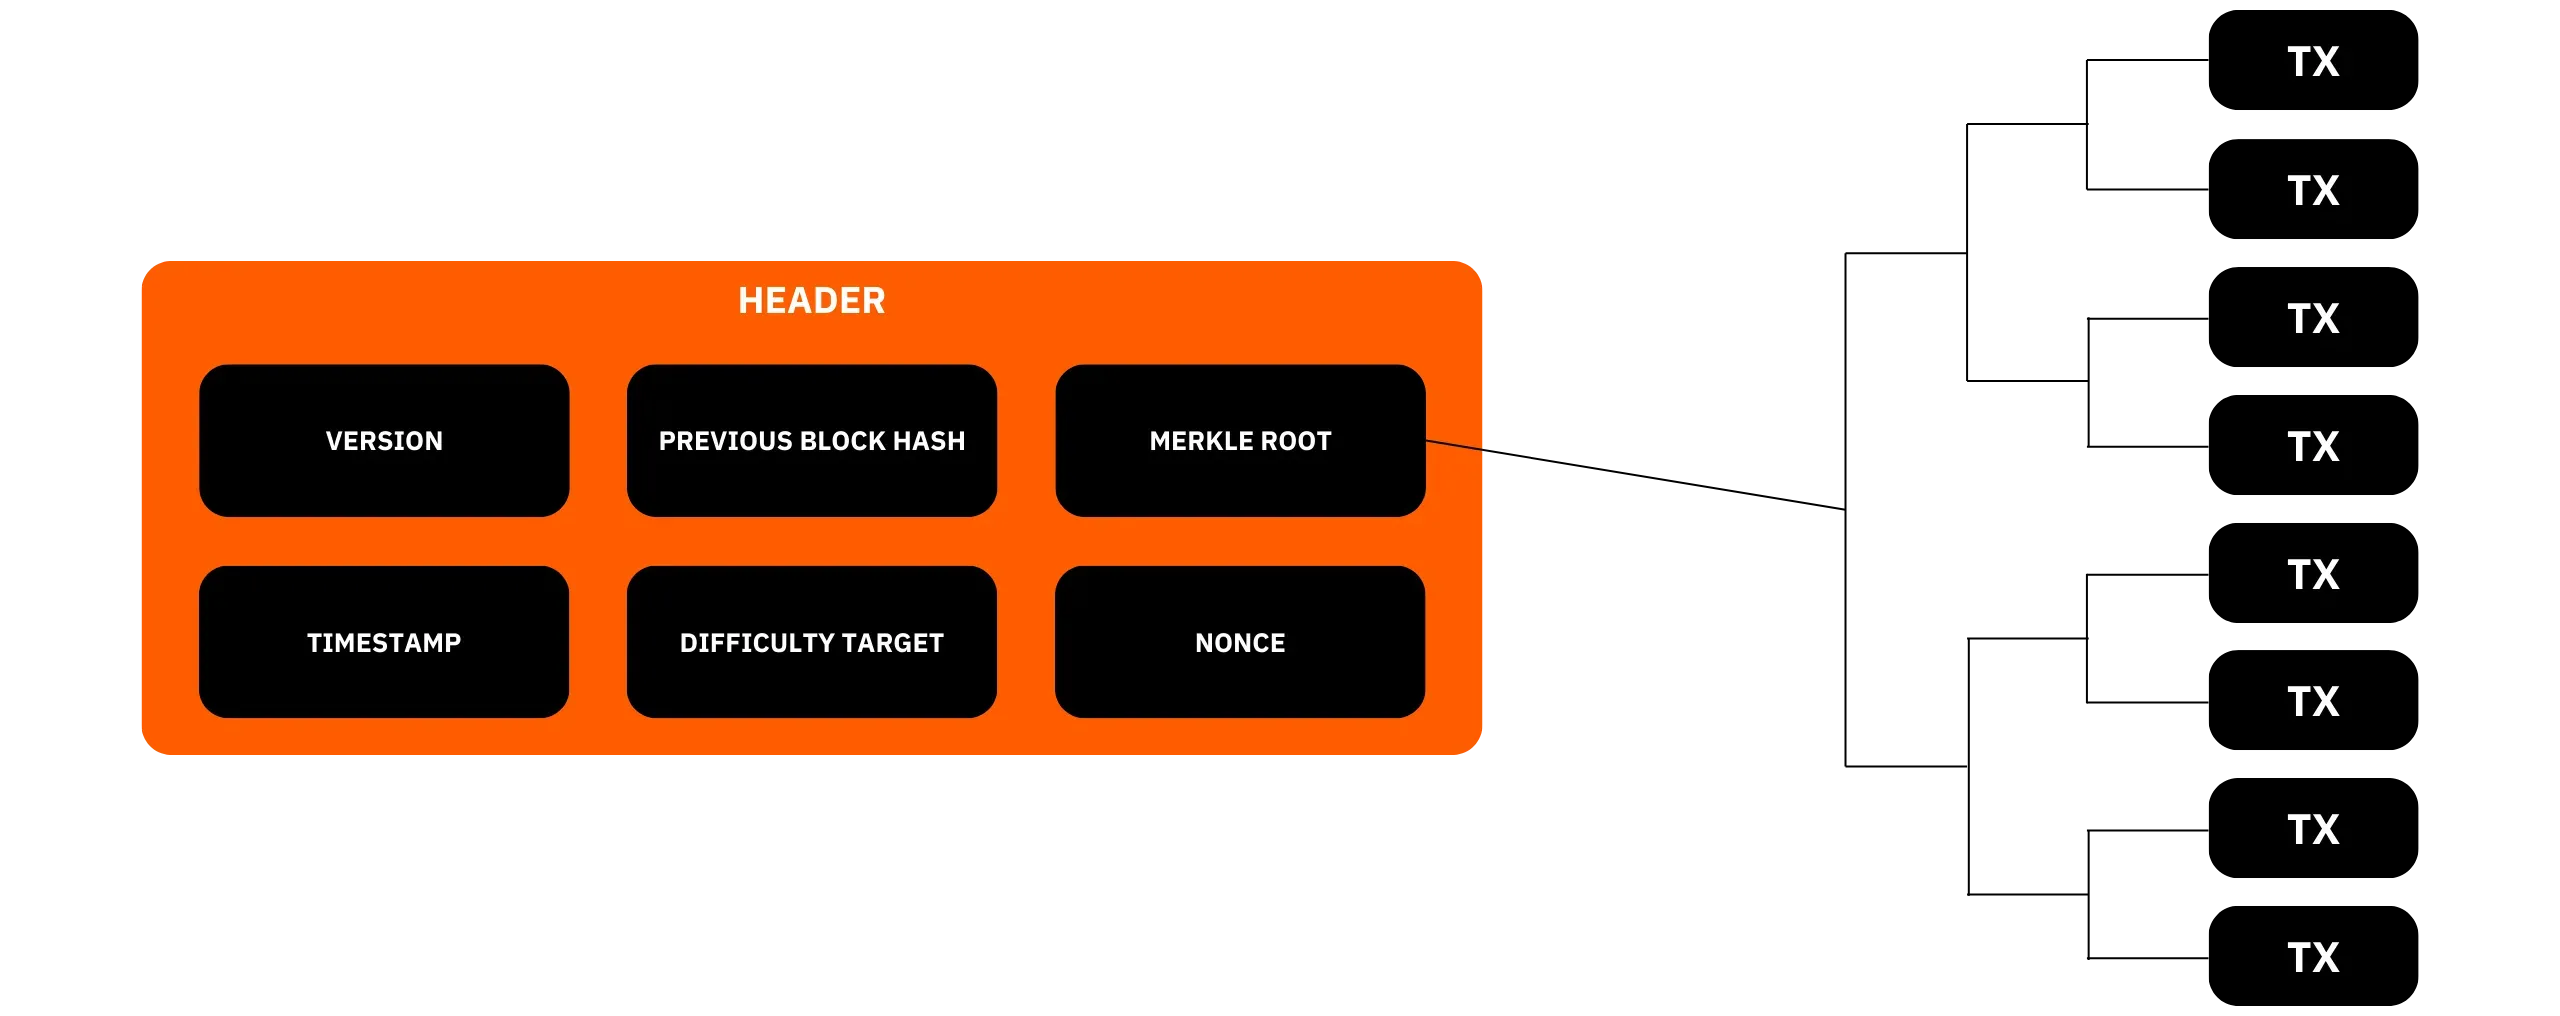
This _**headers-first**_ step enables the node to identify the branch with the most work (regardless of its number of blocks), which is the branch on which Bitcoin nodes synchronize. Once this branch has been identified, the node downloads the contents of the blocks in parallel from several connections, then validates each transaction: format, validity of scripts (except `assumevalid=1`), amounts, and absence of double spending. With each successful check, the current state of unspent coins (UTXO set) is updated in the `chainstate` database: spent outputs are removed, while new valid outputs are added.
Mempool, on the other hand, only comes into play when approaching the tip of the chain: as long as the node is still catching up, it has no pending transactions to store.
Once the IBD is complete, the node enters its normal phase: it validates new blocks as they are published, maintains its mempool with pending transactions according to its relay rules, relays transactions and blocks, and manages any chain reorganizations.
### AssumeValid
Bitcoin Core incorporates a mechanism designed to reduce the time needed before a node is fully operational, while retaining the essence of the autonomous verification principle: [AssumeValid](https://planb.academy/resources/glossary/assume-valid).
The `assumevalid` parameter is based on a past reference block, the hash of which is integrated into each software version. During IBD, if your node finds that this block is indeed on the branch with the most work, it can ignore script verification for all transactions prior to this point.
All other rules (block structure, proof of work, size limits, transaction amounts, UTXOs, etc.) remain fully verified. Only the calculation of scripts prior to this reference block is ignored. The performance gain is significant on the IBD, as signature verification accounts for a major portion of the CPU load. Beyond this reference block, verification returns to its normal state.
You can force full validation of all scripts by disabling this mechanism, at the cost of a much longer IBD, using the `assumevalid=0` parameter in the `bitcoin.conf` file.
### AssumeUTXO
`assumeutxo` is another existing parameter, but unlike `assumevalid`, it is not activated by default. This mechanism enables the software to load a snapshot of the UTXO set, along with its metadata, and provisionally consider it as a reference state, after verifying that the headers indeed lead to the blockchain with the most work.
The node thus quickly becomes operational for common uses (RPC, connecting wallets, etc.), while simultaneously launching the complete, verified reconstruction of its own UTXO set in the background. Once this stage is complete, the initial snapshot is replaced by the locally reconstructed state. This approach separates fast node provision from full verification, without compromising the latter.
### Peer discovery: How does your node find the Bitcoin network?
When a node starts up for the first time, it doesn't yet know any peers. However, it must find other Bitcoin nodes on the internet to request headers, then blocks, in order to complete its IBD. To initiate these connections, Bitcoin Core follows a prioritized logic.

When the node restarts after having already been used, Core first attempts to reconnect to outgoing peers registered before the shutdown, information is stored in the `anchors.dat` file. Then, it consults its IP address book **`peers.dat`**, which stores the list of previously encountered peers, in order to reconnect to them. This is simply a local file, updated and kept by Core. On the other hand, for a new node that has just been launched, these 2 files are empty, since it has never yet communicated with other Bitcoin nodes.
In this case, the software queries _**[DNS seeds](https://planb.academy/resources/glossary/dns-seeds)**_. These are [servers maintained by recognized ecosystem developers](https://github.com/Bitcoin/Bitcoin/blob/master/src/kernel/chainparams.cpp), which return a list of IP addresses of presumed active nodes. These addresses enable the new node to initiate its first connections and request the necessary data from the IBD. Here is the list of *DNS seeds* active to date (August 2025):
- Pieter Wuille: `seed.Bitcoin.sipa.be.`
- Matt Corallo: `dnsseed.bluematt.me.`
- Luke Dashjr: `dnsseed.Bitcoin.dashjr-list-of-P2P-nodes.us.`
- Jonas Schnelli: `seed.Bitcoin.jonasschnelli.ch.`
- Peter Todd: `seed.btc.petertodd.net.`
- Sjors Provoost: `seed.Bitcoin.sprovoost.nl.`
- Stephan Oeste: `dnsseed.emzy.de.`
- Jason Maurice: `seed.Bitcoin.wiz.biz.`
- Ava Chow: `seed.Mainnet.achownodes.xyz.`
In the vast majority of cases, the *DNS seeds* step is sufficient to establish the first connections with other nodes. If, exceptionally, these servers fail to respond within 60 seconds, the node switches to another method: [a static list of over 1,000 addresses](https://github.com/Bitcoin/Bitcoin/blob/master/src/chainparamsseeds.h) of _seed nodes_ is built into Bitcoin Core's code and regularly updated. If the first two methods of obtaining IP addresses fail, this last solution establishes an initial connection, from which the node can then request new IP addresses.
As a last resort, you can manually supply IP addresses via the `peers.dat` file to force specific connections.
Once bootstrapped, the internal address manager diversifies the sources (separate autonomous networks, clearnet, and Tor, as well as various geographical areas) to reduce the risk of topological isolation. The node establishes these outgoing connections (connections it selects itself, and which are therefore more secure).
If your node is listening on an open port (by default, 8333), it accepts incoming connections. These reinforce the overall resilience of the network by providing a point of contact for new nodes, without bringing any particular benefit to your own IBD. If your node runs on Tor, the logic remains the same, but the addresses used are `.onion` services.
## Anatomy of your Bitcoin node
b420bd9d-7e2a-4984-bc70-2b732a94c8ce
When your node has completed its initial synchronization, it stores several complementary data sets locally, enabling it to validate blocks and transactions, serve network peers, and restart quickly while maintaining its state. 3 main building blocks are essential on a node:
- the **blocks** of the blockchain stored on disk,
- the **UTXO set** maintained in a key-value database,
- and the **mempool** is stored in RAM and periodically serialized.
Additionally, several auxiliary files (peers, fee estimates, exclusion lists, wallets, etc.) complete the picture. Let's discover the role of all these files.
### Where are the node's data actually located?
By default, Bitcoin Core saves its data in a specific working directory. Under GNU/Linux, this is usually in `~/.Bitcoin/`, under Windows in `%APPDATA%\Bitcoin\`, and under macOS in `~/Library/Application Support/Bitcoin/`. If you're using a packaged solution (e.g., within a node distribution), this directory may be mounted elsewhere, but its structure remains the same. The important sub-folders and files described below are still located here.
### The blocks
Blockchain is, therefore, a collection of blocks. A full node stores these blocks as sequential flat files and maintains a parallel index for quick retrieval. When needed (reorganization, wallet rescan, peer service), this data is re-read as is.
**Note:** A reorganization, or resynchronization, is a phenomenon in which the blockchain undergoes a modification of its structure due to the existence of competing blocks at the same height. This happens when a portion of the blockchain is replaced by another chain with a greater amount of accumulated work. These resynchronizations are a natural part of Bitcoin's operation, where different miners can find new blocks almost simultaneously, thereby splitting the Bitcoin network in two. In such cases, the network may temporarily split into competing chains. Eventually, as one of these chains accumulates more work, the other chains are abandoned by the nodes, and their blocks become known as "obsolete blocks" or "orphan blocks." This process of replacing one chain with another is called resynchronization.
#### blk*.dat files (raw block data)
Received and validated blocks are written to sequential containers named `blkNNNNN.dat`, stored in the `blocks/` folder. Each file is filled in sequence until it reaches a maximum size of 128 MiB, at which point Core opens the next file. Inside, each block is serialized in network format, preceded by a magic identifier and a length. This organization enables fast writing to disk and facilitates serving blocks to peers that are synchronizing.
In pruned mode, the node retains only a recent window of these files to limit the disk footprint. It deletes the oldest `blk*.dat` containers as soon as the configured space target is reached, while retaining sufficient history to remain consistent with the best-known chain. The index and UTXO set remain normal, enabling the next transactions and blocks to be validated.
#### rev*.dat files (cancellation data)
In order to be able to go back in time during a reorganization, Core saves, in parallel with each `blk` file, a `revNNNNN.dat` file in `blocks/`. This file contains the information needed to undo the effect of a block on the UTXO set: for each output consumed by the block, the previous state of the corresponding UTXO is stored (amount, script, height...). In the event of a block abort, the node can quickly reconstruct the previous state without having to rescan the entire chain.
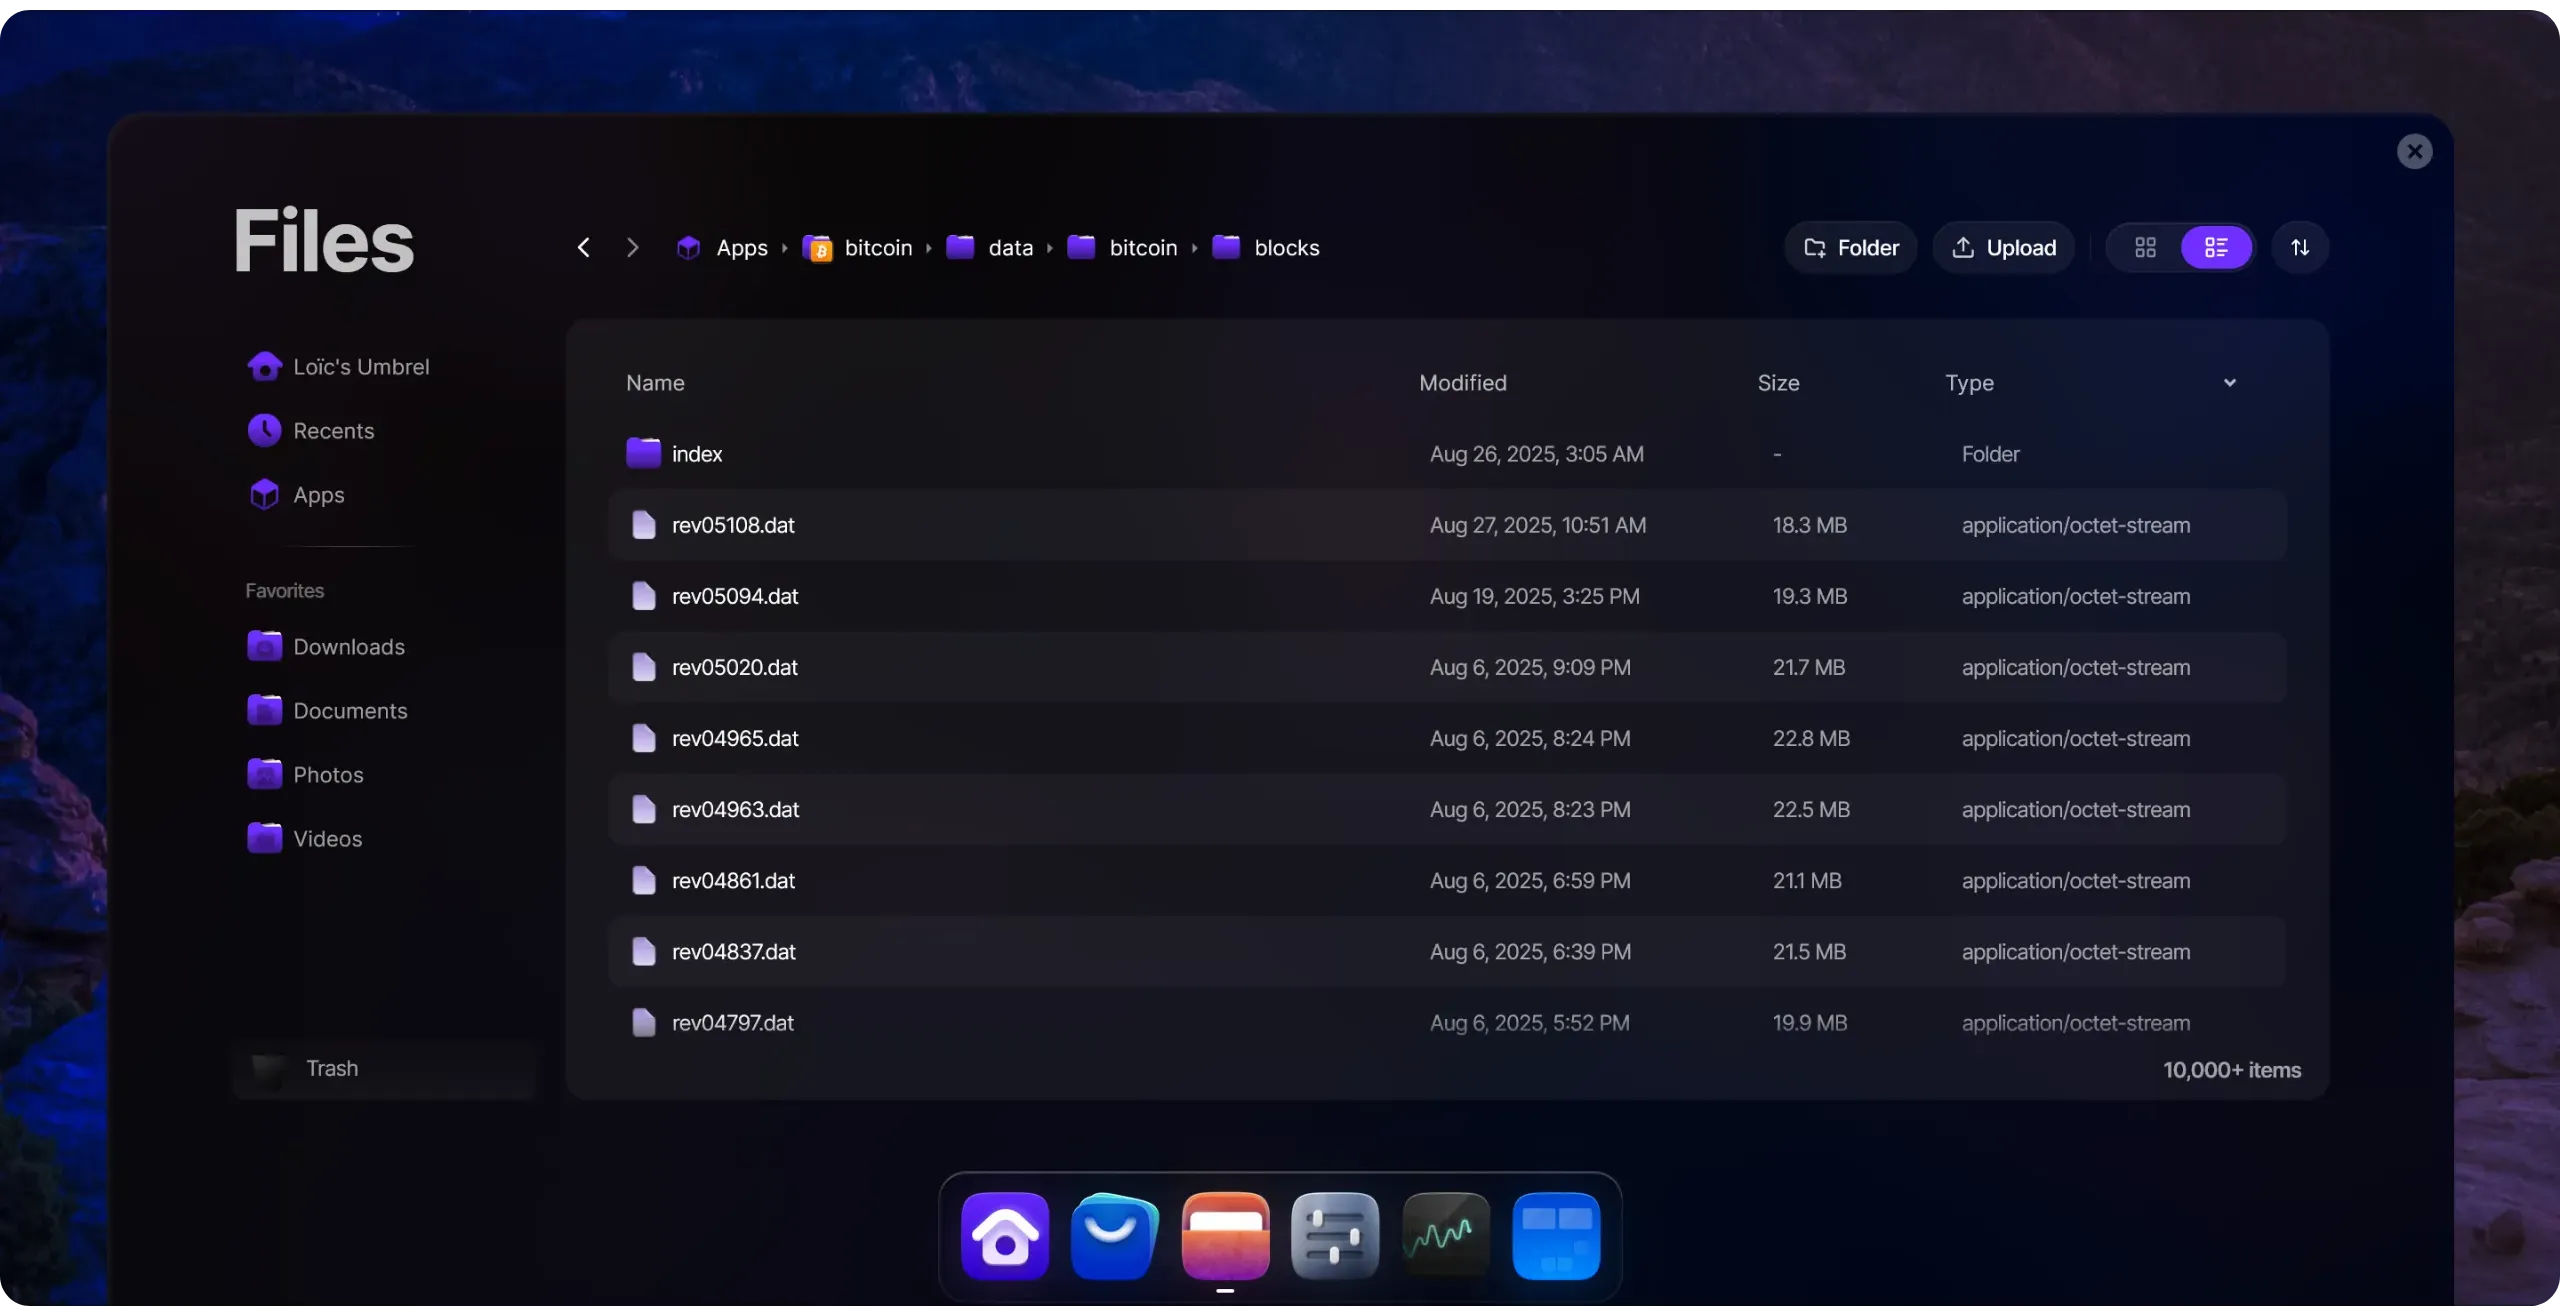
#### Block index (blocks/index)
Searching for a block directly in the flat files would be too time-consuming. Core therefore maintains a [LevelDB](https://planb.academy/resources/glossary/leveldb) database in `blocks/index/` which lists, for each known block, metadata such as Hash, height, validation status, `blk` file, and offset where it is located. When a peer requests a block, or when an internal component needs to access a specific block, this index provides quick access. Without this index, too many operations would be required.
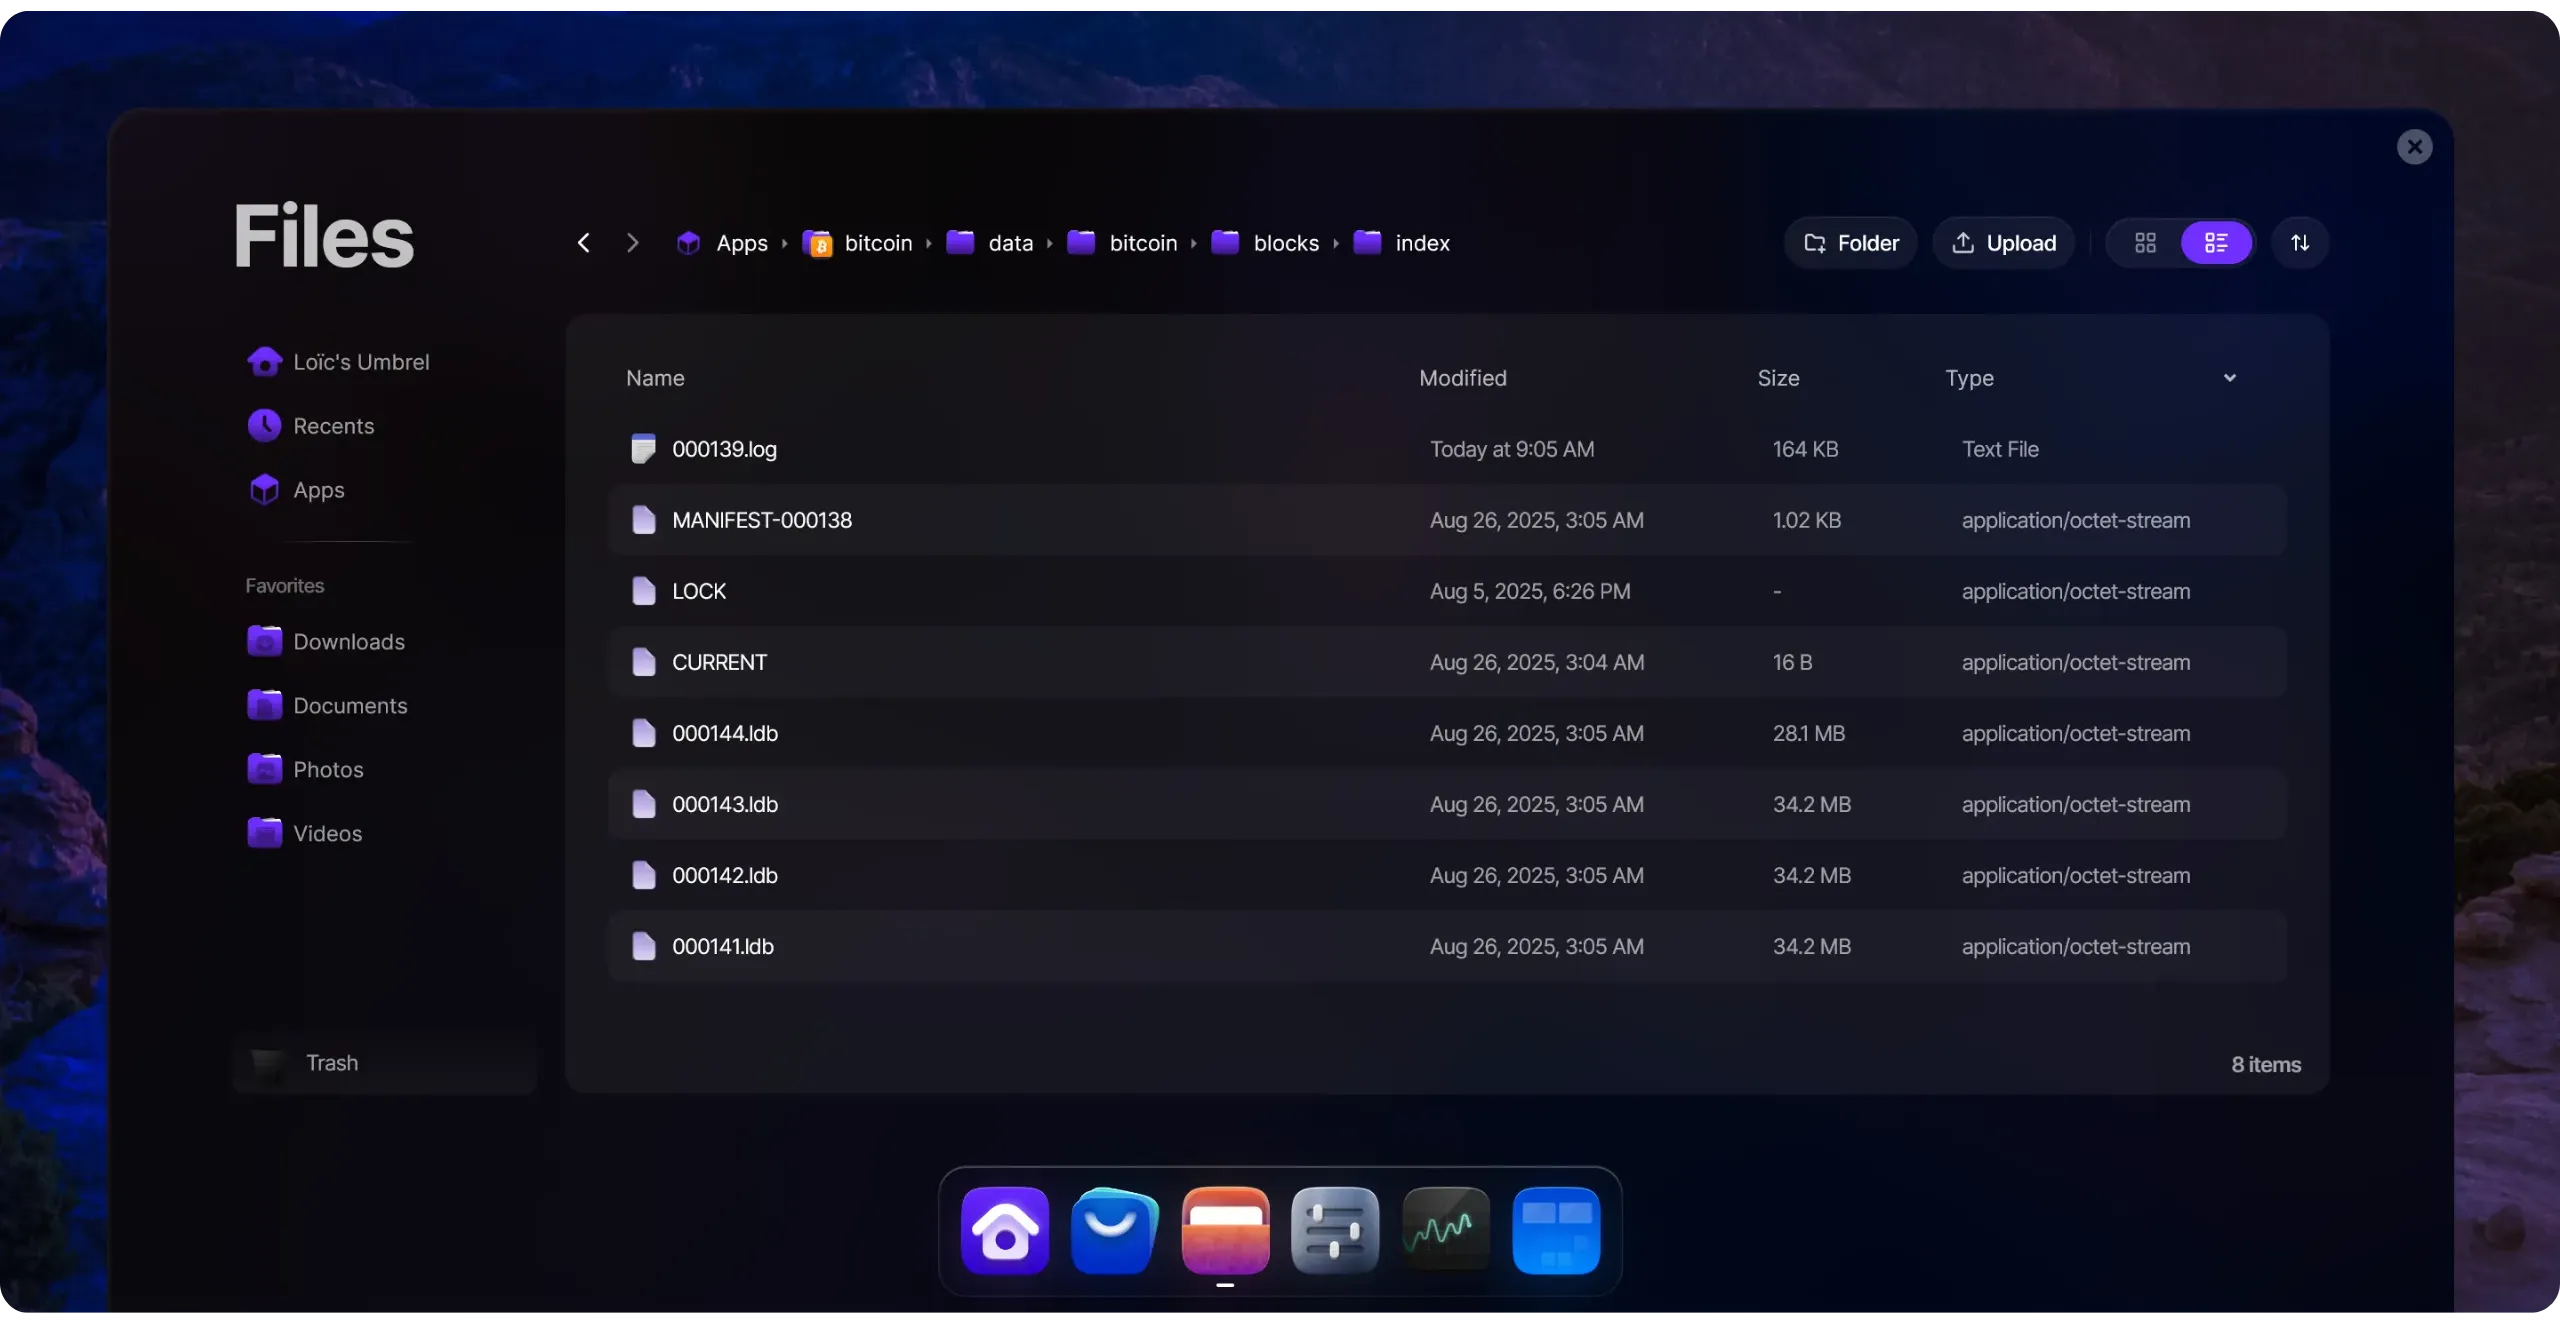
#### Optional indexes (indexes/)
Some indexes are optional and disabled by default, as they increase the disk footprint:
- `indexes/txindex/`, which we've already mentioned, provides a transaction → location mapping table, making it possible to retrieve any confirmed transaction without knowing the block that contains it. This is useful for off-wallet `getrawtransaction` type RPC queries, but is quite expensive.
- indexes/blockfilter/` which can contain compact block filters (BIP157/158) for thin clients. These structures accelerate client-side verification at the expense of additional storage on the indexer node.
### UTXO set (chainstate)
The UTXO (*Unspent Transaction Output*) model is the accounting representation of Bitcoin: each unspent output is an available "coin" that can be used as an input for a future transaction.
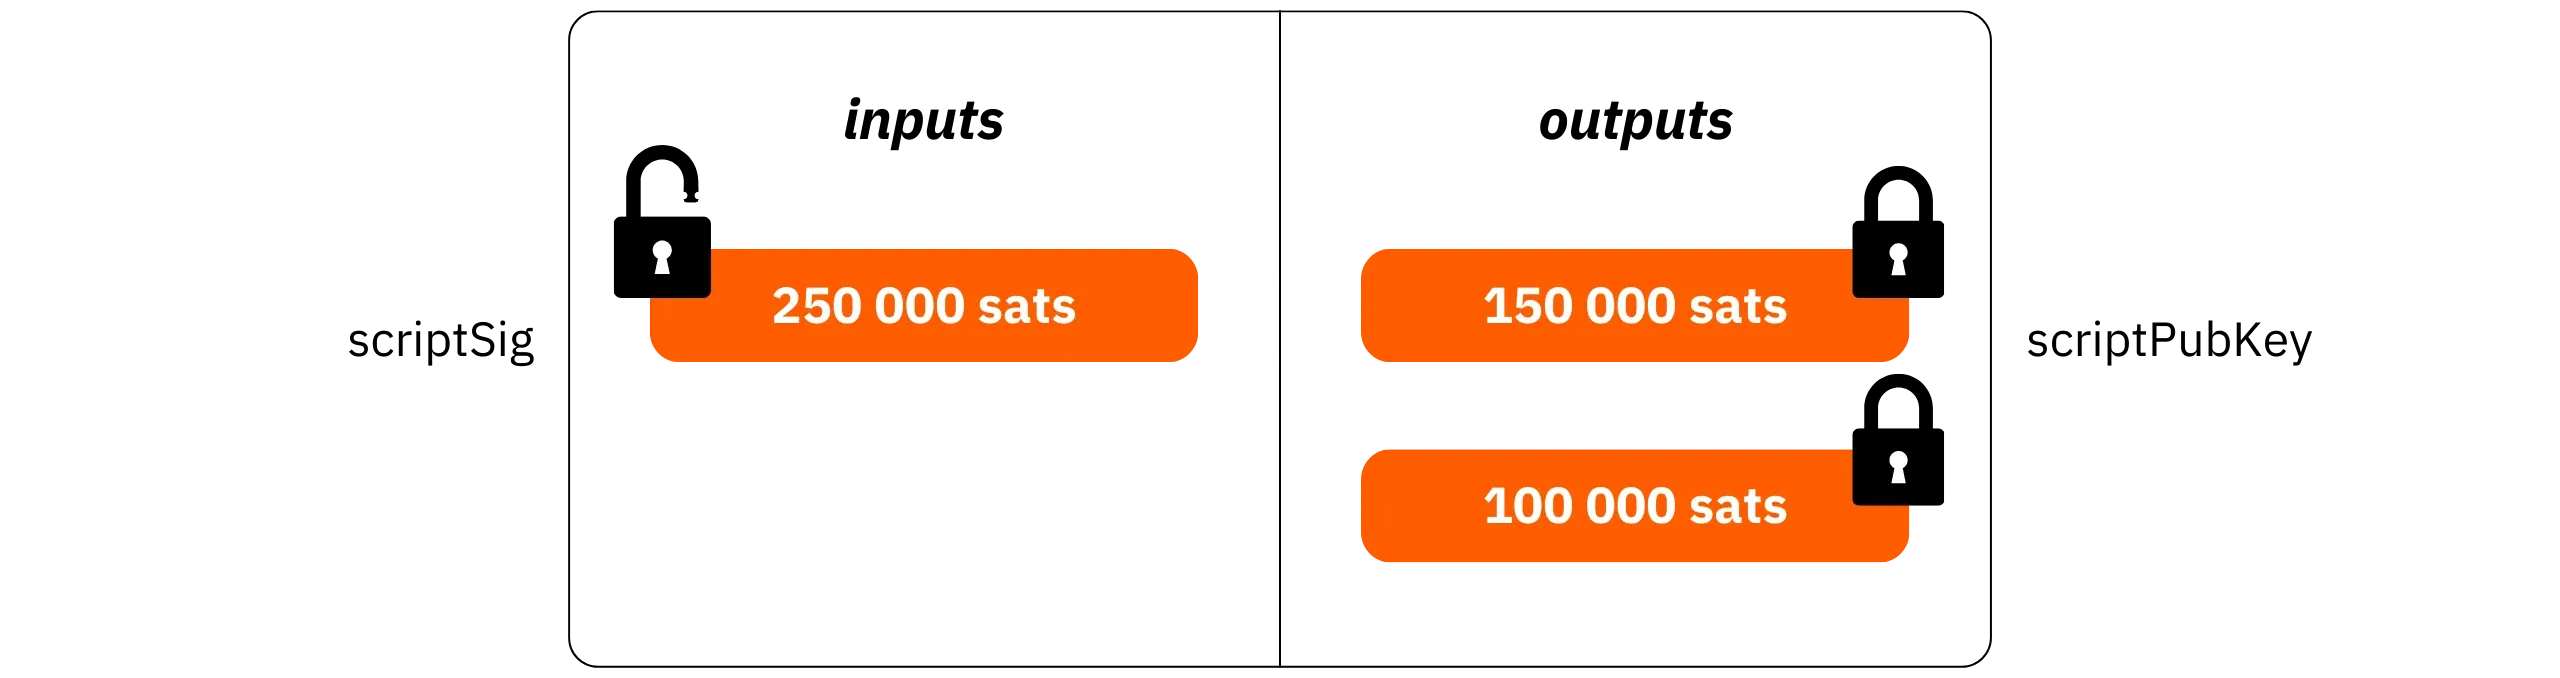
The totality of all these parts at a given moment T constitutes the UTXO set: a large list of all the parts now available. It's this state that the node consults to decide whether a transaction spends legitimate units not already used in a previous transaction (to avoid double-spending).

The UTXO set is stored in the `chainstate/` folder as a compact LevelDB database. Each part associates a key derived from the Hash of the transaction and the output index with a value containing: the amount, the `scriptPubKey` lock, the height of the creation block, and a [coinbase](https://planb.academy/resources/glossary/coinbase-transaction) indicator.
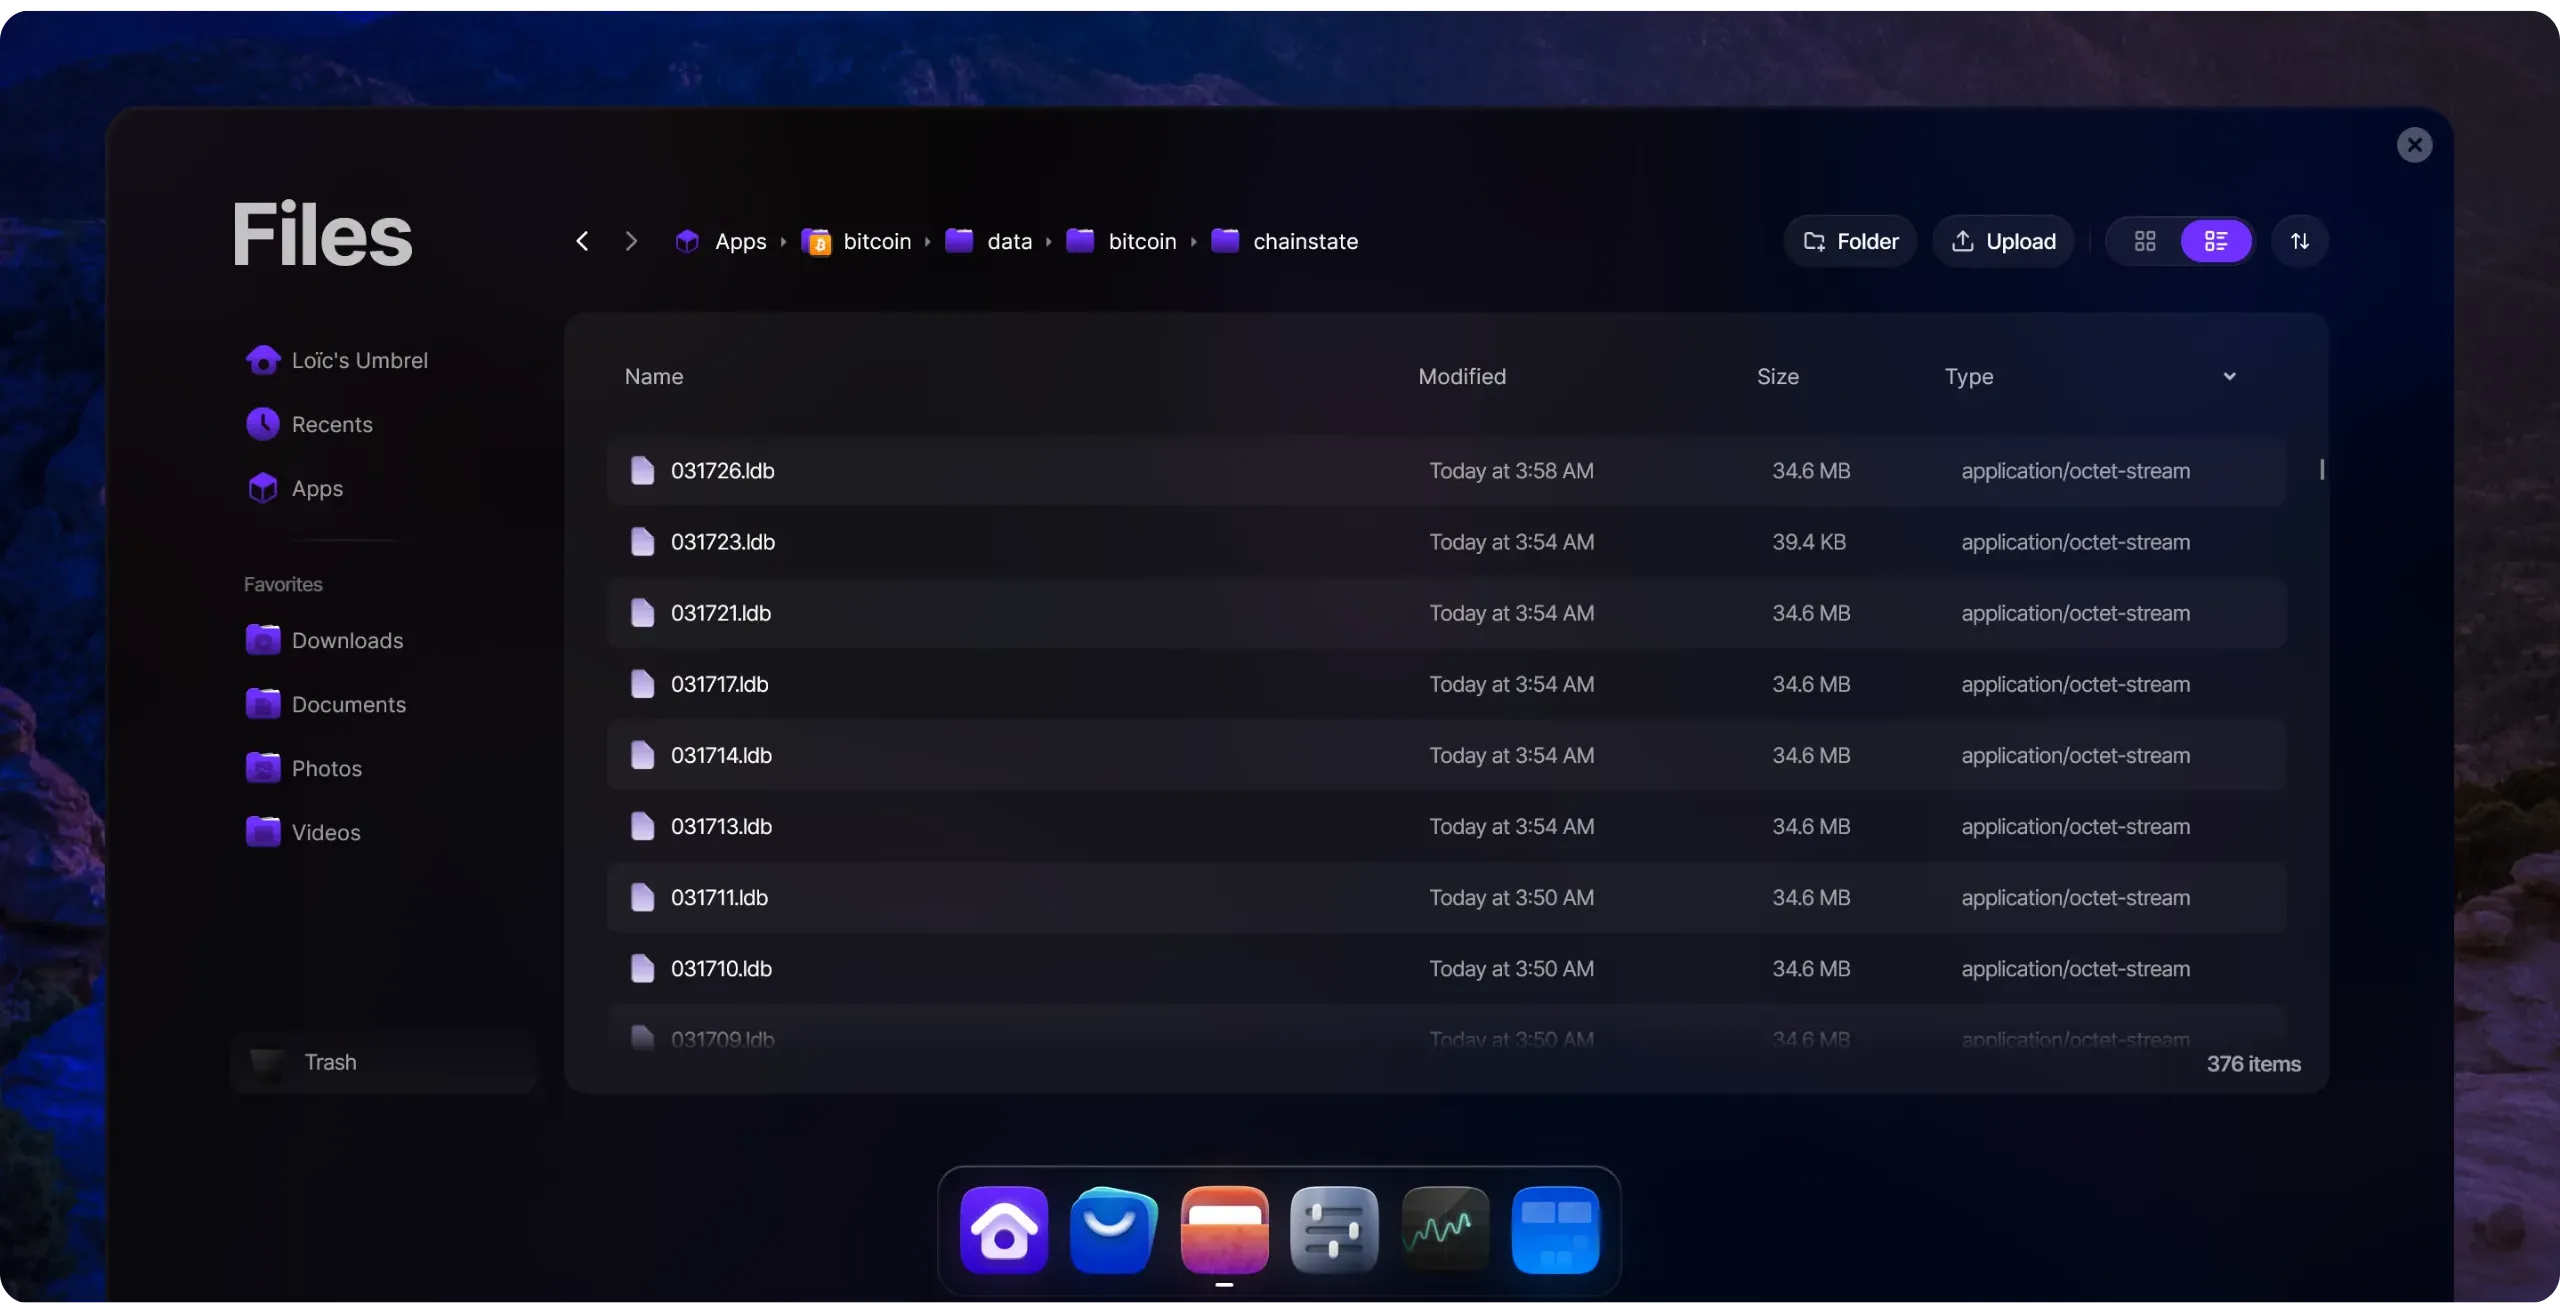
The node maintains a memory cache above LevelDB to absorb frequent read and write operations. The `dbcache` parameter can be used to modify the size of this cache: the larger it is, the more the IBD and ongoing validation benefit from memory access, at the cost of higher RAM consumption. When a new block is found by a miner, the node deletes from the UTXO set the outputs spent (or consumed) by the transactions included in the block and adds the newly created outputs.
Theoretically, we could validate a transaction by rescanning the block history to check that an output has never been spent. In practice, however, this would be far too time-consuming, as the entire blockchain would have to be scanned for each new transaction. The UTXO set, therefore, provides the minimum view required to prove locally and in a reasonable amount of time the absence of double-spending.
Note that the UTXO set is often at the heart of concerns about Bitcoin's decentralization, as its size naturally increases rapidly. This is partly due to the rising price of Bitcoin, which encourages fragmentation of parts, and partly to the growing adoption of the system: the more users there are, the greater the demand for UTXOs.
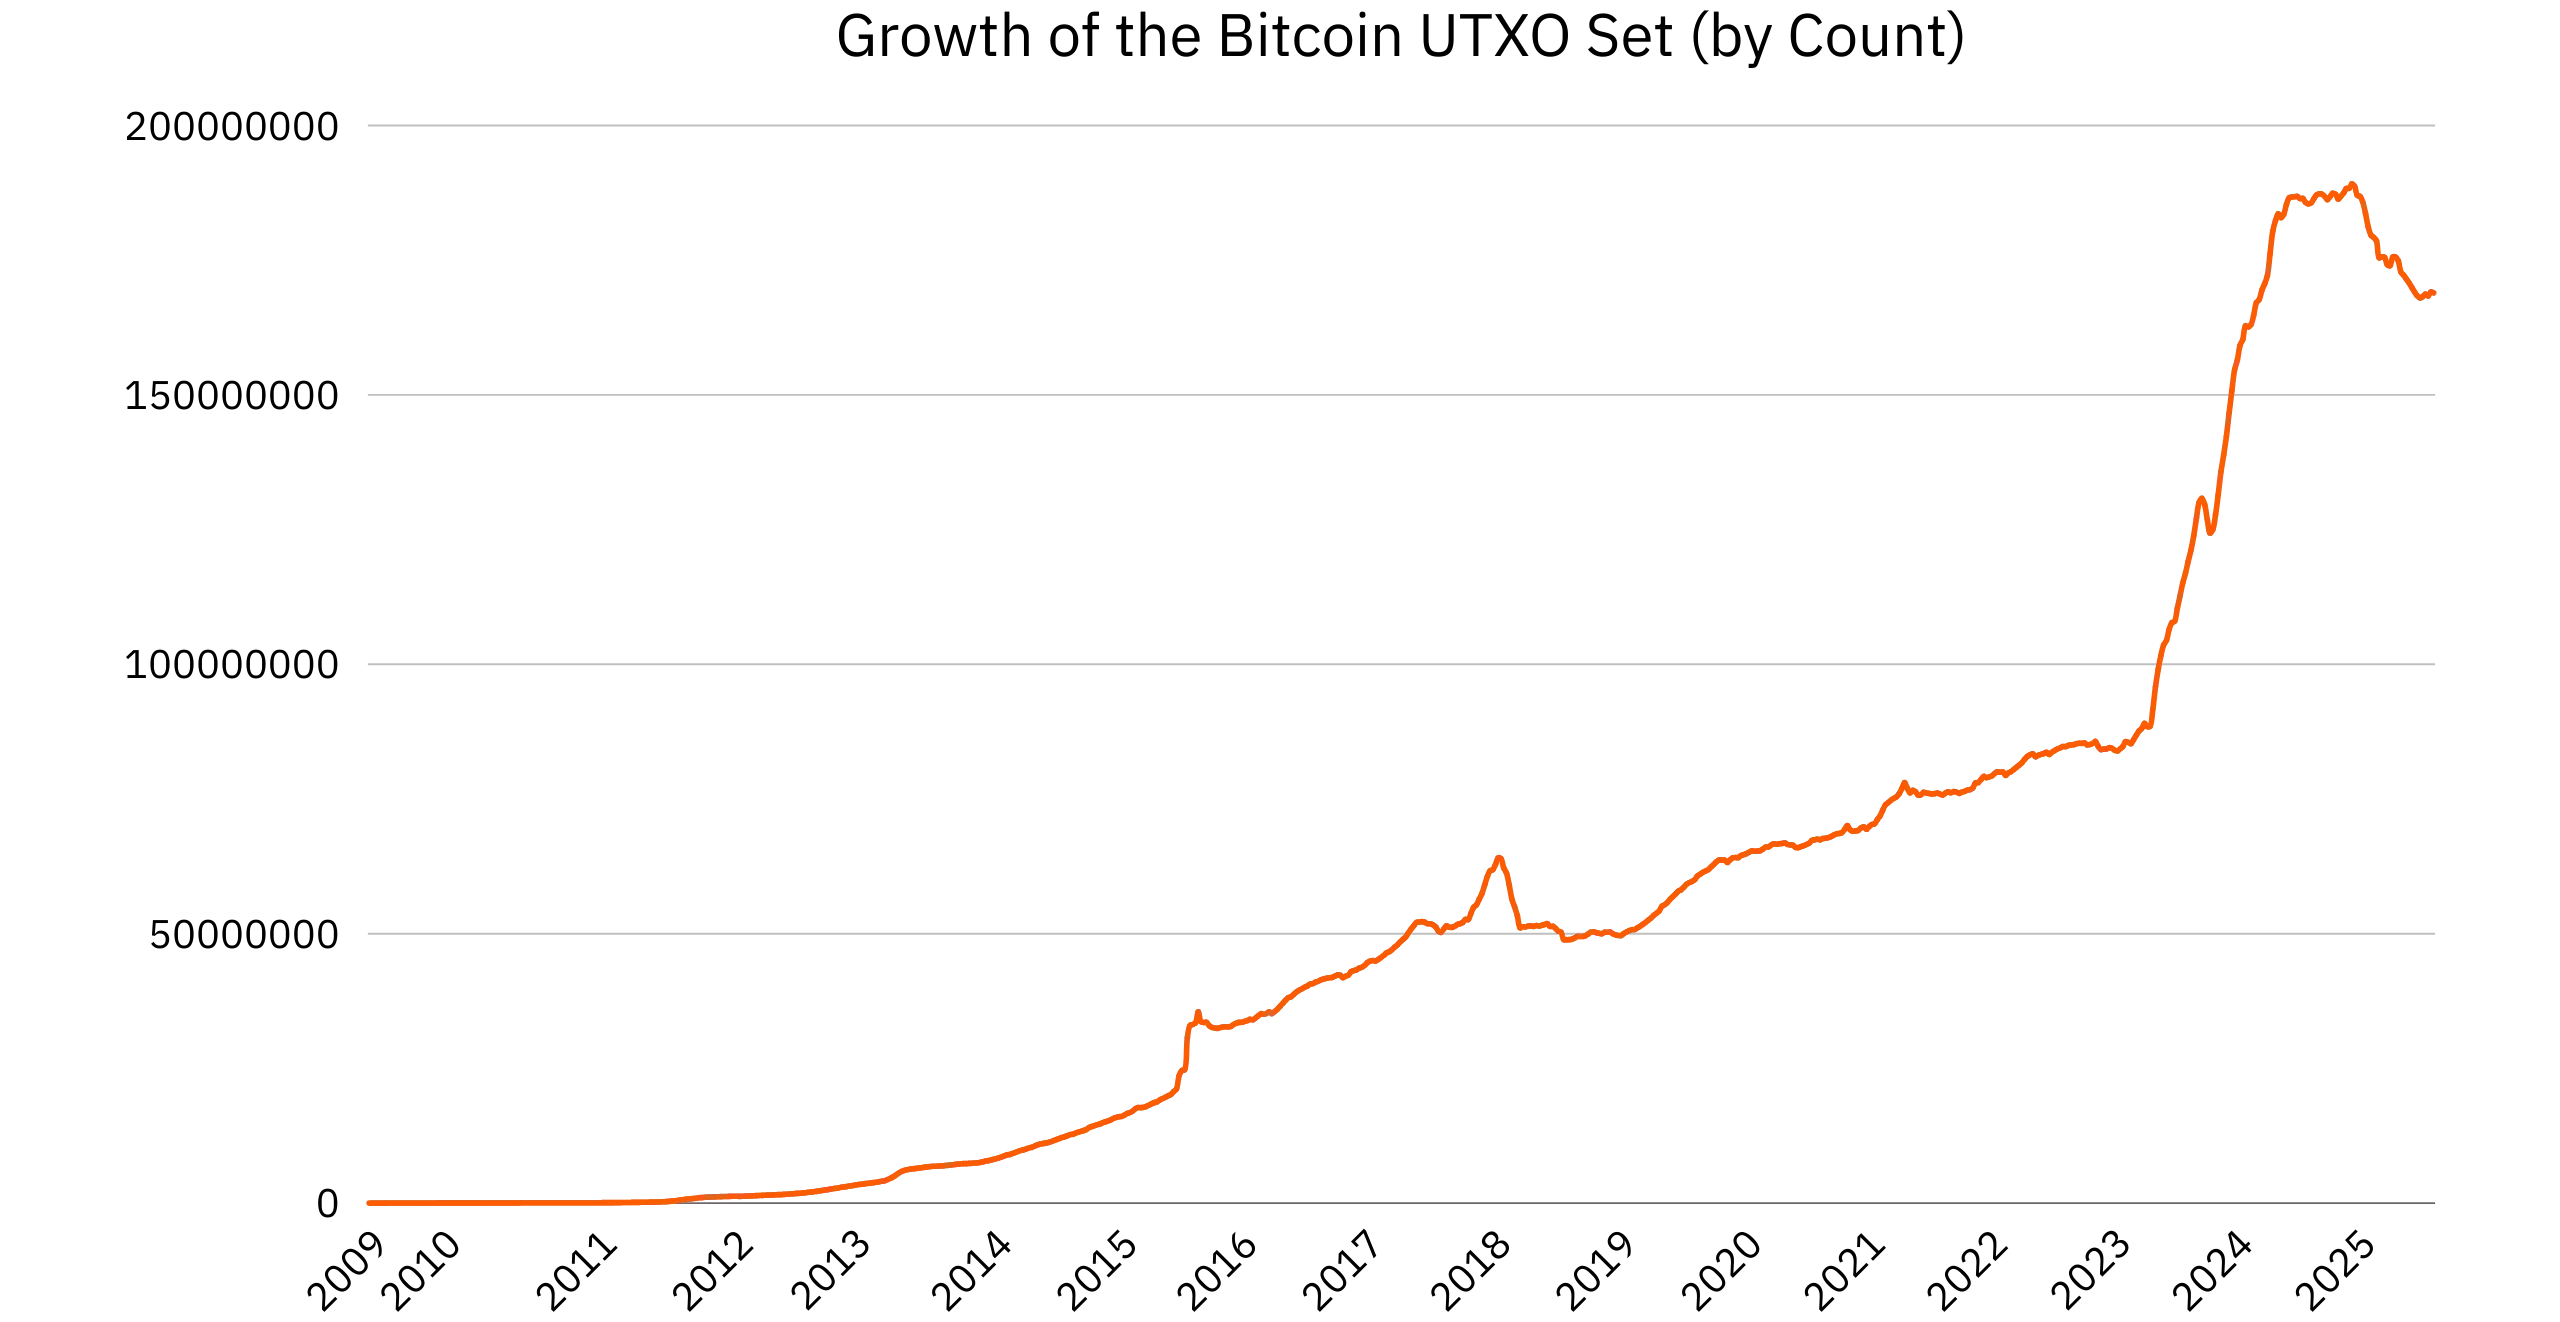
The growth of the UTXO set also stems from the structure of simple payment transactions on Bitcoin. Indeed, when you make a payment, you consume a single UTXO as input and create two new UTXOs as output (one for the payment and the other for the change that comes back to the payer). Finally, a chain analysis heuristic, called [CIOH](https://planb.academy/resources/glossary/cioh) (*Common Input Ownership Heuristic*), provides a further incentive to avoid coin consolidation.
https://planb.academy/courses/65c138b0-4161-4958-bbe3-c12916bc959c
Since a portion of it must be kept in RAM to verify transactions in a reasonable time, the UTXO set may gradually render the operation of a full node too costly. To solve this problem, a few proposals already exist, notably Utreexo.
### The Mempool
The mempool is the local set of valid transactions that have been received but not yet confirmed. As a reminder, a "confirmed transaction" is one that has been included in a valid block. Each node maintains its own mempool, which may differ from that of other nodes in the network depending on:
- the size allocated to the mempool via the `maxmempool` parameter: a node with a larger mempool will be able to hold more transactions than a node with a smaller mempool (unless the latter becomes empty);
- mempool rules: they form a subset of the node’s relay rules and define the characteristics that an unconfirmed transaction must meet to be accepted into the mempool;
- transaction percolation: due to various factors, a given transaction may have been distributed to one part of the network, but not yet reached another.
It is important to note that node mempools have no consensus value. Bitcoin works perfectly even if each node has a different mempool. Ultimately, the authoritative blocks are always those added to the blockchain. For example, even if a node initially rejects a given transaction in its mempool (valid according to the consensus rules), it will be obliged to accept it if it is eventually included in a block with a valid proof of work. If it failed to do so and rejected this block, even though it complied with the consensus rules, it would trigger a hard fork, i.e., the creation of a new, separate Bitcoin on which it would be alone.
#### Memory policy and management
When a transaction is received, Core applies a series of checks against consensus rules (syntax, valid scripts, no double spending, etc.) and mempool rules, which are a local policy ([RBF](https://planb.academy/resources/glossary/rbf-replacebyfee), minimum charge thresholds, data limit in `OP_RETURN`, etc.). If the transaction adheres to these rules, it is stored in memory.
The size of the mempool is limited by the `maxmempool` parameter in the `bitcoin.conf` file (more on this in the next chapter). By default, the limit is 300 MB. When it's full, the node dynamically raises its minimum fee threshold and expels the least profitable transactions first (i.e., it retains transactions that should be mined first). Transactions that are too old can also expire after a configured delay.
#### Mempool persistence on disk
To speed up restarts, Core periodically serializes the state of the mempool in the `mempool.dat` file when the node shuts down. In addition to the actual mempool, which remains in memory, Core stores this `mempool.dat` file on disk. The next time the node is launched, it reloads this snapshot and deletes anything that is no longer valid for the current blockchain.
### Auxiliary files and databases
Several other files at the same level as `blocks/`, `chainstate/`, and `indexes/` participate in the proper functioning of the node:
- `peers.dat` keeps an IP address book of potential peers, fed by initial DNS discovery, network exchanges, and manual additions. When the node starts up, it can draw on this file to establish outgoing connections.
- When the node is switched off, `anchors.dat` saves the addresses of outgoing peers, so that you can try to contact them again quickly the next time you start up.
- `banlist.json` contains local bans decided by the operator or by the node (repeated invalid behavior), in order to prevent the node from reconnecting or accepting connections from these specific peers.
- `fee_estimates.dat` stores time horizon statistics on observed confirmations, used by the fee estimator to propose fee rates consistent with the delay objectives chosen when creating a transaction.
- `bitcoin.conf` contains your node’s configuration parameters. It is in this file that the relay rules can be adjusted. I will discuss this in more detail in the next chapter;
- `settings.json` contains additional parameters to `bitcoin.conf`.
- `debug.log` is the diagnostic text log, which can be used to understand node activity in the event of a bug.
- `bitcoind.pid` records the process ID during execution, allowing other applications or scripts to easily identify Bitcoind (*Bitcoin Daemon*) and interact with it if necessary. It is created when the node starts and deleted when it stops;
- `ip_asn.map` is an IP → ASN mapping table (standalone system) used for peer bucketing and peer diversification (`-asmap` option).
- `onion_v3_private_key` stores the private key of the Tor v3 service when the `-listenonion` option is enabled, in order to keep a stable onion address between reboots.
- `i2p_private_key` stores the I2P private key when `-i2psam=` is used, to make outgoing and possibly incoming connections on I2P.
- `.cookie` contains an ephemeral RPC authentication token (created at startup, deleted at shutdown) when cookie authentication is used. This can be used, for example, to connect wallet software.
- `.lock` is the data directory lock, which prevents multiple instances from writing to the same datadir simultaneously.
- `guisettings.ini.bak` is the automatic saving of GUI settings (*Bitcoin Qt*) when the `-resetguisettings` option is used.
As we saw in the first parts of this BTC 202 course, Bitcoin Core is both Bitcoin node software and wallet. However, it's not necessarily the solution I'd recommend for managing your wallets, as its interface remains basic and its functionalities are limited compared with modern software such as Sparrow or Liana. Core also includes files for managing your wallets:
- `wallets/` is the default directory that hosts one or more wallets;
- `wallets//wallet.dat` is the SQLite database of the wallet (keys, descriptors, transaction metadata, etc.);
- `wallets//wallet.dat-journal` is the SQLite rollback journal.
To summarize, here is the Bitcoin Core file structure:
```
~/.bitcoin/
├── bitcoin.conf
├── blocks/
│ ├── blk00000.dat
│ ├── blk00001.dat
│ ├── rev00000.dat
│ ├── rev00001.dat
│ └── index/
├── chainstate/
├── indexes/
│ ├── txindex/
│ ├── blockfilter/
│ │ └── basic/
│ │ ├── db/
│ │ └── fltrNNNNN.dat
│ └── coinstats/
│ └── db/
├── wallets/
│ └── /
│ ├── wallet.dat
│ └── wallet.dat-journal
├── peers.dat
├── anchors.dat
├── banlist.json
├── mempool.dat
├── fee_estimates.dat
├── bitcoind.pid
├── debug.log
├── ip_asn.map
├── onion_v3_private_key
├── i2p_private_key
├── settings.json
├── guisettings.ini.bak
├── .cookie
└── .lock
```
### The validation path for a new block
On receipt of a new block, your node checks the proof of work and, more generally, compliance with the consensus rules. If all is well, it applies the changes transaction by transaction to its UTXO set: it checks that each entry spends existing UTXOs with a valid script, deletes these UTXOs, and adds the new outputs. If everything is valid, the changes are committed to `chainstate/`.
In parallel, undo data is written to `rev*.dat` and metadata to the `blocks/index/` index. The block is then serialized to the correct `blk*.dat` file. In the event of a reorganization, the node reads `rev*.dat` in reverse to cleanly disconnect the abandoned blocks, restore the UTXO set, and then connect the blocks of the new best chain.
## Understanding bitcoin.conf
c54a629a-ddb1-41cb-9a88-21dfd9be50ca
The `bitcoin.conf` file is the main configuration file for Bitcoin Core. It allows you to adjust the behavior and parameters of your node without having to recompile its source code or make command-line modifications. In concrete terms, it's a plain text file structured in key-value pairs, meaning that each line of the file references a specific parameter (the key) and its associated value, which can be modified to adjust that parameter.
Network, transaction relay, performance, indexing, logging, and RPC access parameters can be defined in the `bitcoin.conf`. However, this configuration file never modifies the protocol's consensus rules: it only sets the node's local policy (relaying rules), the way it connects, indexes, and exposes services.
### Location and priority
By default, `bitcoin.conf` resides in the Bitcoin Core data directory. This is the famous directory we mentioned in the previous chapter. However, this file is not automatically created by Bitcoin Core, except in certain environments, such as Umbrel. If it doesn't already exist, you'll have to generate it yourself by simply creating a file named `bitcoin.conf`, then opening it in a text editor to make your modifications.
The parameters defined in the `bitcoin.conf` can be overridden by 2 layers:
- `settings.json` (written dynamically by graphical interface or some RPC),
- and options modified via command lines.
Note that any modification to `bitcoin.conf` requires a node restart to take effect.
### Format and structure
The format of the `bitcoin.conf` is therefore very simple: one line per option, in the form `option=value`. Unnecessary spaces and blank lines are ignored, and code comments begin with `#`.
Almost all boolean options can be disabled with a `no` prefix. For example, `listen=0` and `nolisten=1` are equivalent depending on the version.
To segment the configuration by network, you can use sections: `[main]`, `[test]` (testnet3), `[testnet4]`, `[bookmark]`, `[regtest]`. Alternatively, you can prefix the option name with `regtest.maxmempool=100`.
### What bitcoin.conf can and cannot do
As explained above, consensus rules are obviously not configurable in `bitcoin.conf`, as this could create a hard fork. On the other hand, many other aspects are configurable. There are 3 useful classes to keep in mind:
- Purely local parameters. These affect only your node: cache size (`dbcache`), pruned mode (`prune`), optional indexes... They influence your machine's performance, but not the network.
- Relay and mempool policies. These decide what your node accepts, retains, and relays before confirmation: minimum fee threshold (`minrelaytxfee`), mempool size and retention time (`maxmempool`, `mempoolexpiry`), transaction replacement (RBF)... These rules are not part of the consensus, so two different nodes can have different policies and still be fully compatible. On the other hand, these parameters will have an influence on the Bitcoin network (as explained in the first part, notably with percolation theory).
- Network connectivity. These options determine how your node finds peers, listens, traverses a NAT, uses Tor or a proxy, or limits its bandwidth. They shape your topology, but do not alter the relaying of transactions.
Understanding this separation is crucial: if a transaction doesn't adhere to the consensus rules, your node will reject it in any case. But a stricter local policy may refuse to relay a transaction that is valid in the consensus sense.
### Network and topology
First of all, it's important to clearly distinguish between the 2 types of connection a Bitcoin node can have:
- Outgoing connections, which are initiated by our node to another node;

- Incoming connections, initiated by another node to ours.

These two types of connection are perfectly capable of exchanging the same data in both directions; it's not a question of limiting the direction of flow, but only of a difference in the initiator of the connection. From our node's point of view, outgoing connections are generally considered safer, since we initiate them and choose precisely which node to connect to, making it unlikely that the connection is malicious. By default, Bitcoin Core maintains 10 outgoing connections (8 "*full-relay*" + 2 "*block-relay-only*").
A full node adds more value to the network by accepting incoming connections. The `listen=1` parameter enables listening on the network's default port 8333, allowing it to receive incoming connections on the clearnet. For this to work, this port must also be open on your router. If it isn't, your node will continue to work with outgoing connections only, which will have no impact on your personal use of Bitcoin. The choice of whether to allow incoming connections is yours; there is no "best choice."
If you prefer not to open a port on your router, but still accept incoming connections, you can activate the `listenonion=1` parameter. This will achieve the same result, but only through the Tor network rather than clearnet.
On the network level, we also have:
- `addnode`: adds a friendly peer to contact in addition to the usual discovery (can be specified several times).
- `connect`: strictly restricts connections to the provided address (can be specified multiple times). Core will not connect to any other node;
- `seednode`: is used only to fill in the address book when connecting to a node, then disconnects.
- `maxconnections`: defines the global ceiling for incoming + outgoing connections. By default, this parameter is set to 125, meaning that your node will never accept more than 125 connections.
- `maxuploadtarget` : caps the upload to limit bandwidth over a rolling 24-hour window. This cap does not sacrifice the propagation of essential recent elements;
- `onlynet`: limits outgoing connections to selected networks only (`ipv4`, `ipv6`, `onion`, `i2p`, `cjdns`). For example, if you want your node to connect to the Bitcoin network only via Tor, you can enable the `onlynet=onion` parameter and disable incoming connections (or only allow connections via Tor as well).
- `dnsseed`: allows or disallows _DNS seeds_ to obtain peers when your local address pool is low (default: `1`, unless `-connect` or `-maxconnections=0`).
- `forcednsseed`: forces _DNS seeds_ to be queried at startup, even if you already have addresses in stock (default: `0`).
- `fixedseeds`: Allow use of *seed nodes* (hardcoded address list) if _DNS seeds_ fail or are disabled (default: `1`).
- `dns`: Authorizes DNS resolutions in general (e.g., for `-addnode`/`-seednode`/`-connect`).
By default, your node communicates over clearnet, Tor, and I2P. This means that the peers it connects with on the clearnet can see your public IP address, and your ISP will likely be able to detect that you're running a Bitcoin node (although [P2P Transport V2](https://planb.academy/resources/glossary/p2p-transport-v2) makes it more difficult for an ISP to eavesdrop). This isn't necessarily a problem, but if you want to avoid any leakage of this information, you can connect your node exclusively via the Tor network.
To be fully Tor-enabled, you need to force Bitcoin Core to use only this network and to create a hidden service for incoming connections (if you want to enable them). In the `bitcoin.conf`, you need to add this configuration:
- `onlynet=onion`,
- `proxy=127.0.0.1:9050`,
- `listenonion=1`,
- `torcontrol=127.0.0.1:9051`,
- `proxyrandomize=1`,
- `listen=1`,
- `bind=127.0.0.1`,
- `upnp=0`,
- `natpmp=0`.
All your P2P connections go through Tor. Your node receives a `.onion` address for incoming connections, so no ports need to be opened on the router. Your ISP only sees Tor traffic, and your peers are unaware of your actual public IP address.
To avoid DNS resolution in the clear, you can add `dnsseed=0` and `dns=0` to your configuration. You'll then need to manually provide `.onion` peers via `seednode=` or `addnode=`, as discovery of new nodes will be difficult otherwise.
Obviously, if you're a beginner, I'd advise you to leave all these network settings alone for the time being. The default configuration is often sufficient.
### Mempool and relay policy
#### Basic parameters
Here are the basic parameters you can modify on your `bitcoin.conf` concerning the management of your mempool and the relaying of unconfirmed transactions:
- `maxmempool=`: Limits the maximum size of the local mempool to `` megabytes (default: `300`). When the limit is reached, your node dynamically raises its effective fee threshold and prioritizes the least profitable transactions (based on the fee rate, not the absolute value) to stay below the limit. You can leave this setting as the default. Increasing it can be useful if you're mining solo, or if you want to get a more accurate view of mempool congestion and improve fee estimation. Conversely, reducing it will save RAM and, to a lesser extent, other system resources.
- `mempoolexpiry=`: Maximum retention time for unconfirmed transactions in mempool (in hours, default: `336`). After this time, transactions are removed even if space remains available.
- `persistmempool=1`: Saves a snapshot of the mempool on shutdown and reloads it on reboot (default: `1`). This speeds up recovery after reboot, avoiding the need to relearn the state via the network.
- `maxorphantx=`: Maximum number of orphan transactions retained (inputs dependent on UTXOs not yet seen in the UTXO set., default: `100`). Beyond this threshold, the oldest transactions are deleted to avoid uncontrolled growth of the cache.
- `blocksonly=1` : Disables the acceptance and relay of unconfirmed transactions received from peers (except for special permissions). The node only downloads and announces blocks. Locally created transactions can still be broadcast (to use your node with your wallet software). This greatly reduces bandwidth and RAM requirements at the cost of reduced relay usefulness and total unawareness of the mempool.
- `minrelaytxfee=`: Minimum fee rate (in BTC/kvB) below which transactions are not accepted in the node's mempool and not relayed to peers (default: `0.00001` = 1 sat/vB). The higher this value, the more aggressively your node filters low-cost transactions.
- `mempoolfullrbf=1`: Accept RBF transactions even without explicit RBF signaling in the replaced transaction. With this "*full-RBF*" policy, a transaction offering a higher fee rate can replace another in mempool if the other replacement conditions are met.
As a reminder, RBF is a transactional mechanism that enables the sender to replace a transaction with one that has higher fees in order to speed up confirmation. If a transaction with too low fee remains blocked, the sender can use *Replace-by-fee* to increase the fee and prioritize their replacement transaction in mempools and with miners.
#### Advanced and specific settings
Here are the advanced settings for mempool and relay policy. If you're a beginner, you shouldn't need to modify these settings:
- `datacarrier=1` : Allows the relay and (if mining via the node) inclusion of transactions carrying non-financial data via an `OP_RETURN` output (default: `1`). Disabling this parameter slightly reduces the surface for non-financial data spam at the cost of lower compatibility with certain uses. In all cases, you must accept mined `OP_RETURN`.
- `datacarriersize=`: Maximum size (in bytes) of the `OP_RETURN` that the node relays (default: `83`). Lowering this value restricts the payloads transported via `OP_RETURN`. Note that this limit will be removed by default in a future version of Bitcoin Core.
- `bytespersigop=`: Parameter which converts signature transactions into equivalent bytes for evaluating relay limits (default: `20`). This will influence the acceptance of `sigops` rich transactions according to local policy rules.
- `permitbaremultisig=1`: Allows relaying of *bare-Multisig* P2MS transactions (default: `1`). This is the oldest script template for establishing [multisignature](https://planb.academy/resources/glossary/multisig) conditions on a UTXO (invented in 2011 by Gavin Andresen).
- `whitelistrelay=1`: Automatically grants relay permission to whitelisted incoming peers (default: `1`). These peers have their transactions accepted by the relay even if your node is not in general relay mode.
- `whitelistforcerelay=1`: Assigns "*forcerelay*" permission to whitelisted peers with default permissions (default: `0`). The node then relays their transactions even if they are already present in mempool, thus bypassing anti-redundancy mechanisms.
- `whitebind=<[permissions@]addr>` / `whitelist=<[permissions@]CIDR>`: Binds an interface or address range and assigns fine-grained permissions to the corresponding peers: `relay`, `forcerelay`, `mempool` (mempool content request), `noban`, `download`, `addr`, `bloomfilter`. This can be useful for granting privileged treatment to trusted peers (such as gateways, LANs, and internal services).
- `peerbloomfilters=1` : Enables support for [Bloom filters](https://planb.academy/resources/glossary/bloom-filter) (BIP37) to serve filtered blocks/transactions to lightweight clients (default: `0`). Note that this increases the load on your resources.
- `peerblockfilters=1` : Serves compact BIP157 (*Neutrino*) filters to peers (default: `0`).
- `blockreconstructionextratxn=`: Additional number of transactions retained in memory to rebuild compact blocks (default: `100`). Improves the success of reconstructions during compact synchronizations, at the cost of a little memory.
As a reminder, all these relay rules have no impact on the validity of transactions included in a valid block. They serve to adjust your contribution to the relay, protect your resources, and make your node predictable in constrained environments, but never allow you to refuse blocks that respect the consensus rules.
### Wallets
You can also adjust the way your wallets are managed in the `bitcoin.conf` file. If you're not using wallet directly in Core, but rather external management software such as Sparrow or Liana, these parameters will be of little importance:
- `addresstype=` : Defines the format of addresses generated by the wallet for receiving.
- `changetype=`: Forces the format of change addresses (the remainder of an input on a single payment).
- `wallet=`: Loads an existing wallet at startup (can be repeated to load multiple wallets).
- `walletdir=`: Directory containing wallets (default: `/wallets` if it exists, otherwise ``). This can be useful if you wish to store wallets on a dedicated or encrypted volume.
- `walletbroadcast=1`: Automatically broadcasts transactions created by loaded wallets (default: `1`). Set to `0` if you wish to manage broadcasting via another channel.
- `walletrbf=1`: Enables RBF opt-in to signal RBF on all transactions (default: `1`). Allows you to increase fees later in the event of a blocked transaction.
- `txconfirmtarget=`: Confirmation target for the transaction (in number of blocks, default: `6`). The wallet will automatically set the fee for the transaction to be confirmed within this number of blocks.
- `paytxfee=`: Fixed fee rate (BTC/kvB) applied to wallet transactions. Avoid in general: use adaptive estimation via `txconfirmtarget`.
- `fallbackfee=`: Fallback fee rate (BTC/kvB) used if the estimator lacks data (default: `0.00`). Setting it to 0 completely disables the fallback.
- `mintxfee=`: Minimum threshold (BTC/kvB) for wallet to create transactions (default: `0.00001`). Wallet will refuse to build a transaction below this threshold.
- `maxtxfee=`: Absolute cap on total fees for a wallet transaction (default: `0.10` BTC). Protects against abnormally high fees that would unnecessarily destroy bitcoins.
- `avoidpartialspends=1`: Selects UTXOs by address clusters to avoid partial spending.
- `spendzeroconfchange=1`: Allows an unconfirmed change UTXO to be reused as an entry in a new transaction (default: `1`).
- `consolidatefeerate=`: Maximum rate (BTC/kvB) beyond which wallet avoids adding more inputs than necessary to consolidate. This allows consolidations of small UTXO into larger ones at low prices, and reduces costs when costs are high.
- `maxapsfee=`: Additional fee budget (in BTC, absolute value) that the wallet is willing to pay to enable the "*avoid partial spends*" option.
- `discardfee=`: Rate (BTC/kvB) indicating your tolerance to throw away the change by adding it to the fee. Outputs that would cost more than a third of their value at this rate are dropped.
- `keypool=`: Size of pre-generated address pool (default: `1000`). Values that are too small increase the risk of incomplete restores.
- `disablewallet=1`: Starts Bitcoin Core without the wallet subsystem and disables associated RPCs. Reduces the attack surface and footprint if the node is only used for validation/release.
### Storage, indexing, and performance
The configuration file also allows you to adjust the parameters related to your machine. This can be particularly relevant if you have limited resources, or, on the contrary, a large amount of available capacity:
- `datadir=`: Sets Bitcoin Core's main data directory.
- `blocksdir=`: Decouples the location of the blocks files (`blocks/blk*.dat` and `blocks/rev*.dat`) from the `datadir`. This can be useful for placing the blocks archive on a different volume, while keeping the state database (`chainstate/`) on a faster medium, for example.
- `dbcache=`: Allocates `` MiB to the database cache (*LevelDB*) used by the block index and `chainstate` (default: `450`). The higher the value, the faster the IBD and current validation, at the cost of higher RAM consumption.
- `prune=`: Enables pruning of block files and sets a disk space target in MiB (default: `0` = disabled; `1` = manual pruning via RPC; `>=550` = automatic pruning below target). Incompatible with `txindex=1`. The node remains a fully validating node, but can no longer provide the old history. This option is particularly useful if your disk space is limited, for example, when installing a node on your home computer.
- `txindex=1` : Builds and maintains a global index of confirmed transactions. Essential for certain queries (`getrawtransaction` outside the wallet) and for exploration purposes, but significantly increases disk usage. Incompatible with pruned mode.
- `assumevalid=`: Indicates a block that is assumed to be valid, allowing you to skip script checks for its ancestors (set `0` to check everything). See the previous chapter for more information.
- `reindex=1`: Reconstructs block indexes and state (`chainstate`) from `blk*.dat` files on disk. Also rebuilds optional active indexes. This is a time-consuming operation to use to repair a corrupted database or cleanly activate/deactivate heavy indexes.
- `reindex-chainstate=1`: Rebuilds only the `chainstate` from the current block index. Preferred when block files are healthy.
- `blockfilterindex=`: Maintains indexes of compact block filters (e.g., `basic`) used by thin clients (BIP157/158) and some RPCs. Disabled by default (`0`). Consumes additional disk space and indexing time.
- `coinstatsindex=1`: Maintains an index of UTXO set statistics operated by the `gettxoutsetinfo` call. Useful for audits and metrics, eliminating the need for costly recalculation. Disabled by default.
- `loadblock=`: Imports blocks at startup from an external `blk*.dat` file. Used to preload history from an offline source (local copy, external media) to speed up initialization.
- `par=`: Sets the number of script verification threads (from `-10` to `15`, `0` = auto, `<0` = leaves this number of cores free). Allows you to adjust CPU parallelism during validation. Auto mode is suitable in most cases.
- `debuglogfile=`: Specifies the location of the `debug.log` log.
- `shrinkdebugfile=1`: Reduces the size of `debug.log` at startup (default: `1` when `-debug` is not active).
- `settings=`: Path to dynamic settings file `settings.json`.
### RPC access and operational safety
Finally, the `bitcoin.conf` file also allows you to configure the access parameters for your node. Be cautious with these settings, especially if you're just starting out: avoid changing them without a thorough understanding of the implications, as this could introduce vulnerabilities.
- `server=1`: Activates the JSON-RPC server. Essential if you control `bitcoind` via `bitcoin-cli` or a third-party application. Disable (`0`) on a purely validating node that doesn't expose any API, or already uses an Electrum server.
- `rpcbind=[:port]`: RPC server listening address/port. By default, listening is done locally only (`127.0.0.1` and `::1`). This parameter is ignored if `rpcallowip` is not also defined. Use it to explicitly bind the interface.
- `rpcport=`: RPC port (default: `8332` on mainnet, `18332` on testnet, `38332` on bookmark, `18443` on regtest).
- `rpcallowip=`: Allows RPC clients from a given IP or subnet (can be repeated). Use in conjunction with `rpcbind` to expose the API only to a trusted segment (LAN/VPN).
- `rpcauth=:$`: Recommended RPC authentication method (hashed password). Allows multiple entries and avoids storing a secret in clear text.
- `rpccookiefile=`: Path to authentication cookie (default: `.cookie` file under `datadir/`). This is used for local access by the same user without managing persistent passwords. For example, you can use it to connect the Liana wallet to your Bitcoin Core on the same machine.
- `rpcuser=` / `rpcpassword=`: Classic RPC authentication with plaintext password. Avoid using this in favor of `rpcauth` or a cookie.
- `rpcthreads=`: Number of threads to serve RPC calls (default: `4`). Increase it if you have high call peaks on the monitoring/external tool side.
- `rpcwhitelist=:,,...`: Whitelist of authorized APIs. Reduces the attack surface by restricting accessible methods.
- `rpcwhitelistdefault=1|0`: Default whitelist behavior: if enabled and a whitelist is used, unlisted calls are refused. This can also force a default empty set (no calls allowed) as long as nothing is explicitly listed.
- `rest=1`: Enable public REST API (disabled by default). To be exposed only on a trusted network (same caution as with JSON-RPC).
- `conf=`: Specifies, on the command line only, a read-only configuration file. Useful for freezing an execution profile (immutable) on the ops side.
- `includeconf=`: Loads an additional configuration file (path relative to `datadir/`). Allows separation of roles: common base + sensitive local overload.
- `daemon=1` / `daemonwait=1`: Starts `bitcoind` in the background and, with `daemonwait`, waits for initialization to finish before handing over. This facilitates integration with supervisors (systemd, runit).
- `pid=`: Location of PID file.
- `sandbox=`: Enables experimental syscalls sandboxing: only expected syscalls are allowed.
- `startupnotify=` / `shutdownnotify=`: Executes a command at startup or shutdown.
- `alertnotify=`: Triggers a command on receipt of an alert.
- `blocknotify=`: Executes a command for each new block.
- `debug=|1` / `debugexclude=`: Enables/disables detailed log categories (e.g. `net`, `mempool`, `RPC`, `validation`...).
- `logips=1`: Logs IP addresses.
- `logsourcelocations=1` / `logthreadnames=1` / `logtimestamps=1`: Adds source locations, thread names, and precise timestamps to logs, respectively.
- `printtoconsole=1`: Sends traces/debugs to the console (*stdout*).
- `help-debug=1`: Displays debug option help and quits.
- `uacomment=`: Adds a comment to User-Agent P2P.
We've now finished listing most of the configuration parameters. This `bitcoin.conf` file thus constitutes the real dashboard of your node: it defines network configuration, mempool management, disk and memory usage, indexing, and general administration. If you'd like to learn more about this file and create one tailored to your needs, I recommend using [Jameson Lopp's generator](https://jlopp.github.io/Bitcoin-core-config-generator/).
We've reached the conclusion of this BTC 202 course, which will have enabled you not only to understand the basics of how nodes work and how they interact within the system, but also to set up your own. You're now a sovereign Bitcoiner, with your own self-custody wallet, broadcasting your transactions via your own node. Congratulations!
You can now move on to the final part of the course, where you'll be able to evaluate BTC 202, then take your diploma to check that you've mastered all the concepts covered.
Several paths are now open to you. The next logical step is to set up your own Lightning node, in order to be fully independent for your off-chain transactions. This is precisely the topic of another course on Plan ₿ Academy:
https://planb.academy/courses/593e483e-1785-4e83-aa7e-32b99056844c
I also invite you to discover the BTC 204 course, which will enable you to understand and master the principles of privacy protection in your use of Bitcoin:
https://planb.academy/courses/65c138b0-4161-4958-bbe3-c12916bc959c
# Final part
679169f5-b990-47e1-9a00-45098ba8096b
## Reviews & Ratings
c18f672d-1074-427e-9505-eecd7ae43e71
true
## Final examination
a4c97701-996c-4cc5-81fa-37d2dc4ee856
true
## Conclusion
28c5cf1f-7b9c-4b68-8b8f-eee109629764
true