# Workflows
This template uses [GitHub workflows](https://docs.github.com/en/actions/using-workflows) for [CI / CD](https://www.redhat.com/en/topics/devops/what-is-ci-cd), defined in [`.github/workflows/`](../.github/workflows).
> [!WARNING]
> GitHub puts a limit on free CI usage for [private repositories](https://docs.github.com/en/actions/using-github-hosted-runners/using-github-hosted-runners/about-github-hosted-runners#standard-github-hosted-runners-for--private-repositories), so tune your workflows accordingly!
## CI (testing)
The [CI workflow](../.github/workflows/ci.yaml) will trigger on every commit or PR to `main`, and it will:
- Check formatting.
- Check documentation.
- Run Clippy lints.
- Run [Bevy lints](https://thebevyflock.github.io/bevy_cli/bevy_lint/).
- Run tests.
- Check that the web build compiles.
> [!TIP]
>
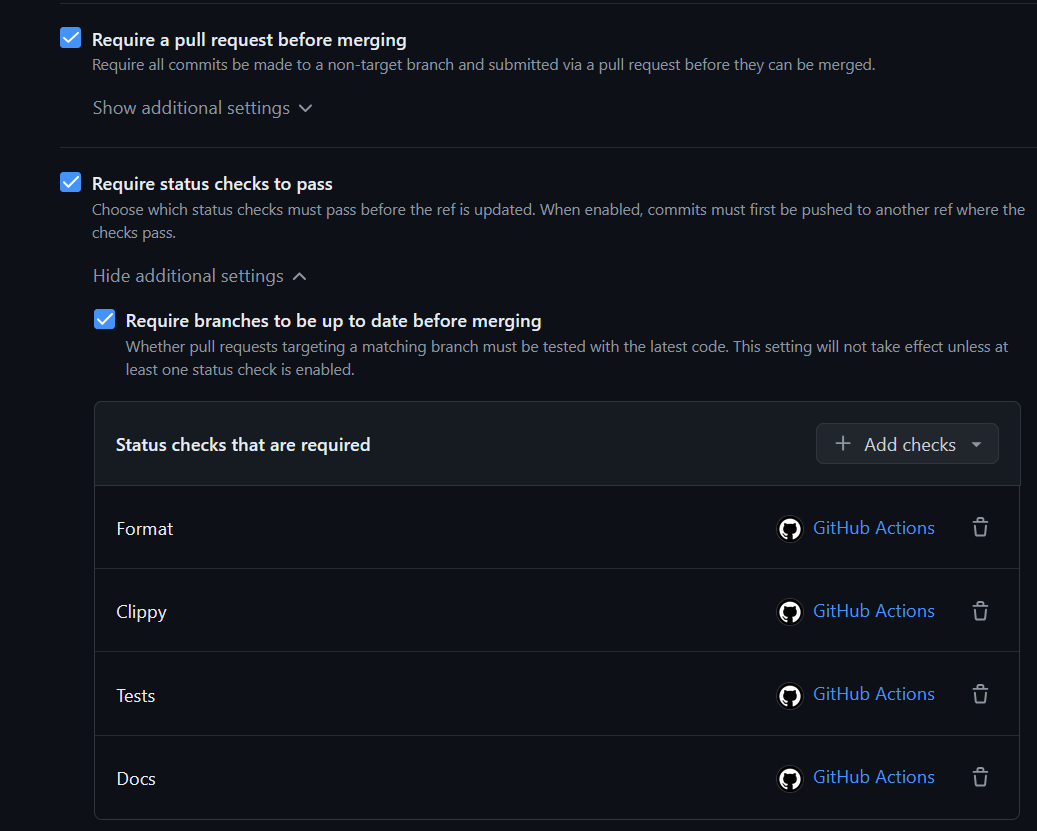
> Consider setting up a GitHub ruleset to require that all commits to main pass CI.
>
>  >
>
## CD (releasing)
The [CD workflow](../.github/workflows/release.yaml) will trigger on manual workflow dispatch, and it will:
- (Optional) Create a release build for Windows, macOS, Linux, and web.
- (Optional) Upload to [GitHub releases](https://docs.github.com/en/repositories/releasing-projects-on-github).
- (Optional) Deploy to [itch.io](https://itch.io).
- (Optional) Deploy to [GitHub Pages](https://docs.github.com/en/pages).
If you enable `env.continuous_deployment_to_itch`, it will also deploy the newest version of the app to itch.io on every push to `main` (assuming the page is set up).
Triggering a release
In your GitHub repository, navigate to `Actions > Release > Run workflow`:
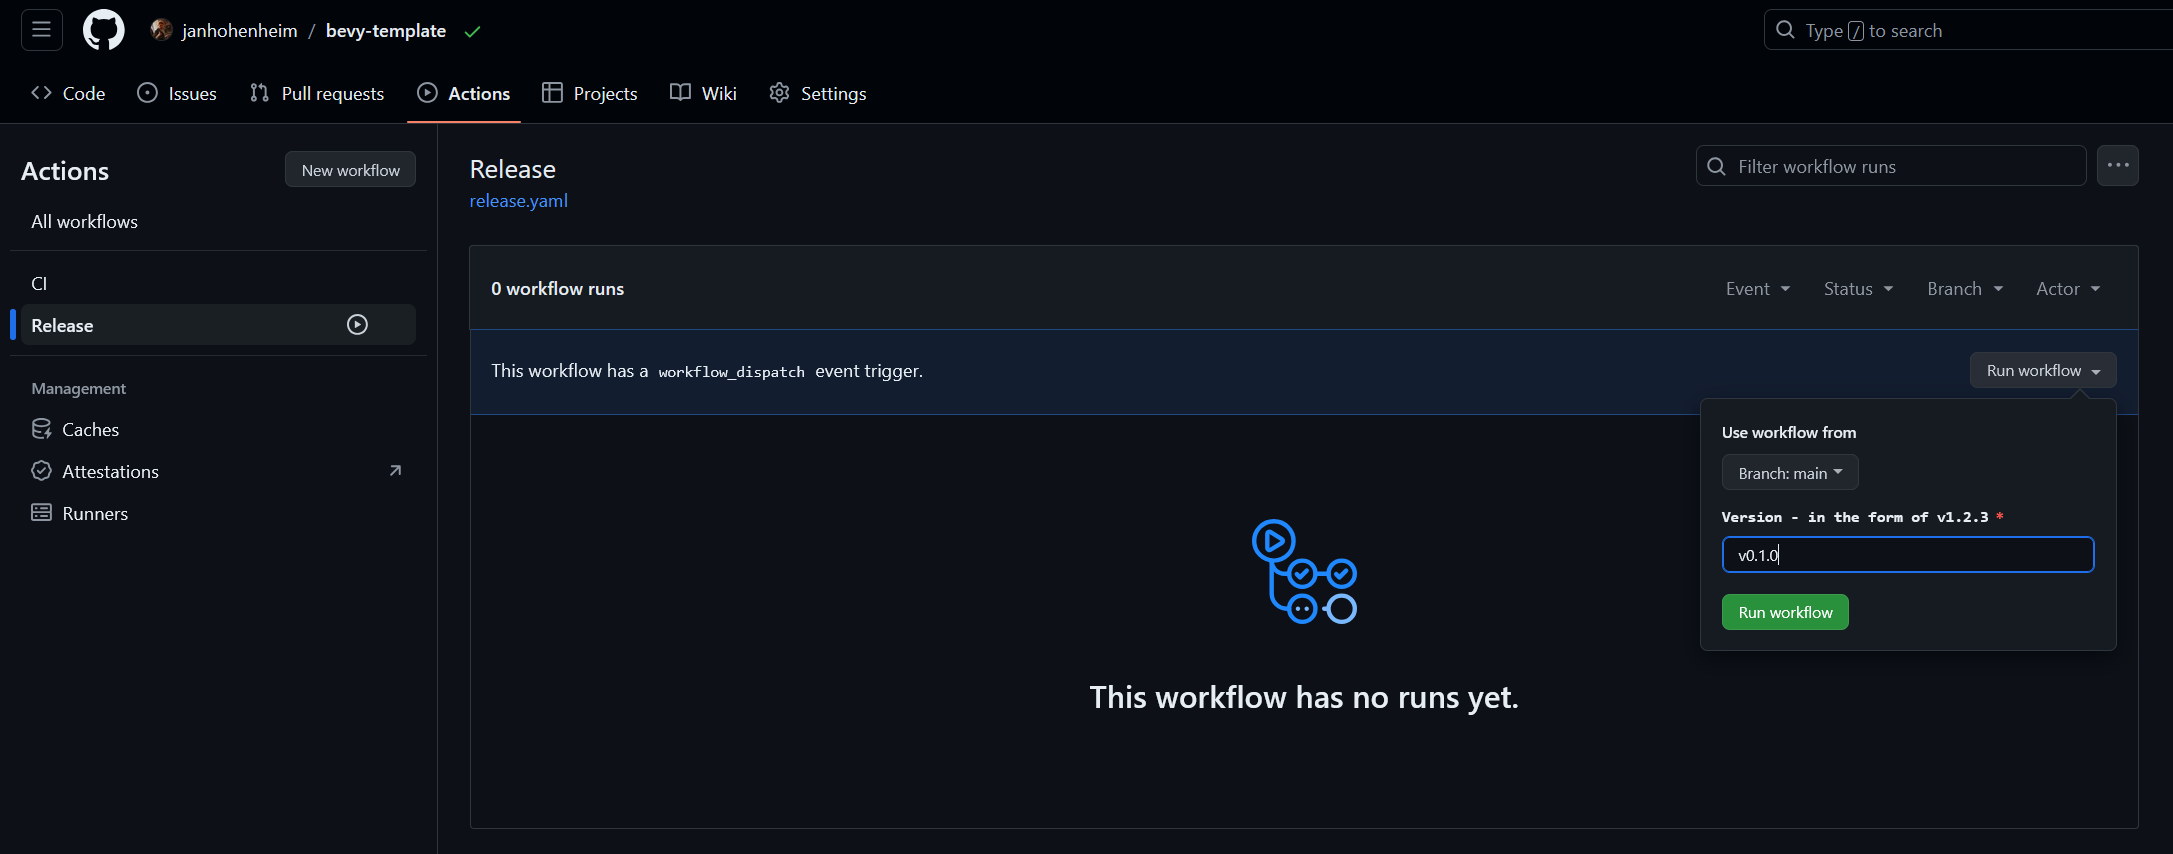
Enter a version number in the format `v1.2.3`, then hit the green `Run workflow` button.
> [!IMPORTANT]
> Using this workflow requires some setup. We'll go through this now.
### Configure environment variables
The release workflow can be configured by tweaking the environment variables in [`.github/workflows/release.yaml`](../.github/workflows/release.yaml).
List of environment variables and how they're used
```yaml
# The base filename of the binary produced by `cargo build`.
cargo_build_binary_name: bevy_new_2d
# The path to the assets directory.
assets_path: assets
# The itch.io project to deploy to in the format `user-name/project-name`.
# There will be no deployment to itch.io if this is commented out.
itch_page: the-bevy-flock/bevy-new-2d
# The ID of the app produced by this workflow.
# Applies to macOS releases.
# Must contain only A-Z, a-z, 0-9, hyphen, and period: .
app_id: the-bevy-flock.bevy-new-2d
# The base filename of the binary in the package produced by this workflow.
# Applies to Windows, macOS, and Linux releases.
# Defaults to `cargo_build_binary_name` if commented out.
app_binary_name: bevy_new_2d
# The name of the `.zip` or `.dmg` file produced by this workflow.
# Defaults to `app_binary_name` if commented out.
app_package_name: bevy-new-2d
# The display name of the app produced by this workflow.
# Applies to macOS releases.
# Defaults to `app_package_name` if commented out.
app_display_name: Bevy New 2D
# The short display name of the app produced by this workflow.
# Applies to macOS releases.
# Must be 15 or fewer characters: .
# Defaults to `app_display_name` if commented out.
app_short_name: Bevy New 2D
# Before enabling LFS, please take a look at GitHub's documentation for costs and quota limits:
#
git_lfs: false
# Enable these to deploy on every push to `main`.
# Make sure to set up any enabled targets. Builds will ignore warnings.
# Warning: If you use private repositories, this will eat through your available worker minutes quickly.
continuous_deployment_to_itch: false
continuous_deployment_to_github_pages: false
```
The initial values are set automatically by `bevy new`, but you can edit them yourself and push a commit.
### Set up itch.io deployment
#### Add butler credentials
In your GitHub repository, navigate to Settings > Secrets and variables > Actions.
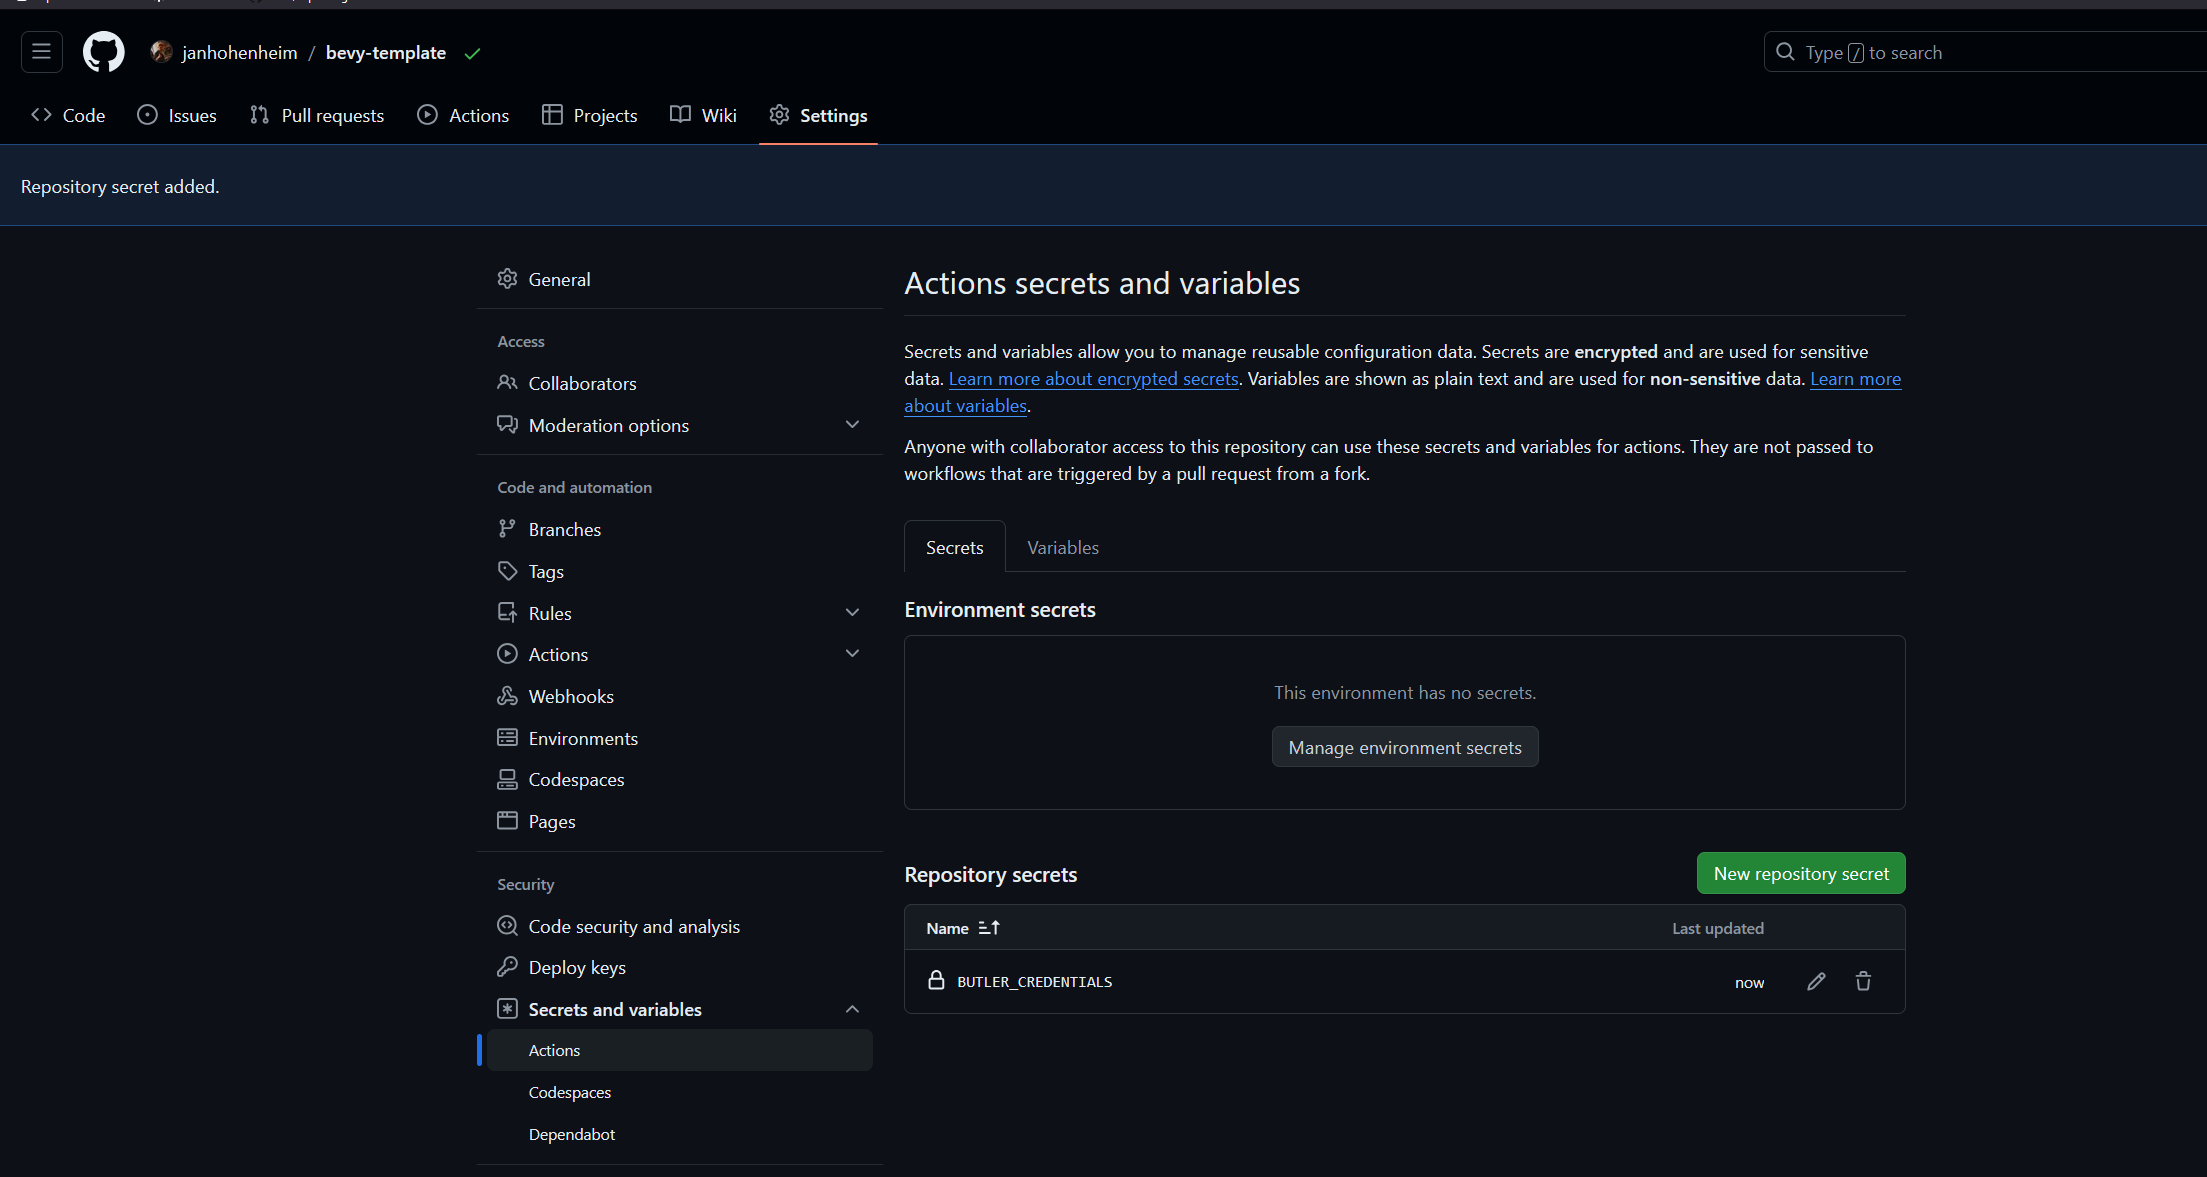
Hit `New repository secret` and enter the following values, then hit `Add secret`:
- **Name:** `BUTLER_CREDENTIALS`
- **Secret:** Your [itch.io API key](https://itch.io/user/settings/api-keys) (create a new one if necessary)
#### Create itch.io project
Create a new itch.io project with the same user and project name as in the `itch_page` variable in [`.github/workflows/release.yaml`](../.github/workflows/release.yaml).
Hit `Save & view page` at the bottom of the page.
Trigger the [release workflow](#cd-releasing) for the first time. Once it's done, go back to itch.io and hit `Edit game` in the top left.
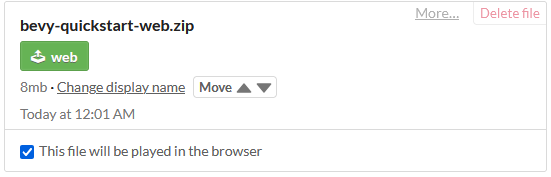
Set `Kind of project` to `HTML`, then find the newly uploaded `web` build and tick the box that says `This file will be played in the browser`.
### Set up GitHub Pages deployment
#### Enable deployment via GitHub Actions
In your GitHub repository, navigate to Settings > Pages > Build and Deployment.
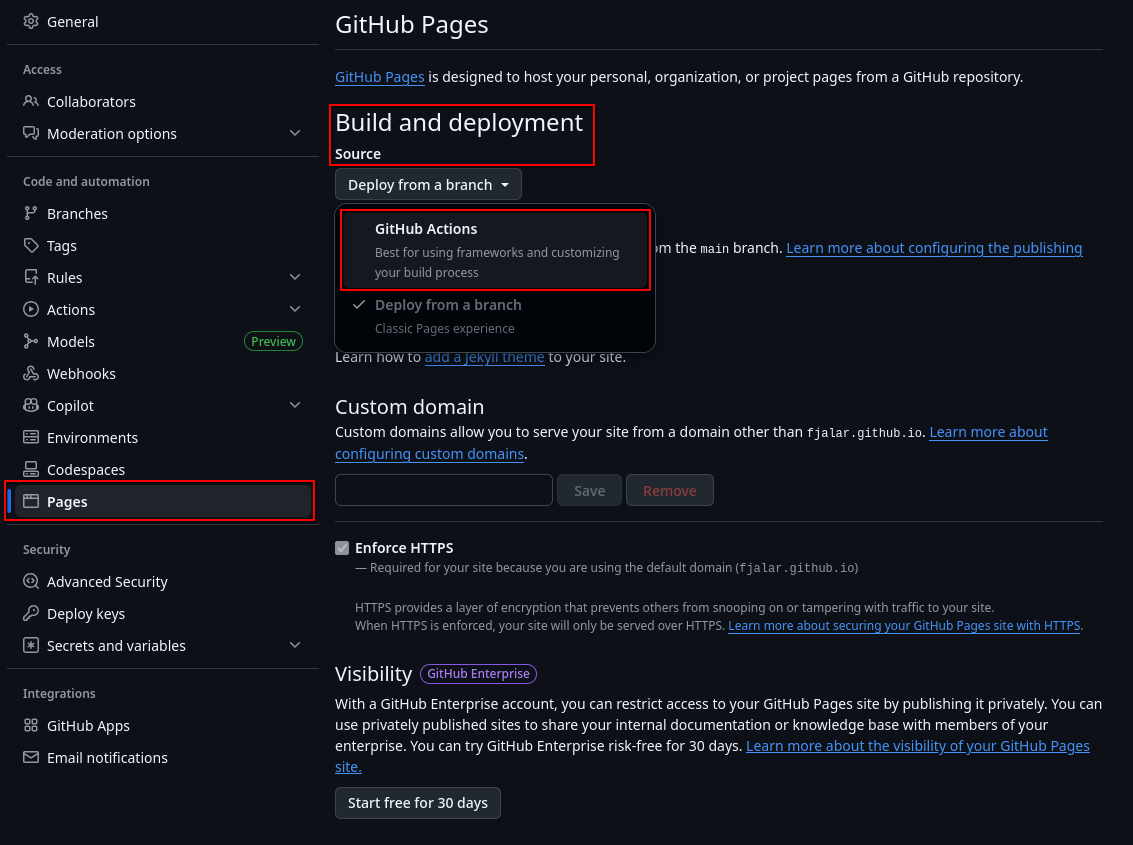
Hit the drop-down under `Source` and choose `Github Actions` as the source of your Pages deployment.
#### Add your branch to the `github-pages` environment
If you want to deploy to GitHub Pages from a branch other than `main`, you'll have to add that branch to the `github-pages` environment.
In your GitHub repository, navigate to Settings > Environments > github-pages > Deployment branches.
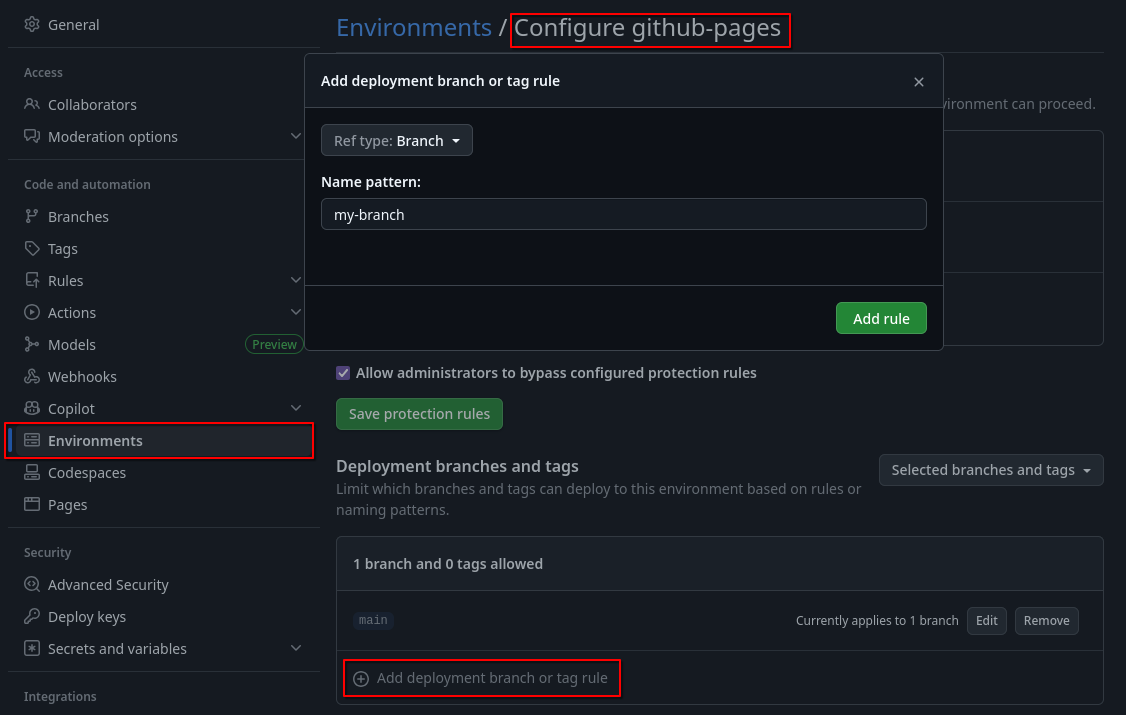
Hit `Add deployment branch rule`, type in the name of the branch you want to deploy to Pages, and hit `Add rule`.