```text
██████╗ ██████╗ ██████╗ ███╗ ██╗███████╗
██╔════╝ ██╔═══██╗██╔══██╗████╗ ██║██╔════╝
██║ ███╗██║ ██║██║ ██║██╔██╗ ██║███████╗
██║ ██║██║ ██║██║ ██║██║╚██╗██║╚════██║
╚██████╔╝╚██████╔╝██████╔╝██║ ╚████║███████║
╚═════╝ ╚═════╝ ╚═════╝ ╚═╝ ╚═══╝╚══════╝
```
[![Apache licensed][9]][10] [![Docker][3]][4] [![Go Report Card][11]][12] [![GoDoc][13]][14] [![Homebrew][15]][16]
[3]: https://img.shields.io/docker/image-size/timothyye/godns/latest
[4]: https://hub.docker.com/r/timothyye/godns
[9]: https://img.shields.io/badge/license-Apache-blue.svg
[10]: LICENSE
[11]: https://goreportcard.com/badge/github.com/timothyye/godns
[12]: https://goreportcard.com/report/github.com/timothyye/godns
[13]: https://godoc.org/github.com/TimothyYe/godns?status.svg
[14]: https://godoc.org/github.com/TimothyYe/godns
[15]: https://img.shields.io/homebrew/v/godns
[16]: https://formulae.brew.sh/formula/godns
[GoDNS](https://github.com/TimothyYe/godns) is a self-hosted dynamic DNS (DDNS) client with multi-provider support and a built-in web panel. It is a rewrite in [Go](https://golang.org) of my early [DynDNS](https://github.com/TimothyYe/DynDNS) open-source project.
[查看中文帮助文档](README_CN.md)
## Hosted version
If you want a managed DDNS service instead of self-hosting GoDNS yourself, try [godns.app](https://godns.app).
It is a hosted option for users who want DDNS without running their own server, managing DNS manually, or even owning a domain in advance.
Below is the built-in web panel of the open-source GoDNS project:
 - [Supported DNS Providers](#supported-dns-providers)
- [Quick Start](#quick-start)
- [Supported Platforms](#supported-platforms)
- [Self-hosting Pre-conditions](#self-hosting-pre-conditions)
- [Installation](#installation)
- [Configuration](#configuration)
- [Web Panel](#web-panel)
- [Running GoDNS](#running-godns)
- [Contributing](#contributing)
---
## Supported DNS Providers
| Provider | IPv4 support | IPv6 support | Root Domain | Subdomains |
| ------------------------------------- | :----------------: | :----------------: | :----------------: | :----------------: |
| [Cloudflare][cloudflare] | :white_check_mark: | :white_check_mark: | :white_check_mark: | :white_check_mark: |
| [DigitalOcean][digitalocean] | :white_check_mark: | :white_check_mark: | :white_check_mark: | :white_check_mark: |
| [Google Domains][google.domains] | :white_check_mark: | :white_check_mark: | :x: | :white_check_mark: |
| [DNSPod][dnspod] | :white_check_mark: | :white_check_mark: | :white_check_mark: | :white_check_mark: |
| [Dynv6][dynv6] | :white_check_mark: | :white_check_mark: | :x: | :white_check_mark: |
| [HE.net (Hurricane Electric)][he.net] | :white_check_mark: | :white_check_mark: | :white_check_mark: | :white_check_mark: |
| [AliDNS][alidns] | :white_check_mark: | :white_check_mark: | :white_check_mark: | :white_check_mark: |
| [DuckDNS][duckdns] | :white_check_mark: | :white_check_mark: | :x: | :white_check_mark: |
| [Dreamhost][dreamhost] | :white_check_mark: | :white_check_mark: | :x: | :white_check_mark: |
| [No-IP][no-ip] | :white_check_mark: | :white_check_mark: | :x: | :white_check_mark: |
| [Scaleway][scaleway] | :white_check_mark: | :white_check_mark: | :white_check_mark: | :white_check_mark: |
| [Linode][linode] | :white_check_mark: | :white_check_mark: | :white_check_mark: | :white_check_mark: |
| [Strato][strato] | :white_check_mark: | :white_check_mark: | :x: | :white_check_mark: |
| [LoopiaSE][loopiase] | :white_check_mark: | :white_check_mark: | :x: | :white_check_mark: |
| [Infomaniak][infomaniak] | :white_check_mark: | :white_check_mark: | :x: | :white_check_mark: |
| [Hetzner][hetzner] | :white_check_mark: | :white_check_mark: | :white_check_mark: | :white_check_mark: |
| [OVH][ovh] | :white_check_mark: | :white_check_mark: | :x: | :white_check_mark: |
| [Porkbun][porkbun] | :white_check_mark: | :white_check_mark: | :white_check_mark: | :white_check_mark: |
| [Dynu][dynu] | :white_check_mark: | :white_check_mark: | :x: | :white_check_mark: |
| [IONOS][ionos] | :white_check_mark: | :white_check_mark: | :x: | :white_check_mark: |
| [TransIP][transip] | :white_check_mark: | :white_check_mark: | :x: | :white_check_mark: |
[cloudflare]: https://cloudflare.com
[digitalocean]: https://digitalocean.com
[google.domains]: https://domains.google
[dnspod]: https://www.dnspod.cn
[dynv6]: https://dynv6.com
[he.net]: https://dns.he.net
[alidns]: https://help.aliyun.com/product/29697.html
[duckdns]: https://www.duckdns.org
[dreamhost]: https://www.dreamhost.com
[no-ip]: https://www.noip.com
[scaleway]: https://www.scaleway.com/
[linode]: https://www.linode.com
[strato]: https://strato.de
[loopiase]: https://www.loopia.se/
[infomaniak]: https://www.infomaniak.com/
[hetzner]: https://hetzner.com/
[ovh]: https://www.ovh.com
[porkbun]: https://porkbun.com/
[dynu]: https://www.dynu.com/
[ionos]: https://www.ionos.com/
[transip]: https://www.transip.net/
Tip: You can follow this [issue](https://github.com/TimothyYe/godns/issues/76) to view the current status of DDNS for root domains.
## Quick Start
Choose the path that fits you best:
- Want a managed service with no self-hosting: use [godns.app](https://godns.app).
- Want the fastest self-hosted setup: download a binary from [releases](https://github.com/TimothyYe/godns/releases).
- Want to run it in a container: jump to [As a Docker container](#as-a-docker-container).
- Want to build from source: see [Installation](#installation).
## Supported Platforms
- Linux
- MacOS
- ARM Linux (Raspberry Pi, etc.)
- Windows
- MIPS32 platform
To compile binaries for MIPS (mips or mipsle), run:
```bash
GOOS=linux GOARCH=mips/mipsle GOMIPS=softfloat go build -a
```
The binary can run on routers as well.
## Self-hosting Pre-conditions
To self-host GoDNS, it is assumed:
- You registered (now own) a domain
- Domain was delegated to a supported [DNS provider](#supported-dns-providers) (i.e. it has nameserver `NS` records pointing at a supported provider)
Alternatively, you can sign in to [DuckDNS](https://www.duckdns.org) (with a social account) and get a subdomain on the duckdns.org domain for free.
## Installation
Choose one of the following installation methods:
- Install with [Homebrew](https://brew.sh) (macOS / Linux):
```bash
brew install godns
```
- Download a compiled binary from [releases](https://github.com/TimothyYe/godns/releases).
- Use the Docker image described in [As a Docker container](#as-a-docker-container).
- Build from source:
```bash
cd cmd/godns # go to the GoDNS directory
go mod download # get dependencies
go build # build
```
## Usage
Print usage/help by running:
```bash
$ ./godns -h
Usage of ./godns:
-c string
Specify a config file (default "./config.json")
-h Show help
```
## Configuration
### Overview
- Make a copy of [config_sample.json](configs/config_sample.json) and name it as `config.json`, or make a copy of [config_sample.yaml](configs/config_sample.yaml) and name it as `config.yaml`.
- Configure your provider, domain/subdomain info, credentials, etc.
- Configure a notification medium (e.g. SMTP to receive emails) to get notified when your IP address changes
- Place the file in the same directory of GoDNS or use the `-c=path/to/your/file.json` option
### Multi-Provider Support
🆕 **GoDNS now supports multiple DNS providers simultaneously!**
You can now configure domains from different DNS providers in a single configuration file, allowing you to:
- Manage domains across multiple DNS services (Cloudflare, DNSPod, DigitalOcean, etc.)
- Use provider-specific credentials for each service
- Maintain full backward compatibility with existing single-provider configurations
📖 **[View the complete Multi-Provider Configuration Guide](MULTI_PROVIDER.md)** for detailed setup instructions and examples.
### Configuration file format
GoDNS supports 2 different configuration file formats:
- JSON
- YAML
By default, GoDNS uses `JSON` config file. However, you can specify to use the `YAML` format via: `./godns -c /path/to/config.yaml`
### Dynamic loading of configuration
GoDNS supports dynamic loading of configuration. If you modify the configuration file, GoDNS will automatically reload the configuration and apply the changes.
### Configuration properties
- `provider` — One of the [supported provider to use](#supported-dns-providers): `Cloudflare`, `Google`, `DNSPod`, `AliDNS`, `HE`, `DuckDNS` or `Dreamhost`.
- `email` — Email or account name of the DNS provider.
- `password` — Password of the DNS provider.
- `login_token` — API token of the DNS provider.
- `domains` — Domains list, with your subdomains.
- `ip_urls` — A URL array for fetching one's public IPv4 address.
- `ipv6_urls` — A URL array for fetching one's public IPv6 address.
- `ip_type` — Switch deciding if IPv4 or IPv6 should be used (when [supported](#supported-dns-providers)). Available values: `IPv4` or `IPv6`.
- `interval` — How often (in seconds) the public IP should be updated.
- `socks5_proxy` — Socks5 proxy server.
- `resolver` — Address of a public DNS server to use. For instance to use [Google's public DNS](https://developers.google.com/speed/public-dns/docs/using), you can set `8.8.8.8` when using GoDNS in IPv4 mode or `2001:4860:4860::8888` in IPv6 mode.
- `skip_ssl_verify` - Skip verification of SSL certificates for https requests.
### Update root domain
By simply putting `@` into `sub_domains`, for example:
```json
"domains": [{
"domain_name": "example.com",
"sub_domains": ["@"]
}]
```
### Configuration examples
#### Cloudflare
For Cloudflare, you need to provide the email & Global API Key as a password (or to use the API token) and configure all the domains & subdomains.
By setting the option `proxied = true`, the record receives the performance and security benefits of Cloudflare. This option is only available for Cloudflare.
- [Supported DNS Providers](#supported-dns-providers)
- [Quick Start](#quick-start)
- [Supported Platforms](#supported-platforms)
- [Self-hosting Pre-conditions](#self-hosting-pre-conditions)
- [Installation](#installation)
- [Configuration](#configuration)
- [Web Panel](#web-panel)
- [Running GoDNS](#running-godns)
- [Contributing](#contributing)
---
## Supported DNS Providers
| Provider | IPv4 support | IPv6 support | Root Domain | Subdomains |
| ------------------------------------- | :----------------: | :----------------: | :----------------: | :----------------: |
| [Cloudflare][cloudflare] | :white_check_mark: | :white_check_mark: | :white_check_mark: | :white_check_mark: |
| [DigitalOcean][digitalocean] | :white_check_mark: | :white_check_mark: | :white_check_mark: | :white_check_mark: |
| [Google Domains][google.domains] | :white_check_mark: | :white_check_mark: | :x: | :white_check_mark: |
| [DNSPod][dnspod] | :white_check_mark: | :white_check_mark: | :white_check_mark: | :white_check_mark: |
| [Dynv6][dynv6] | :white_check_mark: | :white_check_mark: | :x: | :white_check_mark: |
| [HE.net (Hurricane Electric)][he.net] | :white_check_mark: | :white_check_mark: | :white_check_mark: | :white_check_mark: |
| [AliDNS][alidns] | :white_check_mark: | :white_check_mark: | :white_check_mark: | :white_check_mark: |
| [DuckDNS][duckdns] | :white_check_mark: | :white_check_mark: | :x: | :white_check_mark: |
| [Dreamhost][dreamhost] | :white_check_mark: | :white_check_mark: | :x: | :white_check_mark: |
| [No-IP][no-ip] | :white_check_mark: | :white_check_mark: | :x: | :white_check_mark: |
| [Scaleway][scaleway] | :white_check_mark: | :white_check_mark: | :white_check_mark: | :white_check_mark: |
| [Linode][linode] | :white_check_mark: | :white_check_mark: | :white_check_mark: | :white_check_mark: |
| [Strato][strato] | :white_check_mark: | :white_check_mark: | :x: | :white_check_mark: |
| [LoopiaSE][loopiase] | :white_check_mark: | :white_check_mark: | :x: | :white_check_mark: |
| [Infomaniak][infomaniak] | :white_check_mark: | :white_check_mark: | :x: | :white_check_mark: |
| [Hetzner][hetzner] | :white_check_mark: | :white_check_mark: | :white_check_mark: | :white_check_mark: |
| [OVH][ovh] | :white_check_mark: | :white_check_mark: | :x: | :white_check_mark: |
| [Porkbun][porkbun] | :white_check_mark: | :white_check_mark: | :white_check_mark: | :white_check_mark: |
| [Dynu][dynu] | :white_check_mark: | :white_check_mark: | :x: | :white_check_mark: |
| [IONOS][ionos] | :white_check_mark: | :white_check_mark: | :x: | :white_check_mark: |
| [TransIP][transip] | :white_check_mark: | :white_check_mark: | :x: | :white_check_mark: |
[cloudflare]: https://cloudflare.com
[digitalocean]: https://digitalocean.com
[google.domains]: https://domains.google
[dnspod]: https://www.dnspod.cn
[dynv6]: https://dynv6.com
[he.net]: https://dns.he.net
[alidns]: https://help.aliyun.com/product/29697.html
[duckdns]: https://www.duckdns.org
[dreamhost]: https://www.dreamhost.com
[no-ip]: https://www.noip.com
[scaleway]: https://www.scaleway.com/
[linode]: https://www.linode.com
[strato]: https://strato.de
[loopiase]: https://www.loopia.se/
[infomaniak]: https://www.infomaniak.com/
[hetzner]: https://hetzner.com/
[ovh]: https://www.ovh.com
[porkbun]: https://porkbun.com/
[dynu]: https://www.dynu.com/
[ionos]: https://www.ionos.com/
[transip]: https://www.transip.net/
Tip: You can follow this [issue](https://github.com/TimothyYe/godns/issues/76) to view the current status of DDNS for root domains.
## Quick Start
Choose the path that fits you best:
- Want a managed service with no self-hosting: use [godns.app](https://godns.app).
- Want the fastest self-hosted setup: download a binary from [releases](https://github.com/TimothyYe/godns/releases).
- Want to run it in a container: jump to [As a Docker container](#as-a-docker-container).
- Want to build from source: see [Installation](#installation).
## Supported Platforms
- Linux
- MacOS
- ARM Linux (Raspberry Pi, etc.)
- Windows
- MIPS32 platform
To compile binaries for MIPS (mips or mipsle), run:
```bash
GOOS=linux GOARCH=mips/mipsle GOMIPS=softfloat go build -a
```
The binary can run on routers as well.
## Self-hosting Pre-conditions
To self-host GoDNS, it is assumed:
- You registered (now own) a domain
- Domain was delegated to a supported [DNS provider](#supported-dns-providers) (i.e. it has nameserver `NS` records pointing at a supported provider)
Alternatively, you can sign in to [DuckDNS](https://www.duckdns.org) (with a social account) and get a subdomain on the duckdns.org domain for free.
## Installation
Choose one of the following installation methods:
- Install with [Homebrew](https://brew.sh) (macOS / Linux):
```bash
brew install godns
```
- Download a compiled binary from [releases](https://github.com/TimothyYe/godns/releases).
- Use the Docker image described in [As a Docker container](#as-a-docker-container).
- Build from source:
```bash
cd cmd/godns # go to the GoDNS directory
go mod download # get dependencies
go build # build
```
## Usage
Print usage/help by running:
```bash
$ ./godns -h
Usage of ./godns:
-c string
Specify a config file (default "./config.json")
-h Show help
```
## Configuration
### Overview
- Make a copy of [config_sample.json](configs/config_sample.json) and name it as `config.json`, or make a copy of [config_sample.yaml](configs/config_sample.yaml) and name it as `config.yaml`.
- Configure your provider, domain/subdomain info, credentials, etc.
- Configure a notification medium (e.g. SMTP to receive emails) to get notified when your IP address changes
- Place the file in the same directory of GoDNS or use the `-c=path/to/your/file.json` option
### Multi-Provider Support
🆕 **GoDNS now supports multiple DNS providers simultaneously!**
You can now configure domains from different DNS providers in a single configuration file, allowing you to:
- Manage domains across multiple DNS services (Cloudflare, DNSPod, DigitalOcean, etc.)
- Use provider-specific credentials for each service
- Maintain full backward compatibility with existing single-provider configurations
📖 **[View the complete Multi-Provider Configuration Guide](MULTI_PROVIDER.md)** for detailed setup instructions and examples.
### Configuration file format
GoDNS supports 2 different configuration file formats:
- JSON
- YAML
By default, GoDNS uses `JSON` config file. However, you can specify to use the `YAML` format via: `./godns -c /path/to/config.yaml`
### Dynamic loading of configuration
GoDNS supports dynamic loading of configuration. If you modify the configuration file, GoDNS will automatically reload the configuration and apply the changes.
### Configuration properties
- `provider` — One of the [supported provider to use](#supported-dns-providers): `Cloudflare`, `Google`, `DNSPod`, `AliDNS`, `HE`, `DuckDNS` or `Dreamhost`.
- `email` — Email or account name of the DNS provider.
- `password` — Password of the DNS provider.
- `login_token` — API token of the DNS provider.
- `domains` — Domains list, with your subdomains.
- `ip_urls` — A URL array for fetching one's public IPv4 address.
- `ipv6_urls` — A URL array for fetching one's public IPv6 address.
- `ip_type` — Switch deciding if IPv4 or IPv6 should be used (when [supported](#supported-dns-providers)). Available values: `IPv4` or `IPv6`.
- `interval` — How often (in seconds) the public IP should be updated.
- `socks5_proxy` — Socks5 proxy server.
- `resolver` — Address of a public DNS server to use. For instance to use [Google's public DNS](https://developers.google.com/speed/public-dns/docs/using), you can set `8.8.8.8` when using GoDNS in IPv4 mode or `2001:4860:4860::8888` in IPv6 mode.
- `skip_ssl_verify` - Skip verification of SSL certificates for https requests.
### Update root domain
By simply putting `@` into `sub_domains`, for example:
```json
"domains": [{
"domain_name": "example.com",
"sub_domains": ["@"]
}]
```
### Configuration examples
#### Cloudflare
For Cloudflare, you need to provide the email & Global API Key as a password (or to use the API token) and configure all the domains & subdomains.
By setting the option `proxied = true`, the record receives the performance and security benefits of Cloudflare. This option is only available for Cloudflare.
Using email & Global API Key
```json
{
"provider": "Cloudflare",
"email": "you@example.com",
"password": "Global API Key",
"domains": [
{
"domain_name": "example.com",
"sub_domains": ["www", "test"]
},
{
"domain_name": "example2.com",
"sub_domains": ["www", "test"]
}
],
"resolver": "8.8.8.8",
"ip_urls": ["https://api.ip.sb/ip"],
"ip_type": "IPv4",
"interval": 300,
"socks5_proxy": "",
"proxied": false
}
```
Using the API Token
```json
{
"provider": "Cloudflare",
"login_token": "API Token",
"domains": [
{
"domain_name": "example.com",
"sub_domains": ["www", "test"]
},
{
"domain_name": "example2.com",
"sub_domains": ["www", "test"]
}
],
"resolver": "8.8.8.8",
"ip_urls": ["https://api.ip.sb/ip"],
"ip_type": "IPv4",
"interval": 300,
"socks5_proxy": ""
}
```
#### DNSPod
For DNSPod, you need to provide your API Token(you can create it [here](https://www.dnspod.cn/console/user/security)), and config all the domains & subdomains.
Example
```json
{
"provider": "DNSPod",
"login_token": "your_id,your_token",
"domains": [
{
"domain_name": "example.com",
"sub_domains": ["www", "test"]
},
{
"domain_name": "example2.com",
"sub_domains": ["www", "test"]
}
],
"resolver": "8.8.8.8",
"ip_urls": ["https://api.ip.sb/ip"],
"ip_type": "IPv4",
"interval": 300,
"socks5_proxy": ""
}
```
#### DigitalOcean
For DigitalOcean, you need to provide an API Token with the `domain` scopes (you can create it [here](https://cloud.digitalocean.com/account/api/tokens/new)), and config all the domains & subdomains.
Example
```json
{
"provider": "DigitalOcean",
"login_token": "dop_v1_00112233445566778899aabbccddeeff",
"domains": [
{
"domain_name": "example.com",
"sub_domains": ["@", "www"]
}
],
"resolver": "8.8.8.8",
"ip_urls": ["https://api.ip.sb/ip"],
"ip_type": "IPv4",
"interval": 300
}
```
#### Dreamhost
For Dreamhost, you need to provide your API Token(you can create it [here](https://panel.dreamhost.com/?tree=home.api)), and config all the domains & subdomains.
Example
```json
{
"provider": "Dreamhost",
"login_token": "your_api_key",
"domains": [
{
"domain_name": "example.com",
"sub_domains": ["www", "test"]
},
{
"domain_name": "example2.com",
"sub_domains": ["www", "test"]
}
],
"resolver": "8.8.8.8",
"ip_urls": ["https://api.ip.sb/ip"],
"ip_type": "IPv4",
"interval": 300,
"resolver": "ns1.dreamhost.com",
"socks5_proxy": ""
}
```
#### Dynv6
For Dynv6, only need to provide the `token`, config 1 default domain & subdomains.
Example
```json
{
"provider": "Dynv6",
"password": "",
"login_token": "1234567ABCDEFGabcdefg123456789",
"domains": [
{
"domain_name": "dynv6.net",
"sub_domains": ["myname"]
}
],
"resolver": "8.8.8.8",
"ip_urls": ["https://api.ip.sb/ip"],
"ip_type": "IPv4",
"interval": 300,
"socks5_proxy": ""
}
```
#### Google Domains
For Google Domains, you need to provide email & password, and config all the domains & subdomains.
Example
```json
{
"provider": "Google",
"email": "Your_Username",
"password": "Your_Password",
"domains": [
{
"domain_name": "example.com",
"sub_domains": ["www", "test"]
},
{
"domain_name": "example2.com",
"sub_domains": ["www", "test"]
}
],
"resolver": "8.8.8.8",
"ip_urls": ["https://api.ip.sb/ip"],
"ip_type": "IPv4",
"interval": 300,
"socks5_proxy": ""
}
```
#### AliDNS
For AliDNS, you need to provide `AccessKeyID` & `AccessKeySecret` as `email` & `password`, and config all the domains & subdomains.
Example
```json
{
"provider": "AliDNS",
"email": "AccessKeyID",
"password": "AccessKeySecret",
"login_token": "",
"domains": [
{
"domain_name": "example.com",
"sub_domains": ["www", "test"]
},
{
"domain_name": "example2.com",
"sub_domains": ["www", "test"]
}
],
"resolver": "8.8.8.8",
"ip_urls": ["https://api.ip.sb/ip"],
"ip_type": "IPv4",
"interval": 300,
"socks5_proxy": ""
}
```
#### DuckDNS
For DuckDNS, the only thing needed is to provide the `token`, config 1 default domain & subdomains.
Example
```json
{
"provider": "DuckDNS",
"password": "",
"login_token": "3aaaaaaaa-f411-4198-a5dc-8381cac61b87",
"domains": [
{
"domain_name": "www.duckdns.org",
"sub_domains": ["myname"]
}
],
"resolver": "8.8.8.8",
"ip_urls": ["https://api.ip.sb/ip"],
"ip_type": "IPv4",
"interval": 300,
"socks5_proxy": ""
}
```
#### No-IP
Example
```json
{
"provider": "NoIP",
"email": "mail@example.com",
"password": "YourPassword",
"domains": [
{
"domain_name": "ddns.net",
"sub_domains": ["timothyye6"]
}
],
"ip_type": "IPv4",
"ip_urls": ["https://api.ip.sb/ip"],
"resolver": "8.8.8.8",
"interval": 300,
"socks5_proxy": ""
}
```
#### HE.net
For HE, email is not needed, just fill in the DDNS key as a password, and configure all the domains & subdomains.
Example
```json
{
"provider": "HE",
"password": "Your DDNS Key",
"login_token": "",
"domains": [
{
"domain_name": "example.com",
"sub_domains": ["www", "test"]
},
{
"domain_name": "example2.com",
"sub_domains": ["www", "test"]
}
],
"resolver": "8.8.8.8",
"ip_urls": ["https://api.ip.sb/ip"],
"ip_type": "IPv4",
"interval": 300,
"socks5_proxy": ""
}
```
Provider configuration
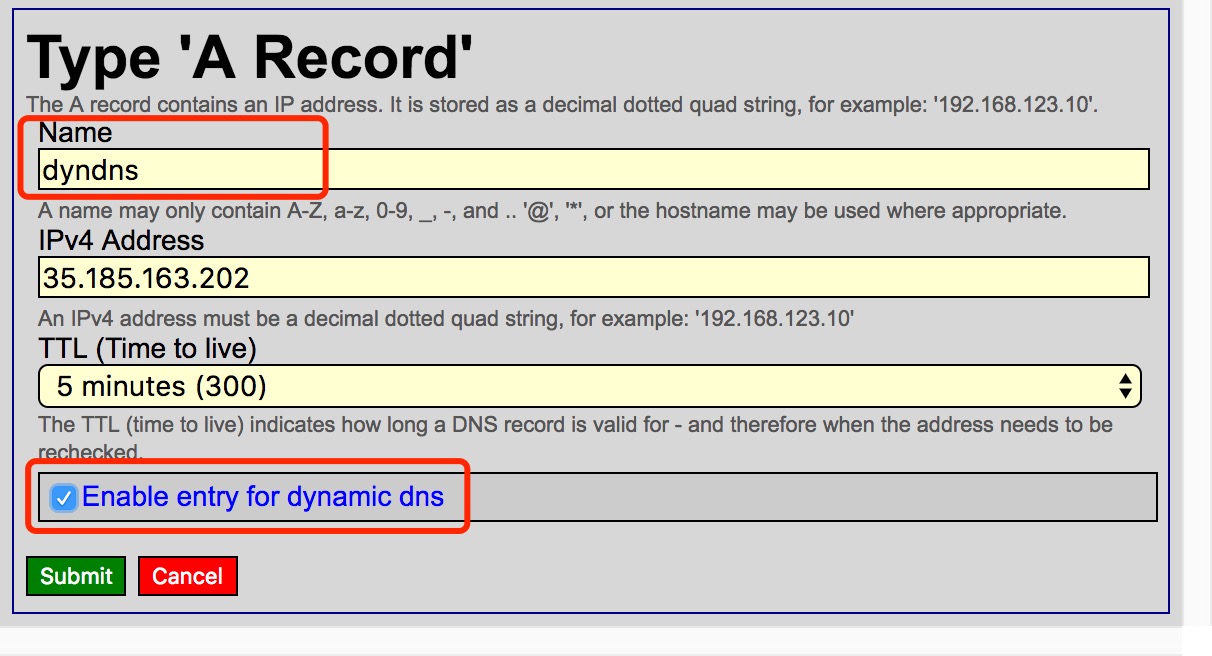
Add a new "A record" and make sure that "Enable entry for dynamic dns" is checked:
 Fill in your own DDNS key or generate a random DDNS key for this newly created "A record":
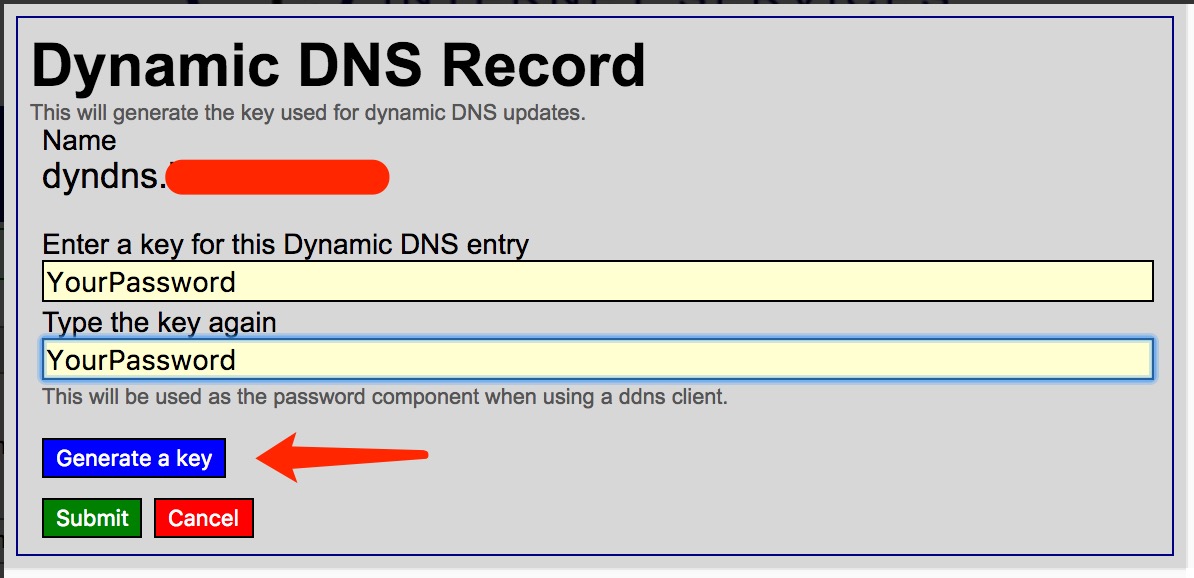 Remember the DDNS key and set it in the `password` property in the configuration file.
**NOTICE**: If you have multiple domains or subdomains, make sure their DDNS key are the same.
Remember the DDNS key and set it in the `password` property in the configuration file.
**NOTICE**: If you have multiple domains or subdomains, make sure their DDNS key are the same.
#### Scaleway
For Scaleway, you need to provide an API Secret Key as the `login_token` ([How to generate an API key](https://www.scaleway.com/en/docs/generate-api-keys/)), and configure the domains and subdomains. `domain_name` should equal a DNS zone, or the root domain in Scaleway. TTL for the DNS records will be set to the `interval` value. Make sure `A` or `AAAA` records exist for the relevant sub domains, these can be set up in the [Scaleway console](https://www.scaleway.com/en/docs/scaleway-dns/#-Managing-Records).
Example
```json
{
"provider": "Scaleway",
"login_token": "API Secret Key",
"domains": [
{
"domain_name": "example.com",
"sub_domains": ["www", "@"]
},
{
"domain_name": "samplednszone.example.com",
"sub_domains": ["www", "test"]
}
],
"resolver": "8.8.8.8",
"ip_urls": ["https://api.ip.sb/ip"],
"ip_type": "IPv4",
"interval": 300
}
```
#### Linode
To authenticate with the Linode API you will need to provide a Personal Access Token with "Read/Write" access on the "Domain" scope. Linode has [a help page about creating access tokens](https://www.linode.com/docs/guides/getting-started-with-the-linode-api/). Pass this token into the `login_token` field of the config file.
The `domain_name` field of the config file must be the name of an existing Domain managed by Linode. Linode has [a help page about adding domains](https://www.linode.com/docs/guides/dns-manager/). The GoDNS Linode handler will not create domains automatically but will create subdomains automatically.
The GoDNS Linode handler currently uses a fixed TTL of 30 seconds for Linode DNS records.
Example
```json
{
"provider": "Linode",
"login_token": ${PERSONAL_ACCESS_TOKEN},
"domains": [{
"domain_name": "example.com",
"sub_domains": ["www","@"]
},{
"domain_name": "samplednszone.example.com",
"sub_domains": ["www","test"]
}
],
"resolver": "8.8.8.8",
"ip_urls": ["https://api.ip.sb/ip"],
"ip_type": "IPv4",
"interval": 300
}
```
#### Strato
For Strato, you need to provide email & password and configure all the domains & subdomains.
More Info: [German](https://www.strato.de/faq/hosting/so-einfach-richten-sie-dyndns-fuer-ihre-domains-ein/) [English](https://www.strato-hosting.co.uk/faq/hosting/this-is-how-easy-it-is-to-set-up-dyndns-for-your-domains/)
Example
```json
{
"provider": "strato",
"password": "Your_Password",
"domains": [
{
"domain_name": "example.com",
"sub_domains": ["www", "test"]
},
{
"domain_name": "example2.com",
"sub_domains": ["www", "test"]
}
],
"resolver": "8.8.8.8",
"ip_urls": ["https://api.ip.sb/ip"],
"ip_type": "IPv4",
"interval": 300,
"socks5_proxy": ""
}
```
#### LoopiaSE
For LoopiaSE, you need to provide a username & password and configure all the domains & subdomains.
More info: [Swedish](https://support.loopia.se/wiki/om-dyndns-stodet/)
Example
```json
{
"provider": "LoopiaSE",
"email": "Your_Username",
"password": "Your_Password",
"domains": [
{
"domain_name": "example.com",
"sub_domains": ["www", "test"]
},
{
"domain_name": "example2.com",
"sub_domains": ["www", "test"]
}
],
"resolver": "8.8.8.8",
"ip_urls": ["https://api.ip.sb/ip"],
"ip_type": "IPv4",
"interval": 300,
"socks5_proxy": ""
}
```
#### Infomaniak
For Infomaniak, you need to provide a username & password and configure all the domains & subdomains.
More info: [English](https://faq.infomaniak.com/2376)
Example
```json
{
"provider": "Infomaniak",
"email": "Your_Username",
"password": "Your_Password",
"domains": [
{
"domain_name": "example.com",
"sub_domains": ["www", "test"]
},
{
"domain_name": "example2.com",
"sub_domains": ["www", "test"]
}
],
"resolver": "8.8.8.8",
"ip_urls": ["https://api.ip.sb/ip"],
"ip_type": "IPv4",
"interval": 300,
"socks5_proxy": ""
}
```
#### Hetzner
For Hetzner, you have to create an access token. This can be done in the DNS-Console.
(Person Icon in the top left corner --> API Tokens)
Notice: If a domain has multiple Records **only the first** Record will be updated.
Make sure there is just one record.
Example
```json
{
"provider": "hetzner",
"login_token": "",
"domains": [
{
"domain_name": "example.com",
"sub_domains": ["www", "test"]
},
{
"domain_name": "example2.com",
"sub_domains": ["www", "test"]
}
],
"resolver": "8.8.8.8",
"ip_urls": ["https://api.ip.sb/ip"],
"ip_type": "IPv4"
}
```
#### OVH
For OVH, you need to provide a Consumerkey, an Appsecret, and an Appkey and configure all the domains & subdomains.
The needed values can be obtained by visiting [this site](https://www.ovh.com/auth/api/createToken)
Rights should be '\*' on GET, POST and PUT
More info: [help.ovhcloud.com](https://help.ovhcloud.com/csm/en-gb-api-getting-started-ovhcloud-api?id=kb_article_view&sysparm_article=KB0042784)
Example
```json
{
"provider": "OVH",
"consumer_key": "e389ac80cc8da9c7451bc7b8f171bf4f",
"app_secret": "d1ffee354d3643d70deaab48a09131fd",
"app_key": "cd338839d6472064",
"domains": [
{
"domain_name": "example.com",
"sub_domains": ["www", "test"]
},
{
"domain_name": "example2.com",
"sub_domains": ["www", "test"]
}
],
"resolver": "8.8.8.8",
"ip_urls": ["https://api.ip.sb/ip"],
"ip_type": "IPv4",
"interval": 300,
"socks5_proxy": ""
}
```
#### Porkbun
For Porkbun, you need to provide your API key as `login_token` and secret key as `password`.
Get your API credentials from [Porkbun API Management](https://porkbun.com/account/api).
Example
```json
{
"provider": "Porkbun",
"login_token": "pk1_your_api_key",
"password": "sk1_your_secret_key",
"domains": [
{
"domain_name": "example.com",
"sub_domains": ["@", "www", "test"]
}
],
"resolver": "8.8.8.8",
"ip_urls": ["https://api.ipify.org"],
"ip_type": "IPv4",
"interval": 300
}
```
#### Dynu
For Dynu, you need to configure the `password`, config 1 default domain & subdomain.
Example
```json
{
"provider": "Dynu",
"password": "Your_Password",
"domains": [
{
"domain_name": "your_domain.com",
"sub_domains": ["your_subdomain"]
}
],
"resolver": "8.8.8.8",
"ip_urls": ["https://api.ip.sb/ip"],
"ip_type": "IPv4",
"interval": 300,
"socks5_proxy": ""
}
```
#### IONOS
This is for IONOS Hosting Services, **not** IONOS Cloud.
You'll need to [sign up for API Access to Hosting Services](https://my.ionos.com/shop/product/ionos-api), then create an [API Key](https://developer.hosting.ionos.com/keys).
You can find a full guide in the [IONOS API Documentation](https://developer.hosting.ionos.com/docs/getstarted).
**Note**: The API-Key used by GoDNS must follow the form `publicprefix.secret` as described in the aforementioned documentation.
Example
```yaml
provider: IONOS
login_token: publicprefix.secret
domains:
- domain_name: example.com
sub_domains:
- somesubdomain
- anothersubdomain
resolver: 1.1.1.1
ip_urls:
- https://api.ipify.org
ip_type: IPv4
interval: 300
socks5_proxy: ""
```
#### TransIP
For TransIP, you need to provide your api private key as `login_token` and username as `email`, and configure all the domains & subdomains.
Example
```yaml
provider: TransIP
email: account_name
login_token: api_key
domains:
- domain_name: example.com
sub_domains:
- "@"
- somesubdomain
- anothersubdomain
resolver: 1.1.1.1
ip_urls:
- https://api.ipify.org
ip_type: IPv4
interval: 300
socks5_proxy: ""
```
### Notifications
GoDNS can send a notification each time the IP changes.
#### Email
Emails are sent over [SMTP](https://en.wikipedia.org/wiki/Simple_Mail_Transfer_Protocol). Update your configuration with the following snippet:
```json
"notify": {
"mail": {
"enabled": true,
"smtp_server": "smtp.example.com",
"smtp_username": "user",
"smtp_password": "password",
"smtp_port": 25,
"send_from": "my_mail@example.com"
"send_to": "my_mail@example.com"
}
}
```
Each time the IP changes, you will receive an email like this:
 #### Telegram
To receive a [Telegram](https://telegram.org/) message each time the IP changes, update your configuration with the following snippet:
```json
"notify": {
"telegram": {
"enabled": true,
"bot_api_key": "11111:aaaa-bbbb",
"chat_id": "-123456",
"message_template": "Domain *{{ .Domain }}* updated to %0A{{ .CurrentIP }}",
"use_proxy": false
},
}
```
The `message_template` property supports [markdown](https://www.markdownguide.org). New lines need to be escaped with `%0A`.
#### Slack
To receive a [Slack](https://slack.com) message each time the IP changes, update your configuration with the following snippet:
```json
"notify": {
"slack": {
"enabled": true,
"bot_api_token": "xoxb-xxx",
"channel": "your_channel",
"message_template": "Domain *{{ .Domain }}* updated to \n{{ .CurrentIP }}",
"use_proxy": false
},
}
```
The `message_template` property supports [markdown](https://www.markdownguide.org). New lines needs to be escaped with `\n`.
#### Discord
To receive a [Discord](https://discord.gg) message each time the IP changes, update your configuration with the following snippit:
```json
"notify": {
"discord": {
"enabled": true,
"bot_api_token": "discord_bot_token",
"channel": "your_channel",
"message_template": "(Optional) Domain *{{ .Domain }}* updated to \n{{ .CurrentIP }}",
}
}
```
#### Pushover
To receive a [Pushover](https://pushover.net/) message each time the IP changes, update your configuration with the following snippet:
```json
"notify": {
"pushover": {
"enabled": true,
"token": "abcdefghijklmnopqrstuvwxyz1234",
"user": "abcdefghijklmnopqrstuvwxyz1234",
"message_template": "",
"device": "",
"title": "",
"priority": 0,
"html": 1
}
}
```
The `message_template` property supports [html](https://pushover.net/api#html) if the `html` parameter is `1`. If it is left empty a default message will be used.
If the `device` and `title` parameters are left empty, Pushover will choose defaults [see](https://pushover.net/api#messages). More details on the priority parameter
can be found on the Pushover [API description](https://pushover.net/api#priority).
#### Bark
To receive a [Bark](https://bark.day.app/) message each time the IP changes, update your configuration with the following snippet:
```json
"notify": {
"bark": {
"enabled": true,
"server": "https://api.day.app",
"device_keys": "",
"params": "{ \"isArchive\": 1, \"action\": \"none\" }"
}
}
```
`server` Bark server address. You can use the default official server `https://api.day.app` or set it to a self-hosted server address.
`device_keys` device key, supports multiple keys (comma-separated) for batch push.
`params` Bark request parameters, please refer to [Bark API](https://bark.day.app/#/en-us/tutorial?id=request-parameters)
`user` Basic auth username of the self-hosted server, same with server side environment variable `BARK_SERVER_BASIC_AUTH_USER`.
`password` Basic auth password of the self-hosted server, same with server side environment variable `BARK_SERVER_BASIC_AUTH_PASSWORD`.
For more information, please refer to the [Bark official documentation](https://bark.day.app/)
#### Ntfy
To receive an [ntfy](https://ntfy.sh/) notification each time the IP changes, update your configuration with the following snippet:
```json
"notify": {
"ntfy": {
"enabled": true,
"topic": "godns",
"server": "https://ntfy.sh",
"token": "",
"user": "",
"password": "",
"priority": "default",
"tags": "rotating_light",
"icon": "",
"message_template": ""
}
}
```
`topic` The ntfy topic to publish to (required). The topic is essentially a channel name — pick something not easily guessable.
`server` The ntfy server URL. Defaults to `https://ntfy.sh`. Set to your self-hosted server address if applicable.
`token` Access token for authentication (optional). Only needed for self-hosted servers with access control.
`user` Username for basic authentication (optional). Used with `password` for self-hosted servers.
`password` Password for basic authentication (optional). Used with `user` for self-hosted servers.
`priority` Message priority: `min`, `low`, `default`, `high`, or `max` (optional).
`tags` Comma-separated list of tags or [emoji short codes](https://docs.ntfy.sh/emojis/) (optional).
`icon` URL to an icon to display in the notification (optional).
`message_template` Custom message template (optional). If empty, defaults to `IP address of {{ .Domain }} updated to {{ .CurrentIP }}`.
For more information, please refer to the [ntfy documentation](https://docs.ntfy.sh/publish/)
### Webhook
Webhook is another feature that GoDNS provides to deliver notifications to other applications while the IP is changed. GoDNS delivers a notification to the target URL via an HTTP `GET` or `POST` request.
The configuration section `webhook` is used for customizing the webhook request. In general, there are 2 fields used for the webhook request:
> - `url`: The target URL for sending webhook requests.
> - `request_body`: The content for sending a `POST` request, if this field is empty, an HTTP GET request will be sent instead of the HTTP POST request.
Available variables:
> - `Domain`: The current domain.
> - `IP`: The new IP address.
> - `IPType`: The type of the IP: `IPV4` or `IPV6`.
#### Webhook with HTTP GET request
```json
"webhook": {
"enabled": true,
"url": "http://localhost:5000/api/v1/send?domain={{.Domain}}&ip={{.CurrentIP}}&ip_type={{.IPType}}",
"request_body": ""
}
```
For this example, a webhook with query string parameters will be sent to the target URL:
```
http://localhost:5000/api/v1/send?domain=ddns.example.com&ip=192.168.1.1&ip_type=IPV4
```
#### Webhook with HTTP POST request
```json
"webhook": {
"enabled": true,
"url": "http://localhost:5000/api/v1/send",
"request_body": "{ \"domain\": \"{{.Domain}}\", \"ip\": \"{{.CurrentIP}}\", \"ip_type\": \"{{.IPType}}\" }"
}
```
For this example, a webhook will be triggered when the IP changes, and the target URL `http://localhost:5000/api/v1/send` will receive an `HTTP POST` request with the request body:
```json
{ "domain": "ddns.example.com", "ip": "192.168.1.1", "ip_type": "IPV4" }
```
### Miscellaneous topics
#### IPv6 support
Most of the [providers](#supported-dns-providers) support IPv6.
To enable the `IPv6` support of GoDNS, there are two solutions to choose from:
1. Use an online service to lookup the external IPv6
For that:
- Set the `ip_type` as `IPv6`, and make sure the `ipv6_urls` is configured
- Create an `AAAA` record instead of an `A` record in your DNS provider
#### Telegram
To receive a [Telegram](https://telegram.org/) message each time the IP changes, update your configuration with the following snippet:
```json
"notify": {
"telegram": {
"enabled": true,
"bot_api_key": "11111:aaaa-bbbb",
"chat_id": "-123456",
"message_template": "Domain *{{ .Domain }}* updated to %0A{{ .CurrentIP }}",
"use_proxy": false
},
}
```
The `message_template` property supports [markdown](https://www.markdownguide.org). New lines need to be escaped with `%0A`.
#### Slack
To receive a [Slack](https://slack.com) message each time the IP changes, update your configuration with the following snippet:
```json
"notify": {
"slack": {
"enabled": true,
"bot_api_token": "xoxb-xxx",
"channel": "your_channel",
"message_template": "Domain *{{ .Domain }}* updated to \n{{ .CurrentIP }}",
"use_proxy": false
},
}
```
The `message_template` property supports [markdown](https://www.markdownguide.org). New lines needs to be escaped with `\n`.
#### Discord
To receive a [Discord](https://discord.gg) message each time the IP changes, update your configuration with the following snippit:
```json
"notify": {
"discord": {
"enabled": true,
"bot_api_token": "discord_bot_token",
"channel": "your_channel",
"message_template": "(Optional) Domain *{{ .Domain }}* updated to \n{{ .CurrentIP }}",
}
}
```
#### Pushover
To receive a [Pushover](https://pushover.net/) message each time the IP changes, update your configuration with the following snippet:
```json
"notify": {
"pushover": {
"enabled": true,
"token": "abcdefghijklmnopqrstuvwxyz1234",
"user": "abcdefghijklmnopqrstuvwxyz1234",
"message_template": "",
"device": "",
"title": "",
"priority": 0,
"html": 1
}
}
```
The `message_template` property supports [html](https://pushover.net/api#html) if the `html` parameter is `1`. If it is left empty a default message will be used.
If the `device` and `title` parameters are left empty, Pushover will choose defaults [see](https://pushover.net/api#messages). More details on the priority parameter
can be found on the Pushover [API description](https://pushover.net/api#priority).
#### Bark
To receive a [Bark](https://bark.day.app/) message each time the IP changes, update your configuration with the following snippet:
```json
"notify": {
"bark": {
"enabled": true,
"server": "https://api.day.app",
"device_keys": "",
"params": "{ \"isArchive\": 1, \"action\": \"none\" }"
}
}
```
`server` Bark server address. You can use the default official server `https://api.day.app` or set it to a self-hosted server address.
`device_keys` device key, supports multiple keys (comma-separated) for batch push.
`params` Bark request parameters, please refer to [Bark API](https://bark.day.app/#/en-us/tutorial?id=request-parameters)
`user` Basic auth username of the self-hosted server, same with server side environment variable `BARK_SERVER_BASIC_AUTH_USER`.
`password` Basic auth password of the self-hosted server, same with server side environment variable `BARK_SERVER_BASIC_AUTH_PASSWORD`.
For more information, please refer to the [Bark official documentation](https://bark.day.app/)
#### Ntfy
To receive an [ntfy](https://ntfy.sh/) notification each time the IP changes, update your configuration with the following snippet:
```json
"notify": {
"ntfy": {
"enabled": true,
"topic": "godns",
"server": "https://ntfy.sh",
"token": "",
"user": "",
"password": "",
"priority": "default",
"tags": "rotating_light",
"icon": "",
"message_template": ""
}
}
```
`topic` The ntfy topic to publish to (required). The topic is essentially a channel name — pick something not easily guessable.
`server` The ntfy server URL. Defaults to `https://ntfy.sh`. Set to your self-hosted server address if applicable.
`token` Access token for authentication (optional). Only needed for self-hosted servers with access control.
`user` Username for basic authentication (optional). Used with `password` for self-hosted servers.
`password` Password for basic authentication (optional). Used with `user` for self-hosted servers.
`priority` Message priority: `min`, `low`, `default`, `high`, or `max` (optional).
`tags` Comma-separated list of tags or [emoji short codes](https://docs.ntfy.sh/emojis/) (optional).
`icon` URL to an icon to display in the notification (optional).
`message_template` Custom message template (optional). If empty, defaults to `IP address of {{ .Domain }} updated to {{ .CurrentIP }}`.
For more information, please refer to the [ntfy documentation](https://docs.ntfy.sh/publish/)
### Webhook
Webhook is another feature that GoDNS provides to deliver notifications to other applications while the IP is changed. GoDNS delivers a notification to the target URL via an HTTP `GET` or `POST` request.
The configuration section `webhook` is used for customizing the webhook request. In general, there are 2 fields used for the webhook request:
> - `url`: The target URL for sending webhook requests.
> - `request_body`: The content for sending a `POST` request, if this field is empty, an HTTP GET request will be sent instead of the HTTP POST request.
Available variables:
> - `Domain`: The current domain.
> - `IP`: The new IP address.
> - `IPType`: The type of the IP: `IPV4` or `IPV6`.
#### Webhook with HTTP GET request
```json
"webhook": {
"enabled": true,
"url": "http://localhost:5000/api/v1/send?domain={{.Domain}}&ip={{.CurrentIP}}&ip_type={{.IPType}}",
"request_body": ""
}
```
For this example, a webhook with query string parameters will be sent to the target URL:
```
http://localhost:5000/api/v1/send?domain=ddns.example.com&ip=192.168.1.1&ip_type=IPV4
```
#### Webhook with HTTP POST request
```json
"webhook": {
"enabled": true,
"url": "http://localhost:5000/api/v1/send",
"request_body": "{ \"domain\": \"{{.Domain}}\", \"ip\": \"{{.CurrentIP}}\", \"ip_type\": \"{{.IPType}}\" }"
}
```
For this example, a webhook will be triggered when the IP changes, and the target URL `http://localhost:5000/api/v1/send` will receive an `HTTP POST` request with the request body:
```json
{ "domain": "ddns.example.com", "ip": "192.168.1.1", "ip_type": "IPV4" }
```
### Miscellaneous topics
#### IPv6 support
Most of the [providers](#supported-dns-providers) support IPv6.
To enable the `IPv6` support of GoDNS, there are two solutions to choose from:
1. Use an online service to lookup the external IPv6
For that:
- Set the `ip_type` as `IPv6`, and make sure the `ipv6_urls` is configured
- Create an `AAAA` record instead of an `A` record in your DNS provider
Configuration example
```json
{
"domains": [
{
"domain_name": "example.com",
"sub_domains": ["ipv6"]
}
],
"resolver": "2001:4860:4860::8888",
"ipv6_urls": ["https://api-ipv6.ip.sb/ip"],
"ip_type": "IPv6"
}
```
2. Let GoDNS find the IPv6 of the network interface of the machine it is running on (more on that [later](#network-interface-ip-address)).
For this to happen, just leave `ip_urls` and `ipv6_urls` empty.
Note that the network interface must be configured with an IPv6 for this to work.
#### Network interface IP address
For some reasons, if you want to get the IP address associated with a network interface (instead of performing an online lookup), you can specify it in the configuration file this way:
```json
"ip_urls": [""],
"ip_interface": "interface-name",
```
With `interface-name` replaced by the name of the network interface, e.g. `eth0` on Linux or `Local Area Connection` on Windows.
Note: If `ip_urls` is also specified, it will be used to perform an online lookup first and the network interface IP will be used as a fallback in case of failure.
#### SOCKS5 proxy support
You can make all remote calls go through a [SOCKS5 proxy](https://en.wikipedia.org/wiki/SOCKS#SOCKS5) by specifying it in the configuration file this way:
```json
"socks5_proxy": "127.0.0.1:7070"
"use_proxy": true
```
#### Obtain IP from Router OS
If you want to get the public IP from a Mikrotik RouterOS device, you can use the following configuration:
```json
"mikrotik": {
"enabled": false,
"server": "http://192.168.88.1",
"username": "admin",
"password": "password",
"interface": "pppoe-out"
}
```
#### Display debug info
To display debug info, set `debug_info` as `true` to enable this feature. By default, the debug info is disabled.
```json
"debug_info": true,
```
#### Multiple API URLs
GoDNS supports fetching the public IP from multiple URLs via a simple round-robin algorithm. If the first URL fails, it will try the next one until it succeeds. Here is an example of the configuration:
```json
"ip_urls": [
"https://api.ipify.org",
"https://myip.biturl.top",
"https://api-ipv4.ip.sb/ip"
],
```
#### Recommended APIs
-
-
-
-
## Web Panel
Starting from version 3.1.0, GoDNS provides a web panel to manage the configuration and monitor the status of the domains. The web UI is disabled by default. To enable it, just enable the `web_panel` in the configuration file.
```json
"web_panel": {
"enabled": true,
"addr": "0.0.0.0:9000",
"username": "admin",
"password": "123456"
}
```
After enabling the web panel, you can visit `http://localhost:9000` to manage the configuration and monitor the status of the domains.
## Running GoDNS
There are a few ways to run GoDNS.
### Manually
Note: make sure to set the `run_once` parameter in your config file so the program will quit after the first run (the default is `false`).
It can be added to `cron` or attached to other events on your system.
```json
{
"...": "...",
"run_once": true
}
```
Then run
```bash
./godns
```
### As a manual daemon
```bash
nohup ./godns &
```
Note: when the program stops, it will not be restarted.
### As a managed daemon (with upstart)
1. Install `upstart` first (if not available already)
2. Copy `./config/upstart/godns.conf` to `/etc/init` (and tweak it to your needs)
3. Start the service:
```bash
sudo start godns
```
### As a managed daemon (with systemd)
1. Install `systemd` first (it not available already)
2. Copy `./config/systemd/godns.service` to `/lib/systemd/system` (and tweak it to your needs)
3. Start the service:
```bash
sudo systemctl enable godns
sudo systemctl start godns
```
### As a managed daemon (with procd)
`procd` is the init system on OpenWRT. If you want to use godns as a service with OpenWRT and procd:
1. Copy `./config/procd/godns` to `/etc/init.d` (and tweak it to your needs)
2. Start the service (with root privilege):
```bash
service godns enable
service godns start
```
### As a Docker container
Available docker registries:
-
-
Visit to fetch the latest docker image. The `-p 9000:9000` option exposes the web panel.
With `/path/to/config.json` as your local configuration file, run:
```bash
docker run \
-d --name godns --restart=always \
-v /path/to/config.json:/config.json \
-p 9000:9000 \
timothyye/godns:latest
```
To run it with a `YAML` config file:
```bash
docker run \
-d --name godns \
-e CONFIG=/config.yaml \
--restart=always \
-v /path/to/config.yaml:/config.yaml \
-p 9000:9000 \
timothyye/godns:latest
```
### As a Windows service
1. Download the latest version of [NSSM](https://nssm.cc/download)
2. In an administrative prompt, from the folder where NSSM was downloaded, e.g. `C:\Downloads\nssm\` **win64**, run:
```
nssm install YOURSERVICENAME
```
3. Follow the interface to configure the service. In the "Application" tab just indicate where the `godns.exe` file is. Optionally you can also define a description on the "Details" tab and define a log file on the "I/O" tab. Finish by clicking on the "Install service" button.
4. The service will now start along Windows.
Note: you can uninstall the service by running:
```
nssm remove YOURSERVICENAME
```
## Contributing
Contributions are welcome! Please feel free to submit a Pull Request.
### Setup the frontend development environment
Requirements:
- Bun `1.3.11` or higher
- Go `1.17` or higher
The frontend project is built with [Next.js](https://nextjs.org/) and [daisyUI](https://daisyui.com/). To start the development environment, run:
```bash
cd web
bun install
bun run dev
```
### Build the frontend
To build the frontend, run:
```bash
cd web
bun run build
```
### Run the frontend
To run the frontend, run:
```bash
cd web
bun run start
```
## Star History
[](https://www.star-history.com/?repos=timothyye%2Fgodns&type=date&legend=top-left)