# TLF, a Contest Logger for Linux
There are two types of amateur radio logging programs: general-purpose loggers
and contest loggers. A good general purpose logger has lots of features for
lots of different activities within the hobby: chasing DX, keeping track of
ragchewing buddies, managing incoming and outgoing QSLs, monitoring progress
toward various awards, and managing a lifetime worth of amateur radio
contacts. Ham Radio Deluxe on Windows, MacLoggerDX and RUMLogNG on Mac, and
[CQRLog](https://www.cqrlog.com/) on Linux are excellent examples of
general-purpose loggers.
Contest loggers, in contrast, are laser-focused on making rapid-fire
competitive radiosport contacts, either in a radio contest or on a DXpedition.
A good contest logger maximizes operator efficiency and ergonomics for hams
who want to make hundreds of QSOs per hour for hours on end. It will typically
display just a minimal logging window for the essential contest exchange, the
operator's current score, DX spots for Assisted or Multi-Operator competitors,
and a few other tactically important bits of data. N1MM+ on Windows and
Skookum Logger on Mac are excellent examples of contest loggers.
TLF is a contest logger for Linux.
# Contents
* [Background](#real-contesters-dont-need-windows)
* [TLF?](#about-the-name)
* [Getting started](#getting-started)
* [The TLF interface](#the-tlf-interface)
* [CW operation](#cw)
* [SSB operation](#ssb)
* [RTTY and digital operation](#rtty-and-digital-modes)
* [QTC handling](#qtc-handling)
* [QTCs on RTTY](#qtcs-on-rtty)
* [Cabrillo file handling](#cabrillo-file-handling)
* [Bandmap](#bandmap)
* [FAQ](#faq)
## Real contesters don't need windows
The earliest contest loggers were built for DOS-based computers, and one of
the best was [TR log](https://www.trlog.com/) by Larry "Tree" Tyree, N6TR.
Larry's interface is so elegant that most modern contest loggers operate more
or less the same way. Indeed, TLF can be considered a descendant of TR log,
but rebuilt with modern code architecture. A separate group has made a more or
less direct [Linux port of TR log](https://www.kkn.net/trlinux/) that some
users may prefer. Fans of Perl might also want to look at
[YFKtest](https://git.fkurz.net/yfktest/yfktest).
While contest loggers on other platforms have adopted the standard windowed
interface modern users expect, Linux contest loggers have all gravitated to
console-based designs that operate in a terminal window. There are a couple of
reasons for that.
First, Linux users tend to be relatively comfortable using the terminal.
Second, if we take a step back and look at the design of a contest logger
objectively, a windowed interface is actually a handicap. Ideally, a
contester's hands never have to leave the keyboard - and what better way to
ensure that than to put the whole logger in a console?
Console-based loggers are also fast, computationally lightweight, and easy to
configure for remote operation with limited bandwidth. TLF can run on anything
from a high-end desktop with triple monitors to a headless Raspberry Pi Zero.
The chief disadvantage of this design is that there's a steep learning curve
for new users. TLF is a powerful and efficient tool for contest logging, but
you can't just click through the menus and figure things out on your own. You
need to read some documentation. This manual, plus the built-in man page
(accessed in the terminal with `man tlf`) is that documentation. Once you've
gotten familiar with TLF's operation, you may begin to wonder why anyone would
design a contest logger any other way.
## About the name
Why "TLF?" It's an old joke about someone sending bad CW (Morse code) over the
radio, as if stomping on the key with their foot. TLF is "try left foot
instead."
## Getting started
This manual assumes you've read the main `README.md` file and gotten through
basic installation of TLF. Two important concepts from that document are:
* TLF configuration happens entirely in the `logcfg.dat` and rules files, and
local copies of those files will override the defaults.
* Creating a new directory for each contest, with its own `logcfg.dat` and
rules files, will help keep things organized.
Note that the rules file has to be in a subdirectory called `rules` in order
for TLF to recognize it. The rules file itself will be named for the contest,
with no extension, e.g. `arrldx_usa` is the rules file for a USA-based station
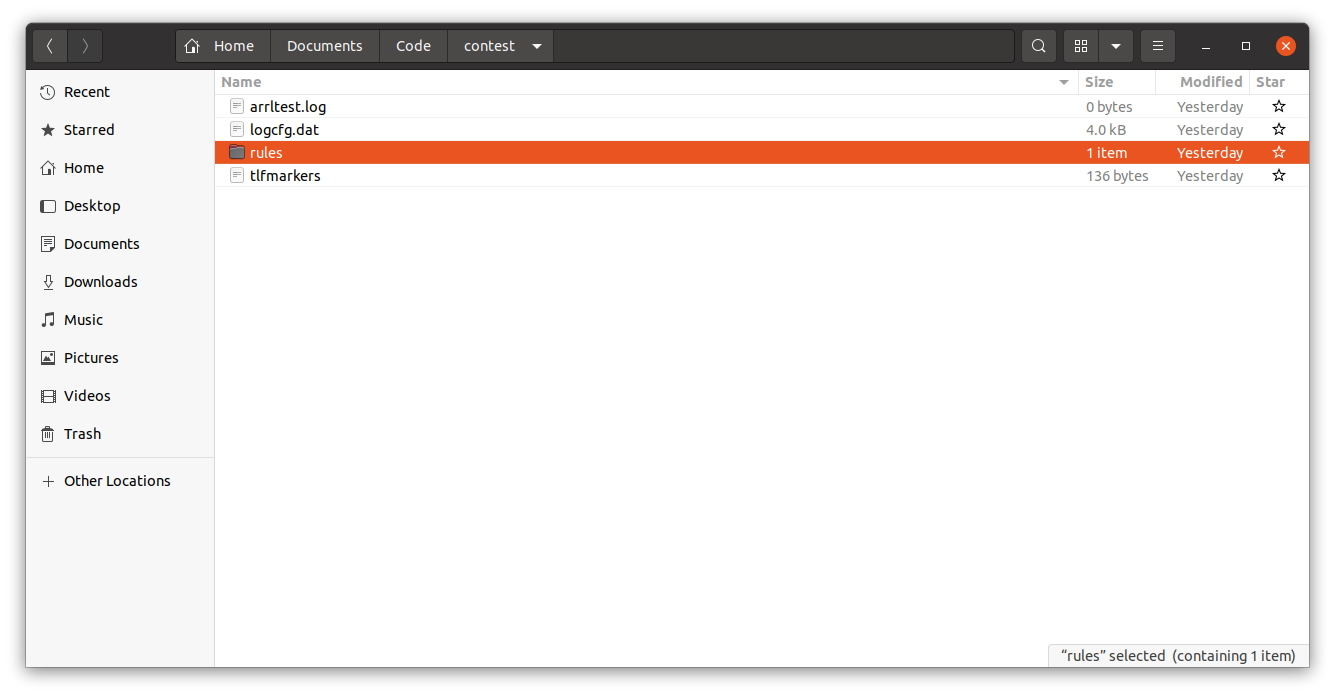
operating in the ARRL DX contest (either CW or SSB). In the image below, the
arrltest.log and tlfmarkers files were created by TLF on its initial launch
from this directory. The former is the working log file, and the latter is for
plotting DX spots on a grayline map displayed in a separate window (optional).
 In general, `logcfg.dat` is for station-specific settings, while the rules
file is for contest-specific settings. That means once you've gotten TLF set
up to work with your particular setup, you can simply copy the same
`logcfg.dat` into a new directory for the next contest, and add a new rules
file. Both files have comments explaining what the settings do, and as always
`man tlf` can provide further information.
Also take a look at `doc/station-sample.cbr` for Cabrillo export settings and
how to use them. If you don't use a Cabrillo export settings file, TLF will
just prompt you for the information when you use the `:write` command, so this
is optional.
## The TLF interface
The normal way to start TLF is to open a terminal console, navigate to the
directory from which you want to run the contest (where you put your local
`logcfg.dat` and `rules/contestname` files), and type:
```
tlf
```
If you've enabled DX spots, you'll see the output as TLF tries to log into the
cluster you've chosen. The first time it's started in a new directory (i.e.
with no log file already there), TLF will then ask you some questions before
opening the main screen.
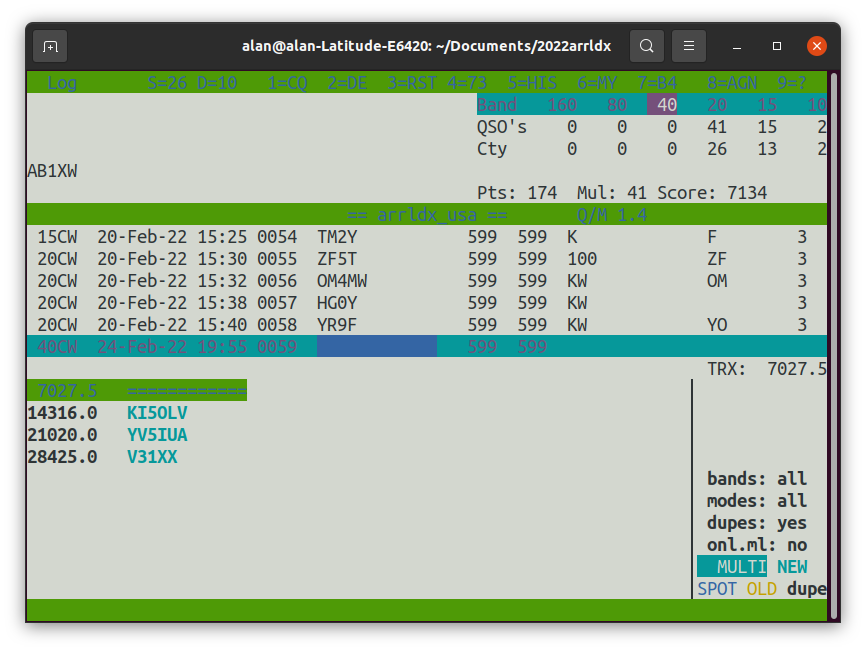
As long as the window is set to 80 columns x 25 lines, TLF should launch and
look okay in your default terminal window. Here is the main screen on the
default terminal (GNOME Terminal) in Ubuntu 20.04:
In general, `logcfg.dat` is for station-specific settings, while the rules
file is for contest-specific settings. That means once you've gotten TLF set
up to work with your particular setup, you can simply copy the same
`logcfg.dat` into a new directory for the next contest, and add a new rules
file. Both files have comments explaining what the settings do, and as always
`man tlf` can provide further information.
Also take a look at `doc/station-sample.cbr` for Cabrillo export settings and
how to use them. If you don't use a Cabrillo export settings file, TLF will
just prompt you for the information when you use the `:write` command, so this
is optional.
## The TLF interface
The normal way to start TLF is to open a terminal console, navigate to the
directory from which you want to run the contest (where you put your local
`logcfg.dat` and `rules/contestname` files), and type:
```
tlf
```
If you've enabled DX spots, you'll see the output as TLF tries to log into the
cluster you've chosen. The first time it's started in a new directory (i.e.
with no log file already there), TLF will then ask you some questions before
opening the main screen.
As long as the window is set to 80 columns x 25 lines, TLF should launch and
look okay in your default terminal window. Here is the main screen on the
default terminal (GNOME Terminal) in Ubuntu 20.04:
 > **_Note:_** The terminal emulator programs provided with the various desktop
> environments, i.e.
> [GNOME Terminal](https://help.gnome.org/users/gnome-terminal/stable/) (GNOME),
> [Konsole](https://konsole.kde.org) (KDE),
> [QTerminal](https://github.com/lxqt/qterminal) (LXQt),
> [Xfce Terminal](https://docs.xfce.org/apps/xfce4-terminal/start) (Xfce),
> and so on, provide for configuration through their Graphical User Interface
> (GUI). Through their GUI configuration dialogues such things as the text font,
> text size, and foreground and background color palette may be modified. The
> one setting that's definitely worth playing with is the text size, which in
> the Ubuntu terminal can be changed from the "hamburger" menu in the top right
> of the window.
>
> In contrast, the older terminal emulators
> [**XTerm**](https://invisible-island.net/xterm/) and
> [**rxvt-unicode**](http://software.schmorp.de/pkg/rxvt-unicode.html) are
> configured through the classic X Window System resource database. The `doc`
> directory contains a sample `Xresources` file to change the colors to those
> resembling the VGA palette and the text font and its size from the defaults of
> each emulator. Comments in this file explain how to use it in X and Wayland
> sessions. These emulators are useful since they do not reserve many of the
> key combinations available in TLF such as F11 or Ctrl-PgUp/Ctrl-PgDown as most
> desktop emulators do. As usual, the Arch Linux Wiki provides good information
> for both [XTerm](https://wiki.archlinux.org/title/Xterm) and
> [rxvt-unicode](https://wiki.archlinux.org/title/Rxvt-unicode).
>
> Console customization is a [deep rabbit
> hole](https://www.n0nb.us/blog/2020/02/coping-with-color-on-the-linux-console-and-xterm-and-friends/)
> that goes beyond the scope of this manual.
On the top line of the console, you'll see the mode indicator ("Log" in the
image). This is based on the TR logging standard that has since been adopted
by virtually every other contest logger, which has a "Run" mode and a "Search
and Pounce" mode. In "Run" mode (indicated by "Log" in TLF), you stay on one
frequency, calling CQ and answering whoever responds. "Search and Pounce"
("Log" changes to "S&P" in the TLF interface) means tuning up and down the
band answering the stations who are running. Switch between modes by hitting
"+". The mode determines things like what the "Enter" key does.
After the mode is the current CW speed if that's set ("S=26" above), the
auto-CQ delay time in 500ms units, and short labels for the F1-F9 keys to
remind you what macro each one will send ("F1=CQ" and so forth).
The upper left section will list possible call completions if partial call
checking is on, the top right is the scoreboard and a highlight indicating
what band the radio is currently on, and the full-width section below that
shows the last few contacts logged.
The line across the middle of the console (starting with "40CW" above) has the
current UTC time, QSO number, call entry field, RST (599 599), and the
exchange entry field. Under the right-hand end of that line is the current
frequency the transceiver is tuned to, if rig control is active.
The bottom section of the screen has DXcluster spots, the band map, and
related information.
The spacebar moves between fields, the "Enter" key sends the appropriate
message for the current stage of the QSO, and the "ESC" key backs out of
whatever you just did. With the cursor in the callsign entry field, "Alt-h"
brings up a help screen, while typing `:help` and hitting "Enter" will bring
up a full list of commands. From that list, typing `q` will return you to the
main logging screen. Typing `:cfg` and hitting "Enter" will let you edit
logcfg.dat in the text editor, and exiting that editor will return you to the
main logging screen.
The log is saved continuously in TLF's text-based native format. After the
contest ends, typing `:write` in the call entry field will export the log in
Cabrillo format as `.cbr`, which is how most contest sponsors want
it. If you haven't set the Cabrillo configuration in a file as described
above, you'll be asked a series of questions for the file header, such as your
category, power level, and so forth. You can also export an ADIF file by
typing `:adif` in the callsign field. That's handy for importing your contest
contacts into your general logging program, or uploading them to sites such as
Clublog or Logbook of the World.
## CW
CW contest setup is straightforward. Assuming you've installed either
`cwdaemon` or one of the Winkeyer servers (`winkeydaemon` or
`winkeyer_server`) as described in the installation guide, just start that
before starting TLF. For example, in my current setup I make sure my rig is on
and ready to go, navigate to the current contest directory (with my
`logcfg.dat`and `rules/contestname` files in it), and type:
```
winkeydaemon -m -d /dev/ttyUSB1
tlf
```
The `-m` flag mutes the sidetone on my Winkeyer, as I prefer it off, and `-d
/dev/ttyUSB1` sets the correct device name to access. If you're unsure where
your Winkeyer connects, use
```
ls -l /dev/serial/by-id
```
which should list serial devices by somewhat readable names, and which ports
they're on.
You can stop the CW server with `killall winkeydaemon`, which is handy for
stopping and restarting it while trying different port configurations.
TLF will start in CW mode by default.
## SSB
TLF provides a voice keyer facility using the PC's sound card. This section
provides additional information to help the user configure SSB operation.
### Radio Interfacing
Often, the biggest challenge in getting voice keying to work, whether with TLF
or any other logging program, is connecting the computer audio to the radio in
a way that triggers PTT correctly. We can't cover all possible configurations
in this manual, but will offer some general pointers. If you've used sound
card-based HF digital modes, you must already have a workable computer-to-rig
connection, which should serve as a starting point for routing the voice keyer
audio. A West Mountain Rigblaster interface or homebrew equivalent makes the
process even more straightforward, and the manual for that device will cover
the appropriate settings. Those with newer radios that offer direct USB,
Bluetooth, or Wi-Fi connections may need to explore the menu settings.
If you decide you need TLF to trigger the PTT line and the hamlib PTT isn't
working, you can try a workaround with `cwdaemon`, which can be invoked for a
serial port or a parallel port. The most likely modern scenario is to use a
USB<->serial adapter, in which case an example of starting cwdaemon (as root)
might be:
```
cwdaemon -d ttyUSB0
```
You can figure out which `tty` port the adapter is on by running `dmesg`
before and after plugging in the USB. Check `man cwdaemon` for circuit
suggestions on interfacing DTR/RTS to CW/PTT ports on your radio.
One option for mic interfacing is to use PTT to control a relay that connects
the radio's mic input either to the mic or to the soundcard. An alternative
solution, recommended by many other contest loggers, is instead to connect the
mic to the soundcard's mic input and the soundcard's output to the radio's mic
input. Most soundcards will loop the mic audio back to the output, which is
easily checked. The only issue here is that the mic is also live when playing
voice keyer messages, but this can be avoided (see the next section).
Note that some radios (e.g. TenTec Orion) have only one port that becomes PTT
in SSB mode and Key in CW mode. Wire OR-ing the CW and PTT outputs from
`cwdaemon` is not ideal, because in CW mode PTT is still asserted, resulting
in key-down for the duration of the message. There is currently no
satisfactory solution to this problem, so we don't recommend that approach.
### Configuration Files
The normal practice with TLF is to create a new directory for each contest, so
a `logcfg.dat` file in that directory overrides the default. If you are using
SSB only in a contest you can force TLF to start in SSB mode by uncommenting
the SSBMODE keyword in `logcfg.dat`.
If you have adopted the method that loops back the mic audio and you want to
automatically mute the mic when voice keyer messages are played, copy the
`play_vk` shell script found in the `scripts` directory of your TLF release to
the same directory. This will then be used in preference to the default.
Uncomment the lines beginning with `amixer`.
Since TLF version 1.1.0, (un)muting and playing voice messages has been
devolved to this external script file, because not all soundcards offer the
same interface. 'Mic' could be called something else. One way of finding this
out is to run `amixer` from a terminal, which returns its capabilities. An
alternative method is to install your distribution's version of the
`alsamixergui` package and simply see what's available on the faders. This is
probably a good idea anyway because it's likely sound won't work well without
some manual intervention.
If you have something other than a 'Mic' source, you could try replacing 'Mic'
with what you think it should be in the local `play_vk` file. The process of
muting and unmuting the mic is displayed in `alsamixergui`, which is useful
for debug purposes. Please share any information you discover with the TLF
community.
A `rules` sub-directory within the local contest folder should contain a
contest-specific rule file. As with `logcfg.dat`, this local copy will
override the defaults, which you will want to do. This rule file must contain
the paths to the audio files corresponding to each F-key to be used. An
example might be:
```
VKM1=/home/aham/tlf/audio/f1.wav
VKM2=/home/aham/tlf/audio/f2.wav
VKM3=/home/aham/tlf/audio/f3.wav
VKM4=/home/aham/tlf/audio/f4.wav
VKM5=/home/aham/tlf/audio/f5.wav
VKM6=/home/aham/tlf/audio/f6.wav
VKM7=/home/aham/tlf/audio/f7.wav
VKM8=/home/aham/tlf/audio/f8.wav
VKM9=/home/aham/tlf/audio/f9.wav
VKM10=/home/aham/tlf/audio/f10.wav
VKM11=/home/aham/tlf/audio/f11.wav
VKM12=/home/aham/tlf/audio/f12.wav
VKSPM=/home/aham/tlf/audio/vkspm.wav
VKCQM=/home/aham/tlf/audio/vkcqm.wav
```
Thus a common set of voice messages can be pointed to from different rule
files. The F12 message is the auto-repeated CQ message for when the rate is
low. The VKSPM and VKCQM messages are sent after a contact is logged, in S&P
and CQ modes respectively.
Paths that are not defined cannot be recorded to from within TLF.
### Distribution-specific Notes
TLF uses `sox` to record and play audio, so you must have it installed. You
can use the sox commands `rec` and `play` on the command line in case you need
to debug any TLF issues.
Modern distros often use the `pulseaudio` sound server, but this can cause
unacceptably long delays at the beginning and end of recordings, and at the
beginning and end of voice message playback. If you experience these problems,
try uninstalling just the `pulseaudio` ALSA plugin. You lose the ability for
ALSA applications to play and record across a network, but for most TLF users
this isn't a problem.
### Recording
For the best sound quality, record voice messages with an external audio
editor such as [Audacity](https://www.audacityteam.org/), which will also
allow you to trim leading and trailing silence. Export each message in .wav
format and add their paths to the rules file as described above.
TLF also has a built-in sound recording feature for changing messages on the
fly, or for those who don't want to use an external editor. To record messages
from within TLF, enter `:sou` in the call entry field to take you to the TLF
Sound Recorder Utility page. Recording starts by hitting the relevant F-key
for that message ('s' or 'c' for the VKSPM and VKCQM messages). Terminate
recording by hitting the **ESC** key.
Currently, recording messages does not key PTT. If you want to hear yourself
via the radio's monitor function while recording, you will need to manually
assert PTT, e.g. press your footswitch throughout. Obviously, this means your
recording also goes out on-air, so you might want to minimise your transmitted
power and use a dummy load while doing this.
It takes a bit of practice to time your speech within the starting and ending
key presses. It's also quite easy to set the ALSA mic gain too high and end up
with clipped audio. This will show up during playback as some black and white
writing appearing over the top of the display colours. It's actually `sox`
reporting warnings. You can fix this by adjusting the mic level using the ALSA
mixer.
## RTTY and Digital Modes
For RTTY or other digital mode contesting,
the most common and straightforward approach is to use Fldigi
for digital signal demodulation.
Fldigi may also be used for digital signal transmission, if desired.
Alternatively, digital transmission can be handled
by external keyers such as the MFJ-1278, K3NG Keyer, nanoIO,
and similar interfaces.
These devices typically connect to the host system via a serial or USB interface.
Some models also support digital signal reception in addition to transmission.
This section focuses on using Fldigi with TLF.
### Setting up Fldigi
The first step is to configure Fldigi to work in standalone mode.
* To activate the capturing of received text, switch to contest mode:
Configure -> Contests -> General
Contest "Generic contest"
* Set up rig control via Hamlib's `rigctld`:
Configure -> Rig Control -> Hamlib
Rig: "Hamlib NET rigctl"
Device "localhost:4532"
**NOTE**: Do not use direct rig connection, as it cannot be shared between Fldigi and TLF.
If `rigctld` runs on a different server than Fldigi,
then update the configuration accordingly.
* Set up the digital mode to be used,
including audio levels and rig mode setting.
* Verify that all relevant Fldigi functions (sending, receiving, and rig control)
are operational.
### Configuring TLF
TLF communicates with Fldigi via its XML-RPC interface.
If both TLF and Fldigi are running on the same computer, simply add
```
FLDIGI
```
to the TLF configuration file (either `logcfg.dat` or the corresponding rule file)
to enable the connection:
If Fldigi runs on a different computer, or if it uses a port other than the default
7632, specify the full URL:
```
FLDIGI=http://:/RPC2
```
The Fldigi interface can be toggled at runtime using the command `:FLDigi`.
This command can also be used to reconnect to Fldigi if the connection is lost.
If a specific rig mode is required for the digital mode,
it can be configured using the `DIGI_RIG_MODE` setting.
By default, the rig is set to match typical AFSK digital modes.
When exporting the log in Cabrillo format, digital mode QSOs are marked
with the generic digital mode designator 'DG'.
marked as having a generic digital mode 'DG'.
To export RTTY QSOs as 'RY' instead, enable the `RTTYMODE` configuration option.
Other non-standard modes (such as 'FH' for FeldHell) require
manual editing of the generated Cabrillo file.
### Using TLF-Fldigi interworking
Messages used in digital QSOs are configured in the same way as for CW,
but the key names are prefixed with `DK`, which stands for "digital keyer".
For example, the CQ message (`F1`) is defined as `DKF1`.
By clicking on the Rx pane in Fldigi, QSO fields (callsign and exchange)
can be selected and transferred to TLF, significantly reducing
the amount of typing required.
In FSK RTTY mode -- where the receiving audio shift is fixed -- clicking
on the waterfall display tunes the rig to the desired carrier frequency.
The preferred audio frequency for this "auto-QSY" feature is configured via
`FLDIGI_RTTY_SWEET_SPOT`.
The keyer window (Ctrl-K) can also be used in digital modes;
however, switching between transmit and receive must be done explicitly
using the '[' and ']' keys.
For RTTY, the `:MINiterm` command activates an embedded Rx window within TLF,
which is useful when running Fldigi in headless mode.
Grabbing cluster spots works the same way as for non-digital modes.
## QTC Handling
*Pasted from README_QTC.txt; some information may be out of date.*
This is a short intro for TLF QTC handling. Ervin Hegedus HA2OS, 2014.
airween@gmail.com
### Introduction
QTC handling was made for WAEDC contest for TLF. It doesn't need any external
tool, TLF supports it out of box. To enable that, you only needs to put a
"QTC=" option to logcfg.dat. This parameter needs a value, which could be one
of these: "RECV", "SEND", or "BOTH". These values means you only want to
receive or send QTCs, or you want to send AND receive QTCs (for example, in
RTTY mode). Note, that currently only RECV and SEND mode are implemented. BOTH
will used for RTTY mode.
### QTC window
When you enabled the QTC handling in logcfg.dat, you can open the QTC window
from either field: callsign or exchange, it doesn't matter. To open it, just
press CTRL+Q. If you want to close it, just simply press ESC. The window is
divided to 2 sides: the left side contains the QTCs data, the right side
contains the help information.
The data side contains the following QTCs fields:
* QTC callsign - 14 characters, allowed: alphanums, digits, /
* QTC serial - 4 characters, allowed: digits,
* number of QSO in current QTC block - 2 characters, allowed: digits
* 10 QSO lines in RECV mode:
* time - 4 characters, allowed: digits, ?
* callsign - 14 characters, allowed: alphanums, digits, /, ?
* serial - 4 characters, allowed: digits, ?
* 10 QSO lines in SEND mode:
* every line generated by the QSOs, all of them are formatted
for three fields: time, callsign and serial
Note, that if you set up the QTC_RECV_LAZY option in RECV mode (EU station in
CW/SSB contest), then TLF will skip to check the restrictions above.
This side contains many "meta" information:
* at right of the QTC callsign field, TLF shows the QTC info of current station:
how many QTC has it; if the callsign field in main window is empty, the last
callsign will be picked up. When the station has not send or received any QTC yet,
there will be: "Received 0 QTC", or "Sent 0 QTC". If you had exchanged any QTC
with the station, the message will read "Received 3 QTC" or "Sent 5 QTC".
* if you type the number of QSO in the QTC block in RECV mode, TLF will show its
number at the beginning of every line; if the station indicates that it will
send to you 6 QSO, and you type it in that field, TLF will put a digit to
the begin of first 6 lines
* if you type the number of QSO in the QTC block in SEND mode, TLF will find the
next number QSO, which doesn't contain the current callsign (see contest rules 7.2).
Note, that if you don't have eonugh QSOs, you can't send the maximum (10), eg. you
have only 9 QSO. If you type greater number than available QTC number, the field
value will be aligned to maximum number!
* in RECV mode, every QSO line has a status, which could be: "invalid",
"valid", "confirmed". This status is indicated by a sign at the end of the
line. When a line is invalid, you can see a "?", if the line is valid, then
there isn't any character, and finally, if the QSO line had been confirmed,
you can see a "*" sign * in SEND mode, if you've sent a QTC line (with
ENTER), at the end of the line you will see a "*" character, which means,
you've sent that QTC.
### Navigation between the fields
You can move to any field as you want and when you want. There isn't a
mandatory order, but the navigation keys don't work in all cases. Normally,
with TAB you can move to the next field, and Shift+TAB goes back. There is an
exception: TAB will not leave the current QSO line, until you confirm the
line. Instead it takes you to the time field, if you are in the exchange
field, and Shift+TAB does it in reverse order. With UP and DOWN cursor keys
you can go to up or down.
In RECV mode with SPACE, you can navigate between the fields in one line, for
faster move, so that means the SPACE and TAB are equals in this mode, in QTC
line.
### Navigation in a field
If you press an allowed character in a field, that will be displayed, and the
cursor will go right to the next place. If you press a not allowed character,
then nothing happens. The BACKSPACE key deletes the next characters to left,
and move the right part to left. DELETE key deletes the current character as
you're staying, and shifts the characters to left at the next to right. As I
described above, the SPACE move the cursor to the next field (or first, if you
are in last field) inside of QTC line, in RECV mode.
### Storing QTCs
TLF stores QTCs in two files. The received QTCs are stored in QTC_recv.log,
sent QTCs are stored in QTC_sent.log. These logfiles will created
automatically, when TLF starts.
### Receiving QTC
If the station asks you, if are you QRV for QTC, you can press CTRL+Q, it
doesn't matter in which field are you: callsign or exchange. As another way,
you an open the QTC window (CTRL+Q), and press F1 to ask for QTC - it is
configured in rule file to send "QTC?".
If the callsign fields isn't empty, the content of that field will be copied.
Otherwise the callsign of the last QSO will be copied. If the station sent you
some QTC previously, you can see the number of QTC QSOs, eg. "Received 3
QTC". You can receive at maximum 10 QTC from every station. If you have 3 QTC
from a station, then you can receive 7 QTC more. If you type more than 7, TLF
will replace the number to 7.
Afterwards you can fill the QTC serial, and number of QSOs. What you type in
as number of QSOs will be used by TLF to number that many lines, to show you,
how many lines remains.
If you filled the callsign, serial and number fields (all three fields are
required), and then press ENTER, TLF will send the F2 message, which is "QRV"
normally, so you don't need to send it manually.
If you start to receive the QTCs, you need to fill 3 fields: time (HHMM, as
hour and minutes), callsign and serial. If you only enter parts of a line,
that line will be marked as "incomplete", which you can see by the "?" at the
end of the line.
If you fill the time field (4 digits), the cursor will go to the callsign
field. Fill that field, and press TAB to move the next one. If you put there
at least 1 digit, TLF recognizes that line is complete and the "?" will
disappear at the end of the line.
If you press SPACE in any field, the cursor will go to the next field (or
first, if the current is the exchange number).
Important: in any fields you can type "?", eg: "111?" in time field, or "W?"
in callsign field. That mean, you couldn't receive that letter. Then you fill
all fields vainly, the line remain as incomplete. Otherwise TLF assumes the
line is complete.
This is important, because when you press the ENTER, TLF will send the answer
to the station based the status of the line. If the line is incomplete, TLF
sends "AGN" message, but if it's complete, it sends "R".
If you could receive the line, and pressed ENTER, and TLF sent the "R" signal,
then you will see a "*" at the end of the line. That means, you received the
QTC line from the station.
If you want to ask only one field (eg. only callsign), then you need just
press F5 (TIME?), F6 (CALL?), or F7 (NR?). If you want to ask the complete QTC
line, you can press F8 (AGN).
When you received a QTC, the cursor goes to the start of the next line, and
you can continue to receive QTC.
If you received the last line, and all lines are complete, after the last
ENTER TLF will close the QTC window, and send "QSL ALL" message to the
station.
At this time the QTC data will be written to the logfile on disk, fields will
be flushed, and if there is configured any other node in logcfg.dat, the QTC
lines will be sent to them.
On other nodes, TLF will also write the QTCs to its own logfiles.
If you press ESC before you receive the QTC block, the data isn't lost. TLF
flushes the fields only in these cases:
* you received all QSOs, and saved to disc
* pressed ESC, and changed regular callsign field
Note, that TLF send the "QRV" message only in case the fields are empty. Keep
in mind, if you've pressed ESC, and CTRL+Q again, all data remains, and "QRV"
message will NOT be sent.
### Sending QTC
If the other station asks you for QTCs, you can press CTRL+Q, it doesn't
matter in which field are you: callsign or exchange. When the QTC window
opens, you can press F2 and TLF will send the message: "QTC sr/nr" with "sr"
and "nr" replaced with the i serial and number of lines in QTC, example: "QTC
3/8".
If the callsign fields isn't empty, the contents of that field will be copied.
Otherwise, the callsign of the last QSO will be used. If the station received
QTCs previously, you can see the number of QTCs on the current band, eg.
"Sent 3 QTC". You can send maximum 10 QTC to every station. If you sent 3 QTC
to a station, you can send maximum 7 QTC in next block. If you type more, than
7, TLF will replace the number to 7, and of course, only 7 QSO will be shown.
If you don't have enough QSO, TLF also will replace this value to the number
of the available QSO.
The QTC serial field will be filled automatically, you just need to set up,
how many QTCs you want to send. Note, that TLF looks for the current
callsign, and that will be excluded from the QTC list! If you modify the
callsign field, TLF will hide some lines, which match the actual callsign,
but don't afraid: if you finish the modification of field, you can see the
available list.
If you don't want to send the maximum available QTC lines, just edit the
number field, and TLF will gives only that many QTC lines.
Now, you can move to the 1st QTC line with DOWN cursor. If you press ENTER,
TLF will send the current QTC, and will put a "*" char to the end of the line.
It shows you, that QTC line had been sent.
Now just press DOWN and ENTER, if the station gives "R" sign. If it asks to
send the last QTC again, just simple press UP and ENTER again. With the DEL
key you can delete the "SENT" flag from the end of the line.
If you sent all lines, and if the station confirms them, you can press the
CTRL+S (like in most software), and TLF will save the block. After 2 seconds
the window will be closed, and you can go away.
At this time the QTC data will be written to the logfile on the disk, callsign
and number fields will be flushed, and if there is any other node configured
in logcfg.dat, the QTC lines will be sent to them.
On the other nodes, TLF will also write the QTCs to its own logfiles.
If you press ESC before you receive the QTC block, the data isn't lost. TLF
flushes the fields only in the following case:
* you sent all QTCs, and saved them to disk
### Showing QTC capable stations
After you sent or received a QTC block from or to a station, TLF writes it to
the log, but stores it in memory too. If you meet that station on another
bands, and use "Worked window", then you can see, how many QTCs had been
exchanged with the station on each band.
There is a "Q" letter on the upper border of "Worked window", and in that
column there are the number of QTCs. If there is a "0" in a line, that means
you sent to or received no QTC from that station. If there is a "Q", that
means you sent to or received from the station the maximum number of QTC (10).
This information also is visible in the cluster info, if you use that. At the
end of the callsign in bandmap, you can see a "0", "Q" or any digit, which
means same as above, eg "DL1A Q", or "HA5A 3".
### Preparing Cabrillo
When you finished the contest, just use the ":wri" command to save your log
in Cabrillo format. (It's a good idea to exit from TLF, and start it again -
this is only need to recalc correct points, nothing else.)
Now leave TLF, and run the "qtcmerge.py" script, which is part of TLF, and has
been installed to your INSTALLDIR/share/tlf, eg. /usr/local/share/tlf. The
normal way to run this script from the TLF contest directory is:
/usr/local/share/tlf/qtcmerge.py YOURCALL.cbr
The script reads your saved Cabrillo file and your QTCs and saves them to a
new file, in Cabrillo format. The new file name will be YOURCALL_QTC.cbr.
Make a backup of the original file, rename the new one to YOURCALL.cbr and
send it to the contest organizers.
Note: You can find more info about the QTC cabrillo format here:
http://dl0tud.tu-dresden.de/~dj1yfk/qtcs/
http://www.kkn.net/~trey/cabrillo/qso-template.html
### Shortkey summary
* CTRL+Q - open QTC window
* ESC - close QTC window
* TAB - move to the next field
* SPACE - move to the next field in QTC line, in RECV mode
* Shift+TAB - move to the previous field
* UP, DOWN - move up or down
* BACKSPACE - delete the next char left
* DELETE - delete the current position, shift left the rest of line
* ENTER - send "R" or "AGN" to station
If you have any question, just send an e-mail to me or the TLF develop list.
73,
Ervin HA2OS
## QTCs on RTTY
*Pasted from the original README_QTC_RTTY.txt; some information may be out of
date.*
This is a short intro for TLF QTC handling in RTTY mode. Ervin Hegedus HA2OS,
2014. airween@gmail.com
### Introduction
The QTC base instructions described in README_QTC.txt, please read it
CAREFULLY, before you start to read this readme. There you will find detailed
information about how TLF handles the QTC in CW and SSB mode. In this readme,
I just write the differences.
### General
The QTC window(s), fields, navigation is almost the same, like in CW and SSB
modes. In CW/SSB modes every QTC line int the full QTC block exchanged by
individually (every QTC line sent or received separately), but that method
would be too slow in RTTY mode. In this mode, a complete QTC block exchanged
in whole. That's the main different, but this divergence involves a few
necessary modifications. Another important thing, that in RTTY mode everyone
can send or receive QTCs, there isn't any limit (except the number of total
QTCs between two stations). So, it happens that you sent 5 QTCs in a block,
but to complete to 10, the second 5 QTCs you will receive from same station.
That's why there is the third possible value of "QTC" option in
logcfg.dat/rule file, which is "BOTH".
### Receiving QTC
Even if you choose the two-way QTC handling, or you just want to receive QTCs,
the CTRL-Q combination remaining to receive the QTC block. If you open the QTC
receive window with CTRL-Q, apparently nothing has changed. The point is same
than in another modes: fill the lines. Yes, the speed of RTTY is a little bit
fast, and you have to know type as very quickly, if you want to copy from the
terminal of your modem software. To help the copy operation, there is a new
feature in TLF: capturing the output of modem. Currently, only the gMFSK modem
could be captured.
If you want to start the capture, just press CTRL+S, that means "Start
capture". To finish the capture process, just press CTRL+E, that means "End
capture".
If you've started the capture process, the new window will open, which is a
"terminal" window - there you can see the gMFSK modem lines. At the top of the
double-window, you can see a small HELP window, which contains all shortkeys
these windows. If you press ESC (Escape), then terminal window will be hidden,
but - this is very important! - the capture process doesn't finish! Now, if
you press CTRL+S again, the terminal window will open again, and you can see
the characters in the meantime.
You can recognize two types of lines for QTC block: the serial/number line, or
a single QTC line. The formula of serial/number line is NNN/NN. This works
only if you didn't fill the serial and number fields in QTC window. So, if
those lines are empty, and in your terminal window the line is like this:
"QTC 32/8 QTC 32/8"
and you scroll there, and pressing ENTER, TLF recognizes this as the serial
and number of the QTC block, and will fill those fields.
The QTC line formula could be:
1111/W1AW/234 1111-PX2A-345
The "separator" character could be the "/" (slash) or "-" hyphen.
If you scroll to a line like one of these, and pressing ENTER, TLF will fill
the next empty QTC line in QTC block. Note, that the line starts with 4
number, and at the end is also a numeric character, and the length of leftover
is less than 14, then TLF also recognizes the QTC line.
**IMPORTANT!**
Only the complete received lines can be captured from right side to left side,
and only once. You can't move that line, which increments horizontally -
that's the current line. If the line has an NL (new-line) character, then you
can capture that. If you've pressed the ENTER on a line, then it will be
marked with an "*" (asterisk) sign. That means, you couldn't capture that
anymore.
**STILL IMPORTANT!**
If you fill the serial and number fields in main QTC window, the first pattern
WILL NOT be recognized (SERIAL/NR). If you didn't fill the serial AND number
fields (with or without the capture process), you CAN'T capture the QTC lines!
That means, you press ENTER on a QTC line at right side vainly, the line will
not copied to right side!
So, if you can copy one or more lines from right side to left with capture
process, the result could be two types: TLF thinks the line is a good,
fail-safe QTC line, or isn't it: the line contains wrong character, eg. the
time filed contains non-numeric character. In this case, the end of the line
you can see a "?" (question mark) character. If the line doesn't contain
wrong character, you can see a "+" (plus) character.
**IMPORTANT!**
You NEED to review ALL lines at the left side by press an ENTER. If the line
has "+" character, then that will changed to "*" (asterisk), which means "line
marked as confirmed". If line has "?" at the end, then TLF will send an "AGN N
AGN N" message, where the N is the number of the line. Then you can change the
wrong character, till the status will goes to "+".
If all lines have "*" sign, and you press the ENTER at last line, TLF will send
the message "QSL ALL", or what you've configures for QR_F10 macro.
You can send the last message manually, if you press F10 - then TLF also
sends that message, and it will save the received QTC block too.
If the all QTC lines are right, and TLF sent "QTC ALL", then the QTC block
will be saved automatically.
### Sending QTC
As you can read the QTC=BOTH description above, TLF can send AND receive QTCs
in same contest. To avoid the shortkey collisions, in this case the only one
combination can be used: CTRL+S.
If you fill the callsign field (or that's filled when you open the QTC send
window), then the QTC serial field is fixed - you can't change that, like
CW/SSB modes. Only you can change the number of QTCs field, which could be
maximum 10, or if you have QTC (received or sent) with the station, then TLF
calculates the possible number.
Then if you press the ENTER, TLF sends the complete QTC block to your modem
(eg. gmfsk_autofile), and you can see the characters in the window of your
modem (eg. Fldigi).
If station asks you to resend one or more QTC line again, just move the asked
line, and press ENTER again.
If station confirms the QTC block, you have to save that with CTRL+S.
## Cabrillo File Handling
*Pasted from the README.Cabrillo file*.
Recently Cabrillo format became the de facto standard to submit contest
results. TLF's approach to handle QSO and QTC lines is based on a textual
description and can be easily extended by the user to support newer contests.
Header fields can be specified either in config file or using an existing
Cabrillo file as a template.
### WORKING PRINCIPLE
The QSO/QTC format descriptions are contained in 'cabrillo.fmt' file in the
/usr(/local)/share/tlf directory. It provides format descriptions for common
contests. All descriptions are named and you have to specify which one has to
be used with a statement in logcfg.dat or (better) in the contest rule file
with the following syntax:
CABRILLO-QSO-FORMAT=*formatname* (or simply CABRILLO=*formatname* )
You can put your own format file 'cabrillo.fmt' in your actual working
directory which gets precedence over the central one.
### Cabrillo formatting
The format of cabrillo.fmt entries is as follows:
* The file contains groups of lines which are interpreted as key-value pairs.
* Each group describes a possible Cabrillo format and starts by a line
containing the in square brackets.
* At the moment the following keywords are supported: QSO=... QTC=...
EXCHANGE-SEPARATOR=...
* Lines beginning with a '#' are interpreted as comments.
* The 'QSO=' key has to be followed by a list of string, number pairs
separated by semicolons. Each pair specifies one item to put into the QSO:
line. The name of the item has to be followed by a comma ',' and a number
specifying the character width of that field in the QSO: line. Values
which are too wide will be truncated to that width.
The following items names are supported:
FREQ The working frequency.
MODE Mode of operation ('CW', 'PH',...)
DATE Date of the QSO
TIME Logged time of the QSO
MYCALL Own call
HISCALL Other sides call
RST_S RST sent
RST_R RST received
EXC_S Exchange sent (May contain a '#' character, which gets replaced by the
QSO number formatted to 4 digits).
EXCH The complete received exchange line
EXC1 First word of the received exchange, see *Exchange Separator* below
EXC2 Second word of the received exchange
EXC3 Third word of the received exchange
EXC4 Fourth word of the received exchange
TX Number of the TX (for cqww or other contests).
All items represent one column in the resulting Cabrillo log file. All entries
are separated by an additional space character.
### Exchange Separator
EXC1..EXC4 allow writing parts of the received exchange in separate columns.
The exchange is split by default on white space (space or tab). Another
separator(s) can be specified with the EXCHANGE-SEPARATOR keyword. If '/'
(slash) is used to separate parts of the exchange (e.g. 002/1234) then this
line has to be added to the format:
EXCHANGE-SEPARATOR=/
In the provided cabrillo.fmt file the formats for AGCW use this construct.
### Example
The following entry
[cwo]
QSO=FREQ,5;MODE,2;DATE,10;TIME,4;MYCALL,13;EXC_S,14;HISCALL,13;EXC1,4;EXC2,9
will be selected if
CABRILLO=cwo
is in the rules file for the CW Open contest. All QSOs will then be formatted
as in the following example:
QSO: 28000 CW 2012-09-23 0815 DL1JBE 0001 Tom HB9XXX 0023
### Importing Cabrillo
An existing Cabrillo file can be imported by starting TLF with the "-i"
option. The Cabrillo file must be called YOURCALL.cbr, which is the standard
naming convention for TLF. In this case, TLF reads the configuration and rule
files, so the scoring and multipliers will be used as your config describes.
Your config also describes the CABRILLO format, that TLF uses to parse the log
to handle the fields correctly.
The output file(s) will IMPORT_contest.log, where the contest is the name of
contest in your rule/config file. Eg. my Cabrillo is HA2OS.cbr, which must be
in the current directory. After the import, the result is IMPORT_cqww.log (if
the contest name is cqww), so the TLF doesn't write over the existing logfile.
If you want to use the new, imported file, you have to move the old one, and
rename the imported file.
When the contest is WAE, and the rule file contains a valid QTC setup, and
Cabrillo contains lines with begin of "QTC:", then you will have the
IMPORT_QTC_sent.log and IMPORT_QTC_recv.log. In this case, the original files
also kept, and you have to archive and rename the files.
## Alternative packet cluster setup
*Pasted from the original doc/README file; some information may be out of
date.*
TLF can also run packet spots in a separate terminal. To link this to the TLF
program start a telnet session from the working directory with:
telnet | tee -a clfile
In case your packet program is on your own machine, use
telnet localhost | tee -a clfile
Now you have a separate packet terminal where you can e.g. start "call",
telnet or or "minicom" and connect to your favorite dx cluster, or telnet to a
cluster on the internet.
Activate "FIFOINTERFACE".
Activate the cluster display in TLF with :cluster, :spot, or :map You can
toggle the announcements filter with :filter
## Bandmap
*Pasted from the original New_Bandmap.txt file; some information may be out of
date.*
One main problem in old TLF versions is the very narrow space for cluster
messages (only 8 entries plus some room in scrolling). Furthermore the code
for looking up the messages was very inefficient and does not allow good
filtering of the information we need.
The new bandmap tries to fix some of the problems. The following principles
were applied:
* Use the space below the QSO entry line for displaying the spots in the
background.
* For each spot display the frequency (with one decimal) and the call of the
spotted station. That allows 3 columns with 10 spots each.
* There are 3 sources of spots:
* dx cluster messages
* spots in local LAN (maybe from other stations scanning the band)
* finished QSOs while in S&P
* The frequency is remembered with a resolution of 1 Hz if available
* You can filter the displayed spots by
* band (all bands or only own (momentarily active) band)
* mode (all or own)
* dupe (show dupes or not)
* Each spot may have a letter or star between frequency and call denoting the
source of the spot
* blank - from cluster
* '*' - self spotted or worked in S&P
* 'a'..'z' -spotted from station 'a' to 'z' in local network
* Color of spots signal the age of the spot
* bright blue - new spot
* blue - older than 45s (at the moment)
* brown - older than 5 min
* Dupes (already worked stations) are show in lower case and grey
### Usage
Turn on rig control and connect to a cluster (experiment what happens if one
or both conditions are not met). Wait some moments until some spots shows up.
* Press '.' to show the filter menu. Next letter switches filtering:
* b - toggle band filter
* m - toggle mode filter
* d - toggle display of dupes
* o - only shows the multipliers (CQWW only)
* Tune in to any interesting station, insert its call into the input field and
press 'Ctrl-A'. The heard station gets added to the bandmap and broadcasted
to other stations in the local net. See that it gets marked with a '*' as
self spotted.
* Tune in to any contest station in S&P and work it as normal. After the QSO
is finished the station is added to the bandmap and shown as dupe.
* Press 'Ctrl-G' to grab the next displayed spot (starting at your frequency
upwards). Each further press of 'Ctrl-G' jumps to the next spot. So you can
scan the spotted stations, see if you can work them or jump to the next one.
If you reach the last station (highest frequency) the scan switches
direction and following key presses goes downward (on lower boundary it
switches to upwards again...). **At the moment Ctrl-G requires a connected
transceiver to work correctly as it reads the actual starting frequency from
the rig**
* If you type some letters of a call in the map you are interested in and then
'Alt-G' afterwards the first call with that letters gets grabbed.
* You can narrow the spots to grab by the above mentioned filters.
* If you grab a spot while in 'Run' mode, TLF switches to S&P and remembers
your 'run' frequency in the memory. You can switch back to your old running
frequency by '+' (back to Run mode) and '#' (back to old frequency).
You can also configure bandmap filtering and spot lifetime from logcfg.dat.
`BANDMAP `-> use default values (no filtering, lifetime = 900 s)
`BANDMAP=`*xyz*,*number*
*xyz* string parsed for:
* 'B' - only own band
* 'M' - only own mode
* 'D' - do not show dupes
* 'S' - skip dupes during grab_next (ctrl-g)
* 'O' - only shows the multipliers (CQWW only)
* *number* lifetime for new spots in second (number >=300)
## FAQ
*Pasted from the original FAQ file*
Q: Where can I download the latest callmaster call sign data file?
A: You can use the master.scp file from http://www.supercheckpartial.com. Save
it as `callmaster` and copy it in the actual contest directory or in TLF's
global data directory (`/usr/local/share/tlf`). The file in the actual contest
directory takes precedence.
Q: Can I add my own list of call signs to the callmaster file.
A: Sure. Just add it to the end of the file - each call (in uppercase) on a
line by itself. Be aware that at the moment the file is limited to 50000
entries.
Q: Where can I find an actual CTY.DAT file for TLF?
A: Try https://www.country-files.com/ Make sure to save it as 'cty.dat' in
lower case letters. Be aware that there a two different file formats:
* For version before TLF-1.3.1 you have to use the old style CTY.DAT file with
no embedded '=' character.
* For newer versions you can also use the newer file format also used by
>=CT9.91. It allows to give information not only for call areas but for
>single stations with a call sign preceded by a '=' character. (See [the
>site](http://www.country-files.com/cty-dat-format/) for details).
Q: TLF thinks that I am in cq zone 5 but in fact I am in another one. How can
I fix that?
A: At the moment you have to modify your cty.dat file. Look for the entry for
your country, e.g. for Canada look for:
Canada: 05: 09: NA: 44.35: 78.75: 5.0: VE:0
Below that entry there may be lines with special prefixes and call signs which
counts also for Canada. Add yourself (VE3XYZ in the following example) to the
list with the correct CQ zone appended in parentheses, e.g.:
=VE2IM(2)[4],=VY0PW(4)[3],=VE3XYZ(3);
That would override the default setting for the CQ zone (5 for VE) with your
one (3). Also see [this page](http://www.country-files.com/cty-dat-format/)
for a detailed description.
Q: How can I use a K1EL series of Winkeyers or similar devices (e.g. the K3NG
arduino based ones)?
A: Yes. You can use one of the UDP related keying daemons out there for it. At
the moment there are at least three different versions:
* The Perl based [winkeydaemon](https://github.com/N0NB/winkeydaemon).
* OK2CQR, creator of CQRlog, has
[winkeyer_server](https://github.com/ok2cqr/winkeyer_server).
* The Python based
[pywinkeyerdaemon](https://github.com/drewarnett/pywinkeyerdaemon).
Q: The generated ADIF file misses some entries, e.g. the CONTEST_ID which is
used by my log program during import. Any idea to work around it?
A: You can use [adifmerg](https://github.com/oh7bf/adifmerg) from OH7BF for it.
It allows to post process the
ADIF file. For instance you can add the missing CONTEST_ID with:
```sh
adifmerg -f qso.adi -A CONTEST_ID= -o > file.adi
```
With the [ADIF Multitool](https://github.com/flwyd/adif-multitool) from WT0RJ,
you can do it (and more!) with:
```sh
adifmt edit --add 'contest_id=' mylog.adi > file.adi
```
Have a look at [www.adif.org]() for the already standardized contest IDs.
Q: I am using TLF in an XTerm. How can I configure used colors, fonts and
window size?
A: You can can use a .Xresources file in your home directory. See the
Xresources example file in the doc directory. Follow the instructions given
there to install it. You can use it also for URxvt terminals.
> **_Note:_** The terminal emulator programs provided with the various desktop
> environments, i.e.
> [GNOME Terminal](https://help.gnome.org/users/gnome-terminal/stable/) (GNOME),
> [Konsole](https://konsole.kde.org) (KDE),
> [QTerminal](https://github.com/lxqt/qterminal) (LXQt),
> [Xfce Terminal](https://docs.xfce.org/apps/xfce4-terminal/start) (Xfce),
> and so on, provide for configuration through their Graphical User Interface
> (GUI). Through their GUI configuration dialogues such things as the text font,
> text size, and foreground and background color palette may be modified. The
> one setting that's definitely worth playing with is the text size, which in
> the Ubuntu terminal can be changed from the "hamburger" menu in the top right
> of the window.
>
> In contrast, the older terminal emulators
> [**XTerm**](https://invisible-island.net/xterm/) and
> [**rxvt-unicode**](http://software.schmorp.de/pkg/rxvt-unicode.html) are
> configured through the classic X Window System resource database. The `doc`
> directory contains a sample `Xresources` file to change the colors to those
> resembling the VGA palette and the text font and its size from the defaults of
> each emulator. Comments in this file explain how to use it in X and Wayland
> sessions. These emulators are useful since they do not reserve many of the
> key combinations available in TLF such as F11 or Ctrl-PgUp/Ctrl-PgDown as most
> desktop emulators do. As usual, the Arch Linux Wiki provides good information
> for both [XTerm](https://wiki.archlinux.org/title/Xterm) and
> [rxvt-unicode](https://wiki.archlinux.org/title/Rxvt-unicode).
>
> Console customization is a [deep rabbit
> hole](https://www.n0nb.us/blog/2020/02/coping-with-color-on-the-linux-console-and-xterm-and-friends/)
> that goes beyond the scope of this manual.
On the top line of the console, you'll see the mode indicator ("Log" in the
image). This is based on the TR logging standard that has since been adopted
by virtually every other contest logger, which has a "Run" mode and a "Search
and Pounce" mode. In "Run" mode (indicated by "Log" in TLF), you stay on one
frequency, calling CQ and answering whoever responds. "Search and Pounce"
("Log" changes to "S&P" in the TLF interface) means tuning up and down the
band answering the stations who are running. Switch between modes by hitting
"+". The mode determines things like what the "Enter" key does.
After the mode is the current CW speed if that's set ("S=26" above), the
auto-CQ delay time in 500ms units, and short labels for the F1-F9 keys to
remind you what macro each one will send ("F1=CQ" and so forth).
The upper left section will list possible call completions if partial call
checking is on, the top right is the scoreboard and a highlight indicating
what band the radio is currently on, and the full-width section below that
shows the last few contacts logged.
The line across the middle of the console (starting with "40CW" above) has the
current UTC time, QSO number, call entry field, RST (599 599), and the
exchange entry field. Under the right-hand end of that line is the current
frequency the transceiver is tuned to, if rig control is active.
The bottom section of the screen has DXcluster spots, the band map, and
related information.
The spacebar moves between fields, the "Enter" key sends the appropriate
message for the current stage of the QSO, and the "ESC" key backs out of
whatever you just did. With the cursor in the callsign entry field, "Alt-h"
brings up a help screen, while typing `:help` and hitting "Enter" will bring
up a full list of commands. From that list, typing `q` will return you to the
main logging screen. Typing `:cfg` and hitting "Enter" will let you edit
logcfg.dat in the text editor, and exiting that editor will return you to the
main logging screen.
The log is saved continuously in TLF's text-based native format. After the
contest ends, typing `:write` in the call entry field will export the log in
Cabrillo format as `.cbr`, which is how most contest sponsors want
it. If you haven't set the Cabrillo configuration in a file as described
above, you'll be asked a series of questions for the file header, such as your
category, power level, and so forth. You can also export an ADIF file by
typing `:adif` in the callsign field. That's handy for importing your contest
contacts into your general logging program, or uploading them to sites such as
Clublog or Logbook of the World.
## CW
CW contest setup is straightforward. Assuming you've installed either
`cwdaemon` or one of the Winkeyer servers (`winkeydaemon` or
`winkeyer_server`) as described in the installation guide, just start that
before starting TLF. For example, in my current setup I make sure my rig is on
and ready to go, navigate to the current contest directory (with my
`logcfg.dat`and `rules/contestname` files in it), and type:
```
winkeydaemon -m -d /dev/ttyUSB1
tlf
```
The `-m` flag mutes the sidetone on my Winkeyer, as I prefer it off, and `-d
/dev/ttyUSB1` sets the correct device name to access. If you're unsure where
your Winkeyer connects, use
```
ls -l /dev/serial/by-id
```
which should list serial devices by somewhat readable names, and which ports
they're on.
You can stop the CW server with `killall winkeydaemon`, which is handy for
stopping and restarting it while trying different port configurations.
TLF will start in CW mode by default.
## SSB
TLF provides a voice keyer facility using the PC's sound card. This section
provides additional information to help the user configure SSB operation.
### Radio Interfacing
Often, the biggest challenge in getting voice keying to work, whether with TLF
or any other logging program, is connecting the computer audio to the radio in
a way that triggers PTT correctly. We can't cover all possible configurations
in this manual, but will offer some general pointers. If you've used sound
card-based HF digital modes, you must already have a workable computer-to-rig
connection, which should serve as a starting point for routing the voice keyer
audio. A West Mountain Rigblaster interface or homebrew equivalent makes the
process even more straightforward, and the manual for that device will cover
the appropriate settings. Those with newer radios that offer direct USB,
Bluetooth, or Wi-Fi connections may need to explore the menu settings.
If you decide you need TLF to trigger the PTT line and the hamlib PTT isn't
working, you can try a workaround with `cwdaemon`, which can be invoked for a
serial port or a parallel port. The most likely modern scenario is to use a
USB<->serial adapter, in which case an example of starting cwdaemon (as root)
might be:
```
cwdaemon -d ttyUSB0
```
You can figure out which `tty` port the adapter is on by running `dmesg`
before and after plugging in the USB. Check `man cwdaemon` for circuit
suggestions on interfacing DTR/RTS to CW/PTT ports on your radio.
One option for mic interfacing is to use PTT to control a relay that connects
the radio's mic input either to the mic or to the soundcard. An alternative
solution, recommended by many other contest loggers, is instead to connect the
mic to the soundcard's mic input and the soundcard's output to the radio's mic
input. Most soundcards will loop the mic audio back to the output, which is
easily checked. The only issue here is that the mic is also live when playing
voice keyer messages, but this can be avoided (see the next section).
Note that some radios (e.g. TenTec Orion) have only one port that becomes PTT
in SSB mode and Key in CW mode. Wire OR-ing the CW and PTT outputs from
`cwdaemon` is not ideal, because in CW mode PTT is still asserted, resulting
in key-down for the duration of the message. There is currently no
satisfactory solution to this problem, so we don't recommend that approach.
### Configuration Files
The normal practice with TLF is to create a new directory for each contest, so
a `logcfg.dat` file in that directory overrides the default. If you are using
SSB only in a contest you can force TLF to start in SSB mode by uncommenting
the SSBMODE keyword in `logcfg.dat`.
If you have adopted the method that loops back the mic audio and you want to
automatically mute the mic when voice keyer messages are played, copy the
`play_vk` shell script found in the `scripts` directory of your TLF release to
the same directory. This will then be used in preference to the default.
Uncomment the lines beginning with `amixer`.
Since TLF version 1.1.0, (un)muting and playing voice messages has been
devolved to this external script file, because not all soundcards offer the
same interface. 'Mic' could be called something else. One way of finding this
out is to run `amixer` from a terminal, which returns its capabilities. An
alternative method is to install your distribution's version of the
`alsamixergui` package and simply see what's available on the faders. This is
probably a good idea anyway because it's likely sound won't work well without
some manual intervention.
If you have something other than a 'Mic' source, you could try replacing 'Mic'
with what you think it should be in the local `play_vk` file. The process of
muting and unmuting the mic is displayed in `alsamixergui`, which is useful
for debug purposes. Please share any information you discover with the TLF
community.
A `rules` sub-directory within the local contest folder should contain a
contest-specific rule file. As with `logcfg.dat`, this local copy will
override the defaults, which you will want to do. This rule file must contain
the paths to the audio files corresponding to each F-key to be used. An
example might be:
```
VKM1=/home/aham/tlf/audio/f1.wav
VKM2=/home/aham/tlf/audio/f2.wav
VKM3=/home/aham/tlf/audio/f3.wav
VKM4=/home/aham/tlf/audio/f4.wav
VKM5=/home/aham/tlf/audio/f5.wav
VKM6=/home/aham/tlf/audio/f6.wav
VKM7=/home/aham/tlf/audio/f7.wav
VKM8=/home/aham/tlf/audio/f8.wav
VKM9=/home/aham/tlf/audio/f9.wav
VKM10=/home/aham/tlf/audio/f10.wav
VKM11=/home/aham/tlf/audio/f11.wav
VKM12=/home/aham/tlf/audio/f12.wav
VKSPM=/home/aham/tlf/audio/vkspm.wav
VKCQM=/home/aham/tlf/audio/vkcqm.wav
```
Thus a common set of voice messages can be pointed to from different rule
files. The F12 message is the auto-repeated CQ message for when the rate is
low. The VKSPM and VKCQM messages are sent after a contact is logged, in S&P
and CQ modes respectively.
Paths that are not defined cannot be recorded to from within TLF.
### Distribution-specific Notes
TLF uses `sox` to record and play audio, so you must have it installed. You
can use the sox commands `rec` and `play` on the command line in case you need
to debug any TLF issues.
Modern distros often use the `pulseaudio` sound server, but this can cause
unacceptably long delays at the beginning and end of recordings, and at the
beginning and end of voice message playback. If you experience these problems,
try uninstalling just the `pulseaudio` ALSA plugin. You lose the ability for
ALSA applications to play and record across a network, but for most TLF users
this isn't a problem.
### Recording
For the best sound quality, record voice messages with an external audio
editor such as [Audacity](https://www.audacityteam.org/), which will also
allow you to trim leading and trailing silence. Export each message in .wav
format and add their paths to the rules file as described above.
TLF also has a built-in sound recording feature for changing messages on the
fly, or for those who don't want to use an external editor. To record messages
from within TLF, enter `:sou` in the call entry field to take you to the TLF
Sound Recorder Utility page. Recording starts by hitting the relevant F-key
for that message ('s' or 'c' for the VKSPM and VKCQM messages). Terminate
recording by hitting the **ESC** key.
Currently, recording messages does not key PTT. If you want to hear yourself
via the radio's monitor function while recording, you will need to manually
assert PTT, e.g. press your footswitch throughout. Obviously, this means your
recording also goes out on-air, so you might want to minimise your transmitted
power and use a dummy load while doing this.
It takes a bit of practice to time your speech within the starting and ending
key presses. It's also quite easy to set the ALSA mic gain too high and end up
with clipped audio. This will show up during playback as some black and white
writing appearing over the top of the display colours. It's actually `sox`
reporting warnings. You can fix this by adjusting the mic level using the ALSA
mixer.
## RTTY and Digital Modes
For RTTY or other digital mode contesting,
the most common and straightforward approach is to use Fldigi
for digital signal demodulation.
Fldigi may also be used for digital signal transmission, if desired.
Alternatively, digital transmission can be handled
by external keyers such as the MFJ-1278, K3NG Keyer, nanoIO,
and similar interfaces.
These devices typically connect to the host system via a serial or USB interface.
Some models also support digital signal reception in addition to transmission.
This section focuses on using Fldigi with TLF.
### Setting up Fldigi
The first step is to configure Fldigi to work in standalone mode.
* To activate the capturing of received text, switch to contest mode:
Configure -> Contests -> General
Contest "Generic contest"
* Set up rig control via Hamlib's `rigctld`:
Configure -> Rig Control -> Hamlib
Rig: "Hamlib NET rigctl"
Device "localhost:4532"
**NOTE**: Do not use direct rig connection, as it cannot be shared between Fldigi and TLF.
If `rigctld` runs on a different server than Fldigi,
then update the configuration accordingly.
* Set up the digital mode to be used,
including audio levels and rig mode setting.
* Verify that all relevant Fldigi functions (sending, receiving, and rig control)
are operational.
### Configuring TLF
TLF communicates with Fldigi via its XML-RPC interface.
If both TLF and Fldigi are running on the same computer, simply add
```
FLDIGI
```
to the TLF configuration file (either `logcfg.dat` or the corresponding rule file)
to enable the connection:
If Fldigi runs on a different computer, or if it uses a port other than the default
7632, specify the full URL:
```
FLDIGI=http://:/RPC2
```
The Fldigi interface can be toggled at runtime using the command `:FLDigi`.
This command can also be used to reconnect to Fldigi if the connection is lost.
If a specific rig mode is required for the digital mode,
it can be configured using the `DIGI_RIG_MODE` setting.
By default, the rig is set to match typical AFSK digital modes.
When exporting the log in Cabrillo format, digital mode QSOs are marked
with the generic digital mode designator 'DG'.
marked as having a generic digital mode 'DG'.
To export RTTY QSOs as 'RY' instead, enable the `RTTYMODE` configuration option.
Other non-standard modes (such as 'FH' for FeldHell) require
manual editing of the generated Cabrillo file.
### Using TLF-Fldigi interworking
Messages used in digital QSOs are configured in the same way as for CW,
but the key names are prefixed with `DK`, which stands for "digital keyer".
For example, the CQ message (`F1`) is defined as `DKF1`.
By clicking on the Rx pane in Fldigi, QSO fields (callsign and exchange)
can be selected and transferred to TLF, significantly reducing
the amount of typing required.
In FSK RTTY mode -- where the receiving audio shift is fixed -- clicking
on the waterfall display tunes the rig to the desired carrier frequency.
The preferred audio frequency for this "auto-QSY" feature is configured via
`FLDIGI_RTTY_SWEET_SPOT`.
The keyer window (Ctrl-K) can also be used in digital modes;
however, switching between transmit and receive must be done explicitly
using the '[' and ']' keys.
For RTTY, the `:MINiterm` command activates an embedded Rx window within TLF,
which is useful when running Fldigi in headless mode.
Grabbing cluster spots works the same way as for non-digital modes.
## QTC Handling
*Pasted from README_QTC.txt; some information may be out of date.*
This is a short intro for TLF QTC handling. Ervin Hegedus HA2OS, 2014.
airween@gmail.com
### Introduction
QTC handling was made for WAEDC contest for TLF. It doesn't need any external
tool, TLF supports it out of box. To enable that, you only needs to put a
"QTC=" option to logcfg.dat. This parameter needs a value, which could be one
of these: "RECV", "SEND", or "BOTH". These values means you only want to
receive or send QTCs, or you want to send AND receive QTCs (for example, in
RTTY mode). Note, that currently only RECV and SEND mode are implemented. BOTH
will used for RTTY mode.
### QTC window
When you enabled the QTC handling in logcfg.dat, you can open the QTC window
from either field: callsign or exchange, it doesn't matter. To open it, just
press CTRL+Q. If you want to close it, just simply press ESC. The window is
divided to 2 sides: the left side contains the QTCs data, the right side
contains the help information.
The data side contains the following QTCs fields:
* QTC callsign - 14 characters, allowed: alphanums, digits, /
* QTC serial - 4 characters, allowed: digits,
* number of QSO in current QTC block - 2 characters, allowed: digits
* 10 QSO lines in RECV mode:
* time - 4 characters, allowed: digits, ?
* callsign - 14 characters, allowed: alphanums, digits, /, ?
* serial - 4 characters, allowed: digits, ?
* 10 QSO lines in SEND mode:
* every line generated by the QSOs, all of them are formatted
for three fields: time, callsign and serial
Note, that if you set up the QTC_RECV_LAZY option in RECV mode (EU station in
CW/SSB contest), then TLF will skip to check the restrictions above.
This side contains many "meta" information:
* at right of the QTC callsign field, TLF shows the QTC info of current station:
how many QTC has it; if the callsign field in main window is empty, the last
callsign will be picked up. When the station has not send or received any QTC yet,
there will be: "Received 0 QTC", or "Sent 0 QTC". If you had exchanged any QTC
with the station, the message will read "Received 3 QTC" or "Sent 5 QTC".
* if you type the number of QSO in the QTC block in RECV mode, TLF will show its
number at the beginning of every line; if the station indicates that it will
send to you 6 QSO, and you type it in that field, TLF will put a digit to
the begin of first 6 lines
* if you type the number of QSO in the QTC block in SEND mode, TLF will find the
next number QSO, which doesn't contain the current callsign (see contest rules 7.2).
Note, that if you don't have eonugh QSOs, you can't send the maximum (10), eg. you
have only 9 QSO. If you type greater number than available QTC number, the field
value will be aligned to maximum number!
* in RECV mode, every QSO line has a status, which could be: "invalid",
"valid", "confirmed". This status is indicated by a sign at the end of the
line. When a line is invalid, you can see a "?", if the line is valid, then
there isn't any character, and finally, if the QSO line had been confirmed,
you can see a "*" sign * in SEND mode, if you've sent a QTC line (with
ENTER), at the end of the line you will see a "*" character, which means,
you've sent that QTC.
### Navigation between the fields
You can move to any field as you want and when you want. There isn't a
mandatory order, but the navigation keys don't work in all cases. Normally,
with TAB you can move to the next field, and Shift+TAB goes back. There is an
exception: TAB will not leave the current QSO line, until you confirm the
line. Instead it takes you to the time field, if you are in the exchange
field, and Shift+TAB does it in reverse order. With UP and DOWN cursor keys
you can go to up or down.
In RECV mode with SPACE, you can navigate between the fields in one line, for
faster move, so that means the SPACE and TAB are equals in this mode, in QTC
line.
### Navigation in a field
If you press an allowed character in a field, that will be displayed, and the
cursor will go right to the next place. If you press a not allowed character,
then nothing happens. The BACKSPACE key deletes the next characters to left,
and move the right part to left. DELETE key deletes the current character as
you're staying, and shifts the characters to left at the next to right. As I
described above, the SPACE move the cursor to the next field (or first, if you
are in last field) inside of QTC line, in RECV mode.
### Storing QTCs
TLF stores QTCs in two files. The received QTCs are stored in QTC_recv.log,
sent QTCs are stored in QTC_sent.log. These logfiles will created
automatically, when TLF starts.
### Receiving QTC
If the station asks you, if are you QRV for QTC, you can press CTRL+Q, it
doesn't matter in which field are you: callsign or exchange. As another way,
you an open the QTC window (CTRL+Q), and press F1 to ask for QTC - it is
configured in rule file to send "QTC?".
If the callsign fields isn't empty, the content of that field will be copied.
Otherwise the callsign of the last QSO will be copied. If the station sent you
some QTC previously, you can see the number of QTC QSOs, eg. "Received 3
QTC". You can receive at maximum 10 QTC from every station. If you have 3 QTC
from a station, then you can receive 7 QTC more. If you type more than 7, TLF
will replace the number to 7.
Afterwards you can fill the QTC serial, and number of QSOs. What you type in
as number of QSOs will be used by TLF to number that many lines, to show you,
how many lines remains.
If you filled the callsign, serial and number fields (all three fields are
required), and then press ENTER, TLF will send the F2 message, which is "QRV"
normally, so you don't need to send it manually.
If you start to receive the QTCs, you need to fill 3 fields: time (HHMM, as
hour and minutes), callsign and serial. If you only enter parts of a line,
that line will be marked as "incomplete", which you can see by the "?" at the
end of the line.
If you fill the time field (4 digits), the cursor will go to the callsign
field. Fill that field, and press TAB to move the next one. If you put there
at least 1 digit, TLF recognizes that line is complete and the "?" will
disappear at the end of the line.
If you press SPACE in any field, the cursor will go to the next field (or
first, if the current is the exchange number).
Important: in any fields you can type "?", eg: "111?" in time field, or "W?"
in callsign field. That mean, you couldn't receive that letter. Then you fill
all fields vainly, the line remain as incomplete. Otherwise TLF assumes the
line is complete.
This is important, because when you press the ENTER, TLF will send the answer
to the station based the status of the line. If the line is incomplete, TLF
sends "AGN" message, but if it's complete, it sends "R".
If you could receive the line, and pressed ENTER, and TLF sent the "R" signal,
then you will see a "*" at the end of the line. That means, you received the
QTC line from the station.
If you want to ask only one field (eg. only callsign), then you need just
press F5 (TIME?), F6 (CALL?), or F7 (NR?). If you want to ask the complete QTC
line, you can press F8 (AGN).
When you received a QTC, the cursor goes to the start of the next line, and
you can continue to receive QTC.
If you received the last line, and all lines are complete, after the last
ENTER TLF will close the QTC window, and send "QSL ALL" message to the
station.
At this time the QTC data will be written to the logfile on disk, fields will
be flushed, and if there is configured any other node in logcfg.dat, the QTC
lines will be sent to them.
On other nodes, TLF will also write the QTCs to its own logfiles.
If you press ESC before you receive the QTC block, the data isn't lost. TLF
flushes the fields only in these cases:
* you received all QSOs, and saved to disc
* pressed ESC, and changed regular callsign field
Note, that TLF send the "QRV" message only in case the fields are empty. Keep
in mind, if you've pressed ESC, and CTRL+Q again, all data remains, and "QRV"
message will NOT be sent.
### Sending QTC
If the other station asks you for QTCs, you can press CTRL+Q, it doesn't
matter in which field are you: callsign or exchange. When the QTC window
opens, you can press F2 and TLF will send the message: "QTC sr/nr" with "sr"
and "nr" replaced with the i serial and number of lines in QTC, example: "QTC
3/8".
If the callsign fields isn't empty, the contents of that field will be copied.
Otherwise, the callsign of the last QSO will be used. If the station received
QTCs previously, you can see the number of QTCs on the current band, eg.
"Sent 3 QTC". You can send maximum 10 QTC to every station. If you sent 3 QTC
to a station, you can send maximum 7 QTC in next block. If you type more, than
7, TLF will replace the number to 7, and of course, only 7 QSO will be shown.
If you don't have enough QSO, TLF also will replace this value to the number
of the available QSO.
The QTC serial field will be filled automatically, you just need to set up,
how many QTCs you want to send. Note, that TLF looks for the current
callsign, and that will be excluded from the QTC list! If you modify the
callsign field, TLF will hide some lines, which match the actual callsign,
but don't afraid: if you finish the modification of field, you can see the
available list.
If you don't want to send the maximum available QTC lines, just edit the
number field, and TLF will gives only that many QTC lines.
Now, you can move to the 1st QTC line with DOWN cursor. If you press ENTER,
TLF will send the current QTC, and will put a "*" char to the end of the line.
It shows you, that QTC line had been sent.
Now just press DOWN and ENTER, if the station gives "R" sign. If it asks to
send the last QTC again, just simple press UP and ENTER again. With the DEL
key you can delete the "SENT" flag from the end of the line.
If you sent all lines, and if the station confirms them, you can press the
CTRL+S (like in most software), and TLF will save the block. After 2 seconds
the window will be closed, and you can go away.
At this time the QTC data will be written to the logfile on the disk, callsign
and number fields will be flushed, and if there is any other node configured
in logcfg.dat, the QTC lines will be sent to them.
On the other nodes, TLF will also write the QTCs to its own logfiles.
If you press ESC before you receive the QTC block, the data isn't lost. TLF
flushes the fields only in the following case:
* you sent all QTCs, and saved them to disk
### Showing QTC capable stations
After you sent or received a QTC block from or to a station, TLF writes it to
the log, but stores it in memory too. If you meet that station on another
bands, and use "Worked window", then you can see, how many QTCs had been
exchanged with the station on each band.
There is a "Q" letter on the upper border of "Worked window", and in that
column there are the number of QTCs. If there is a "0" in a line, that means
you sent to or received no QTC from that station. If there is a "Q", that
means you sent to or received from the station the maximum number of QTC (10).
This information also is visible in the cluster info, if you use that. At the
end of the callsign in bandmap, you can see a "0", "Q" or any digit, which
means same as above, eg "DL1A Q", or "HA5A 3".
### Preparing Cabrillo
When you finished the contest, just use the ":wri" command to save your log
in Cabrillo format. (It's a good idea to exit from TLF, and start it again -
this is only need to recalc correct points, nothing else.)
Now leave TLF, and run the "qtcmerge.py" script, which is part of TLF, and has
been installed to your INSTALLDIR/share/tlf, eg. /usr/local/share/tlf. The
normal way to run this script from the TLF contest directory is:
/usr/local/share/tlf/qtcmerge.py YOURCALL.cbr
The script reads your saved Cabrillo file and your QTCs and saves them to a
new file, in Cabrillo format. The new file name will be YOURCALL_QTC.cbr.
Make a backup of the original file, rename the new one to YOURCALL.cbr and
send it to the contest organizers.
Note: You can find more info about the QTC cabrillo format here:
http://dl0tud.tu-dresden.de/~dj1yfk/qtcs/
http://www.kkn.net/~trey/cabrillo/qso-template.html
### Shortkey summary
* CTRL+Q - open QTC window
* ESC - close QTC window
* TAB - move to the next field
* SPACE - move to the next field in QTC line, in RECV mode
* Shift+TAB - move to the previous field
* UP, DOWN - move up or down
* BACKSPACE - delete the next char left
* DELETE - delete the current position, shift left the rest of line
* ENTER - send "R" or "AGN" to station
If you have any question, just send an e-mail to me or the TLF develop list.
73,
Ervin HA2OS
## QTCs on RTTY
*Pasted from the original README_QTC_RTTY.txt; some information may be out of
date.*
This is a short intro for TLF QTC handling in RTTY mode. Ervin Hegedus HA2OS,
2014. airween@gmail.com
### Introduction
The QTC base instructions described in README_QTC.txt, please read it
CAREFULLY, before you start to read this readme. There you will find detailed
information about how TLF handles the QTC in CW and SSB mode. In this readme,
I just write the differences.
### General
The QTC window(s), fields, navigation is almost the same, like in CW and SSB
modes. In CW/SSB modes every QTC line int the full QTC block exchanged by
individually (every QTC line sent or received separately), but that method
would be too slow in RTTY mode. In this mode, a complete QTC block exchanged
in whole. That's the main different, but this divergence involves a few
necessary modifications. Another important thing, that in RTTY mode everyone
can send or receive QTCs, there isn't any limit (except the number of total
QTCs between two stations). So, it happens that you sent 5 QTCs in a block,
but to complete to 10, the second 5 QTCs you will receive from same station.
That's why there is the third possible value of "QTC" option in
logcfg.dat/rule file, which is "BOTH".
### Receiving QTC
Even if you choose the two-way QTC handling, or you just want to receive QTCs,
the CTRL-Q combination remaining to receive the QTC block. If you open the QTC
receive window with CTRL-Q, apparently nothing has changed. The point is same
than in another modes: fill the lines. Yes, the speed of RTTY is a little bit
fast, and you have to know type as very quickly, if you want to copy from the
terminal of your modem software. To help the copy operation, there is a new
feature in TLF: capturing the output of modem. Currently, only the gMFSK modem
could be captured.
If you want to start the capture, just press CTRL+S, that means "Start
capture". To finish the capture process, just press CTRL+E, that means "End
capture".
If you've started the capture process, the new window will open, which is a
"terminal" window - there you can see the gMFSK modem lines. At the top of the
double-window, you can see a small HELP window, which contains all shortkeys
these windows. If you press ESC (Escape), then terminal window will be hidden,
but - this is very important! - the capture process doesn't finish! Now, if
you press CTRL+S again, the terminal window will open again, and you can see
the characters in the meantime.
You can recognize two types of lines for QTC block: the serial/number line, or
a single QTC line. The formula of serial/number line is NNN/NN. This works
only if you didn't fill the serial and number fields in QTC window. So, if
those lines are empty, and in your terminal window the line is like this:
"QTC 32/8 QTC 32/8"
and you scroll there, and pressing ENTER, TLF recognizes this as the serial
and number of the QTC block, and will fill those fields.
The QTC line formula could be:
1111/W1AW/234 1111-PX2A-345
The "separator" character could be the "/" (slash) or "-" hyphen.
If you scroll to a line like one of these, and pressing ENTER, TLF will fill
the next empty QTC line in QTC block. Note, that the line starts with 4
number, and at the end is also a numeric character, and the length of leftover
is less than 14, then TLF also recognizes the QTC line.
**IMPORTANT!**
Only the complete received lines can be captured from right side to left side,
and only once. You can't move that line, which increments horizontally -
that's the current line. If the line has an NL (new-line) character, then you
can capture that. If you've pressed the ENTER on a line, then it will be
marked with an "*" (asterisk) sign. That means, you couldn't capture that
anymore.
**STILL IMPORTANT!**
If you fill the serial and number fields in main QTC window, the first pattern
WILL NOT be recognized (SERIAL/NR). If you didn't fill the serial AND number
fields (with or without the capture process), you CAN'T capture the QTC lines!
That means, you press ENTER on a QTC line at right side vainly, the line will
not copied to right side!
So, if you can copy one or more lines from right side to left with capture
process, the result could be two types: TLF thinks the line is a good,
fail-safe QTC line, or isn't it: the line contains wrong character, eg. the
time filed contains non-numeric character. In this case, the end of the line
you can see a "?" (question mark) character. If the line doesn't contain
wrong character, you can see a "+" (plus) character.
**IMPORTANT!**
You NEED to review ALL lines at the left side by press an ENTER. If the line
has "+" character, then that will changed to "*" (asterisk), which means "line
marked as confirmed". If line has "?" at the end, then TLF will send an "AGN N
AGN N" message, where the N is the number of the line. Then you can change the
wrong character, till the status will goes to "+".
If all lines have "*" sign, and you press the ENTER at last line, TLF will send
the message "QSL ALL", or what you've configures for QR_F10 macro.
You can send the last message manually, if you press F10 - then TLF also
sends that message, and it will save the received QTC block too.
If the all QTC lines are right, and TLF sent "QTC ALL", then the QTC block
will be saved automatically.
### Sending QTC
As you can read the QTC=BOTH description above, TLF can send AND receive QTCs
in same contest. To avoid the shortkey collisions, in this case the only one
combination can be used: CTRL+S.
If you fill the callsign field (or that's filled when you open the QTC send
window), then the QTC serial field is fixed - you can't change that, like
CW/SSB modes. Only you can change the number of QTCs field, which could be
maximum 10, or if you have QTC (received or sent) with the station, then TLF
calculates the possible number.
Then if you press the ENTER, TLF sends the complete QTC block to your modem
(eg. gmfsk_autofile), and you can see the characters in the window of your
modem (eg. Fldigi).
If station asks you to resend one or more QTC line again, just move the asked
line, and press ENTER again.
If station confirms the QTC block, you have to save that with CTRL+S.
## Cabrillo File Handling
*Pasted from the README.Cabrillo file*.
Recently Cabrillo format became the de facto standard to submit contest
results. TLF's approach to handle QSO and QTC lines is based on a textual
description and can be easily extended by the user to support newer contests.
Header fields can be specified either in config file or using an existing
Cabrillo file as a template.
### WORKING PRINCIPLE
The QSO/QTC format descriptions are contained in 'cabrillo.fmt' file in the
/usr(/local)/share/tlf directory. It provides format descriptions for common
contests. All descriptions are named and you have to specify which one has to
be used with a statement in logcfg.dat or (better) in the contest rule file
with the following syntax:
CABRILLO-QSO-FORMAT=*formatname* (or simply CABRILLO=*formatname* )
You can put your own format file 'cabrillo.fmt' in your actual working
directory which gets precedence over the central one.
### Cabrillo formatting
The format of cabrillo.fmt entries is as follows:
* The file contains groups of lines which are interpreted as key-value pairs.
* Each group describes a possible Cabrillo format and starts by a line
containing the in square brackets.
* At the moment the following keywords are supported: QSO=... QTC=...
EXCHANGE-SEPARATOR=...
* Lines beginning with a '#' are interpreted as comments.
* The 'QSO=' key has to be followed by a list of string, number pairs
separated by semicolons. Each pair specifies one item to put into the QSO:
line. The name of the item has to be followed by a comma ',' and a number
specifying the character width of that field in the QSO: line. Values
which are too wide will be truncated to that width.
The following items names are supported:
FREQ The working frequency.
MODE Mode of operation ('CW', 'PH',...)
DATE Date of the QSO
TIME Logged time of the QSO
MYCALL Own call
HISCALL Other sides call
RST_S RST sent
RST_R RST received
EXC_S Exchange sent (May contain a '#' character, which gets replaced by the
QSO number formatted to 4 digits).
EXCH The complete received exchange line
EXC1 First word of the received exchange, see *Exchange Separator* below
EXC2 Second word of the received exchange
EXC3 Third word of the received exchange
EXC4 Fourth word of the received exchange
TX Number of the TX (for cqww or other contests).
All items represent one column in the resulting Cabrillo log file. All entries
are separated by an additional space character.
### Exchange Separator
EXC1..EXC4 allow writing parts of the received exchange in separate columns.
The exchange is split by default on white space (space or tab). Another
separator(s) can be specified with the EXCHANGE-SEPARATOR keyword. If '/'
(slash) is used to separate parts of the exchange (e.g. 002/1234) then this
line has to be added to the format:
EXCHANGE-SEPARATOR=/
In the provided cabrillo.fmt file the formats for AGCW use this construct.
### Example
The following entry
[cwo]
QSO=FREQ,5;MODE,2;DATE,10;TIME,4;MYCALL,13;EXC_S,14;HISCALL,13;EXC1,4;EXC2,9
will be selected if
CABRILLO=cwo
is in the rules file for the CW Open contest. All QSOs will then be formatted
as in the following example:
QSO: 28000 CW 2012-09-23 0815 DL1JBE 0001 Tom HB9XXX 0023
### Importing Cabrillo
An existing Cabrillo file can be imported by starting TLF with the "-i"
option. The Cabrillo file must be called YOURCALL.cbr, which is the standard
naming convention for TLF. In this case, TLF reads the configuration and rule
files, so the scoring and multipliers will be used as your config describes.
Your config also describes the CABRILLO format, that TLF uses to parse the log
to handle the fields correctly.
The output file(s) will IMPORT_contest.log, where the contest is the name of
contest in your rule/config file. Eg. my Cabrillo is HA2OS.cbr, which must be
in the current directory. After the import, the result is IMPORT_cqww.log (if
the contest name is cqww), so the TLF doesn't write over the existing logfile.
If you want to use the new, imported file, you have to move the old one, and
rename the imported file.
When the contest is WAE, and the rule file contains a valid QTC setup, and
Cabrillo contains lines with begin of "QTC:", then you will have the
IMPORT_QTC_sent.log and IMPORT_QTC_recv.log. In this case, the original files
also kept, and you have to archive and rename the files.
## Alternative packet cluster setup
*Pasted from the original doc/README file; some information may be out of
date.*
TLF can also run packet spots in a separate terminal. To link this to the TLF
program start a telnet session from the working directory with:
telnet | tee -a clfile
In case your packet program is on your own machine, use
telnet localhost | tee -a clfile
Now you have a separate packet terminal where you can e.g. start "call",
telnet or or "minicom" and connect to your favorite dx cluster, or telnet to a
cluster on the internet.
Activate "FIFOINTERFACE".
Activate the cluster display in TLF with :cluster, :spot, or :map You can
toggle the announcements filter with :filter
## Bandmap
*Pasted from the original New_Bandmap.txt file; some information may be out of
date.*
One main problem in old TLF versions is the very narrow space for cluster
messages (only 8 entries plus some room in scrolling). Furthermore the code
for looking up the messages was very inefficient and does not allow good
filtering of the information we need.
The new bandmap tries to fix some of the problems. The following principles
were applied:
* Use the space below the QSO entry line for displaying the spots in the
background.
* For each spot display the frequency (with one decimal) and the call of the
spotted station. That allows 3 columns with 10 spots each.
* There are 3 sources of spots:
* dx cluster messages
* spots in local LAN (maybe from other stations scanning the band)
* finished QSOs while in S&P
* The frequency is remembered with a resolution of 1 Hz if available
* You can filter the displayed spots by
* band (all bands or only own (momentarily active) band)
* mode (all or own)
* dupe (show dupes or not)
* Each spot may have a letter or star between frequency and call denoting the
source of the spot
* blank - from cluster
* '*' - self spotted or worked in S&P
* 'a'..'z' -spotted from station 'a' to 'z' in local network
* Color of spots signal the age of the spot
* bright blue - new spot
* blue - older than 45s (at the moment)
* brown - older than 5 min
* Dupes (already worked stations) are show in lower case and grey
### Usage
Turn on rig control and connect to a cluster (experiment what happens if one
or both conditions are not met). Wait some moments until some spots shows up.
* Press '.' to show the filter menu. Next letter switches filtering:
* b - toggle band filter
* m - toggle mode filter
* d - toggle display of dupes
* o - only shows the multipliers (CQWW only)
* Tune in to any interesting station, insert its call into the input field and
press 'Ctrl-A'. The heard station gets added to the bandmap and broadcasted
to other stations in the local net. See that it gets marked with a '*' as
self spotted.
* Tune in to any contest station in S&P and work it as normal. After the QSO
is finished the station is added to the bandmap and shown as dupe.
* Press 'Ctrl-G' to grab the next displayed spot (starting at your frequency
upwards). Each further press of 'Ctrl-G' jumps to the next spot. So you can
scan the spotted stations, see if you can work them or jump to the next one.
If you reach the last station (highest frequency) the scan switches
direction and following key presses goes downward (on lower boundary it
switches to upwards again...). **At the moment Ctrl-G requires a connected
transceiver to work correctly as it reads the actual starting frequency from
the rig**
* If you type some letters of a call in the map you are interested in and then
'Alt-G' afterwards the first call with that letters gets grabbed.
* You can narrow the spots to grab by the above mentioned filters.
* If you grab a spot while in 'Run' mode, TLF switches to S&P and remembers
your 'run' frequency in the memory. You can switch back to your old running
frequency by '+' (back to Run mode) and '#' (back to old frequency).
You can also configure bandmap filtering and spot lifetime from logcfg.dat.
`BANDMAP `-> use default values (no filtering, lifetime = 900 s)
`BANDMAP=`*xyz*,*number*
*xyz* string parsed for:
* 'B' - only own band
* 'M' - only own mode
* 'D' - do not show dupes
* 'S' - skip dupes during grab_next (ctrl-g)
* 'O' - only shows the multipliers (CQWW only)
* *number* lifetime for new spots in second (number >=300)
## FAQ
*Pasted from the original FAQ file*
Q: Where can I download the latest callmaster call sign data file?
A: You can use the master.scp file from http://www.supercheckpartial.com. Save
it as `callmaster` and copy it in the actual contest directory or in TLF's
global data directory (`/usr/local/share/tlf`). The file in the actual contest
directory takes precedence.
Q: Can I add my own list of call signs to the callmaster file.
A: Sure. Just add it to the end of the file - each call (in uppercase) on a
line by itself. Be aware that at the moment the file is limited to 50000
entries.
Q: Where can I find an actual CTY.DAT file for TLF?
A: Try https://www.country-files.com/ Make sure to save it as 'cty.dat' in
lower case letters. Be aware that there a two different file formats:
* For version before TLF-1.3.1 you have to use the old style CTY.DAT file with
no embedded '=' character.
* For newer versions you can also use the newer file format also used by
>=CT9.91. It allows to give information not only for call areas but for
>single stations with a call sign preceded by a '=' character. (See [the
>site](http://www.country-files.com/cty-dat-format/) for details).
Q: TLF thinks that I am in cq zone 5 but in fact I am in another one. How can
I fix that?
A: At the moment you have to modify your cty.dat file. Look for the entry for
your country, e.g. for Canada look for:
Canada: 05: 09: NA: 44.35: 78.75: 5.0: VE:0
Below that entry there may be lines with special prefixes and call signs which
counts also for Canada. Add yourself (VE3XYZ in the following example) to the
list with the correct CQ zone appended in parentheses, e.g.:
=VE2IM(2)[4],=VY0PW(4)[3],=VE3XYZ(3);
That would override the default setting for the CQ zone (5 for VE) with your
one (3). Also see [this page](http://www.country-files.com/cty-dat-format/)
for a detailed description.
Q: How can I use a K1EL series of Winkeyers or similar devices (e.g. the K3NG
arduino based ones)?
A: Yes. You can use one of the UDP related keying daemons out there for it. At
the moment there are at least three different versions:
* The Perl based [winkeydaemon](https://github.com/N0NB/winkeydaemon).
* OK2CQR, creator of CQRlog, has
[winkeyer_server](https://github.com/ok2cqr/winkeyer_server).
* The Python based
[pywinkeyerdaemon](https://github.com/drewarnett/pywinkeyerdaemon).
Q: The generated ADIF file misses some entries, e.g. the CONTEST_ID which is
used by my log program during import. Any idea to work around it?
A: You can use [adifmerg](https://github.com/oh7bf/adifmerg) from OH7BF for it.
It allows to post process the
ADIF file. For instance you can add the missing CONTEST_ID with:
```sh
adifmerg -f qso.adi -A CONTEST_ID= -o > file.adi
```
With the [ADIF Multitool](https://github.com/flwyd/adif-multitool) from WT0RJ,
you can do it (and more!) with:
```sh
adifmt edit --add 'contest_id=' mylog.adi > file.adi
```
Have a look at [www.adif.org]() for the already standardized contest IDs.
Q: I am using TLF in an XTerm. How can I configure used colors, fonts and
window size?
A: You can can use a .Xresources file in your home directory. See the
Xresources example file in the doc directory. Follow the instructions given
there to install it. You can use it also for URxvt terminals.