# Raspberry Pi GPIOzero
1. [Materials needed](#materials-needed)
2. [GPIO pinout](#gpio_pinout)
3. [Analog vs. Digital](#analog-vs-digital)
4. [Blink](#blink)
5. [LED PWM](#led-pwm)
6. [Button](#button)
7. [Combining everything](#combining-everything)
Your Raspberry Pi is more than just a small computer, it is a hardware prototyping tool! The RPi has **bi-directional I/O pins**, which you can use to drive LEDs, spin motors, or read button presses. To drive the RPi's I/O lines requires a bit or programming. You can use a [variety of programing languages](http://elinux.org/RPi_GPIO_Code_Samples), but we decided to use a really solid, easy tools for driving I/O: **Python**.
### Materials needed
* Raspberry Pi 3 B
* [Breadboard](https://www.sparkfun.com/products/12002?_ga=1.251311686.1915117394.1476705504)
* [Jumper Wires(M/F)](https://www.sparkfun.com/products/12794)
* [Momentary Pushbutton Switch](https://www.sparkfun.com/products/9190?_ga=1.213562324.1915117394.1476705504)
* [Resistors](https://www.sparkfun.com/products/11507?_ga=1.213562324.1915117394.1476705504)
* [2 LEDs](https://www.sparkfun.com/products/9590?_ga=1.213548756.1915117394.1476705504)
### GPIO Pinout
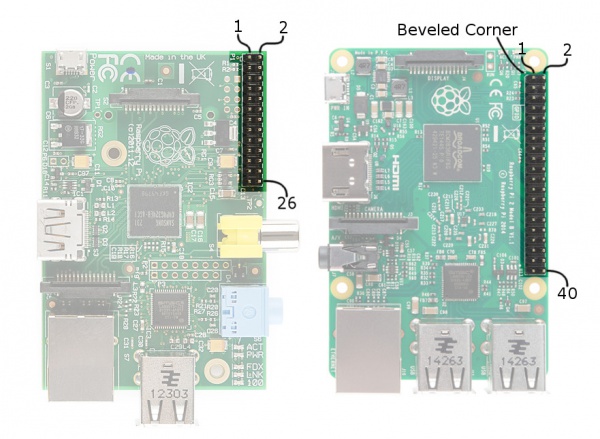
Raspberry has its GPIO over a standard male header on the board. From the first models to the latest, the header has expanded from 26 pins to 40 pins while maintaining the original pinout.
There are (at least) two, different numbering schemes you may encounter when referencing **Pi pin numbers**:
1. **Broadcom (SoC) chip-specific** pin numbers.
2. **P1 physical** pin numbers.
You can use either number-system, but when you are programming how to use the pins, it requires that you declare which scheme you are using at the very beginning of your program. We will see this later.
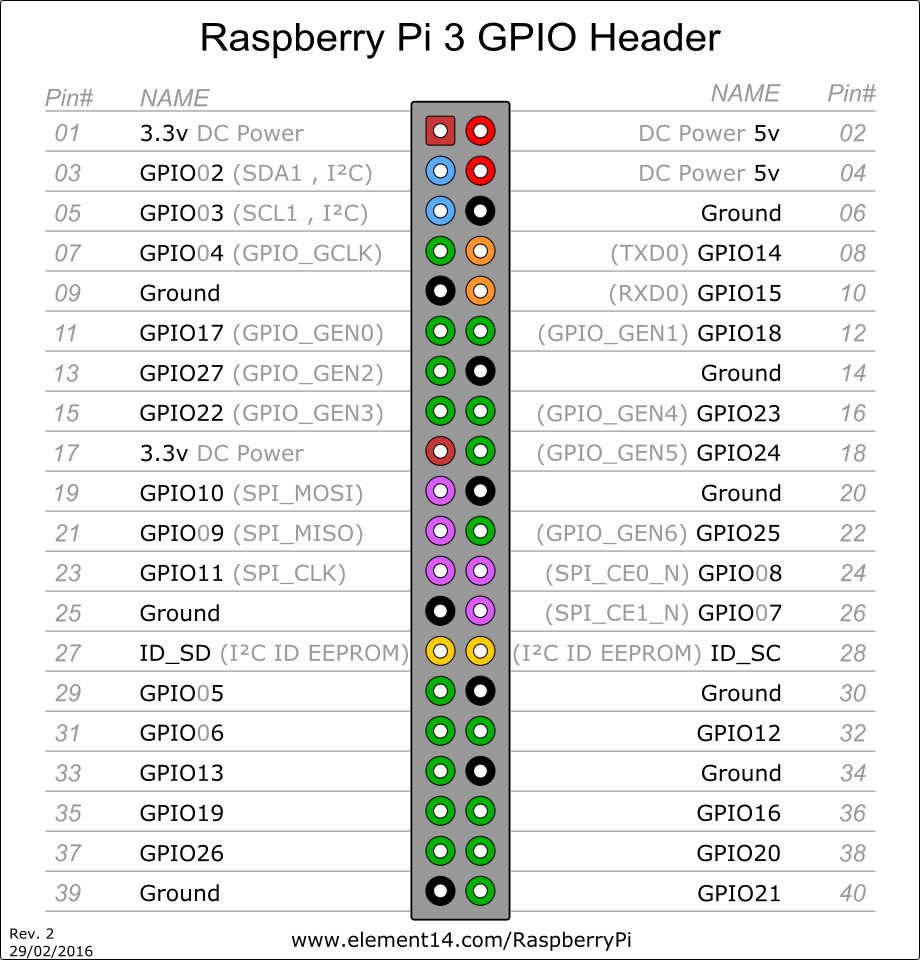
The next table shows all 40 pins on the P1 header, including any particular function they may have, and their dual numbers:
In the next table, we show another numbering system along with the ones we showed above: **Pi pin header numbers and element14 given names, wiringPi numbers, Python numbers, and related silkscreen on the wedge**. The Broadcom pin numbers in the table are related to RPi Model 2 and later only.
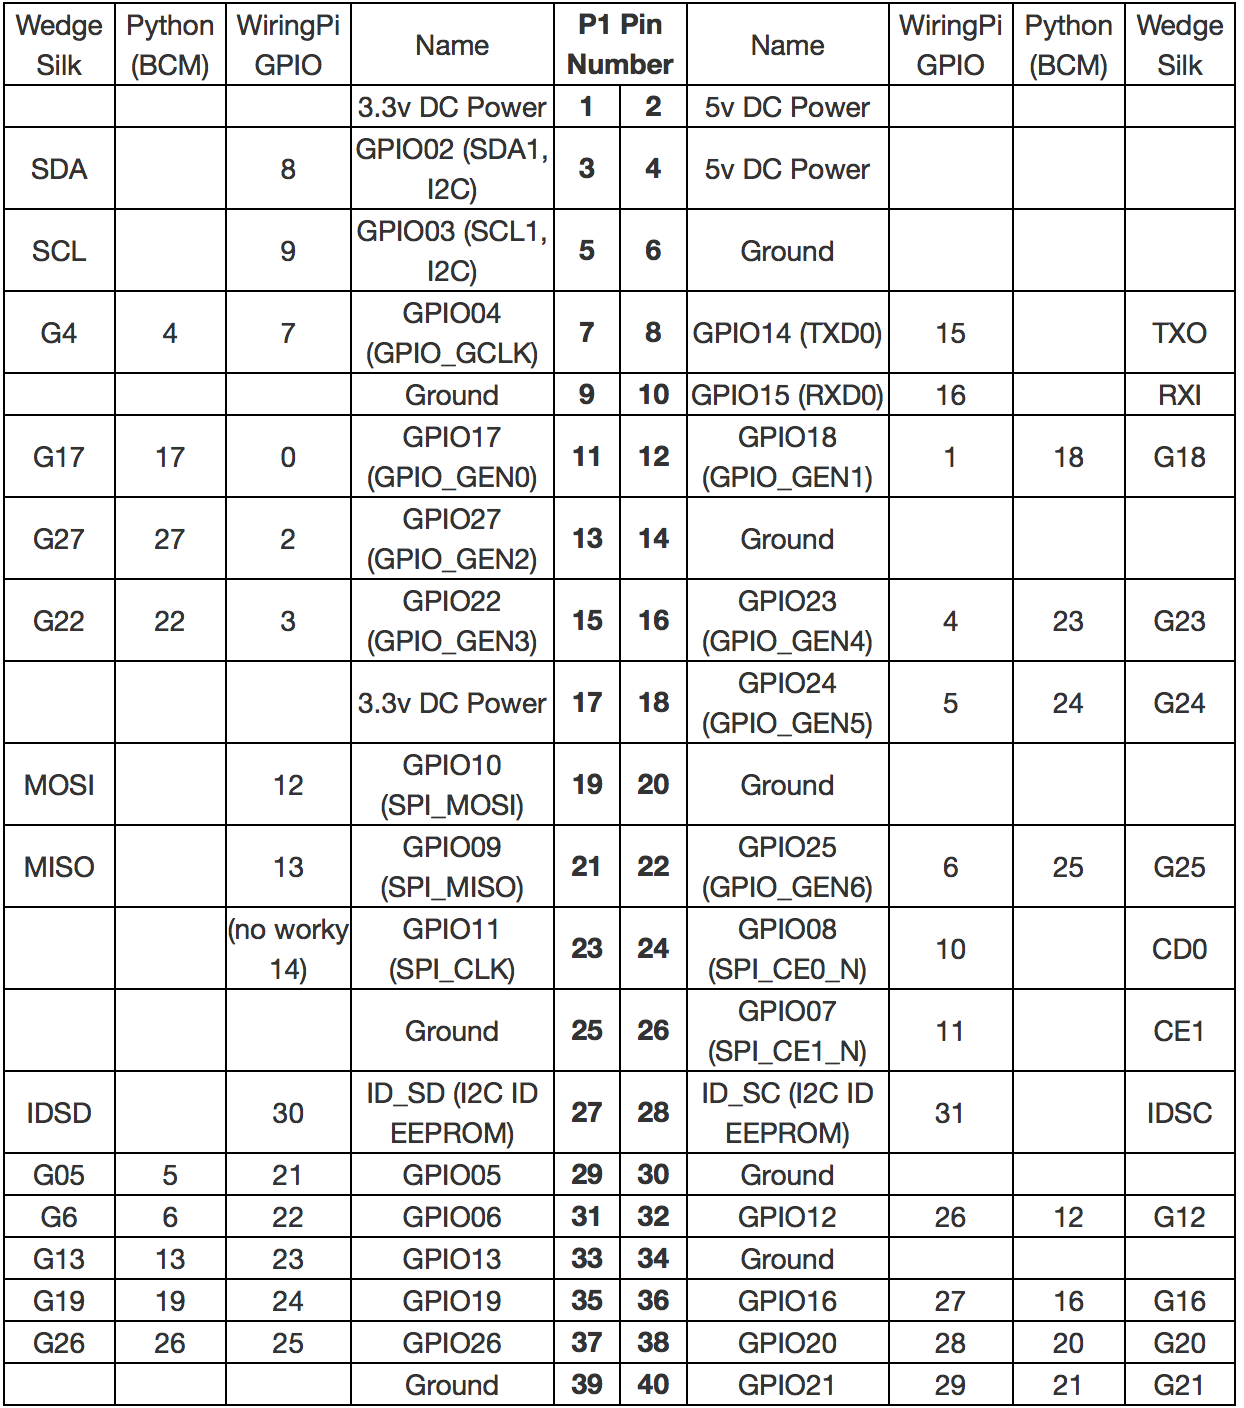
This table shows that the RPi not only gives you access to the bi-directional I/O pins, but also [Serial (UART)](https://learn.sparkfun.com/tutorials/serial-communication), [I2C](https://learn.sparkfun.com/tutorials/i2c), [SPI](https://learn.sparkfun.com/tutorials/serial-peripheral-interface-spi), and even some Pulse width modulation ([PWM](https://learn.sparkfun.com/tutorials/pulse-width-modulation) — “analog output”).
There is a useful online guide for finding the assignment and numbering of each pin, along with other guides, that you may find useful at: [pinout.xyz](pinout.xyz)
##### Analog vs. Digital
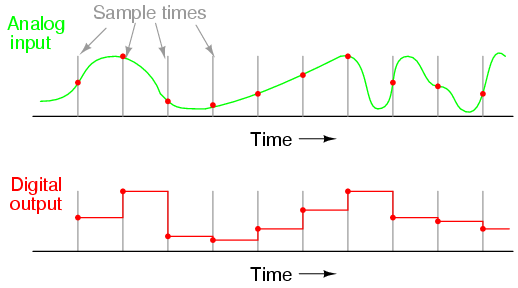
Before starting with our practise, we will revise the difference between **analog** and **digital** signals. Both are used to transmit information, usually through **electric signals**. In both these technologies, the information, such as any audio or video, is transformed into electric signals. The **difference between analog and digital**:
* In **analog technology**, information is translated into electric pulses of varying amplitude.
* In **digital technology**, translation of information is into binary format (zero or one) where each bit is representative of two distinct amplitudes.
 ##### Comparison chart
||Analog |Digital|
|:------|:-------|:-------|
|**Signal**| Analog signal is a continuous signal which represents physical measurements.| Digital signals are discrete time signals generated by digital modulation.|
|**Waves**| Denoted by sine waves.| Denoted by square waves.|
|**Representation**| Uses continuous range of values to represent information.| Uses discrete or discontinuous values to represent information.|
|**Example**| Human voice in air, analog electronic devices.| Computers, CDs, DVDs, and other digital electronic devices.|
|**Technology**| Analog technology records waveforms as they are.| Samples analog waveforms into a limited set of numbers and records them.|
|**Data transmissions**|Subjected to deterioration by noise during transmission and write/read cycle.|Can be noise-immune without deterioration during transmission and write/read cycle.|
|**Response to Noise**| More likely to get affected reducing accuracy| Less affected since noise response are analog in nature|
|**Flexibility**| Analog hardware is not flexible.|Digital hardware is flexible in implementation.|
|**Uses**|Can be used in analog devices only. Best suited for audio and video transmission.| Best suited for Computing and digital electronics.|
|**Applications**|Thermometer|PCs, PDAs|
|**Bandwidth**| Analog signal processing can be done in real time and consumes less bandwidth.| There is no guarantee that digital signal processing can be done in real time and consumes more bandwidth to carry out the same information.|
|**Memory**| Stored in the form of wave signal.|Stored in the form of binary bit.|
|**Power**| Analog instrument draws large power.| Digital instrument drawS only negligible power.|
|**Cost**|Low cost and portable.| Cost is high and not easily portable.|
|**Impedance**| Low |High order of 100 megaohm|
|**Errors**|Analog instruments usually have a scale which is cramped at lower end and give considerable observational errors.| Digital instruments are free from observational errors like parallax and approximation errors.|
### Blink
We will start with a very easy example, the classic "Blink" example, later we will do the same with our Arduino and see the differences.
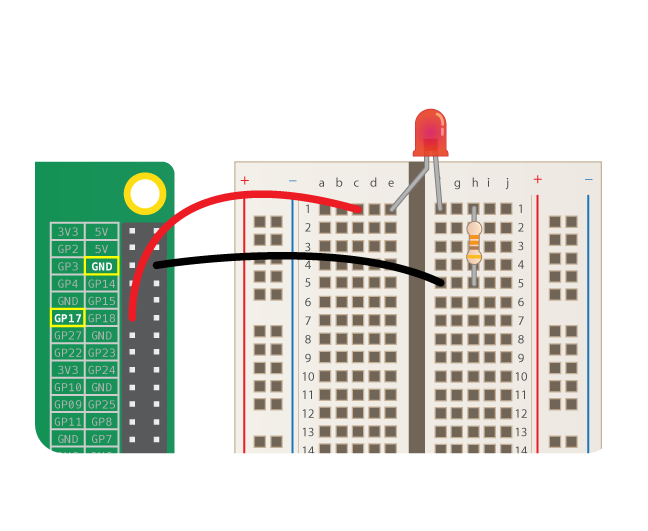
##### Hardware Setup
We start assembling the circuit as shown in the diagram below.
##### Code
For the code we are going to use the [GPIOzero](https://gpiozero.readthedocs.io/en/stable/) library which is a on the GPIO library (https://sourceforge.net/p/raspberry-gpio-python/wiki/Home/).
1. From your laptop's terminal connect to the RPi
2. Create a folder called "code" and inside it a file called "blinker.py":
```bash
$ mkdir code
$ cd code
$ nano blinker.py
```
Note: you may not need to create a new folder everytime for the script. I.e. once you have created the folder code, you can create the scripts within the folder with nano
##### Comparison chart
||Analog |Digital|
|:------|:-------|:-------|
|**Signal**| Analog signal is a continuous signal which represents physical measurements.| Digital signals are discrete time signals generated by digital modulation.|
|**Waves**| Denoted by sine waves.| Denoted by square waves.|
|**Representation**| Uses continuous range of values to represent information.| Uses discrete or discontinuous values to represent information.|
|**Example**| Human voice in air, analog electronic devices.| Computers, CDs, DVDs, and other digital electronic devices.|
|**Technology**| Analog technology records waveforms as they are.| Samples analog waveforms into a limited set of numbers and records them.|
|**Data transmissions**|Subjected to deterioration by noise during transmission and write/read cycle.|Can be noise-immune without deterioration during transmission and write/read cycle.|
|**Response to Noise**| More likely to get affected reducing accuracy| Less affected since noise response are analog in nature|
|**Flexibility**| Analog hardware is not flexible.|Digital hardware is flexible in implementation.|
|**Uses**|Can be used in analog devices only. Best suited for audio and video transmission.| Best suited for Computing and digital electronics.|
|**Applications**|Thermometer|PCs, PDAs|
|**Bandwidth**| Analog signal processing can be done in real time and consumes less bandwidth.| There is no guarantee that digital signal processing can be done in real time and consumes more bandwidth to carry out the same information.|
|**Memory**| Stored in the form of wave signal.|Stored in the form of binary bit.|
|**Power**| Analog instrument draws large power.| Digital instrument drawS only negligible power.|
|**Cost**|Low cost and portable.| Cost is high and not easily portable.|
|**Impedance**| Low |High order of 100 megaohm|
|**Errors**|Analog instruments usually have a scale which is cramped at lower end and give considerable observational errors.| Digital instruments are free from observational errors like parallax and approximation errors.|
### Blink
We will start with a very easy example, the classic "Blink" example, later we will do the same with our Arduino and see the differences.
##### Hardware Setup
We start assembling the circuit as shown in the diagram below.

##### Code
For the code we are going to use the [GPIOzero](https://gpiozero.readthedocs.io/en/stable/) library which is a on the GPIO library (https://sourceforge.net/p/raspberry-gpio-python/wiki/Home/).
1. From your laptop's terminal connect to the RPi
2. Create a folder called "code" and inside it a file called "blinker.py":
```bash
$ mkdir code
$ cd code
$ nano blinker.py
```
Note: you may not need to create a new folder everytime for the script. I.e. once you have created the folder code, you can create the scripts within the folder with nano