従来良く使われていた node-red-dashboard(ダッシュボードノード)は、 Angular を使用した WEB UI です。
Angular は開発が終了しており、 Dashboard をアップグレードする取り組みの一環として、 FlowFuse によって Dashboard 2.0 が開発されています。
今後は、 Dashboard 2.0 が標準になっていくと思われます。
Dashboar 2.0 は、 Vue.js v3.0 / Vuetify(マテリアル デザイン コンポーネント フレームワーク)などで作られています。
インストール方法と「template」ノードについて簡単に説明します。
他の「button」「text input」「slider」などは直感的に扱えると思いますが、「template」ノードに関しては大幅に記述方法が変わっているからです。
インストール方法
「.node-red」フォルダで、
> npm install @flowfuse/node-red-dashboardもしくは、
Node-RED の右上のバーガーボタン ⇒ 「パレット管理」 ⇒ 「ノードを追加」 ⇒ 「ノードを検索」で「@flowfuse/node-red-dashboard」 ⇒ [ノードを追加]ボタンをクリックしてください。
「template」ノードについて
カスタムなダッシュボードを作成することができます。
.vue ファイルの形式でコードを記述します。
.vue ファイルは、 Vue.js で使われる シングルファイルコンポーネント(SFC: Single File Component)のことで、1つの .vue ファイルに HTML/ CSS/ JavaScript をまとめて書けるのが特徴です。
Node-REDの「template」ノードとはとても相性が良さそうです。
「template」ノードを新規作成すると、テンプレートには以下のような例が表示されています。(2025年1月、Version 1.21.0)

<template>
    <div>
        <h2>Counter</h2>
        <!-- Conditional Styling using Attribute Binding (":") -->
        <!-- and rendering content inside <tags></tags> with {{ }} -->
        <p :style="{'color' : (count > 5 ? 'red' : 'green' )}">Current Count: {{ count }}</p>
        <!-- Computed Rendering using Vue Computed Variables -->
        <p class="my-class">Formatted Count: {{ formattedCount }}</p>
        <!-- Conditional Rendering with "v-if" -->
        <b v-if="count > 5">Too many!</b>
        <v-btn @click="increase()">Increment</v-btn>
    </div>
</template>

<script>
    export default {
        data() {
            // define variables available component-wide
            // (in <template> and component functions)
            return {
                count: 0
            }
        },
        watch: {
            // watch for any changes of "count"
            count: function () {
                if (this.count % 5 === 0) {
                    this.send({payload: 'Multiple of 5'})
                }
            }
        },
        computed: {
            // automatically compute this variable
            // whenever VueJS deems appropriate
            formattedCount: function () {
                return this.count + ' Apples'
            }
        },
        methods: {
            // expose a method to our <template> and Vue Application
            increase: function () {
                this.count++
            }
        },
        mounted() {
            // code here when the component is first loaded
        },
        unmounted() {
            // code here when the component is removed from the Dashboard
            // i.e. when the user navigates away from the page
        }
    }
</script>
<style>
    /* define any styles here - supports raw CSS */
    .my-class {
        color: red;
    }
</style>
試してみます。
「template」ノードは、1ファイル( .vue)でコンポーネントを作成する形式のコードを採用しているので、ChatGPTで「Vue.jsで~したい」「Vuerifyで~したい」と質問すれば、良さげなコードを教えてくれます。
Version 1.21.0では「Date Picker」がありません。
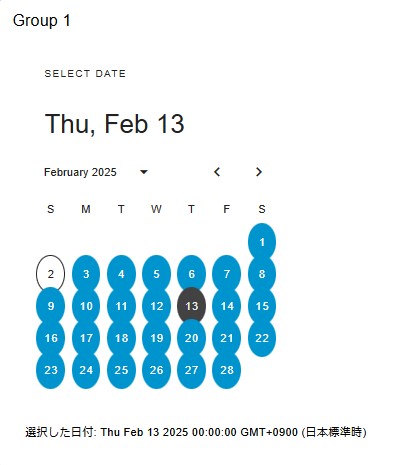
ChatGPTに「VuetifyでDate Pickerを作って」と聞いてみると、以下のようなコードを教えてくれました。
<template>
  <v-container>
    <v-date-picker v-model="selectedDate"></v-date-picker>
    <p>選択した日付: {{ selectedDate }}</p>
  </v-container>
</template>

<script>
export default {
  data() {
    return {
      selectedDate: null
    };
  }
};
</script>
これを「template」ノードに入力しデプロイすると以下のような Date Picker が表示されました。
更にChatGPTに「selectedDataが選択された時にスクリプトを実行したい時はどうする?」と聞いたら答えてくれました。
<script> 内で、 this.send({payload: [値]}) を実行すると次のノードに値を送ることができるのでそれも利用します。
<template>
  <v-container>
    <v-date-picker v-model="selectedDate"></v-date-picker>
    <p>選択した日付: {{ selectedDate }}</p>
  </v-container>
</template>

<script>
export default {
  data() {
    return {
      selectedDate: null
    };
  },
  watch: {
    selectedDate(newValue, oldValue) {
       this.send({payload: newValue})
    }
  }
};
</script>
以下のように、「debug」ノードをつないで試してみるとうまくいきました。
