# Stage 3 — 工具使用與第一個 Agent(Tool Use & Hello Agent)⭐
> **繁體中文** | [简体中文](./03-tool-use-and-hello-agent.zh-Hans.md) | [English](./03-tool-use-and-hello-agent.en.md)
⏱ **時間估算**:2-3 週(約 10-20 小時)
> 💡 用語密集(agent / tool use / function calling / ReAct / structured output⋯)→ 翻 [`resources/glossary.md` 2](../resources/glossary.md#2-agent--工具使用)。
> 🗺️ **進 Track A(CLI Power User)還是 Track B(Agent Builder)前**,先看 [`resources/agent-paradigms.md`](../resources/agent-paradigms.md) — 5 種 agent 型態的全景圖,幫你選軌。
> 📋 **本章組成**:〔開場框景:AI/LLM/Agent 三者關係〕→ 學習目標 → 進入條件 → 必修閱讀 →〔可選 · 概念地圖〕→ 動手練習 → 反思(概念 + 路由)→ 精選 Projects → 自我檢查
> 🔑 **關鍵名詞**:見 [`resources/glossary.md` 2](../resources/glossary.md#2-agent--工具使用)
## 🤖 開始前:AI / LLM / Agent — 三者怎麼分?
> **本節是「開場框景」(由大到小 pedagogy)**:先把學習者腦中的 mental hierarchy 建好,再進 學習目標、練習。這節只做**簡短說明 + 對照**,深度入門讀物已經是中英文圈各自的 canonical reference(見下方資源)。**不是重寫 hello-agents Ch1。**
### 一張階層圖先建立認知
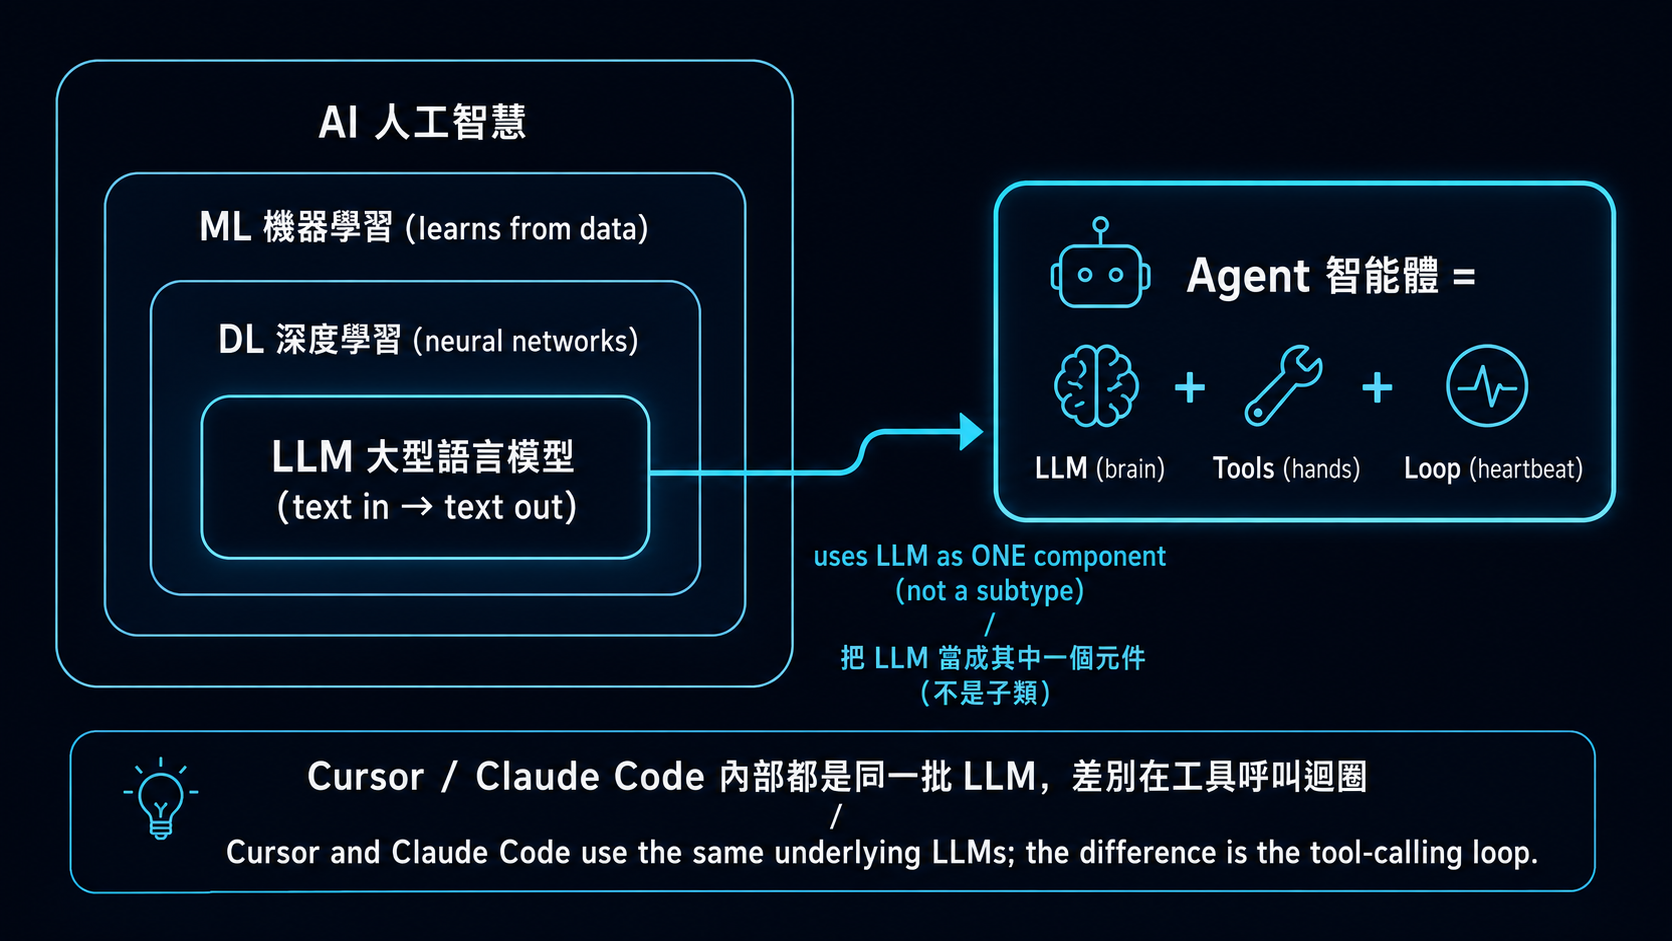
→ **「Agent」不是「比 LLM 更厲害的模型」,也不是 LLM 樹狀分類底下的一個分支**。Agent 是個**跨層抽象的系統**,把 LLM 當作其中一個元件來用。Cursor / Claude Code / Hermes Agent 內部都還是同一批 LLM(Claude / GPT / Gemini)—— 差別是怎麼把 LLM 包進工具呼叫迴圈裡。
### 三行對照(最快版)
| 詞 | 是什麼 | 你給它什麼、它回什麼 | 例子 |
|---|---|---|---|
| **AI** | 整個學科 | 太抽象、不能直接「用」 | ML、DL、LLM、RL 都是 AI 子領域 |
| **LLM** | 把文字映射到文字的單一模型 | 給 prompt → 回字 | GPT-5、Claude、Llama 3、Qwen |
| **Agent** | LLM + 工具 + loop 的**系統** | 給任務 → 自己跑多步驟達成 | Cursor、Claude Code、Hermes Agent |
**一句話**:LLM 像是會理解與產生文字的大腦;Agent 則是把這個大腦接上工具、流程與回饋迴圈,讓它能完成多步驟任務的系統。
### Agent 的 3 個**最小必要**部件(這就是 agent vs LLM 的核心差別)
| 部件 | 角色 | 在哪學 |
|---|---|---|
| 🧠 **LLM**(brain) | 推理 / 決策 / 自然語言 | Stage 1 已學 |
| 🔧 **Tools**(hands) | 對世界做事(call API、跑 code、查資料) | **本 stage** |
| 🔁 **Loop**(heartbeat) | 想 → 做 → 看結果 → 再想(ReAct) | **本 stage 練習 3** |
→ **這 3 個合在一起就是 agent 的最低定義**。沒有 tools / loop,那只是「LLM + 你寫 retry」,不算 agent。
### Agent 的經典範式(thinking patterns)
學完最小 3 部件後、下一層是「**LLM 怎麼想**」。hello-agents Ch4「智能體經典範式構建」整章在講這個。簡短對照:
| 範式 | 是什麼 | 在哪學 |
|---|---|---|
| **CoT**(Chain-of-Thought、思維鏈) | LLM 寫出推理過程再給答案、不只給結論——是個 **prompting 技巧**、不是 agent 結構 | **Stage 2** 學習目標 + 動手練習(推理任務 CoT) |
| **ReAct**(Reasoning + Acting) | 在 Loop 裡套 CoT:Thought(想)→ Action(呼叫 tool)→ Observation(看結果)→ Thought ...,是 **Loop 部件最常見的實作** | **本 stage 練習 3** + [ReAct paper (Yao 2022)](https://arxiv.org/abs/2210.03629) |
| **Reflection** | 跑完一輪後讓 LLM 批改自己、根據 feedback 重答 | **本 stage 反思**(concept + 路由) |
| **Planning**(任務分解) | 把大任務拆成子任務、可分給多個 agent 各做 | **Stage 4** 什麼是 multi-agent framework |
→ 這些範式都是「**LLM 自我引導**」的不同變化、堆疊在 3 部件(LLM + Tools + Loop)之上。**「Agent 是什麼」用 3 部件就講完了;「Agent 怎麼想」需要這 4 個範式才講得完整**。
> 💡 **延伸組件**(agent 變強的 infrastructure、但**不是「是不是 agent」的判準**):
> - **記憶 / RAG**(agent 能跨對話記住東西)→ **Stage 6** 完整教
> - **反思 / self-critique**(agent 看自己答案、發現問題、回頭改)→ 基本版見 **本 stage 反思**(concept + paper routing);帶持久 memory 的進階版見 **Stage 6 Reflexion with Memory**
> - **Production harness**(telemetry / safety / retry / orchestration)→ **Stage 5 5.6**
>
> 這些都是 advanced pattern——Stage 3 教最小可行 agent、後面 stage 教怎麼變強。
### 📚 深度入門資源(中英文 / 影片優先)
**🀄 中文**:
1. [**李宏毅 — 生成式 AI 導論(2024 春台大課程)**](https://speech.ee.ntu.edu.tw/~hylee/genai/2024-spring.php) ⭐⭐⭐ — 中文圈最高品質的 AI / LLM / agent 學術級導論。每集 30-60 分鐘、台大授課、官方頁含投影片 + YouTube 連結。LLM / agent 概念都涵蓋。最新整合版見 [**GenAI-ML 2025 秋**](https://speech.ee.ntu.edu.tw/~hylee/GenAI-ML/2025-fall.php)、YouTube 主頻道 [**@HungyiLeeNTU**](https://www.youtube.com/@HungyiLeeNTU)
2. [**datawhalechina/hello-agents** Ch1「初識智能體」](https://github.com/datawhalechina/hello-agents) ⭐ — 文字版最完整中文 agent 導論
3. [**datawhalechina/hello-agents** Ch2「智能體發展史」](https://github.com/datawhalechina/hello-agents) — BabyAGI → AutoGPT → Claude Code 演化脈絡
4. [**3Blue1Brown 中文配音版**](https://www.youtube.com/@3Blue1BrownCN) — LLM / Transformer 視覺化解說(中文配音)
**🇺🇸 English**:
1. [**Andrej Karpathy — "Intro to Large Language Models"**](https://www.youtube.com/watch?v=zjkBMFhNj_g) ⭐⭐⭐(1hr)— LLM 從零開始 visual intro(ex-OpenAI / ex-Tesla AI Director、英文圈最重視的 LLM 入門影片)
2. [**Andrej Karpathy — "Let's build GPT from scratch"**](https://www.youtube.com/watch?v=kCc8FmEb1nY) ⭐⭐(2hr)— 想看 LLM 內部到程式碼級的人
3. [**3Blue1Brown — "But what is a Transformer?"**](https://www.youtube.com/watch?v=wjZofJX0v4M) ⭐⭐⭐ — visual 解釋 LLM,英文圈最被推薦的視覺化教材
4. [**Lilian Weng — "LLM Powered Autonomous Agents"**](https://lilianweng.github.io/posts/2023-06-23-agent/) ⭐⭐⭐ — canonical 1-page agent anatomy(Planning / Memory / Tool use / Action)、英文圈被引用最多的 agent 解剖文
5. [**Anthropic — "Building Effective Agents"**](https://www.anthropic.com/research/building-effective-agents) ⭐ — Anthropic 觀點:何時該用 agent、何時 workflow 就夠
6. [**Chip Huyen — "Agents"**](https://huyenchip.com/2025/01/07/agents.html) — practitioner 視角,full chapter 級深度
**選讀 / 進階補充**:
- [**Simon Willison — "I think 'agent' may finally have a widely enough agreed upon definition"**](https://simonwillison.net/2025/Sep/18/agents/) — working definition:「agent runs tools in a loop to achieve a goal」、含對照 OpenAI 等不同定義的爭議(**給已有基礎的人**)
- [**DeepLearning.AI Short Courses**](https://www.deeplearning.ai/short-courses/):「AI Agents in LangGraph」/「Multi AI Agent Systems with crewAI」/「Functions, Tools and Agents with LangChain」(**API 多數是 2023-2024 舊版**、看概念為主、寫 code 對照官方最新 docs)
- [**microsoft/ai-agents-for-beginners**](https://github.com/microsoft/ai-agents-for-beginners) — 微軟官方 12 課 build-agent 入門(MIT、★ 64k+)。結構化、英文、含 code;適合想要一條**平行入門課對照**的人,不是本 stage 動手練習的替代
- [**liyupi/ai-guide**](https://github.com/liyupi/ai-guide) — 中文圈最大 AI 資源**聚合**型 repo(不是原創教材、適合廣度延伸)
> 📌 **資源清單上限規則**:本 section 是 router 不是 tutorial。主清單合計上限 **10 條**(中 4 + 英 6),要加新資源前**必須先移除一條**。選讀區不計入主清單上限。
> 💡 **推薦學習路徑**:先看 1-2 個影片(中:李宏毅、英:Karpathy / 3Blue1Brown)建立 visual mental model → 再讀 1-2 個 blog(Lilian Weng / Anthropic)拿到 working definition → 再回本 stage 動手練習。**不必全部看完**,這是 reference library 不是 reading list。
---
這是整個學習路線最關鍵的一站。**你建過一個 agent 才算真懂 agent**——本 stage 的基礎練習建議至少實際手寫一次、再依需求往 [hello-agents](https://github.com/datawhalechina/hello-agents) 或本 stage 精選 projects 找深度教材。
## 📌 學習目標
完成這個 stage 後你會:
- 講得出為什麼 LLM 需要 tools(它不是萬能的,而且文字以外的事它都做不了)
- 定義一個 tool schema,並讓 LLM 呼叫它
- 從零(不靠任何 framework)寫出一個單步 ReAct agent
- 寫出多步 ReAct agent,並讓它自己判斷何時該停
- 分得出哪種問題該用 tool use、哪種純 prompt 就夠
## 🚪 進入條件
你應該已經:
- 有可以跑的 Claude / OpenAI / Gemini API 權限(Stage 1)
- 對 prompt engineering 基礎已經上手(Stage 2)
- 能寫一個吃 JSON 進、吐 JSON 出的 Python 函式
## 📚 必修閱讀
1. [**Anthropic — Tool Use**](https://docs.anthropic.com/en/docs/agents-and-tools/tool-use/overview) — 官方指南
2. [**anthropics/courses — Tool Use**](https://github.com/anthropics/courses) ⭐⭐⭐⭐⭐ ★ 21k+ — Anthropic 官方 5 course umbrella、**module 5「Tool Use」對應本 stage**。Jupyter notebook 互動式練習、含 multimodal prompts / streaming / tool 實作 walk-through
3. [**ReAct: Synergizing Reasoning and Acting in Language Models**](https://arxiv.org/abs/2210.03629) — Yao et al. 2022,奠基論文。至少讀 abstract 跟 Section 3。
4. [**OpenAI — Function Calling**](https://platform.openai.com/docs/guides/function-calling) — function calling 格式參考
5. [**Build an agent from scratch**](https://shafiqulai.github.io/blogs/blog_3.html) — 從零打造 agent 的故事式導覽
## 🛠 動手練習(基礎 illustrative 練習)
> 🦙 **本 stage 預設用 Ollama qwen2.5:3b**(成本考量、tool-use 支援穩定)。Stage 3 進到 tool calling / ReAct loop、`gemma4:e4b` 不夠、改用 `qwen2.5:3b`(1.9 GB、`ollama pull qwen2.5:3b` 即裝)。每個練習都有 Path A(Ollama、預設)+ Path B(Anthropic、選擇性、想看 cloud 高品質 tool-use 時用)。
>
> 💰 **Stage 3 預算估算**(全 6 練習、tool use 較重):**全本機 = $0**、**全 haiku ≈ $0.50**、**全 sonnet ≈ $1.50**。ReAct loop 練習單次 4-6 tool calls × 5 練習 × 5 reps ≈ $0.80 haiku。完整預算見 [`examples/README.md#推薦-llm-清單`](../examples/README.md#推薦-llm-清單)。
>
> 完整 3 路 trade-off 見 [`examples/README.md`](../examples/README.md#三條路徑--預設用-ollama成本考量)。
>
> 🆘 **卡住了?** Tool calling 是整個 curriculum 最陡的學習曲線。裝 [`examples/stage-5/tool-calling-tutor/`](../examples/stage-5/tool-calling-tutor/) skill——當你 prompt Claude Code「為什麼 LLM 不呼叫我的 tool」、「我這 schema 哪裡寫壞」會自動載入、走 4-symptom 診斷流程。
>
> 🪜 **本 stage 是 single-agent 起點**:一個 LLM + ReAct loop。**Multi-agent 概念**(多個 agent 協作)入門看 [Stage 4 什麼是 multi-agent framework](04-agent-frameworks.md#-什麼是-multi-agent-framework)、**Claude 原生 subagent 機制**(`.claude/agents/` + Task tool、不需 framework)看 [Stage 5.5](05-claude-code-ecosystem.md#55--subagentsclaude-code-原生-multi-agent-機制-2025-新功能)。
### 練習 1:Function Calling(一個工具、一次呼叫)
給 Claude 一個工具(假的天氣 API)跟一個問題(「台北現在有下雨嗎?」)。看 Claude 怎麼呼叫工具、拿到結果、再回答你。
📋 起手碼 — Path A(本機 Ollama qwen2.5:3b、預設)(複製到 practice_1.py)
```python
# 需要:pip install openai
# 前置:ollama pull qwen2.5:3b && ollama serve
# Note: Stage 3+ 用 qwen2.5:3b(tool-use 穩定)、不是 gemma4:e4b
import sys, json
if hasattr(sys.stdout, "reconfigure"):
sys.stdout.reconfigure(encoding="utf-8", errors="replace")
from openai import OpenAI
client = OpenAI(base_url="http://localhost:11434/v1", api_key="ollama")
# Step 1: 定義 tool schema — OpenAI-compatible 格式包一層 {"type":"function", "function":{...}}
weather_tool = {
"type": "function",
"function": {
"name": "get_weather",
"description": "查詢城市目前天氣(晴/雨/陰),回傳一個短字串。",
"parameters": {
"type": "object",
"properties": {
"city": {"type": "string", "description": "城市名稱(如「台北」)"},
},
"required": ["city"],
},
},
}
# Step 2: 問問題、讓 LLM 自己決定要不要呼叫 tool
resp = client.chat.completions.create(
model="qwen2.5:3b",
max_tokens=512,
tools=[weather_tool],
messages=[{"role": "user", "content": "台北現在有下雨嗎?"}],
)
# === 自我驗證 ===
msg = resp.choices[0].message
print("finish_reason:", resp.choices[0].finish_reason)
print("tool_calls:", msg.tool_calls)
assert msg.tool_calls, "預期 LLM 會選擇呼叫 tool(而非直接回答)"
tc = msg.tool_calls[0]
assert tc.function.name == "get_weather", f"預期呼叫 get_weather、實際 {tc.function.name}"
args = json.loads(tc.function.arguments)
assert args.get("city"), "預期 city 參數有值"
print(f"✅ 練習 1 通過 — qwen2.5:3b 正確選了 get_weather、帶 city='{args['city']}' 參數")
```
**預期輸出**(樣本):
```
finish_reason: tool_calls
tool_calls: [ChatCompletionMessageToolCall(id='call_xxx', function=Function(name='get_weather', arguments='{"city": "台北"}'), type='function')]
✅ 練習 1 通過 — qwen2.5:3b 正確選了 get_weather、帶 city='台北' 參數
```
**沒裝 Ollama 也能驗邏輯**:用 `unittest.mock.MagicMock` 取代 client、塞固定 response、assert 一樣 work。完整 mock 範例見 [`examples/stage-3/03-react-from-scratch/test.py`](../examples/stage-3/03-react-from-scratch/test.py)(pattern 跨 backend 通用)。
📋 起手碼 — Path B(Anthropic API、選擇性)(複製到 practice_1_anthropic.py)
```python
# 需要:pip install anthropic
# 環境變數:export ANTHROPIC_API_KEY=sk-ant-...
import anthropic
client = anthropic.Anthropic()
# Anthropic native tool schema — 不用包 wrapper
weather_tool = {
"name": "get_weather",
"description": "查詢城市目前天氣(晴/雨/陰),回傳一個短字串。",
"input_schema": {
"type": "object",
"properties": {
"city": {"type": "string", "description": "城市名稱(如「台北」)"},
},
"required": ["city"],
},
}
resp = client.messages.create(
model="claude-haiku-4-5",
max_tokens=512,
tools=[weather_tool],
messages=[{"role": "user", "content": "台北現在有下雨嗎?"}],
)
# === 自我驗證 ===
assert resp.stop_reason == "tool_use", f"非預期 stop_reason: {resp.stop_reason}"
tool_calls = [b for b in resp.content if b.type == "tool_use"]
assert tool_calls[0].name == "get_weather"
assert tool_calls[0].input.get("city")
print(f"✅ 練習 1 通過(Anthropic)— Claude 選了 get_weather、city='{tool_calls[0].input['city']}'")
```
**3 個關鍵 SDK 差異**:
- **Schema wrap**:Anthropic 直接 `tools=[{name, description, input_schema}]`;OpenAI/Ollama 要包 `[{"type":"function", "function":{...}}]`
- **Response 路徑**:Anthropic 從 `resp.content[i].type=="tool_use"` 抓;OpenAI/Ollama 從 `resp.choices[0].message.tool_calls[i]`
- **Args 格式**:Anthropic `.input` 是 dict(自動 parse);OpenAI/Ollama `.function.arguments` 是 JSON string,要 `json.loads(...)`
**成本**:1 次 ≈ $0.001。**Claude 的 tool-use 比 qwen2.5:3b 更穩**——複雜場景(5+ tools、模糊問題)gap 會明顯。
### 練習 2:多工具選擇
給 Claude 三個工具(搜尋、計算機、行事曆)跟一個任務。看 Claude 怎麼挑工具,順便注意它什麼時候會挑錯。
📋 簡化版核心觀念 — Path A (Ollama)
**NEW vs 練習 1**:tools 從 1 個變 3 個。LLM 看 `description` 邊界決定挑哪個——`description` 寫得越像「給人讀的 docstring」、越容易挑錯。
```python
from openai import OpenAI
import json
client = OpenAI(base_url="http://localhost:11434/v1", api_key="ollama")
TOOLS = [
{"type": "function", "function": {"name": "web_search",
"description": "Search current or external info not in the prompt.",
"parameters": {"type": "object", "properties": {"query": {"type": "string"}}, "required": ["query"]}}},
{"type": "function", "function": {"name": "calculator",
"description": "Evaluate basic arithmetic with +, -, *, /, parentheses.",
"parameters": {"type": "object", "properties": {"expression": {"type": "string"}}, "required": ["expression"]}}},
{"type": "function", "function": {"name": "calendar_lookup",
"description": "Look up events for a specific date.",
"parameters": {"type": "object", "properties": {"date": {"type": "string"}}, "required": ["date"]}}},
]
resp = client.chat.completions.create(model="qwen2.5:3b", tools=TOOLS,
messages=[{"role": "user", "content": "What is (19 * 42) - 8?"}])
tc = resp.choices[0].message.tool_calls[0]
print(f"LLM 挑了: {tc.function.name}, args: {json.loads(tc.function.arguments)}")
# 預期:calculator, {"expression": "(19 * 42) - 8"}
```
**punchline**:3 個 tool 的 `description` 邊界要互斥——`calendar` 寫「行事曆」太籠統、會跟 `web_search` 撞;寫「特定日期事件」就清楚。小 model 對 description 質量比 Claude 更敏感。
**Path B (Anthropic) 改 3 行**:schema 拿掉 `{"type": "function", "function": {...}}` 外包、`tool_calls` 變 `[b for b in resp.content if b.type == "tool_use"]`、`tc.input` 已經是 dict 不用 `json.loads`。完整版見 folder。
→ **基礎 starter 範本** → [`examples/stage-3/02-multi-tool-selection/`](../examples/stage-3/02-multi-tool-selection/)(starter.py 含 stub + 簡單 test,illustrative,**不是 chapter-length 完整教學**;深度章節見 stage 開頭 📚 hello-agents callout)
### 練習 3:從零實作 ReAct(不用 framework)
用 50-80 行 Python 把 Thought → Action → Observation 迴圈寫出來。不要 LangChain、不要 LangGraph,就是純 `while not done: thought; action; observation; ...`。
📋 簡化版核心觀念 — Path A (Ollama)、ReAct loop 的全部就在這 13 行
**NEW vs 練習 2**:把單次 call 包進迴圈、`messages` 一直長、看 `tool_calls` 在不在來決定收尾。
```python
# 假設 TOOLS + TOOL_IMPL(dict: name → callable)已經像練習 2 一樣定義好
messages = [{"role": "user", "content": "台北人口除以紐約人口?"}]
for step in range(5): # max_iter safety net
r = client.chat.completions.create(model="qwen2.5:3b", tools=TOOLS, messages=messages)
msg = r.choices[0].message
# 把 assistant response 接回 messages(重要!下輪 LLM 才看得到自己上輪講什麼)
messages.append({"role": "assistant", "content": msg.content, "tool_calls": msg.tool_calls})
if not msg.tool_calls:
print(f"✅ 收尾:{msg.content}"); break
for tc in msg.tool_calls:
args = json.loads(tc.function.arguments)
obs = TOOL_IMPL[tc.function.name](args) # 本地執行
# observation 接回 messages(用 role="tool"、配 tool_call_id)
messages.append({"role": "tool", "tool_call_id": tc.id, "content": obs})
```
**3 個容易踩坑**:
1. **忘記把 assistant response 加回 messages**——下輪 LLM 看不到自己上輪講什麼、會 loop forever
2. **`tool` message 沒帶 `tool_call_id`**——LLM 無法配對哪個 result 對應哪個 call
3. **沒 `max_iter`**——tool 結果寫不好時、LLM 會無限呼叫,safety net 必須設
**Path B (Anthropic) 差幾行**:迴圈架構一模一樣、`msg.tool_calls` 變 `[b for b in resp.content if b.type == "tool_use"]`、用 `stop_reason == "end_turn"` 判停、tool result 包成 `{"type": "tool_result", "tool_use_id": ..., "content": obs}` 放進 user message。完整版見 folder。
→ **基礎 starter 範本** → [`examples/stage-3/03-react-from-scratch/`](../examples/stage-3/03-react-from-scratch/)(含 mock-based test.py、不花 API 錢也能驗;illustrative,**不是 chapter-length 完整教學**——深度章節見 stage 開頭 📚 hello-agents callout)
### 練習 4:多步驟推理任務
一個需要連續呼叫 3-5 次 tool 的任務。例如:「找出台北人口,除以紐約人口,再把比例換成百分比。」每一步用不同的工具。
📋 簡化版核心觀念 — 跟練習 3 同一個 loop、跑久一點而已
**NEW vs 練習 3**:**完全同一個 loop**——只是 `TOOLS` 換成 4 個(`lookup_population` / `divide` / `to_percentage` / `round_int`)、題目自然走完 4 輪 tool call 才收尾。
```python
# 沒有新 code、純粹是 TOOLS / TOOL_IMPL 換內容
TOOL_IMPL = {
"lookup_population": lambda i: lookup_population(i["city"]),
"divide": lambda i: divide(i["a"], i["b"]),
"to_percentage": lambda i: to_percentage(i["ratio"]),
"round_int": lambda i: round_int(i["x"]),
}
# loop 完全照 練習 3,只是 max_iter 拉大到 8
```
**punchline**:多步推理不是新 pattern、是**讓 ReAct loop 跑久一點**。**真正的挑戰是「LLM 會不會中間漏一步」**——qwen2.5:3b 可能漏「轉百分比」、Claude haiku 較穩。**這恰好是觀察「model 規模 vs 多步穩定度」的好實驗**。試試 `MODEL=qwen2.5:7b python starter.py` 對照。
→ **基礎 starter 範本** → [`examples/stage-3/04-multi-step-reasoning/`](../examples/stage-3/04-multi-step-reasoning/)(starter.py 含 stub + 簡單 test,illustrative,**不是 chapter-length 完整教學**;深度章節見 stage 開頭 📚 hello-agents callout)
### 練習 5:錯誤處理
讓某個工具失敗(網路錯誤、輸入無效)。看看 agent 會怎麼處理錯誤、能不能恢復,再加上 retry 機制。
📋 簡化版核心觀念 — tool error 是 data、不是 exception
**NEW vs 練習 4**:tool error 回傳**結構化 dict**、不要 `raise`。loop 把 dict 接回 LLM、模型自己決定 retry / 改 query / 放棄。
```python
def fetch_weather(city: str) -> dict:
if network_failed():
return {"error": "network timeout", "retry_hint": "try again in 1s"}
return {"city": city, "forecast": "rain", "temperature_c": 24}
# loop 裡:
obs = fetch_weather(args["city"])
messages.append({"role": "tool", "tool_call_id": tc.id,
"content": json.dumps(obs, ensure_ascii=False)}) # error dict 也是 string 化接回去
# 下一輪 LLM 看到 retry_hint、可能會 retry、可能會放棄、可能會改 query
```
**為什麼不 `raise`**:`raise` 直接中斷 loop、LLM 沒機會 recover。**Production 的 retry 不在 Python 層、而在 LLM 層**——這個 mental flip 是 Stage 3 練習 5 的核心。
**Bad vs Good error 回傳**:
| Bad | Good |
|---|---|
| `raise Exception("failed")` | `return {"error": "network timeout", "retry_hint": "try again in 1s"}` |
| `return "failed"` | `return {"error": "...", "category": "transient", "retry_hint": "..."}` |
| 無限 retry | `max_iter` safety + 業務層 retry quota |
**小 model 觀察**:qwen2.5:3b 對 `retry_hint` follow-up 較弱、可能直接放棄;Claude haiku 較穩。完整版(含連續失敗 graceful end 範例)見 folder。
→ **基礎 starter 範本** → [`examples/stage-3/05-error-handling/`](../examples/stage-3/05-error-handling/)(starter.py 含 stub + 簡單 test,illustrative,**不是 chapter-length 完整教學**;深度章節見 stage 開頭 📚 hello-agents callout)
### 練習 6:Function schema 設計(壞 schema 修到好)
**先給 LLM 一份故意寫爛的 schema**——`description` 模糊(「處理資料」)、參數全用 `type: string`、沒分 required / optional、enum 該用沒用。觀察 LLM 怎麼選錯 tool、傳錯參數。然後逐項修:
- description 寫到 LLM 一眼就懂這個 tool 適用情境(不是寫給人讀的 docstring)
- parameters 用對 type(number / boolean / enum / array),required 列清楚
- 模糊邊界用 enum 強制收斂(例如 `unit: "celsius" | "fahrenheit"` 而不是 `unit: string`)
- error 回傳要包 `{"error": "...", "retry_hint": "..."}` 讓 LLM 能恢復
> 💡 詳細 cheatsheet 看 [`resources/schema-design-cheatsheet.md`](../resources/schema-design-cheatsheet.md)——5 條黃金規則 + 5 個常見 anti-pattern。
📋 簡化版核心觀念 — bad vs good schema 對照
**NEW vs 練習 5**:同一個工具(溫度轉換)、兩種 schema 寫法。看 4 個差別。
```python
# ❌ BAD — qwen2.5:3b 幾乎必錯(Claude haiku 還能猜對、但機率明顯下降)
{"name": "convert", "description": "Convert a value.",
"parameters": {"type": "object", "properties": {
"value": {"type": "string"}, "unit": {"type": "string"}}}}
# ✅ GOOD — qwen 也能穩定挑對
{"name": "convert_temperature",
"description": "Use when user asks to convert temperatures between Fahrenheit and Celsius.",
"parameters": {"type": "object", "properties": {
"value": {"type": "number", "description": "Temperature value"},
"unit": {"type": "string", "enum": ["celsius", "fahrenheit"]}},
"required": ["value", "unit"]}}
```
**4 個改進**:(1) `name` 改具體、(2) `description` 寫「**何時**用」而非「**做什麼**」、(3) `type` 改 `number`、(4) 加 `required` + `enum`。
**punchline**:**寫 schema 的功夫能省下換大 model 的成本**——小 model 對 schema 質量比大 model 敏感,相同 bad schema 在 Claude 上可能還能猜對、在 qwen 上幾乎必錯。Production 想用便宜 model?schema 必須寫到 production-grade。
**搞不定 schema 怎麼辦**:裝 [`examples/stage-5/tool-calling-tutor/`](../examples/stage-5/tool-calling-tutor/) skill,遇到「LLM 不呼叫我的 tool」、「我這 schema 哪裡寫壞」會自動跳出來幫你 debug。
→ **基礎 starter 範本** → [`examples/stage-3/06-schema-design/`](../examples/stage-3/06-schema-design/)(含 bad schema vs good schema 兩個版本對照;illustrative,**不是 chapter-length 完整教學**——深度章節見 stage 開頭 📚 hello-agents callout)
## 🪞 反思(Reflexion / Self-Refine)— 概念 + 路由
> **本節是 concept + routing、不是練習**。沒有 verified working solution、不掛「練習 N」label、不給 success criteria——遵守本 repo「沒驗證答案不寫練習、頂多 routing」原則。想動手做?直接讀下方 paper / project。
**反思是什麼**:練習 5 的 error handling 是「LLM 出錯 → 你(外部)catch + retry」;**反思**是「LLM 觀察自己出錯 → 自己改」。差別是 agency 在哪一邊——這是 production agent(Cursor / Cline / Claude Code)每天都在跑的迴圈。
**為什麼這節在 Stage 3 而不是 Stage 6**:反思在學術(Reflexion paper Shinn 2023、Self-Refine Madaan 2023)跟 production(Cursor / Claude Code)上都被歸類在 **planning / reasoning loop** 機制——是 ReAct(練習 3)的 sibling pattern,**不是 memory pattern**。同樣是 LLM 自我引導的多輪迴圈,只是「下一輪要做什麼」從「呼叫 tool」換成「批改自己」。
**進階版(帶 persistent memory 的 Reflexion 完整版)→ [Stage 6 進階:Reflexion with Memory](06-memory-rag.md#-進階帶持久記憶的-reflexion-完整版--track-b-選讀)**——當反思要跨 session、把過去失敗存起來當下一輪 context,這個版本才真的需要 memory 層。
### 一張對照圖
| Pattern | 形式 | 需要 memory? | 在哪學 |
|---|---|---|---|
| **Error handling**(練習 5) | 外部 catch + retry | 不需 | **本 stage 練習 5** |
| **ReAct loop**(練習 3) | LLM → tool → 結果 → LLM | 不需 | **本 stage 練習 3** |
| **基本反思 / Self-Refine** | Actor → Critic → Actor,single session | 不需 | **本節 routing(下方)** |
| **完整 Reflexion**(含 episodic memory) | 上面 + 把失敗反思存起來、跨 session 累積 | **需要** | **Stage 6 進階:Reflexion with Memory** |
### 📚 想動手 / 想深入?直接讀這些
**Paper**:
- [**Reflexion (Shinn et al. 2023)**](https://arxiv.org/abs/2303.11366) ⭐ — 原 paper,定義「verbal reinforcement learning」
- [**Self-Refine (Madaan et al. 2023)**](https://arxiv.org/abs/2303.17651) — single-agent self-critique,是「基本反思」的學術定義
**Reference 實作**:
- [**arunpshankar/react-from-scratch**](https://github.com/arunpshankar/react-from-scratch) — 已在本 stage 精選 Projects 列出,含 Reflection 實作可直接讀
- [**LangChain — Reflection Agents(blog)**](https://blog.langchain.dev/reflection-agents/) — framework 實作參考 + 完整 working notebook
- [**datawhalechina/hello-agents**](https://github.com/datawhalechina/hello-agents) — 對應章節(自我反思 / Self-Refine 段落、中文完整教學)
> 💡 **想看反思怎麼長進 production agent**:[Stage 5 5.6 Harness Internals](05-claude-code-ecosystem.md#56--claude-code-source-解剖reference-harness-implementation-track-b-必看) 解剖 Claude Code source 時可以看到——agent 跑完 tool call 後自我評估 patch、有問題回頭改、修正後再 commit。**這是現代 production agent 的核心 building block 之一**。
## 🎯 精選 Projects
按用途分 4 類、12 個項目一張表搞定。**挑入口看「適合誰」、想深入點連結看 repo README**。
| 分類 | Project | ⭐ | 適合誰 | 為什麼推薦 / 備註 |
|---|---|---|---|---|
| **官方 cookbook**
(先看這個) | [Anthropic — Tool Use Cookbook](https://github.com/anthropics/claude-cookbooks/tree/main/tool_use) | ⭐⭐⭐⭐⭐ | 練習 1 / 練習 2 入手 | 單工具 → 多工具 → parallel → structured output 全部 notebook(重點看 `tool_use/customer_service_agent.ipynb`) |
| | [Anthropic — Quickstarts](https://github.com/anthropics/claude-quickstarts) | ⭐⭐⭐⭐⭐ | 練習 1/2 跑完想看「真的應用長什麼樣」 | 3 個 deploy-ready 範本(financial / customer-support / computer-use)、★ 16k+。比社群實作更 canonical |
| | [Anthropic — Building Effective Agents](https://www.anthropic.com/engineering/building-effective-agents) | ⭐⭐⭐⭐⭐ | 練習 3 寫完、進 Stage 4 之前**必讀** | 部落格文章:何時用 agent vs workflow / 常見 pattern / 容易踩的坑——Anthropic 官方觀念框架 |
| **從零實作 ReAct**
(理解原理) | [pguso/ai-agents-from-scratch](https://github.com/pguso/ai-agents-from-scratch) | ⭐⭐⭐⭐⭐ | 練習 3(從零寫 ReAct) | 用本機 Ollama 從零打造、zero framework、章節結構好。**最乾淨的「不靠 framework」參考實作** |
| | [arunpshankar/react-from-scratch](https://github.com/arunpshankar/react-from-scratch) | ⭐⭐⭐⭐ | 練習 3 替代(偏好 Gemini)+ 想看反思變體 | ReAct + Reflection + Self-consistency、Gemini 最佳化(⚠️ 2025-05 後更新放緩、Apache-2.0) |
| | [mattambrogi/agent-implementation](https://github.com/mattambrogi/agent-implementation) | ⭐⭐⭐ | 練習 3 卡住時逐行對照 | ~150 行最精簡 ReAct(⚠️ 已停滯 2024-01、留作教學玩具參考) |
| | [lsdefine/GenericAgent](https://github.com/lsdefine/GenericAgent) | ⭐⭐⭐⭐ | 練習 3/4,想看「精簡但完整」framework | 自我演化 framework、~3K 行、★ 11k+、支援 Claude / Gemini / Kimi / MiniMax。介於玩具版與 LangGraph 之間 |
| **CodeAct 路線**
(agent 寫程式碼當 action) | [HuggingFace Smolagents](https://github.com/huggingface/smolagents) | ⭐⭐⭐⭐ | 練習 5 替代方案、本地 LLM 實驗 | ≤1000 LOC、CodeAct pattern 代表、★ 27k+。HF 立場:agent 應該要小 |
| | [QuantaLogic/quantalogic](https://github.com/quantalogic/quantalogic) | ⭐⭐⭐ | 練習 3 後想比較 CodeAct vs JSON-tool | 另一條 CodeAct 路線、agent 直接寫 Python 程式碼當 action、Apache-2.0 |
| **中文章節式深度教材**
(chapter-length) | [datawhalechina/hello-agents](https://github.com/datawhalechina/hello-agents) ⭐ **本 stage 推薦** | ⭐⭐⭐⭐⭐ | 中文讀者想要結構化教學 + 完整覆蓋 | **16 種能力**含 tool use / ReAct / context engineering / sub-agents / circuit breaker / observability。中文圈最完整章節式(CC BY-NC-SA、非商用) |
| | [HelloAgents (jjyaoao)](https://github.com/jjyaoao/HelloAgents) | ⭐⭐⭐⭐⭐ | 中文讀者、想跑上面教材的 code | 上面教材 code repo、**請切 `learn_version` 分支**對齊章節(`pip install hello-agents`、CC BY-NC-SA) |
| **Framework 對照**
(看 framework 怎麼藏掉 ReAct loop) | [LangChain — ReAct Agent Template](https://github.com/langchain-ai/react-agent) | ⭐⭐⭐ | 練習 3 自己寫完後再來 | LangGraph Studio 範本、framework 怎麼把 ReAct 抽象化 |
> 💡 **建議閱讀路徑**:練習 1-2 跑 Anthropic Cookbook → 練習 3 跑 pguso/ai-agents-from-scratch → 練習 3 後讀 Building Effective Agents → 中文章節式教材就 hello-agents + jjyaoao 配對 → 進 Stage 4 前看 LangChain ReAct template 對照 framework 抽象。
## ✅ 進 Stage 4 前的自我檢查
你能不能:
- [ ] 定義一個 tool schema(name + description + JSON schema 輸入/輸出)
- [ ] 用不到 100 行 Python、不靠任何 framework,把 ReAct 迴圈寫出來
- [ ] 解釋為什麼 agent 需要一個「我做完了」的退出條件
- [ ] 比較 CodeAct(程式碼即 action)跟 JSON-tool 兩種路線
- [ ] 看出哪些問題其實不需要 agent
如果可以 → 進 [Stage 4 — Agent Frameworks](04-agent-frameworks.md)。
如果不行 → 把 練習 3 再跑一次,不要跳過。如果你不懂 framework 在幫你抽象什麼,Stage 4 的那些東西看起來會像黑魔法。