---
title: Build your first Blueprint
slug: /blueprints/tutorial/build-your-first-blueprint
description: A step-by-step tutorial to build your first Blueprint. Learn to install themes, plugins, and import site content.
---
Let's build an elementary Blueprint that
1. Creates a new WordPress site
2. Sets the site title to "My first Blueprint"
3. Installs the _Adventurer_ theme
4. Installs the _Hello Dolly_ plugin from the WordPress plugin directory
5. Installs a custom plugin
6. Changes the site content
## 1. Create a new WordPress site
Let's start by creating a `blueprint.json` file with the following contents:
```json
{}
```
It may seem like nothing is happening, but this Blueprint already spins up a WordPress site with the latest major version.
[ Run Blueprint ](https://playground.wordpress.net/#{})
**Autocomplete**
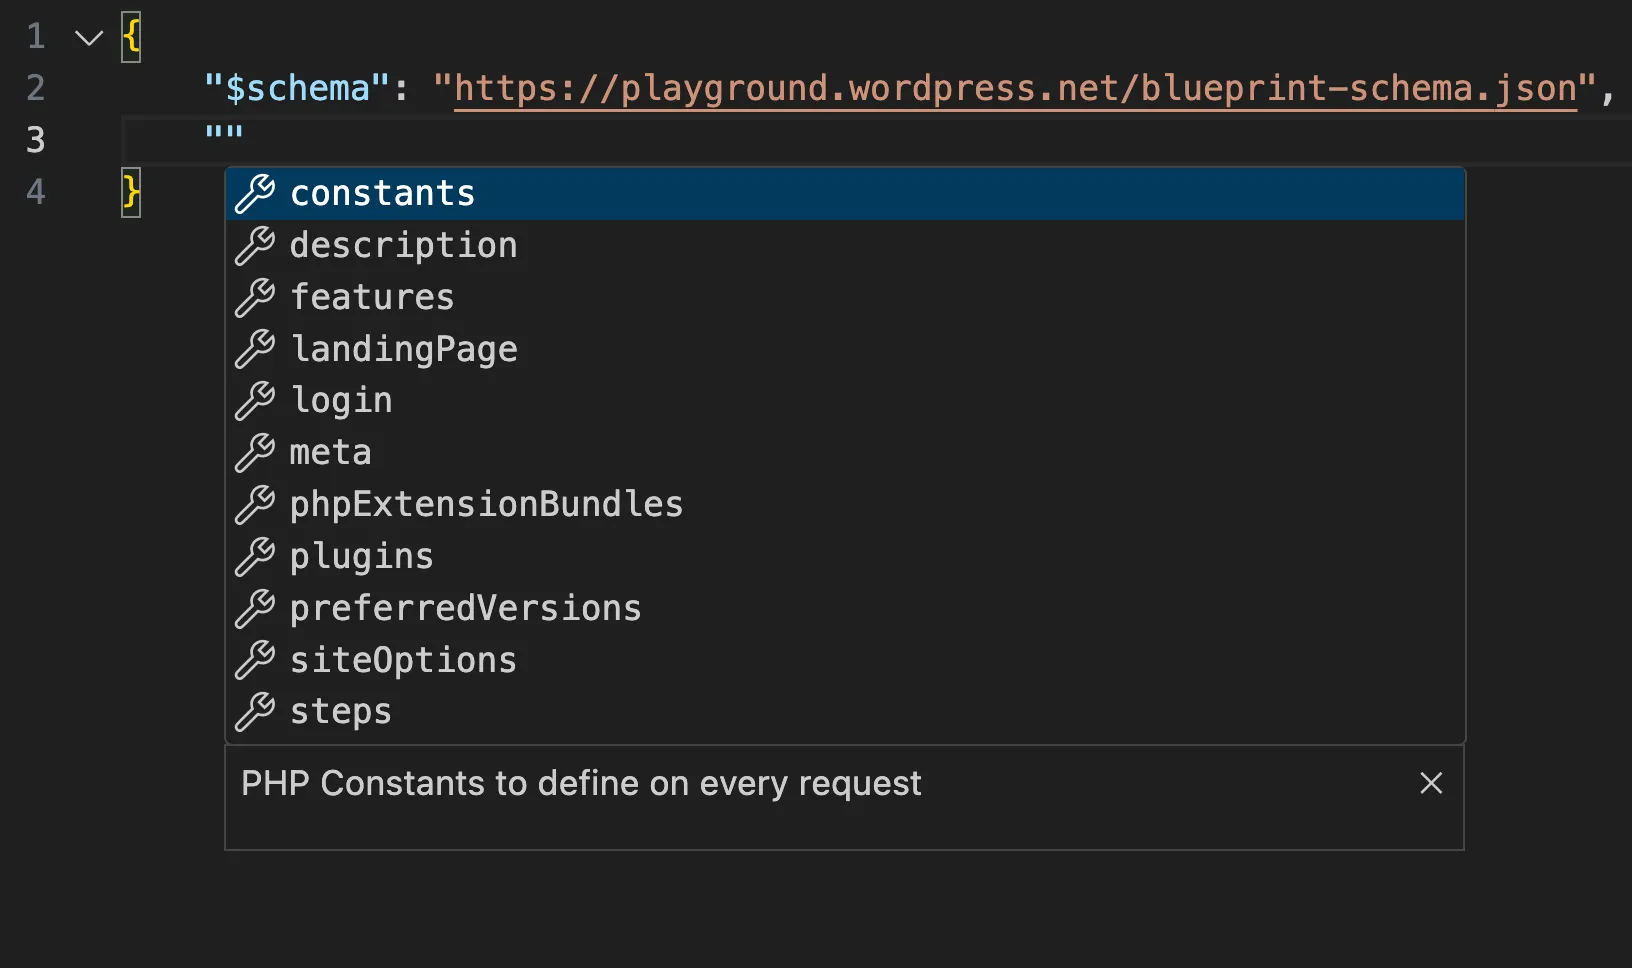
If you use an IDE, like VS Code or PHPStorm, you can use the [Blueprint JSON Schema](https://playground.wordpress.net/blueprint-schema.json) for an autocompleted Blueprint development experience. Add the following line at the top of your `blueprint.json` file:
```json
{
"$schema": "https://playground.wordpress.net/blueprint-schema.json"
}
```
Here's what it looks like in VS Code:
## 2. Set the site title to "My first Blueprint"
Blueprints consist of a series of [steps](/blueprints/steps) that define how to build a WordPress site. Before you write the first step, declare an empty list of steps:
```json
{
"$schema": "https://playground.wordpress.net/blueprint-schema.json",
"steps": []
}
```
This Blueprint isn't very exciting—it creates the same default site as the empty Blueprint above. Let's do something about it!
WordPress stores the site title in the `blogname` option. Add your first step and set that option to "My first Blueprint":
```json
{
"$schema": "https://playground.wordpress.net/blueprint-schema.json",
"steps": [
{
"step": "setSiteOptions",
"options": {
"blogname": "My first Blueprint"
}
}
]
}
```
[ Run Blueprint ](https://playground.wordpress.net/#https://playground.wordpress.net/#eyIkc2NoZW1hIjoiaHR0cHM6Ly9wbGF5Z3JvdW5kLndvcmRwcmVzcy5uZXQvYmx1ZXByaW50LXNjaGVtYS5qc29uIiwic3RlcHMiOlt7InN0ZXAiOiJzZXRTaXRlT3B0aW9ucyIsIm9wdGlvbnMiOnsiYmxvZ25hbWUiOiJNeSBmaXJzdCBCbHVlcHJpbnQifX1dfQ==)
The [`setSiteOptions` step](/blueprints/steps#SetSiteOptionsStep) specifies the site options in the WordPress database. The `options` object contains the key-value pairs to set. In this case, you changed the value of the `blogname` key to "My first Blueprint". You can read more about all available steps in the [Blueprint Steps API Reference](/blueprints/steps).
### Shorthands
You can specify some steps using a shorthand syntax. For example, you could write the `setSiteOptions` step like this:
```json
{
"$schema": "https://playground.wordpress.net/blueprint-schema.json",
"siteOptions": {
"blogname": "My first Blueprint"
}
}
```
The shorthand syntax and the step syntax correspond with each other. Every step specified with the shorthand syntax is automatically added at the beginning of the `steps` array in an arbitrary order. Which should you choose? Use shorthands when brevity is your main concern, use steps when you need more control over the order of execution.
## 3. Install the _Adventurer_ theme
Adventurer is an open-source theme [available in the WordPress theme directory](https://wordpress.org/themes/adventurer/). Let's install it using the [`installTheme` step](/blueprints/steps#InstallThemeStep):
```json
{
"siteOptions": {
"blogname": "My first Blueprint"
},
"steps": [
{
"step": "installTheme",
"themeData": {
"resource": "wordpress.org/themes",
"slug": "adventurer"
}
}
]
}
```
[ Run Blueprint ](https://playground.wordpress.net/#eyIkc2NoZW1hIjoiaHR0cHM6Ly9wbGF5Z3JvdW5kLndvcmRwcmVzcy5uZXQvYmx1ZXByaW50LXNjaGVtYS5qc29uIiwib3B0aW9ucyI6eyJibG9nbmFtZSI6Ik15IGZpcnN0IEJsdWVwcmludCJ9LCJzdGVwcyI6W3sic3RlcCI6Imluc3RhbGxUaGVtZSIsInRoZW1lWmlwRmlsZSI6eyJyZXNvdXJjZSI6IndvcmRwcmVzcy5vcmcvdGhlbWVzIiwic2x1ZyI6ImFkdmVudHVyZXIifX1dfQ==)
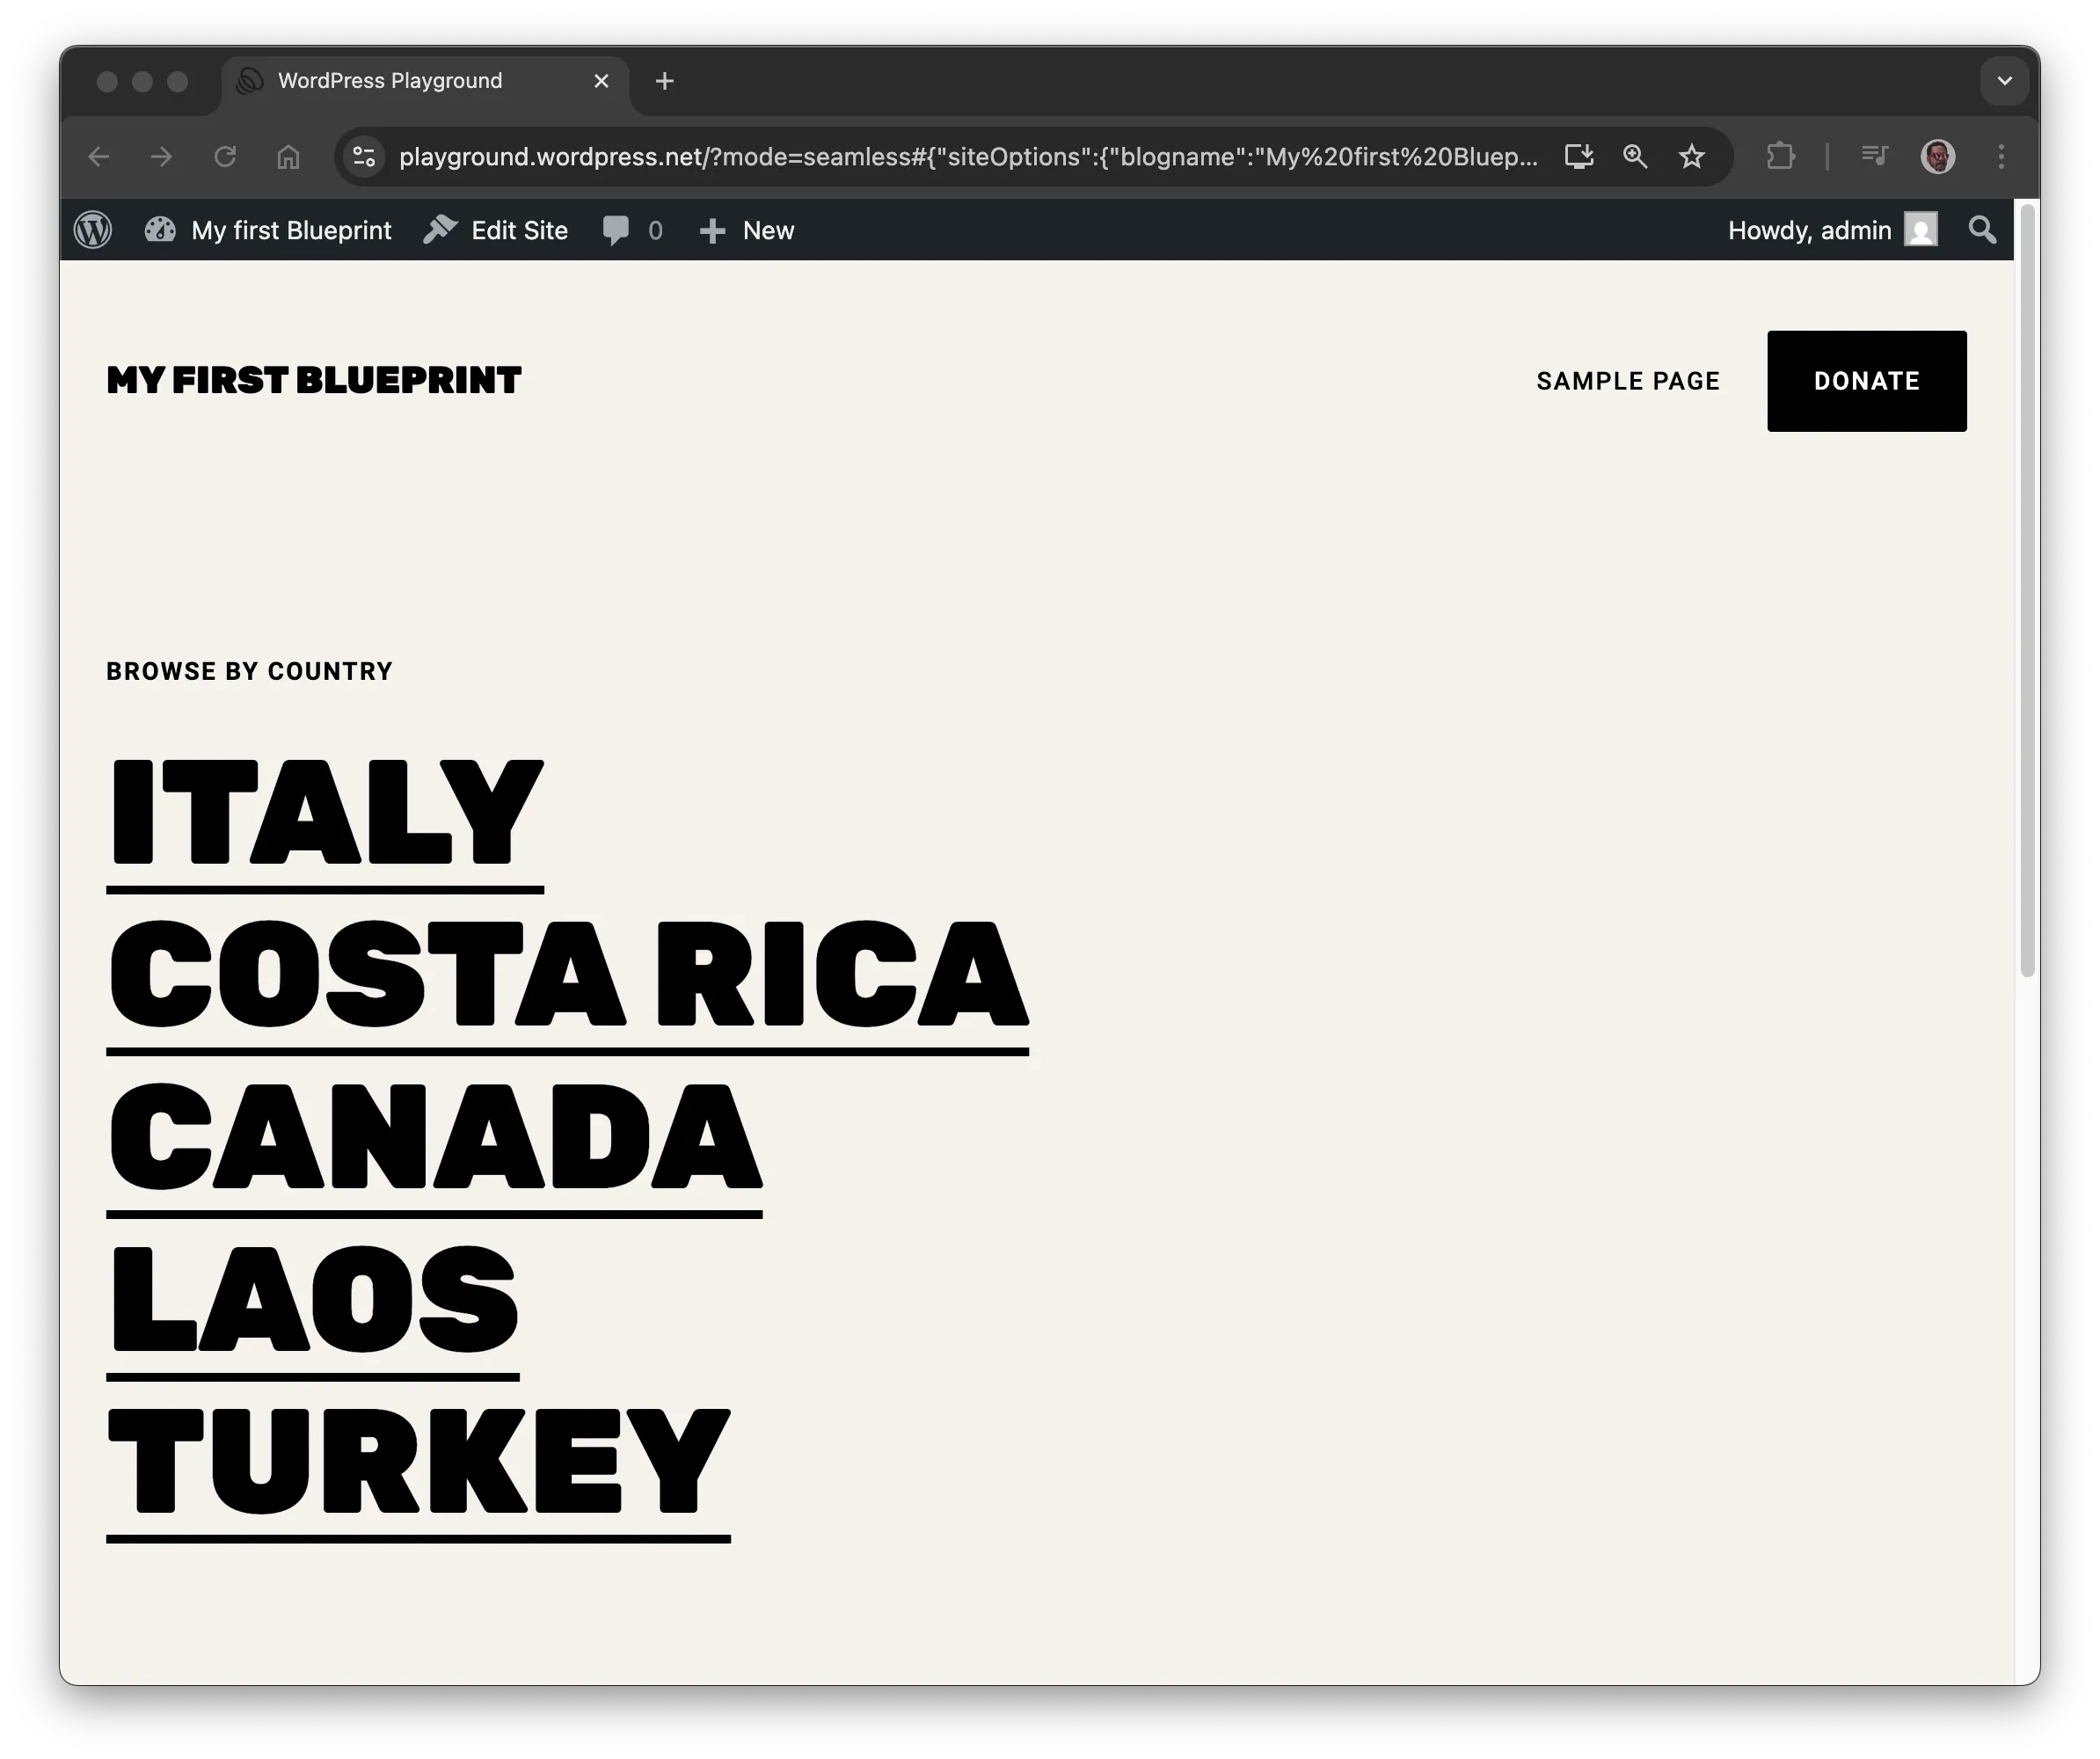
The site should now look like the screenshot below:
### Resources
The `themeData` defines a [resource](/blueprints/steps/resources) and references an external file required to complete the step. Playground supports different types of resources, including
- `url`,
- `wordpress.org/themes`,
- `wordpress.org/plugins`,
- `vfs`(virtual file system), or
- `literal`.
The example uses the `wordpress.org/themes` resource, which requires a `slug` identical to the one used in WordPress theme directory:
In this case, `https://wordpress.org/themes//` becomes `https://wordpress.org/themes/adventurer/`.
Learn more about the supported resources in the [Blueprint Resources API Reference](/blueprints/steps/resources/).
## 4. Install the _Hello Dolly_ plugin
A classic WordPress plugin that displays random lyrics from the song "Hello, Dolly!" in the admin dashboard. Let's install it using the [`installPlugin` step](/blueprints/steps#InstallPluginStep):
```json
{
"siteOptions": {
"blogname": "My first Blueprint"
},
"steps": [
{
"step": "installTheme",
"themeData": {
"resource": "wordpress.org/themes",
"slug": "adventurer"
}
},
{
"step": "installPlugin",
"pluginData": {
"resource": "wordpress.org/plugins",
"slug": "hello-dolly"
}
}
]
}
```
[ Run Blueprint ](https://playground.wordpress.net/#eyJzaXRlT3B0aW9ucyI6eyJibG9nbmFtZSI6Ik15IGZpcnN0IEJsdWVwcmludCJ9LCJzdGVwcyI6W3sic3RlcCI6Imluc3RhbGxUaGVtZSIsInRoZW1lWmlwRmlsZSI6eyJyZXNvdXJjZSI6IndvcmRwcmVzcy5vcmcvdGhlbWVzIiwic2x1ZyI6ImFkdmVudHVyZXIifX0seyJzdGVwIjoiaW5zdGFsbFBsdWdpbiIsInBsdWdpblppcEZpbGUiOnsicmVzb3VyY2UiOiJ3b3JkcHJlc3Mub3JnL3BsdWdpbnMiLCJzbHVnIjoiaGVsbG8tZG9sbHkifX1dfQ==)
The Hello Dolly plugin is now installed and activated.
Like the `themeData`, the `pluginData` defines a reference to an external file required for the step. The example uses the `wordpress.org/plugins` resource to install the plugin with the matching `slug` from the WordPress plugin directory.
## 5. Install a custom plugin
Let's install a custom WordPress plugin that adds a message to the admin dashboard:
```php
Hello from My Custom Plugin!';
}
add_action('admin_notices', 'my_custom_plugin');
```
You can use the [installPlugin](/blueprints/steps#InstallPluginStep), but that requires creating a ZIP file. Let's start with something different to see if the plugin works:
1. Create a `wp-content/plugins/hello-from-the-dashboard` directory using the [`mkdir` step](/blueprints/steps#MkdirStep).
2. Write a `plugin.php` file using the [`writeFile` step](/blueprints/steps#WriteFileStep).
3. Activate the plugin using the [`activatePlugin` step](/blueprints/steps#ActivatePluginStep).
Here's what that looks like in a Blueprint:
```json
{
// ...
"steps": [
// ...
{
"step": "mkdir",
"path": "/wordpress/wp-content/plugins/hello-from-the-dashboard"
},
{
"step": "writeFile",
"path": "/wordpress/wp-content/plugins/hello-from-the-dashboard/plugin.php",
"data": "Hello from My Custom Plugin!';\n}\n\nadd_action('admin_notices', 'my_custom_plugin');"
},
{
"step": "activatePlugin",
"pluginPath": "hello-from-the-dashboard/plugin.php"
}
]
}
```
The last thing to do is log the user in as an admin. You can do that with a shorthand of the [`login` step](/blueprints/steps#LoginStep):
```json
{
"login": true,
"steps": {
// ...
}
}
```
Here's the complete Blueprint:
```json
{
"$schema": "https://playground.wordpress.net/blueprint-schema.json",
"login": true,
"siteOptions": {
"blogname": "My first Blueprint"
},
"steps": [
{
"step": "installTheme",
"themeData": {
"resource": "wordpress.org/themes",
"slug": "adventurer"
}
},
{
"step": "installPlugin",
"pluginData": {
"resource": "wordpress.org/plugins",
"slug": "hello-dolly"
}
},
{
"step": "mkdir",
"path": "/wordpress/wp-content/plugins/hello-from-the-dashboard"
},
{
"step": "writeFile",
"path": "/wordpress/wp-content/plugins/hello-from-the-dashboard/plugin.php",
"data": "Hello from My Custom Plugin!';\n}\n\nadd_action('admin_notices', 'my_custom_plugin');"
},
{
"step": "activatePlugin",
"pluginPath": "hello-from-the-dashboard/plugin.php"
}
]
}
```
[ Run Blueprint ](https://playground.wordpress.net/#eyJsb2dpbiI6dHJ1ZSwic2l0ZU9wdGlvbnMiOnsiYmxvZ25hbWUiOiJNeSBmaXJzdCBCbHVlcHJpbnQifSwic3RlcHMiOlt7InN0ZXAiOiJpbnN0YWxsVGhlbWUiLCJ0aGVtZVppcEZpbGUiOnsicmVzb3VyY2UiOiJ3b3JkcHJlc3Mub3JnL3RoZW1lcyIsInNsdWciOiJhZHZlbnR1cmVyIn19LHsic3RlcCI6Imluc3RhbGxQbHVnaW4iLCJwbHVnaW5aaXBGaWxlIjp7InJlc291cmNlIjoid29yZHByZXNzLm9yZy9wbHVnaW5zIiwic2x1ZyI6ImhlbGxvLWRvbGx5In19LHsic3RlcCI6Im1rZGlyIiwicGF0aCI6Ii93b3JkcHJlc3Mvd3AtY29udGVudC9wbHVnaW5zL2hlbGxvLW9uLXRoZS1kYXNoYm9hcmQifSx7InN0ZXAiOiJ3cml0ZUZpbGUiLCJwYXRoIjoiL3dvcmRwcmVzcy93cC1jb250ZW50L3BsdWdpbnMvaGVsbG8tb24tdGhlLWRhc2hib2FyZC9wbHVnaW4ucGhwIiwiZGF0YSI6Ijw/cGhwXG4vKlxuUGx1Z2luIE5hbWU6IFwiSGVsbG9cIiBvbiB0aGUgRGFzaGJvYXJkXG5EZXNjcmlwdGlvbjogQSBjdXN0b20gcGx1Z2luIHRvIHNob3djYXNlIFdvcmRQcmVzcyBCbHVlcHJpbnRzXG5WZXJzaW9uOiAxLjBcbkF1dGhvcjogV29yZFByZXNzIENvbnRyaWJ1dG9yc1xuKi9cblxuZnVuY3Rpb24gbXlfY3VzdG9tX3BsdWdpbigpIHtcbiAgICBlY2hvICc8aDE+SGVsbG8gZnJvbSBNeSBDdXN0b20gUGx1Z2luITwvaDE+Jztcbn1cblxuYWRkX2FjdGlvbignYWRtaW5fbm90aWNlcycsICdteV9jdXN0b21fcGx1Z2luJyk7In0seyJzdGVwIjoiYWN0aXZhdGVQbHVnaW4iLCJwbHVnaW5QYXRoIjoiaGVsbG8tb24tdGhlLWRhc2hib2FyZC9wbHVnaW4ucGhwIn1dfQ==)
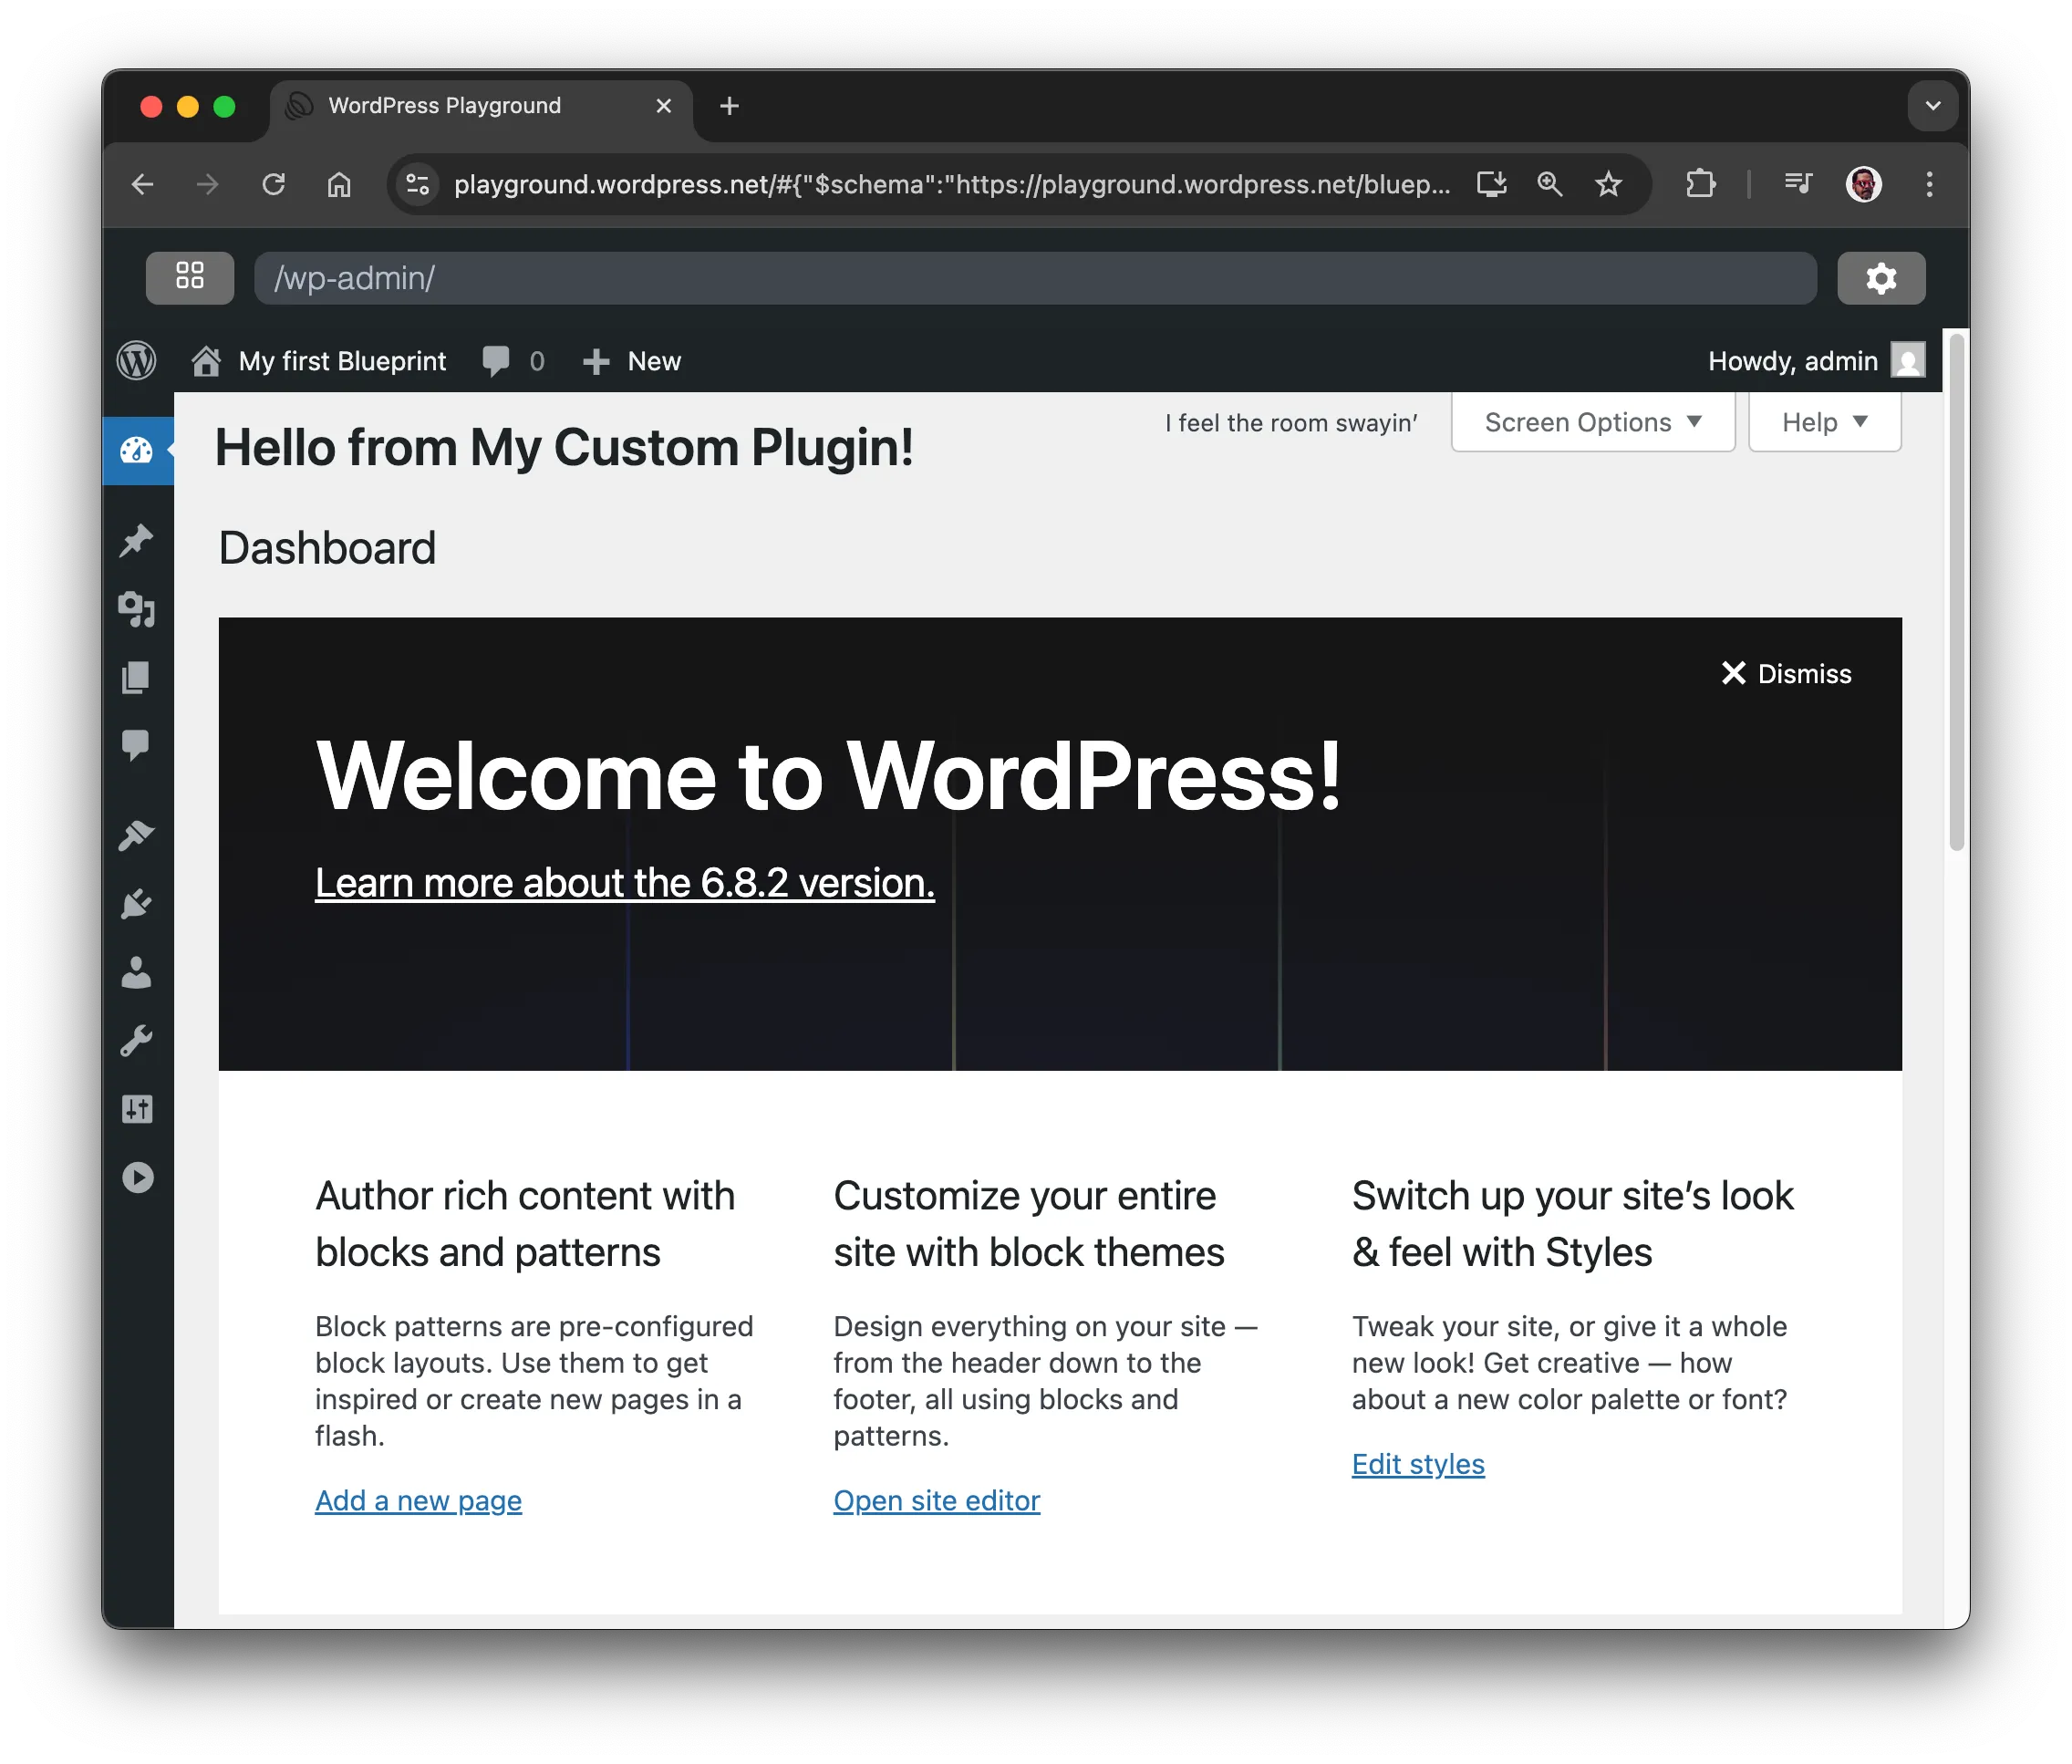
That's what it looks like when you navigate to the dashboard:
### Create a plugin and zip it
Encoding PHP files as `JSON` can be useful for quick testing, but it's inconvenient and difficult to read. Instead, create a file with the plugin code, compress it, and use the `ZIP` file as the `resource` in the [`installPlugin` step](/blueprints/steps#InstallPluginStep) to install it (the path in the `URL` should match the one in your GitHub repository):
```json
{
"$schema": "https://playground.wordpress.net/blueprint-schema.json",
"login": true,
"siteOptions": {
"blogname": "My first Blueprint"
},
"steps": [
{
"step": "installTheme",
"themeData": {
"resource": "wordpress.org/themes",
"slug": "adventurer"
}
},
{
"step": "installPlugin",
"pluginData": {
"resource": "wordpress.org/plugins",
"slug": "hello-dolly"
}
},
{
"step": "installPlugin",
"pluginData": {
"resource": "url",
"url": "https://raw.githubusercontent.com/wordpress/blueprints/trunk/docs/assets/hello-from-the-dashboard.zip"
}
}
]
}
```
You can shorten that Blueprint even more using the shorthand syntax:
```json
{
"$schema": "https://playground.wordpress.net/blueprint-schema.json",
"login": true,
"siteOptions": {
"blogname": "My first Blueprint"
},
"plugins": ["hello-dolly", "https://raw.githubusercontent.com/wordpress/blueprints/trunk/docs/assets/hello-from-the-dashboard.zip"],
"steps": [
{
"step": "installTheme",
"themeData": {
"resource": "wordpress.org/themes",
"slug": "adventurer"
}
}
]
}
```
[ Run Blueprint ](https://playground.wordpress.net/#eyIkc2NoZW1hIjoiaHR0cHM6Ly9wbGF5Z3JvdW5kLndvcmRwcmVzcy5uZXQvYmx1ZXByaW50LXNjaGVtYS5qc29uIiwibG9naW4iOnRydWUsInNpdGVPcHRpb25zIjp7ImJsb2duYW1lIjoiTXkgZmlyc3QgQmx1ZXByaW50In0sInBsdWdpbnMiOlsiaGVsbG8tZG9sbHkiLCJodHRwczovL3Jhdy5naXRodWJ1c2VyY29udGVudC5jb20vYWRhbXppZWwvYmx1ZXByaW50cy90cnVuay9kb2NzL2hlbGxvLW9uLXRoZS1kYXNoYm9hcmQuemlwIl0sInN0ZXBzIjpbeyJzdGVwIjoiaW5zdGFsbFRoZW1lIiwidGhlbWVaaXBGaWxlIjp7InJlc291cmNlIjoid29yZHByZXNzLm9yZy90aGVtZXMiLCJzbHVnIjoiYWR2ZW50dXJlciJ9fV19)
## 6. Change the site content
Finally, let's delete the default content of the site and import a new one from a WordPress export file (WXR).
### Delete the old content
There isn't a Blueprint step to delete the default content, but you can do that with a snippet of PHP code:
```php
-1,
'post_type' => array('post', 'page'),
'post_status' => 'any'
));
foreach ($posts as $post) {
wp_delete_post($post->ID, true);
}
```
To run that code during the site setup, use the [`runPHP` step](/blueprints/steps#RunPHPStep):
```json
{
// ...
"steps": [
// ...
{
"step": "runPHP",
"code": " -1,\n 'post_type' => array('post', 'page'),\n 'post_status' => 'any'\n));\n\nforeach ($posts as $post) {\n wp_delete_post($post->ID, true);\n}"
}
]
}
```
### Import the new content
Let's use the [`importWxr` step](/blueprints/steps#ImportWXRStep) to import a WordPress export (`WXR`) file that helps test WordPress themes. The file is available in the [WordPress/theme-test-data](https://github.com/WordPress/theme-test-data) repository, and you can access it via its `raw.githubusercontent.com` address: [https://raw.githubusercontent.com/WordPress/theme-test-data/master/themeunittestdata.wordpress.xml](https://raw.githubusercontent.com/WordPress/theme-test-data/master/themeunittestdata.wordpress.xml).
Here's what the final Blueprint looks like:
```json
{
"$schema": "https://playground.wordpress.net/blueprint-schema.json",
"login": true,
"siteOptions": {
"blogname": "My first Blueprint"
},
"plugins": ["hello-dolly", "https://raw.githubusercontent.com/wordpress/blueprints/trunk/docs/assets/hello-from-the-dashboard.zip"],
"steps": [
{
"step": "installTheme",
"themeData": {
"resource": "wordpress.org/themes",
"slug": "adventurer"
}
},
{
"step": "runPHP",
"code": " -1,\n 'post_type' => array('post', 'page'),\n 'post_status' => 'any'\n));\n\nforeach ($posts as $post) {\n wp_delete_post($post->ID, true);\n}"
},
{
"step": "importWxr",
"file": {
"resource": "url",
"url": "https://raw.githubusercontent.com/WordPress/theme-test-data/master/themeunittestdata.wordpress.xml"
}
}
]
}
```
[ Run Blueprint ](https://playground.wordpress.net/#eyIkc2NoZW1hIjoiaHR0cHM6Ly9wbGF5Z3JvdW5kLndvcmRwcmVzcy5uZXQvYmx1ZXByaW50LXNjaGVtYS5qc29uIiwibG9naW4iOnRydWUsInNpdGVPcHRpb25zIjp7ImJsb2duYW1lIjoiTXkgZmlyc3QgQmx1ZXByaW50In0sInBsdWdpbnMiOlsiaGVsbG8tZG9sbHkiLCJodHRwczovL3Jhdy5naXRodWJ1c2VyY29udGVudC5jb20vYWRhbXppZWwvYmx1ZXByaW50cy90cnVuay9kb2NzL2Fzc2V0cy9oZWxsby1mcm9tLXRoZS1kYXNoYm9hcmQuemlwIl0sInN0ZXBzIjpbeyJzdGVwIjoiaW5zdGFsbFRoZW1lIiwidGhlbWVaaXBGaWxlIjp7InJlc291cmNlIjoid29yZHByZXNzLm9yZy90aGVtZXMiLCJzbHVnIjoiYWR2ZW50dXJlciJ9fSx7InN0ZXAiOiJydW5QSFAiLCJjb2RlIjoiPD9waHBcbnJlcXVpcmUgJy93b3JkcHJlc3Mvd3AtbG9hZC5waHAnO1xuXG4kcG9zdHMgPSBnZXRfcG9zdHMoYXJyYXkoXG4gICAgJ251bWJlcnBvc3RzJyA9PiAtMSxcbiAgICAncG9zdF90eXBlJyA9PiBhcnJheSgncG9zdCcsICdwYWdlJyksXG4gICAgJ3Bvc3Rfc3RhdHVzJyA9PiAnYW55J1xuKSk7XG5cbmZvcmVhY2ggKCRwb3N0cyBhcyAkcG9zdCkge1xuICAgIHdwX2RlbGV0ZV9wb3N0KCRwb3N0LT5JRCwgdHJ1ZSk7XG59In0seyJzdGVwIjoiaW1wb3J0V3hyIiwiZmlsZSI6eyJyZXNvdXJjZSI6InVybCIsInVybCI6Imh0dHBzOi8vcmF3LmdpdGh1YnVzZXJjb250ZW50LmNvbS9Xb3JkUHJlc3MvdGhlbWUtdGVzdC1kYXRhL21hc3Rlci90aGVtZXVuaXR0ZXN0ZGF0YS53b3JkcHJlc3MueG1sIn19XX0=)
And that's it. Congratulations on creating your first Blueprint! 🥳