# 发布到 DSH 插件市场 —— 步骤与现状
> 目标站点:
> 站点**没有上传表单**(`/zh/submit/` 是 404)。收录的唯一入口是往
> [awesome-dsh-plugin](https://github.com/awesome-dsh-plugin/awesome-dsh-plugin)
> 仓库提 PR,加**一个 YAML 文件**。市场(dshmarket)与站点每天从那里刷新。
## 收录规则(2026-10-21 从 PR 模板 + contributing.md 抄下来的硬性项)
| 规则 | 我们的状态 |
|---|---|
| 一个 PR 只加 `data/plugins/__.yml`,**一个文件就是全部投稿** | 条目已备好(`market/XXP-AI-SPACE__dsh-snip.yml`) |
| 仓库 `package.json` 必须声明 **`dsh.bundle`**(只声明 `dsh.client` 会被拒) | ✅ 已声明 `dsh.bundle.patch` + `cordis.patch.yml` |
| 仓库创建**满 1 天**(CI 自动查) | ❌ **这是唯一的时间门槛**:今天建仓、明天才能提 |
| 仓库要有真实可用代码 | ✅ |
| 仓库打上 **`dsh-plugin`** topic | 需在 GitHub 上点一下 |
| `category` 取固定清单里的值 | ✅ `ui` |
| 描述只讲功能、不带营销词、且必须与代码相符 | ✅ 已按此写 |
| 截图:在自己仓库放 `screenshots.json`(1–8 张相对路径) | ✅ 已加 `screenshots.json` → `docs/overlay.png` |
| npm 可选;若发 npm,包的 `repository` 必须指回该仓库,否则不关联 | 建仓后补 `repository` 再发 |
| 条目里**不许**手写 `npm:` 字段(会被校验拒绝) | ✅ 我们的 yml 没有 |
| 不发 npm 也可;无法从源码安装的仓库才必须给 `tarball:` | 我们可从源码装(纯 JS + PS 脚本) |
## 建议的推进顺序(受 1 天年龄门槛限制)
1. **今天**:建仓库 + 打 topic + push(下面第一步);
2. 顺手发 npm(可选,但推荐:免 `allowBuilds`,用户一条命令装好);
3. **明天之后**:提 PR(第三步),CI 年龄检查才过得去。
## 这台机器的硬阻断(2026-10-21 实测)
| 检查项 | 结果 |
|---|---|
| agent 侧到 `api.github.com` / `github.com` / `raw.githubusercontent.com` 的 HTTPS | **全部失败**(连接关闭 / 超时)⇒ 我无法建仓、push、开 PR |
| `git` | **未安装**(PATH 与 `C:\Program Files\Git` 等常见目录都没有) |
| `gh` | 未安装;`winget install GitHub.cli` 在沙箱里报 `-1978335231`(写不了自己的状态目录) |
| `npm` 登录 | 无 |
| npm 包名 `dsh-snip` | **可用**(`registry.npmjs.org/dsh-snip` 返回 404) |
| 本机 `.npmrc` | 指向 `registry.npmmirror.com` —— **镜像不能发布**,必须显式 `--registry=https://registry.npmjs.org` |
**结论**:agent 侧无法完成发布;也不需要(更不应该)把 GitHub 密码交出来——GitHub 早已不支持密码做 git 操作,且本机会把对话写进 `%DSH_HOME%\sessions\`。
## 路线 A:只用浏览器(零工具、零密钥)——推荐
1. **建仓**: → Name `dsh-snip` → **Public** → 不勾 README → Create。
2. **上传**:解压 `dist/dsh-snip-0.1.0-src.zip`,在新仓库页点
*uploading an existing file*,把解压出来的**全部文件与文件夹**拖进去(要保留 `lib/`、`client/`、`docs/`、`market/` 目录结构)→ Commit changes。
3. **打 topic**:仓库主页右上 About 旁的齿轮 → Topics 加 `dsh-plugin`。
4. **等满 1 天**(CI 硬性检查)。
5. **提 PR**:
- fork
- 在你 fork 的仓库里 **Add file → Create new file**,路径填
**`data/plugins/XXP-AI-SPACE__dsh-snip.yml`**
- 把 `market/XXP-AI-SPACE__dsh-snip.yml` 的内容**整段粘进去**(已经填好 owner,不用改)→ Commit
- 回到上游仓库 → **Contribute → Open pull request**
PR 标题:
```
Add dsh-snip (screenshot annotation, Windows)
```
PR 描述(直接粘):
```markdown
Adds `XXP-AI-SPACE/dsh-snip` under `ui`.
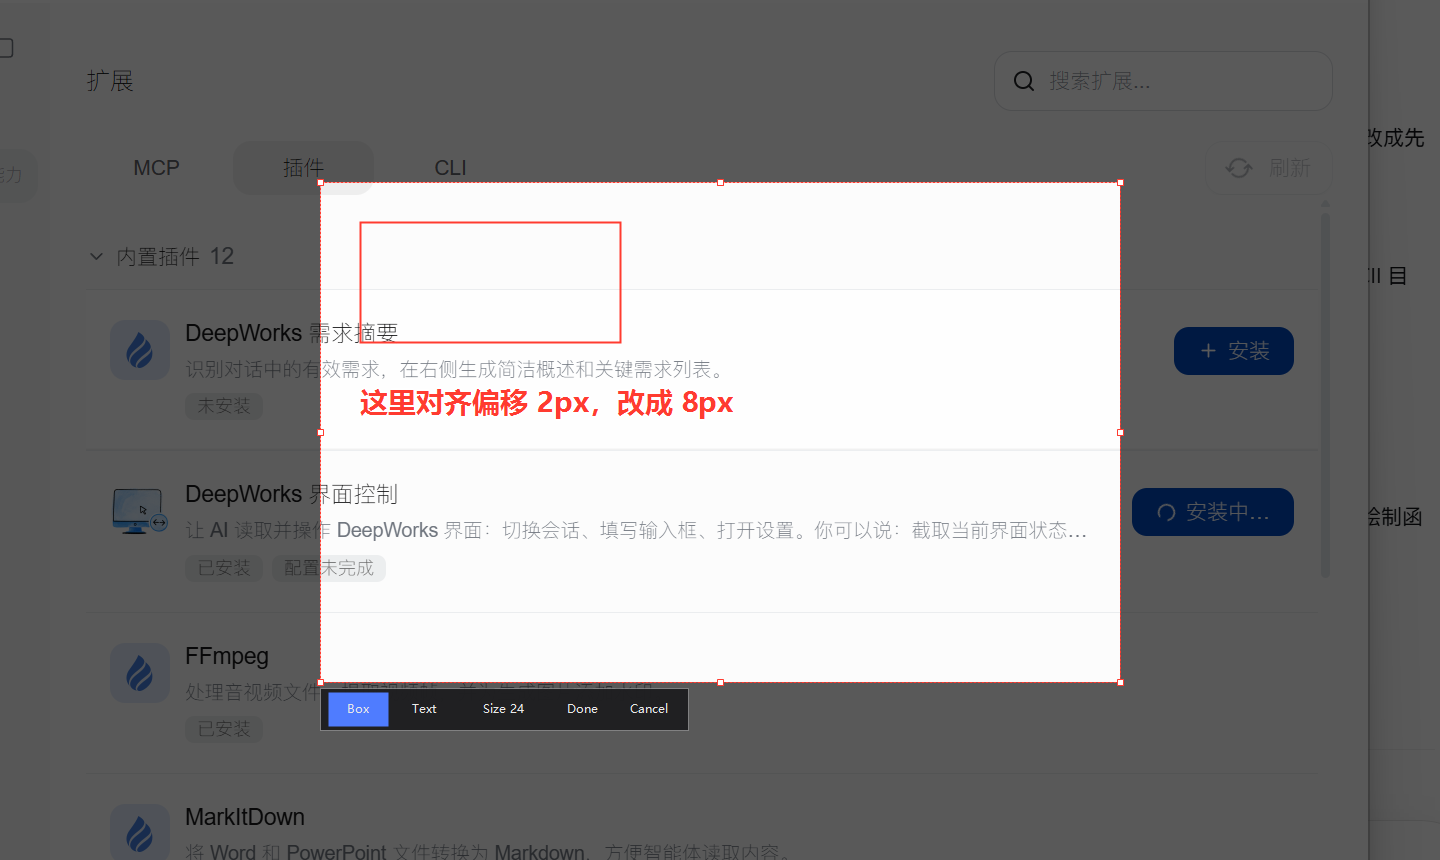
- Snipaste-style capture overlay: `F1` is a real Windows global hotkey (`RegisterHotKey`),
the screen freezes and dims, drag to select, `Esc` exits.
- Annotations: red rectangle outlines, click-to-type text with wheel-resizable font size.
- The selection is composited at native resolution and pasted into the composer
(`[data-composer-input]` via a synthetic paste event), with clipboard fallback.
- Built from the overlay's own paint code; no page-side screenshot preview.
Repo declares `dsh.bundle` (`cordis.patch.yml`), has the `dsh-plugin` topic,
and `screenshots.json` pointing at `docs/overlay.png`.
```
6. **(可选)npm**:在你自己的终端 `npm login --registry=https://registry.npmjs.org`,然后
`npm publish dist/dsh-snip-0.1.0.tgz --registry=https://registry.npmjs.org`。
`package.json` 里的 `repository` 已指回 `https://github.com/XXP-AI-SPACE/dsh-snip`,
条目会自动关联下载量。
## 路线 B:等装上 git 之后用脚本
`publish/push.ps1` 会把插件目录组装成一个仓库、补好 `repository` 字段、`git init` + 提交,
并在 `gh` 可用且已登录时直接建仓 + push + 打 topic:
```powershell
powershell -File publish\push.ps1 -Owner XXP-AI-SPACE
```
前置:装 Git();想一步到位再装 `gh` 并 `gh auth login`。
⚠️ 这个脚本需要在**你自己的终端**跑——agent 侧到 GitHub 的网络是断的。
已经准备好的东西(都在本目录):
| 文件 | 用途 |
|---|---|
| `package.json` | 已去掉 `private`,补 `repository`/`homepage`/`bugs`(指向 XXP-AI-SPACE/dsh-snip)、`files`/`keywords`/`os`/`engines.dsh` |
| `LICENSE` | MIT |
| `screenshots.json` | 市场详情页截图声明(指向 `docs/overlay.png`) |
| `docs/overlay.png` | 市场与 README 用的界面参考图(截图状态下的选区 + 工具条) |
| `market/XXP-AI-SPACE__dsh-snip.yml` | **可直接提交的目录条目**(owner 已填) |
| `dist/dsh-snip-0.1.0.tgz` | `npm pack` 产物,可直接 `npm publish ` |
| `dist/dsh-snip-0.1.0-src.zip` | 仓库源码包,解压即是仓库根(含 screenshots.json) |
| `publish/push.ps1` | 装了 git 之后一条命令建仓 + push(需你终端执行) |
## 第一步:建 GitHub 仓库
1. 新建仓库 `dsh-snip`(public)。
2. 把 `plugins/dsh-snip/` 下的内容作为仓库根提交(`.plugin-review/` 不用带)。
3. 建议补上 `package.json` 里的 `repository` / `homepage` / `bugs` 与 `author` —— 市场卡片会用仓库信息。
```sh
cd plugins/dsh-snip
git init -b main
git add .
git commit -m "feat: dsh-snip 0.1.0 - Snipaste-style screenshot annotation for DSH"
git remote add origin https://github.com/XXP-AI-SPACE/dsh-snip.git
git push -u origin main
```
## 第二步:发布 npm 包
```sh
cd plugins/dsh-snip
npm login --registry=https://registry.npmjs.org
npm publish --registry=https://registry.npmjs.org # 或直接发已打好的包:
# npm publish dist/dsh-snip-0.1.0.tgz --registry=https://registry.npmjs.org
```
> 注意两点:
> 1. **必须带 `--registry=https://registry.npmjs.org`**,否则会读到 `.npmrc` 里的镜像;
> 2. 本包 `os: ["win32"]`,在 macOS/Linux 上装会报平台不符 —— 这是有意的(依赖 Windows PowerShell + WinForms)。
## 第三步:提交市场目录 PR
插件市场(dshmarket)本身**不接受条目**,列表来自精选仓库
[awesome-dsh-plugin](https://github.com/awesome-dsh-plugin/awesome-dsh-plugin):
1. fork 该仓库;
2. 把 `market/XXP-AI-SPACE__dsh-snip.yml` 复制为 `data/plugins/XXP-AI-SPACE__dsh-snip.yml`
(文件名里是**双下划线**;owner 已填好,无需修改);
3. 开 PR,标题建议 `Add dsh-snip (screenshot annotation, Windows)`;
4. 描述里贴 `docs/overlay.png` 这张图,并写一句话:F1 全局热键、框选、红框 + 文字标注(滚轮调字号)、Esc 退出。
站点(awesome-dsh-plugin.com)与市场里的列表都由 CI **每天刷新** `plugins.json`,
合并后通常一天内出现在市场里;市场每次打开都实时拉取,不会用旧缓存。
## 第四步:验证
```sh
# 市场里装
dsh plugin --profile desktop add dsh-snip
# 或者先从 GitHub 装(不等收录也能用)
dsh plugin --profile desktop add github:XXP-AI-SPACE/dsh-snip
```
装完**完全退出再启动**桌面端(宿主半需要冷启动),输入框工具行出现剪刀、`F1` 生效。
## 本机现状提醒
本机现在是 `link:` 安装(指向 `F:\工作之后\3-DSH\plugins\dsh-snip`)。
npm 包发布后如果想改用它:
```sh
dsh plugin --profile desktop remove dsh-snip
dsh plugin --profile desktop add dsh-snip
```
否则本地改动仍然生效但不会跟着 npm 版本走。