

Menu Bar widget overview and structure
A Menu Bar widget is a set of navigational menu buttons that display submenus when a mouse pointer hovers over one of the buttons. Menu Bars let you display a large amount of navigational information in a compact space, and also give visitors to the site a sense of what is available on the site without having to browse it extensively.
The following example shows a horizontal Menu Bar widget, with the third menu item expanded.
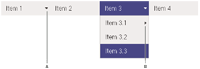
- A.
- Menu item has submenu
- B.
- Submenu item has submenu
The HTML code for the Menu Bar widget consists of an outer ul tag that contains an li tag and a tag for each of the top-level menu items. The li tags act as container tags for the menu items, and the a tags themselves are the actual menu items. Thus, when you want to style a particular menu item, you will usually want to style the CSS rule that corresponds to the a tag (not the CSS rules that correspond to the ul and li tags, which style the containers of the actual menu items). These rules exist in the accompanying CSS file, SpryMenuBarHorizontal.css or SpryMenuBarVertical.css, depending on your selection
The top-level menu items can in turn contain other ul, li, and a tags that define submenus for each of the items, and submenus can likewise contain submenus. Any menu item container (i.e. li tag) at any level can contain an unlimited number of submenu items.
The HTML code for the Menu Bar widget also includes script tags in the head of the document and after the Menu Bar’s HTML code. These tags create a JavaScript object, which makes the Menu Bar interactive. You define whether the Menu Bar widget will be vertical or horizontal in the main container ul tag for the Menu Bar.
Following is the HTML code for a horizontal Menu Bar widget:
<head>
...
<!--Link the Spry Manu Bar JavaScript library-->
<script src="SpryAssets/SpryMenuBar.js" type="text/javascript"></script>
<!--Link the CSS style sheet that styles the menu bar. You can select between horizontal and vertical-->
<link href="SpryAssets/SpryMenuBarHorizontal.css" rel="stylesheet" type="text/css" />
</head>
<body>
<!--Create a Menu bar widget and assign classes to each element-->
<ul id="menubar1" class="MenuBarHorizontal">
	<li><a class="MenuBarItemSubmenu" href="#">Item 1</a>
		<ul>
			<li><a href="#">Item 1.1</a></li>
			<li><a href="#">Item 1.2</a></li>
			<li><a href="#">Item 1.3</a></li>
		</ul>
	</li>
	<li><a href="#">Item 2</a></li>
	<li><a class="MenuBarItemSubmenu" href="#">Item 3</a>
		<ul>
			<li><a class="MenuBarItemSubmenu" href="#">Item 3.1</a>
				<ul>
					<li><a href="#">Item 3.1.1</a></li>
					<li><a href="#">Item 3.1.2</a></li>
				</ul>
			</li>
			<li><a href="#">Item 3.2</a></li>
			<li><a href="#">Item 3.3</a></li>
		</ul>
	</li>
	<li><a href="#">Item 4</a></li>
</ul>
<!--Initialize the Menu Bar widget object-->
<script type="text/javascript">
	var mb1 = new Spry.Widget.MenuBar("menubar1", {imgDown:"SpryAssets/SpryMenuBarDownHover.gif", imgRight:"SpryAssets/SpryMenuBarRightHover.gif"});
</script>
</body>
In the code, the new JavaScript operator initializes the Menu Bar object, and transforms the ul content with the ID of menubar1 from static HTML code into an interactive page element. The Spry.Widget.MenuBar method is a constructor in the Spry framework that creates Menu Bar objects, and the information necessary to initialize the object is contained in the MenuBar.js JavaScript library that you linked to in the head of the document.
You can change the appearance of any given part of the Menu Bar widget by editing the CSS rule that corresponds to the class names assigned to it in the HTML code. For example, to change the background color of the Menu Bar’s top-level menu items, edit the corresponding CSS rule in the SpryMenuBarHorizontal.css file. Keep in mind that changing the CSS code in the SpryManuBarHorizontal.css file will affect all menu bars that are linked to that file.
In addition to the classes shown in the HTML code, the Menu Bar widget includes certain default behaviors that are attached to the widget. These behaviors are a built‑in part of the Spry framework, and are in the SpryMenuBar.js JavaScript library file. The library file includes behaviors related to hovering.
You can change the look of the Menu Bar as it relates to these behaviors by editing the appropriate classes in one of the CSS files. If for some reason you want to remove a given behavior, you can delete the CSS rules that correspond to that behavior.