iLO Fans Controller
Easily manage your HP's server fans speeds, anywhere!
---
🎉 Thank you so much for the 1.000+ container pulls! 🎉
> ℹ **NOTE:** The v1.0.0 is a **complete rewrite** of the tool, so any feedback is appreciated!
> If you find any bug or have any suggestion, please [open an issue](https://github.com/alex3025/ilo-fans-controller/issues). Thanks! 😄
## FAQ
### How does it work? 🛠
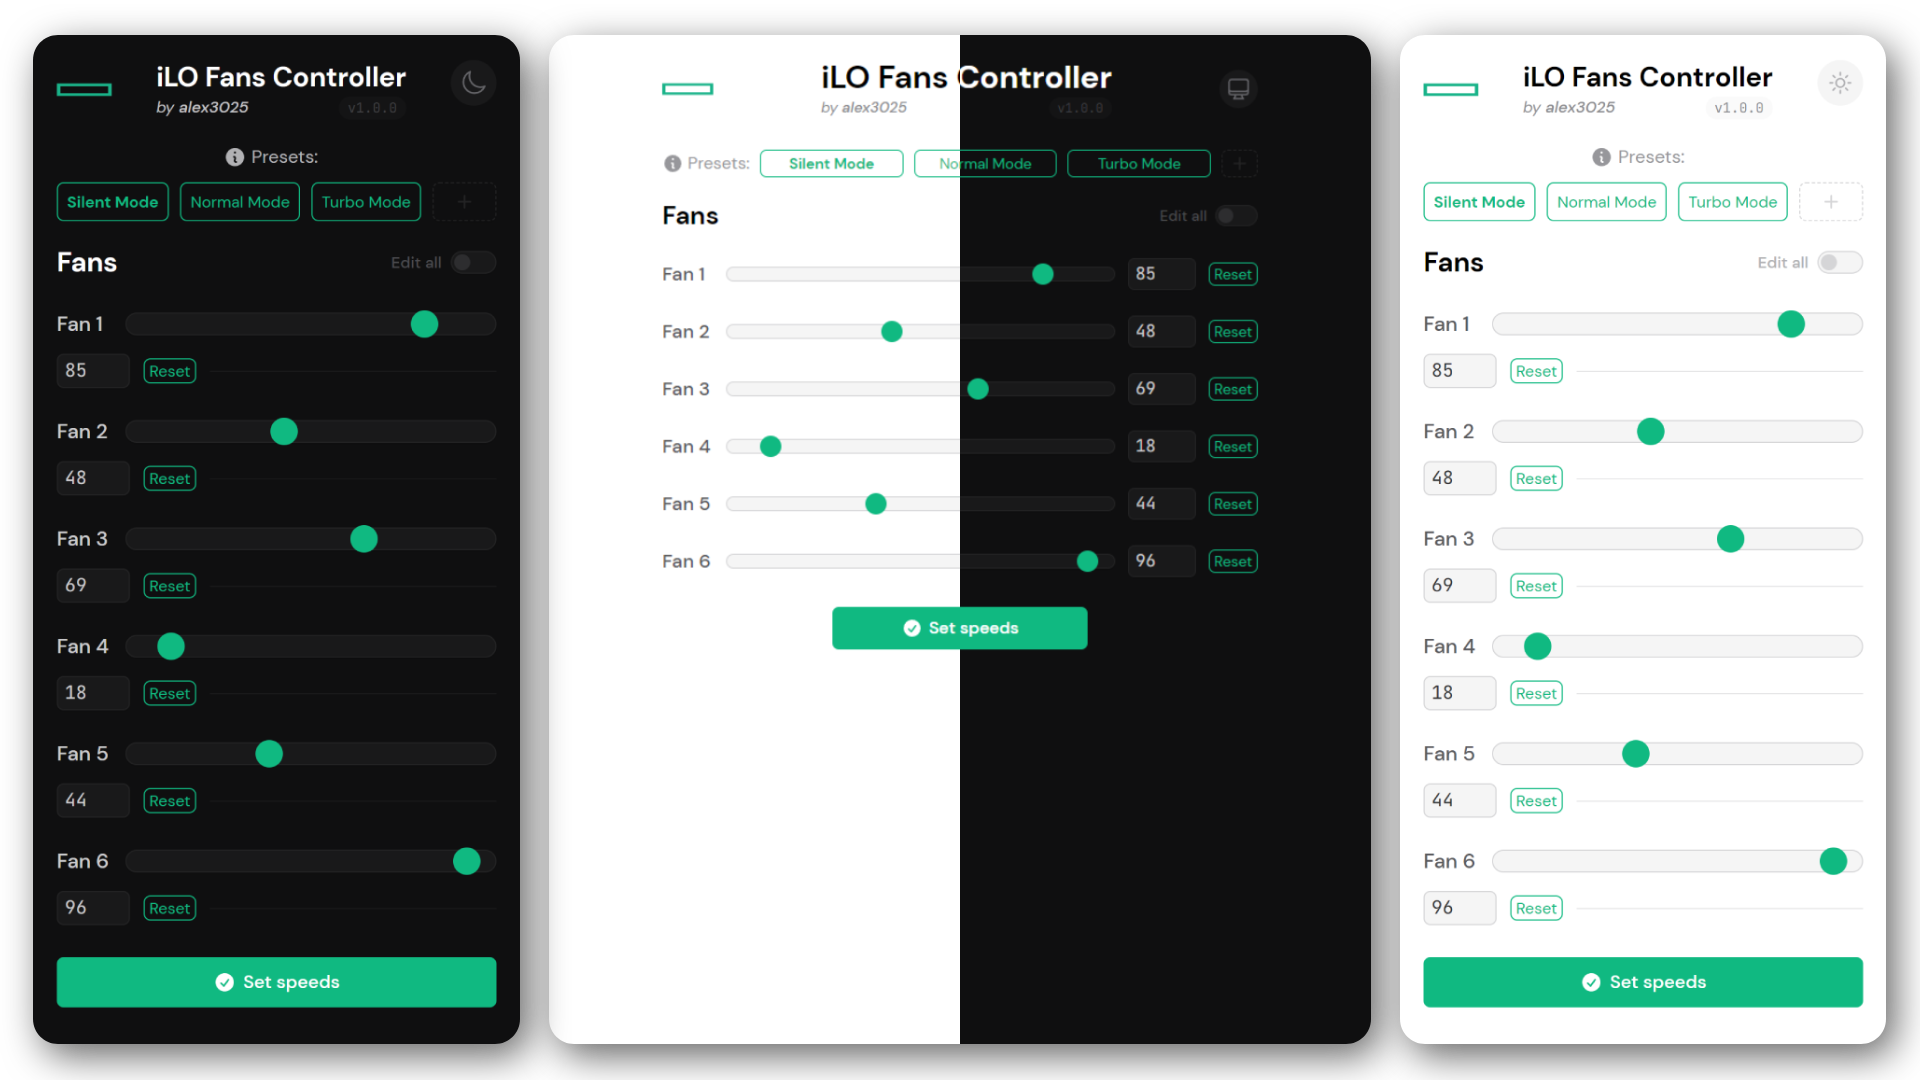
This tool is a **single PHP script** that uses the `php-curl` extension to **get the current server fan speeds from the iLO REST api** and the `php-ssh2` extension to **set the fan speeds using the [patched iLO SSH interface](#can-i-use-this-tool-with-my-hp-server-%EF%B8%8F).** You can also **create custom presets** to set a specific fan configuration with a single click, all with a **simple and clean web interface** made by using [Alpine.js](https://alpinejs.dev/) and [TailwindCSS](https://tailwindcss.com/).
### Can I use this tool with my HP server? 🖥️
This tool requires a **patched iLO firmware** that expose to the iLO SSH interface some commands to manipulate the fans speeds. You can find more information about this patch on [this Reddit post](https://www.reddit.com/r/homelab/comments/sx3ldo/hp_ilo4_v277_unlocked_access_to_fan_controls/).
As of now, the patch (and so this tool) only works for **Gen8 & Gen9 servers with iLO 4.**
> 🚫 Gen10/11/12 servers with iLO 5/6/7 are not supported (and probably never will).
### Why PHP? 📄
In my opinion, PHP is perfect for this type of tasks where you need to do some simple server-side stuff and something easy to deploy (you just need a web server with PHP installed).
### Why did you make this? 🤔
See my [original comment on r/homelab](https://www.reddit.com/r/homelab/comments/rcel73/comment/hnu3iyp/?utm_source=share&utm_medium=web2x&context=3) to know the story behind this tool!
### Do you like this project? Offer me a slice of pizza! 🍕
If you found this tool useful, consider offering me a slice of (or entire) pizza using [PayPal](https://paypal.me/alex3025) or [GitHub Sponsors](https://github.com/sponsors/alex3025) to support my work! Thank you so much! 🙏
---
## Getting started with Docker / Docker Compose
If you already have a Docker environment, you can be up and running in minutes using the following command (obviously you need to change the value):
```sh
docker run -d --name ilo-fans-controller --restart always \
-p 8000:80 \
-e ILO_HOST='your-ilo-address' \
-e ILO_USERNAME='your-ilo-username' \
-e ILO_PASSWORD='your-ilo-password' \
ghcr.io/alex3025/ilo-fans-controller:latest
```
Or if you prefer, you can use `docker compose`, as the [docker-compose.yaml](https://github.com/alex3025/ilo-fans-controller/blob/main/docker-compose.yaml) file is provided as well.
**Check [`config.inc.php`](https://github.com/alex3025/ilo-fans-controller/blob/main/config.inc.php) for all the available environment variables!**
---
> ⚠ **IMPORTANT!** ⚠
>
> Again, this tool works thanks to a **[patched iLO firmware](#can-i-use-this-tool-with-my-hp-server-%EF%B8%8F)** that expose to the iLO SSH interface some commands to manipulate the fans speeds.
>
> **This patch is required to use this tool!**
## Manual installation
### The following guide was run on
* An **HP ProLiant DL380e Gen8** server
* **Patched iLO 4** Advanced **v2.77** (07 December 2020)
* A Proxmox container (LXC) running **Ubuntu 22.04**
* **Apache 2** & **PHP 8.1**
### Preparing the environment
1. Update the system:
```sh
sudo apt-get update && sudo apt-get upgrade
```
2. Install the required packages (`apache2`, `php`, `php-curl` and `php-ssh2`):
```sh
sudo apt-get install apache2 php php-curl php-ssh2
```
### Downloading the tool
1. Download and extract the latest source code using `wget` and `tar`:
```sh
wget -qL https://github.com/alex3025/ilo-fans-controller/archive/refs/heads/main.tar.gz -O - | tar -xz
```
2. Enter the directory:
```sh
cd ilo-fans-controller-main
```
### Configuring and installing the tool
1. Open the `config.inc.php` file you favourite text editor and change the variables according to your configuration.
> ℹ **NOTE:** Remember that `$ILO_HOST` is the IP address of your iLO interface, not of the server itself.
> ℹ **NOTE:** It's recommended to create a new iLO user with the minimum privileges required to access the SSH interface and the REST api (Remote Console Access).
Here is an example:
```php
/*
ILO ACCESS CREDENTIALS
--------------
These are used to connect to the iLO
interface and manage the fan speeds.
*/
$ILO_HOST = '192.168.1.69';
$ILO_USERNAME = 'Administrator';
$ILO_PASSWORD = 'AdministratorPassword1234';
```
2. When you're done, create a new subdirectory in your web server root directory (usually `/var/www/html/`) and copy the `config.inc.php`, `ilo-fans-controller.php` and `favicon.ico` to it:
```sh
sudo mkdir /var/www/html/ilo-fans-controller
sudo cp config.inc.php ilo-fans-controller.php favicon.ico /var/www/html/ilo-fans-controller/
```
Then rename `ilo-fans-controller.php` to `index.php` (to make it work without specifying the filename in the URL):
```sh
sudo mv /var/www/html/ilo-fans-controller/ilo-fans-controller.php /var/www/html/ilo-fans-controller/index.php
```
3. That's it! Now you can reach the tool at `http:///ilo-fans-controller/` (or `http:///ilo-fans-controller/index.php` for API requests).
> ℹ **NOTE:** If the web server where you installed this tool **will be reachable from outside your network**, remember to **setup some sort of authentication** (like Basic Auth) to prevent _unauthorized fan management at 2AM_.
---
## Troubleshooting
The first thing to do when you encounter a problem is to **check the logs**.
> If you are using Apache, PHP errors are logged in the `/var/log/apache2/error.log` file.
If you think you found a bug, please [open an issue](https://github.com/alex3025/ilo-fans-controller/issues) and I'll take a look.
Below you can find some common problems and their solutions.
### The presets are not saved
If you see the following error in the logs when you create a new preset:
```log
PHP Warning: file_put_contents(presets.json): Failed to open stream: Permission denied in .../index.php on line X
```
This is probably because the `presets.json` file is not writable by the web server user.
To fix this, run the following command to change the file owner to `www-data` (the default Apache user):
```sh
sudo chown www-data:www-data /var/www/html/ilo-fans-controller/presets.json
```
---
## API Documentation
The tool exposes a simple API that can be used to:
* Get current fan speeds from iLO
* Set the fan speeds
* Get all presets
* Create a preset
> The following examples use cURL to show how to use the API, but you can use any other tool you want.
### Fan APIs
To use the following APIs you need to add `?api=fans` at the end of the URL.
#### Get fan speeds (`GET`)
JSON structure (response)
```jsonc
{
"Fan 1": 85,
"Fan 2": 48,
"Fan 3": 69,
"Fan 4": 18,
"Fan 5": 44,
"Fan 6": 96
}
```
cURL example
```sh
curl 'http:///ilo-fans-controller/index.php?api=fans'
```
#### Set the fan speeds (`POST`)
JSON structure example
```jsonc
{
"action": "fans",
// You can use either an object or a single number value (that will be applied to all fans):
// Example: `fans: { ... }` or `fans: 50`
"fans": {
"Fan 1": 40,
"Fan 2": 23,
"Fan 5": 70
// ...
}
}
```
cURL example
```sh
curl -X POST 'http:///ilo-fans-controller/index.php' \
-H 'Content-Type: application/json' \
-d '{"action": "fans", "fans": 50}'
```
This command will set all fans to 50%.
_I personally use this command to slow down the fans automatically when my server boots._
### Preset APIs
To use the following APIs you need to add `?api=preset` at the end of the URL.
#### Get all presets (`GET`)
JSON structure (response)
```jsonc
[
{
"name": "Silent Mode",
"speeds": [15] // Like when setting the speeds, this number applies to all fans.
},
{
"name": "Normal Mode",
"speeds": [50]
},
{
"name": "Turbo Mode",
"speeds": [100]
},
{
"name": "My Custom Preset",
"speeds": [10, 10, 25, 30, 10, 15] // Here you can see the different speeds for each fan.
}
]
```
cURL example
```sh
curl 'http:///ilo-fans-controller/index.php?api=presets'
```
#### Create a preset (`POST`)
JSON structure example
```jsonc
{
"action": "presets",
// WARNING: The API will replace all the saved presets with the new data!
// To add a preset you should get all the presets first and then add the new one to the existing array.
"presets": [
{
"name": "Silent Mode",
"speeds": [15]
},
{
"name": "Normal Mode",
"speeds": [50]
},
{
"name": "Turbo Mode",
"speeds": [100]
},
{
"name": "My Custom Preset",
"speeds": [10, 10, 25, 30, 10, 15]
}
]
}
```
cURL example
```sh
curl -X POST 'http:///ilo-fans-controller/index.php' \
-H 'Content-Type: application/json' \
-d '{"action": "presets", "presets": [{"My Custom Preset 1": [50], "My Custom Preset 2": [10, 20, 30, 30, 20, 10]}]}'
```