## Table of Contents
- [About The Project](#about-the-project)
- [Human-Inspired Interface](#human-inspired-interface)
- [Installation](#installation)
- [Quick Install](#quick-install)
- [Manual Download](#manual-download)
- [Install from Main](#install-from-main)
- [Post-Installation Setup](#post-installation-setup)
- [TmuxAI Layout](#tmuxai-layout)
- [Observe Mode](#observe-mode)
- [Prepare Mode](#prepare-mode)
- [Watch Mode](#watch-mode)
- [Activating Watch Mode](#activating-watch-mode)
- [Example Use Cases](#example-use-cases)
- [Knowledge Base](#knowledge-base)
- [Creating Knowledge Bases](#creating-knowledge-bases)
- [Using Knowledge Bases](#using-knowledge-bases)
- [Auto-Loading Knowledge Bases](#auto-loading-knowledge-bases)
- [Skills](#skills)
- [Enabling Skills](#enabling-skills)
- [Creating Skills](#creating-skills)
- [Using Skills](#using-skills)
- [Auto-Match](#auto-match)
- [Budget Controls](#budget-controls)
- [Model Configuration](#model-configuration)
- [Setting Up Multiple Models](#setting-up-multiple-models)
- [Switching Between Models](#switching-between-models)
- [Squashing](#squashing)
- [What is Squashing?](#what-is-squashing)
- [Manual Squashing](#manual-squashing)
- [Multiline Input](#multiline-input)
- [Web Search & Fetch](#web-search-and-fetch)
- [MCP Server Tools](#mcp-server-tools)
- [Core Commands](#core-commands)
- [Command-Line Usage](#command-line-usage)
- [Configuration](#configuration)
- [Status Line Customization](#status-line-customization)
- [Environment Variables](#environment-variables)
- [Session-Specific Configuration](#session-specific-configuration)
- [Contributing](#contributing)
- [License](#license)
## About The Project
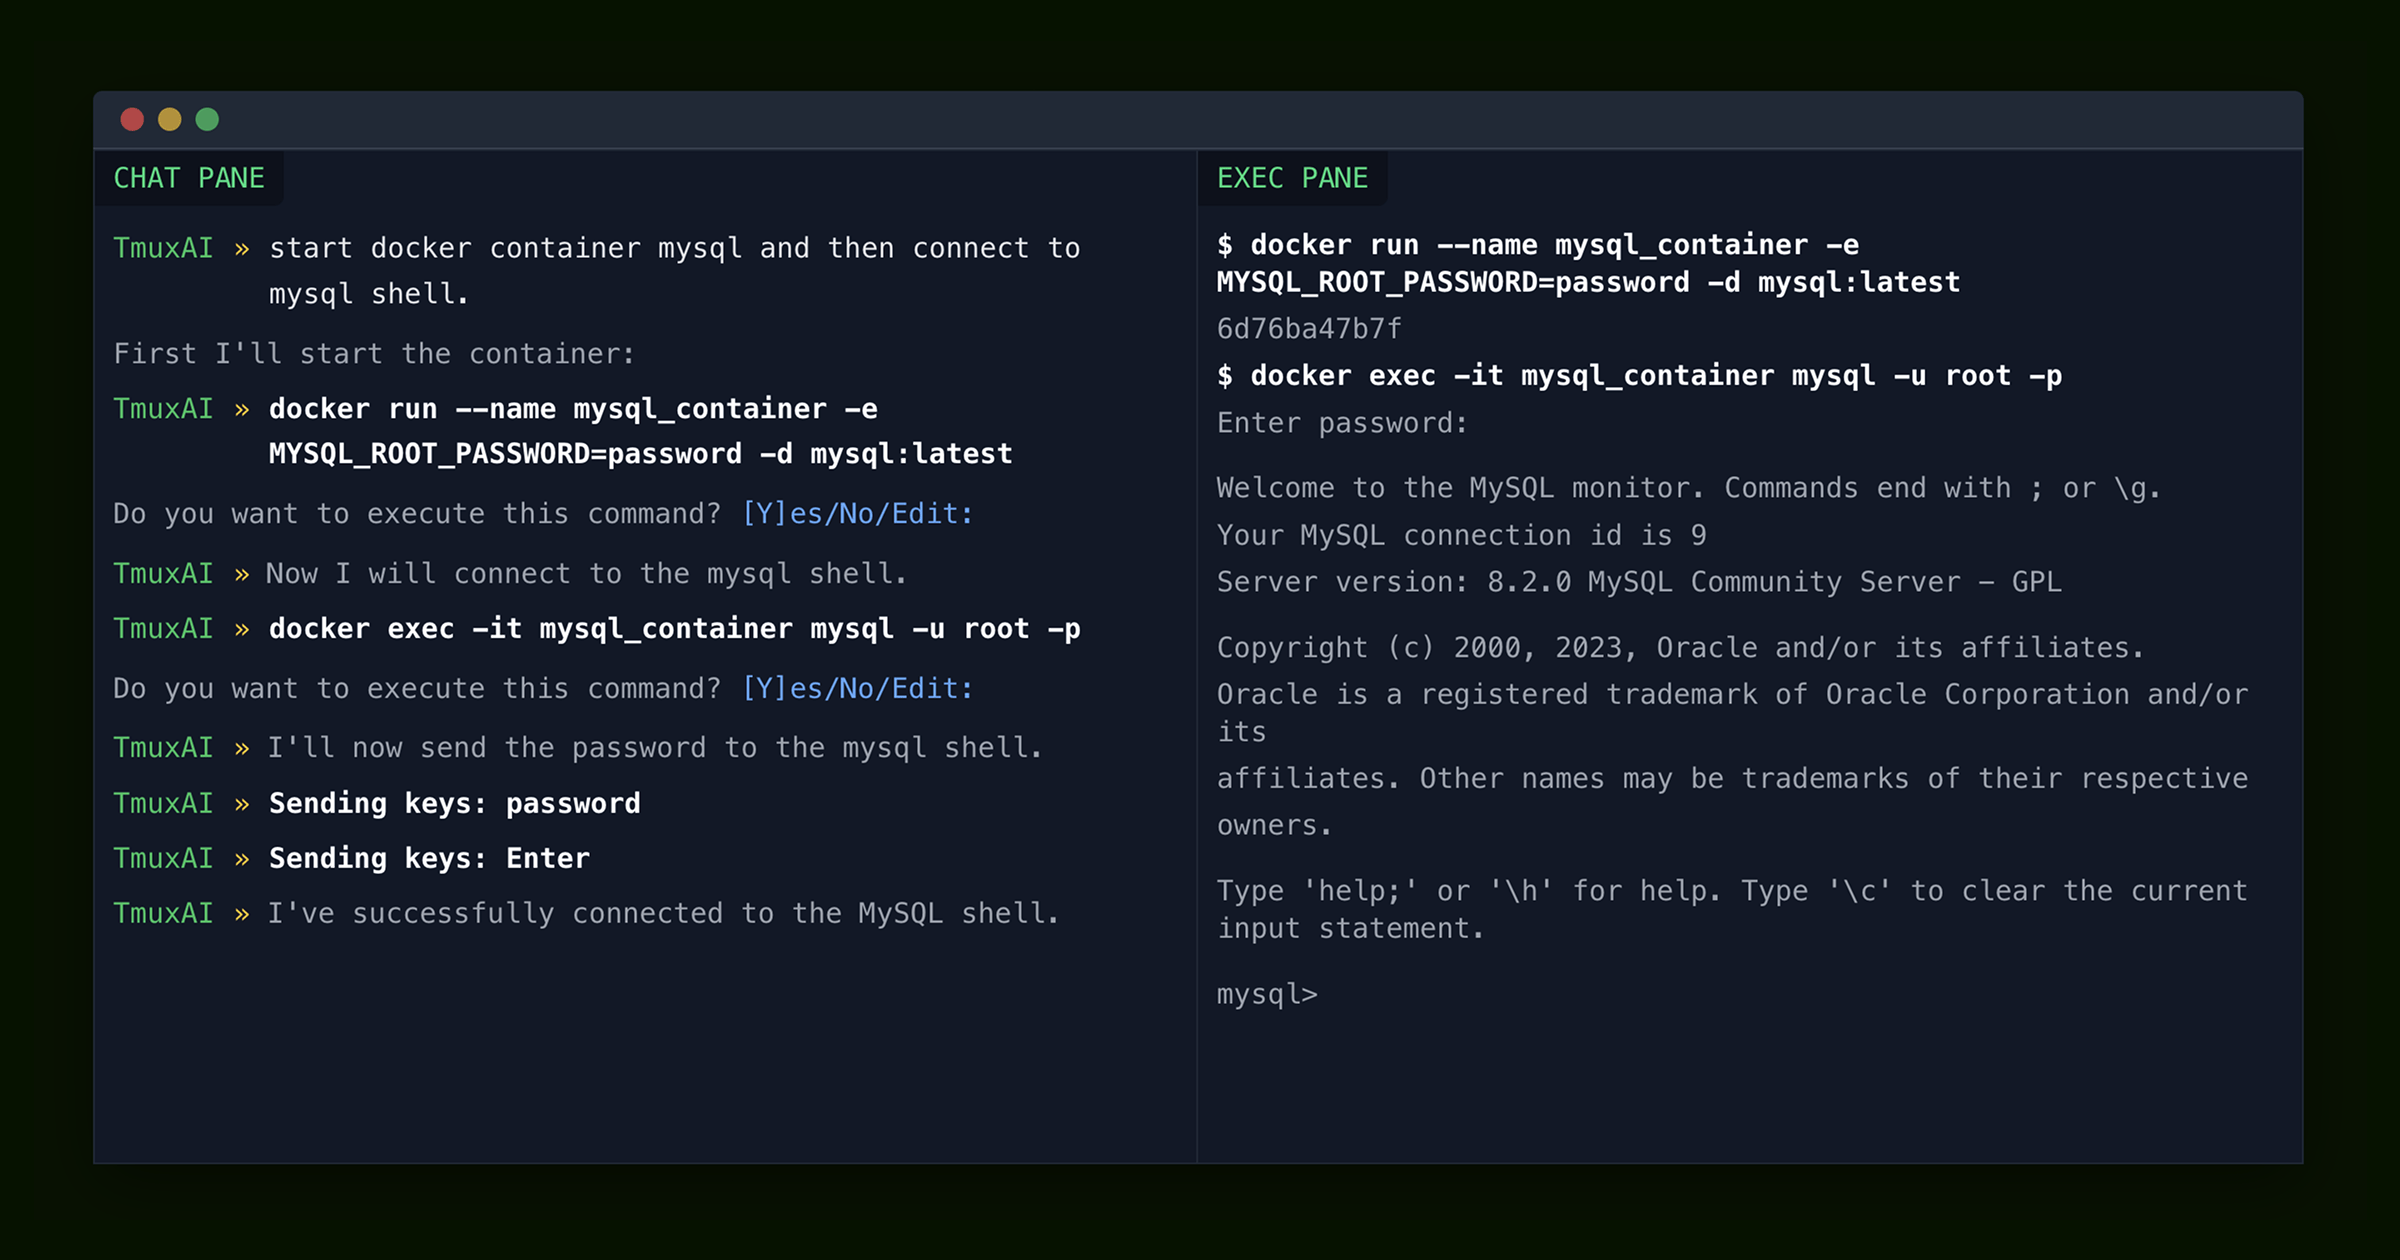
TmuxAI is an intelligent terminal assistant that lives inside your tmux sessions. Unlike other CLI AI tools, TmuxAI observes and understands the content of your tmux panes, providing assistance without requiring you to change your workflow or interrupt your terminal sessions.
Think of TmuxAI as a _pair programmer_ that sits beside you, watching your terminal environment exactly as you see it. It can understand what you're working on across multiple panes, help solve problems and execute commands on your behalf in a dedicated execution pane.
### Human-Inspired Interface
TmuxAI's design philosophy mirrors the way humans collaborate at the terminal. Just as a colleague sitting next to you would observe your screen, understand context from what's visible, and help accordingly, TmuxAI:
1. **Observes**: Reads the visible content in all your panes
2. **Communicates**: Uses a dedicated chat pane for interaction
3. **Acts**: Can execute commands in a separate execution pane (with your permission)
This approach provides powerful AI assistance while respecting your existing workflow and maintaining the familiar terminal environment you're already comfortable with.
## Installation
TmuxAI requires only tmux to be installed on your system. It's designed to work on Unix-based operating systems including Linux and macOS.
### Quick Install
The fastest way to install TmuxAI is using the installation script:
```bash
# install tmux if not already installed
curl -fsSL https://get.tmuxai.dev | bash
```
This installs TmuxAI to `/usr/local/bin/tmuxai` by default. If you need to install to a different location or want to see what the script does before running it, you can view the source at [get.tmuxai.dev](https://get.tmuxai.dev).
### Manual Download
You can also download pre-built binaries from the [GitHub releases page](https://github.com/alvinunreal/tmuxai/releases).
After downloading, make the binary executable and move it to a directory in your PATH:
```bash
chmod +x ./tmuxai
sudo mv ./tmuxai /usr/local/bin/
```
### Install from Main
To install the latest development version directly from the main branch:
```bash
go install github.com/alvinunreal/tmuxai@main
```
**Note:** The main branch contains the latest features and fixes but may be less stable than official releases.
## Post-Installation Setup
TmuxAI reads its configuration from `~/.config/tmuxai/config.yaml`. To get running, create the file with a model entry that points at the provider you use.
1. **Create the config path**
```bash
mkdir -p ~/.config/tmuxai
vim ~/.config/tmuxai/config.yaml
```
2. **Add a minimal config**
```yaml
models:
primary:
provider: openrouter # openrouter, requesty, openai or azure
model: anthropic/claude-haiku-4.5
api_key: sk-your-api-key
```
Swap the provider name and fill in the model/API key required by your account.
3. **Start TmuxAI**
```bash
tmuxai
```
See [Model Configuration](#model-configuration) for more details.
## TmuxAI Layout

TmuxAI is designed to operate within a single tmux window, with one instance of
TmuxAI running per window and organizes your workspace using the following pane structure:
1. **Chat Pane**: This is where you interact with the AI. It features a REPL-like interface with syntax highlighting, auto-completion, and readline shortcuts.
2. **Exec Pane**: TmuxAI selects (or creates) a pane where commands can be executed. You can also force a specific exec pane with `--exec-pane`.
3. **Read-Only Panes**: All other panes in the current window serve as additional context. TmuxAI can read their content but does not interact with them.
## Observe Mode
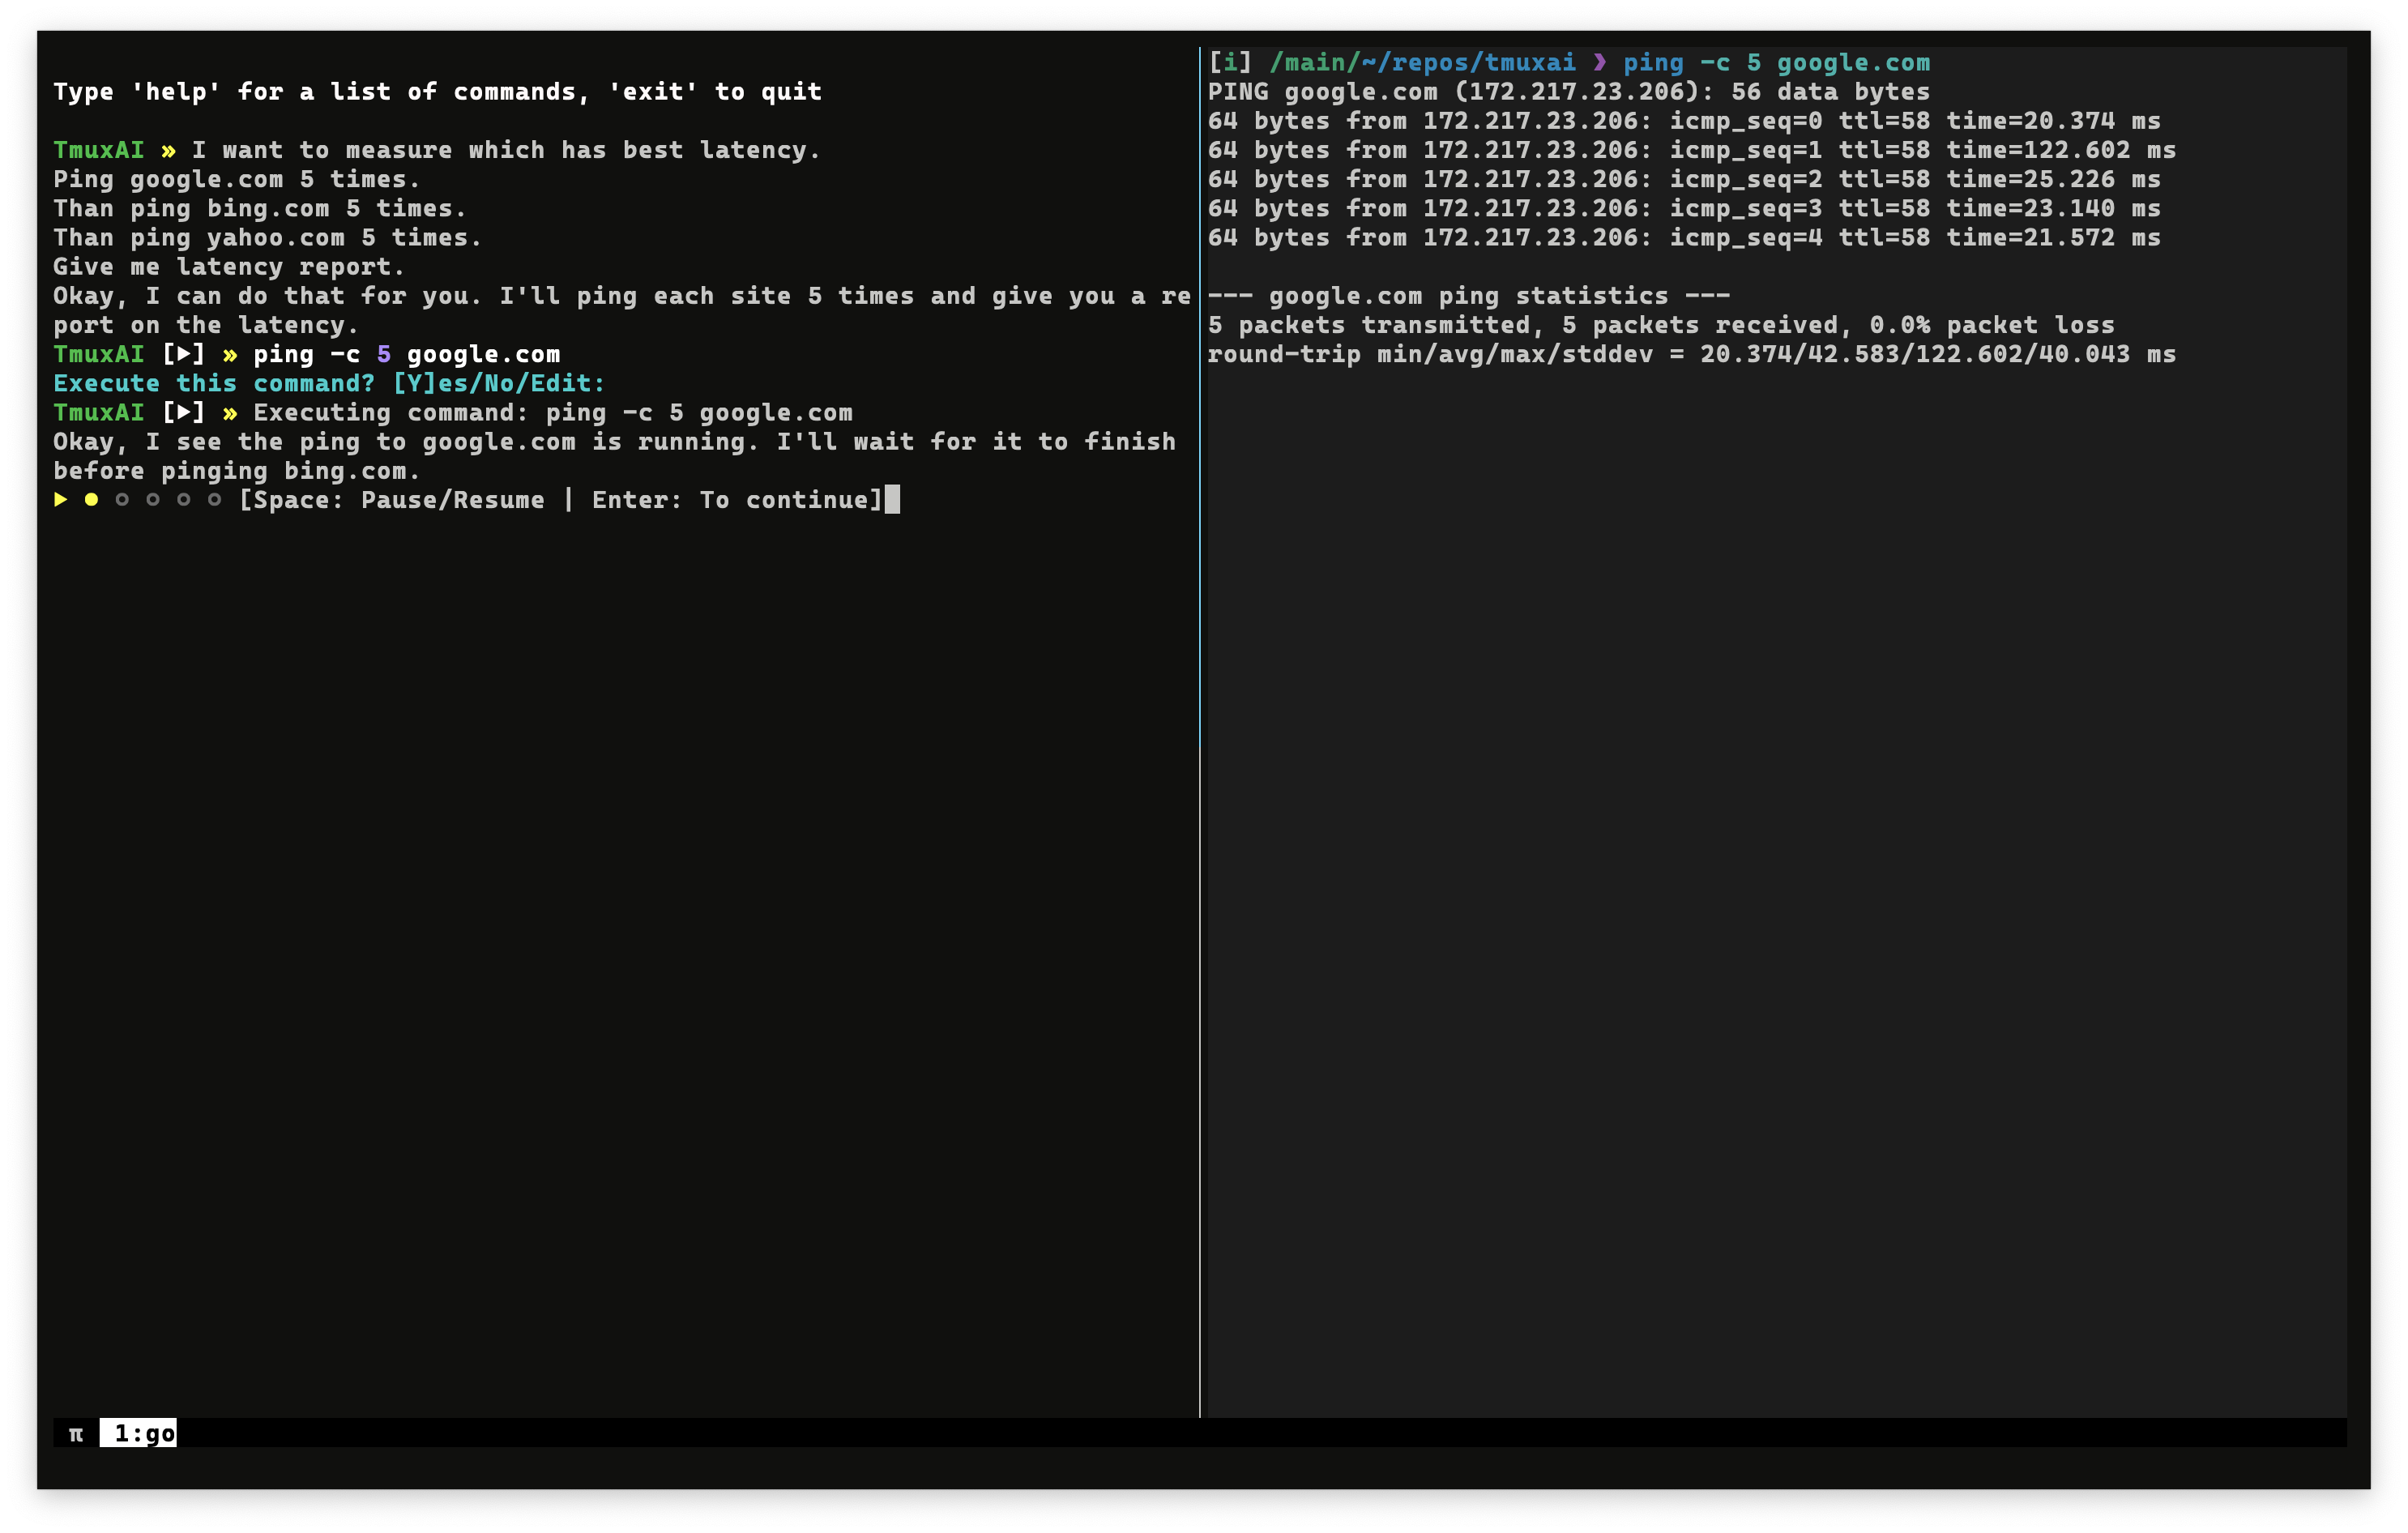
_TmuxAI sent the first ping command and is waiting for the countdown to check for the next step_
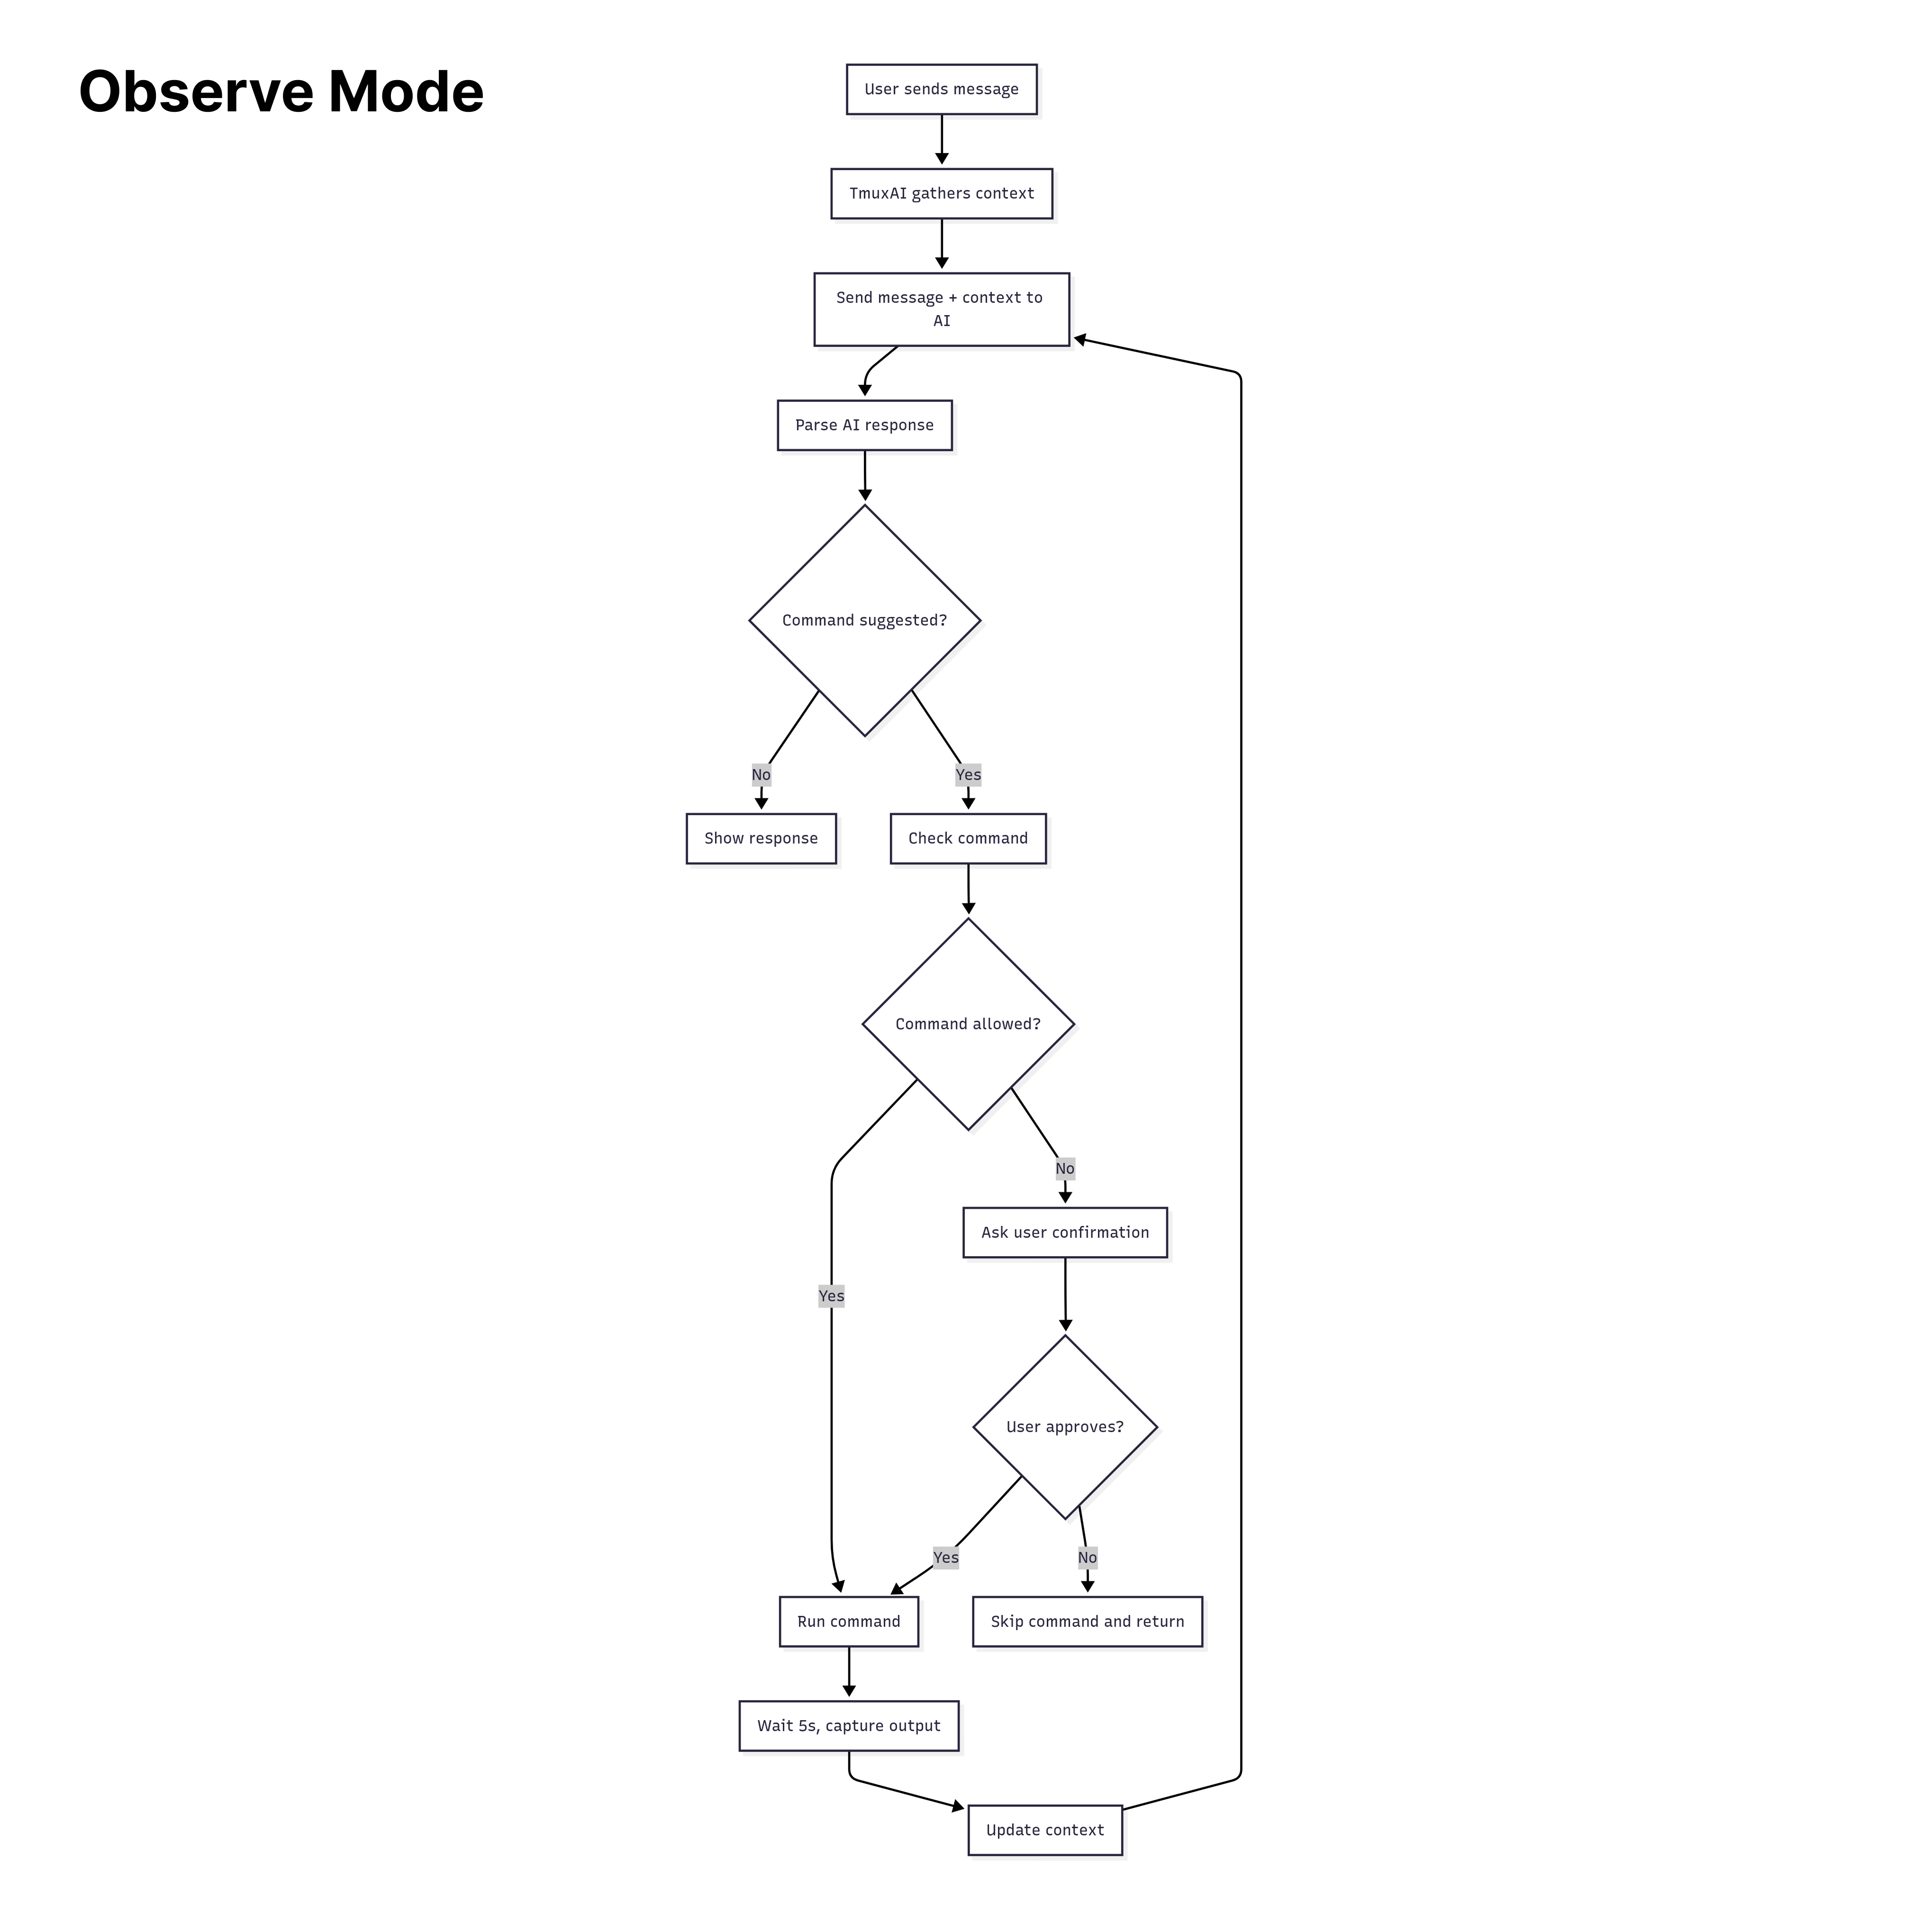
TmuxAI operates by default in "observe mode". Here's how the interaction flow works:
1. **User types a message** in the Chat Pane.
2. **TmuxAI captures context** from all visible panes in your current tmux window (excluding the Chat Pane itself). This includes:
- Current command with arguments
- Detected shell type
- User's operating system
- Current content of each pane
3. **TmuxAI processes your request** by sending user's message, the current pane context, and chat history to the AI.
4. **The AI responds** with information, which may include a suggested command to run.
5. **If a command is suggested**, TmuxAI will:
- Check if the command matches whitelist or blacklist patterns
- Ask for your confirmation (unless the command is whitelisted). The confirmation prompt includes a risk indicator (✓ safe, ? unknown, ! danger) for guidance only - always review commands carefully as the risk scoring is not exhaustive and should not be relied upon for security decisions
- Execute the command in the designated Exec Pane if approved
- Wait for the `wait_interval` (default: 5 seconds) (You can pause/resume the countdown with `space` or `enter` to stop the countdown)
- Capture the new output from all panes
- Send the updated context back to the AI to continue helping you
6. **The conversation continues** until your task is complete.
## Prepare Mode

_TmuxAI customized the pane prompt and sent the first ping command. Instead of the countdown, it's waiting for command completion_
Prepare mode is an optional feature that enhances TmuxAI's ability to work with your terminal by customizing
your shell prompt and tracking command execution with better precision. This
enhancement eliminates the need for arbitrary wait intervals and provides the AI
with more detailed information about your commands and their results.
When you enable Prepare Mode, TmuxAI will:
1. **Detects your current shell** in the execution pane (supports bash, zsh, and fish)
2. **Customizes your shell prompt** to include special markers that TmuxAI can recognize
3. **Will track command execution history** including exit codes, and per-command outputs
4. **Will detect command completion** instead of using fixed wait time intervals
To activate Prepare Mode, simply use:
```
TmuxAI » /prepare
```
By default, TmuxAI will attempt to detect the shell running in the execution pane. If you need to specify the shell manually, you can provide it as an argument:
```
TmuxAI » /prepare bash
```
**Prepared Fish Example:**
```shell
$ function fish_prompt; set -l s $status; printf '%s@%s:%s[%s][%d]» ' $USER (hostname -s) (prompt_pwd) (date +"%H:%M") $s; end
username@hostname:~/r/tmuxai[21:05][0]»
```
## Watch Mode
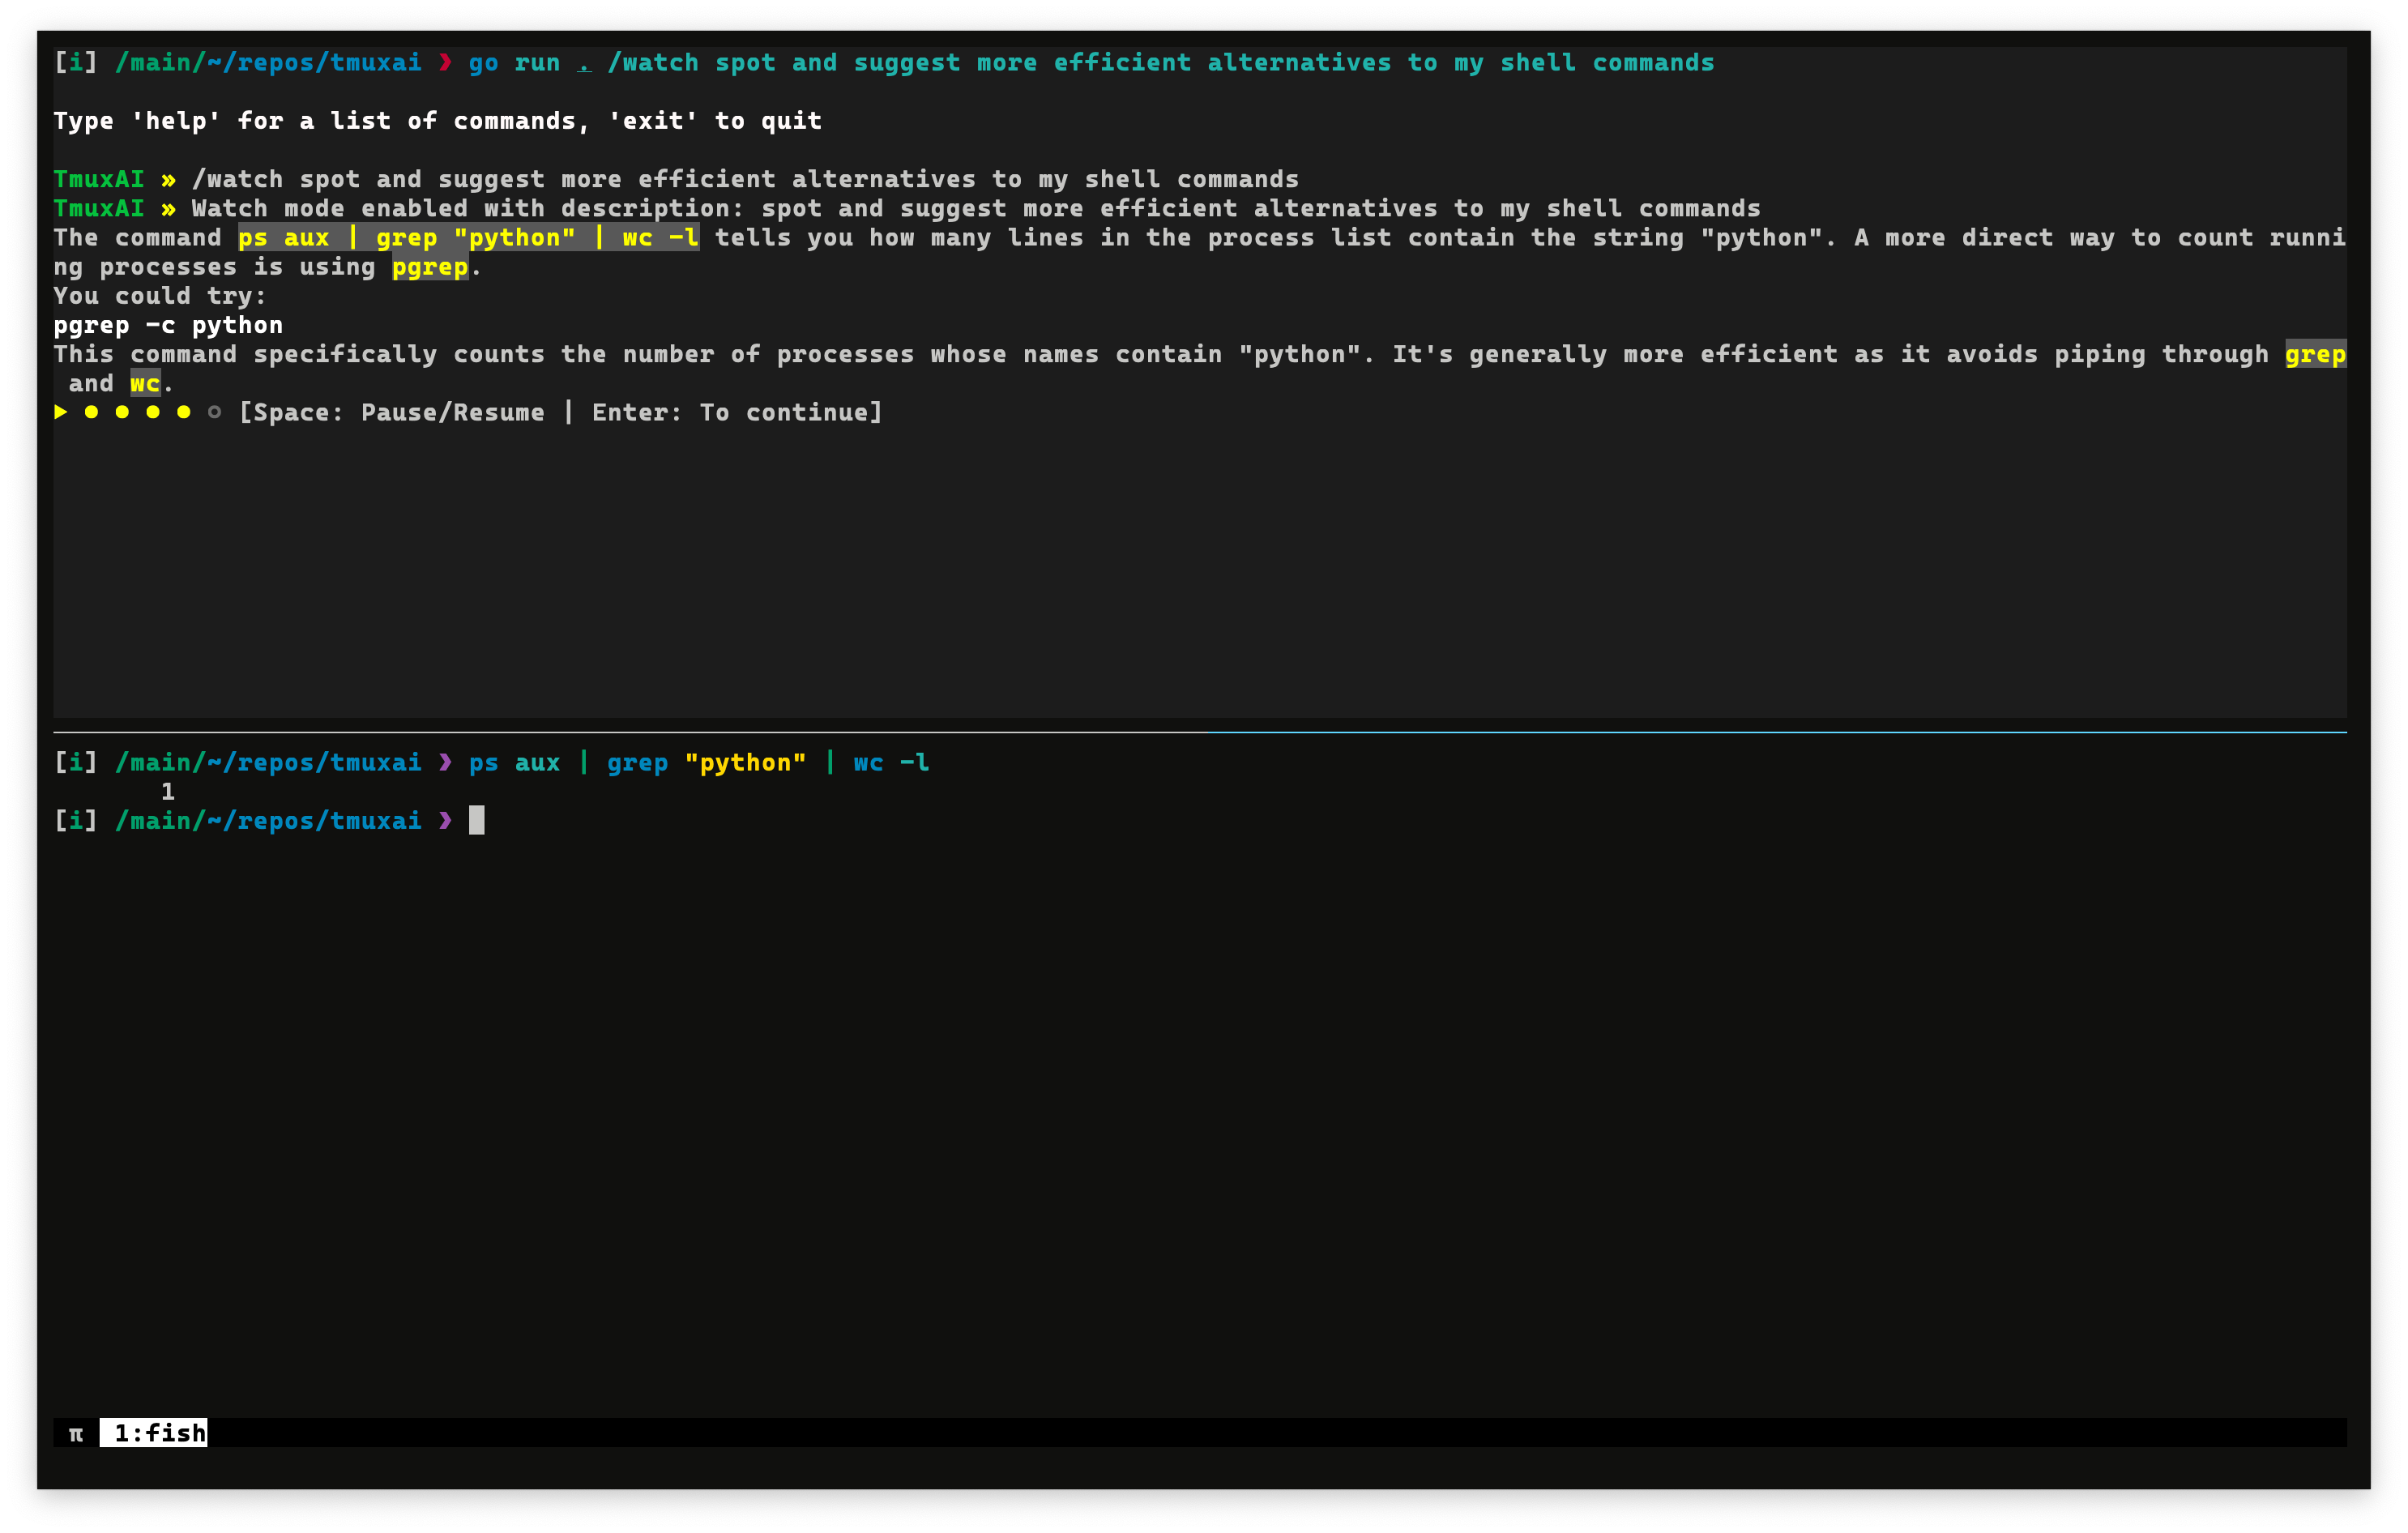
_TmuxAI watching user shell commands and better alternatives_
Watch Mode transforms TmuxAI into a proactive assistant that continuously
monitors your terminal activity and provides suggestions based on what you're
doing.
### Activating Watch Mode
To enable Watch Mode, use the `/watch` command followed by a description of what you want TmuxAI to look for:
```
TmuxAI » /watch spot and suggest more efficient alternatives to my shell commands
```
When activated, TmuxAI will:
1. Start capturing the content of all panes in your current tmux window at regular intervals (`wait_interval` configuration)
2. Analyze content based on your specified watch goal and provide suggestions when appropriate
### Example Use Cases
Watch Mode could be valuable for scenarios such as:
- **Learning shell efficiency**: Get suggestions for more concise commands as you work
```
TmuxAI » /watch spot and suggest more efficient alternatives to my shell commands
```
- **Detecting common errors**: Receive warnings about potential issues or mistakes
```
TmuxAI » /watch flag commands that could expose sensitive data or weaken system security
```
- **Log Monitoring and Error Detection**: Have TmuxAI monitor log files or terminal output for errors
```
TmuxAI » /watch monitor log output for errors, warnings, or critical issues and suggest fixes
```
## Squashing
As you work with TmuxAI, your conversation history grows, adding to the context
provided to the AI model with each interaction. Different AI models have
different context size limits and pricing structures based on token usage. To
manage this, TmuxAI implements a simple context management feature called
"squashing."
### What is Squashing?
Squashing is TmuxAI's built-in mechanism for summarizing chat history to manage
token usage.
When your context grows too large, TmuxAI condenses previous
messages into a more compact summary.
You can check your current context utilization at any time using the `/info` command:
```bash
TmuxAI » /info
Context
────────
Messages 15
Context Size~ 82500 tokens
████████░░ 82.5%
Max Size 100000 tokens
```
This example shows that the context is at 82.5% capacity (82,500 tokens out of 100,000). When the context size reaches 80% of the configured maximum (`max_context_size` in your config), TmuxAI automatically triggers squashing.
### Manual Squashing
If you'd like to manage your context before reaching the automatic threshold, you can trigger squashing manually with the `/squash` command:
```bash
TmuxAI » /squash
```
## Multiline Input
For longer or more complex prompts, you can open your current input in an external text editor. This is similar to how bash allows editing commands with `Ctrl+X Ctrl+E`.
**Keyboard Shortcuts:**
- `Ctrl+O` - Open current prompt in external editor (works on all platforms)
- `Alt+E` - Alternative binding (may not work on macOS due to Option key behavior)
When triggered, TmuxAI will:
1. Open your `$EDITOR` (falls back to `vim` if not set) with the current prompt content
2. Wait for you to edit, save, and close the editor
3. Replace the prompt with the edited content
This is useful for:
- Writing multi-line prompts or detailed instructions
- Editing long commands more comfortably
- Pasting and formatting complex content
## Knowledge Base
The Knowledge Base feature allows you to create pre-defined context files in markdown format that can be loaded into TmuxAI's conversation context. This is useful for sharing common patterns, workflows, or project-specific information with the AI across sessions.
### Creating Knowledge Bases
Knowledge bases are text files stored in `~/.config/tmuxai/kb/`. To create one:
1. Create the knowledge base directory if it doesn't exist:
```bash
mkdir -p ~/.config/tmuxai/kb
```
2. Create a file with your knowledge base content:
```bash
cat > ~/.config/tmuxai/kb/docker-workflows << 'EOF'
# Docker Workflows
## Common Commands
- Always use `docker compose` (not `docker-compose`)
- Prefer named volumes over bind mounts for databases
- Use `.env` files for environment-specific configuration
## Project Structure
- Development: `docker compose -f docker-compose.dev.yml up`
- Production: `docker compose -f docker-compose.prod.yml up -d`
EOF
```
### Using Knowledge Bases
Once created, you can load knowledge bases into your TmuxAI session:
```bash
# List available knowledge bases
TmuxAI » /kb
Available knowledge bases:
[ ] docker-workflows
[ ] git-conventions
[ ] testing-procedures
# Load a knowledge base
TmuxAI » /kb load docker-workflows
✓ Loaded knowledge base: docker-workflows (850 tokens)
# List again to see loaded status
TmuxAI » /kb
Available knowledge bases:
[✓] docker-workflows (850 tokens)
[ ] git-conventions
[ ] testing-procedures
Loaded: 1 KB(s), 850 tokens
# Unload a knowledge base
TmuxAI » /kb unload docker-workflows
✓ Unloaded knowledge base: docker-workflows
# Unload all knowledge bases
TmuxAI » /kb unload --all
✓ Unloaded all knowledge bases (2 KB(s))
```
You can also load knowledge bases directly from the command line when starting TmuxAI:
```bash
# Load single knowledge base
tmuxai --kb docker-workflows
# Load multiple knowledge bases (comma-separated)
tmuxai --kb docker-workflows,git-conventions
```
### Auto-Loading Knowledge Bases
You can configure knowledge bases to load automatically on startup by adding them to your `~/.config/tmuxai/config.yaml`:
```yaml
knowledge_base:
auto_load:
- docker-workflows
- git-conventions
# path: /custom/path # Optional: use custom KB directory
```
**Important Notes:**
- Loaded knowledge bases consume tokens from your context budget
- Use `/info` to see how many tokens your loaded KBs are using
- Knowledge bases are injected after the system prompt but before conversation history
- Unloading a KB removes it from future messages immediately
## Skills
The Skills feature extends the Knowledge Base system with structured, metadata-rich instructions that teach TmuxAI new capabilities. Unlike KBs (which provide passive reference material), skills can be auto-discovered, lazily loaded, and optionally auto-matched to incoming messages.
Each skill lives in a directory with a `SKILL.md` file containing frontmatter metadata and body content. Ancillary files (scripts, templates, reference docs) can coexist in the same directory.
### Enabling Skills
Skills are **disabled by default**. Enable them in `~/.config/tmuxai/config.yaml`:
```yaml
knowledge_base:
skills:
enabled: true
```
### Creating Skills
Skills are stored in `~/.config/tmuxai/skills//`:
```bash
mkdir -p ~/.config/tmuxai/skills/git-hooks
```
Create `SKILL.md` with frontmatter:
```bash
cat > ~/.config/tmuxai/skills/git-hooks/SKILL.md << 'EOF'
---
name: git-hooks
description: Git pre-commit and linting setup. Auto-stage hooks, conventional commits, branch protection.
disable-model-invocation: false
---
# Git Hooks Guide
## Pre-commit Setup
```bash
git config core.hooksPath .husky
npm install husky --save-dev
```
...rest of the skill body...
EOF
```
**Frontmatter fields:**
| Field | Required | Description |
|-------|----------|-------------|
| `name` | Yes | Unique skill name (must match directory name, alphanumeric + hyphens only) |
| `description` | Yes | Brief description shown in L1 discovery block and `/skill list` |
| `disable-model-invocation` | No | If `true`, disables auto-match — skill must be loaded manually |
Optional ancillary files (`.sh`, `.txt`, `.py`, `.json`) can be placed alongside `SKILL.md`. When a skill is loaded, TmuxAI includes a manifest listing those helper file paths so the model can request them if needed.
### Using Skills
```bash
# List available skills
TmuxAI » /skill
Available skills:
[ ] docker-workflows
[ ] git-hooks [manual]
[ ] terraform-best-practices
# Load a skill (lazy-load body + ancillary file manifest)
TmuxAI » /skill load git-hooks
✓ Loaded skill: git-hooks (1,240 chars)
# List again to see loaded status
TmuxAI » /skill
Available skills:
[✓] docker-workflows (850 chars)
[✓] git-hooks (1,240 chars)
[ ] terraform-best-practices
Loaded: 2/3 skill(s), 2,090/32,000 chars
# View skill details without loading body
TmuxAI » /skill info git-hooks
Name: git-hooks
Description: Git pre-commit and linting setup.
Disabled: false
Loaded: true
Body Size: 1,240 chars
Directory: ~/.config/tmuxai/skills/git-hooks
File: ~/.config/tmuxai/skills/git-hooks/SKILL.md
# Validate all skills
TmuxAI » /skill validate
Validated 3 skill(s):
✓ OK docker-workflows
✓ OK git-hooks
✓ OK terraform-best-practices
# Unload a skill
TmuxAI » /skill unload git-hooks
✓ Unloaded skill: git-hooks
# Unload all skills
TmuxAI » /skill unload --all
✓ Unloaded all skills (2 skill(s))
```
### Auto-Match
You can enable automatic skill matching against incoming messages:
```yaml
knowledge_base:
skills:
enabled: true
auto_match: true
auto_match_threshold: 0.1 # Match sensitivity (0.0–1.0, lower = more aggressive)
```
With auto-match enabled, TmuxAI analyzes incoming messages and loads relevant skills based on term frequency and description relevance. Skills marked `[manual]` (via `disable-model-invocation: true`) require explicit loading.
### Budget Controls
Skills share context budget with your conversation. Defaults:
| Setting | Default | Description |
|---------|---------|-------------|
| `max_l1_chars` | 8,000 | Maximum chars for the L1 discovery block |
| `max_loaded_chars` | 32,000 | Maximum chars across all loaded skill bodies |
| `max_skill_chars` | 20,000 | Maximum chars per individual skill body; set to `0` to disable the per-skill cap |
Use `/info` to monitor context usage with skills loaded.
**Important Notes:**
- Skills are injected after the system prompt and KBs, before conversation history
- The L1 discovery block tells the model which skills exist and their load status
- Body content is only loaded on demand (lazy loading)
- A 1MB cap per SKILL.md prevents runaway memory usage
- SKILL.md frontmatter fences (`---`) are matched line-by-line; standalone `---` lines in multi-line YAML values will be misinterpreted as the closing fence
## Model Configuration
TmuxAI supports configuring multiple AI model configurations and easily switching between them. This allows you to define different AI providers, models, and settings for various use cases.
### Setting Up Multiple Models
Configure multiple AI models in your `~/.config/tmuxai/config.yaml`:
```yaml
# Optional: specify which model to use by default
# If not set, the first model alphabetically will be used automatically
default_model: "fast"
models:
fast:
provider: "openrouter"
model: "anthropic/claude-haiku-4.5"
api_key: "sk-or-your-openrouter-key"
smart:
provider: "openrouter"
model: "google/gemini-2.5-prod"
api_key: "sk-or-...-key"
# Requesty (OpenAI-compatible router, defaults to https://router.requesty.ai/v1)
# Get a key at https://app.requesty.ai/api-keys ; browse models at https://app.requesty.ai/router/list
requesty:
provider: "requesty"
model: "openai/gpt-4o-mini"
api_key: "${REQUESTY_API_KEY}"
# You can use any chat completion compatible endpoint as base_url
anthropic:
provider: "openrouter"
model: "claude-3-5-sonnet-20241022"
api_key: "your-anthropic-api-key"
base_url: "https://api.anthropic.com"
# GitHub Copilot — requires the `copilot` CLI in PATH and `gh auth login`
# No api_key needed; the CLI uses your existing gh auth credentials
github-copilot:
provider: "github-copilot"
model: "claude-sonnet-4.5"
local-llama:
provider: "openrouter"
model: "gemma3:1b"
api_key: "sk-or-your-openrouter-key"
base_url: http://localhost:11434/v1
# Responses API
codex:
provider: "openai"
model: "gpt-5-codex"
api_key: "sk-or-your-openrouter-key"
azure-gpt4:
provider: "azure"
model: "gpt-4o"
api_key: "your-azure-openai-api-key"
api_base: "https://your-resource.openai.azure.com/"
api_version: "2025-04-01-preview"
deployment_name: "gpt-4o"
# Gemini API (direct access)
gemini-flash:
provider: "gemini"
model: "gemini-2.5-flash"
api_key: "${GOOGLE_API_KEY}"
```
**Supported Providers:**
- `openai` - OpenAI Responses API (GPT-4, GPT-5, etc.)
- `openrouter` - Universal Chat Completion API, defaults to openrouter base url
- `requesty` - [Requesty](https://requesty.ai) router (OpenAI-compatible Chat Completion API), defaults to `https://router.requesty.ai/v1`. Browse models at [app.requesty.ai/router/list](https://app.requesty.ai/router/list)
- `azure` - Azure Chat Completions API
- `gemini` - Google Gemini API (direct access via go-genai SDK)
- `github-copilot` - GitHub Copilot (via official copilot-sdk/go — see setup below)
- `bedrock` - AWS Bedrock (via the Converse API — supports Anthropic, Meta, Mistral, Amazon Nova/Titan, Cohere, AI21, etc.)
### AWS Bedrock Setup
TmuxAI talks to AWS Bedrock via the [Converse API](https://docs.aws.amazon.com/bedrock/latest/userguide/conversation-inference.html), which provides a unified interface across all Bedrock-hosted model families. No `api_key` is required — credentials flow through the standard AWS credential chain (environment variables, `~/.aws/credentials`, IAM role, SSO, etc.).
Before first use:
1. Request access to the models you want in the [AWS Bedrock console](https://console.aws.amazon.com/bedrock/) (Model access → Enable models).
2. Ensure your AWS credentials are configured (`aws configure`, `aws sso login`, an IAM role, or `AWS_ACCESS_KEY_ID` / `AWS_SECRET_ACCESS_KEY` env vars).
3. Add a model config:
```yaml
models:
claude-bedrock:
provider: "bedrock"
model: "anthropic.claude-3-5-sonnet-20241022-v2:0"
region: "us-east-1" # optional if AWS_REGION is set
aws_profile: "default" # optional — named profile from ~/.aws/credentials
nova-pro:
provider: "bedrock"
model: "amazon.nova-pro-v1:0"
region: "us-east-1"
```
The `model` field must be a Bedrock model ID (or inference-profile ARN). See the [Bedrock model IDs documentation](https://docs.aws.amazon.com/bedrock/latest/userguide/models-supported.html) for a full list.
### GitHub Copilot Setup
TmuxAI integrates with GitHub Copilot via the [official Go SDK](https://github.com/github/copilot-sdk), which communicates with the `copilot` CLI. No `api_key` is required — authentication uses your existing `gh` credentials.
Follow the [GitHub Copilot CLI installation guide](https://docs.github.com/en/copilot/how-tos/copilot-cli/set-up-copilot-cli/install-copilot-cli) to install and authenticate the CLI, then configure TmuxAI:
```yaml
models:
fast:
provider: "github-copilot"
model: "claude-haiku-4.5"
smart:
provider: "github-copilot"
model: "claude-sonnet-4.5"
```
**Interactive Commands:**
```bash
# List available models and see current selection
TmuxAI » /model
Available Models
[ ] claude-sonnet (openrouter: anthropic/claude-3.5-sonnet)
[ ] fast (openrouter: anthropic/claude-haiku-4.5)
[✓] smart (openrouter: google/gemini-2.5-prod)
[ ] local-llama (openrouter: meta-llama/llama-3.1-8b-instruct:free)
Current Model:
Configuration: smart
Provider: openrouter
Model: google/gemini-2.5-prod
# Switch to a different model
TmuxAI » /model claude-sonnet
✓ Switched to claude-sonnet (openrouter: anthropic/claude-3.5-sonnet)
# Status bar shows current model when using non-default
TmuxAI [claude-sonnet] »
```
## Web Search & Fetch
TmuxAI can search the web and fetch webpage content without leaving your terminal.
Search and fetch are manual, non-agentic. You initiate when to search and fetch to add
to TmuxAI context.
```
TmuxAI » /websearch how to set up WireGuard
TmuxAI » /websearch -f 3 latest tmux best practices
TmuxAI » /webfetch https://example.com/docs
```
- **Providers:** Brave Search API (primary) or self-hosted SearXNG
- **Fallback chain:** direct fetch → Wayback Machine → Google Cache
- **Safety:** Fetched content is sanitized and injected as assistant context, not user input
- Configure providers and limits under `web_search` and `web_fetch` in `config.yaml` (see [Configuration](#configuration))
> **Note:** Using `/websearch -f N` auto-fetches the top N search results and injects them
> into TmuxAI's context. Each fetch is capped by `web_fetch.max_chars` (default 25000 for direct
> `/webfetch`, or `web_search.fetch_max_chars` default 15000 for auto-fetched search results). The
> cumulative total is not capped. With `-f 5` or higher on large pages, this can consume a
> significant portion of the context window. Prefer `-f 1` to `-f 3` unless you need broader coverage.
## MCP Server Tools
TmuxAI supports the [Model Context Protocol (MCP)](https://modelcontextprotocol.io/), allowing you to connect external MCP servers and make their tools available to the AI alongside built-in commands. This is opt-in — if no config file exists, there is zero MCP overhead.
### Configuration
Create `~/.config/tmuxai/mcp.json` to define your MCP servers:
```json
{
"mcpServers": {
"context7": {
"command": "npx",
"args": ["-y", "@upstash/context7-mcp@latest"]
},
"remote-mcp": {
"type": "streamable-http",
"url": "http://localhost:3050/mcp",
"headers": { "X-API-Key": "${MCP_API_KEY}" }
}
}
}
```
TmuxAI supports three transport types:
| Transport | When to use | Required fields |
|-----------|-------------|----------------|
| **stdio** | Local MCP servers (spawned as child process) | `command` (and optionally `args`) |
| **SSE** | Remote servers using Server-Sent Events | `url` |
| **streamable-http** | Remote servers using MCP Streamable HTTP | `type: "streamable-http"` + `url` |
For stdio and SSE servers, TmuxAI auto-detects the transport from the presence of `command` or `url` — no `type` field needed. For streamable HTTP, set `"type": "streamable-http"` explicitly.
| Field | Description |
|-------|-------------|
| `type` | Transport type: `"stdio"`, `"sse"`, or `"streamable-http"` (auto-detected if omitted) |
| `command` / `url` | Server command (stdio) or endpoint URL (SSE / streamable-http) |
| `args` | Command-line arguments (stdio only) |
| `env` | Environment variables (supports `${VAR}` expansion) |
| `headers` | HTTP headers (SSE and streamable-http, supports `${VAR}` expansion) |
| `timeout_seconds` | Per-tool-call timeout (default: 30s) |
| `disabled` | Set `true` to skip without removing the entry |
On startup, TmuxAI connects to each enabled server, lists available tools, and injects their definitions into the AI's system prompt. The AI can then call MCP tools using `` tags, with results automatically fed back for continued reasoning.
### Commands
```
TmuxAI » /mcp # List servers with status and tool counts
TmuxAI » /mcp tools # List all available MCP tools
TmuxAI » /mcp tools context7 # List tools for a specific server
TmuxAI » /mcp load # Reload config and reconnect all servers
TmuxAI » /mcp reload # Hot reload — only reconnects changed servers
TmuxAI » /mcp unload # Disconnect all MCP servers
```
Use `/info` to see active MCP servers, tool counts, and estimated token usage.
## Core Commands
| Command | Description |
| --------------------------- | ---------------------------------------------------------------- |
| `/info` | Display system information, pane details, and context statistics |
| `/clear` | Clear chat history. |
| `/reset` | Clear chat history and reset all panes. |
| `/config` | View current configuration settings |
| `/config set ` | Override configuration for current session |
| `/model` | List available models and show current active model |
| `/model ` | Switch to a different model configuration |
| `/squash` | Manually trigger context summarization |
| `/prepare [shell]` | Initialize Prepared Mode for the Exec Pane (e.g., bash, zsh) |
| `/watch ` | Enable Watch Mode with specified goal |
| `/kb` | List available knowledge bases with loaded status |
| `/kb load ` | Load a knowledge base into conversation context |
| `/kb unload ` | Unload a specific knowledge base |
| `/kb unload --all` | Unload all knowledge bases |
| `/skill` | List available skills with loaded status |
| `/skill load ` | Load a skill into conversation context |
| `/skill unload ` | Unload a specific skill |
| `/skill unload --all` | Unload all skills |
| `/skill info ` | View skill details without loading |
| `/skill validate` | Validate all discovered skills |
| `/websearch [-f N] ` | Search the web via Brave or SearXNG; use `-f N` to auto-fetch top N results |
| `/webfetch ` | Fetch readable content from a URL, with Wayback Machine fallback |
| `/mcp` | List MCP servers with status and tool counts |
| `/mcp tools [server]` | List available MCP tools, optionally filtered by server |
| `/mcp load` | Reload MCP config and reconnect all servers |
| `/mcp reload` | Hot reload — only reconnects changed servers |
| `/mcp unload` | Disconnect all MCP servers |
| `/exit` | Exit TmuxAI |
## Command-Line Usage
You can start `tmuxai` with an initial message, task file, model configuration, or knowledge bases from the command line:
- **Direct Message:**
```sh
tmuxai your initial message
```
- **Task File:**
```sh
tmuxai -f path/to/your_task.txt
```
- **Specify Model:**
```sh
# Use a specific model configuration
tmuxai --model gpt4 "Write a Go function"
tmuxai --model claude-sonnet
```
- **Load Knowledge Bases:**
```sh
# Single knowledge base
tmuxai --kb docker-workflows
# Multiple knowledge bases
tmuxai --kb docker-workflows,git-conventions
```
- **Choose Tmux Panes Explicitly:**
```sh
# Force a specific exec pane by tmux pane ID
tmuxai --exec-pane %3
# Restrict read context to specific panes
tmuxai --read-panes %1,%2
# Fully control both execution and read context
tmuxai --exec-pane %3 --read-panes %1,%2
```
Notes:
- `--exec-pane` forces TmuxAI to use that pane for command execution and disables auto-picking or auto-creating an exec pane.
- `--read-panes` limits read context to the listed pane IDs in the current tmux window.
- The TmuxAI chat pane cannot be used as an exec pane or read pane.
- Pane IDs must exist in the current tmux window.
- **Combine Options:**
```sh
tmuxai --model gpt4 --kb docker-workflows --exec-pane %3 --read-panes %1,%2 "Debug this Docker issue"
```
- **Yolo Mode (Skip Confirmations):**
```sh
# Skip all confirmation prompts - commands execute immediately
tmuxai --yolo "Install and configure nginx"
```
> **Warning**: Use `--yolo` with caution. This mode skips all safety confirmations and executes commands directly. Only use when you trust the AI's command suggestions completely.
## Configuration
The configuration can be managed through a YAML file, environment variables, or via runtime commands.
TmuxAI looks for its configuration file at `~/.config/tmuxai/config.yaml`.
For a sample configuration file, see [config.example.yaml](https://github.com/alvinunreal/tmuxai/blob/main/config.example.yaml).
### Status Line Customization
By default, TmuxAI uses its built-in interactive prompt:
```text
TmuxAI »
```
You can customize that prompt/status prefix with `status_line`:
```yaml
status_line: "{app} ({context}) - {model} >> "
```
Available placeholders:
| Placeholder | Description |
|-------------|-------------|
| `{app}` | `TmuxAI` |
| `{context}` | Approximate used/max context tokens, e.g. `37k/256k` |
| `{context_used}` | Approximate used context tokens |
| `{context_max}` | Configured max context tokens |
| `{model}` | Current model configuration name |
| `{state}` | Current state symbol, if active |
| `{state_badge}` | Current state symbol in brackets, if active |
| `{model_changed}` | Current model badge when it differs from the configured default; requires the `models:` config section |
Examples:
```yaml
# Compact prompt with context usage
status_line: "✨ ({context}) >> "
# Include model information
status_line: "{app} ({context}) - {model} >> "
```
You can also try a status line for the current session only:
```bash
TmuxAI » /config set status_line ✨ ({context}) >>
```
### tmux pane split configuration
You can customize how TmuxAI creates its exec pane by setting raw `tmux split-window` arguments:
```yaml
tmux:
exec_split_args: ["-d", "-h"]
```
These args are injected as:
```bash
tmux split-window -t -P -F "#{pane_id}"
```
Reserved flags `-t`, `-P`, and `-F` are managed internally and must not be included in `exec_split_args`.
If omitted, TmuxAI uses the legacy default: `-d -h`.
### Web Search & Fetch Configuration
Enable web search (via Brave or SearXNG) and web fetching (with Wayback/Google Cache fallback):
```yaml
web_search:
enabled: true
default_provider: brave
max_results: 5
max_result_chars: 6000
timeout_seconds: 10
providers:
brave:
api_key: "YOUR_BRAVE_API_KEY"
searxng:
base_url: "http://127.0.0.1:8888"
web_fetch:
enabled: true
max_chars: 25000
timeout_seconds: 8
allowed_redirects: false
```
### Environment Variables
All configuration options can also be set via environment variables, which take precedence over the config file. Use the prefix `TMUXAI_` followed by the uppercase configuration key:
```bash
# General settings
export TMUXAI_DEBUG=true
export TMUXAI_MAX_CAPTURE_LINES=300
export TMUXAI_MAX_CONTEXT_SIZE=150000
# Quick setup with environment variables (alternative to model configurations)
export TMUXAI_OPENAI_API_KEY="your-openai-api-key-here"
export TMUXAI_OPENAI_MODEL="gpt-4"
export TMUXAI_OPENROUTER_API_KEY="your-openrouter-api-key-here"
export TMUXAI_REQUESTY_API_KEY="your-requesty-api-key-here"
```
You can also use environment variables directly within your configuration file values. The application will automatically expand these variables when loading the configuration:
```yaml
# Example config.yaml with environment variable expansion
openai:
api_key: "${OPENAI_API_KEY}"
model: "${OPENAI_MODEL:-gpt-4}"
openrouter:
api_key: "${OPENROUTER_API_KEY}"
base_url: "${OPENROUTER_BASE_URL:-https://openrouter.ai/api/v1}"
requesty:
api_key: "${REQUESTY_API_KEY}"
base_url: "${REQUESTY_BASE_URL:-https://router.requesty.ai/v1}"
```
### Session-Specific Configuration
You can override configuration values for your current TmuxAI session using the `/config` command:
```bash
# View current configuration
TmuxAI » /config
# Override a configuration value for this session
TmuxAI » /config set max_capture_lines 300
TmuxAI » /config set wait_interval 3
```
These changes will persist only for the current session and won't modify your config file.
## Contributing
If you have a suggestion that would make this better, please fork the repo and create a pull request.
You can also simply open an issue.
Don't forget to give the project a star!
## License
Distributed under the Apache License. See [Apache License](https://github.com/alvinunreal/tmuxai/blob/main/LICENSE) for more information.
---