Specialist
==========
[](https://github.com/brandtbucher/specialist/releases)[](https://github.com/brandtbucher/specialist/actions)[](https://github.com/brandtbucher/specialist/issues)
Specialist uses [fine-grained location](https://peps.python.org/pep-0657/)
information to create visual representations of exactly *where* and *how*
CPython's new
[specializing, adaptive interpreter](https://peps.python.org/pep-0659/)
optimizes your code.

Getting Started
---------------
Specialist supports CPython 3.11+ on all platforms.
To install, just run:
```sh
$ pip install specialist
```
If you normally use `pytest` to run your tests, then you can try using the
following command to run them instead:
```sh
$ specialist --output report --targets '**/*.py' -m pytest # any additional pytest options here...
```
After your tests complete, `specialist` will create a directory named `report`
and fill it with browsable HTML visualizations for each module in the current
directory tree.
Background
----------
While CPython is running your code, it identifies "hot" regions that are being
run often enough to spend time optimizing. It occasionally "quickens" these
regions, which `specialist` represents using color. **Dark, rich colors indicate
code with many quickened instructions (and, therefore, high specialization
potential), while light, pale colors indicate code with relatively few
specialization opportunities.**
Most of the time, quickening involves three phases:
- Replacing individual bytecode instructions with "adaptive" forms. These are
actually a bit slower than normal instructions, because they attempt to
"specialize" themselves periodically. If they are unable to specialize, they
will remain in their adaptive form. **`specialist` uses red to indicate the
presence of adaptive instructions.**
- Occasionaly, adaptive instructions will convert themselves into much faster
"specialized" instructions. Examples of specializations include attribute
accesses on a single object or type, certain pure-Python calls, or integer
addition. **`specialist` uses green to indicate the presence of specialized
instructions.**
- If a specialization becomes invalid after some time (for example, if an
expression that previously added two integers starts concatenating two strings
instead), the specialized instruction may be converted back into an adaptive
one. At this point, the cycle repeats itself.
Specialist aims to provide insight into this process for the maintainers of
CPython itself, as well as for users seeking an optimization profile for their
own code. If you're curious to learn more about specialization, check out [this
talk from PyCon US 2023](https://youtu.be/shQtrn1v7sQ).
Tutorial
--------
Suppose we have the following source file, `conversions.py`, which contains some
utilities and tests for converting between Fahrenheit and Celsius:
```py
import math
def f_to_c(f: float) -> float:
"""Convert Fahrenheit to Celsius."""
x = f - 32
return x * 5 / 9
def c_to_f(c: float) -> float:
"""Convert Celsius to Fahrenheit."""
x = c * 9 / 5
return x + 32
TEST_VALUES = [-459.67, -273.15, 0.0, 32.0, 42.0, 273.15, 100.0, 212.0, 373.15]
def test_conversions() -> None:
for t in TEST_VALUES:
assert_round_trip(t)
def assert_round_trip(t: float) -> None:
# Round-trip Fahrenheit through Celsius:
assert math.isclose(t, f_to_c(c_to_f(t))), f"{t} F -> C -> F failed!"
# Round-trip Celsius through Fahrenheit:
assert math.isclose(t, c_to_f(f_to_c(t))), f"{t} C -> F -> C failed!"
if __name__ == "__main__":
test_conversions()
```
We can run this file with CPython from the command-line using `specialist`:
```sh
$ specialist conversions.py
```
After the script has finished running, `specialist` will open a web browser and
display the annotated program source:
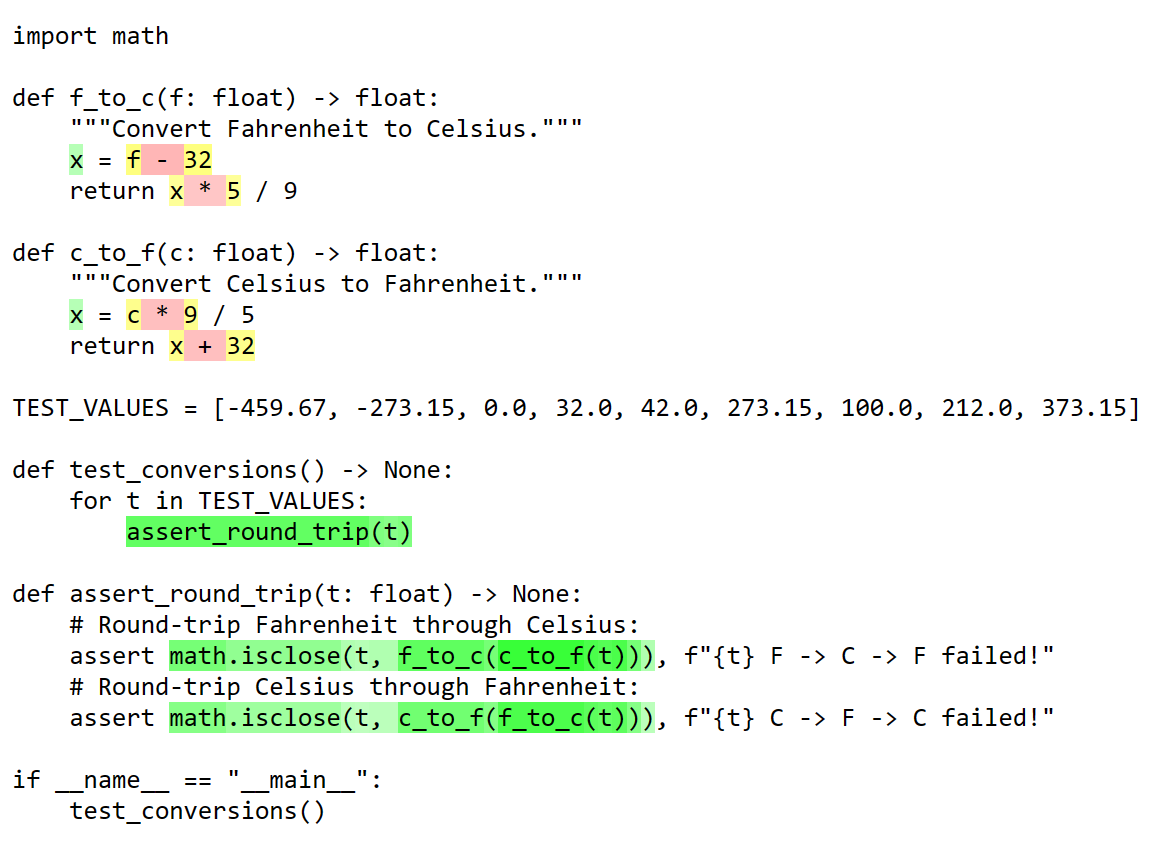
The green areas indicate regions of code that were successfully specialized,
while the red areas indicate unsuccessful specializations (in the form of
"adaptive" instructions). Mixed results are indicated by colors along the
green-yellow-orange-red gradient, depending on the ratio of successes to
failures. Regions of code that don't contain any attempted specializations are
left white.
Focusing on `f_to_c` and `c_to_f` for a moment, we can see that CPython is
failing to specialize addition and subtraction by `32`. It doesn't currently
specialize binary operators between mixed `float` and `int` values, which is
exactly what the code here is doing.
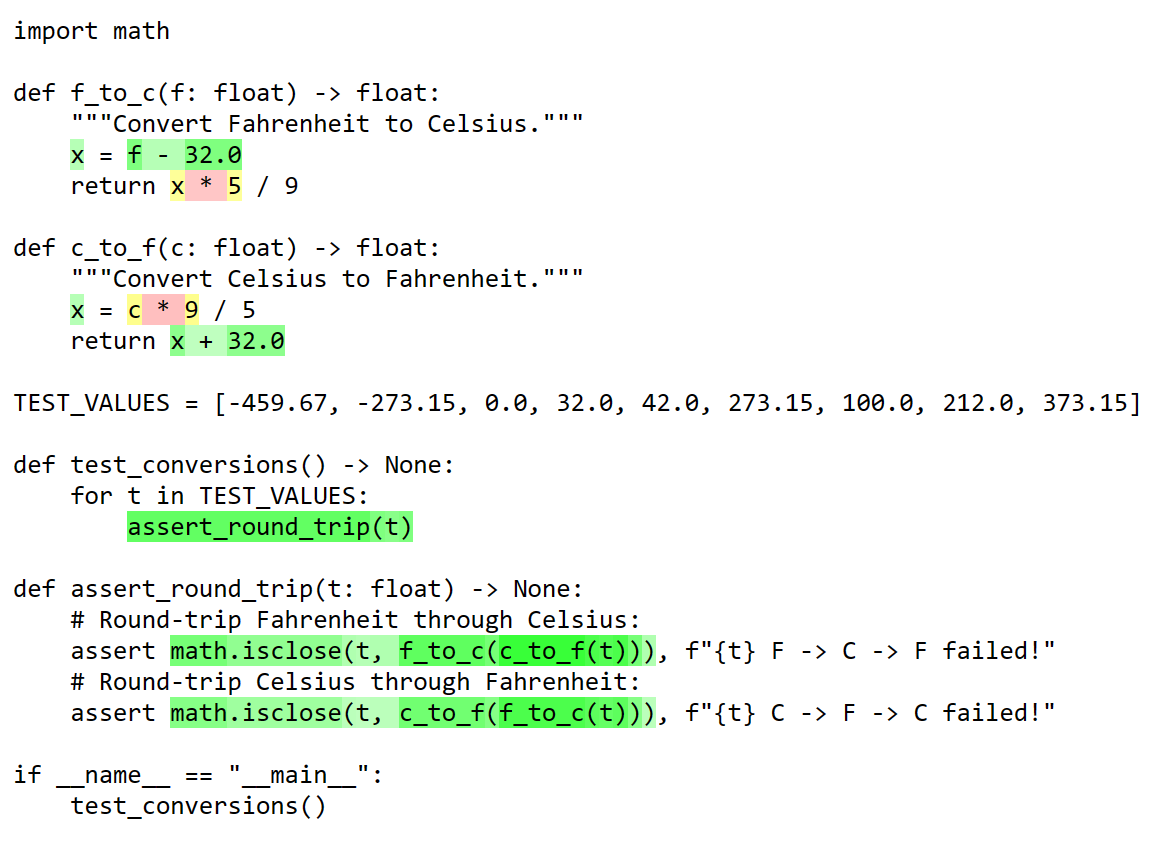
It can, however, specialize addition and subtraction between two `float` values!
Replacing `32` with `32.0` results in successful specializations (confirmed by
re-running `specialist`):
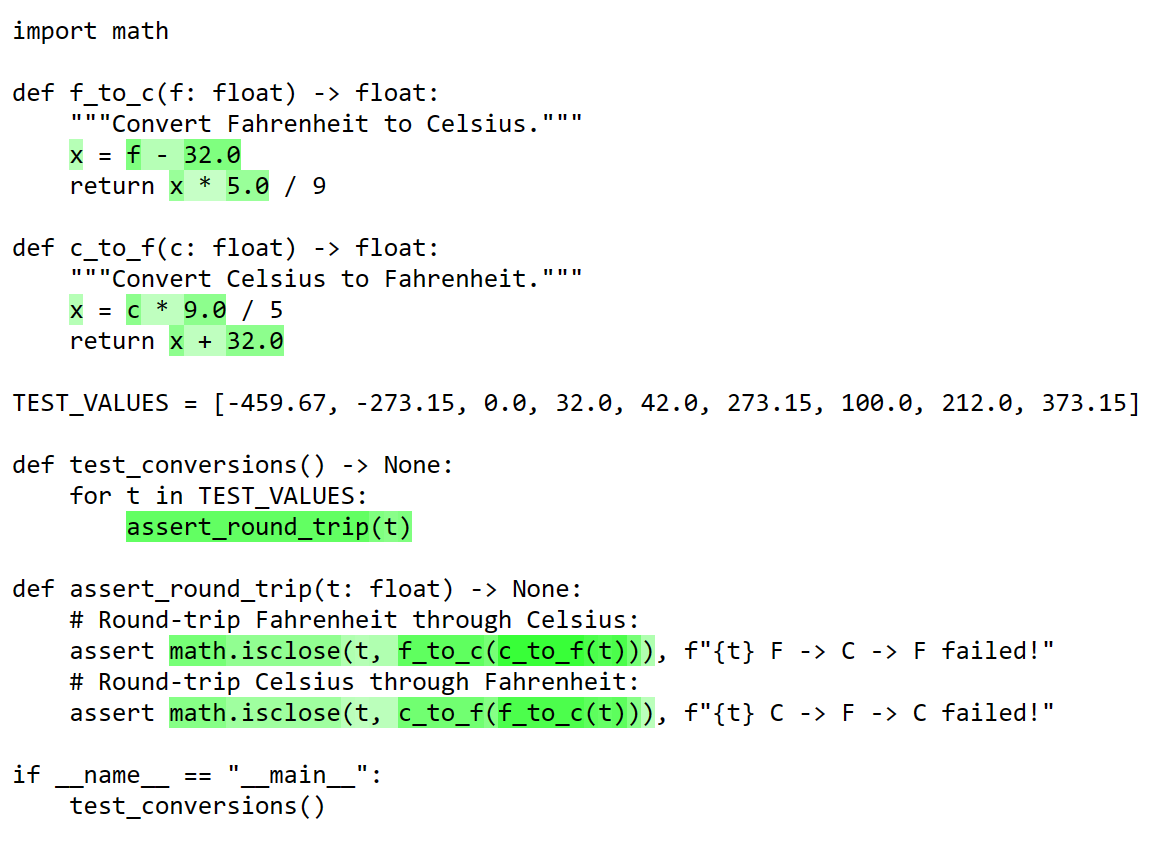
We can see that something similar is happening with `float` and `int`
multiplication as well. One option could be to continue converting constant
values to `float`:
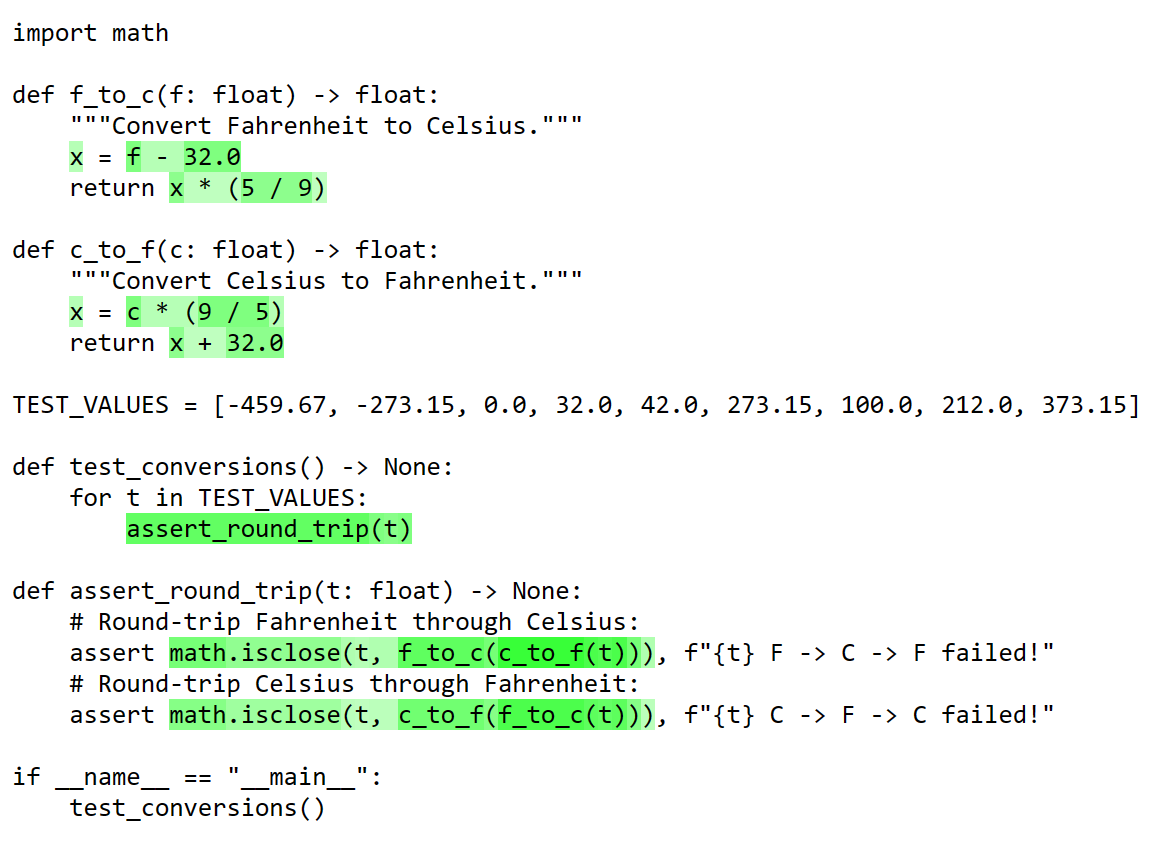
However, there's a better option! Notice that CPython doesn't attempt to
specialize division at all (it's left white in the visualization). We can take
advantage of CPython's constant folding optimizations by slightly changing the
order of operations, which allows our scaling factors (`5 / 9` and `9 / 5`) to
be computed at compile-time. When we do this, CPython is able to implement our
converters *entirely* using native floating-point operations:
Modes
-----
Like `python` itself, `specialist` can run code a few different ways. It can be
given a file path:
```sh
$ specialist spam/eggs.py foo bar baz
```
Or a module name:
```sh
$ specialist -m spam.eggs foo bar baz
```
Or a command:
```sh
$ specialist -c 'import spam; spam.eggs()' foo bar baz
```
It also has a `-t`/`--targets` option to support discovery of arbitrary "target"
files to analyze after the script completes. This is useful if the script being
run is different from the code you want to visualize:
```sh
$ specialist --targets spam/eggs.py -c 'import uses_eggs; uses_eggs.run()'
```
Multiple files can be provided using "glob" style patterns:
```sh
$ specialist --targets 'spam/**/*.py' -m pytest
```
Specialist can also write the generated HTML files to the filesystem instead of
opening them in a browser. To do so, just provide an output directory path using
the `-o`/`--output` option:
```sh
$ specialist --output ../report --targets 'spam/**/*.py' -m pytest
/home/brandtbucher/sketch/spam/__init__.py -> /home/brandtbucher/report/__init__.html
/home/brandtbucher/sketch/spam/_spammy.py -> /home/brandtbucher/report/_spammy.html
/home/brandtbucher/sketch/spam/eggs/__init__.py -> /home/brandtbucher/report/eggs/__init__.html
/home/brandtbucher/sketch/spam/eggs/_eggy.py -> /home/brandtbucher/report/eggs/_eggy.html
```
Options
-------
### `-b`/`--blue`
Use blue (rather than green) to indicate specialized code. Some users may find
a blue-violet-magenta-red gradient easier to read than the default
green-yellow-orange-red one.
### `-d`/`--dark`
Use light text on a dark background. Some users may find a dark scheme makes
them feel cooler than the default light one.