
Revolutionize Your Debugging Experience with PHP
Buggregator Trap
[](https://docs.buggregator.dev/trap/what-is-trap.html)
[](https://boosty.to/roxblnfk)
[](https://shepherd.dev/github/buggregator/trap)
[](https://shepherd.dev/github/buggregator/trap)
[](https://codecov.io/gh/buggregator/trap)
[](https://dashboard.stryker-mutator.io/reports/github.com/buggregator/trap/master)
[](https://github.com/ziadoz/awesome-php#debugging-and-profiling)
[](https://twitter.com/buggregator)
[](https://discord.gg/qF3HpXhMEP)
**Trap** is a package designed to enhance the debugging experience in conjunction with the Buggregator Server.
Trap includes:
- A set of functions for direct interaction with any Buggregator server.
- Extensions for Symfony VarDumper that become active immediately after installing Trap.
- A minimized version of the [Buggregator Server](https://github.com/buggregator/server) that does not require Docker
and is intended solely for local use.
- Use PHPStorm? Consider using Trap with the [Buggregator Plugin](https://github.com/buggregator/phpstorm-plugin) for a seamless debugging experience.
**Table of content:**
- [Installation](#installation)
- [Overview](#overview)
- [Usage](#usage)
- [Contributing](#contributing)
## Installation
To install Buggregator Trap in your PHP application, add the package as a dev dependency
to your project using Composer:
```bash
composer require --dev buggregator/trap -W
```
[](https://packagist.org/packages/buggregator/trap)
[](https://packagist.org/packages/buggregator/trap)
[](LICENSE.md)
[](https://packagist.org/packages/buggregator/trap/stats)
And that's it. Trap is [ready to go](#usage).
### Binary
If you prefer to use Trap as a binary, you can install it globally using [Dload](https://github.com/php-internal/dload):
```bash
dload get trap
```
### Phar
Sometimes your project may conflict with Trap's dependencies, or you might be interested in using only the local
server (e.g., for analyzing local profiler files).
In this case, consider installing Trap as a Phar (a self-contained PHP executable).
Using wget:
```bash
wget https://github.com/buggregator/trap/releases/latest/download/trap.phar
chmod +x trap.phar
./trap.phar --version
```
Using [Phive](https://phar.io/):
```bash
phive install buggregator/trap
```
## Overview
Buggregator Trap provides a toolkit for use in your code. Firstly, just having Buggregator Trap in your
package enhances the capabilities of Symfony Var-Dumper.
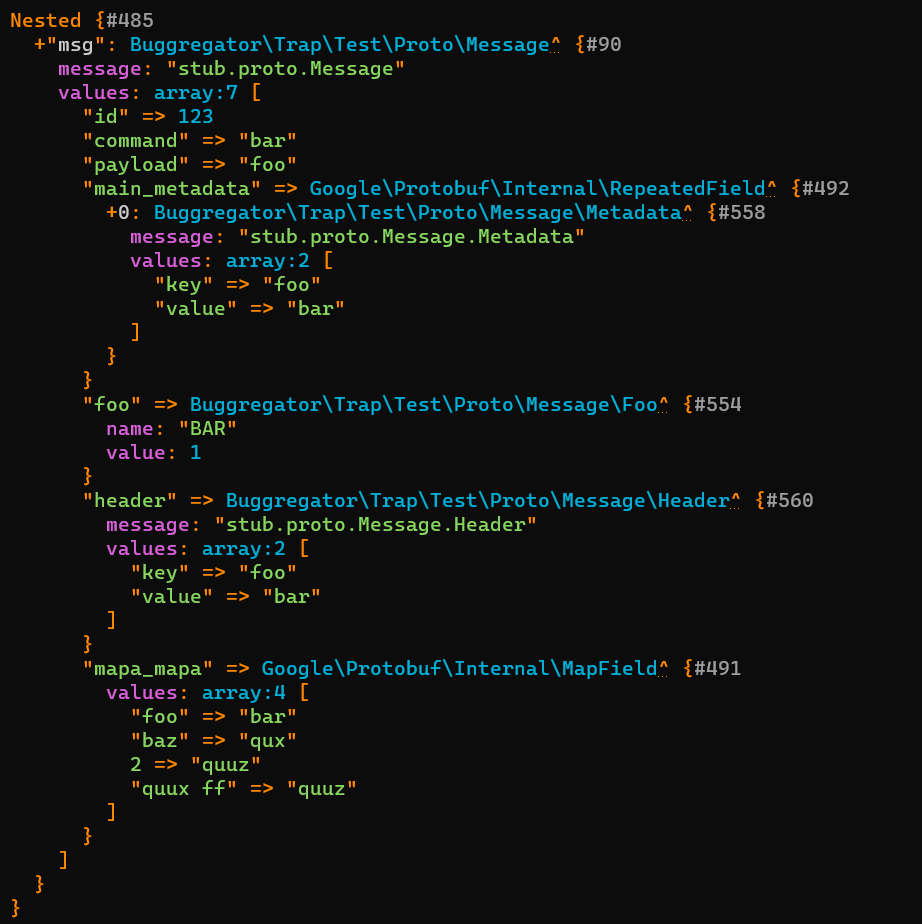
If you've already worked with `google/protobuf`, you probably know how unpleasant it can be.
Now let's compare the dumps of protobuf-message: on the left (with trap) and on the right (without trap).

This simultaneously compact and informative output format of protobuf message will be just as compact
and informative in the Buggregator Server interface. Now, working with protobuf is enjoyable.
---
Buggreagtor Trap includes a console application - a mini-server.
The application is entirely written in PHP and does not require Docker to be installed in the system.
It may seem like it's just the same as the `symfony/var-dumper` server, but it's not.
Buggregator Trap boasts a much wider range of handlers ("traps") for debug messages:
- Symfony var-dumper,
- Monolog,
- Sentry,
- OpenTelemetry traces (OTLP/HTTP),
- SMTP,
- HTTP dumps,
- Ray,
- Any raw data
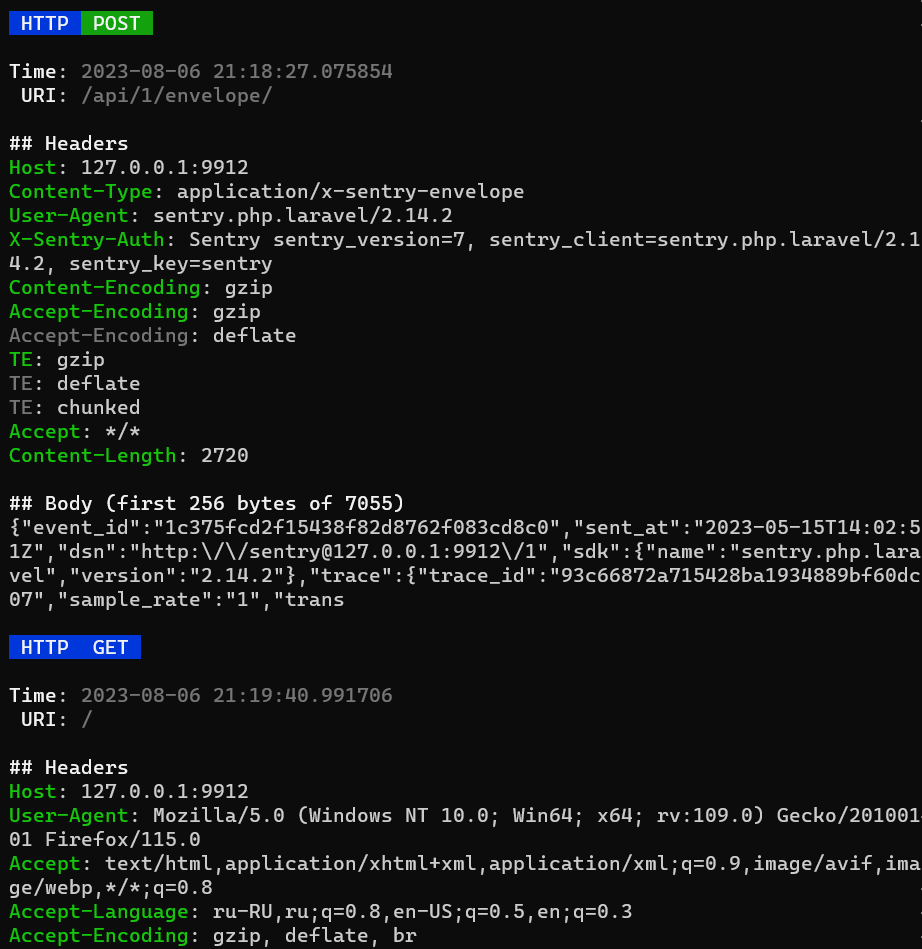
You can effortlessly visualize and analyze console information about various elements of your codebase.
Here's a sneak peek into the console output you can expect with Trap:
| symfony/var-dumper (proto) | Binary Data |
|--------------------------------------------------------------------------------------------------------|---------------------------------------------------------------------------------------------------------|
|  |  |
| SMTP Mail Trap | HTTP Dump |
|--------------------------------------------------------------------------------------------------|---------------------------------------------------------------------------------------------------|
|  |  |
---
Additionally, you can manually set traps in the code. Use the `trap()` function,
which works almost the same as Symfony's `dump()`, but configures the dumper to send dumps to the local server,
unless other user settings are provided.
Also, the `trap()` has a lot of useful options:
```php
// Limit the depth of the dumped structure
trap($veryDeepArray)->depth(3);
foreach ($veryLargeArray as $item) {
// We don't need to dump more than 3 items
trap($item)->times(3);
}
// Dump once if the condition is true
trap($animal)->once()->if($var instanceof Animal\Cat);
```
---
> [!TIP]
> Feature in development:
> add the flag `--ui` to rise the web interface of the Buggregator Server without docker.

---
We care about the quality of our products' codebase and strive to provide the best user experience.
Buggregator Trap has passed the Proof of Concept stage and is now an important part of the Buggregator ecosystem.
We have big plans for the development of the entire ecosystem and we would be delighted if you join us on this journey.
## Usage
After successfully [installing](#installation) Buggregator Trap, you can initiate the debugging process by using the following command:
```bash
vendor/bin/trap
```
This command will start the Trap server, ready to receive any debug messages. Once a debug message is trapped, you will see a convenient report about it right here in the terminal.
Then just call the `trap()` function in your code:
```php
// dump the current stack trace
trap()->stackTrace();
// dump a variable with a depth limit
trap($var)->depth(4);
// dump a named variables sequence
trap($var, foo: $far, bar: $bar);
// dump a variable and return it
$responder->respond(trap($response)->return());
```
> **Note**:
> The `trap()` function configures `$_SERVER['REMOTE_ADDR']` and `$_SERVER['REMOTE_PORT']` automatically,
> if they are not set.
Also, there are a couple of shortcuts here:
- `tr(...)` - equivalent to `trap(...)->return()`
- `td(...)` - equivalent to `trap(...); die;`
If called without arguments, they will display a short stack trace, used memory, and time between shortcut calls.
```php
function handle($input) {
tr(); // Trace #0 -.--- 3.42M
$data = $this->prepareData($input);
tr(); // Trace #1 0.015ms 6.58M
$this->processor->process(tr(data: $data));
td(); // exit with output: Trace #2 1.15ms 7.73M
}
```
### Default port
Trap automatically recognizes the type of traffic.
Therefore, there is no need to open separate ports for different protocols.
By default, it operates on the same ports as the Buggregator Server: `9912`, `9913`, `1025`, and `8000`,
plus `4318`, the default OTLP/HTTP port.
However, if you wish to utilize a different port, you can easily make this adjustment using the `-p` option:
```bash
vendor/bin/trap -p9912 --ui=8000
```
Environment variables can also be used to set endpoints:
- `TRAP_TCP_PORTS` - for TCP traffic: `9912,9913,1025,8000,4318`
- `TRAP_TCP_HOST` - for the TCP host (default: `127.0.0.1`)
- `TRAP_UI_PORT` - for the web interface: `8080`
### OpenTelemetry traces
Trap receives traces exported over OTLP/HTTP (`POST /v1/traces`) on any of its ports
and prints them in the console as a tree of spans:
```bash
OTEL_EXPORTER_OTLP_ENDPOINT=http://127.0.0.1:4318
OTEL_EXPORTER_OTLP_PROTOCOL=http/json
```
Logs and metrics are not supported yet: Trap answers `/v1/logs` and `/v1/metrics` with success and drops them.
To send only traces, set `OTEL_EXPORTER_OTLP_TRACES_ENDPOINT=http://127.0.0.1:4318/v1/traces` instead of the
common endpoint, or turn the other signals off with `OTEL_LOGS_EXPORTER=none` and `OTEL_METRICS_EXPORTER=none`.
The `http/protobuf` protocol needs the suggested packages:
```bash
composer require --dev open-telemetry/gen-otlp-protobuf google/protobuf
```
The PHAR, the standalone binary and the Docker image do not include them, so they accept only `http/json`.
Notes:
- Requests with `Transfer-Encoding: chunked` are not supported by the HTTP parser of Trap;
OpenTelemetry SDK exporters send `Content-Length`.
- Exporters running in a browser are not supported: Trap does not answer CORS preflight requests.
- One export request may carry up to 10 MB (after decompression) and up to 10 000 spans; a bigger one gets `413`.
SDK batch processors export 512 spans at a time by default.
- Port `4318` is also the default port of an OpenTelemetry Collector or Jaeger. On Linux and macOS, when it is
taken, Trap keeps retrying to listen on it silently (run with `-vv` to see the errors) and works on the other ports.
On Windows, Trap can listen on `127.0.0.1:4318` even while another process, such as a Collector or Jaeger in
Docker Desktop, listens on `0.0.0.0:4318`, and then Trap receives the local traffic meant for that process.
To leave the port to it, list the ports without `4318`:
`vendor/bin/trap -p1025 -p8000 -p9912 -p9913` or `TRAP_TCP_PORTS=1025,8000,9912,9913`.
With the `file` sender, each export request is saved as one JSON line:
`{"type":"otlp.traces","resourceSpans":[...]}`.
Spans of one trace often arrive in separate requests (a simple span processor exports each span on its own),
so Trap keeps received spans in memory to print them together. The memory is limited by:
- `TRAP_TRACES_MAX_SPANS` - the maximum number of kept spans; the least recently updated traces are dropped
above it, and a single trace above it keeps only its most recent spans (default: `10000`)
- `TRAP_TRACES_TTL` - seconds a trace is kept after its last received span (default: `600`)
The same limits can be set in `trap.xml`: ``.
Non-positive or non-numeric values fall back to the defaults.
### Choosing Your Senders
Buggregator Trap provides a variety of "senders" that dictate where the dumps will be sent. Currently, the available
sender options include:
- `console`: Shows dumps directly in the console.
- `server`: Sends dumps to a remote Buggregator server.
- `file`: Saves dumps in a file for later use.
- `mail-to-file`: Creates a folder for each recipient and saves each message as a JSON file. Useful for testing mails.
If you send a mail `To: foo@example.com, bar@example2.org`, the following folders will be created:
- `runtime/mail/foo@example.com`
- `runtime/mail/bar@example2.org`
By default, the Trap server is set to display dumps in the console. However, you can easily select your preferred
senders using the `-s` option.
For instance, to simultaneously use the console and file senders, you would input:
```bash
vendor/bin/trap -sconsole -sfile
```
## Contributing
We believe in the power of community-driven development. Here's how you can contribute:
- Share your experience:
- If you find a bug or have a feature request, please [create an issue](https://github.com/buggregator/trap/issues).
- Help others by answering questions on [Discord](https://discord.gg/qF3HpXhMEP) or asking your own.
- Share the love and tell others about Buggregator.
- Write code:
- If you want to fix a bug or add a feature, let us know in the issue tracker.
[There are issues](https://github.com/buggregator/trap/issues?q=is%3Aopen+is%3Aissue+label%3A%22help+wanted%22) labeled "help wanted" that are a good place to start.
- Have good documentation writing skills? We'd love your help improving our [docs](https://github.com/buggregator/docs/tree/master/docs).
- Sponsor us:
- If you use Buggregator in a commercial setting, consider [becoming a sponsor](https://boosty.to/roxblnfk) to help us maintain and improve the project.
- You also can promote a specific feature or bug fix.
We mark sponsored tasks with the honorary label [`SPONSORED`](https://github.com/buggregator/trap/issues?q=label%3ASPONSORED).