Groq Code CLI: A highly customizable, lightweight, and open-source coding CLI powered by Groq for instant iteration.


Overview •
Installation •
Usage •
Development
https://github.com/user-attachments/assets/5902fd07-1882-4ee7-825b-50d627f8c96a
# Overview
Coding CLIs are everywhere. The Groq Code CLI is different. It is a blueprint, a building block, for developers looking to leverage, customize, and extend a CLI to be entirely their own. Leading open-source CLIs are all fantastic, inspiring for the open-source community, and hugely rich in features. However, that's just it: they are *gigantic*. Feature-rich: yes, but local development with such a large and interwoven codebase is unfriendly and overwhelming. **This is a project for developers looking to dive in.**
Groq Code CLI is your chance to make a CLI truly your own. Equipped with all of the features, tools, commands, and UI/UX that’s familiar to your current favorite CLI, we make it simple to add new features you’ve always wanted. By massively cutting down on bloat and code mass without compromising on quality, you can jump into modifying this CLI however you see fit. By leveraging models on Groq, you can iterate even faster (`/models` to see available models). Simply activate the CLI by typing `groq` in your terminal. Use Groq Code CLI in any directory just like you would with any other coding CLI. Use it in this directory to have it build and customize itself!
A few customization ideas to get started:
- New slash commands (e.g. /mcp, /deadcode, /complexity, etc.)
- Additional tools (e.g. web search, merge conflict resolver, knowledge graph builder, etc.)
- Custom start-up ASCII art
- Change the start-up command
- Anything you can think of!
## Installation
### For Development (Recommended)
```bash
git clone https://github.com/build-with-groq/groq-code-cli.git
cd groq-code-cli
npm install
npm run build
npm link # Enables the `groq` command in any directory
```
```bash
# Run this in the background during development to automatically apply any changes to the source code
npm run dev
```
### Run Instantly
```bash
# Using npx, no installation required
npx groq-code-cli@latest
```
### Install Globally
```bash
npm install -g groq-code-cli@latest
```
## Usage
```bash
# Start chat session
groq
```
### Command Line Options
```bash
groq [options]
Options:
-t, --temperature Temperature for generation (default: 1)
-s, --system Custom system message
-d, --debug Enable debug logging to debug-agent.log in current directory
-p, --proxy Proxy URL (e.g. http://proxy:8080 or socks5://proxy:1080)
-h, --help Display help
-V, --version Display version number
```
### Authentication
On first use, start a chat:
```bash
groq
```
And type the `/login` command:
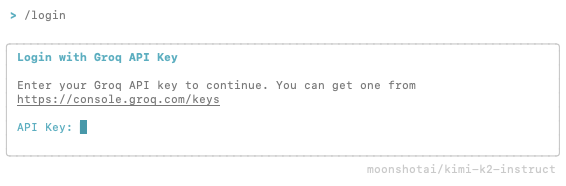
>Get your API key from the Groq Console [here](https://console.groq.com/keys)
This creates a .groq/ folder in your home directory that stores your API key, default model selection, and any other config you wish to add.
You can also set your API key for your current directory via environment variable:
```bash
export GROQ_API_KEY=your_api_key_here
```
### Proxy Configuration
Supports HTTP/HTTPS/SOCKS5 proxies via CLI flag or environment variables:
```bash
# CLI flag (highest priority)
groq --proxy http://proxy:8080
groq --proxy socks5://proxy:1080
# Environment variables
export HTTP_PROXY=http://proxy:8080
export HTTPS_PROXY=socks5://proxy:1080
```
Priority: `--proxy` > `HTTPS_PROXY` > `HTTP_PROXY`
### Available Commands
- `/help` - Show help and available commands
- `/login` - Login with your credentials
- `/model` - Select your Groq model
- `/clear` - Clear chat history and context
- `/reasoning` - Toggle display of reasoning content in messages
- `/stats` - Display session statistics and token usage
## Development
### Testing Locally
```bash
# Run this in the background during development to automatically apply any changes to the source code
npm run dev
```
### Available Scripts
```bash
npm run build # Build TypeScript to dist/
npm run dev # Build in watch mode
```
### Project Structure
```
groq-code-cli/
├── src/
│ ├── commands/
│ │ ├── definitions/ # Individual command implementations
│ │ │ ├── clear.ts # Clear chat history command
│ │ │ ├── help.ts # Help command
│ │ │ ├── login.ts # Authentication command
│ │ │ ├── model.ts # Model selection command
│ │ │ └── reasoning.ts # Reasoning toggle command
│ │ ├── base.ts # Base command interface
│ │ └── index.ts # Command exports
│ ├── core/
│ │ ├── agent.ts # AI agent implementation
│ │ └── cli.ts # CLI entry point and setup
│ ├── tools/
│ │ ├── tool-schemas.ts # Tool schema definitions
│ │ ├── tools.ts # Tool implementations
│ │ └── validators.ts # Input validation utilities
│ ├── ui/
│ │ ├── App.tsx # Main application component
│ │ ├── components/
│ │ │ ├── core/ # Core chat TUI components
│ │ │ ├── display/ # Auxiliary components for TUI display
│ │ │ └── input-overlays/ # Input overlays and modals that occupy the MessageInput box
│ │ └── hooks/
│ └── utils/
│ ├── constants.ts # Application constants
│ ├── file-ops.ts # File system operations
│ ├── local-settings.ts # Local configuration management
│ └── markdown.ts # Markdown processing utilities
├── docs/
├── package.json
├── tsconfig.json
└── LICENSE
```
**TL;DR:** Start with `src/core/cli.ts` (main entry point), `src/core/agent.ts`, and `src/ui/hooks/useAgent.ts` (bridge between TUI and the agent). Tools are in `src/tools/`, slash commands are in `src/commands/definitions/`, and customize the TUI in `src/ui/components/`.
### Customization
#### Adding New Tools
Tools are AI-callable functions that extend the CLI's capabilities. To add a new tool:
1. **Define the tool schema** in `src/tools/tool-schemas.ts`:
```typescript
export const YOUR_TOOL_SCHEMA: ToolSchema = {
type: 'function',
function: {
name: 'your_tool_name',
description: 'What your tool does',
parameters: {
type: 'object',
properties: {
param1: { type: 'string', description: 'Parameter description' }
},
required: ['param1']
}
}
};
```
2. **Implement the tool function** in `src/tools/tools.ts`:
```typescript
export async function yourToolName(param1: string): Promise {
// Your implementation here
return createToolResponse(true, result, 'Success message');
}
```
3. **Register the tool** in the `TOOL_REGISTRY` object and `executeTool` switch statement in `src/tools/tools.ts`.
4. **Add the schema** to `ALL_TOOL_SCHEMAS` array in `src/tools/tool-schemas.ts`.
#### Adding New Slash Commands
Slash commands provide direct user interactions. To add a new command:
1. **Create command definition** in `src/commands/definitions/your-command.ts`:
```typescript
import { CommandDefinition, CommandContext } from '../base.js';
export const yourCommand: CommandDefinition = {
command: 'yourcommand',
description: 'What your command does',
handler: ({ addMessage }: CommandContext) => {
// Your command logic here
addMessage({
role: 'system',
content: 'Command response'
});
}
};
```
2. **Register the command** in `src/commands/index.ts` by importing it and adding to the `availableCommands` array.
#### Changing Start Command
To change the start command from `groq`, change `"groq"` in `"bin"` of `package.json` to your global command of choice.
Re-run `npm run build` and `npm link`.
## Contributing and Support
Improvements through PRs are welcome!
For issues and feature requests, please open an issue on GitHub.
#### Share what you create with Groq on our [socials](https://x.com/GroqInc)!
### Featured Community Creations
- [OpenRouter Support](https://github.com/rahulvrane/groq-code-cli-openrouter) - rahulvrane