# Packémon
Packet monster, or `Packémon` for short! (っ‘-’)╮=͟͟͞͞◒ ヽ( '-'ヽ)
https://github.com/user-attachments/assets/dbb0baeb-a0b8-4e18-8647-ac05020f83d5
TUI tool for generating packets of arbitrary input and monitoring packets on any network interfaces (default: `eth0`). **This tool is not available for Windows and macOS. I have confirmed that it works on Linux (Debian and Ubuntu on WSL2) .**
I intend to develop it patiently🌴
The images of Packemon on REDME should be used as reference only, as they may look different from the actual Packemon.
> [!WARNING]
> This tool is implemented with protocol stacks from scratch and utilizes raw socket.
> There may be many bugs. If you find a bug, I would be glad if you raise an issue or give me a pull request!
## Feature
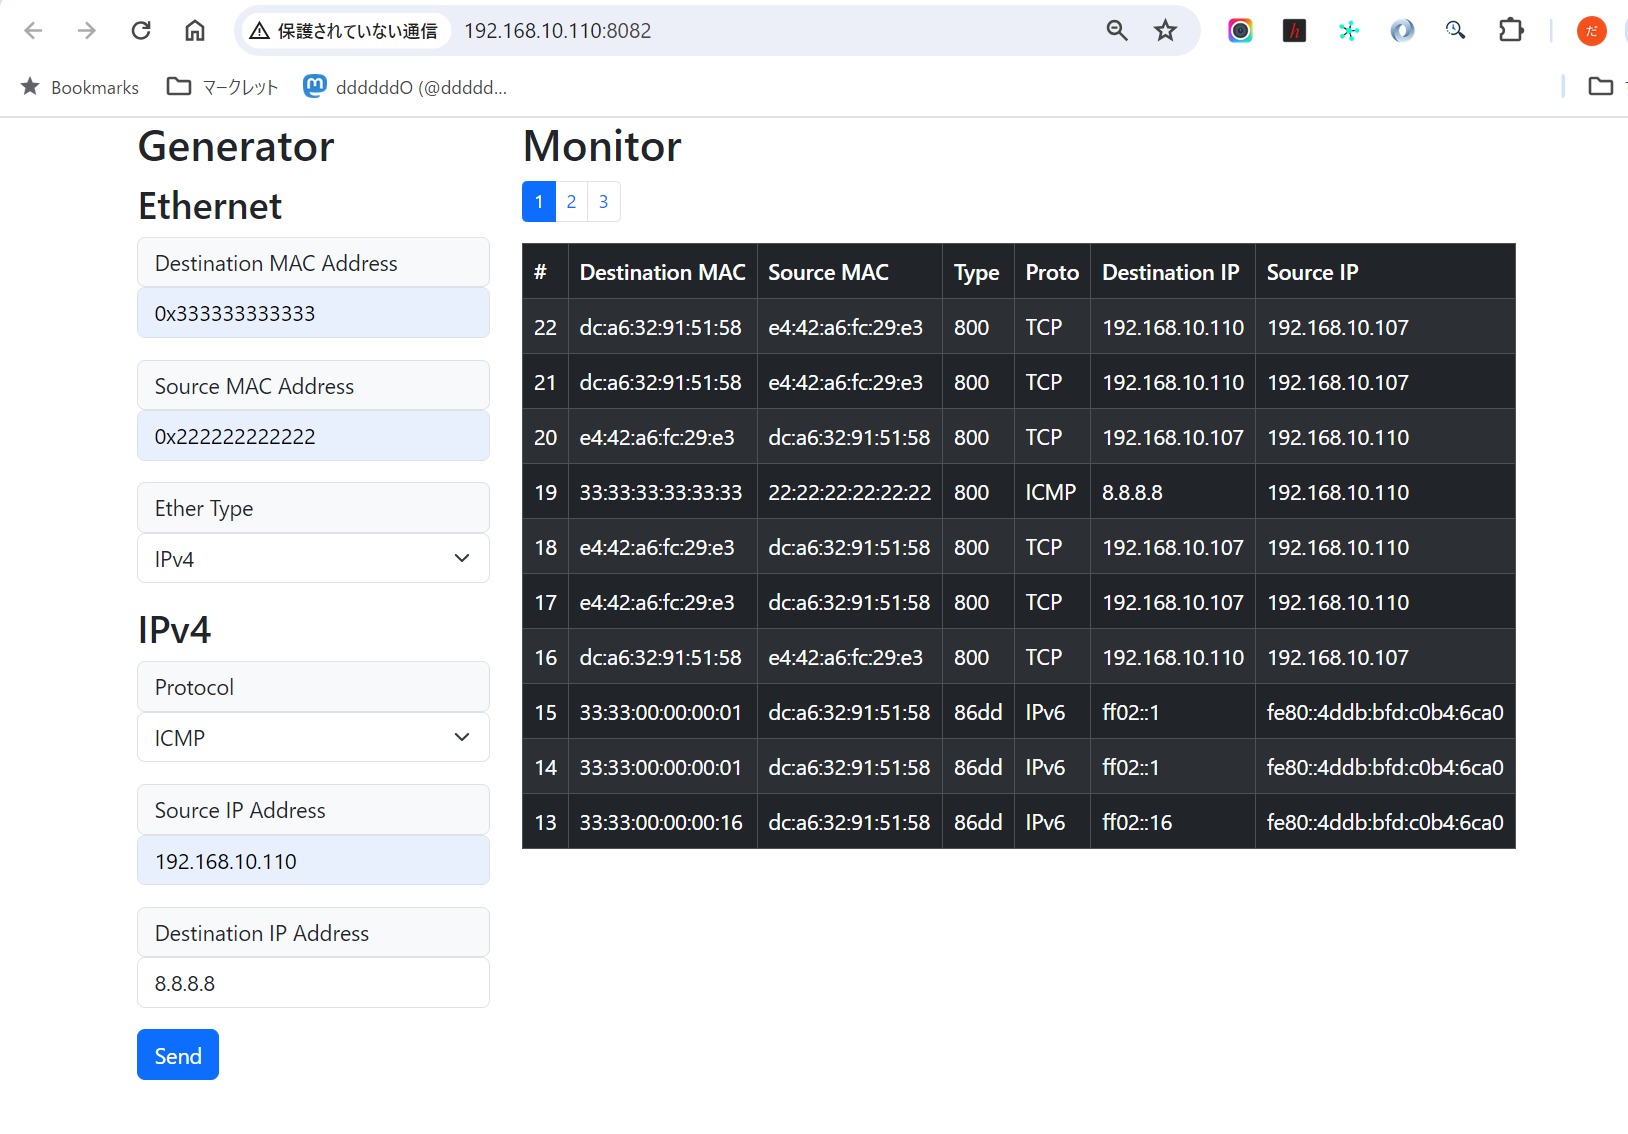
This TUI tool has two major functions: packet generation and packet monitoring.
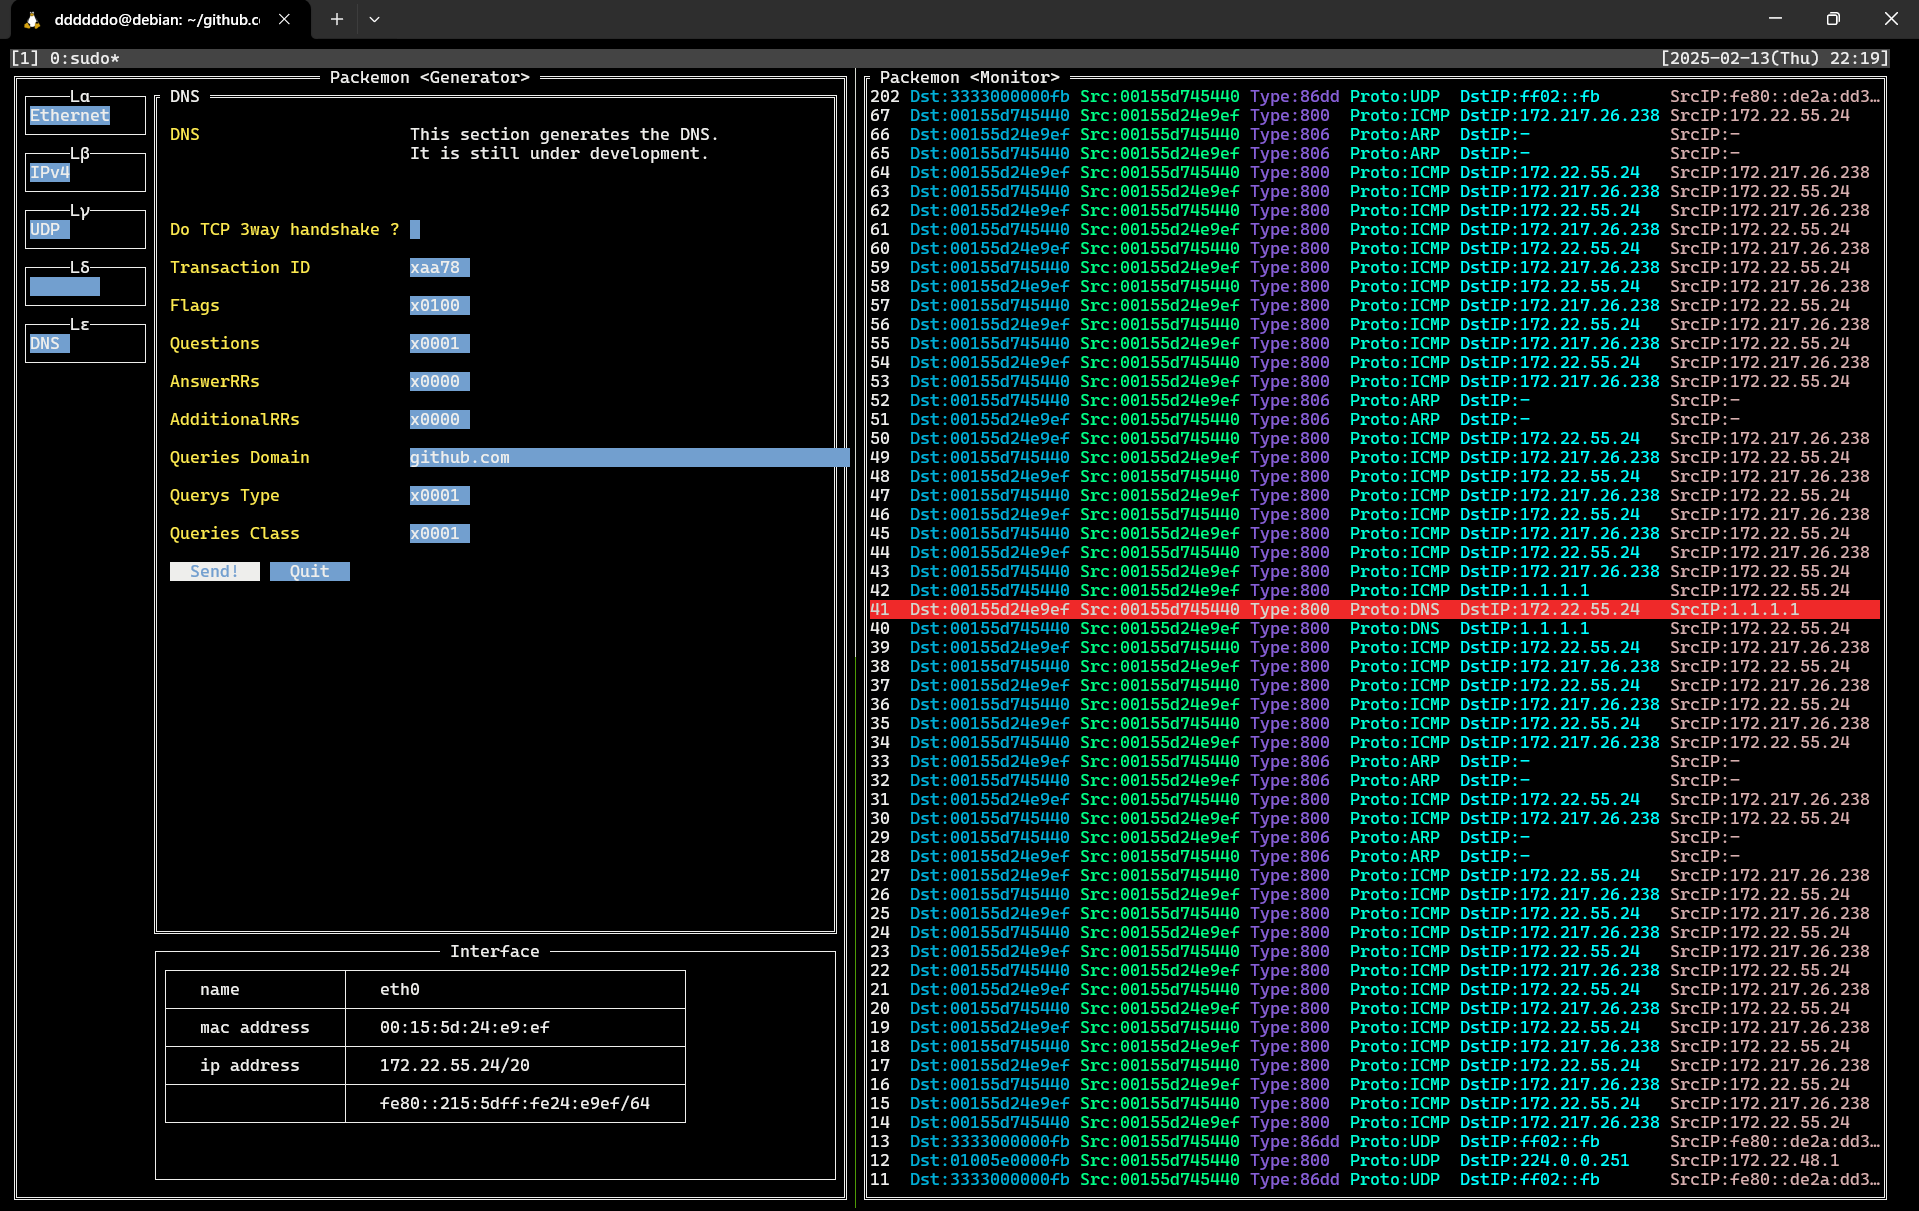
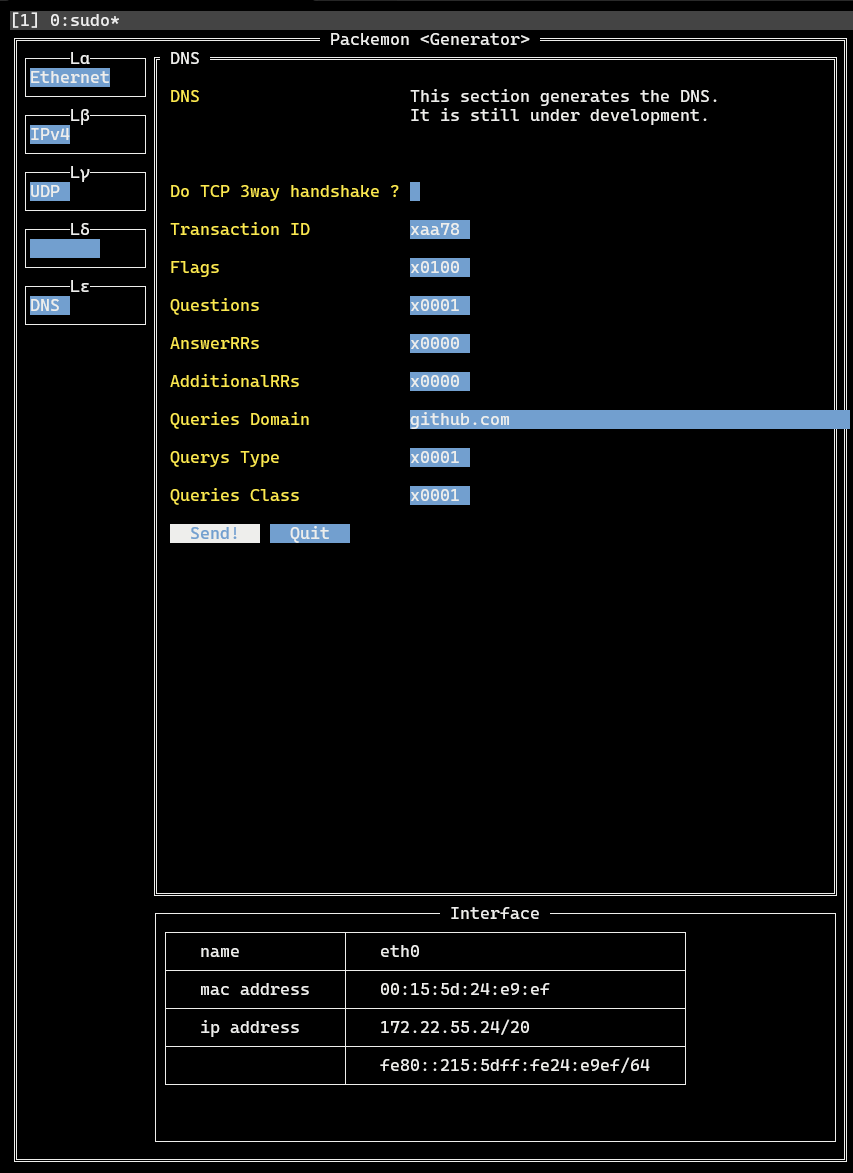
This image shows packemon running in Generator / Monitor mode.
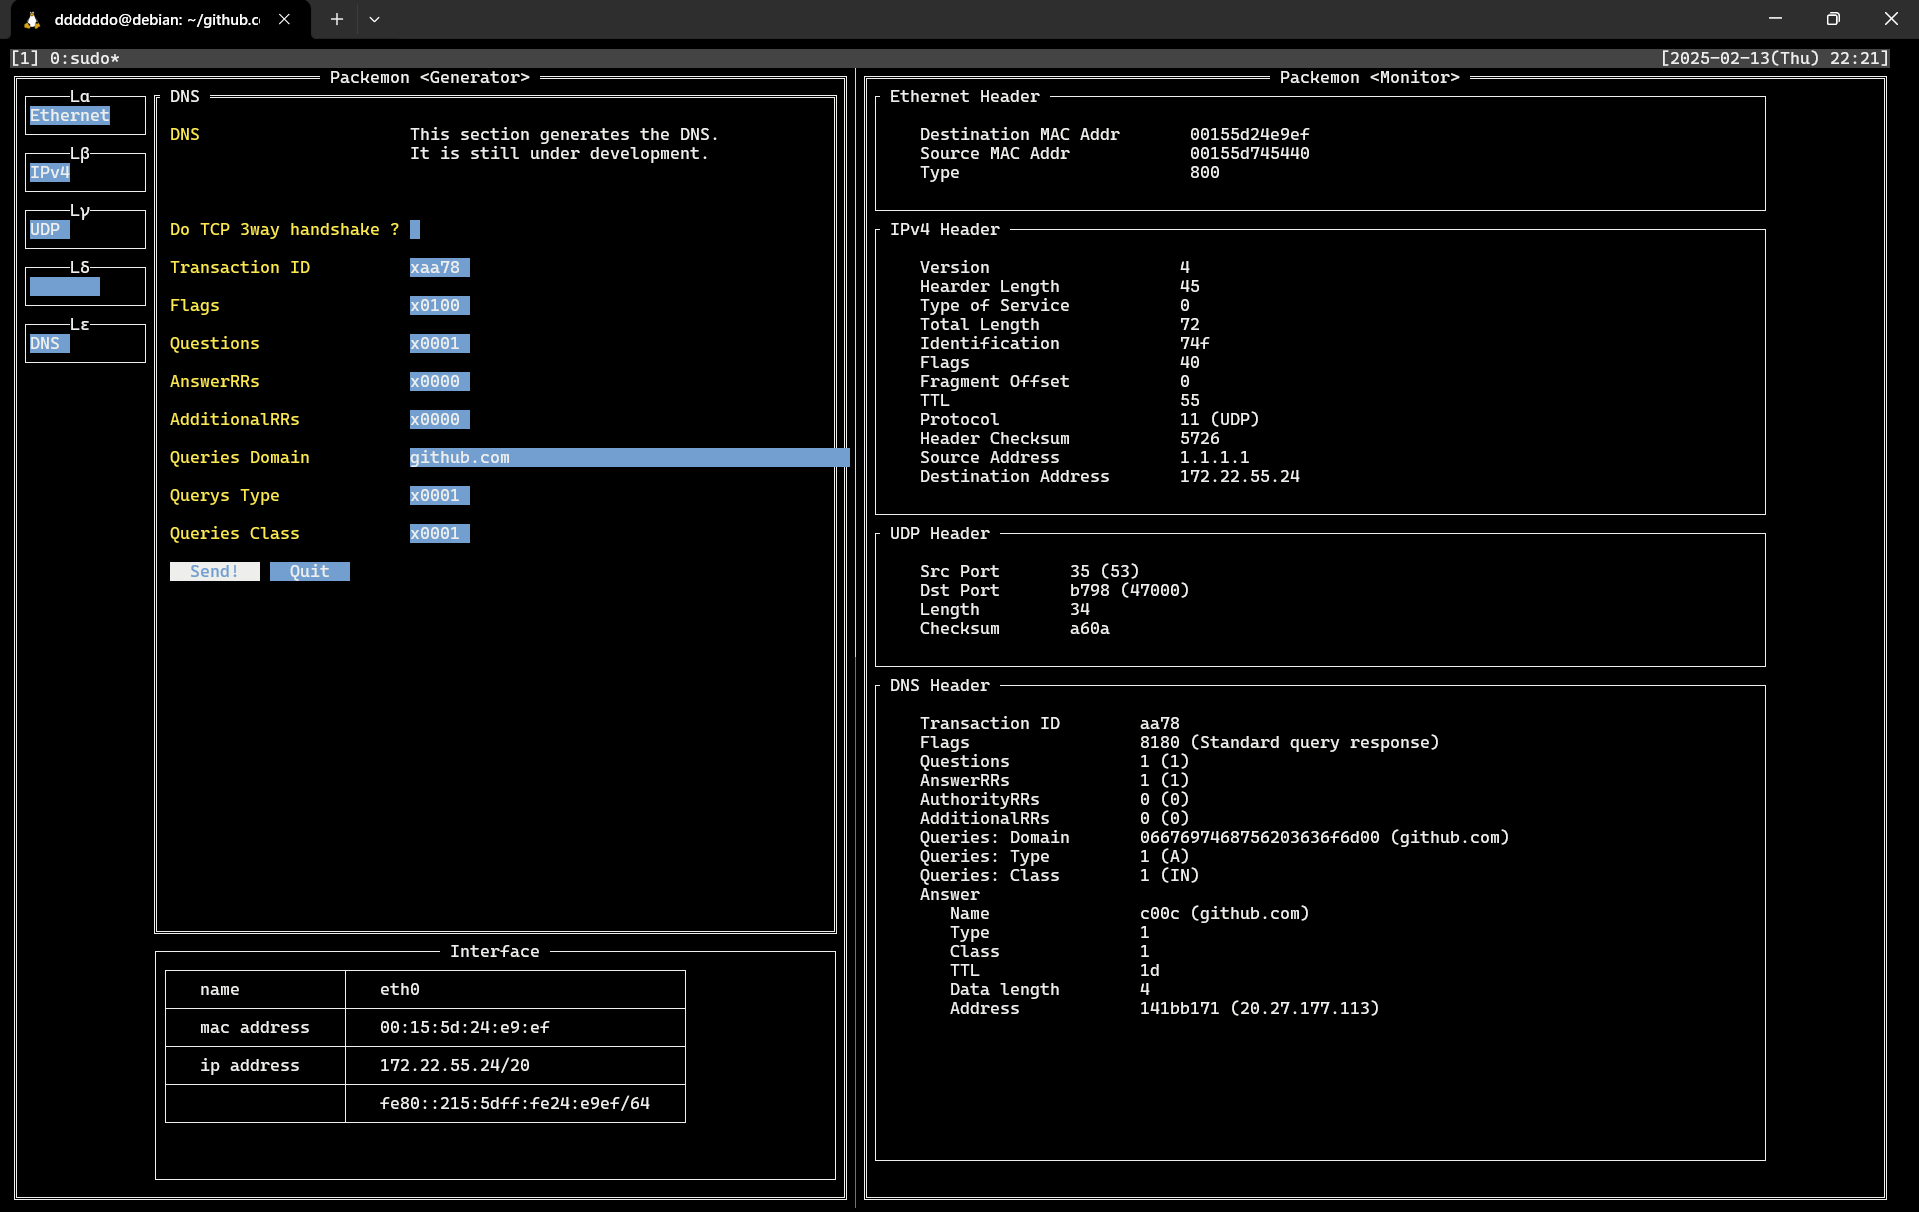
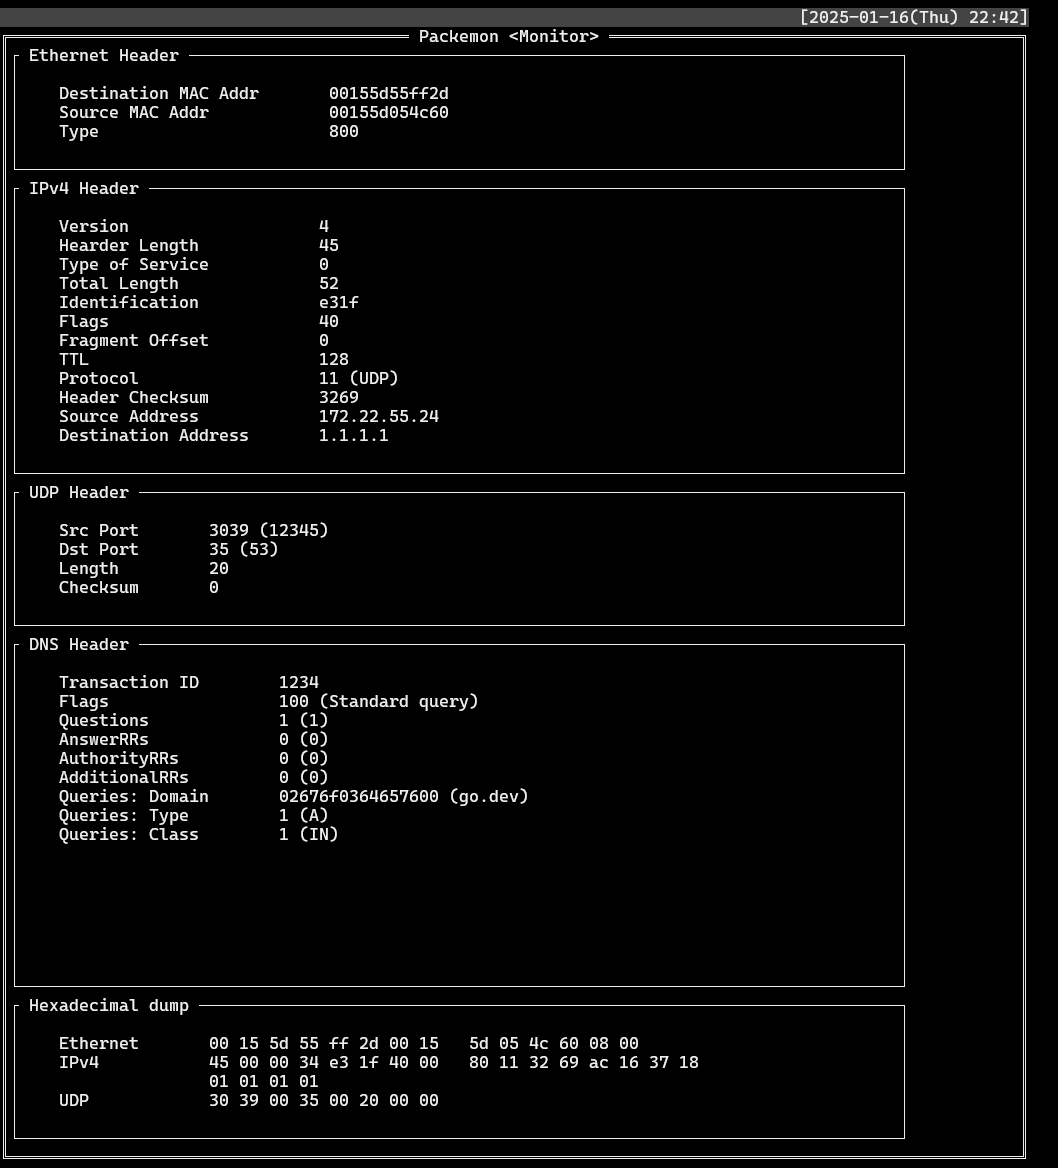
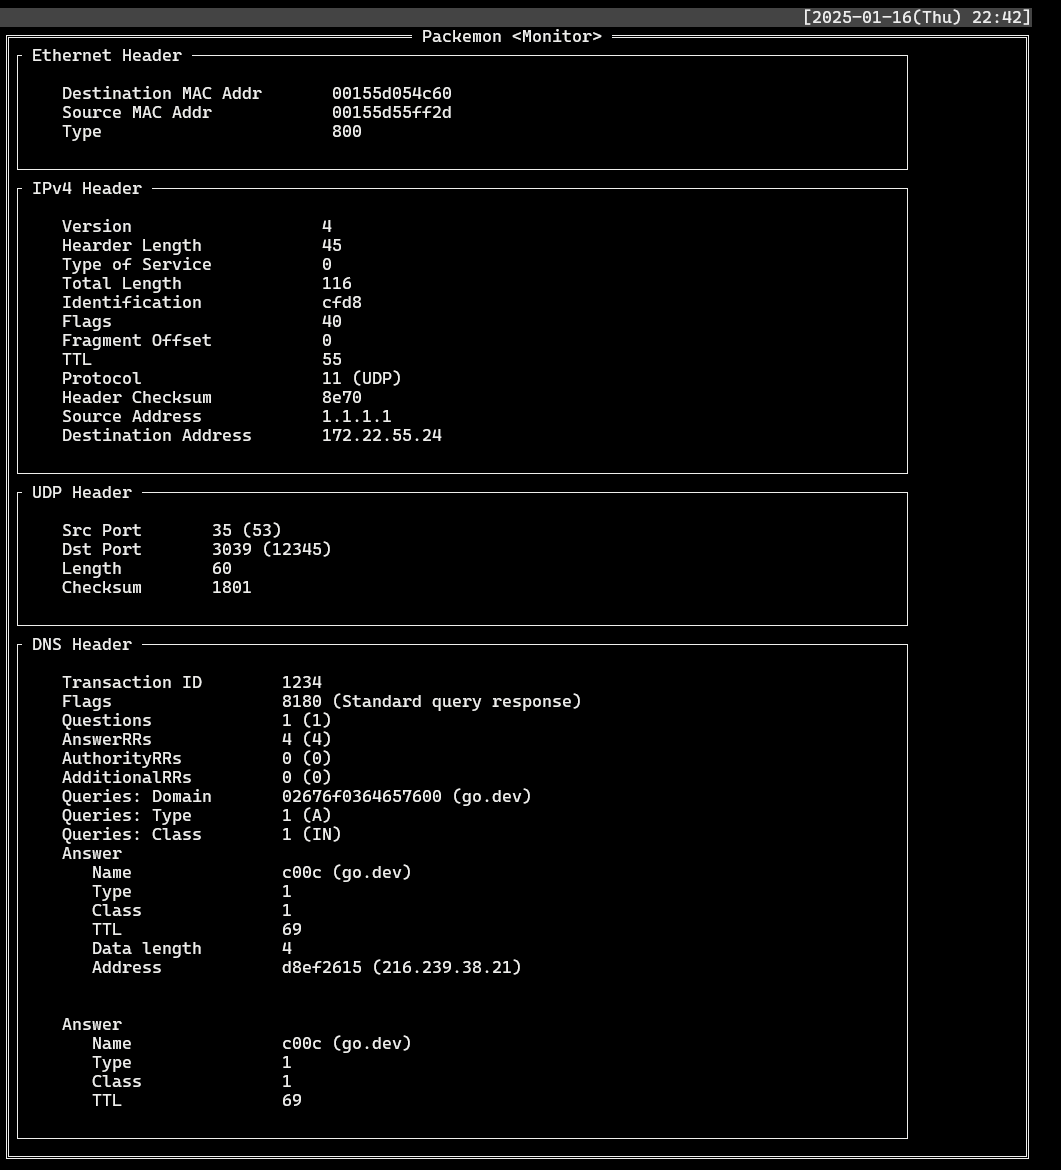
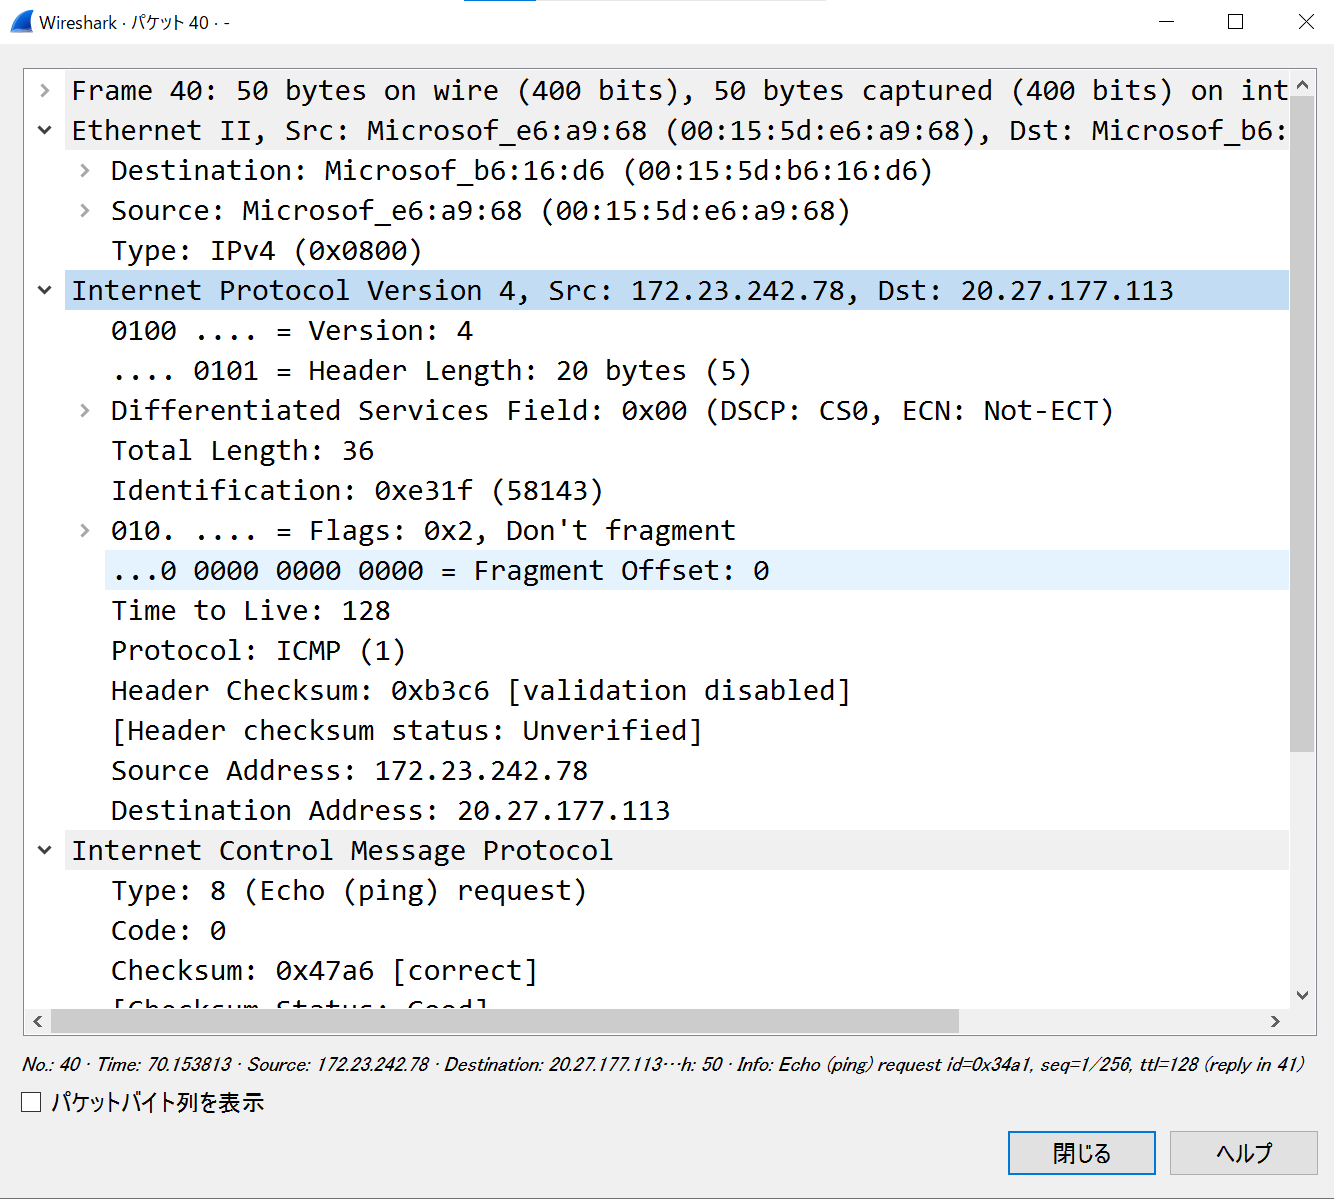
DNS query packet generated by Generator on the left is shown in **40** line of the Monitor. DNS query response packet is shown as **41** line, and a more detailed view of it is shown in the image below.
See **[here](https://github.com/ddddddO/packemon#sending-dns-query-and-monitoring-dns-response)** for detailed instructions.
Packemon's Monitor allows user to select each packet by pressing `Enter` key. Then, select any line and press `Enter` key to see the details of the desired packet. Pressing `Esc` key in the packet detail screen will return you to the original packet list screen.
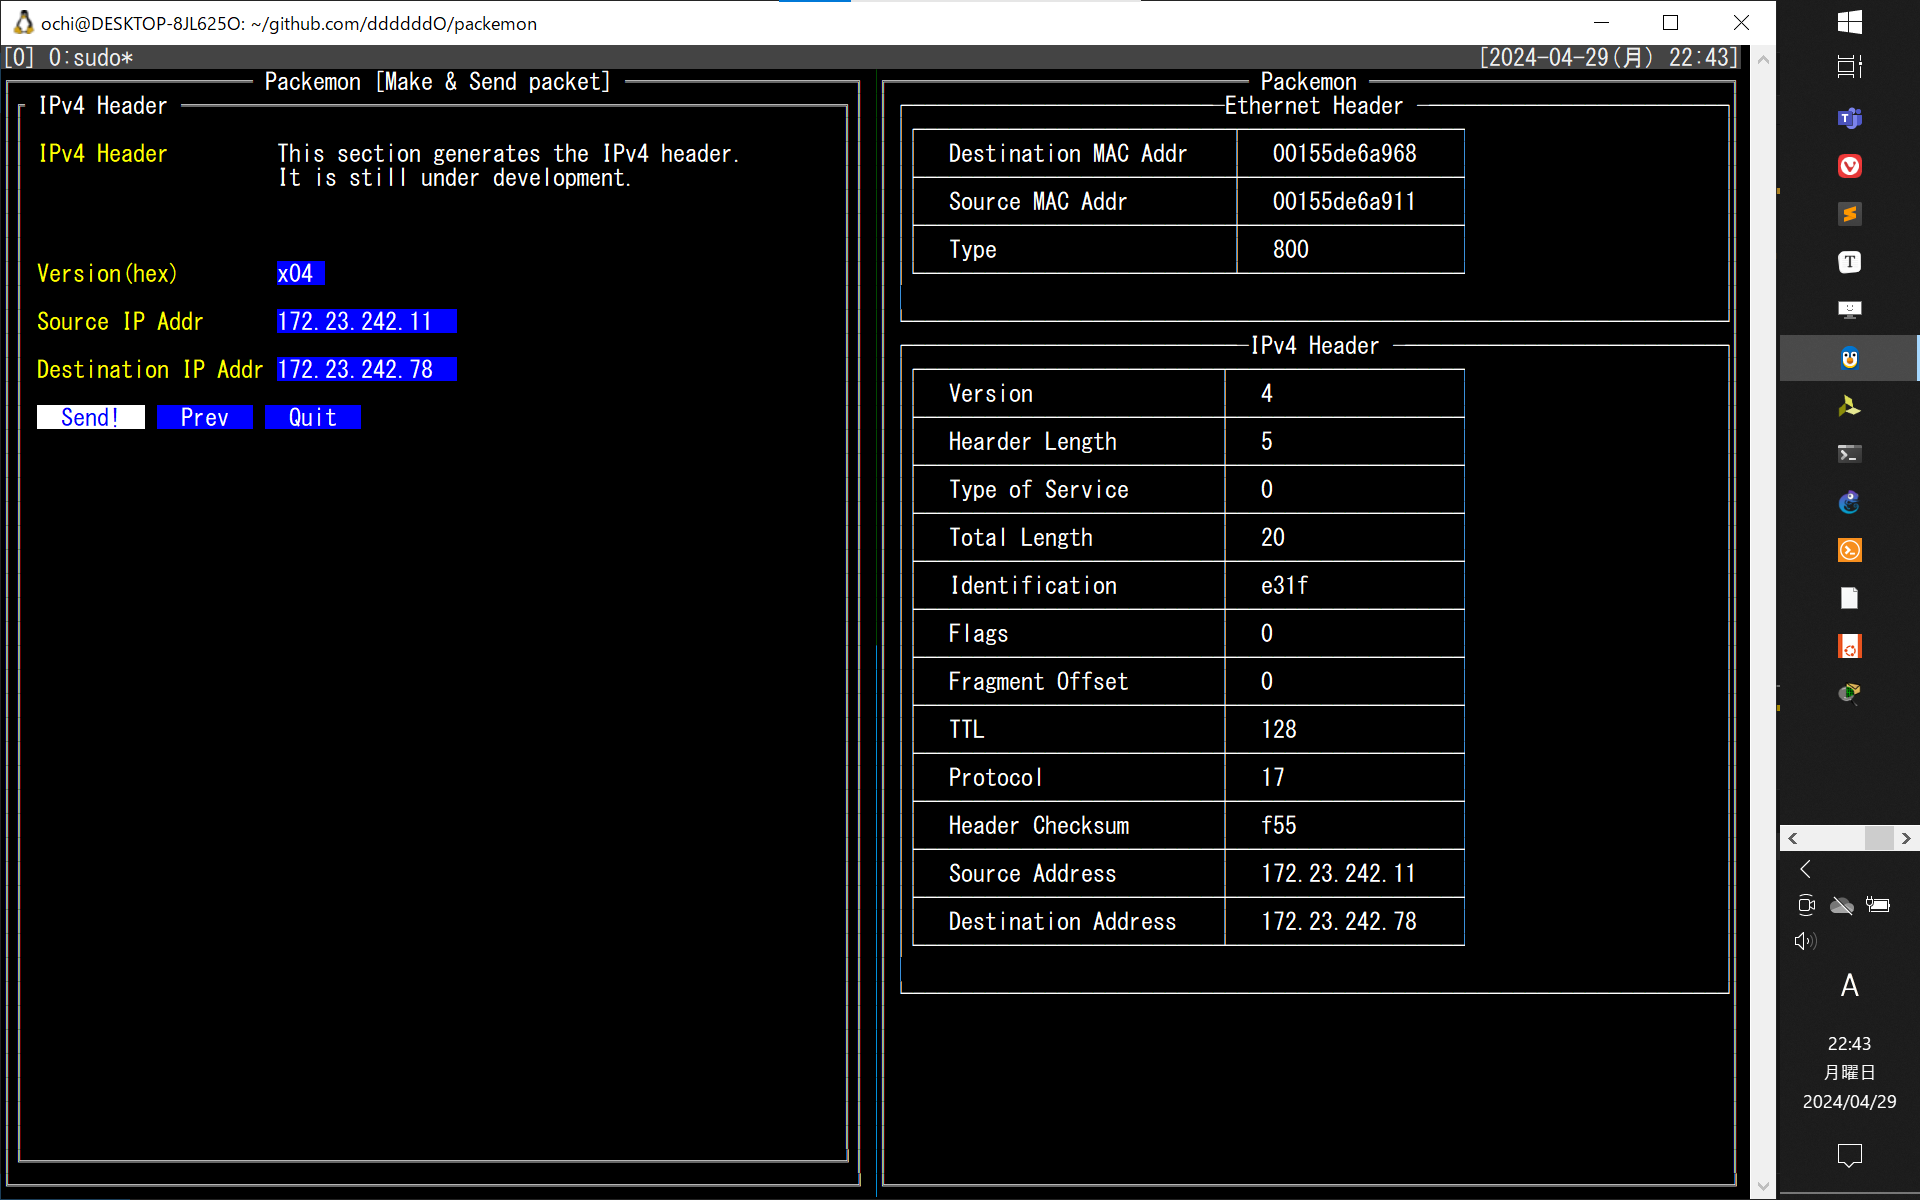
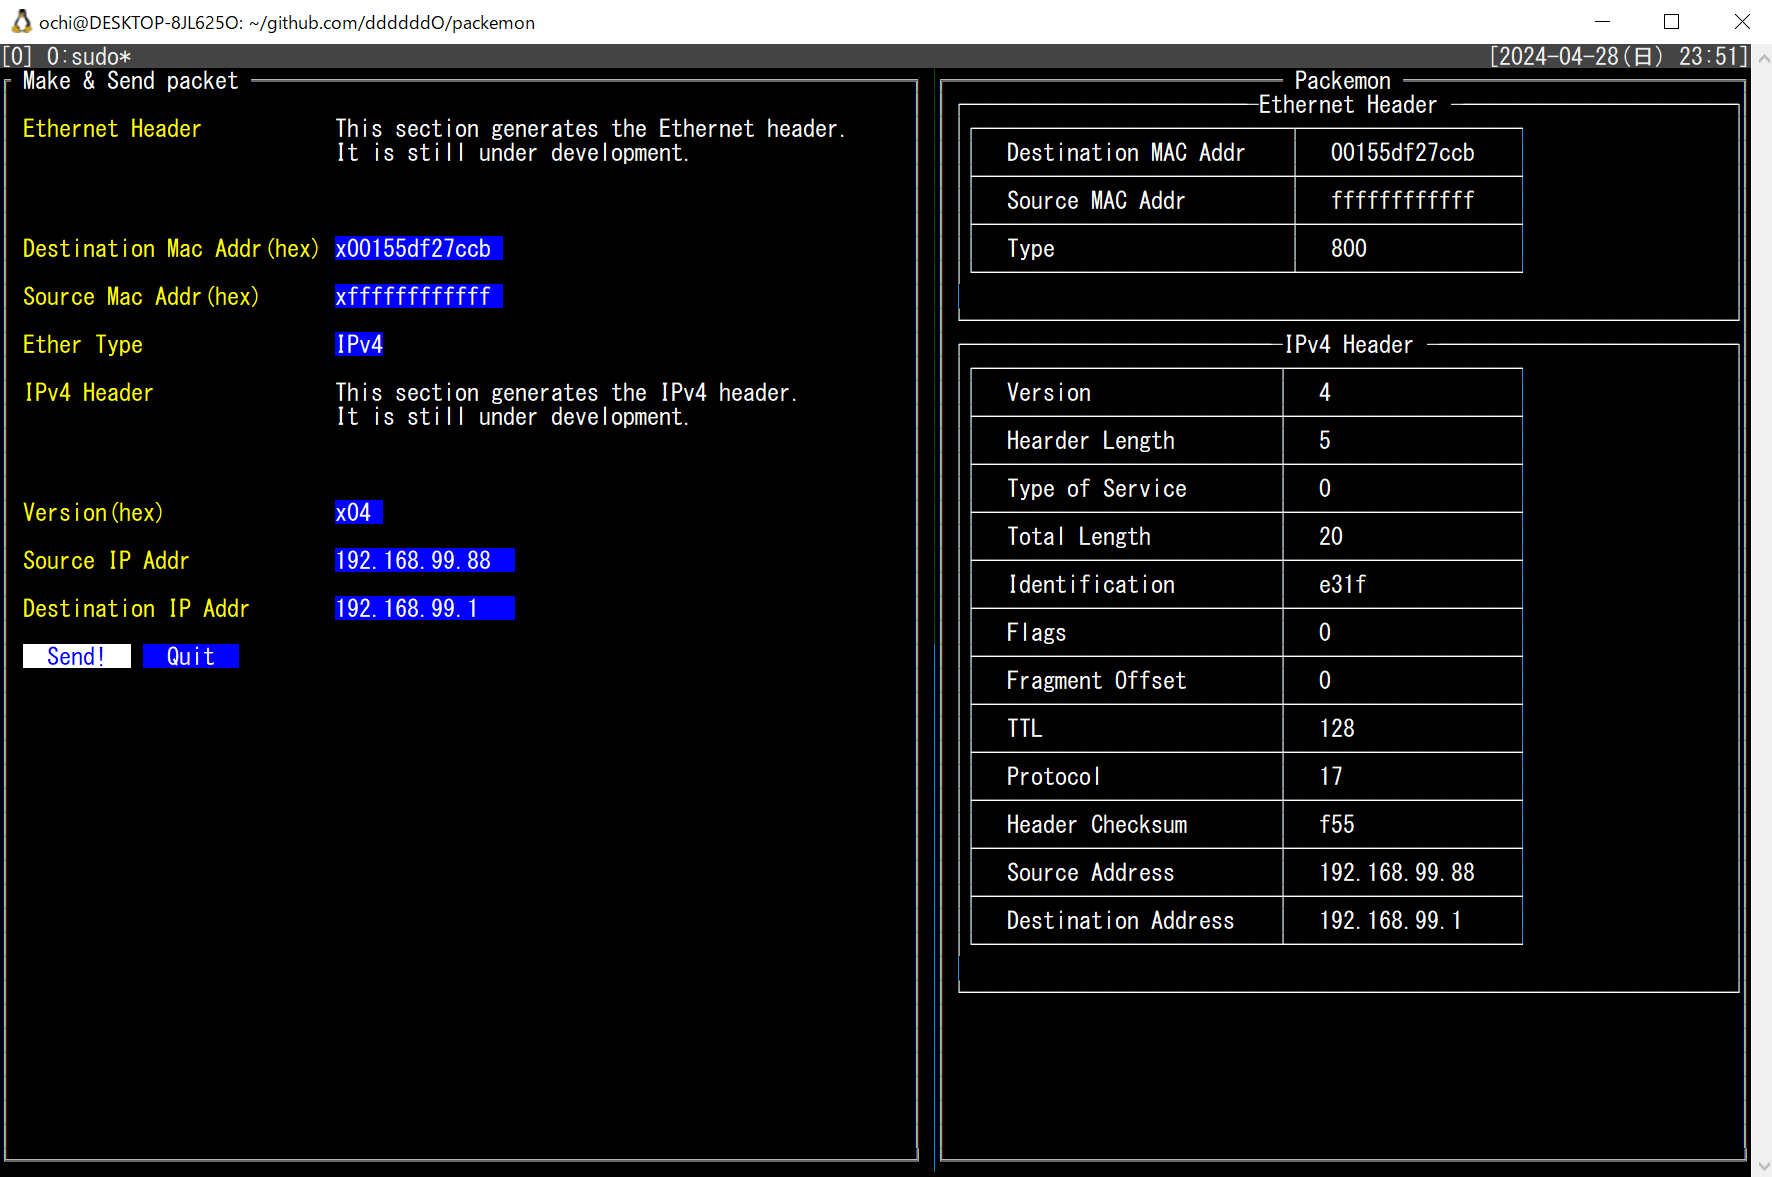
### Packet Generator
>[!WARNING]
> While using Generator mode, TCP RST packets automatically sent out by the kernel are dropped. When this mode is stopped, the original state is restored. Probably😅.
> Incidentally, dropping RST packets is done by running [the eBPF program](./egress_control/).
> The background note incorporating the eBPF is the POST of X around [here](https://x.com/ddddddOpppppp/status/1798715056513056881).
- Send generated packets to any network interfaces.
- You can specify network interface with `--interface` flag. Default is `eth0`.
- The following types of packets are covered.
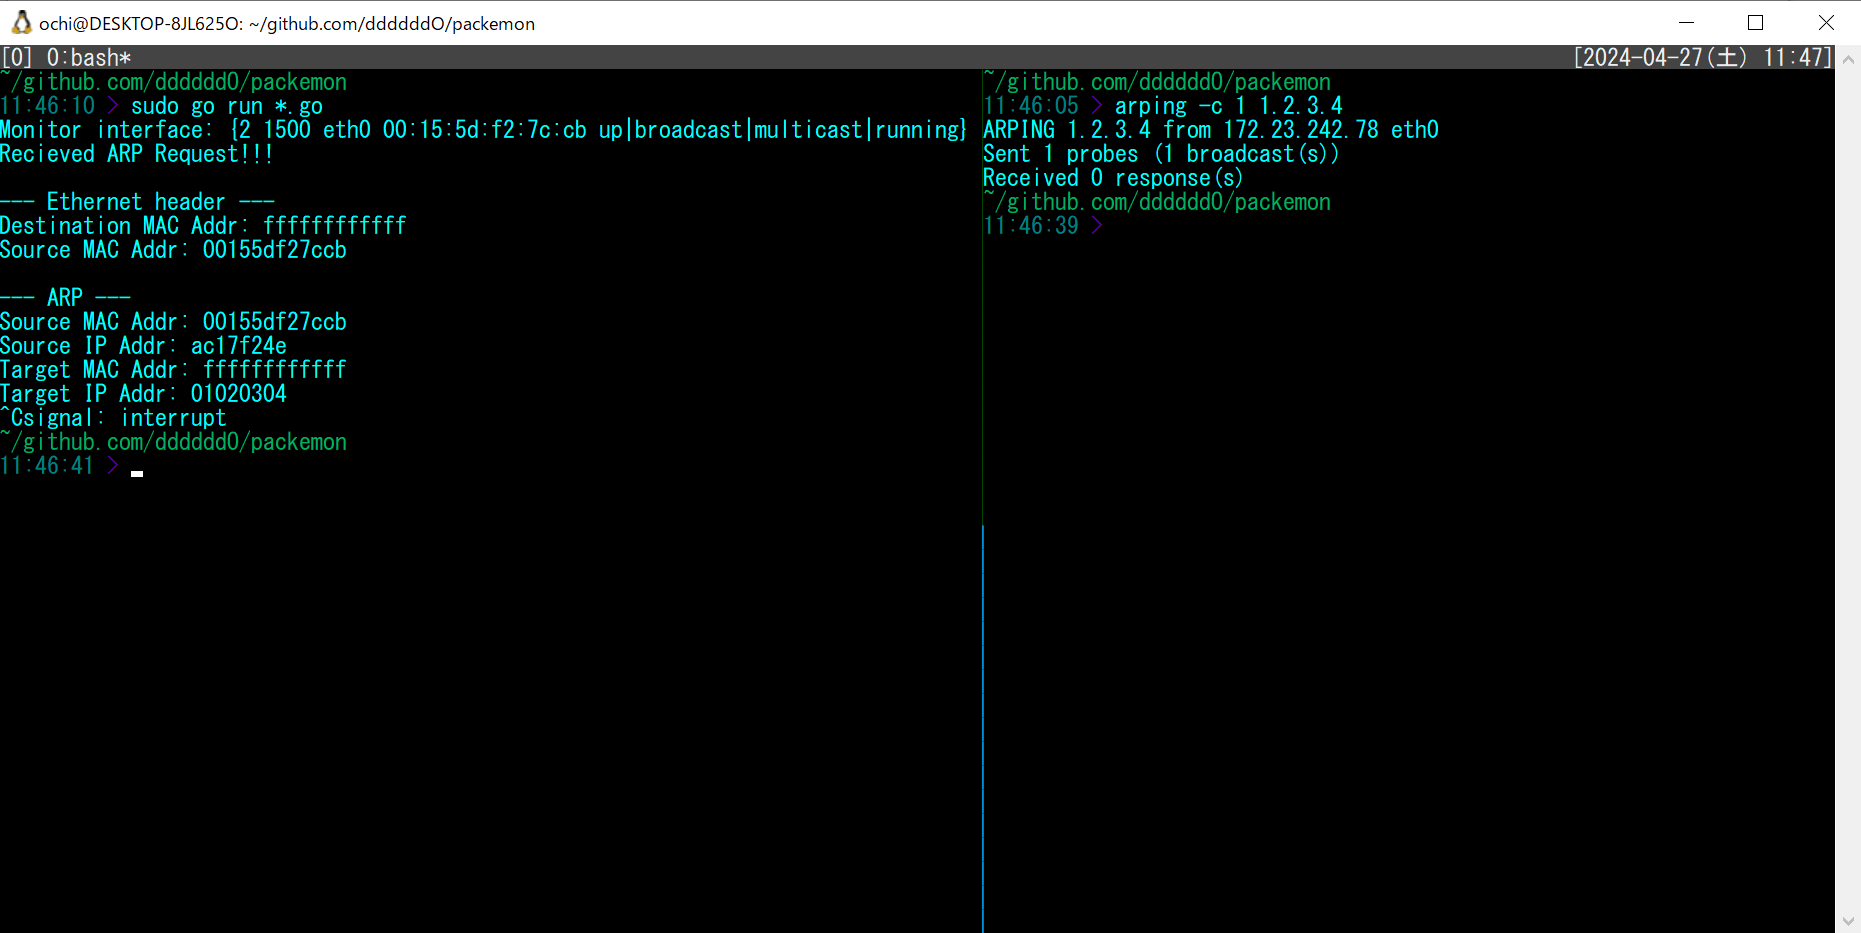
- [x] Ethernet
- [x] ARP (WIP)
- [x] IPv4 (WIP)
- [x] IPv6 (WIP)
- [x] ICMPv4 (WIP)
- [ ] ICMPv6
- [x] TCP (WIP)
- [x] UDP (WIP)
- [ ] TLSv1.2 (WIP)
- This tool is not very useful because the number of cipher suites it supports is still small, but an environment where you can try it out can be found [here](./cmd/debugging/https-server/README.md).
- TCP 3way handshake ~ TLS handshake ~ TLS Application data (encrypted HTTP)
- Supported cipher suites include
- `TLS_RSA_WITH_AES_128_GCM_SHA256`
- You can check the server for available cipher suites with the following command
- `nmap --script ssl-enum-ciphers -p 443 `
- [ ] TLSv1.3
- [x] DNS (WIP)
- [x] HTTP (WIP)
- [ ] xxxxx....
- [ ] Routing Protocols
- IGP (Interior Gateway Protocol)
- [ ] OSPF (Open Shortest Path First)
- [ ] EIGRP (Enhanced Interior Gateway Routing Protocol)
- [ ] RIP (Routing Information Protocol)
- EGP (Exterior Gateway Protocol)
- [ ] BGP (Border Gateway Protocol)
- [Currently there is only debug mode](./cmd/debugging/bgp/README.md)
- TCP 3way handshake ~ Open ~ Keepalive ~ Update ~ Notification
### Packet Monitor
- Monitor any network interfaces.
- You can specify network interface with `--interface` flag. Default is `eth0`.
- Specified packets can be saved to pcap file.
- The following types of packets are covered.
- [x] Ethernet
- [x] ARP
- [x] IPv4 (WIP)
- [x] IPv6 (WIP)
- [x] ICMPv4 (WIP)
- [ ] ICMPv6
- [x] TCP (WIP)
- [x] UDP
- [x] TLSv1.2 (WIP)
- [ ] TLSv1.3
- [ ] DNS (WIP)
- [x] DNS query
- [x] DNS query response
- [ ] xxxxx....
- [ ] HTTP (WIP)
- [x] HTTP GET request
- [x] HTTP GET response
- [ ] xxxxx....
- [ ] xxxxx....
- [ ] Routing Protocols
- IGP (Interior Gateway Protocol)
- [ ] OSPF (Open Shortest Path First)
- [ ] EIGRP (Enhanced Interior Gateway Routing Protocol)
- [ ] RIP (Routing Information Protocol)
- EGP (Exterior Gateway Protocol)
- [ ] BGP (Border Gateway Protocol)
## Installation
git clone & Go
# Recomended (Clone this repository and require 'Dependencies' section of https://ebpf-go.dev/guides/getting-started/#ebpf-c-program)
$ cd egress_control/ && go generate && cd -
$ go build -o packemon cmd/packemon/*.go
$ ls | grep packemon
$ mv packemon /usr/local/bin/

Go
# Deprecated (In some environments, RST packets may be sent during TCP 3-way handshake)
$ go install github.com/ddddddO/packemon/cmd/packemon@latest

deb
$ export PACKEMON_VERSION=X.X.X
$ curl -o packemon.deb -L https://github.com/ddddddO/packemon/releases/download/v$PACKEMON_VERSION/packemon_$PACKEMON_VERSION-1_amd64.deb
$ dpkg -i packemon.deb

rpm
$ export PACKEMON_VERSION=X.X.X
$ yum install https://github.com/ddddddO/packemon/releases/download/v$PACKEMON_VERSION/packemon_$PACKEMON_VERSION-1_amd64.rpm

apk
$ export PACKEMON_VERSION=X.X.X
$ curl -o packemon.apk -L https://github.com/ddddddO/packemon/releases/download/v$PACKEMON_VERSION/packemon_$PACKEMON_VERSION-1_amd64.apk
$ apk add --allow-untrusted packemon.apk
## Usage
- Packet Generator
```console
sudo packemon --send
```
- Packet Monitor
```console
sudo packemon
```
## Usecase
### Sending DNS query and Monitoring DNS response
1. setup
```sh
# Generator
$ sudo packemon --send
```
```sh
# Monitor
$ sudo packemon
```
← Generator | Monitor →

2. Generator
- `Lα` > `Ethernet` > `Ether Type` > **IPv4**
- `Lβ` > `IPv4` > `Protocol` > **UDP**
- `Lβ` > `IPv4` > `Destination IP Addr` > **1.1.1.1**
- Enter the address of DNS resolver here. Above is the address of Cloudflare resolver.
- `Lγ` > `UDP` > `Destination Port` > **53**
- `Lγ` > `UDP` > `Automatically calculate length ?` > **(Check!)**
- `Lε` > `DNS` > `Queries Domain` > **go.dev**
- Enter here the domain for which you want to name resolution.
- `Lε` > `DNS` > Click on **Send!**
- At this time, DNS query is sent with the contents set so far.
3. Monitor
- Find records where `Proto`: **DNS** and `DstIP` or `SrcIP` is **1.1.1.1**. Select each record to see the packet structure of the DNS query and the packet structure of the DNS response.
- List
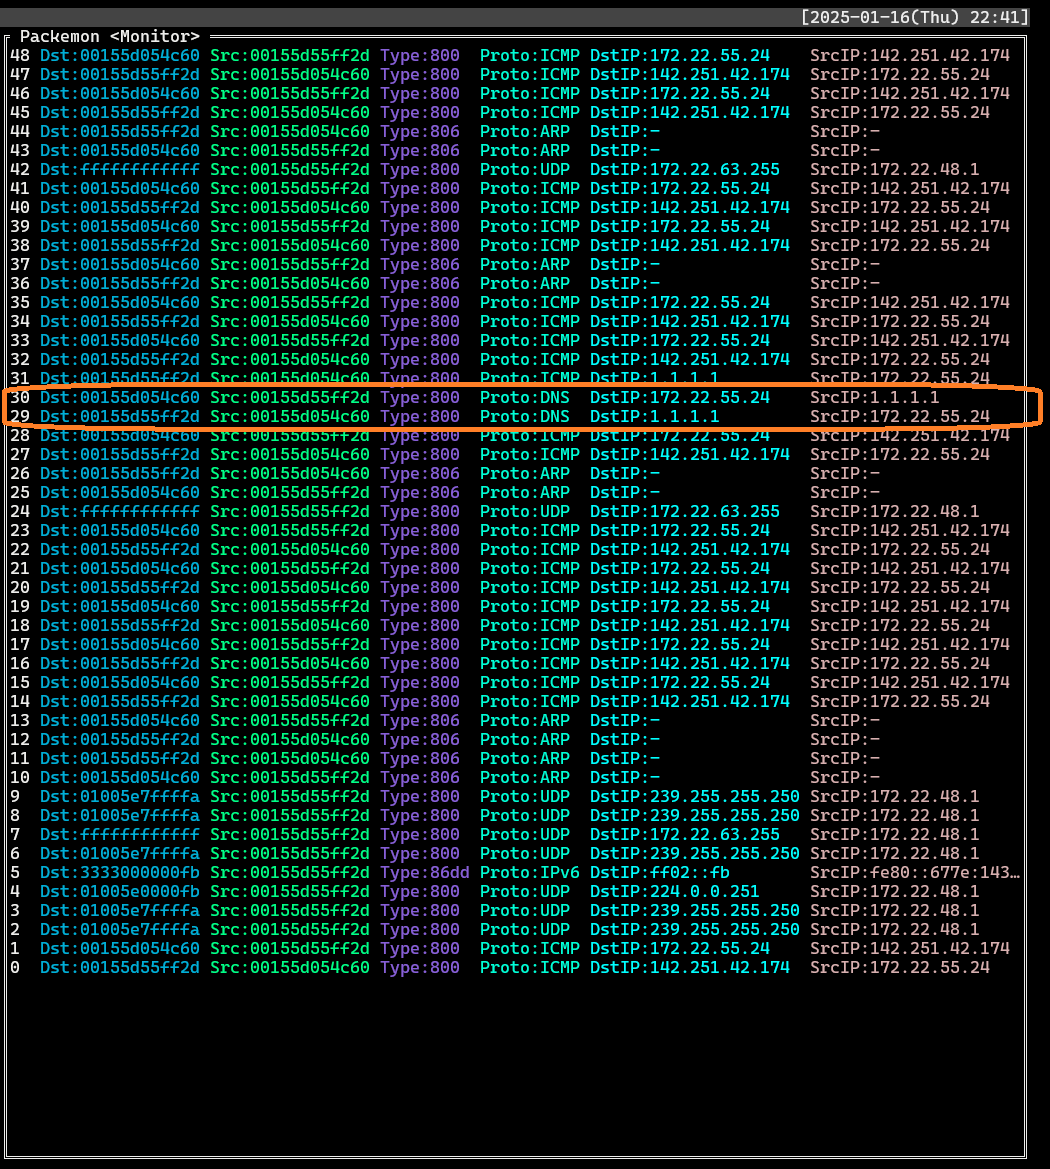
- DNS query (`DstIP: 1.1.1.1`)
- DNS response (`SrcIP: 1.1.1.1`)
## Another feature
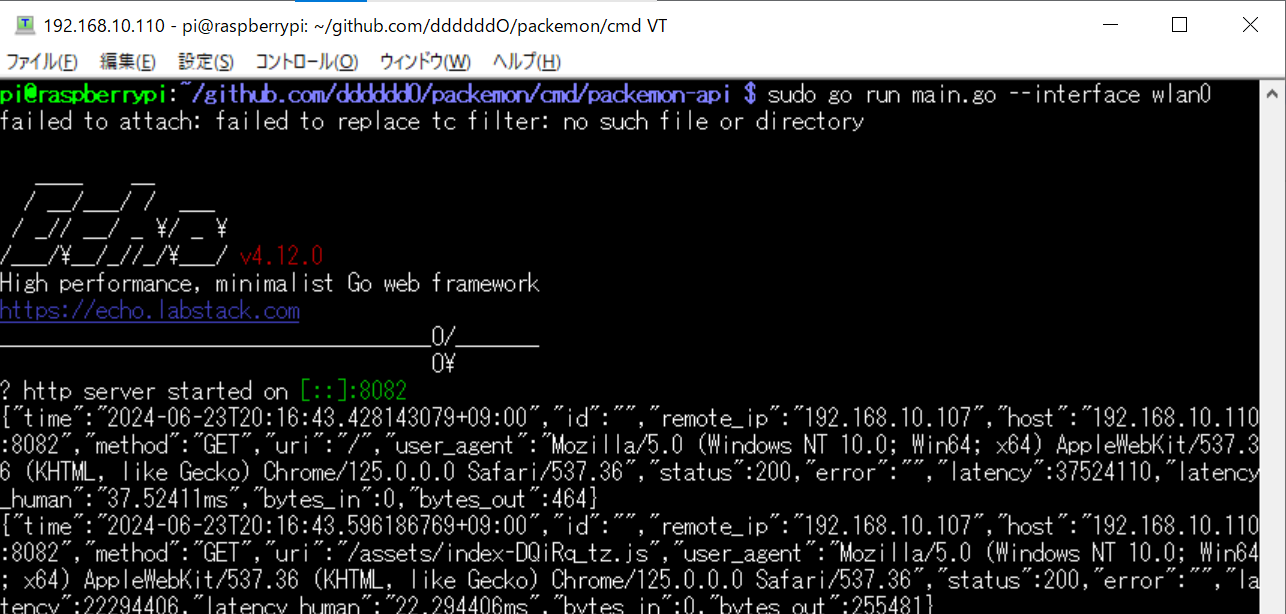
The local node's browser can monitor packets from remote nodes or send arbitrary packets from remote nodes.
```
+-------------------------------------+
+----------------------+ | REMOTE NODE |
| LOCAL NODE (Browser) | | $ sudo packemon-api --interface xxx |
| Monitor <---------|-- WebSocket --|--> HTTP GET /ws <-----+ |
| Generator ---------|-- POST packet --|--> HTTP POST /packet | |
+----------------------+ | -> parse packet | | +---------------+
| -> Network Interface -----|-- Send packet -->| TARGET NODE x |
+-------------------------------------+ | |
+---------------+
```
- Remote node
- Local node
>[!WARNING]
> Please note that the following is dangerous.
The following procedure is an example of how you can expose packemon-api to the outside world and monitor and send remote node packets on your browser.
1. (REMOTE) Please install `packemon-api` and run.
```console
$ go install github.com/ddddddO/packemon/cmd/packemon-api@latest
$ sudo packemon-api --interface wlan0
```
1. (REMOTE) Run [`ngrok`](https://ngrok.com/) and note the URL to be paid out.
```console
$ ngrok http 8082
```
1. (LOCAL) Enter the dispensed URL into your browser and you will be able to monitor and send packets to remote node.
## Related tools
- netcat
- [Nmap](https://nmap.org/)
- [Scapy](https://github.com/secdev/scapy)
- [google/gopacket](https://github.com/google/gopacket)
## Acknowledgment
- [rivo/tview](https://github.com/rivo/tview)
- Packemon is using this TUI library.
- [Golangで作るソフトウェアルータ](https://booth.pm/ja/items/5290391)
- The way Go handles syscalls, packet checksum logic, etc. was helpful. This is a book in Japanese.
## Document
- [ネットワークを知りたくて](https://zenn.dev/openlogi/articles/195d07bd9bc5b4)
## Stargazers over time
[](https://starchart.cc/ddddddO/packemon)
## Log (japanese)
xxx
## Links
- 「Golangで作るソフトウェアルータ」
- その実装コード: https://github.com/sat0ken/go-curo
- https://terassyi.net/posts/2020/03/29/ethernet.html
- 動作確認用コマンドの参考
- https://zenn.dev/takai404/articles/76d47e944d8e18
- [Scrapboxメモ書き](https://scrapbox.io/ddddddo/%E3%83%8D%E3%83%83%E3%83%88%E3%83%AF%E3%83%BC%E3%82%AF%E7%B3%BB%E8%AA%AD%E3%81%BF%E7%89%A9)
- WSL2のDebianで動作した。
- 任意の Ethernet ヘッダ / IPv4 ヘッダ / ARP / ICMP を楽に作れてフレームを送信できる
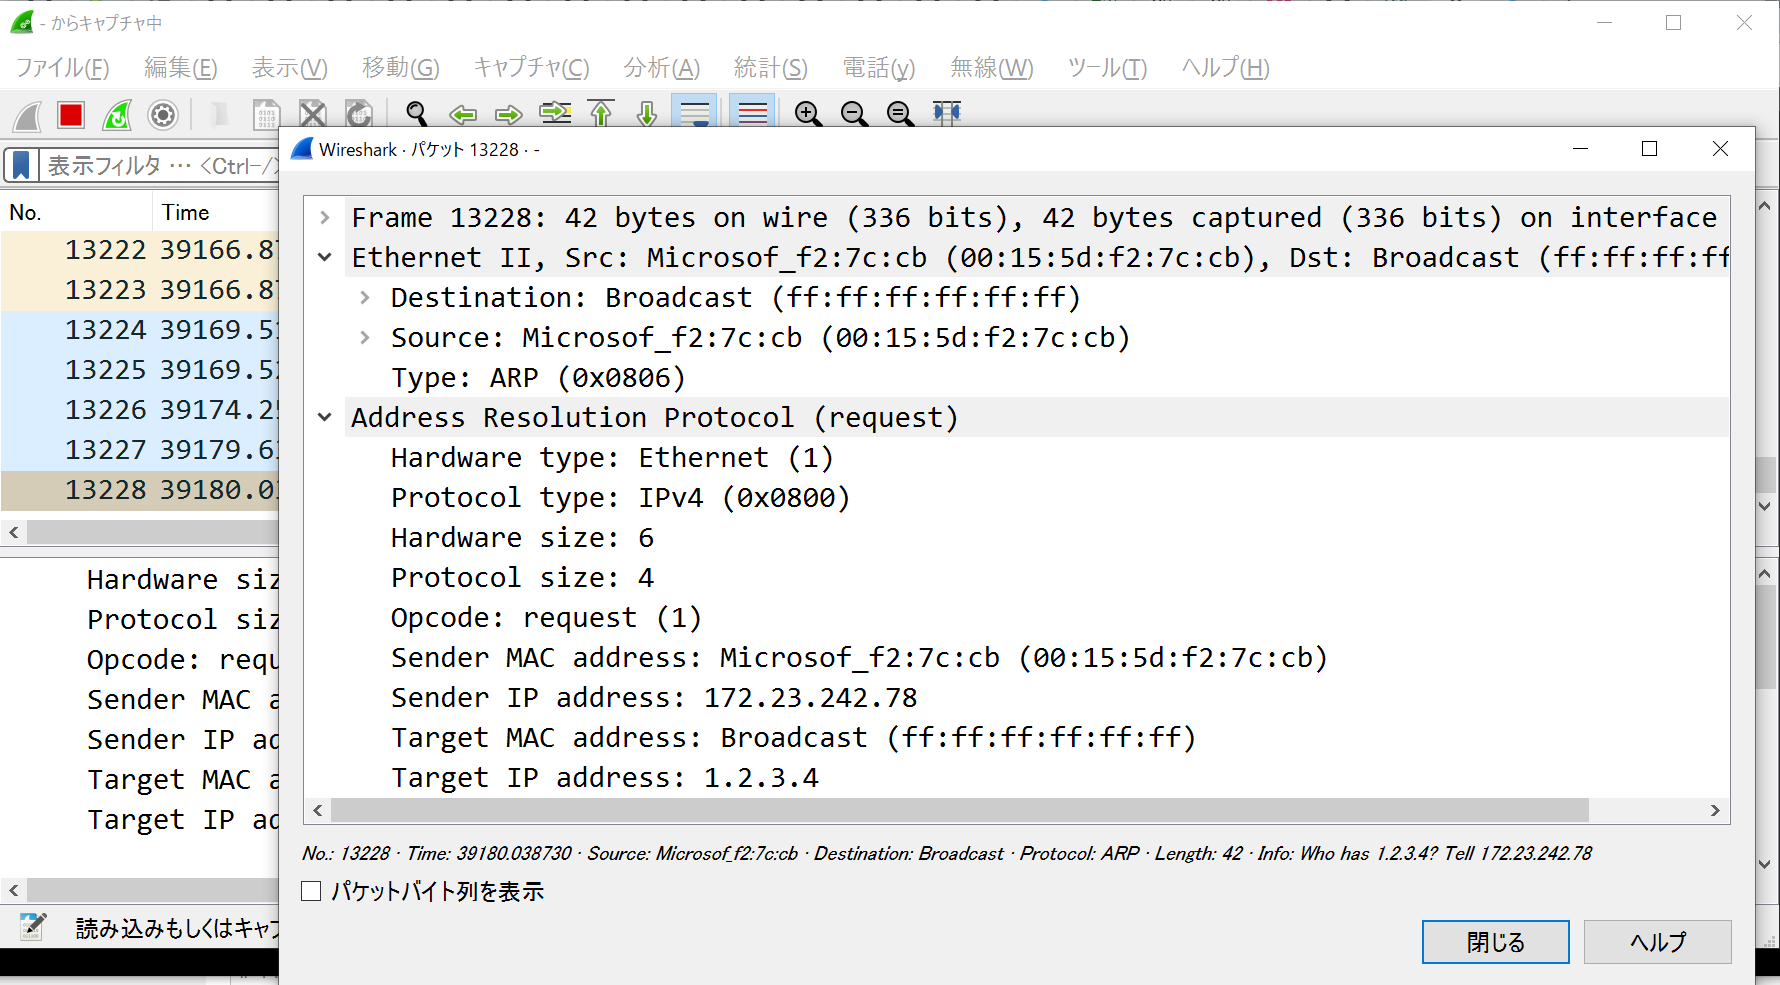
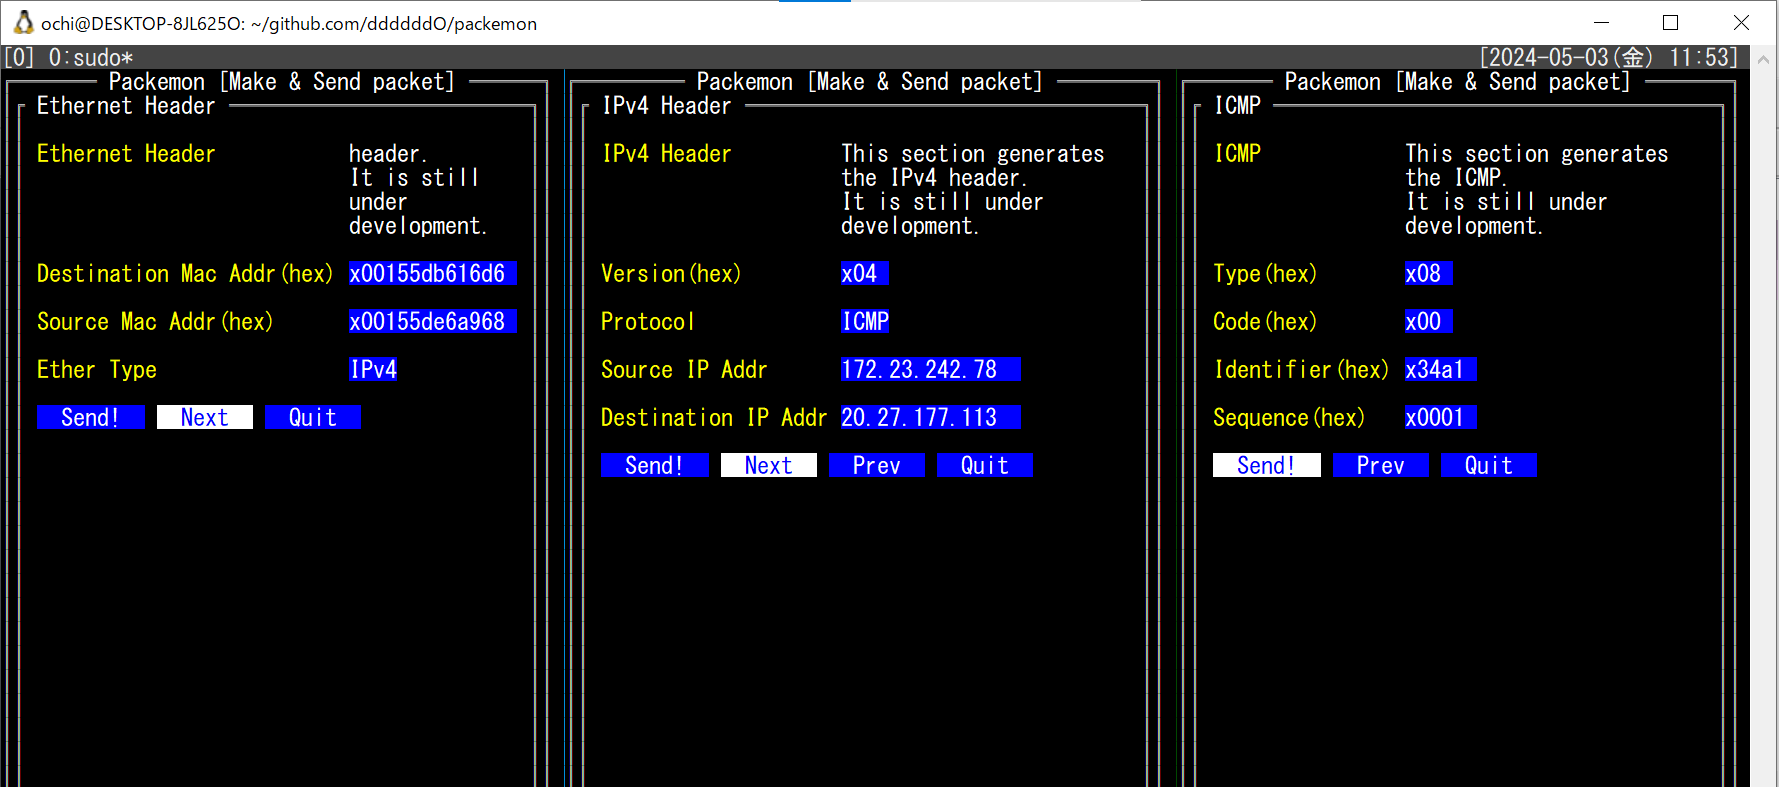
- 以下はtmuxで3分割した画面に各種ヘッダのフォーム画面を表示している。そして ICMP echo request を送信し、 echo reply が返ってきていることを Wireshark で確認した様子
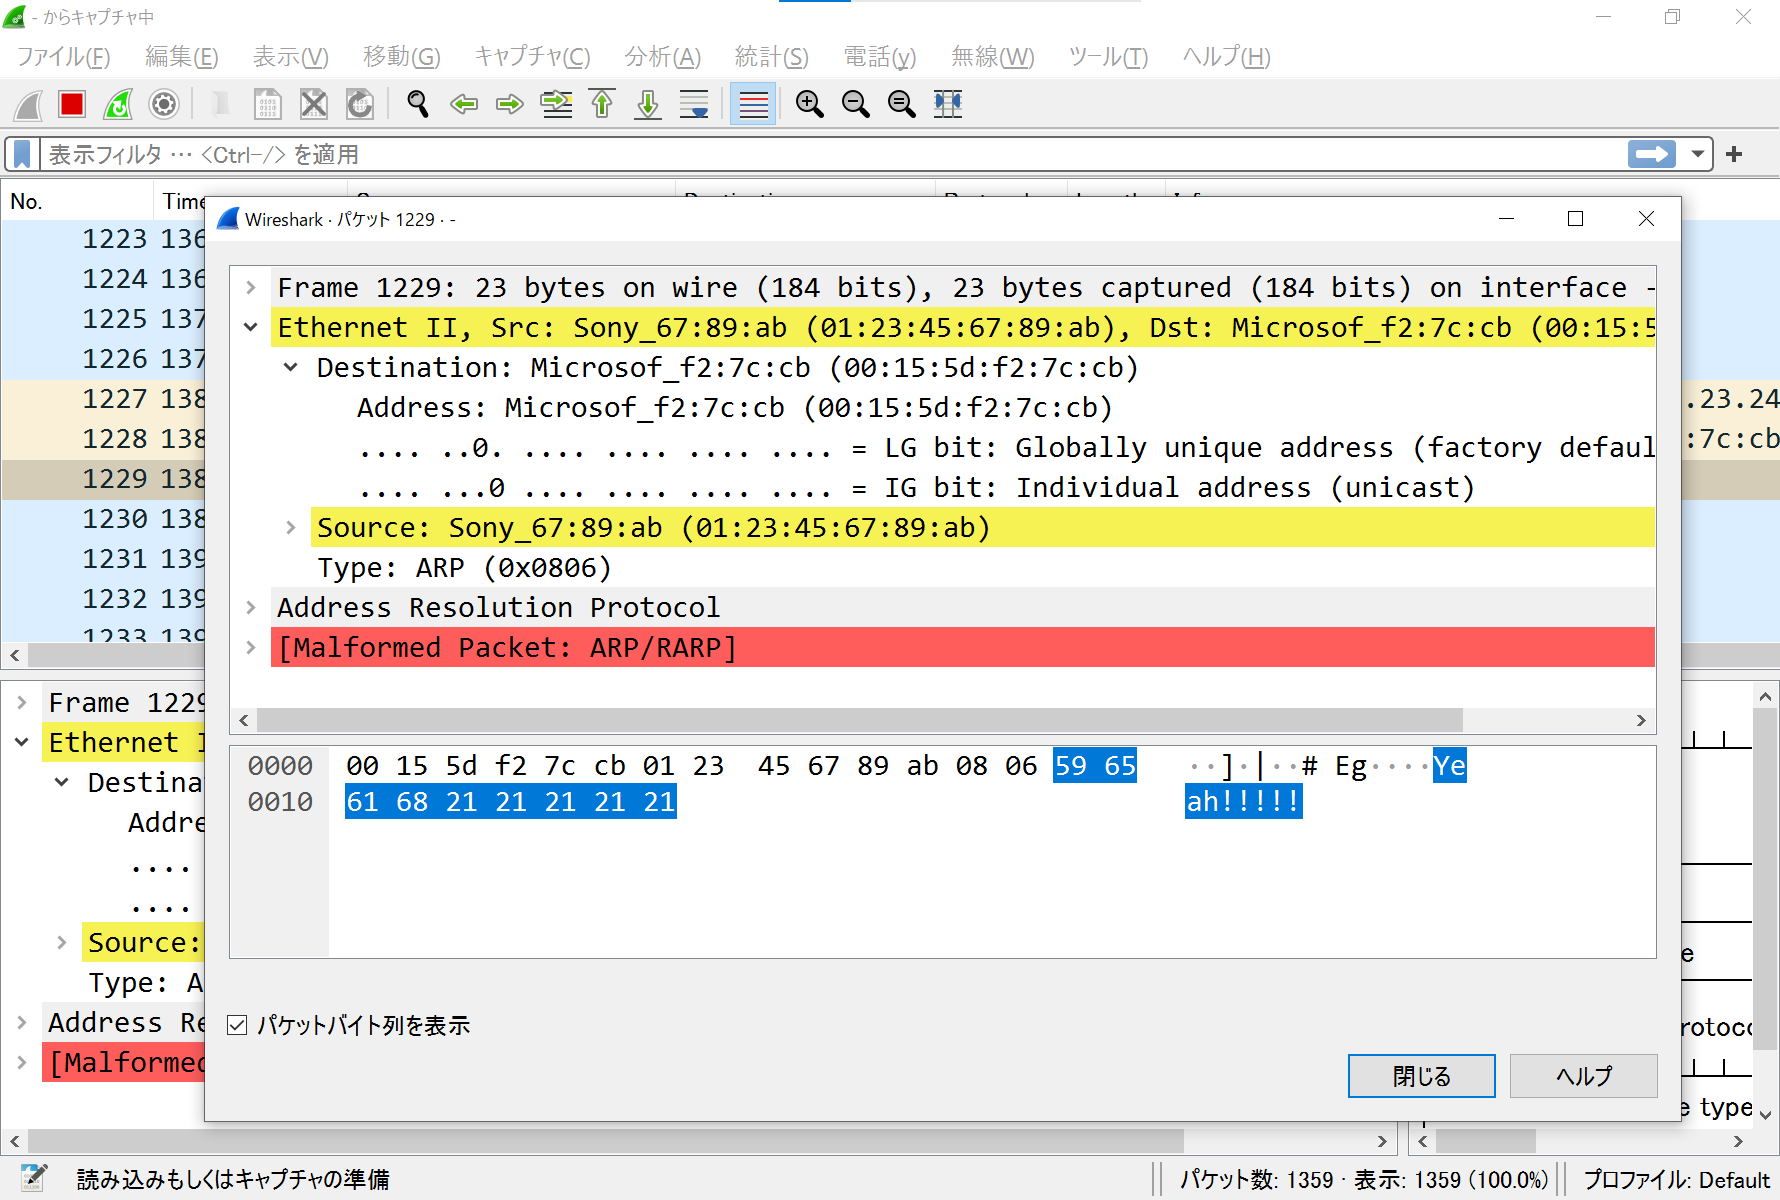
- フレームを受信して詳細表示(ARPとIPv4)
少し前のUI(`5062561` のコミット)

xxx
- Ethernetフレームのみ作って送信(`77c9149` でコミットしたファイルにて)
- ARPリクエストを作って送信(`390f266` でコミットしたファイルにて。中身はめちゃくちゃと思うけど)

- ARPリクエストを受信してパース(`b6a025a` でコミット)