# Writing duckyScript
[Get duckyPad Pro](https://www.tindie.com/products/37399/) | [Official Discord](https://discord.gg/4sJCBx5) | [Getting Started](./getting_started.md) | [Table of Contents](#table-of-contents)
------
## Overview
duckyScript is a simple language for **automating keyboard/mouse inputs**.
It was originally developed for [USB Rubber Ducky](https://shop.hak5.org/products/usb-rubber-ducky-deluxe).
## Quick Examples
In the **simplest form**, you just tell it what key to press!
Ideal for key combos:
* New Tab: `CONTROL t`
* Task Manager: `CONTROL SHIFT ESC`
--------
Once familiar, you can write longer **multi-line scripts** for more complex actions.
**Open Webpage:**
```
WINDOWS r
DELAY 500
STRING https://youtu.be/dQw4w9WgXcQ
ENTER
```
---------
At **full potential**, duckyScript is much closer to a **general-purpose language**.
You can:
* Use Variables, Conditions, and Loops.
* Read Buttons
* Write to OLED screen
* Change RGB colors
* And more!
This allows highly customized macros for your exact needs.
## First Time?
There are quite a few commands, and it can be a bit daunting.
The **first few sections** (from `Comments` to `Mouse`) is more than enough to get started.
You can skim the rest once familiar with the basics.
Also **playing with sample profiles** is a good way to get a feel of duckyScript.
Of course, people at the [Official Discord](https://discord.gg/4sJCBx5) are always happy to help!
## 👉👉 duckyScript Cheatsheet 👈👈
[Click me to download a PDF](https://github.com/dekuNukem/duckyPad-Pro/blob/master/doc/duckyscript_cheatsheet.pdf?raw=1) of the **quick reference guide**!
Much easier to lookup than going through this whole page.
## 🤖 Doc for AI 🤖
You can also ask AI to write / explain duckyScript for you.
* [Download this file](https://raw.githubusercontent.com/dekuNukem/duckyPad-Pro/refs/heads/master/doc/duckyscript_for_ai.md) (Right click -> Save As)
* Include as attachment (or paste content) in chat
* AI can make mistakes. Always double check!
## Syntax Highlighter
[Available for VS Code and Sublime Text](https://github.com/duckyPad/duckyScript-Syntax-Highlighter/blob/master/README.md)
Recommended for longer and more complex scripts, write there and copy it back.
## List of Commands
- [Comments](#comments)
- [`//`](#)
- [`REM_BLOCK`](#rem_block-and-end_rem)
- [Typing](#typing)
- [`STRING` and `STRINGLN`](#string-and-stringln)
- [`STRINGLN_BLOCK`](#stringln_block-and-end_stringln)
- [`STRING_BLOCK`](#string_block-and-end_string)
- [Pressing Keys](#pressing-keys)
- [Special Keys](#special-keys)
- [`KEYDOWN` / `KEYUP`](#keydown-keyup)
- [`REPEAT`](#repeat)
- [Timing](#timing)
- [`DELAY`](#delay-n)
- [`DEFAULTDELAY`](#defaultdelay-n)
- [`DEFAULTCHARDELAY`](#defaultchardelay-n)
- [`CHARJITTER`](#charjitter-n)
- [Mouse](#mouse)
- [Mouse Buttons](#mouse-buttons)
- [`MOUSE_MOVE`](#mouse_move-x-y)
- [`MOUSE_SCROLL`](#mouse_scroll-h-v)
- [Multiple Actions](#multiple-actions)
- [Profile Switching](#profile-switching)
- [`PREV_PROFILE` / `NEXT_PROFILE`](#prev_profile-next_profile)
- [`GOTO_PROFILE`](#goto_profile)
- [Autoswitcher](#autoswitcher)
- [OLED](#oled)
- [`OLED_CURSOR`](#oled_cursor-x-y)
- [`OLED_PRINT`](#oled_print)
- [`OLED_CPRINT`](#oled_cprint)
- [`OLED_CLEAR`](#oled_clear)
- [`OLED_CIRCLE`](#oled_circle-x-y-radius-options)
- [`OLED_LINE`](#oled_line-x1-y1-x2-y2)
- [`OLED_RECT`](#oled_rect-x1-y1-x2-y2-options)
- [`OLED_UPDATE`](#oled_update)
- [`OLED_RESTORE`](#oled_restore)
- [Per-Key RGB](#per-key-rgb)
- [`SWC_SET`](#swc_set-n-r-g-b)
- [`SWC_FILL`](#swc_fill-r-g-b)
- [`SWC_RESET`](#swc_reset-n)
- [Constants](#constants)
- [Variables](#variables)
- [Persistent Global Variables](#persistent-global-variables)
- [Reserved Variables](#reserved-variables)
- [Operators](#operators)
- [Mathematics](#mathematics)
- [Comparison](#comparison)
- [Logical](#logical)
- [Bitwise](#bitwise)
- [Augmented Assignments](#augmented-assignments)
- [UNSIGNED Operators](#unsigned-operators)
- [Advanced Printing](#advanced-printing)
- [Format Specifiers](#format-specifiers)
- [Numerical Padding](#numerical-padding)
- [Real-time Clock (RTC)](#real-time-clock-rtc)
- [Setting RTC](#setting-rtc)
- [Reading RTC](#reading-rtc)
- [Conditional Statements](#conditional-statements)
- [`WHILE` Loops](#loops)
- [Functions](#functions)
- [Plain Functions](#plain-functions)
- [Arguments and Returns](#arguments-and-returns)
- [Variable Scoping](#variable-scoping)
- [Nested / Recursive Calls](#nested-recursive-calls)
- [duckyPad Standard Library](#duckypad-standard-library)
- [User Headers](#user-headers)
- [Built-in Functions](#built-in-functions)
- [Reading Inputs](#reading-inputs)
- [Randomization](#randomization)
- [Random Number](#random-number)
- [Random Character](#random-character)
- [Miscellaneous](#miscellaneous)
- [Reserved Variables List](#reserved-variables-list)
## Comments
### `//`
C-style comment. Anything after `//` is ignored.
```
// This is a comment
```
### `REM_BLOCK` and `END_REM`
Comment block. Everything in-between is ignored.
```
REM_BLOCK
Put as much comment here
as you want!
END_REM
```
-------
[⬆️⬆️⬆️⬆️⬆️⬆️ Back to Top ⬆️⬆️⬆️⬆️⬆️⬆️](#list-of-commands)
## Typing
### `STRING` and `STRINGLN`
`STRING` types out whatever after it **`AS-IS`**.
```
STRING Hello world!
// types out "Hello world!"
```
`STRINGLN` also presses **enter key** at the end.
### `STRINGLN_BLOCK` and `END_STRINGLN`
Type out everything inside as-is.
Also presses **enter key** at the **end of each line**.
```
STRINGLN_BLOCK
According to all known laws of aviation,
there is no way a bee should be able to fly.
END_STRINGLN
```
### `STRING_BLOCK` and `END_STRING`
Similar to above, but does **NOT** press enter on new lines.
### Printing Variables / Print Formatting
See [Advanced Printing](#advanced-printing)
-------
[⬆️⬆️⬆️⬆️⬆️⬆️ Back to Top ⬆️⬆️⬆️⬆️⬆️⬆️](#list-of-commands)
## Pressing Keys
### Special Keys
duckyScript supports many special keys.
They can be used on their own:
```
WINDOWS
```
...or combined with a character to form shortcuts:
```
WINDOWS s
```
...or chained even longer:
```
WINDOWS SHIFT s
```
------
* Type the key name **as-is** in **`ALL CAPS`**.
* Keys are pressed in sequence from **left-to-right**, then released **right-to-left**.
------
List of Special Keys:
```
CTRL / RCTRL | (media keys)
SHIFT / RSHIFT | MK_VOLUP
ALT / RALT | MK_VOLDOWN
WINDOWS / RWINDOWS | MK_MUTE
GUI | MK_PREV
COMMAND / RCOMMAND | MK_NEXT
OPTION / ROPTION | MK_PP (play/pause)
ESC | MK_STOP
ENTER |
UP/DOWN/LEFT/RIGHT |
SPACE | (numpad keys)
BACKSPACE | NUMLOCK
TAB | KP_SLASH
CAPSLOCK | KP_ASTERISK
PRINTSCREEN | KP_MINUS
SCROLLLOCK | KP_PLUS
PAUSE | KP_ENTER
BREAK | KP_0 to KP_9
INSERT | KP_DOT
HOME | KP_EQUAL
PAGEUP / PAGEDOWN |
DELETE | (Japanese input method)
END | ZENKAKUHANKAKU
MENU | HENKAN
POWER | MUHENKAN
F1 to F24 | KATAKANAHIRAGANA
```
### `KEYDOWN` / `KEYUP`
Hold/release a key.
Allows more fine-grained control.
Can be used to input [Alt Codes](https://en.wikipedia.org/wiki/Alt_code) for special characters:
```
// types out ¼
KEYDOWN ALT
KP_1
KP_7
KP_2
KEYUP ALT
```
### `REPEAT`
Repeats the **last line** **`n`** times.
```
STRING Hello world
REPEAT 10
// types out "Hello world" 11 times (1 original + 10 repeats)
```
-------
[⬆️⬆️⬆️⬆️⬆️⬆️ Back to Top ⬆️⬆️⬆️⬆️⬆️⬆️](#list-of-commands)
## Timing
### `DELAY n`
Pause execution for `n` **milliseconds**.
Useful for **waiting for UI to catch up**.
* 1 second = 1000 ms
```
WINDOWS r
DELAY 1000
STRING cmd
```
### `DEFAULTDELAY n`
How long to wait between each **`NON-LETTER input actions`**.
* Default: 20ms
* Applies to:
* `KEYDOWN` and `KEYUP` (including combo keys)
* `MOUSE_MOVE` and `MOUSE_SCROLL`
* Pressing ENTER at end of `STRINGLN`
```
DEFAULTDELAY 50
CTRL ALT DELETE // Waits 50ms between pressing each key
```
### `DEFAULTCHARDELAY n`
How long to wait between **`each letter`** when **`typing text`**.
* Default: 20ms
* To type faster, set to around 10.
* Applies to:
* `STRING` and `STRINGLN`
* `RANDCHR()`
* `PUTS()`
```
DEFAULTCHARDELAY 10
STRING Hello World! // Waits 10ms between each letter
```
### `CHARJITTER n`
Adds an **`additional`** random delay between 0 and `n` milliseconds after **`each letter`** when **`typing text`**.
* Can make typing more human-like
* Set to 0 to disable
* Applies to:
* `STRING` and `STRINGLN`
* `RANDCHR()`
* `PUTS()`
-------
[⬆️⬆️⬆️⬆️⬆️⬆️ Back to Top ⬆️⬆️⬆️⬆️⬆️⬆️](#list-of-commands)
## Mouse
### Mouse Buttons
* `LMOUSE`: Click `LEFT` mouse button
* `RMOUSE`: Click `RIGHT` mouse button
* `MMOUSE`: Click `MIDDLE` mouse button
* `FMOUSE`: Click `FORWARD` mouse side-button
* `BMOUSE`: Click `BACKWARD` mouse side-button
* Can be used with `KEYDOWN` / `KEYUP` commands.
### `MOUSE_MOVE x y`
Move mouse cursor `x` pixels horizontally, and `y` pixels vertically.
* `x`: Positive moves RIGHT, negative moves LEFT.
* `y`: Positive moves UP, negative moves DOWN.
* Set to 0 if no movement needed
* **Disable mouse acceleration** for **pixel-accurate** results
### `MOUSE_SCROLL h v`
Scroll mouse wheel **Horizontal** `h` lines, and **Vertical** `v` lines.
* `h`: Positive scrolls RIGHT, negative scrolls LEFT.
* `v`: Positive scrolls UP, negative scrolls DOWN.
* Set to 0 for no scroll
-------
[⬆️⬆️⬆️⬆️⬆️⬆️ Back to Top ⬆️⬆️⬆️⬆️⬆️⬆️](#list-of-commands)
## Multiple Actions
`LOOP` command lets you to **assign multiple actions to one key**.
You can use it to toggle / cycle through several actions like this:
```
LOOP0:
STRINGLN first action
LOOP1:
STRINGLN second action
LOOP2:
STRINGLN third action
```
* Start from `LOOP0`
* When pressed, a counter increments, and the script at the corresponding loop is executed.
* Keep the code inside simple!
* For more complex needs, see [`WHILE` Loops](#loops) section below.
-------
[⬆️⬆️⬆️⬆️⬆️⬆️ Back to Top ⬆️⬆️⬆️⬆️⬆️⬆️](#list-of-commands)
## Profile Switching
### `PREV_PROFILE` / `NEXT_PROFILE`
Switch to the previous / next profile.
### `GOTO_PROFILE`
Jump to a profile by name. **Case sensitive!**
This ends the current script execution.
Works with [Advanced Printing](#advanced-printing).
```
GOTO_PROFILE NumPad
```
### Autoswitcher
Also try the [Autoswitcher](https://github.com/dekuNukem/duckyPad-profile-autoswitcher) for **switching profile automatically** based on **active window**!
-------
[⬆️⬆️⬆️⬆️⬆️⬆️ Back to Top ⬆️⬆️⬆️⬆️⬆️⬆️](#list-of-commands)
## OLED
### `OLED_CURSOR x y`
Set where to print on screen.
`x y`: Pixel coordinates between `0` and `127`.
Characters are **7 pixels wide, 10 pixels tall.**
Max **18 Characters Per Line**.
Characters print from **top-left** corner.
### `OLED_PRINT`
`OLED_PRINT hello world!`
Print the message into display buffer at **current cursor location**.
Works with [Advanced Printing](#advanced-printing).
### `OLED_CPRINT`
Same as `OLED_PRINT`, but prints message **center-aligned**.
### `OLED_CLEAR`
Clear the display buffer.
### `OLED_CIRCLE x y radius options`
* `x y`: Origin
* `radius`: In Pixels
* `options`:
* `0`: White, outline.
* `1`: White, filled.
* `2`: Black, outline.
* `3`: Black, filled.
### `OLED_LINE x1 y1 x2 y2`
* `x1, y1`: Start Point
* `X2, y2`: End Point
### `OLED_RECT x1 y1 x2 y2 options`
* `x1, y1`: Start Corner
* `X2, y2`: End Corner
* `options`:
* `0`: White, outline.
* `1`: White, filled.
* `2`: Black, outline.
* `3`: Black, filled.
### `OLED_UPDATE`
Actually update the OLED.
You should use the other commands to set up the buffer, then call `OLED_UPDATE` to write to display.
This is **much faster** than updating the whole screen for every change.
### `OLED_RESTORE`
Restore the default profile/key name display.
* `OLED_UPDATE` **NOT NEEDED**.
-------
[⬆️⬆️⬆️⬆️⬆️⬆️ Back to Top ⬆️⬆️⬆️⬆️⬆️⬆️](#list-of-commands)
## Per-Key RGB
### `SWC_SET n r g b`
Change LED color of a switch
Set `n` to 0 for current key.
Set `n` between 1 to 20 for a particular key.
`r, g, b` must be between 0 and 255.
### `SWC_FILL r g b`
Change color of **ALL** LEDs.
`r, g, b` must be between 0 and 255.
### `SWC_RESET n`
Reset the key back to default color.
Set `n` to 0 for current key.
Set `n` from 1 to 20 for a particular key.
Set `n` to 99 for all keys.
-------
[⬆️⬆️⬆️⬆️⬆️⬆️ Back to Top ⬆️⬆️⬆️⬆️⬆️⬆️](#list-of-commands)
## Constants
You can use `DEFINE` to, well, define a constant.
The content is **replaced AS-IS** during preprocessing, similar to `#define` in C.
```
DEFINE MY_EMAIL example@gmail.com
STRING My email is MY_EMAIL!
```
-------
[⬆️⬆️⬆️⬆️⬆️⬆️ Back to Top ⬆️⬆️⬆️⬆️⬆️⬆️](#list-of-commands)
## Variables
You can declare a variable using `VAR` command, and assign values to it.
Assignment can be:
* Decimal: Normal numbers
* Hexadecimal: Starts with `0x`
* Character: **A single character** inside **single or double quote**
* Will be converted to its 8-bit ASCII value
```
// Declaration
VAR spam = 42
VAR eggs = 0xff
VAR foo = 'a'
// Assignment
spam = 20
eggs = spam*2
```
* Variables are **SIGNED 32-bit Integers**
* Can hold values between **−2,147,483,648 and 2,147,483,647**
* Variables declared at top level have **global scope** and can be accessed **anywhere**.
* Variables declared **inside a function** have **local scope** and is only accessible **within that function**.
### Persistent Global Variables
There are 32 pre-defined global variables that provides **non-volatile** data storage.
* `_GV0` to `_GV31`
* Available across **all profiles**
* Persists over reboots
### Reserved Variables
Some variables are **always available**. They all start with an underscore `_`.
You can read them to obtain information, or write to adjust settings.
```
VAR status = _IS_NUMLOCK_ON
_CHARJITTER = 10
```
[Click me for full list](#reserved-variables-list)
## Operators
You can perform operations on constants and variables.
All ops are **Signed** by default. Use explicit [**unsigned calls**](#unsigned-operators) to treat variables as unsigned.
### Mathematics
```
= Assignment
+ Add
- Subtract
* Multiply
/ SIGNED Integer Division
% SIGNED Modulus
** Exponent
```
Example:
```
spam = 2+3
spam = eggs * 10
```
### Comparison
All comparisons evaluate to **either 0 or 1**.
```
== Equal
!= Not equal
> SIGNED Greater than
< SIGNED Less than
>= SIGNED Greater than or equal
<= SIGNED Less than or equal
```
### Logical
| Operator | Name | Comment |
|:--------:|:---------------------:|--------------------------------------------------------|
| `&&` | Logical AND | Evaluates to 1 if BOTH side are non-zero, otherwise 0. |
| `\|\|` | Logical OR | Evaluates to 1 if ANY side is non-zero, otherwise 0. |
| `!` | Logical NOT | **Single (Unary) Operand**
Evaluates to 1 if expression is 0
Evaluates to 0 if expression is **Non-Zero**|
### Bitwise
```
& Bitwise AND
| Bitwise OR
^ Bitwise XOR
~ Bitwise NOT
<< Left Shift
>> Arithmetic Right Shift (sign-extend)
```
### Augmented Assignments
* E.g. `+=`, `-=`, `*=`, etc.
* Available for all **2-operand operators**
* `x += 1` same as `x = x + 1`, etc.
### UNSIGNED Operators
Call built-in functions below to perform **unsigned** operations on variables.
```
ULT(lhs, rhs) Unsigned Less Than
ULTE(lhs, rhs) Unsigned Less Than or Equal
UGT(lhs, rhs) Unsigned Greater Than
UGTE(lhs, rhs) Unsigned Greater Than or Equal
UDIV(val, n) Unsigned Division (val / n)
UMOD(val, n) Unsigned Modulo (val % n)
LSR(val, n) Logical Right Shift (Zero-Extend)
```
-------
[⬆️⬆️⬆️⬆️⬆️⬆️ Back to Top ⬆️⬆️⬆️⬆️⬆️⬆️](#list-of-commands)
## Advanced Printing
You can print the **value of a variable** by adding a **dollar symbol ($) before its name**.
```
VAR foo = -10
STRING Value is $foo
```
```
Value is -10
```
* Works with `STRING`, `STRINGLN`, `OLED_PRINT`, `OLED_CPRINT` and `GOTO_PROFILE`.
### Format Specifiers
You can use **optional C-Style Format Specifiers** to adjust **print format** and **padding**.
To add a specifier: **Immediately after the variable name**, type `%`, then a **data-type indicator letter**.
* `%d` to print variable as **Signed Decimal**
* **DEFAULT**, same as no specifier.
* `%u` to print variable as **Unsigned Decimal**
* `%x` to print variable as **Lowercase Hexadecimal**
* `%X` to print variable as **Uppercase Hexadecimal**
```
VAR foo = -10
STRING Value is: $foo%d
STRING Value is: $foo%u
STRING Value is: $foo%x
STRING Value is: $foo%X
```
```
Value is: -10
Value is: 4294967286
Value is: fffffff6
Value is: FFFFFFF6
```
### Numerical Padding
* To pad with **SPACE**
* Add a **width number** just **after `%`** and **before the letter**
* The output will be **at least that** wide
* Any extra space are padded with **space characters**
```
VAR foo = 5
STRING I have $foo%10d apples!
```
```
I have 5 apples!
```
* To pad with **LEADING-ZERO**
* Right **after `%`**, add a `0`, then **width number**, then the letter.
* The output will be **at least that** wide
* Any extra space are padded with `0`
* Useful for printing **dates** and **hex numbers**
```
VAR foo = 5
STRING I have $foo%010d apples!
```
```
I have 0000000005 apples!
```
-------
[⬆️⬆️⬆️⬆️⬆️⬆️ Back to Top ⬆️⬆️⬆️⬆️⬆️⬆️](#list-of-commands)
## Real-time Clock (RTC)
duckyPad can keep track of **current date and time** for use in scripts.
### Setting RTC
On cold-boot, duckyPad doesn't know what time it is.
It must be set once, after which it will keep time **as long as it is powered-on**.
* RTC is **automatically set** when using the [Autoswitcher](https://github.com/duckyPad/duckyPad-Profile-Autoswitcher)
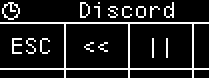
* A **clock icon** appears when RTC is valid
* You can also set it manually
* [HID Commands](https://github.com/duckyPad/duckyPad-Profile-Autoswitcher/blob/master/HID_details.md)
* [Sample Script](https://github.com/duckyPad/duckyPad-Profile-Autoswitcher/blob/master/hid_example/ex3_set_rtc.py)
### Reading RTC
#### Validity Check
**ALWAYS check** `_RTC_IS_VALID` **first**!
* **Do not proceed** if value is 0.
```
IF _RTC_IS_VALID == 0
// RTC is uninitialised, do not proceed.
HALT
END_IF
```
#### UTC Offset
The RTC always runs in **UTC**.
Local time is obtained by adding an **UTC Offset in `MINUTES`**
* It is **set automatically** to your **local timezone** when using the [Autoswitcher](https://github.com/duckyPad/duckyPad-Profile-Autoswitcher).
* You can check (and manually adjust) the offset by reading/writing `_RTC_UTC_OFFSET` variable
* Can be positive, 0, or negative.
#### Time and Date
With **valid RTC** and **correct UTC offset**, you can now read from the variables below:
| Name | Comment | Range |
| ------------- | -------------------------- | --------------- |
| `_RTC_YEAR` | **4-digit** Year | e.g. `2025` |
| `_RTC_MONTH` | Month | `1–12` |
| `_RTC_DAY` | Day | `1–31` |
| `_RTC_HOUR` | Hour | `0–23` |
| `_RTC_MINUTE` | Minute | `0–59` |
| `_RTC_SECOND` | Second | `0–60` |
| `_RTC_WDAY` | Day of Week (`0 = Sunday`) | `0–6` |
| `_RTC_YDAY` | Day of Year (`0 = Jan 1`) | `0–365` |
#### Example Usage
```
STRING $_RTC_YEAR%04d-$_RTC_MONTH%02d-$_RTC_DAY%02d $_RTC_HOUR%02d:$_RTC_MINUTE%02d:$_RTC_SECOND%02d
```
```
2025-09-18 09:07:23
```
See [Advanced Printing](#advanced-printing) for formatting tips.
-------
[⬆️⬆️⬆️⬆️⬆️⬆️ Back to Top ⬆️⬆️⬆️⬆️⬆️⬆️](#list-of-commands)
## Conditional Statements
`IF` statements can be used to **conditionally execute code**.
At simplest, it involves `IF` and `END_IF`:
```
IF expression
code to execute
END_IF
```
The code inside is executed if the **expression evaluates to non-zero**.
Indent doesn't matter, feel free to add them for a cleaner look.
----
You can use `ELSE IF` and `ELSE` for additional checks.
If the first `IF` evaluate to 0, `ELSE IF`s are checked.
If none of the conditions are met, code inside `ELSE` is executed.
```
VAR temp = 25
IF temp > 30
STRING It's very hot!
ELSE IF temp > 18
STRING It's a pleasant day.
ELSE
STRING It's quite chilly!
END_IF
```
-------
[⬆️⬆️⬆️⬆️⬆️⬆️ Back to Top ⬆️⬆️⬆️⬆️⬆️⬆️](#list-of-commands)
## Loops
You can use `WHILE` statement to **repeat actions** until a **certain condition is met**.
```
WHILE expression
code to repeat
END_WHILE
```
* If `expression` evaluates to **non-zero**, code inside is repeated. Otherwise, the code is skipped.
This simple example loops 3 times.
```
VAR i = 0
WHILE i < 3
STRINGLN Counter is $i!
i = i + 1
END_WHILE
```
```
Counter is 0!
Counter is 1!
Counter is 2!
```
### `LBREAK`
Use `LBREAK` to **exit a loop** immediately.
```
VAR i = 0
WHILE 1
STRINGLN Counter is $i!
i = i + 1
IF i == 3
LBREAK
END_IF
END_WHILE
```
```
Counter is 0!
Counter is 1!
Counter is 2!
```
### `CONTINUE`
Use `CONTINUE` to **jump to the start of loop** immediately.
```
VAR i = 0
WHILE i < 5
i = i + 1
IF i == 3
CONTINUE
END_IF
STRINGLN Counter is $i!
END_WHILE
```
Here when `i` is 3, it skips printing and starts from the top instead.
```
Counter is 1!
Counter is 2!
Counter is 4!
Counter is 5!
```
### Infinite Loop
To exit an infinite loop, you can [check button status](#reading-inputs), or turn on `Allow Abort` in configurator settings.
-------
[⬆️⬆️⬆️⬆️⬆️⬆️ Back to Top ⬆️⬆️⬆️⬆️⬆️⬆️](#list-of-commands)
## Functions
A function is a **block of organized code** that you can call to **perform a task**.
It makes your script **more modular** and **easier to maintain** compared to copy-pasting same code multiple times.
### Plain Functions
* Declare a function with `FUN name()` and `END_FUN`
* Put the code you want to execute inside
* Call it with `name()`
* Code inside are executed
```
FUN print_addr()
STRINGLN 123 Ducky Lane
STRINGLN Pond City, QU 12345
END_FUN
print_addr() // call it
```
### Arguments and Returns
You can also **pass arguments** into a function and specify a **return value**.
* Ideal for performing calculations
```
FUN add_number(a, b)
RETURN a + b
END_FUN
VAR total = add_number(10, 20)
```
### Variable Scoping
Variables declared **outside functions** have **global scope**, they can be **accessed anywhere**.
Variables declared **inside functions** have **local scope**, they are only accessible **within that function**.
* If a local variable has the **same name** as a global variable, the **local var takes priority** within that function.
```
// Both global scope
VAR x = 10
VAR y = 20
FUN scope_demo()
VAR x = 5 // This x is local, will shadow the global x.
x = x + y
STRINGLN Local x is: $x
END_FUN
```
```
Local x is: 25
```
### Nested / Recursive Calls
You can also:
* Call other functions from inside a function
* Including **calling itself**!
```
FUN factorial(n)
IF n <= 1
RETURN 1
END_IF
RETURN n * factorial(n - 1)
END_FUN
VAR fact = factorial(5)
```
-------
[⬆️⬆️⬆️⬆️⬆️⬆️ Back to Top ⬆️⬆️⬆️⬆️⬆️⬆️](#list-of-commands)
## duckyPad Standard Library
The **DPDS StdLib** provides handy helper functions to simplify duckyScript coding.
To use them, add `USE_STDLIB` in your code.
[More Info / Contribute](https://github.com/duckyPad/DPDS-Standard-Library/blob/master/README.md)
```
USE_STDLIB
STRINGLN Press Key 3 to continue...
WAITKEY(3)
VAR high_score = MAX(100, 500)
STRINGLN The high score is: $high_score
```
-------
[⬆️⬆️⬆️⬆️⬆️⬆️ Back to Top ⬆️⬆️⬆️⬆️⬆️⬆️](#list-of-commands)
## User Headers
You can also **create your own header** for custom helper functions and more.
* Click `Edit Headers` Button
* Write code
* Add `USE_UH` to your script to include them
* The header is added to your source code **AS-IS** during preprocessing
-------
[⬆️⬆️⬆️⬆️⬆️⬆️ Back to Top ⬆️⬆️⬆️⬆️⬆️⬆️](#list-of-commands)
## Built-in Functions
A few built-in functions are available. They are intended for **low-level tinkering**.
You might want to get familiar with [VM's memory map](https://duckypad.github.io/DuckStack/)
All multi-byte values are **little-endian**
### `PEEK8(addr)` / `PEEK16(addr)` / `PEEK32(addr)`
Read **SIGNED** value at memory address.
* High bits are **SIGN-extended**
### `PEEKU8(addr)` / `PEEKU16(addr)`
Read **UNSIGNED** value at memory address.
* High bits are **ZERO-extended**
### `POKE8(addr, val)` / `POKE16(addr, val)` / `POKE32(addr, val)`
Write value at memory address.
* `val` can be numbers or characters
* `POKE8(0xf400, 'c')`
* `POKE32(0xf410, 0xabcd)`
### `RANDCHR(value)`
Generate a **random character**.
* `value` is checked as a bitfield:
* `Bit 0`: Letter Lowercase (A-Z)
* `Bit 1`: Letter Uppercase (a-z)
* `Bit 2`: Digits (0-9)
* `Bit 3`: Symbols (\!\"\#\$\%\&\'\(\)\*\+\,\-\.\/\:\;\<\=\>\?\@\[\\\]\^\_\`\{\|\})
* `Bit 8`: Type via Keyboard
* `Bit 9`: Print to OLED at current cursor position
* For `Bit 0-3`, if any bit is `1`, its pool of characters will be included for random selection.
* If `Bit 8` is 1, it will type the character via keyboard.
* If `Bit 9` is 1, it will print the character to screen buffer
* Don't forget to use `OLED_UPDATE` to actually refresh the screen.
### `RANDINT(lower, upper)` / `RANDUINT(lower, upper)`
Returns a **Signed/Unsigned** random number between `lower` and `upper` **INCLUSIVE**.
```
VAR value = RANDINT(-100, 100)
VAR value = RANDUINT(3000000000, 4000000000)
```
### `PUTS(value)`
**Print string** at memory address.
* `value` contains:
* `Bit 0-15`: Address
* `Bit 16-23`: `n`
* `Bit 29`: Print to OLED at current cursor position
* `Bit 30`: Print to OLED center-aligned
* `Bit 31`: Type via Keyboard
* If `n = 0`, print until zero-termination.
* Else, print max `n` characters.
### `HIDTX(addr)`
Send a **raw HID message**
* Pick an address `addr` in **scratch memory area**
* Use `POKE8()` to write **9 bytes** starting from `addr`
* Follow the format below
* Call `HIDTX(addr)` to send the HID message
* Include a short delay (10-20ms) to allow computer to register the input
* Don't forget to **release the key** after pressing it
* Set `Byte 1-8` to 0 to release
#### Keyboard
|Byte|Value|Description|
|:-------:|:----------:|:---------:|
|`addr`|1|Usage ID|
|`addr+1`|Modifier
Bitfield|`Bit 0`: Left Control
`Bit 1`: Left Shift
`Bit 2`: Left Alt
`Bit 3`: Left GUI (Win/Cmd)
`Bit 4`: Right Control
`Bit 5`: Right Shift
`Bit 6`: Right Alt (AltGr)
`Bit 7`: Right GUI (Win/Cmd)|
|`addr+2`|0|Reserved|
|`addr+3`
-
`addr+8`|HID Keyboard
Scan Code|[See list](https://gist.github.com/MightyPork/6da26e382a7ad91b5496ee55fdc73db2)
Max 6 keys at once (6KRO)
Write `0` for released / unused|
#### Media Keys
|Byte|Value|Description|
|:-------:|:----------:|:---------:|
|`addr`|2|Usage ID|
|`addr+1`|Key Status
Bitfield|`Bit 0`: Next Track
`Bit 1`: Previous Track
`Bit 2`: Stop
`Bit 3`: Eject
`Bit 4`: Play / Pause
`Bit 5`: Mute
`Bit 6`: Volume Up
`Bit 7`: Volume Down|
|`addr+2`
-
`addr+8`|0|0|
#### Mouse
|Byte|Value|Description|
|:-------:|:----------:|:---------:|
|`addr`|3|Usage ID|
|`addr+1`|Buttons
Status
Bitfield|`Bit 0`: Left
`Bit 1`: Right
`Bit 2`: Middle
`Bit 3`: Backward
`Bit 4`: Forward|
|`addr+2`|X Movement|-127 - 127|
|`addr+3`|Y Movement|-127 - 127|
|`addr+4`|Vertical
Scroll|-127 - 127|
|`addr+5`|Horizontal
Scroll|-127 - 127|
|`addr+6`
-
`addr+8`|0|0|
-------
[⬆️⬆️⬆️⬆️⬆️⬆️ Back to Top ⬆️⬆️⬆️⬆️⬆️⬆️](#list-of-commands)
## Reading Inputs
You can **read the status of switches / encoders** to perform actions.
### Blocking Read
Simplest method.
Just read `_BLOCKING_READKEY` reserved variable.
It will block until a key is pressed.
```
VAR this_key = _BLOCKING_READKEY
// Blocks here until a key is pressed
IF this_key == 1
// do something here
ELSE IF this_key == 2
// do something else
END_IF
```
### Non-Blocking Read
Read `_READKEY`, **returns immediately**.
Returns 0 if no key is pressed. `Key ID` otherwise.
Check this **in a loop** to perform work even when no key is pressed.
```
WHILE TRUE
VAR this_key = _READKEY
IF this_key == 1
// handling button press
END_IF
// otherwise do work here
END_WHILE
```
### Switch Status Bitfield
Read `_SW_BITFIELD`, **returns immediately**.
Each **bit position** stores the status of a key.
|Bit #|Key ID|
|:-:|:-:|
|0|1|
|1|2|
|...|...|
|31|32|
If that bit is 1, the key is currently pressed.
You can use bitmasks to **check multiple keys at once**.
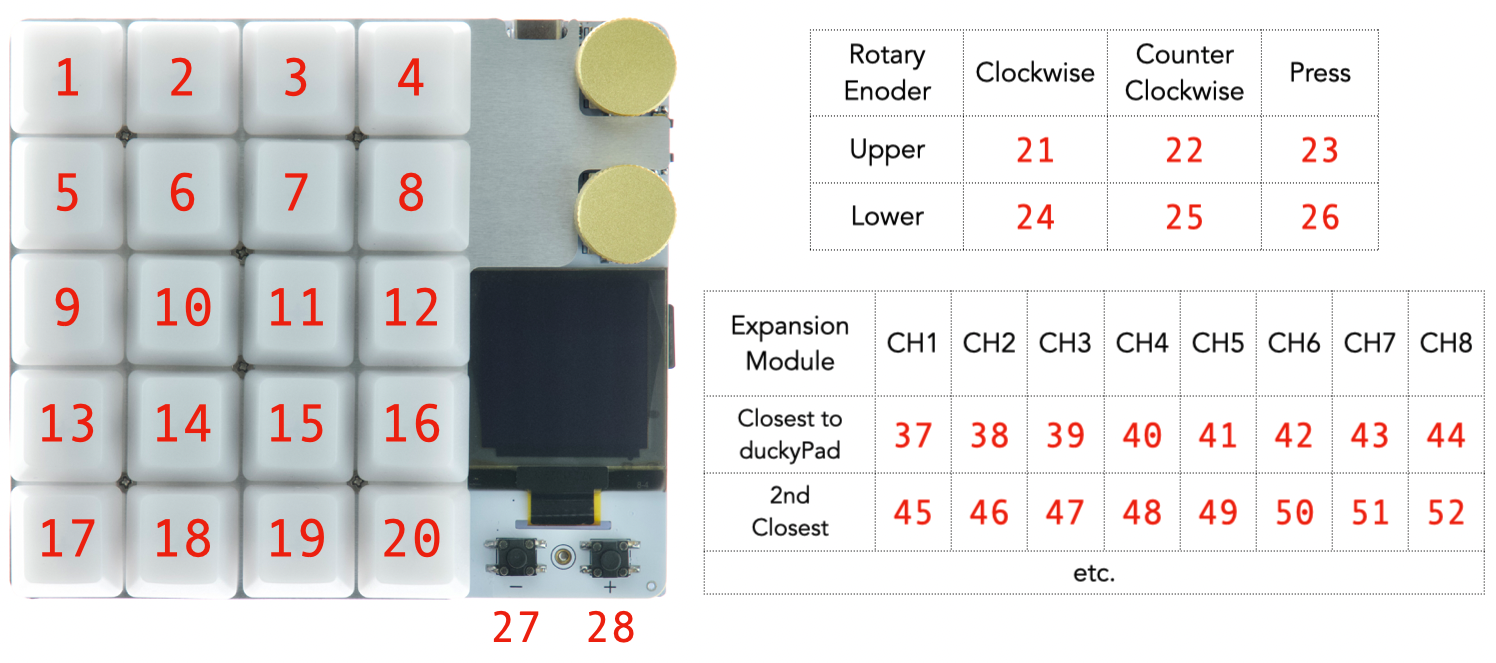
### Key ID
This is the number returned by methods above.
```
duckyPad Pro (2024):
1-20:
* Built-in keys
* Top left is 1
* Bottom right is 20
21: Upper Rotary Encoder Clockwise
22: Upper Rotary Encoder Counterclockwise
23: Upper Rotary Encoder Push-down
24: Lower Rotary Encoder Clockwise
25: Lower Rotary Encoder Counterclockwise
26: Lower Rotary Encoder Push-down
27: Plus Button
28: Minus Button
37+: External Switches
```
```
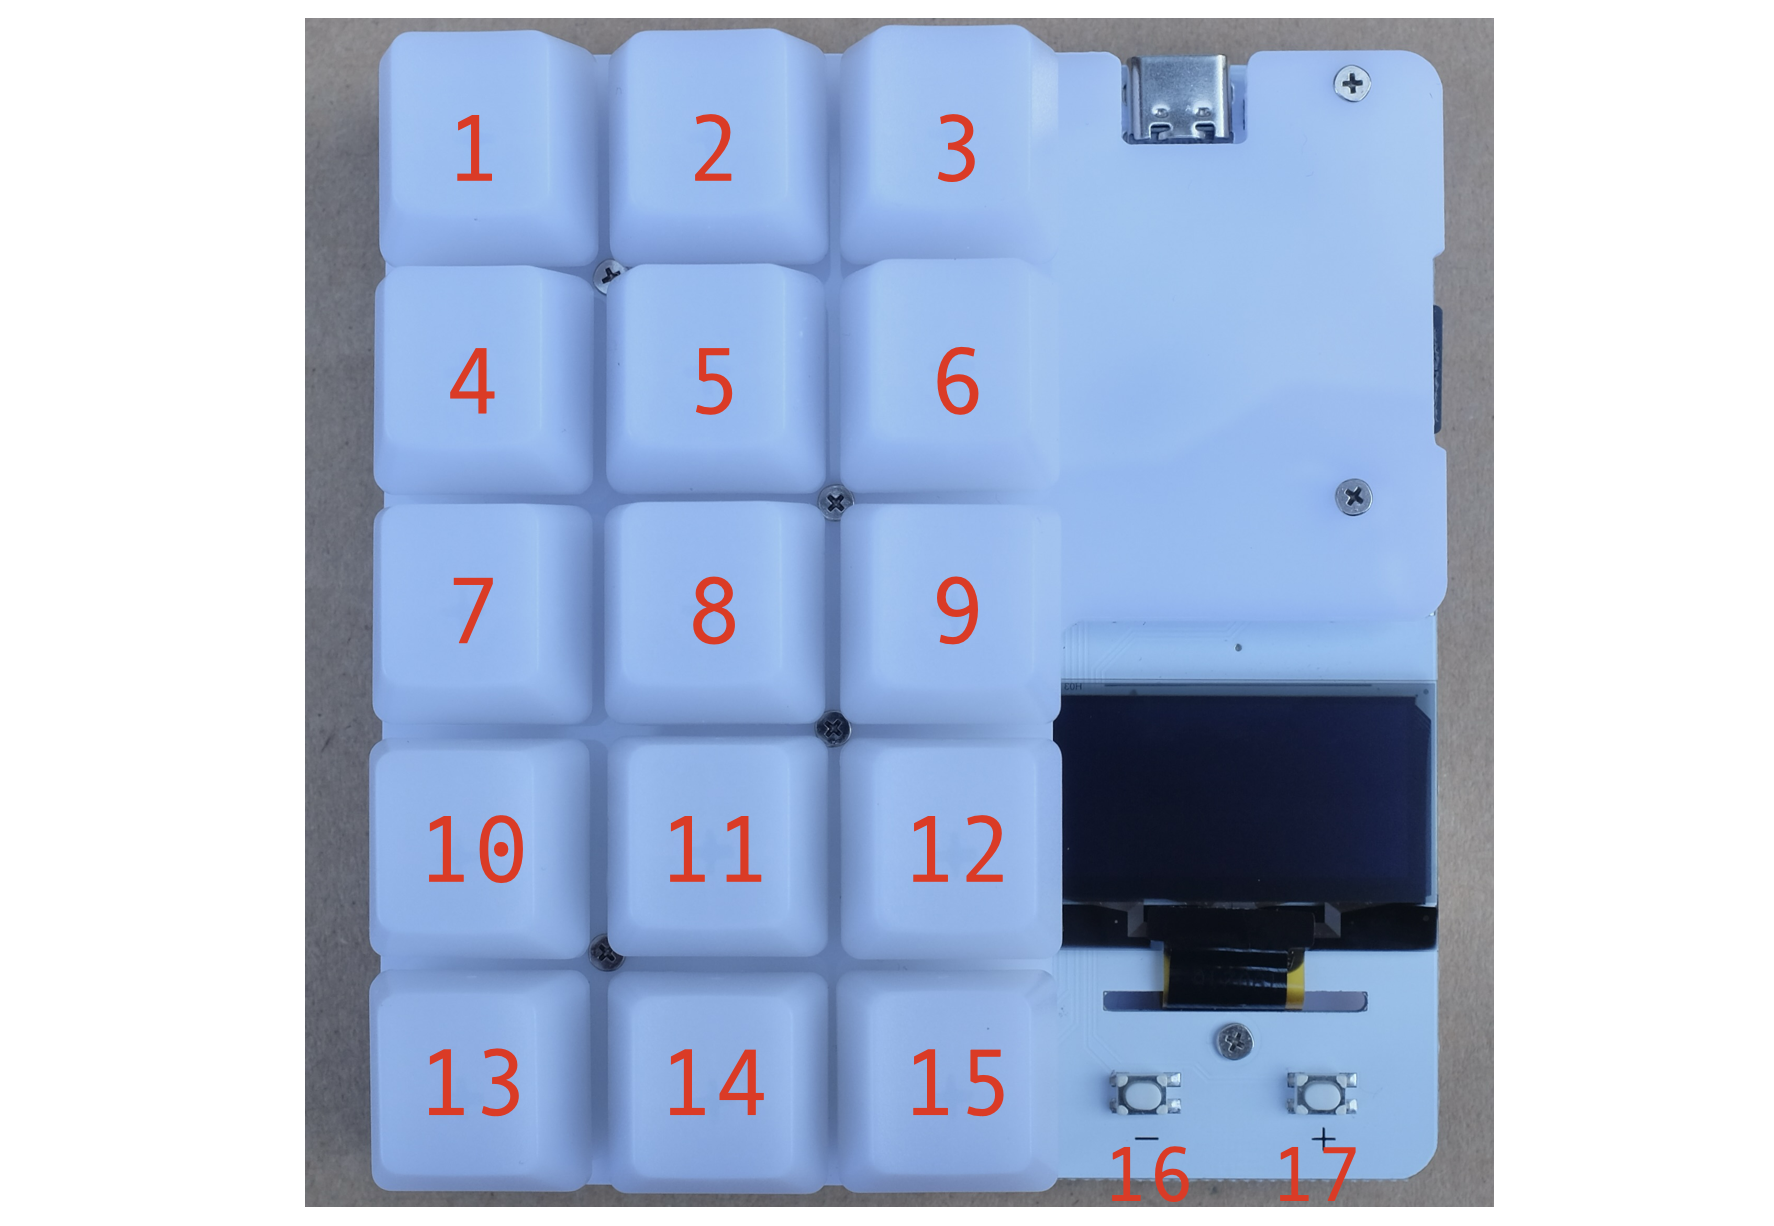
duckyPad (2020):
1-15:
* Top left is 1
* Bottom right is 15
* Plus button 16, Minus button 17.
```
-------
[⬆️⬆️⬆️⬆️⬆️⬆️ Back to Top ⬆️⬆️⬆️⬆️⬆️⬆️](#list-of-commands)
## Randomization
### Random Number
Call `RANDINT(lower, upper)` for a random number between `lower` and `upper` **INCLUSIVE**.
```
VAR value = RANDINT(0, 1000)
```
### Random Character
Use one of below to **type a random character**:
```
RANDOM_LOWERCASE_LETTER RANDOM_NUMBER
RANDOM_UPPERCASE_LETTER RANDOM_SPECIAL
RANDOM_LETTER RANDOM_CHAR
```
```
RANDOM_NUMBER
REPEAT 7
// types 8 random numbers
```
For more granular control, see `RANDCHR()` in [Built-in Functions](#built-in-functions).
-------
[⬆️⬆️⬆️⬆️⬆️⬆️ Back to Top ⬆️⬆️⬆️⬆️⬆️⬆️](#list-of-commands)
## Miscellaneous
### `DP_SLEEP`
Make duckyPad go to sleep. Terminates execution.
Backlight and screen are turned off.
Press any key to wake up.
### `HALT`
Stop execution immediately
### `BCLR`
Clears the internal keypress event queue. Can be used:
* **At end of a long script**: Prevents "buffered" presses from triggering it again.
* **Before reading button status**: Ensures **new presses** are returned instead of old ones in the queue.
### `PASS`
Does nothing. Can be used as **placeholders** or empty statements.
-------
[⬆️⬆️⬆️⬆️⬆️⬆️ Back to Top ⬆️⬆️⬆️⬆️⬆️⬆️](#list-of-commands)
## Reserved Variables List
There are some **reserved variables** that are always available.
You can read or write (RW) to adjust settings. Some are read-only (RO).
| Name | Access | Description |
| --------------------------------------------------------------------------- | :-----: |:----:|
| **`_TIME_S`**
**`_TIME_MS`** | RO | Elapsed time since power-on|
| **`_READKEY`**
**`_BLOCKING_READKEY`**
**`_SW_BITFIELD`** | RO | See [Reading Inputs](#reading-inputs)|
| **`_KBLED_BITFIELD`** | RO |Keyboard LED Status
`Bit 0`: Num Lock
`Bit 1`: Caps Lock
`Bit 2`: Scroll Lock
Bit is set if LED is on.
Certain OS may not have all LEDs|
| **`_IS_NUMLOCK_ON`**
**`_IS_CAPSLOCK_ON`**
**`_IS_SCROLLLOCK_ON`** | RO | Aliases|
| **`_DEFAULTDELAY`**
**`_DEFAULTCHARDELAY`**
**`_CHARJITTER`** | RW | Aliases|
| **`_ALLOW_ABORT`**
**`_DONT_REPEAT`** | RW | Write `1` to enable
`0` to disable. |
| **`_THIS_KEYID`** | RO | Returns the [Key ID](#key-id) for the **current script** |
| **`_DP_MODEL`** | RO | Device model. Returns:
`1` for duckyPad (2020)
`2` for duckyPad Pro (2024) |
| **`_KEYPRESS_COUNT`** | RW | How many times **current key**
has been pressed in the **current profile**
Assign **0 to reset** |
| **`_LOOP_SIZE`** | RO | Used by `LOOP` command.
Do not modify |
| **`_NEEDS_EPILOGUE`** | RO | Internal use only
Do not modify |
|**`_RTC_IS_VALID`**
**`_RTC_YEAR`**
**`_RTC_MONTH`**
**`_RTC_DAY`**
**`_RTC_HOUR`**
**`_RTC_MINUTE`**
**`_RTC_SECOND`**
**`_RTC_WDAY`**
**`_RTC_YDAY`**|RO|See [Real-time Clock](#real-time-clock-rtc)|
|**`_RTC_UTC_OFFSET`**|RW|See [Real-time Clock](#real-time-clock-rtc)|
-------
[⬆️⬆️⬆️⬆️⬆️⬆️ Back to Top ⬆️⬆️⬆️⬆️⬆️⬆️](#list-of-commands)
## Table of Contents
[Main page](../README.md)
[User Manual / Getting Started](getting_started.md)
[Kit Assembly Guide](kit_assembly.md)
[Writing duckyScript](duckyscript_info.md)
[duckStack VM](https://duckypad.github.io/DuckStack/)
[Firmware Update](fw_update.md)
[Tinkering Guide](tinkering_guide.md)
[Troubleshooting](troubleshooting.md)
## Questions or Comments?
Please feel free to [open an issue](https://github.com/dekuNukem/duckypad-pro/issues), ask in the [official duckyPad discord](https://discord.gg/4sJCBx5), or email `dekuNukem`@`gmail`.`com`!