# Docker-Controller-Bot
[](https://github.com/dgongut/docker-controller-bot)
[](https://hub.docker.com/r/dgongut/docker-controller-bot)
[](https://t.me/dockercontrollerbotnews)
[](https://hub.docker.com/r/dgongut/docker-controller-bot/)
[](https://hub.docker.com/r/dgongut/docker-controller-bot/)
[](https://hub.docker.com/r/dgongut/docker-controller-bot/)




> Control all your Docker containers from a single place: your Telegram.

Are you searching for [](https://hub.docker.com/r/dgongut/docker-controller-bot)?
**NEW** News and updates channel (in Spanish) [](https://t.me/dockercontrollerbotnews)
## 🚀 Get started in 5 minutes
Only two steps: create your bot and start it. Everything else is configured later from the chat itself.
### 1. Create your Telegram bot (2 min)
1. Open [@BotFather](https://t.me/BotFather) on Telegram and send `/newbot`. Follow the instructions (a name and a username ending in `bot`).
2. BotFather will reply with the bot token. Save it: it goes into the `TELEGRAM_TOKEN` variable.
3. To know your own chat ID (needed for `TELEGRAM_ADMIN`), talk to [@MissRose_bot](https://t.me/MissRose_bot) and send `/id`. It will reply with a number — that's your ID.
4. *(Optional)* If you plan to use the bot inside a group, add it, make it admin and obtain the group chat ID the same way; that value goes into `TELEGRAM_GROUP`.
5. *(Optional)* If you want to set the official bot icon, download the high-resolution image [here](https://raw.githubusercontent.com/dgongut/pictures/main/Docker-Controller-Bot/Docker-Controller-Bot.png) and send it to [@BotFather](https://t.me/BotFather) using the `/setuserpic` option.
### 2. Start the container (2 min)
Copy this `docker-compose.yml`, fill in the 3 variables and bring it up:
```yaml
services:
docker-controller-bot:
environment:
- TELEGRAM_TOKEN=
- TELEGRAM_ADMIN=
- TZ=Europe/Madrid
#- TELEGRAM_GROUP=
#- TELEGRAM_THREAD=1
#- TELEMETRY=false # Uncomment to turn anonymous statistics off
volumes:
- /var/run/docker.sock:/var/run/docker.sock # DON'T CHANGE
- /path/to/save/the/config:/app/config # CHANGE THE LEFT PATH
#- ~/.ssh:/root/.ssh:ro # Only if you are going to use remote ssh:// hosts
#- ~/.docker/config.json:/root/.docker/config.json # ONLY IF YOU NEED LOGIN
image: dgongut/docker-controller-bot:latest
container_name: docker-controller-bot
restart: always
network_mode: host
```
```bash
docker compose up -d
```
Open Telegram, find your bot and send it `/start`. You will see the button-based main menu. That's it: `/list` shows your containers.
> [!WARNING]
> Mapping a volume to `/app/config` is required: settings, schedules and the update cache live there. Without it you lose everything when the container is recreated.
> [!NOTE]
> Once a day the bot sends some [anonymous usage statistics](#-anonymous-statistics). They are optional: uncomment `TELEMETRY=false` in the compose file, or turn them off from `/settings` → *Anonymous statistics* during the 10 minutes the bot waits before the first report.
🔄 Coming from 4.x? You don't need to change anything
- If your docker-compose maps `/app/schedule` (the path used up to 4.x) the bot detects it and keeps using it, so **upgrading requires no changes** and you will not lose a single setting.
- When you want to move to `/app/config`, it is one word on the volume line:
```diff
- - /your/path:/app/schedule
+ - /your/path:/app/config
```
**Same left-hand side, and no files are moved**: they are already in your volume and keep their names. Then `docker compose up -d` to recreate the container. Until you do, the bot reminds you in its start-up message.
- **`tty: true` is no longer needed.** Up to 4.x the compose carried it so the bot's logs showed up in `docker logs`; from 5.0 the image writes them straight away without it. You can remove it, or leave it: it does no harm.
- **`CONTAINER_NAME` is no longer needed.** Up to 4.x you had to tell the bot the name of its own container, so it would know not to stop or delete itself. It now works that out on its own: it reads its id from `/proc/self/mountinfo` and asks Docker which one it is. If you still have the variable set the bot starts fine and the log tells you that you can drop it.
- On the first start the bot imports the values of your environment variables into `settings.json` and keeps them as they were. From then on `settings.json` is the only source and those variables are no longer read; the log tells you which ones you can remove from the docker-compose.
🔐 Need docker login (DockerHub, GHCR, private registry)?
If you require login on a registry, map that login file into the container `~/.docker/config.json` to `/root/.docker/config.json`:
```yaml
volumes:
- ~/.docker/config.json:/root/.docker/config.json
```
## ✨ What can it do?
- 📦 **Containers:** list, start, stop, restart and remove. With multi-selection on `/run`, `/stop` and `/restart`.
- 🧩 **Compose:** detects your projects and groups them (project → containers).
- 📊 **Diagnostics:** logs in the chat or as a file, `exec` inside containers, ports and detailed info.
- 🔄 **Updates:** tells you when a new image is out, updates one or all, changes tags (rollback) and auto-updates with labels.
- ⏰ **Automation:** cron-scheduled tasks + temporary mute with `/mute` + cleanup with `/prune`.
- 🖥️ **Multi-host & settings:** several servers from a single bot, everything tweakable with `/settings` without restarting.
📋 See the full feature list
- ✅ List containers
- ✅ Start, stop and remove containers
- ✅ Multi-selection on `/run`, `/stop` and `/restart`: the menu stays open and refreshes itself so you can chain several containers
- ✅ Docker Compose project support with hierarchical navigation (project → containers)
- ✅ Get logs directly on the chat or on a file
- ✅ Extract the container's docker-compose
- ✅ Notifications when a container starts or stops
- ✅ Notifications when a container has a new image update
- ✅ Updating of containers
- ✅ Change tags (rollback or update)
- ✅ Prune of containers, images, networks and other unused objects
- ✅ Execute commands inside of the container
- ✅ List ports used by containers, check whether a specific port is free and generate random available ports
- ✅ Show detailed information for a container or a whole Compose project
- ✅ Schedule tasks with cron expressions: run, stop, restart, exec, prune and mute
- ✅ Several Docker hosts from a single bot, over `ssh://`, `tcp://` or TLS: added from the chat itself, and with a single host everything looks exactly as it always did
- ✅ Works out which container it is on its own: nothing to tell it, and it still knows not to stop or delete itself
- ✅ Settings editable from the bot itself with `/settings`, without touching the docker-compose or restarting
- ✅ Button-based main menu in `/start`, grouped into categories; typed commands keep working exactly as before
- ✅ Mute notifications temporarily
- ✅ Multi-architecture image (amd64, arm64, armv7…) compatible with Raspberry Pi, NAS and standard servers
- ✅ Multilanguage support (Spanish, English, Dutch, German, Russian, Galician, Italian, Catalan)
## 📋 Commands
Most commands can be used in two ways: typing the command alone (`/run`) to let the bot show an interactive button menu, or passing the container name directly (`/run nginx`) to act without menus.
`/start` opens the main menu, with the commands grouped into categories (Containers, Diagnostics, Updates, System, Automation, Settings and About). Pressing a button does exactly what typing the bare command does.
| Command | Description |
|---|---|
| `/start` | Main menu with buttons, grouped by kind of action |
| `/list` | Full list of containers |
| `/run` `/stop` `/restart` | Start / stop / restart a container or a whole Compose project |
| `/delete` | Remove a container or a whole Compose project |
| `/exec` | Run a command inside a container |
| `/logs` `/logfile` | Logs in the chat or as a file |
| `/checkupdate` | Check whether a container has an update available |
| `/updateall` | Update every container, across every host at once |
| `/changetag` | Change the image tag (rollback or jump to another version) |
| `/compose` | Extract the `docker-compose` of a container or a project |
| `/info` | Show detailed information of a container or a project |
| `/ports` | List used ports, check a specific one or generate a free one |
| `/prune` | Clean up unused containers, images, networks or volumes |
| `/mute ` | Mute notifications for a number of minutes |
| `/schedule` | Menu to create, edit and delete scheduled tasks |
| `/settings` | Bot settings: language, columns, update checking, notification channel and **Docker hosts** |
| `/version` `/donate` `/donors` | Current version / donate / list of donors |
🧩 My containers were created with docker compose, how do they look?
If your containers were created with `docker compose`, the bot recognizes them automatically as a **project** and shows them grouped.
Commands like `/run`, `/stop`, `/restart`, `/delete`, `/info` or `/compose` will show the project list first, and the containers when you pick a project. On `/run` and `/stop` only the services the action makes sense for are offered (stopped and running respectively), matching what the project button counter already showed. Start, stop, restart and delete actions can be applied to the **whole project** or to an individual container.
⏰ Automate tasks with /schedule
From `/schedule` you can create tasks that run on a cron schedule.
- Supported actions: `run`, `stop`, `restart`, `exec`, `prune` and `mute`.
- Accepts standard cron expressions (`0 */4 * * *`) and shortcuts: `@yearly`, `@monthly`, `@weekly`, `@daily`, `@hourly` and `@reboot`.
- With several hosts the bot asks which one the task runs on, and the host shows up in the summary and in the listing. `mute` is the exception: it silences the bot's own notifications, so it belongs to no machine.
- Schedules are persisted under `/app/config` (don't forget to map that volume).
⚙️ Advanced configuration and /settings
Only what the bot needs **before** it can read its own settings is left here: how to reach Telegram and who is allowed to talk to it. The rule is simple: if getting it wrong can lock you out of the bot, it belongs in the docker-compose, because you cannot fix from the chat what stops the chat from working.
| ENV | REQUIRED | VALUE |
|:------------- |:---------------:| :-------------|
|TELEGRAM_TOKEN |✅| Bot token |
|TELEGRAM_ADMIN |✅| Admin ChatId (You can obtain it by talking to [Rose](https://t.me/MissRose_bot) bot with /id). You can have multiple admins by writting the id separated with commas. Example: 12345,54431,55944 |
|TELEGRAM_GROUP |❌| Group ChatId. If this bot is going to be in a group, you need to specify the chatId of that group. The bot needs to be admin of that group |
|TELEGRAM_THREAD |❌| Thread id inside of a supergroup; it's a numeric value (2,3,4..). Default is 1. To be used with TELEGRAM_GROUP |
|TZ |✅| Timezone (Example: Europe/Madrid) |
|TELEMETRY |❌| `false` to turn anonymous statistics off without going through `/settings`. The usual way is `/settings`; this is for whoever prefers to pin it in the compose file |
Everything else is configured from the bot itself and stored in `settings.json`, inside the mapped volume:
| SETTING | VALUE |
|:------------- | :-------------|
|Language| ES / EN / NL / DE / RU / GL / IT / CAT. Default is ES |
|Button columns| Number of columns in the container lists. Default is 2 |
|Extended messages| Show more information messages. Disabled by default |
|Multiple selection| Whether the `/run`, `/stop` and `/restart` menus stay open so you can act on several containers in a row. Enabled by default |
|Check for updates| Enabled by default |
|Check interval| Hours between checks. Decimals are accepted. Default is 4 |
|Stopped containers| Whether stopped containers are checked for updates too. Enabled by default |
|Notification channel| Channel where container status changes are exclusively published (start, stop, creation and automatic updates). Management still happens in the private chat with the bot or in TELEGRAM_GROUP. The bot verifies it can post there before saving it |
|Docker hosts| The machines the bot manages. Added, tested, renamed and removed from here. See the remote hosts dropdown |
|Anonymous statistics| Once a day it sends anonymous usage figures. Enabled by default. See [Anonymous statistics](#-anonymous-statistics) |
Changes made from `/settings` apply immediately, without restarting the container.
🖥️ More than one server? Manage several Docker hosts
From 5.0.0 the bot can manage several Docker hosts. They are defined in the settings rather than in environment variables, so one is added from the bot itself without touching the docker-compose.
With **a single host** — the normal case — none of this shows up: the bot looks exactly as it did in 4.x.
### How to reach a remote host
There are two ways, and for most people the first one is the answer:
| Form | What it needs | When |
|:---|:---|:---|
| `ssh://user@machine` | Nothing on the remote host beyond its usual `sshd` | **The recommended one.** If you already ssh into that machine, you are halfway there |
| `tcp://machine:2375` | A socket proxy on the remote machine | If your machines are already on a private network (Tailscale, WireGuard, an isolated VLAN) |
> ⚠️ **Warning:** `tcp://` without TLS has **no authentication whatsoever**: anyone who can reach that port controls that machine's Docker completely, with root-equivalent permissions. Only inside a network you trust, never exposed to the internet.
> ℹ️ **Note:** Docker also supports `tcp://` encrypted with TLS. It is quite a bit more work and with `ssh://` available I don't see the need for it, but if your case calls for it, it is explained in the [FAQ](#-frequently-asked-questions-faq), under "*I want to use `tcp://` but encrypted with TLS*".
### The check that settles it
Before configuring anything in the bot, run this from a terminal **on the machine the bot runs on**:
```bash
ssh user@machine docker version
```
If that prints a client and a server version, `ssh://user@machine` will work. If it fails, the message tells you exactly what to fix, and you never had to touch the bot.
The reason is that the bot speaks no protocol of its own: it opens an ssh session and runs `docker system dial-stdio` on the remote machine. So all that is needed there is a user with the `docker` binary on their PATH and access to the socket.
| What you see | What is missing |
|:---|:---|
| `Permission denied (publickey)` | The key is not authorised. Run `ssh-copy-id` again |
| `command not found: docker` | `docker` is not on that user's PATH |
| `permission denied ... /var/run/docker.sock` | The user is not in the `docker` group |
| `Host key verification failed` | The machine is missing from `known_hosts` |
🔑 Step by step with ssh:// (recommended)
> ❗ **Important — one key works for all your servers.** Don't generate one per machine: you create the key once and authorise it on every machine you want to add. Each step below says whether it is *once* or *per machine*, so you don't repeat more than you need.
**1. Enable SSH on the remote machine.** *(per machine)* On a normal Linux it already is. On a NAS it is usually a switch in its panel (see below).
**2. Generate a key without a passphrase** *(once, and never again)*, on the machine the bot runs on. Without a passphrase because nobody will be there to type it:
```bash
ssh-keygen -t ed25519 -N "" -f ~/.ssh/id_ed25519
```
**3. Authorise it on the remote machine.** *(per machine)* This is the only step that really repeats:
```bash
ssh-copy-id -i ~/.ssh/id_ed25519.pub user@machine
```
For the second server, and the third, it is this same command pointing at the new machine:
```bash
ssh-copy-id -i ~/.ssh/id_ed25519.pub root@unraid
ssh-copy-id -i ~/.ssh/id_ed25519.pub admin@synology
```
**4. Connect once by hand** *(per machine)*, from the machine the bot runs on, so the remote machine's fingerprint lands in your `known_hosts`. Take the chance to run the check above:
```bash
ssh user@machine docker version
```
> ❗ **Important:** steps 2, 3 and 4 are done **on the bot's machine, not inside the container**. The bot cannot accept a new fingerprint for you: there is no terminal to answer "yes" on, and `.ssh` is mapped read-only, so it cannot write to `known_hosts`. If the remote machine is not already in your `known_hosts`, the bot will report it as unreachable with a `Host key verification failed`.
**5. Give the remote user access to the socket** *(per machine)*, if step 4 complained about permissions:
```bash
sudo usermod -aG docker user # and log in over ssh again
```
**6. Map your `.ssh` into the container** *(once)* and restart the bot:
```yaml
volumes:
- /var/run/docker.sock:/var/run/docker.sock # DO NOT CHANGE
- /path/to/store/the/configuration:/app/config
- ~/.ssh:/root/.ssh:ro # Only if you are going to use ssh:// hosts
```
The bot runs as `root` inside the container, so it reads `/root/.ssh`. It has to be the `.ssh` of the user you ran `ssh-copy-id` with: that is where the private key and the `known_hosts` that step 4 filled in live. Read-only on purpose, because the bot never needs to write there.
The connection is opened by the system `ssh` client, not by an implementation of our own, so your whole `~/.ssh/config` is respected: host aliases, ports, `IdentityFile`, `User`. If your config has a `Host nas`, the URL can simply be `ssh://nas`.
**7. Add the host in the bot.** No need to touch the docker-compose again: open `/settings`, go into **🖥️ Docker hosts**, press **➕ Add host** and send it the host in a single message, with whatever name you want to give it in front:
```
nas ssh://user@nas
```
The name is optional; leave it out and the bot takes it from the URL. It tests the connection before saving, so if something is wrong it tells you there and then and saves nothing:
| What the bot answers | What it means |
|:---|:---|
| `✅ Host nas added` | Done. Its containers show up in `/list` from that moment |
| `❌ I could not connect` | The reason comes right below it. It is the same one the step 4 check would give you |
| `❌ I don't know how to connect to...` | The URL does not start with `ssh://`, `tcp://` or `unix://` |
| `❌ is already registered` | That machine is already added; adding it twice would show its containers duplicated |
After that, pressing the host on that same screen lets you **🔄 Test again**, **✏️ Rename**, **⏸️ Pause host** or **🗑️ Remove host**. The 🟢, 🔴 and ⏸️ in the list tell you at a glance which one answers and which one is paused.
**⏸️ Pause** is for the machine that is not available right now but that you intend to bring back: it stops being listed, checked and offered in the menus, and its schedules are skipped rather than disabled. Nothing is lost — not the URL, not the name, not the tasks — and the same button resumes it. The local host cannot be paused, because the bot runs on it.
🗂️ I have several servers, do I repeat everything?
No: you repeat **step 3** pointing at each machine and that's it. One key authorises on as many as you like, and it is what I would do on a home network: fewer files to manage and fewer places to get it wrong.
Check each one before adding it to the bot:
```bash
ssh root@unraid docker version
ssh admin@synology docker version
```
I'd rather have a separate key per server
Worth it if you want a compromised key not to open all your machines, or if one of them belongs to somebody else and you'd rather be able to revoke it separately. You generate one per machine:
```bash
ssh-keygen -t ed25519 -N "" -f ~/.ssh/id_unraid -C "dcb-unraid"
ssh-keygen -t ed25519 -N "" -f ~/.ssh/id_synology -C "dcb-synology"
ssh-copy-id -i ~/.ssh/id_unraid.pub root@unraid
ssh-copy-id -i ~/.ssh/id_synology.pub admin@synology
```
And you tell `ssh` which one to use with each, in `~/.ssh/config`:
```
Host unraid
HostName unraid.lan
User root
IdentityFile ~/.ssh/id_unraid
Host synology
HostName 192.168.1.20
User admin
Port 2222
IdentityFile ~/.ssh/id_synology
```
That has two advantages beyond the keys. The first is that the URLs stay as plain **`ssh://unraid`** and **`ssh://synology`**: the user, the port and the key all come from the config. The second is that `ssh unraid docker version` is still the check, so what you verify in the terminal is exactly what the bot is going to do.
> ℹ️ **Note:** the `~/.ssh/config` file is mapped into the container too, because you are already mapping the whole directory. Nothing needs adding to the docker-compose.
🔌 I prefer tcp:// through a socket proxy
If your machines are already on a private network this is the shortest route: instead of exposing the whole socket, you expose a proxy that only lets through what you allow. On the **remote machine**:
```yaml
services:
docker-socket-proxy:
image: tecnativa/docker-socket-proxy
container_name: docker-socket-proxy
environment:
- CONTAINERS=1
- IMAGES=1
- NETWORKS=1
- VOLUMES=1
- POST=1 # needed to start, stop and update
volumes:
- /var/run/docker.sock:/var/run/docker.sock:ro
ports:
- 2375:2375
labels:
- "DCB-Ignore-Check-Updates" # The bot reaches this machine THROUGH the proxy it must not update it
restart: unless-stopped
```
> ⚠️ **Warning:** never update this proxy from the bot. The update would stop the proxy halfway through and be left with no connection to finish or roll back: the host would stay 🔴 until someone restarts it by hand over SSH (`docker start docker-socket-proxy`). Always update it from the remote machine itself.
The URL for the bot is then `tcp://machine:2375`. Check it first from the bot's machine:
```bash
docker -H tcp://machine:2375 version
```
If it answers, add it in the bot the same way as an ssh one — `/settings` → **🖥️ Docker hosts** → **➕ Add host** — sending it `nas tcp://machine:2375`.
> ⚠️ **Warning:** this carries **no TLS and no authentication**: the proxy limits what can be done, not who can do it. Publish the port only on a network you trust — Tailscale, WireGuard, an isolated VLAN — never on the internet. If you need it exposed beyond that, use TLS (see FAQ).
💾 Synology, UnRAID and other NAS
**None of them expose the Docker port by default**, and rightly so: doing it without TLS would leave the machine wide open. So `ssh://` is the way in both cases.
**UnRAID** tends to be the easy one: SSH comes enabled, you log in as `root`, and `docker` is on the PATH. Usually this is all it takes:
```bash
ssh root@unraid docker version
```
If that answers, your URL is `ssh://root@unraid`.
**Synology** is the awkward one, and how awkward depends on your DSM version:
1. Enable SSH in *Control Panel → Terminal & SNMP → Enable SSH service*.
2. Try `ssh your_user@synology docker version`.
The two usual stumbling blocks are that Container Manager's `docker` is not on the PATH of an ssh session, and that the socket belongs to `root` while your administrator user cannot reach it. Modern DSM disables direct root login, so if you hit that, the practical way out is a **socket proxy** container on the Synology itself, which also lets you limit what the bot can do.
In my case I couldn't get SSH working reliably on Synology, so I went with the **docker-socket-proxy** on the Synology itself and connect to it with plain `tcp://...:2375` without TLS, inside the trusted local network (see the `tcp://` dropdown above). That's what works for me day to day.
> 💡 **Tip:** if your machines are on a private network such as Tailscale or WireGuard, plain `tcp://` over it saves you both the certificates and the ssh setup, because the mesh provides the encryption and the authentication. It is the most comfortable option when you already have one.
### Credentials are never stored in the settings
`settings.json` only holds the URL and, for TLS, the paths to the certificates. No keys and no passwords: the sensitive material is files you map yourself, so nothing sensitive ever travels inside a Telegram message.
🏷️ Extra functions through labels on other containers
- Adding the label `DCB-Ignore-Check-Updates` to a container, the bot won't check for image updates on this container.
- Adding the label `DCB-Auto-Update` to a container, it will update automatically without asking.
See the full example in the FAQ: *"I've seen that you can add labels…"*.
## 📊 Anonymous statistics
Since 5.0.0 the bot sends a few anonymous figures once a day, to know how many people use it, on how many hosts and which features are used most. That way I know where to put the effort. The statistics are public: [stats.dgongut.com/docker-controller-bot](https://stats.dgongut.com/docker-controller-bot).
**They are optional.** They are on by default and there are two ways to turn them off:
- From the bot: `/settings` → *Anonymous statistics*. Turning them off also deletes the installation's identifier.
- From the compose file: `TELEMETRY=false`.
Nothing is sent until the bot has been running for at least 10 minutes, so there is plenty of time to turn them off from `/settings` before the first report.
What is sent and what is not
**What is sent:** how many hosts and containers there are (containers in ranges), which settings are on, the bot and Docker versions, the architecture, and how many times a day each command and button was used. In `/settings` → *Anonymous statistics* → *What is sent* you can see the exact report that would go out right now. The complete list, field by field, is on [the privacy page](https://stats.dgongut.com/docker-controller-bot/privacy). The server discards anything that is not on it.
**What is never sent:** container, image, host or project names, addresses, Telegram IDs, paths or anything you type. Your IP is not stored.
**The code is open:** the [client that sends the data](https://github.com/dgongut/telemetry/tree/main/clients/python) and the [server that receives it](https://github.com/dgongut/telemetry).
Nor is anything sent when the configuration is not on a volume, because without one every time the container was recreated it would count as a new installation.
## Special Thanks
- Dutch translation: [ManCaveMedia](https://github.com/ManCaveMedia)
- German translation: [shedowe19](https://github.com/shedowe19)
- Russian translation: [leyalton](https://github.com/leyalton)
- Galician translation: [monfero](https://github.com/monfero)
- Italian translation: [zichichi](https://github.com/zichichi)
- Catalan translation: [flancky](https://t.me/flancky)
- Docker Login testing: [garanda](https://github.com/garanda21)
- English Readme: [phampyk](https://github.com/phampyk)
## ❓ Frequently Asked Questions (FAQ)
> Click each question to see the answer.
🧭 Can the bot tell me from which version to which version an image is updated?
**Yes, as long as the image says so.** The update notice, the `/updateall` list, the comparison before confirming and the final summary show the version step, for example `1.43.3 → 1.43.4`. `/info` also shows each container's version and its pending update.
**Where it comes from.** Not from the tag, since `latest` can point to anything, but from the image itself, with no extra requests:
- The standard `org.opencontainers.image.version` label (or the older `org.label-schema.version`), which most modern images carry, such as linuxserver's.
- For Docker's official images (nginx, postgres, redis…), which don't carry that label, their version environment variable: `NGINX_VERSION`, `PG_VERSION`…
**If the image doesn't declare its version**, the update is still detected, because the bot compares the local image with the registry's, but it can't put numbers on it: you'll see each image's date and identifier (digest).
**Also:**
- If the first number goes up (`1.x → 2.0`), the comparison warns that it may bring breaking changes. Date-based versions, such as `2026.10.1`, don't count as a major jump.
- If the image names its GitHub repository (the `org.opencontainers.image.source` label), the comparison links to that version's release notes, or to the list of releases if it can't find its page.
🛠️ I've seen that you can add labels to control how the bot interacts with certain containers, how do I do that?
That's right, there are currently two labels you can add to containers to control how the bot interacts with them:
- `DCB-Ignore-Check-Updates`
- `DCB-Auto-Update`
To add them to a container, simply edit your `docker-compose.yml` file and include them under the `labels` key.
Here's an example using **Home Assistant**:
```yaml
services:
homeassistant:
image: lscr.io/linuxserver/homeassistant:latest
container_name: homeassistant
network_mode: host
environment:
- PUID=1026
- PGID=100
- TZ=Etc/Madrid
volumes:
- /volume2/docker/homeassistant/config:/config
- /volume2/temp/ha:/tmp
labels:
- "DCB-Auto-Update"
restart: unless-stopped
```
🧩 My containers were created with docker-compose and appear grouped, can I still manage just one?
Yes. When you enter a project you'll see each container separately with its status, and you can act on it individually, just like with standalone containers.
The global actions (start, stop, restart or delete the whole project) are available as an extra button inside the project menu.
📢 If I set the notification channel, will notifications be duplicated?
No. When that channel is set, container status notifications (start, stop, crash and automatic updates) are sent **only** to that channel and stop appearing in the main chat.
Every other message (command results, interactive menus, available-update notices with their buttons, etc.) **never** goes to that channel: the bot always answers wherever you talked to it, be it the private chat or the group/topic configured in `TELEGRAM_GROUP` and `TELEGRAM_THREAD`.
🖥️ I have several hosts, how do I know which machine a container is on?
The bot tells you, and only when it needs to.
With **a single host** the host level shows up nowhere: `/list` and every menu look exactly as they did before hosts existed. There is nothing to learn and nothing changes.
As soon as you have **two or more**, it appears where it matters: `/list` groups containers by machine under a header, every action message says which host it is talking about, and the `/run`, `/stop`, `/logs`… menus ask you for the host first — unless only one of them has anything to offer, in which case the question is skipped and it goes straight there.
If two machines have a container with the same name and you type `/logs nginx`, the bot does not guess: it asks you which of the two.
🔌 A host shows up 🔴 red, what do I do?
Go into `/settings` → **🖥️ Docker hosts** and press it: the host screen tells you the exact reason it failed, and gives you a **🔄 Test again** to retry without leaving the screen.
The important part is that **one machine being down does not break the rest**: `/list` keeps working and shows the hosts that do answer, flagging the one that does not. Commands and update checks skip the one that is out.
To diagnose it, the same old check from the bot's machine is worth more than any menu:
```bash
ssh user@machine docker version
```
The message it gives you there is the same one the bot is giving you, but with all the detail. The usual causes are in the table under *The check that settles it* (🖥️ dropdown above).
🔐 I want to use tcp:// but encrypted with TLS, can I?
You can, yes, and here is the procedure. But first the honest part: **it is fairly advanced and I don't consider it necessary.**
TLS solves one specific problem: crossing a network you don't trust. If your machines are at home, `ssh://` gives you exactly the same protection — encryption and key-based authentication — without generating a single certificate, and reusing the ssh you already have set up. And if you need to reach them from outside, setting up Tailscale or WireGuard is less work than a PKI and serves everything else on your network, not just this.
That said: if your case really calls for it, or you just feel like it, it works perfectly well. Bear in mind that **it is the one route that cannot be added from the bot** and the host has to be written by hand into `settings.json`, as shown in step 5.
Everything below goes on the **remote machine**, except where it says otherwise.
**1. Generate the CA and the certificates.** Replace `machine.local` with the name or IP the bot will call it by:
```bash
openssl genrsa -aes256 -out ca-key.pem 4096
openssl req -new -x509 -days 3650 -key ca-key.pem -sha256 -out ca.pem
openssl genrsa -out server-key.pem 4096
openssl req -subj "/CN=machine.local" -sha256 -new -key server-key.pem -out server.csr
echo "subjectAltName = DNS:machine.local,IP:192.168.1.50" > extfile.cnf
echo "extendedKeyUsage = serverAuth" >> extfile.cnf
openssl x509 -req -days 3650 -sha256 -in server.csr -CA ca.pem -CAkey ca-key.pem \
-CAcreateserial -out server-cert.pem -extfile extfile.cnf
openssl genrsa -out key.pem 4096
openssl req -subj "/CN=client" -new -key key.pem -out client.csr
echo "extendedKeyUsage = clientAuth" > extfile-client.cnf
openssl x509 -req -days 3650 -sha256 -in client.csr -CA ca.pem -CAkey ca-key.pem \
-CAcreateserial -out cert.pem -extfile extfile-client.cnf
```
**2. Configure the daemon** in `/etc/docker/daemon.json`:
```json
{
"tlsverify": true,
"tlscacert": "/etc/docker/certs/ca.pem",
"tlscert": "/etc/docker/certs/server-cert.pem",
"tlskey": "/etc/docker/certs/server-key.pem",
"hosts": ["unix:///var/run/docker.sock", "tcp://0.0.0.0:2376"]
}
```
Under systemd the `-H` the unit ships with has to go, or `dockerd` complains the host is defined twice:
```bash
sudo mkdir -p /etc/systemd/system/docker.service.d
printf '[Service]\nExecStart=\nExecStart=/usr/bin/dockerd\n' | \
sudo tee /etc/systemd/system/docker.service.d/override.conf
sudo systemctl daemon-reload && sudo systemctl restart docker
```
**3. Copy `ca.pem`, `cert.pem` and `key.pem`** to the bot's machine and map them:
```yaml
volumes:
- /path/to/the/certs:/certs:ro
```
**4. Check before configuring the bot:**
```bash
docker --tlsverify --tlscacert=ca.pem --tlscert=cert.pem --tlskey=key.pem -H tcp://machine.local:2376 version
```
**5. Declare the host by hand.** This is the one route that **cannot** be added from `/settings`: the add-host screen only asks for a URL, and a TLS host also needs the paths of the three certificates. It goes into `settings.json`, inside the volume you mapped, in the `hosts` list:
```json
{
"id": "h_tls1",
"alias": "machine",
"url": "tcp://machine.local:2376",
"local": false,
"tls": {
"ca": "/certs/ca.pem",
"cert": "/certs/cert.pem",
"key": "/certs/key.pem",
"verify": true
}
}
```
The paths are the ones **inside the container**, that is the right-hand side of the volume from step 3. The `id` is yours to pick and its value does not matter as long as it is unique: it only has to be stable, because it is what schedules and the update cache are tied to.
> ❗ **Important:** editing `settings.json` by hand **requires restarting the container**: the bot reads it at start-up and keeps it in memory. After the restart the host shows up in `/settings` → **🖥️ Docker hosts** like any other, and can be tested, renamed and removed from there.
💬 Where can I control the bot from?
From the private chat with the bot and from the group (or the specific supergroup topic) you configured in `TELEGRAM_GROUP` and `TELEGRAM_THREAD`.
The bot always replies where you wrote to it: run `/list` in the private chat and the list shows up there; run it in the group topic and it shows up in that topic. The notification channel only receives status change alerts.
Any other chat is ignored: if the bot happens to be in another group it will neither answer nor run anything there, even if the sender is an administrator. Being an administrator is not enough, the chat has to be that administrator's private chat or `TELEGRAM_GROUP`.
🔄 How do I update the bot itself?
The same as any other container: from `/checkupdate docker-controller-bot` or from `/updateall`.
Under the hood the bot spawns an auxiliary container (`UPDATER-Docker-Controler-Bot`) that pulls the new image, replaces it and brings the bot back up, so the bot is never left without a running process during the update.
If you add the `DCB-Auto-Update` label to its `docker-compose.yml`, it will update itself as soon as a new version is detected.
---
🧑💻 Only for developers
### Execute with local code
For local execution and testing new code changes, you need to rename the `.env-example` file to `.env` and fill in the required values for it to run.
You must set working and different `TELEGRAM_TOKEN` and `TELEGRAM_ADMIN` values from those used in normal execution.
The folder structure should be:
```
docker-controller-bot/
├── .env
├── .gitignore
├── LICENSE
├── requirements.txt
├── README.md
├── Dockerfile_local
├── docker-compose.debug.yaml
├── docker-controller-bot.py # entry point: imports and starts
├── core.py # the core: DockerManager, monitors, keyboards, UI
├── commands.py # one `cmd_*` per command
├── callbacks.py # one `cb_*` per button
├── callback_registry.py # the `@callback` decorator and the parsing
├── host_registry.py # the Docker hosts and their client cache
├── store.py # settings.json, state and caches
├── migration.py # start-up migrations (4.x -> 5.0)
├── config.py # start-up variables and constants
├── i18n.py # locale loading and `get_text`
├── own_container.py # works out which container it is, unaided
├── docker_update.py
├── docker_compose_manager.py
├── compose_generator.py
├── port_manager.py
├── schedule_manager.py
├── message_queue.py
├── logger.py
├── tests
│ ├── run_all.py
│ └── ...
└── locale
├── en.json
├── es.json
├── de.json
├── ru.json
├── gl.json
├── nl.json
├── cat.json
└── it.json
```
To bring it up, run in that path: `docker compose -f docker-compose.debug.yaml up -d --build --force-recreate`
To stop and remove it: `docker compose down --rmi`
To try out new changes, just save. Changes are reloaded on the fly.
### The tests
```bash
python3 tests/run_all.py
```
They need no Docker: the SDK is stubbed and the settings are written into a temporary directory, so they run anywhere. A good part of them checks things that only show up at runtime — names a module does not define, locale keys nothing renders, buttons that would carry an id without its host, markup that drifted in one language — so if you touch code, run them before proposing the change.
You can filter by module: `python3 tests/run_all.py test_hosts`.
### Debugging with VS Code
Open the repository folder in [Visual Studio Code](https://code.visualstudio.com/) you'll need the following extensions installed in VS Code:
- [Docker](https://marketplace.visualstudio.com/items?itemName=ms-azuretools.vscode-docker)
- [Python](https://marketplace.visualstudio.com/items?itemName=ms-python.python)
#### Installing the extensions
1. Open VS Code.
2. Go to Extensions on the sidebar and search for “Docker” and “Python”.
3. Install both extensions from the Marketplace.
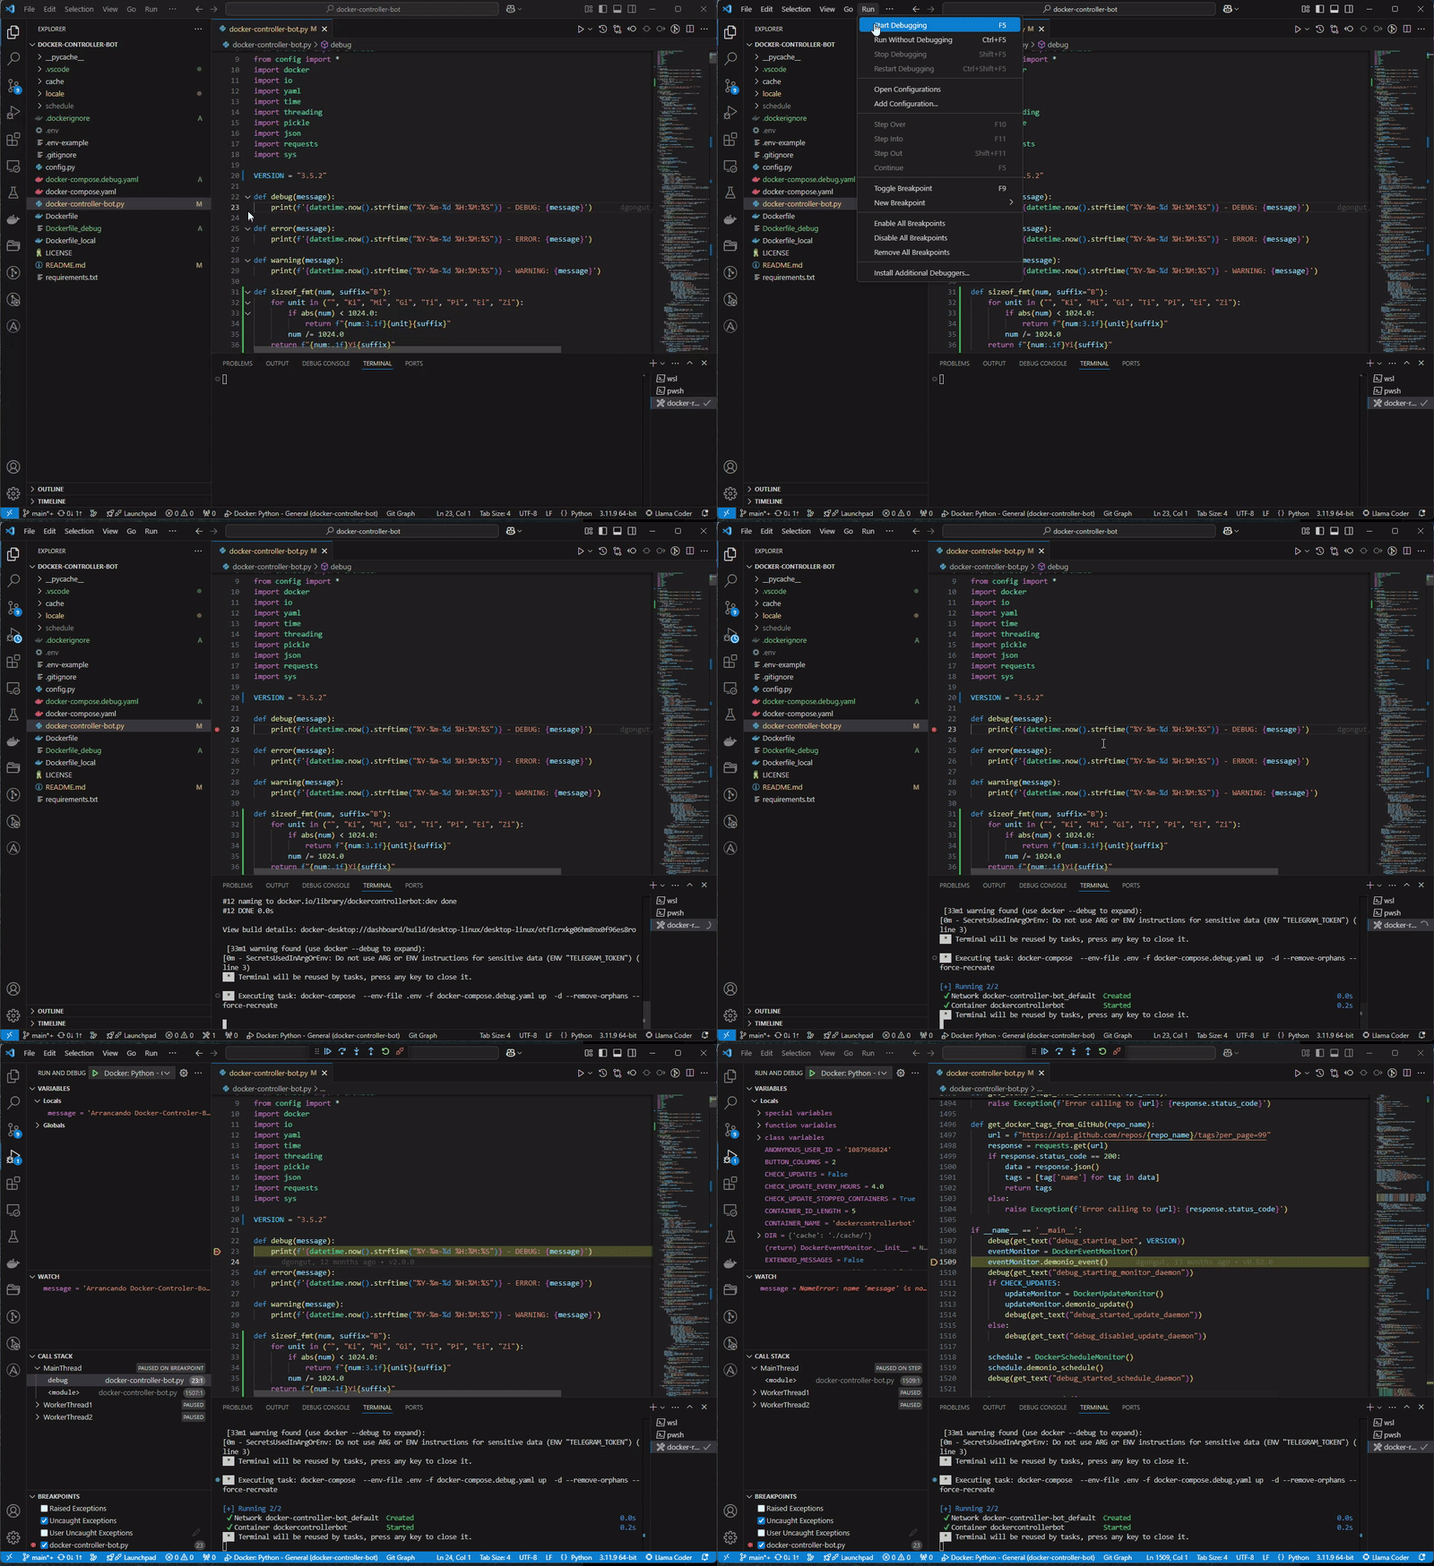
#### Setting Breakpoints
1. Open the code file you want to debug.
2. Click in the left margin next to the line of code where you want to set a breakpoint. A red dot will appear indicating the `breakpoint`.
#### Starting the Debugger
1. Go to the `Run` menu and select `Start Debugging` or press `F5`.
2. VS Code will start using `docker-compose.debug.yaml` and launch the debugging session.
3. The debug panel will open at the bottom, showing variables, the call stack, and the debug console.
#### Debugging Conclusion
- To stop the debugging session, go to `Run > Stop Debugging` or press `Shift+F5`