Manage client-side packages with Bower in ASP.NET Core
By Rick Anderson, Noel Rice, and Scott Addie
Bower calls itself "A package manager for the web." Within the .NET ecosystem, it fills the void left by NuGet’s inability to deliver static content files. For ASP.NET Core projects, these static files are inherent to client-side libraries like jQuery and Bootstrap. For .NET libraries, you still use NuGet package manager.
New projects created with the ASP.NET Core project templates set up the client-side build process. jQuery and Bootstrap are installed, and Bower is supported.
Client-side packages are listed in the bower.json file. The ASP.NET Core project templates configures bower.json with jQuery, jQuery validation, and Bootstrap.
In this tutorial, we'll add support for Font Awesome. Bower packages can be installed with the Manage Bower Packages UI or manually in the bower.json file.
Installation via Manage Bower Packages UI
Create a new ASP.NET Core Web app with the ASP.NET Core Web Application (.NET Core) template. Select Web Application and No Authentication.
Right-click the project in Solution Explorer and select Manage Bower Packages (alternatively from the main menu, Project > Manage Bower Packages).
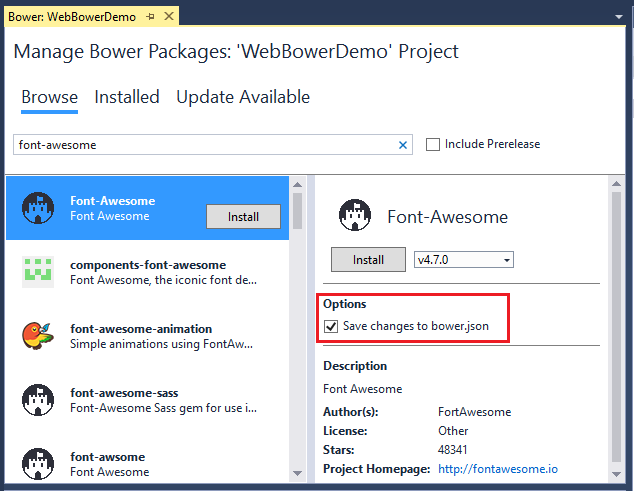
In the Bower: <project name> window, click the "Browse" tab, and then filter the packages list by entering
font-awesomein the search box:
Confirm that the "Save changes to bower.json" checkbox is checked. Select a version from the drop-down list and click the Install button. The Output window shows the installation details.
Manual installation in bower.json
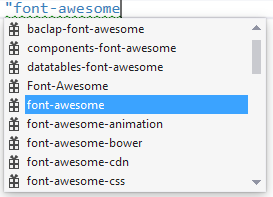
Open the bower.json file and add "font-awesome" to the dependencies. IntelliSense shows the available packages. When a package is selected, the available versions are displayed. The images below are older and will not match what you see.


Bower uses semantic versioning to organize dependencies. Semantic versioning, also known as SemVer, identifies packages with the numbering scheme <major>.<minor>.<patch>. IntelliSense simplifies semantic versioning by showing only a few common choices. The top item in the IntelliSense list (4.6.3 in the example above) is considered the latest stable version of the package. The caret (^) symbol matches the most recent major version and the tilde (~) matches the most recent minor version.
Save the bower.json file. Visual Studio watches the bower.json file for changes. Upon saving, the bower install command is executed. See the Output window's Bower/npm view for the exact command executed.
Open the .bowerrc file under bower.json. The directory property is set to wwwroot/lib which indicates the location Bower will install the package assets.
{
 "directory": "wwwroot/lib"
}
You can use the search box in Solution Explorer to find and display the font-awesome package.
Open the Views\Shared_Layout.cshtml file and add the font-awesome CSS file to the environment Tag Helper for Development. From Solution Explorer, drag and drop font-awesome.css inside the <environment names="Development"> element.
<environment names="Development">
    <link rel="stylesheet" href="~/lib/bootstrap/dist/css/bootstrap.css" />
    <link rel="stylesheet" href="~/css/site.css" />
    <link href="~/lib/font-awesome/css/font-awesome.css" rel="stylesheet" />"
</environment>
In a production app you would add font-awesome.min.css to the environment tag helper for Staging,Production.
Replace the contents of the Views\Home\About.cshtml Razor file with the following markup:
@{
ViewData["Title"] = "About";
}
<div class="list-group">
<a class="list-group-item" href="#"><i class="fa fa-home fa-fw" aria-hidden="true"></i> Home</a>
<a class="list-group-item" href="#"><i class="fa fa-book fa-fw" aria-hidden="true"></i> Library</a>
<a class="list-group-item" href="#"><i class="fa fa-pencil fa-fw" aria-hidden="true"></i> Applications</a>
<a class="list-group-item" href="#"><i class="fa fa-cog fa-fw" aria-hidden="true"></i> Settings</a>
</div>
Run the app and navigate to the About view to verify the font-awesome package works.
Exploring the client-side build process
Most ASP.NET Core project templates are already configured to use Bower. This next walkthrough starts with an empty ASP.NET Core project and adds each piece manually, so you can get a feel for how Bower is used in a project. You see can what happens to the project structure and the runtime output as each configuration change is made.
The general steps to use the client-side build process with Bower are:
- Define packages used in your project.
- Reference packages from your web pages.
Define packages
Once you list packages in the bower.json file, Visual Studio will download them. The following example uses Bower to load jQuery and Bootstrap to the wwwroot folder.
Create a new ASP.NET Core Web app with the ASP.NET Core Web Application (.NET Core) template. Select the Empty project template and click OK.
In Solution Explorer, right-click the project > Add New Item and select Bower Configuration File. Note: A .bowerrc file is also added.
Open bower.json, and add jquery and bootstrap to the
dependenciessection. The resulting bower.json file will look like the following example. The versions will change over time and may not match the image below.
{
  "name": "asp.net",
  "private": true,
  "dependencies": {
    "jquery": "3.1.1",
    "bootstrap": "3.3.7"
  }
}
Save the bower.json file.
Verify the project includes the bootstrap and jQuery directories in wwwroot/lib. Bower uses the .bowerrc file to install the assets in wwwroot/lib.
Note: The "Manage Bower Packages" UI provides an alternative to manual file editing.
Enable static files
- Add the
Microsoft.AspNetCore.StaticFilesNuGet package to the project. - Enable static files to be served with the Static file middleware middleware. Add a call to UseStaticFiles to the
Configuremethod ofStartup.
using Microsoft.AspNetCore.Builder;
using Microsoft.AspNetCore.Hosting;
using Microsoft.AspNetCore.Http;

public class Startup
{
    public void Configure(IApplicationBuilder app)
    {
        app.UseStaticFiles();

        app.Run(async (context) =>
        {
            await context.Response.WriteAsync("Hello World!");
        });
    }
}
Reference packages
In this section, you will create an HTML page to verify it can access the deployed packages.
Add a new HTML page named Index.html to the wwwroot folder. Note: You must add the HTML file to the wwwroot folder. By default, static content cannot be served outside wwwroot. See Working with static files for more information.
Replace the contents of Index.html with the following markup:
<!DOCTYPE html>
<html>
<head>
    <meta charset="utf-8" />
    <title>Bower Example</title>
    <link href="lib/bootstrap/dist/css/bootstrap.css" rel="stylesheet" />
</head>
<body>
    <div class="jumbotron">
        <h1>Using the jumbotron style</h1>
        <p>
            <a class="btn btn-primary btn-lg" role="button">Stateful button</a>
        </p>
    </div>
    <script src="lib/jquery/dist/jquery.js"></script>
    <script src="lib/bootstrap/dist/js/bootstrap.js"></script>
    <script>
        $(".btn").click(function () {
            $(this).text('loading')
                .delay(1000)
                .queue(function () {
                    $(this).text('reset');
                    $(this).dequeue();
                });
        });
    </script>
</body>

</html>
Run the app and navigate to
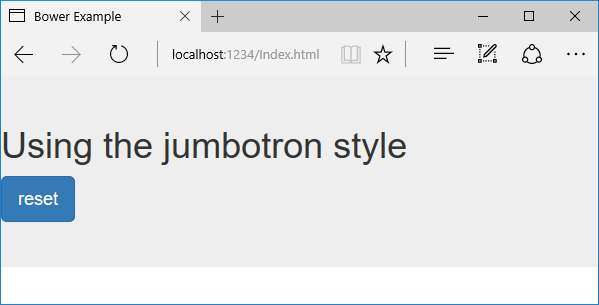
http://localhost:<port>/Index.html. Alternatively, with Index.html opened, pressCtrl+Shift+W. Verify that the jumbotron styling is applied, the jQuery code responds when the button is clicked, and that the Bootstrap button changes state.