<!DOCTYPE html>
<!--[if IE]><![endif]-->
<html>
  
  <head>
    <meta charset="utf-8">
    <meta http-equiv="X-UA-Compatible" content="IE=edge,chrome=1">
    <title>Controller &#26041;&#27861;&#19982;&#35270;&#22270; | Microsoft &#25991;&#26723;&#65288;&#20013;&#25991;&#25991;&#26723;&#65289; </title>
    <meta name="viewport" content="width=device-width">
    <meta name="title" content="Controller &#26041;&#27861;&#19982;&#35270;&#22270; | Microsoft &#25991;&#26723;&#65288;&#20013;&#25991;&#25991;&#26723;&#65289; ">
    <meta name="generator" content="docfx 2.22.2.0">
    
    <link rel="shortcut icon" href="../../favicon.ico">
    <link rel="stylesheet" href="../../styles/docfx.vendor.css">
    <link rel="stylesheet" href="../../styles/docfx.css">
    <link rel="stylesheet" href="../../styles/main.css">
    <meta property="docfx:navrel" content="/foo">
    <meta property="docfx:tocrel" content="../../toc.html">
    
    
  </head>
  <body data-spy="scroll" data-target="#affix">
    <div id="wrapper">
      <header>
        
        <nav id="autocollapse" class="navbar navbar-inverse ng-scope" role="navigation">
          <div class="container">
            <div class="navbar-header">
              <button type="button" class="navbar-toggle" data-toggle="collapse" data-target="#navbar">
                <span class="sr-only">切换导航</span>
                <span class="icon-bar"></span>
                <span class="icon-bar"></span>
                <span class="icon-bar"></span>
              </button>
              
              <a class="navbar-brand" href="../../index.html">
                <img id="logo" class="svg" src="../../logo.svg" alt="">
              </a>
            </div>
            <div class="collapse navbar-collapse" id="navbar">
              <form class="navbar-form navbar-right" role="search" id="search">
                <div class="form-group">
                  <input type="text" class="form-control" id="search-query" placeholder="Search" autocomplete="off">
                </div>
              </form>
            </div>
          </div>
        </nav>
        
        <div class="subnav navbar navbar-default">
          <div class="container hide-when-search" id="breadcrumb">
            <ul class="breadcrumb">
              <li></li>
            </ul>
          </div>
        </div>
      </header>
      <div role="main" class="container body-content hide-when-search">
        
        <div class="sidenav hide-when-search">
          <a class="btn toc-toggle collapse" data-toggle="collapse" href="#sidetoggle" aria-expanded="false" aria-controls="sidetoggle">显示 / 隐藏目录</a>
          <div class="sidetoggle collapse" id="sidetoggle">
            <div id="sidetoc"></div>
          </div>
        </div>
        <div class="article row grid-right">
          <div class="col-md-10">
            <article class="content wrap" id="_content" data-uid="tutorials/first-mvc-app-xplat/controller-methods-views">
<h1 id="controller-方法与视图">Controller 方法与视图</h1>

<p>作者 <a href="https://twitter.com/RickAndMSFT">Rick Anderson</a></p>
<p>翻译 <a href="https://github.com/kiler398/aspnetcore">谢炀(Kiler)</a> </p>
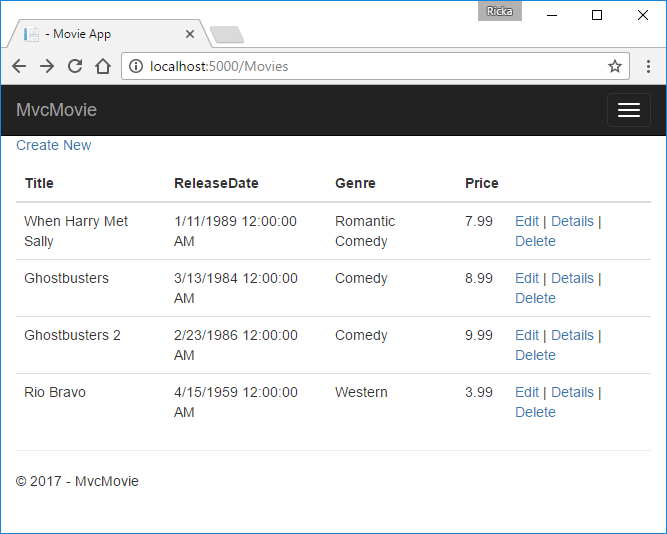
<p>我们已经初步的创建了一个 movie 应用程序,但是展示并不理想。我们不希望看到 release date 字段显示时间并且 <strong>ReleaseDate</strong> 应该是两个单词。</p>
<p><img src="../first-mvc-app/working-with-sql/static/m55.png" alt="Index view: Release Date is one word (no space) and every movie release date shows a time of 12 AM"></p>
<p>打开 <em>Models/Movie.cs</em> 文件并添加下面高亮的代码行:</p>
<pre><code class="lang-csharp" name="Main" highlight-lines="2,11-12">using System;
using System.ComponentModel.DataAnnotations;

namespace MvcMovie.Models
{
    public class Movie
    {
        public int ID { get; set; }
        public string Title { get; set; }

        [Display(Name = &quot;Release Date&quot;)]
        [DataType(DataType.Date)]
        public DateTime ReleaseDate { get; set; }
        public string Genre { get; set; }
        public decimal Price { get; set; }
    }
}
</code></pre><p>编译并运行程序</p>
<!-- include start
![MVC Movie application open browser showing movie data](../../tutorials/first-mvc-app/working-with-sql/_static/m55.png)

 -->
<p>我们会在下一篇文章中继续发掘 <a href="http://msdn.microsoft.com/library/system.componentmodel.dataannotations.aspx">DataAnnotations</a> 的内容。 <a href="https://msdn.microsoft.com/library/system.componentmodel.dataannotations.displayattribute.aspx">Display</a> 标签用来指定字段的显示名(在本示例中 &quot;Release Date&quot; 会替代 &quot;ReleaseDate&quot;)。 <a href="https://msdn.microsoft.com/library/system.componentmodel.dataannotations.datatypeattribute.aspx">DataType</a> 特性指定数据类型,在本示例是日期类型,所以字段中存储的时间信息不会被显示。</p>
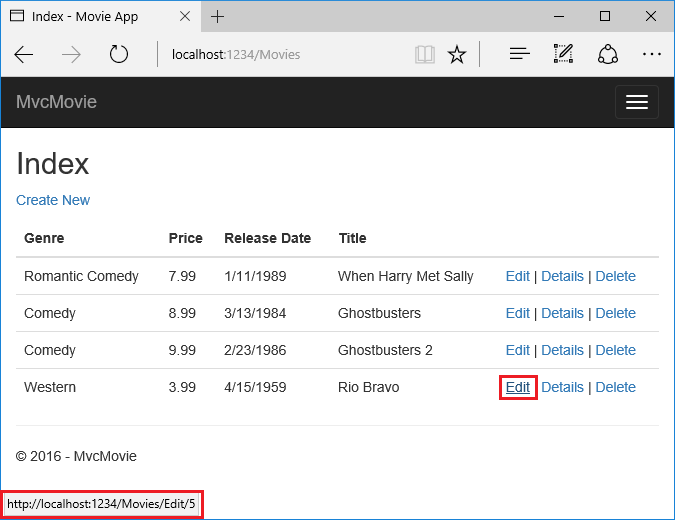
<p>浏览 <code>Movies</code> 控制器并把鼠标悬停于 <strong>Edit</strong> 链接上可以看到目标 URL。</p>
<p><img src="../first-mvc-app/controller-methods-views/static/edit7.png" alt="在浏览窗口把鼠标悬停在编辑链接上会显示链接 http://localhost:1234/Movies/Edit/5 "></p>
<p><strong>Edit</strong>、<strong>Details</strong> 以及 <strong>Delete</strong> 链接是由 <em>Views/Movies/Index.cshtml</em> 文件中的 MVC Core Anchor Tag Helper 自动生成的。</p>
<pre><code class="lang-HTML" name="Main" highlight-lines="1-3">        &lt;a asp-action=&quot;Edit&quot; asp-route-id=&quot;@item.ID&quot;&gt;Edit&lt;/a&gt; |
        &lt;a asp-action=&quot;Details&quot; asp-route-id=&quot;@item.ID&quot;&gt;Details&lt;/a&gt; |
        &lt;a asp-action=&quot;Delete&quot; asp-route-id=&quot;@item.ID&quot;&gt;Delete&lt;/a&gt;
    &lt;/td&gt;
&lt;/tr&gt;
</code></pre><p><a class="xref" href="../../mvc/views/tag-helpers/intro.html">Tag Helpers</a> 允许服务器端代码在 Razor 文件中创建和生成 HTML 元素。在上面的代码中, <code>AnchorTagHelper</code>  通过 controller 方法以及路由ID 动态生成 HTML <code>href</code> 属性值。你可以在你熟悉的浏览器中使用 <strong>View Source</strong> 菜单或者使用 <strong>F12</strong> 工具来检查你生成的 HTML 标签。 <strong>F12</strong> 工具如下图。</p>
<pre><code class="lang-html"> &lt;td&gt;
    &lt;a href = &quot;/Movies/Edit/4&quot; &gt; Edit &lt;/ a &gt; |
    &lt; a href=&quot;/Movies/Details/4&quot;&gt;Details&lt;/a&gt; |
    &lt;a href = &quot;/Movies/Delete/4&quot; &gt; Delete &lt;/ a &gt;
&lt;/ td &gt;
</code></pre><p>在 <em>Startup.cs</em> 文件中设置回调<a class="xref" href="../../mvc/controllers/routing.html">路由</a>格式。</p>
<pre><code class="lang-csharp" name="Main" highlight-lines="5">app.UseMvc(routes =&gt;
{
    routes.MapRoute(
        name: &quot;default&quot;,
        template: &quot;{controller=Home}/{action=Index}/{id?}&quot;);
});
</code></pre><p>ASP.NET Core 会把 <code>http://localhost:1234/Movies/Edit/4</code> 转化成发送到 <code>Movies</code> controller 的 <code>Edit</code> 方法的请求并带上值为 4 的 <code>Id</code> 参数。( Controller 方法其实就是指代 action 方法。)</p>
<p><a class="xref" href="../../mvc/views/tag-helpers/intro.html">Tag Helpers</a>  是 ASP.NET Core 中最受欢迎的新功能之一。参考 <a href="#additional-resources">附录资源</a> 获取更多信息。</p>
<p>打开 <code>Movies</code> controller 并查看两个 <code>Edit</code> 方法,下面的代码展示了 <code>HTTP GET Edit</code> 方法。这个方法读取 movie 数据并显示 <em>Edit.cshtml</em> Razor 文件生成的编辑表单页面。</p>
<pre><code class="lang-csharp" name="Main">// GET: Movies/Edit/5
public async Task&lt;IActionResult&gt; Edit(int? id)
{
    if (id == null)
    {
        return NotFound();
    }

    var movie = await _context.Movie.SingleOrDefaultAsync(m =&gt; m.ID == id);
    if (movie == null)
    {
        return NotFound();
    }
    return View(movie);
}
</code></pre><p>接下来的方法展示 <code>HTTP POST Edit</code> 方法,处理 POST 过来的 movie 数据:</p>
<pre><code class="lang-csharp" name="Main">// POST: Movies/Edit/5
// To protect from overposting attacks, please enable the specific properties you want to bind to, for 
// more details see http://go.microsoft.com/fwlink/?LinkId=317598.
[HttpPost]
[ValidateAntiForgeryToken]
public async Task&lt;IActionResult&gt; Edit(int id, [Bind(&quot;ID,Title,ReleaseDate,Genre,Price&quot;)] Movie movie)
{
    if (id != movie.ID)
    {
        return NotFound();
    }

    if (ModelState.IsValid)
    {
        try
        {
            _context.Update(movie);
            await _context.SaveChangesAsync();
        }
        catch (DbUpdateConcurrencyException)
        {
            if (!MovieExists(movie.ID))
            {
                return NotFound();
            }
            else
            {
                throw;
            }
        }
        return RedirectToAction(&quot;Index&quot;);
    }
    return View(movie);
}
</code></pre><p><code>[Bind]</code>  特性是防止 <a href="https://docs.microsoft.com/aspnet/mvc/overview/getting-started/getting-started-with-ef-using-mvc/implementing-basic-crud-functionality-with-the-entity-framework-in-asp-net-mvc-application#overpost">over-posting</a> (过度提交,客户端可能发送比期望还多的数据,比如只需要2个属性但是发送了3个属性)的一种方法。
你应该只把需要改变的属性包含到 <code>[Bind]</code>  特性中。请参阅 <a href="http://www.asp.net/mvc/overview/getting-started/getting-started-with-ef-using-mvc/implementing-basic-crud-functionality-with-the-entity-framework-in-asp-net-mvc-application#overpost">Protect your controller from over-posting</a> 获取更多信息。 <a href="http://rachelappel.com/use-viewmodels-to-manage-data-amp-organize-code-in-asp-net-mvc-applications/">ViewModels</a> 提供了另外一种方式防止过度提交。</p>
<p>请注意带第二个<code>Edit</code> 方法被 <code>[HttpPost]</code> 特性所修饰。</p>
<pre><code class="lang-csharp" name="Main" highlight-lines="4">// POST: Movies/Edit/5
// To protect from overposting attacks, please enable the specific properties you want to bind to, for 
// more details see http://go.microsoft.com/fwlink/?LinkId=317598.
[HttpPost]
[ValidateAntiForgeryToken]
public async Task&lt;IActionResult&gt; Edit(int id, [Bind(&quot;ID,Title,ReleaseDate,Genre,Price&quot;)] Movie movie)
{
    if (id != movie.ID)
    {
        return NotFound();
    }

    if (ModelState.IsValid)
    {
        try
        {
            _context.Update(movie);
            await _context.SaveChangesAsync();
        }
        catch (DbUpdateConcurrencyException)
        {
            if (!MovieExists(movie.ID))
            {
                return NotFound();
            }
            else
            {
                throw;
            }
        }
        return RedirectToAction(&quot;Index&quot;);
    }
    return View(movie);
}
</code></pre><p><code>HttpPost</code>  标签指定这个 <code>Edit</code> 方法 <em>只能</em> 被 <code>POST</code>  请求调用。你可以把 <code>[HttpGet]</code> 标签应用到第一个 edit方法,但是,不是必须的,因为 <code>[HttpGet]</code> 是被默认使用的。</p>
<p><code>ValidateAntiForgeryToken</code> 标签是用来防止伪造请求的,会在(<em>Views/Movies/Edit.cshtml</em>)视图最终呈现文件中加入反伪造标记和服务器进行配对。edit 视图生成反伪造标记请参考 <a class="xref" href="../../mvc/views/working-with-forms.html">Form Tag Helper</a>。</p>
<pre><code class="lang-HTML" name="Main">&lt;form asp-action=&quot;Edit&quot;&gt;
</code></pre><p><a class="xref" href="../../mvc/views/working-with-forms.html">Form Tag Helper</a> 生成一个隐藏域的防伪标记必须和 Movies controller 的e <code>Edit</code> 方法的 <code>[ValidateAntiForgeryToken]</code> 产生的防伪标记相匹配。更多信息请参考 <a class="xref" href="../../security/anti-request-forgery.html">Anti-Request Forgery</a>。</p>
<p> <code>HttpGet Edit</code> 方法获取 movie 的 <code>ID</code> 参数,通过使用 Entity Framework 的 <code>SingleOrDefaultAsync</code> 方法查找 movie,并将选中的 movie 填充到 Edit 视图。如果 movie 没有找到,返回 <code>NotFound</code> (HTTP 404)响应。</p>
<pre><code class="lang-csharp" name="Main">// GET: Movies/Edit/5
public async Task&lt;IActionResult&gt; Edit(int? id)
{
    if (id == null)
    {
        return NotFound();
    }

    var movie = await _context.Movie.SingleOrDefaultAsync(m =&gt; m.ID == id);
    if (movie == null)
    {
        return NotFound();
    }
    return View(movie);
}
</code></pre><p>在基架系统创建 Edit 视图的时候,会检查 <code>Movie</code> 类并为它的每个属性生成代码以呈现 <code>&lt;label&gt;</code> 和 <code>&lt;input&gt;</code> 元素。下面的例子展示了 Visual Studio 基架系统生成的 Edit 视图:</p>
<pre><code class="lang-HTML" name="Main" highlight-lines="1">@model MvcMovie.Models.Movie

@{
    ViewData[&quot;Title&quot;] = &quot;Edit&quot;;
}

&lt;h2&gt;Edit&lt;/h2&gt;

&lt;form asp-action=&quot;Edit&quot;&gt;
    &lt;div class=&quot;form-horizontal&quot;&gt;
        &lt;h4&gt;Movie&lt;/h4&gt;
        &lt;hr /&gt;
        &lt;div asp-validation-summary=&quot;ModelOnly&quot; class=&quot;text-danger&quot;&gt;&lt;/div&gt;
    &lt;input type=&quot;hidden&quot; asp-for=&quot;ID&quot; /&gt;
        &lt;div class=&quot;form-group&quot;&gt;
            &lt;label asp-for=&quot;Title&quot; class=&quot;col-md-2 control-label&quot;&gt;&lt;/label&gt;
            &lt;div class=&quot;col-md-10&quot;&gt;
                &lt;input asp-for=&quot;Title&quot; class=&quot;form-control&quot; /&gt;
                &lt;span asp-validation-for=&quot;Title&quot; class=&quot;text-danger&quot;&gt;&lt;/span&gt;
            &lt;/div&gt;
        &lt;/div&gt;
        &lt;div class=&quot;form-group&quot;&gt;
            &lt;label asp-for=&quot;ReleaseDate&quot; class=&quot;col-md-2 control-label&quot;&gt;&lt;/label&gt;
            &lt;div class=&quot;col-md-10&quot;&gt;
                &lt;input asp-for=&quot;ReleaseDate&quot; class=&quot;form-control&quot; /&gt;
                &lt;span asp-validation-for=&quot;ReleaseDate&quot; class=&quot;text-danger&quot;&gt;&lt;/span&gt;
            &lt;/div&gt;
        &lt;/div&gt;
        &lt;div class=&quot;form-group&quot;&gt;
            &lt;label asp-for=&quot;Genre&quot; class=&quot;col-md-2 control-label&quot;&gt;&lt;/label&gt;
            &lt;div class=&quot;col-md-10&quot;&gt;
                &lt;input asp-for=&quot;Genre&quot; class=&quot;form-control&quot; /&gt;
                &lt;span asp-validation-for=&quot;Genre&quot; class=&quot;text-danger&quot;&gt;&lt;/span&gt;
            &lt;/div&gt;
        &lt;/div&gt;
        &lt;div class=&quot;form-group&quot;&gt;
            &lt;label asp-for=&quot;Price&quot; class=&quot;col-md-2 control-label&quot;&gt;&lt;/label&gt;
            &lt;div class=&quot;col-md-10&quot;&gt;
                &lt;input asp-for=&quot;Price&quot; class=&quot;form-control&quot; /&gt;
                &lt;span asp-validation-for=&quot;Price&quot; class=&quot;text-danger&quot;&gt;&lt;/span&gt;
            &lt;/div&gt;
        &lt;/div&gt;
        &lt;div class=&quot;form-group&quot;&gt;
            &lt;div class=&quot;col-md-offset-2 col-md-10&quot;&gt;
                &lt;input type=&quot;submit&quot; value=&quot;Save&quot; class=&quot;btn btn-default&quot; /&gt;
            &lt;/div&gt;
        &lt;/div&gt;
    &lt;/div&gt;
&lt;/form&gt;

&lt;div&gt;
    &lt;a asp-action=&quot;Index&quot;&gt;Back to List&lt;/a&gt;
&lt;/div&gt;

@section Scripts {
    @{await Html.RenderPartialAsync(&quot;_ValidationScriptsPartial&quot;);}
}
</code></pre><p>你会注意到为什么视图模版文件的顶部会有一行 <code>@model MvcMovie.Models.Movie</code> 声明呢?— 因为这个声明指定这个视图模版的模型期待的类型是 <code>Movie</code>。</p>
<p>基架生成的代码使用几个 Tag Helper 方法来简化 HTML 标记。 <a class="xref" href="../../mvc/views/working-with-forms.html">Label Tag Helper</a> 用来显示字段名(&quot;Title&quot;、&quot;ReleaseDate&quot;、&quot;Genre&quot; 或者 &quot;Price&quot;)。<a class="xref" href="../../mvc/views/working-with-forms.html">Input Tag Helper</a> 用来呈现 HTML <code>&lt;input&gt;</code> 元素。 <a class="xref" href="../../mvc/views/working-with-forms.html">Validation Tag Helper</a> 显示关联到属性的错误信息。</p>
<p>运行应用程序并导航到 <code>/Movies</code> URL。单击 <strong>编辑</strong> 链接。在浏览器中查看该页面的源代码。为 <code>&lt;form&gt;</code> 元素生成的 HTML 如下所示。</p>
<pre><code class="lang-HTML" name="Main" highlight-lines="1,6,10,17,24,28">&lt;form action=&quot;/Movies/Edit/7&quot; method=&quot;post&quot;&gt;
    &lt;div class=&quot;form-horizontal&quot;&gt;
        &lt;h4&gt;Movie&lt;/h4&gt;
        &lt;hr /&gt;
        &lt;div class=&quot;text-danger&quot; /&gt;
        &lt;input type=&quot;hidden&quot; data-val=&quot;true&quot; data-val-required=&quot;The ID field is required.&quot; id=&quot;ID&quot; name=&quot;ID&quot; value=&quot;7&quot; /&gt;
        &lt;div class=&quot;form-group&quot;&gt;
            &lt;label class=&quot;control-label col-md-2&quot; for=&quot;Genre&quot; /&gt;
            &lt;div class=&quot;col-md-10&quot;&gt;
                &lt;input class=&quot;form-control&quot; type=&quot;text&quot; id=&quot;Genre&quot; name=&quot;Genre&quot; value=&quot;Western&quot; /&gt;
                &lt;span class=&quot;text-danger field-validation-valid&quot; data-valmsg-for=&quot;Genre&quot; data-valmsg-replace=&quot;true&quot;&gt;&lt;/span&gt;
            &lt;/div&gt;
        &lt;/div&gt;
        &lt;div class=&quot;form-group&quot;&gt;
            &lt;label class=&quot;control-label col-md-2&quot; for=&quot;Price&quot; /&gt;
            &lt;div class=&quot;col-md-10&quot;&gt;
                &lt;input class=&quot;form-control&quot; type=&quot;text&quot; data-val=&quot;true&quot; data-val-number=&quot;The field Price must be a number.&quot; data-val-required=&quot;The Price field is required.&quot; id=&quot;Price&quot; name=&quot;Price&quot; value=&quot;3.99&quot; /&gt;
                &lt;span class=&quot;text-danger field-validation-valid&quot; data-valmsg-for=&quot;Price&quot; data-valmsg-replace=&quot;true&quot;&gt;&lt;/span&gt;
            &lt;/div&gt;
        &lt;/div&gt;
        &lt;!-- Markup removed for brevity --&gt;
        &lt;div class=&quot;form-group&quot;&gt;
            &lt;div class=&quot;col-md-offset-2 col-md-10&quot;&gt;
                &lt;input type=&quot;submit&quot; value=&quot;Save&quot; class=&quot;btn btn-default&quot; /&gt;
            &lt;/div&gt;
        &lt;/div&gt;
    &lt;/div&gt;
    &lt;input name=&quot;__RequestVerificationToken&quot; type=&quot;hidden&quot; value=&quot;CfDJ8Inyxgp63fRFqUePGvuI5jGZsloJu1L7X9le1gy7NCIlSduCRx9jDQClrV9pOTTmqUyXnJBXhmrjcUVDJyDUMm7-MF_9rK8aAZdRdlOri7FmKVkRe_2v5LIHGKFcTjPrWPYnc9AdSbomkiOSaTEg7RU&quot; /&gt;
&lt;/form&gt;
</code></pre><p> <code>HTML &lt;form&gt;</code> 中的 <code>&lt;input&gt;</code> 元素的 <code>action</code> 属性用于设置请求发送到 <code>/Movies/Edit/id</code> URL。当点击 <code>Save</code> 按钮时表单数据会被发送到服务器。在 <code>&lt;/form&gt;</code> 元素关闭前最后一行 <code>&lt;/form&gt;</code> 展示了  <a class="xref" href="../../mvc/views/working-with-forms.html">Form Tag Helper</a> 生成的 <a class="xref" href="../../security/anti-request-forgery.html">XSRF</a> 隐藏域标识。</p>
<h2 id="处理-post-请求">处理 POST 请求</h2>
<p>下面的列表显示了 <code>[HttpPost]</code> 不同版本的 <code>Edit</code> 方法。</p>
<pre><code class="lang-csharp" name="Main">// POST: Movies/Edit/5
// To protect from overposting attacks, please enable the specific properties you want to bind to, for 
// more details see http://go.microsoft.com/fwlink/?LinkId=317598.
[HttpPost]
[ValidateAntiForgeryToken]
public async Task&lt;IActionResult&gt; Edit(int id, [Bind(&quot;ID,Title,ReleaseDate,Genre,Price&quot;)] Movie movie)
{
    if (id != movie.ID)
    {
        return NotFound();
    }

    if (ModelState.IsValid)
    {
        try
        {
            _context.Update(movie);
            await _context.SaveChangesAsync();
        }
        catch (DbUpdateConcurrencyException)
        {
            if (!MovieExists(movie.ID))
            {
                return NotFound();
            }
            else
            {
                throw;
            }
        }
        return RedirectToAction(&quot;Index&quot;);
    }
    return View(movie);
}
</code></pre><p> <code>[ValidateAntiForgeryToken]</code> 标签验证 <a class="xref" href="../../mvc/views/working-with-forms.html">Form Tag Helper</a> 生成的存放在隐藏域中的 <a class="xref" href="../../security/anti-request-forgery.html">XSRF</a> 反伪造标记。</p>
<p><a class="xref" href="../../mvc/models/model-binding.html">模型绑定</a> 机制以发送表单数据创建 <code>Movie</code> 对象并作为 <code>movie</code> 参数。 <code>ModelState.IsValid</code> 方法验证表单提交的数据可以用来修改(编辑或更新)一个 <code>Movie</code> 对象。如果数据有效,就可以保存。更新(编辑) movie 数据会被存到数据库通过 database context 的 <code>SaveChangesAsync</code> 方法。数据保存完毕以后,这段代码将用户重定向到 <code>MoviesController</code> 类的 <code>Index</code> 方法,这个页面显示了改动后最新的Movie集合。</p>
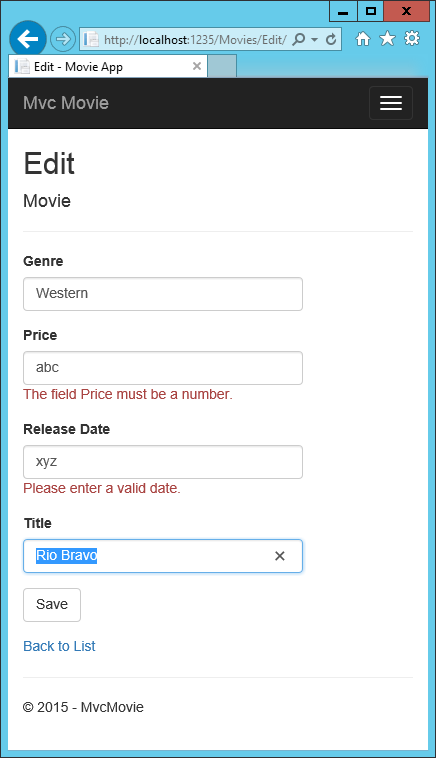
<p>表单数据被发布到服务器之前,客户端校验会检查所有字段上的验证规则。如果有任何验证错误,则显示错误消息,并且表单数据不会被发送。如果禁用了 JavaScript,将不会有客户端验证,但服务器端将检测出发送数据是无效的,表单依旧会显示出错误信息。在稍后的教程中,我们会探讨 <a class="xref" href="../../mvc/models/validation.html">模型验证</a> 更多关于验证的细节。 <em>Views/Book/Edit.cshtml</em> 视图模版中的 <a class="xref" href="../../mvc/views/working-with-forms.html">验证Tag Helper</a>  负责显示错误信息。</p>
<p><img src="../first-mvc-app/controller-methods-views/static/val.png" alt="Edit view: An exception for an incorrect Price value of abc states that The field Price must be a number. An exception for an incorrect Release Date value of xyz states Please enter a valid date."></p>
<p>movie controller 的所有 <code>HttpGet</code> 方法都遵循类似的模式。它们获取一个对象(或者对象列表,比如 <code>Index</code>),把对象(模型)传递到视图。 <code>Create</code> 方法创建一个空的对象到 <code>Create</code> 视图。诸如 Create、Edit、Delete 等之类的会修改数据的方法都会在 <code>[HttpPost]</code> 版本的重载方法中这样做(<em>译者注:</em>执行类似于前文所述的这些操作)。在 HTTP GET 方法中修改数据有安全风险。在 <code>HTTP GET</code> 方法中修改数据同样也违反 HTTP 最佳实践以及 <a href="http://rest.elkstein.org/">REST</a> 架构模式,其中规定 GET 请求不应该更改应用程序的状态。换句话说,执行 GET 操作应该是没有任何副作用,不会修改您的持久化的数据。</p>
<h2 id="其他资源">其他资源</h2>
<ul>
<li><a class="xref" href="../../fundamentals/localization.html">全球化于本地化</a></li>
<li><a class="xref" href="../../mvc/views/tag-helpers/intro.html">介绍 Tag Helpers</a></li>
<li><a class="xref" href="../../mvc/views/tag-helpers/authoring.html">Authoring Tag Helpers</a></li>
<li><a class="xref" href="../../security/anti-request-forgery.html">Anti-Request Forgery</a></li>
<li>Protect your controller from <a href="http://www.asp.net/mvc/overview/getting-started/getting-started-with-ef-using-mvc/implementing-basic-crud-functionality-with-the-entity-framework-in-asp-net-mvc-application#overpost">over-posting</a></li>
<li><a href="http://rachelappel.com/use-viewmodels-to-manage-data-amp-organize-code-in-asp-net-mvc-applications/">视图模型</a></li>
<li><a class="xref" href="../../mvc/views/working-with-forms.html">Form Tag Helper</a></li>
<li><a class="xref" href="../../mvc/views/working-with-forms.html">Input Tag Helper</a></li>
<li><a class="xref" href="../../mvc/views/working-with-forms.html">Label Tag Helper</a></li>
<li><a class="xref" href="../../mvc/views/working-with-forms.html">Select Tag Helper</a></li>
<li><a class="xref" href="../../mvc/views/working-with-forms.html">Validation Tag Helper</a></li>
</ul>
<div class="step-by-step"><p><a href="working-with-sql.html">上一节 - 使用 SQLite</a>
<a href="search.html">下一节 - 添加搜索</a>  </p>
</div>
</article>
          </div>
          <div class="col-md-10">
                    <a name="cloudcomment">
                        <div id="cloud-tie-wrapper" class="cloud-tie-wrapper"></div>
                    </a>          
          </div>
          
          <div class="hidden-sm col-md-2" role="complementary">
            <div class="sideaffix">
              <div class="contribution">
                <ul class="nav">
                  <li>
                    <a href="https://github.com/dotnetcore/aspnetcore-doc-cn/blob/master/aspnetcore/tutorials/first-mvc-app-xplat/controller-methods-views.md/#L1" class="contribution-link">&#25913;&#36827;&#25991;&#26723;</a>
                  </li>
                                                  <li>
                                              <span style="margin-left: 10px; margin-top: 3px; margin-bottom: 3px;" class="contribution-link"><a class="cloud-tie-join-count" href="#cloudcomment">
                                                  <span class="icon-comment"></span>
                                                  <span class="join-count">0</span>
                                                  <span class="join-text">评论</span>
                                              </a></span>
                                          </li>
                                          <li>
                                              <div style="margin-left: 10px; margin-top: 3px; margin-bottom: 3px;" class="bdsharebuttonbox">
                                                  <a href="#" class="bds_more" data-cmd="more"></a>
                                                  <a href="#" class="bds_mshare" data-cmd="mshare" title="分享到一键分享"></a>
                                                  <a href="#" class="bds_weixin" data-cmd="weixin" title="分享到微信"></a>
                                                  <a href="#" class="bds_tsina" data-cmd="tsina" title="分享到新浪微博"></a>
                                                  <a href="#" class="bds_sqq" data-cmd="sqq" title="分享到QQ好友"></a>
                                                  <a href="#" class="bds_copy" data-cmd="copy" title="分享到复制网址"></a>
                                                  <a href="#" class="bds_print" data-cmd="print" title="分享到打印"></a>
                                              </div>
                                          </li>
                </ul>
              </div>
              <nav class="bs-docs-sidebar hidden-print hidden-xs hidden-sm affix" id="affix">
              <!-- <p><a class="back-to-top" href="#top">返回顶部</a><p> -->
              </nav>
            </div>
          </div>
        </div>
      </div>
      
      <footer>
        <div class="grad-bottom"></div>
        <div class="footer">
          <div class="container">
            <span class="pull-right">
              <a href="#top">返回顶部</a>
            </span>
            
            <span>Copyright © 2015-2017 Microsoft<br>Generated by <strong>DocFX</strong></span>
          </div>
        </div>
      </footer>
      <script>
      (function(){
          var bp = document.createElement('script');
          var curProtocol = window.location.protocol.split(':')[0];
          if (curProtocol === 'https'){
         bp.src = 'https://zz.bdstatic.com/linksubmit/push.js';
        }
        else{
        bp.src = 'http://push.zhanzhang.baidu.com/push.js';
        }
          var s = document.getElementsByTagName("script")[0];
          s.parentNode.insertBefore(bp, s);
      })();
      </script>    </div>
    
    <script type="text/javascript" src="../../styles/docfx.vendor.js"></script>
    <script type="text/javascript" src="../../styles/docfx.js"></script>
    <script type="text/javascript" src="../../styles/main.js"></script>
    
    <script src="https://img1.cache.netease.com/f2e/tie/yun/sdk/loader.js"></script>
    <script>
     
        var url = window.location.href;
        
        url = url.replace(window.location.hash,"");
        url = url.replace(window.location.search, "");
    
        var cloudTieConfig = {
            url: url, 
            sourceId: "",
            productKey: "1f2ab3895f9d44a0b3b90ab7a8c4e01b",
            target: "cloud-tie-wrapper"
        };
        var yunManualLoad = true;
        Tie.loader("aHR0cHM6Ly9hcGkuZ2VudGllLjE2My5jb20vcGMvbGl2ZXNjcmlwdC5odG1s", true);
    </script>
    <script type="text/javascript">window._bd_share_config = { "common": { "bdSnsKey": {}, "bdText": "", "bdMini": "2", "bdMiniList": false, "bdPic": "", "bdStyle": "0", "bdSize": "16" }, "share": {} }; with (document) 0[(getElementsByTagName('head')[0] || body).appendChild(createElement('script')).src = 'http://bdimg.share.baidu.com/static/api/js/share.js?v=89860593.js?cdnversion=' + ~(-new Date() / 36e5)];</script>
  </body>
</html>