使用 Swagger 生成 ASP.NET Web API 在线帮助测试文档
作者 Shayne Boyer
翻译 谢炀(Kiler)
校对 许登洋(Seay)
对于开发人员来说,构建一个消费应用程序时去了解各种各样的 API 是一个巨大的挑战。
在你的 Web API 项目中使用 Swagger 的 .NET Core 封装 Swashbuckle.AspNetCore 可以帮助你创建良好的文档和帮助页面。Swashbuckle.AspNetCore 可以通过修改 Startup.cs 作为一组 NuGet 包方便的加入项目。
- Swashbuckle.AspNetCore 是一个开源项目,为使用 ASP.NET Core MVC 构建的 Web APIs 生成 Swagger 文档。
- Swagger 是一个机器可读的 RESTful API 表现层,它可以支持交互式文档、客户端 SDK 的生成和可被发现。
本教程基于 Building Your First Web API with ASP.NET Core MVC and Visual Studio 文档的例子构建。如果需要对应的代码,在这里 https://github.com/aspnet/Docs/tree/master/aspnetcore/tutorials/first-web-api/sample 下载示例。
开始入门
Swashbuckle 有三个核心的组件
- Swashbuckle.AspNetCore.Swagger : Swagger 对象模型和中间件用把 Swagger 文档对象导出为 JSON 终端。
- Swashbuckle.AspNetCore.SwaggerGen : Swagger 生成器直接从 路由,控制器和模型构建 SwaggerDocument 对象。 通常会结合 Swagger 端点中间件自动公开 Swagger JSON。
- Swashbuckle.AspNetCore.SwaggerUI : 是一个嵌入式版本的 Swagger UI 工具,使用 Swagger UI 强大的富文本表现形式来可定制化的来描述 Web API 的功能,并且包含内置的公共方法测试工具。
NuGet 包
您可以使用以下任何方法添加 Swashbuckle :
- 在 Package Manager Console(包管理控制台) 中:
Install-Package Swashbuckle.AspNetCore
在 Visual Studio 中:
<!--* Right click your project in Solution Explorer > Manage NuGet Packages
- Enter Swashbuckle.AspNetCore in the search box
- Set the Package source to nuget.org
- Tap the Swashbuckle.AspNetCore package and then tap Install-->
- 右击你的项目 Solution Explorer > Manage NuGet Packages
- 在搜索框中输入 Swashbuckle.AspNetCore
- 点击 "Include prerelease"
- 设置 Package source 为 nuget.org
- 点击 Swashbuckle.AspNetCore 包并点击 Install
在中间件中添加并配置 Swagger
在 Configure 方法里面把 SwaggerGen 添加到 services 集合,并且在 ConfigureServices 方法中,允许中间件提供和服务生成 JSON 文档以及 SwaggerUI。
public void ConfigureServices(IServiceCollection services)
{
    // Add framework services.
    services.AddMvc();

    services.AddLogging();

    // Add our repository type
    services.AddSingleton<ITodoRepository, TodoRepository>();

    // Register the Swagger generator, defining one or more Swagger documents
    services.AddSwaggerGen(c =>
    {
        c.SwaggerDoc("v1", new Info { Title = "My API", Version = "v1" });
    });
}

// This method gets called by the runtime. Use this method to configure the HTTP request pipeline.
public void Configure(IApplicationBuilder app, IHostingEnvironment env, ILoggerFactory loggerFactory)
{
    app.UseMvcWithDefaultRoute();

    // Enable middleware to serve generated Swagger as a JSON endpoint.
    app.UseSwagger();

    // Enable middleware to serve swagger-ui (HTML, JS, CSS etc.), specifying the Swagger JSON endpoint.
    app.UseSwaggerUI(c =>
    {
        c.SwaggerEndpoint("/swagger/v1/swagger.json", "My API V1");
    });
}
在 Visual Studio 中, 点击 ^F5 启动应用程序并导航到 http://localhost:<random_port>/swagger/v1/swagger.json 页面可以看成生成的终端描述文档。
备注
Microsoft Edge,Google Chrome 以及 Firefox 原生支持显示 JSON 文档。 Chrome 的扩展会格式化文档使其更易于阅读。 下面的例子是简化版的。
{
   "swagger": "2.0",
   "info": {
       "version": "v1",
       "title": "API V1"
   },
   "basePath": "/",
   "paths": {
       "/api/Todo": {
       "get": {
           "tags": [
           "Todo"
           ],
           "operationId": "ApiTodoGet",
           "consumes": [],
           "produces": [
           "text/plain",
           "application/json",
           "text/json"
           ],
           "responses": {
           "200": {
               "description": "OK",
               "schema": {
               "type": "array",
               "items": {
                   "$ref": "#/definitions/TodoItem"
               }
               }
           }
           },
           "deprecated": false
       },
       "post": {
           ...
       }
       },
       "/api/Todo/{id}": {
       "get": {
           ...
       },
       "put": {
           ...
       },
       "delete": {
           ...
   },
   "definitions": {
       "TodoItem": {
       "type": "object",
       "properties": {
           "key": {
           "type": "string"
           },
           "name": {
           "type": "string"
           },
           "isComplete": {
           "type": "boolean"
           }
       }
       }
   },
   "securityDefinitions": {}
   }
这个文档用来驱动 Swagger UI,可以通过访问 http://localhost:<random_port>/swagger 页面来查看。
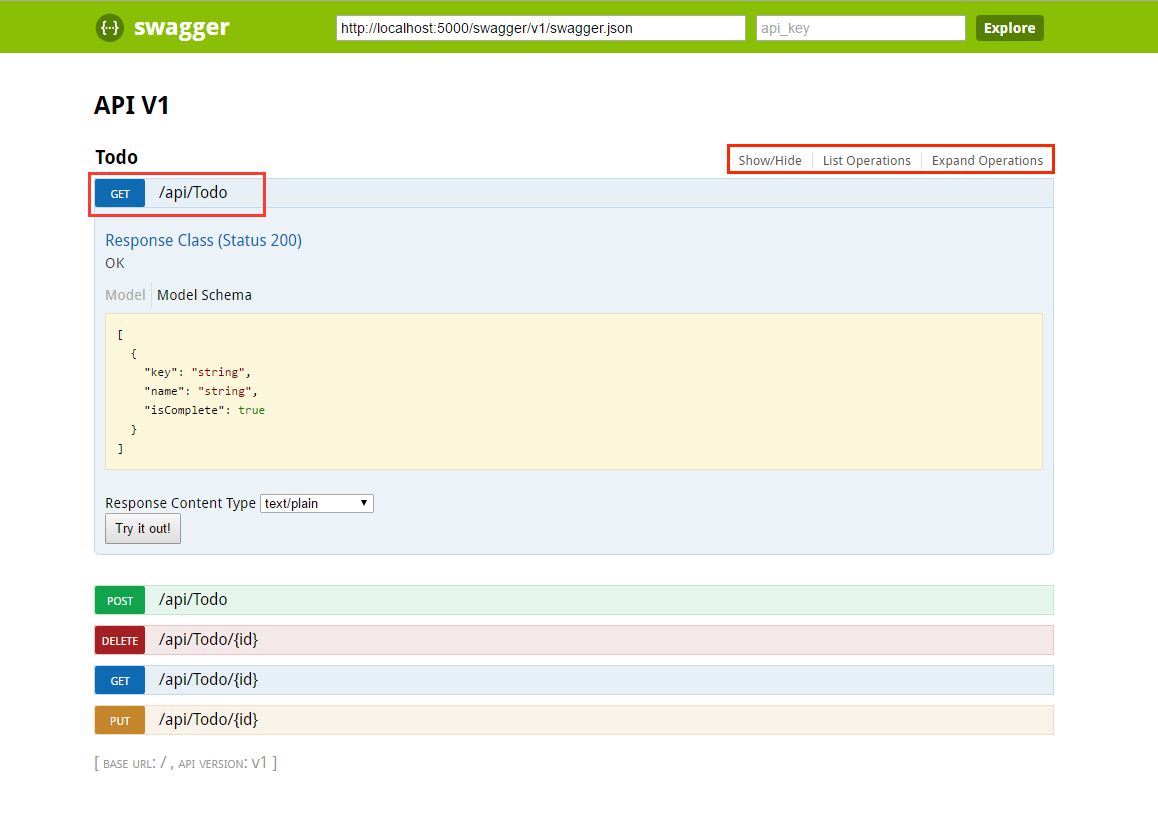
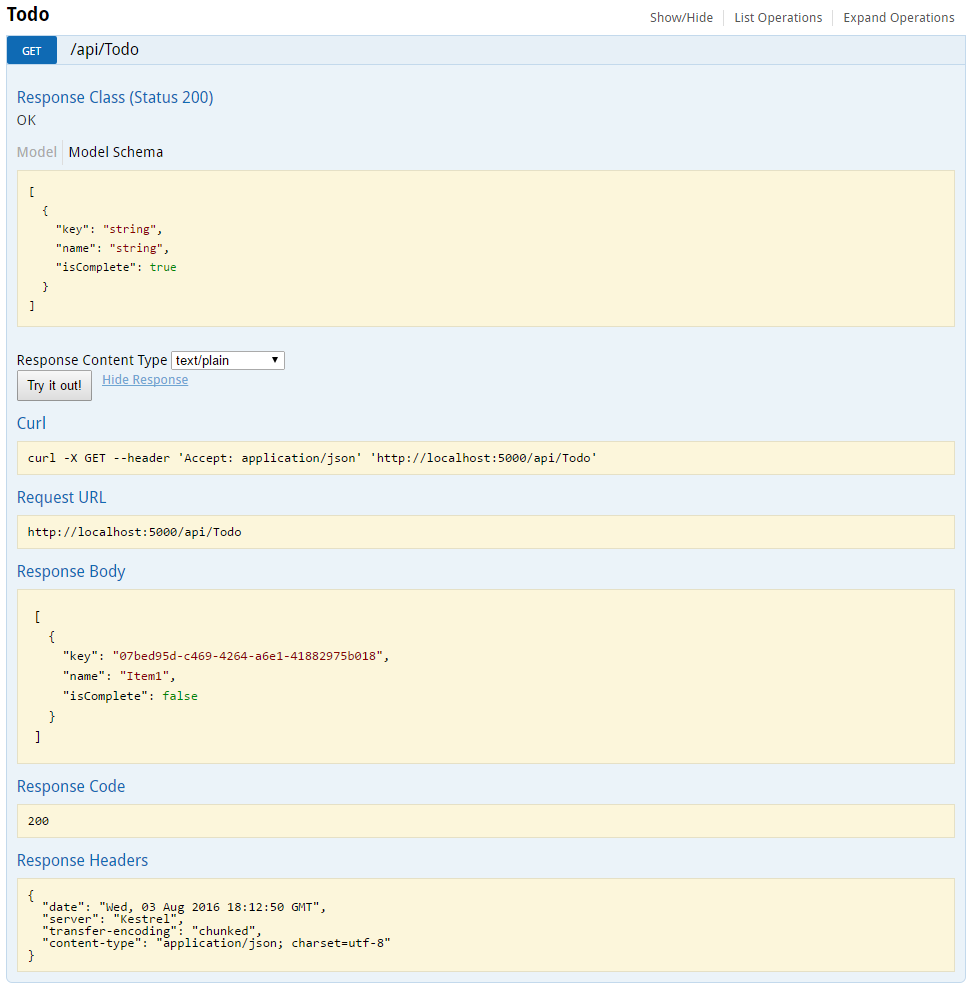
所有的 ToDo controller 的方法都是可以在 UI 上面进行测试。点击方法可以展开对应的区域,输入所需的参数并且点击 "Try it out!" 。
自定义与可扩展性
Swagger 不仅是显示 API 的一个简单方法,而且有可选项:文档对象模型,以及自定义交互 UI 来满足你的视觉感受或者设计语言。
API 信息和描述
config. action 使用 AddSwaggerGen 方法用来添加文档信息。例如:作者,版权,描述。
services.AddSwaggerGen(c =>
{
    c.SwaggerDoc("v1", new Info
    {
        Version = "v1",
        Title = "ToDo API",
        Description = "A simple example ASP.NET Core Web API",
        TermsOfService = "None",
        Contact = new Contact { Name = "Shayne Boyer", Email = "", Url = "https://twitter.com/spboyer"},
        License = new License { Name = "Use under LICX", Url = "https://example.com/license" }
    });
});
下图展示了 Swagger UI 显示添加的版本信息

XML 注释
为了启用 XML 注释, 在 Visual Studio 中右击项目并且选择 Properties 在 Output Settings 区域下面点击 XML Documentation file 。
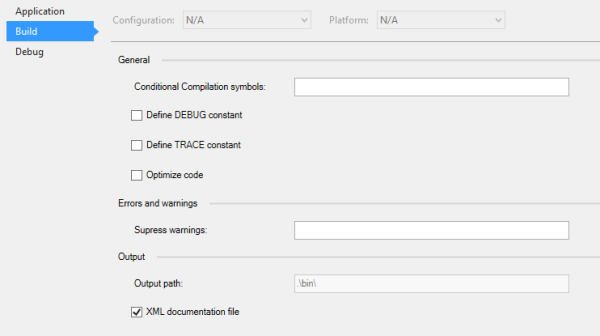
配置 Swagger 使用生成的 XML 文件。
[!NOTE] > For Linux or non-Windows operating systems, file names and paths can be case sensitive. So `ToDoApi.XML` would be found on Windows but not CentOS for example.-->备注
对于 Linux 或者 非 Windows 操作系统,文件名和路径是大小写敏感的。 所以本例中的 ToDoApi.XML 在 Windows 上可以找到但是 CentOS 就无法找到。
// This method gets called by the runtime. Use this method to add services to the container.
public void ConfigureServices(IServiceCollection services)
{
    // Add framework services.
    services.AddMvc();

    services.AddLogging();

    // Add our repository type.
    services.AddSingleton<ITodoRepository, TodoRepository>();

 // Register the Swagger generator, defining one or more Swagger documents
    services.AddSwaggerGen(c =>
    {
        c.SwaggerDoc("v1", new Info
        {
            Version = "v1",
            Title = "ToDo API",
            Description = "A simple example ASP.NET Core Web API",
            TermsOfService = "None",
            Contact = new Contact { Name = "Shayne Boyer", Email = "", Url = "http://twitter.com/spboyer"},
            License = new License { Name = "Use under LICX", Url = "http://url.com" }
        });

        //Set the comments path for the swagger json and ui.
        var basePath = PlatformServices.Default.Application.ApplicationBasePath;
        var xmlPath = Path.Combine(basePath, "TodoApi.xml");
        c.IncludeXmlComments(xmlPath);
    });
}

// This method gets called by the runtime. Use this method to configure the HTTP request pipeline.
public void Configure(IApplicationBuilder app, IHostingEnvironment env, ILoggerFactory loggerFactory)
{
    app.UseStaticFiles();

    app.UseMvcWithDefaultRoute();

    // Enable middleware to serve generated Swagger as a JSON endpoint.
    app.UseSwagger();

    // Enable middleware to serve swagger-ui (HTML, JS, CSS etc.), specifying the Swagger JSON endpoint
    app.UseSwaggerUi(c =>
    {
        c.SwaggerEndpoint("/swagger/v1/swagger.json", "My API V1");
    });
}
在上面的代码中,ApplicationBasePath 获取到应用程序的根路径,是需要设置 XML 注释文件的完整路径。 TodoApi.xml 仅适用于本例,生成的XML注释文件的名称是基于你的应用程序名称。
为方法添加的三斜线注释(C# 文档注释格式)文字会作为描述显示在 Swagger UI 对应方法的头区域。
/// <summary>
/// Deletes a specific TodoItem.
/// </summary>
/// <param name="id"></param>
[HttpDelete("{id}")]
public void Delete(string id)
{
    TodoItems.Remove(id);
}
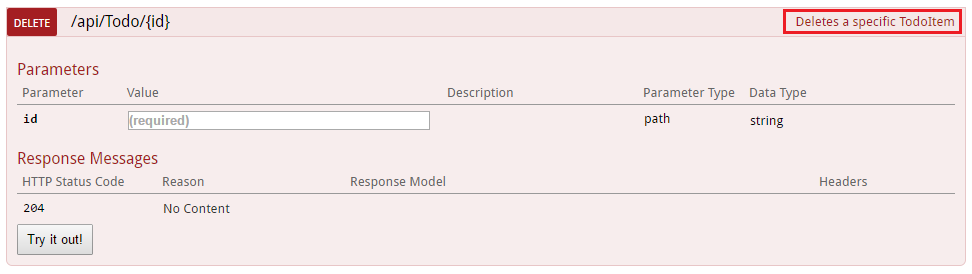
请注意,UI 是由生成的 JSON 文件驱动的,这些注释也会包含在文件中。
"delete": {
  "tags": [
    "Todo"
  ],
  "summary": "Deletes a specific TodoItem",
  "operationId": "ApiTodoByIdDelete",
  "consumes": [],
  "produces": [],
  "parameters": [
    {
      "name": "id",
      "in": "path",
      "description": "",
      "required": true,
      "type": "string"
    }
  ],
  "responses": {
    "204": {
      "description": "No Content"
    }
  },
  "deprecated": false
}
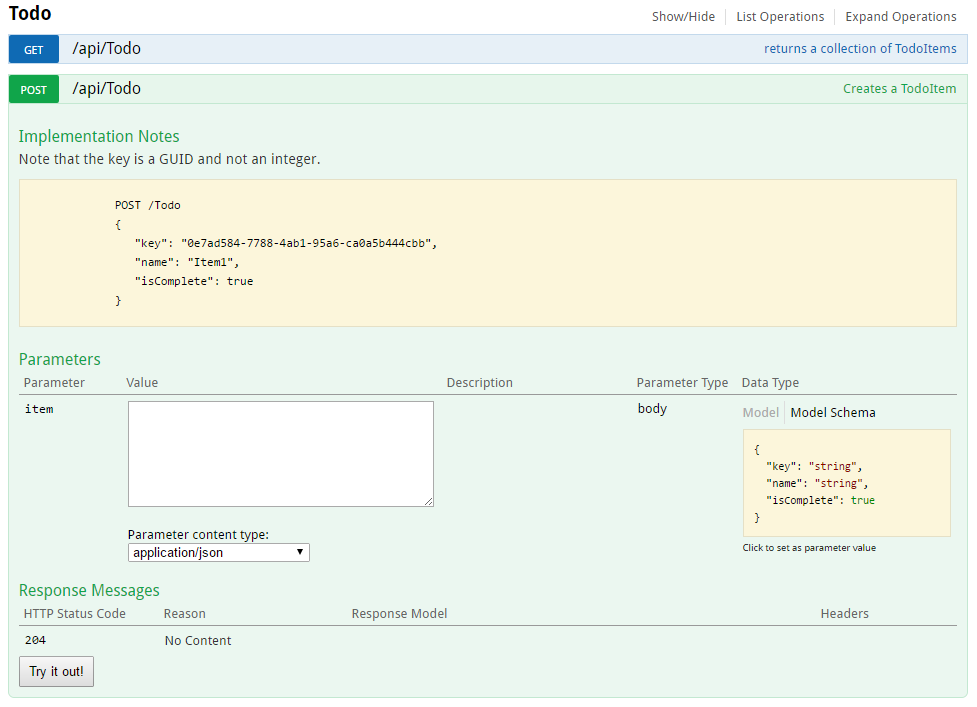
这是一个更强大的例子,加入 <remarks /> 那里面的内容可以是文字或添加的 JSON 或 XML 对象的方法为进一步描述方法文档而服务。
/// <summary>
/// Creates a TodoItem.
/// </summary>
/// <remarks>
/// Note that the key is a GUID and not an integer.
///
///     POST /Todo
///     {
///        "key": "0e7ad584-7788-4ab1-95a6-ca0a5b444cbb",
///        "name": "Item1",
///        "isComplete": true
///     }
///
/// </remarks>
/// <param name="item"></param>
/// <returns>New Created Todo Item</returns>
/// <response code="201">Returns the newly created item</response>
/// <response code="400">If the item is null</response>
[HttpPost]
[ProducesResponseType(typeof(TodoItem), 201)]
[ProducesResponseType(typeof(TodoItem), 400)]
public IActionResult Create([FromBody, Required] TodoItem item)
{
    if (item == null)
    {
        return BadRequest();
    }
    TodoItems.Add(item);
    return CreatedAtRoute("GetTodo", new { id = item.Key }, item);
}
请注意下面是这些附加注释的在用户界面的增强效果。
DataAnnotations
你可以使用 System.ComponentModel.DataAnnotations 来标注 API controller ,帮助驱动 Swagger UI 组件。
在 TodoItem 类的 Name 属性上添加[Required] 标注会改变 UI 中的模型架构信息。 [Produces("application/json")] ,正则表达式验证器将更进一步细化生成页面传递的详细信息。代码中使用的元数据信息越多 API 帮助页面上的描述信息也会越多。
using System;
using System.ComponentModel;
using System.ComponentModel.DataAnnotations;

namespace TodoApi.Models
{
    public class TodoItem
    {
        public string Key { get; set; }
        [Required]
        public string Name { get; set; }
        [DefaultValue(false)]
        public bool IsComplete { get; set; }
    }
}
描述响应类型
API 使用开发者最关心的东西是的返回结果;具体响应类型,错误代码(如果不是标准错误码)。这些都在 XML 注释 和 DataAnnotations 中处理。
以 Create() 方法为例,目前它仅仅返回 "201 Created" 默认响应。如果数据实际创建了或者 POST 正文没有传递数据返回 "204 No Content" 错误,这是理所当然的。但是,如果没有文档知道它的存在或者存在任何其他响应,则可以通过添加下面的代码段是修复这个问题。
/// <summary>
/// Creates a TodoItem.
/// </summary>
/// <remarks>
/// Note that the key is a GUID and not an integer.
///
///     POST /Todo
///     {
///        "key": "0e7ad584-7788-4ab1-95a6-ca0a5b444cbb",
///        "name": "Item1",
///        "isComplete": true
///     }
///
/// </remarks>
/// <param name="item"></param>
/// <returns>New Created Todo Item</returns>
/// <response code="201">Returns the newly created item</response>
/// <response code="400">If the item is null</response>
[HttpPost]
[ProducesResponseType(typeof(TodoItem), 201)]
[ProducesResponseType(typeof(TodoItem), 400)]
public IActionResult Create([FromBody, Required] TodoItem item)
{
    if (item == null)
    {
        return BadRequest();
    }
    TodoItems.Add(item);
    return CreatedAtRoute("GetTodo", new { id = item.Key }, item);
}

自定义 UI
stock UI 是一个非常实用的展示方案,如果你想在生成 API 文档页面的时候想把你的标题做的更好看点。
完成与 Swashbuckle 组件相关的任务很简单,但服务需要添加的资源来通常不会被包含在 Web API 项目中,所以必须建立对应的的文件夹结构来承载这些静态资源文件。
在项目中添加 "Microsoft.AspNetCore.StaticFiles": "1.0.0-*" NuGet 包。
在中间件中启用 static files 服务。
// This method gets called by the runtime. Use this method to configure the HTTP request pipeline.
   public void Configure(IApplicationBuilder app, IHostingEnvironment env, ILoggerFactory loggerFactory)
   {
       // Enable static files middleware.
       app.UseStaticFiles();

       app.UseMvcWithDefaultRoute();

        // Enable middleware to serve generated Swagger as a JSON endpoint.
        app.UseSwagger();

        // Enable middleware to serve swagger-ui (HTML, JS, CSS etc.), specifying the Swagger JSON endpoint.
        app.UseSwaggerUI(c =>
        {
            c.SwaggerEndpoint("/swagger/v1/swagger.json", "My API V1");
        });
   }
从 Github repository 上获取 Swagger UI 页面所需的 index.html 核心文件,把他放到 wwwroot/swaggerui 目录下,并在在同一个文件夹创建一个新的 custom.css 文件。

在 index.html 文件中引用 custom.css 。
<link href='custom.css' media='screen' rel='stylesheet' type='text/css' />
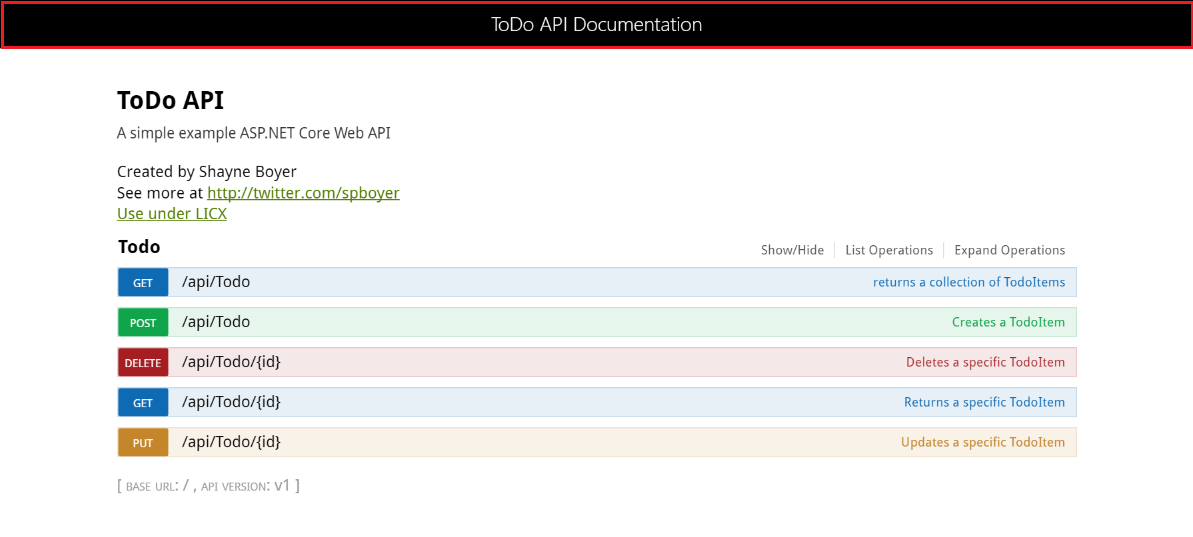
下面的 CSS 提供了一个自定义页面标题的简单的示例。
custom.css 文件
.swagger-section #header
{
    border-bottom: 1px solid #000000;
    font-style: normal;
    font-weight: 400;
    font-family: "Segoe UI Light","Segoe WP Light","Segoe UI","Segoe WP",Tahoma,Arial,sans-serif;
    background-color: black;
}

.swagger-section #header h1
{
    text-align: center;
    font-size: 20px;
    color: white;
}
index.html 正文
<body class="swagger-section">
<div id="header">
<h1>ToDo API Documentation</h1>
</div>
<div id="message-bar" class="swagger-ui-wrap" data-sw-translate> </div>
<div id="swagger-ui-container" class="swagger-ui-wrap"></div>
</body>
你可以在这个页面有更多改进的东西,请在 Swagger UI Github repository 参阅完整的 UI 资源。