Examples > Basics
Blink
This example shows how to program MSP430 to blink its LED using Energia.
Hardware Required
- MSP-EXP430G2 LaunchPad
- LED [ available already as a part of the Launchpad]
Relevant groundwork
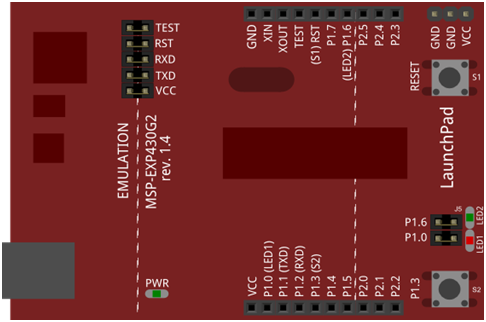
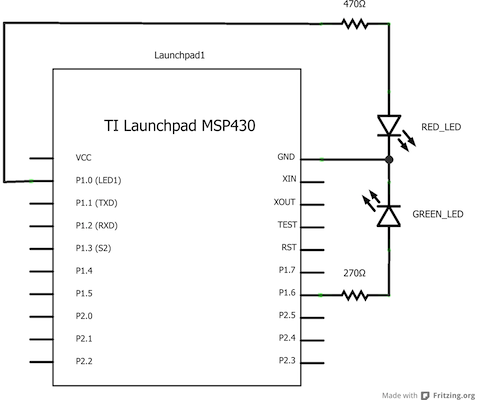
MSP430 has two led pins already attached on the Launchpad. MSP430 has two I/O ports ; P0 & P1, with eight I/O lines each. The two leds are connected to port 1. The red led is connected pin 2/ P1.0 and the green led is connected to pin 14/p1.6. The eight lines of two ports can be individually programmed with the help of dedicated port control registers.
P1DIR:This control register is used in configuring the respective lines of the port as input or output.
A bit field set to 1 : configures the respective line as output
Set to 0 : configures the respective line as input.
Ex : The below bit field configuration of P1DIR shows that Line 0 of port 1 is set as output.
| 7 | 6 | 5 | 4 | 3 | 2 | 1 | 0 |
| 0 | 0 | 0 | 0 | 0 | 0 | 0 | 1 |
This control register is used to write values 0/1 in the respective bit lines configured as output.
Ex : The below bit field configuration of P1OUT shows that Line 0 of port 1 is set to 1.
| 7 | 6 | 5 | 4 | 3 | 2 | 1 | 0 |
| 0 | 0 | 0 | 0 | 0 | 0 | 0 | 1 |
Circuit
MSP430G2 LaunchPad has LED attached to pin 0 and pin 14 on the board itself as shown above in the image. If you run the below code example with no hardware attached, you should see that LED blink.

image developed using Fritzing. For more circuit examples, see the Fritzing project page.
Schematic

Code Explanation
In the program , the first thing you do is to initialize pin 2 [ RED_LED] as an output pin with the line:
pinMode(RED_LED, OUTPUT);
In the main loop, you turn the LED on with the line:
digitalWrite(RED_LED, HIGH);
This supplies 3 volts to pin 2. That creates a voltage difference across the pins of the LED, and lights it up. Then you turn it off with the line:
digitalWrite(RED_LINE, LOW);
That takes pin 2 back to 0 volts, and turns the LED off. In between the on and the off, you want enough time for a person to see the change, so the delay() commands tell the MSP430 to do nothing for 1000 milliseconds, or one second. When you use the delay() command, nothing else happens for that amount of time.
Code
/*
  Blink
  The basic Energia example.
  Turns on an LED on for one second, then off for one second, repeatedly.
  Pin 2 has an LED connected on MSP430 boards, has a name 'RED_LED' in the code.
*/

// the setup routine runs once when you press reset:
void setup() {
  // initialize the digital pin as an output.
  pinMode(RED_LED, OUTPUT);
}

// the loop routine runs over and over again forever:
void loop() {
  digitalWrite(RED_LED, HIGH);   // turn the LED on (HIGH is the voltage level)
  delay(1000);               // wait for a second
  digitalWrite(RED_LED, LOW);    // turn the LED off by making the voltage LOW
  delay(1000);               // wait for a second
}
Working Video
(Insert Video Here)Try it out:
- Blink the green LED
- Blink the red and green alternatively & together
See Also
- setup()
- loop()
- pinMode()
- digitalWrite()
- delay()
Corrections, suggestions, and new documentation should be posted to the Forum.
The text of the Energia reference is licensed under a Creative Commons Attribution-ShareAlike 3.0 License. Energia reference is based on the Arduino reference. Code samples in the reference are released into the public domain.