[](https://github.com/esp-arduino-libs/ESP32_Display_Panel/actions/workflows/arduino_lint.yml) [](https://github.com/esp-arduino-libs/ESP32_Display_Panel/actions/workflows/pre-commit.yml) [](https://github.com/esp-arduino-libs/ESP32_Display_Panel/actions/workflows/build_test.yml)
# ESP Display Panel
* [English Version](./README.md)
ESP32_Display_Panel 是为 ESP SoCs 设计用来驱动显示屏幕的 Arduino 库。它不仅可以用于开发多款[乐鑫开发板](#乐鑫开发板),也适用于开发自定义的开发板。
ESP32_Display_Panel 封装了多种[乐鑫组件库](https://components.espressif.com/)中相关的组件,它需要基于 [arduino-esp32](https://github.com/espressif/arduino-esp32) 进行开发,并且可以直接从 Arduino IDE 中下载获取。
## 目录
- [ESP Display Panel](#esp-display-panel)
- [目录](#目录)
- [概述](#概述)
- [支持的开发板和驱动](#支持的开发板和驱动)
- [乐鑫开发板](#乐鑫开发板)
- [接口总线](#接口总线)
- [LCD 控制器](#lcd-控制器)
- [触摸控制器](#触摸控制器)
- [依赖项版本](#依赖项版本)
- [如何使用](#如何使用)
- [示例](#示例)
- [Panel](#panel)
- [LVGL](#lvgl)
- [Squareline](#squareline)
- [详细使用说明](#详细使用说明)
- [配置 ESP32\_Display\_Panel](#配置-esp32_display_panel)
- [对于支持的开发板](#对于支持的开发板)
- [对于不支持的开发板](#对于不支持的开发板)
- [使用接口](#使用接口)
- [配置开发板](#配置开发板)
- [配置 LVGL](#配置-lvgl)
- [移植 Squareline 工程](#移植-squareline-工程)
## 概述
ESP32_Display_Panel 的功能框图如下所示,主要包含了以下功能:
* 支持多款乐鑫开发板。
* 支持自定义的开发板。
* 支持多种类型的设备驱动,包括接口总线、LCD、触摸、背光。

 | [ESP32-C3-LCDkit](https://docs.espressif.com/projects/esp-dev-kits/en/latest/esp32c3/esp32-c3-lcdkit/index.html) | SPI | GC9A01 | - | - |
|
| [ESP32-C3-LCDkit](https://docs.espressif.com/projects/esp-dev-kits/en/latest/esp32c3/esp32-c3-lcdkit/index.html) | SPI | GC9A01 | - | - |
|  | [ESP32-S3-Box](https://github.com/espressif/esp-box/tree/master) | SPI | ILI9342 | I2C | TT21100 |
|
| [ESP32-S3-Box](https://github.com/espressif/esp-box/tree/master) | SPI | ILI9342 | I2C | TT21100 |
|  |[ESP32-S3-Box-3](https://github.com/espressif/esp-box/tree/master) | SPI | ILI9342 | I2C | GT911 |
 |[ESP32-S3-Box-3(beta)](https://github.com/espressif/esp-box/tree/c4c954888e11250423f083df0067d99e22d59fbe) | SPI | ILI9342 | I2C | TT21100 |
|
|[ESP32-S3-Box-3(beta)](https://github.com/espressif/esp-box/tree/c4c954888e11250423f083df0067d99e22d59fbe) | SPI | ILI9342 | I2C | TT21100 |
|  | [ESP32-S3-Box-Lite](https://github.com/espressif/esp-box/tree/master) | SPI | ST7789 | - | - |
|
| [ESP32-S3-Box-Lite](https://github.com/espressif/esp-box/tree/master) | SPI | ST7789 | - | - |
|  | [ESP32-S3-EYE](https://github.com/espressif/esp-who/blob/master/docs/en/get-started/ESP32-S3-EYE_Getting_Started_Guide.md) | SPI | ST7789 | - | - |
|
| [ESP32-S3-EYE](https://github.com/espressif/esp-who/blob/master/docs/en/get-started/ESP32-S3-EYE_Getting_Started_Guide.md) | SPI | ST7789 | - | - |
|  | [ESP32-S3-Korvo-2](https://docs.espressif.com/projects/esp-adf/en/latest/design-guide/dev-boards/user-guide-esp32-s3-korvo-2.html) | SPI | ILI9342 | I2C | TT21100 |
|
| [ESP32-S3-Korvo-2](https://docs.espressif.com/projects/esp-adf/en/latest/design-guide/dev-boards/user-guide-esp32-s3-korvo-2.html) | SPI | ILI9342 | I2C | TT21100 |
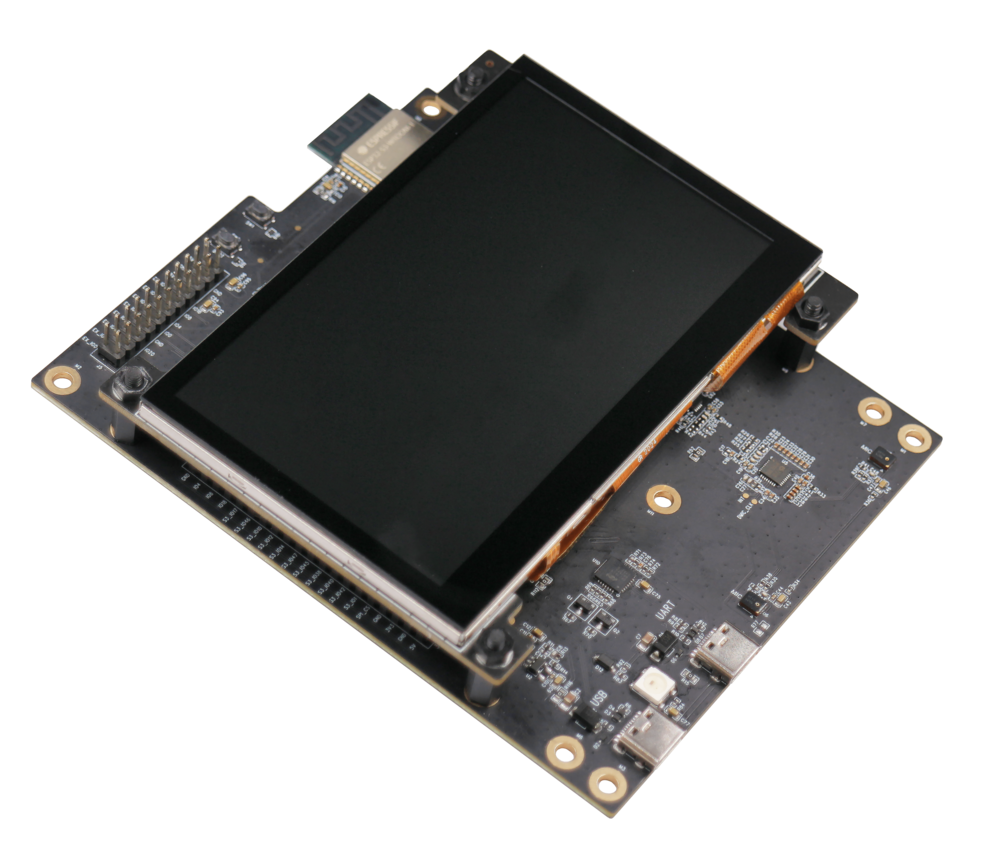
|  | [ESP32-S3-LCD-EV-Board](https://docs.espressif.com/projects/esp-dev-kits/en/latest/esp32s3/esp32-s3-lcd-ev-board/index.html) | 3-wire SPI + RGB | GC9503 | I2C | FT5X06 |
|
| [ESP32-S3-LCD-EV-Board](https://docs.espressif.com/projects/esp-dev-kits/en/latest/esp32s3/esp32-s3-lcd-ev-board/index.html) | 3-wire SPI + RGB | GC9503 | I2C | FT5X06 |
|  | [ESP32-S3-LCD-EV-Board-2](https://docs.espressif.com/projects/esp-dev-kits/en/latest/esp32s3/esp32-s3-lcd-ev-board/index.html) | RGB | ST7262E43 | I2C | GT1151 |
|
| [ESP32-S3-LCD-EV-Board-2](https://docs.espressif.com/projects/esp-dev-kits/en/latest/esp32s3/esp32-s3-lcd-ev-board/index.html) | RGB | ST7262E43 | I2C | GT1151 |
| 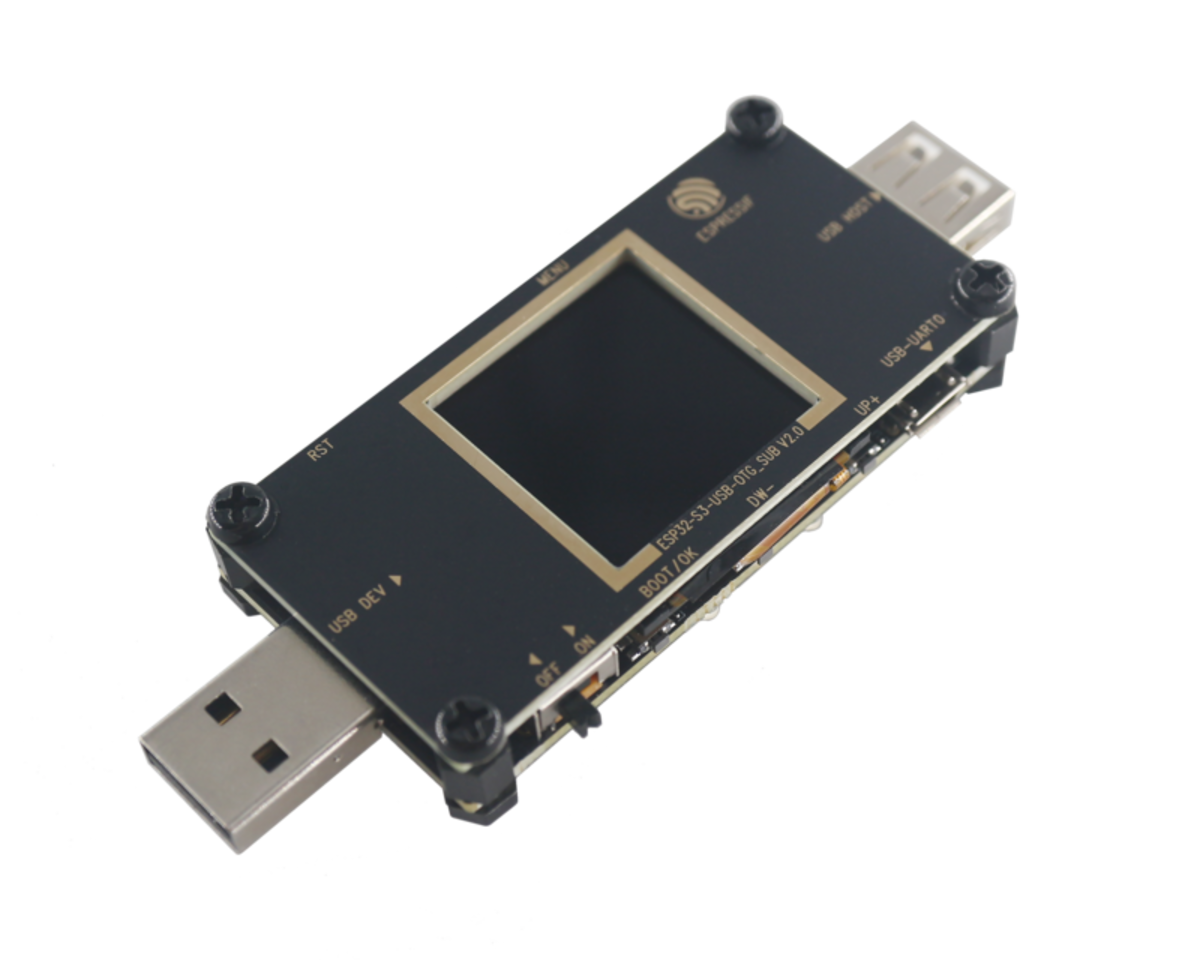 | [ESP32-S3-USB-OTG](https://docs.espressif.com/projects/esp-dev-kits/en/latest/esp32s3/esp32-s3-usb-otg/index.html) | SPI | ST7789 | - | - |
### 接口总线
| **接口总线** | **版本** |
| ---------------------------------------------------------------------------------------------------- | -------- |
| I2C | - |
| SPI | - |
| [3-wire SPI + RGB](https://components.espressif.com/components/espressif/esp_lcd_panel_io_additions) | v1.0.0 |
### LCD 控制器
| **LCD 控制器** | **版本** |
| -------------------------------------------------------------------------------- | -------- |
| [ILI9341](https://components.espressif.com/components/espressif/esp_lcd_ili9341) | 1.0.2 |
| [GC9503](https://components.espressif.com/components/espressif/esp_lcd_gc9503) | 1.0.0 |
| [GC9A01](https://components.espressif.com/components/espressif/esp_lcd_gc9a01) | 1.0.1 |
| ST7262 | - |
| ST7789 | - |
| [ST7796](https://components.espressif.com/components/espressif/esp_lcd_st7796) | 1.0.0 |
### 触摸控制器
| **触摸控制器** | **版本** |
| ---------------------------------------------------------------------------------------- | -------- |
| [esp_lcd_touch](https://components.espressif.com/components/espressif/esp_lcd_touch) | 1.0.4 |
| [CST816S](https://components.espressif.com/components/espressif/esp_lcd_touch_cst816s) | 1.0.3 |
| [FT5x06](https://components.espressif.com/components/espressif/esp_lcd_touch_ft5x06) | 1.0.5~1 |
| [GT1151](https://components.espressif.com/components/espressif/esp_lcd_touch_gt1151) | 1.0.5~1 |
| [GT911](https://components.espressif.com/components/espressif/esp_lcd_touch_gt911) | 1.0.7~1 |
| [TT21100](https://components.espressif.com/components/espressif/esp_lcd_touch_tt21100) | 1.0.7~1 |
| [STMPE610](https://components.espressif.com/components/espressif/esp_lcd_touch_stmpe610) | 1.0.6 |
## 依赖项版本
| **名称** | **版本** |
| ------------------------------------------------------------ | ------------------ |
| ESP32_Display_Panel | v0.0.2 |
| [ESP32_IO_Expander](https://github.com/esp-arduino-libs/ESP32_IO_Expander) | >= v0.0.1 |
| [arduino-esp32](https://github.com/espressif/arduino-esp32) | >= v2.0.9,< 3.0.0 |
## 如何使用
关于如何在 Arduino IDE 中使用库,请参阅 [Arduino IDE v1.x.x](https://docs.arduino.cc/software/ide-v1/tutorials/installing-libraries) 或者 [Arduino IDE v2.x.x](https://docs.arduino.cc/software/ide-v2/tutorials/ide-v2-installing-a-library) 的文档。Arduino 库文件夹的路径可以在 `File` > `Preferences` > `Settings` > `Sketchbook location` 中找到或更改。
### 示例
以下是使用 ESP32_Display_Panel 的一些示例。要在 Arduino IDE 中访问它们,请导航到 `File` > `Examples` > `ESP32_Display_Panel`。如果没有 ESP32_Display_Panel 选项,请检查库是否已正确安装,并首先选择一个 esp32 开发板。
#### Panel
* [Draw Color Bar](examples/Panel/DrawColorBar/): 此示例演示如何绘制简单的彩条。
* [Read Touch Point](examples/Panel/ReadTouchPoint/): 此示例演示如何读取触摸点。
#### LVGL
要配置 LVGL(v8.3.x),请参阅[此处](#配置-lvgl)以获取更多详细信息。
* [Porting](examples/LVGL/Porting/): 此示例演示如何移植 LVGL (v8.3.x)。
#### Squareline
要移植 Squarelina 项目(v1.3.x),请参阅[此处](#移植-Squareline-工程)获取更多详细信息。
- [Porting](examples/Squareline/Porting/): 此示例演示如何移植 Squareline 项目。
- [WiFiClock](examples/Squareline/WiFiClock/): 此示例实现了一个简单的 Wi-Fi 时钟。
### 详细使用说明
以下是如何使用 ESP32_Display_Panel 的详细说明。
#### 配置 ESP32_Display_Panel
ESP32_Display_Panel 具有自己的配置文件,称为 `ESP_Panel_Conf.h`。在安装 ESP32_Display_Panel 后,按照以下配置步骤进行操作:
1. 进入 Arduino 存放库的目录。
2. 进入 `ESP32_Display_Panel` 文件夹,将 `ESP_Panel_Conf_Template.h` 复制并放置在 `ESP32_Display_Panel` 文件夹之外。它应该与 `ESP32_Display_Panel` 文件夹在同一级别,然后将其重命名为 `ESP_Panel_Conf.h`。
3. 最终,包含 `ESP_Panel_Conf.h` 的 Arduino 库所在文件夹的布局应如下所示:
```
Arduino
|-libraries
|-ESP32_Display_Panel
|-other_lib_1
|-other_lib_2
|-ESP_Panel_Conf.h
```
4. 请参考[支持的开发板列表](#支持的开发板和驱动)来检查当前开发板是否兼容,如果兼容请跳转至“[对于支持的开发板](#对于支持的开发板)”一节,否则跳转至“[对于不支持的开发板](#对于不支持的开发板)”一节。
##### 对于支持的开发板
1. 打开 `ESP_Panel_Conf.h` 文件,首先,将宏 `ESP_PANEL_USE_SUPPORTED_BOARD` 设置为 `1`(默认值为 `1`)。然后,根据目标开发板的名称在其下方将格式为 `ESP_PANEL_BOARD_` 的宏定义取消注释。
2. 以 *ESP32_S3_BOX* 开发板为例,下面是修改后的 `ESP_Panel_Conf.h` 文件的部分内容:
```c
...
// #define ESP_PANEL_BOARD_ESP32_C3_LCDKIT
#define ESP_PANEL_BOARD_ESP32_S3_BOX
// #define ESP_PANEL_BOARD_ESP32_S3_BOX_3
...
```
3. 之后,请跳转至“[使用接口](#使用接口)”一节使用 ESP32_Display_Panel 提供的功能。
##### 对于不支持的开发板
由于 ESP32_Display_Panel 只能使用内部支持的驱动程序,请确认自定义开发板的 **LCD**、**触摸**和**接口总线**位于[支持的驱动程序列表](#supported-boards--drivers)中。然后按照下面的步骤配置库:
1. 打开 `ESP_Panel_Conf.h` 文件,将宏 `ESP_PANEL_USE_SUPPORTED_BOARD` 设置为 `0`,如下所示:
```c
#define ESP_PANEL_USE_SUPPORTED_BOARD (0)
```
2. 根据需要修改其他宏定义的值,它们代表了 LCD、触摸和其他设备初始化时所用的可调参数。
* 以下是 **LCD** 的一些重要宏定义:
```c
/* Set to 0 if not using LCD */
#define ESP_PANEL_USE_LCD (0)
/**
* LCD controller name. Choose one of the following:
* - ILI9341
* - GC9503, GC9A01
* - ST7262, ST7789, ST7796
*/
#define ESP_PANEL_LCD_NAME ST7789
/* LCD resolution in pixels */
#define ESP_PANEL_LCD_H_RES (320)
#define ESP_PANEL_LCD_V_RES (240)
/* LCD Bus Settings */
/**
* If set to 1, the bus will skip to initialize the corresponding host. Users need to initialize the host in advance.
* It is useful if other devices use the same host. Please ensure that the host is initialized only once.
*/
#define ESP_PANEL_LCD_BUS_SKIP_INIT_HOST (0)
/**
* LCD bus type. Choose one of the following:
* - 0: I2C (not supported yet)
* - 1: SPI
* - 2: I80 (not supported yet)
* - 3: RGB
*/
#define ESP_PANEL_LCD_BUS_TYPE (1)
/**
* LCD bus parameters.
*
* Please refer to https://docs.espressif.com/projects/esp-idf/en/latest/esp32s3/api-reference/peripherals/lcd.html for details.
*/
#define ESP_PANEL_LCD_BUS_HOST_ID (1)
...
/* LCD Color Settings */
/* LCD color depth in bits */
#define ESP_PANEL_LCD_COLOR_BITS (16)
/*
* LCD Color Space. Choose one of the following:
* - 0: RGB
* - 1: BGR
*/
#define ESP_PANEL_LCD_COLOR_SPACE (0)
#define ESP_PANEL_LCD_INEVRT_COLOR (0)
/* LCD Transformation Flags */
#define ESP_PANEL_LCD_SWAP_XY (0)
#define ESP_PANEL_LCD_MIRROR_X (0)
#define ESP_PANEL_LCD_MIRROR_Y (0)
/* LCD Other Settings */
/* IO num of RESET pin, set to -1 if not use */
#define ESP_PANEL_LCD_IO_RST (-1)
#define ESP_PANEL_LCD_RST_LEVEL (0)
```
* 以下是 **LCD 触摸**的一些重要宏定义:
```c
/* Set to 0 if not using LCD touch */
#define ESP_PANEL_USE_LCD_TOUCH (0)
/**
* LCD Touch IC name. Choose one of the following:
* - CST816S
* - FT5x06
* - GT1151, GT911
* - TT21100
* - STMPE610
*/
#define ESP_PANEL_LCD_TOUCH_NAME TT21100
/* LCD Touch resolution in pixels */
#define ESP_PANEL_LCD_TOUCH_H_RES (ESP_PANEL_LCD_H_RES)
#define ESP_PANEL_LCD_TOUCH_V_RES (ESP_PANEL_LCD_V_RES)
/* LCD Touch Bus Settings */
/**
* If set to 1, the bus will skip to initialize the corresponding host. Users need to initialize the host in advance.
* It is useful if other devices use the same host. Please ensure that the host is initialized only once.
*/
#define ESP_PANEL_LCD_TOUCH_BUS_SKIP_INIT_HOST (0)
/**
* LCD touch bus type. Choose one of the following:
* - 0: I2C
* - 1: SPI
*/
#define ESP_PANEL_LCD_TOUCH_BUS_TYPE (0)
/**
* LCD touch bus parameters.
*
* Please refer to https://docs.espressif.com/projects/esp-idf/en/latest/esp32s3/api-reference/peripherals/lcd.html for details.
*/
#define ESP_PANEL_LCD_TOUCH_BUS_HOST_ID (0)
...
/* LCD Touch Transformation Flags */
#define ESP_PANEL_LCD_TOUCH_SWAP_XY (0)
#define ESP_PANEL_LCD_TOUCH_MIRROR_X (0)
#define ESP_PANEL_LCD_TOUCH_MIRROR_Y (0)
/* LCD Touch Other Settings */
#define ESP_PANEL_LCD_TOUCH_IO_RST (-1)
#define ESP_PANEL_LCD_TOUCH_IO_INT (-1)
#define ESP_PANEL_LCD_TOUCH_RST_LEVEL (0)
#define ESP_PANEL_LCD_TOUCH_INT_LEVEL (0)
```
* 以下是**背光**的一些重要宏定义:
```c
#define ESP_PANEL_USE_BL (0)
/* IO num of backlight pin */
#define ESP_PANEL_LCD_IO_BL (45)
/* If the backlight is on when high level, set to 1; otherwise to 0 */
#define ESP_PANEL_LCD_BL_ON_LEVEL (1)
/* Set to 1 if use PWM for backlight brightness control. */
#define ESP_PANEL_LCD_BL_USE_PWM (0)
/**
* Backlight LEDC Parameters.
*
* Please refer to https://docs.espressif.com/projects/esp-idf/en/latest/esp32s3/api-reference/peripherals/ledc.html for details.
*/
#define ESP_PANEL_LCD_BL_PWM_TIMER (0)
...
```
3. 配置好 `ESP_Panel_Conf.h` 文件后,请跳转至“[使用接口](#使用接口)”一节查看 ESP32_Display_Panel 提供的函数。
#### 使用接口
以下代码展示了常用函数接口的使用:
```
#include
// Create an ESP_Panel object
ESP_Panel *panel = new ESP_Panel();
// Initialize and start the ESP_Panel object
panel->init();
panel->begin();
// Get the LCD object and operate it
panel->getLcd()->setCallback(callback, NULL);
panel->getLcd()->drawBitmap(0, 0, width, height, color);
// Get the LCD touch object and operate it
panel->getLcdTouch()->readData();
bool touched = panel->getLcdTouch()->getTouchState();
if(touched) {
TouchPoint point = panel->getLcdTouch()->getPoint();
Serial.printf("Touch point: x %d, y %d\n", point.x, point.y);
}
// Get the backlight object and operate it
panel->getBacklight()->on();
panel->getBacklight()->off();
panel->getBacklight()->setBrightness(50);
// Release the ESP_Panel object
delete panel;
```
### 配置开发板
以下是在不同开发板上开发 GUI 应用程序的建议配置。这些设置可以根据具体要求进行调整。
前往 Arduino IDE 中的工具菜单以配置以下设置
| Supported Boards | Selected Board | PSRAM | Flash Mode | Flash Size | USB CDC On Boot | Partition Scheme |
| :---------------------: | :----------------: | :------: | :--------: | :--------: | :-------------: | :---------------------: |
| ESP32-C3-LCDkit | ESP32C3 Dev Module | Disabled | QIO | 4MB (32Mb) | Enabled | Default 4MB with spiffs |
| ESP32-S3-Box | ESP32-S3-Box | - | - | - | - | 16M Flash (3MB) |
| ESP32-S3-Box-3 | ESP32S3 Dev Module | OPI | QIO 80MHz | 16MB | Enabled | 16M Flash (3MB) |
| ESP32-S3-Box-3(beta) | ESP32S3 Dev Module | OPI | QIO 80MHz | 16MB | Enabled | 16M Flash (3MB) |
| ESP32-S3-Box-Lite | ESP32-S3-Box | - | - | - | - | 16M Flash (3MB) |
| ESP32-S3-EYE | ESP32S3 Dev Module | OPI | QIO 80MHz | 8MB | Enabled | 8M with spiffs |
| ESP32-S3-Korvo-2 | ESP32S3 Dev Module | OPI | QIO 80MHz | 16MB | Disabled | 16M Flash (3MB) |
| ESP32-S3-LCD-EV-Board | ESP32S3 Dev Module | OPI | QIO 80MHz | 16MB | **See Note 1** | 16M Flash (3MB) |
| ESP32-S3-LCD-EV-Board-2 | ESP32S3 Dev Module | OPI | QIO 80MHz | 16MB | **See Note 1** | 16M Flash (3MB) |
| ESP32-S3-USB-OTG | ESP32-S3-USB-OTG | - | - | - | - | 8M with spiffs |
**Note:**
1. 根据使用的端口启用 "USB CDC On Boot":
* 如果使用 UART端口,则禁用此配置;如果使用 USB端口,则启用它。
* 如果此配置与先前的刷写不同,应首先启用 `Erase All Flash Before Sketch Upload`,然后在刷写后可以禁用它。
2. 若要查看更多输出日志,请将 `Core Debug Level` 设置为 `Info` 或更低级别
### 配置 LVGL
LVGL 有配置文件 `lv_conf.h`。在安装lvgl(v8.3.x)之后,请按照以下配置步骤进行操作:
1. 导航到 Arduino 库安装的目录(库文件夹的路径可以在 `File` > `Preferences` > `Settings` > `Sketchbook location` 中找到或更改)。
2. 进入 `lvgl` 文件夹,复制 `lv_conf_template.h` 并将副本放在`lvgl`文件夹外部的相同目录级别。然后将复制的文件重命名为`lv_conf.h`。
3. 最后,Arduino 库文件夹的布局如下所示:
```
Arduino
|-libraries
|-lv_conf.h
|-lvgl
|-other_lib_1
|-other_lib_2
```
4. 打开 `lv_conf.h` 文件,并将第一个 `#if 0` 改为 `#if 1` 以启用文件的内容。
5. 根据需求设置其他配置,以下是一些常见的配置项:
```c
#define LV_COLOR_DEPTH 16 // 通常使用 16 位色深(RGB565),
// 但也可以通过将其设置为 `32` 来支持 24 位色深(RGB888)
#define LV_COLOR_16_SWAP 1 // 如果使用 RGB LCD(例如 ESP32-S3-LCD-Ev-Board/-2),将其设置为 `0`
#define LV_MEM_CUSTOM 1
#define LV_MEMCPY_MEMSET_STD 1
#define LV_TICK_CUSTOM 1
#define LV_ATTRIBUTE_FAST_MEM IRAM_ATTR // 获取更高的性能但占用更多的 SRAM
#define LV_FONT_MONTSERRAT_N 1 // 启用所有需要使用的内部字体(`N`应该替换为字体大小)
```
6. 获取更多信息,请参考[ LVGL 文档](https://docs.lvgl.io/8.3/get-started/platforms/arduino.html)。
### 移植 Squareline 工程
利用 Squareline Studio 可以通过图像化编辑的方式快捷地设计出精美的 UI,如果想要在 Arduino IDE 中使用 Squareline 导出的 UI 源文件,可以参考以下步骤进行移植:
1. 首先,在 Squareline Studio 中创建一个新的工程,进入 `Create` -> `Arduino` 一栏,选择 `Arduino with TFT-eSPI` 作为工程模板,然后在右侧的 `PROJECT SETTINGS` 一栏需要根据目标开发板的 LCD 属性进行配置,如 `Resolution` and `Color depth`,最后点击 `Create` 按钮创建工程。
2. 对于已有的工程,也可以在导航栏中点击 `File` -> `Project Settings` 按钮进入工程设置,然后在 `BOARD PROPERTIES` 一栏配置 `Board Group` 为 `Arduino`,`Board` 为 `Arduino with TFT-eSPI`,并且根据目标开发板的 LCD 属性在 `DISPLAY PROPERTIES` 一栏进行配置,最后点击 `Save` 按钮保存工程设置。
3. 完成 UI 设计并且配置好导出路径后,即可依次点击菜单栏中的 `Export` -> `Create Template Project` 和 `Export UI Files` 按钮导出工程及 UI 源文件,该工程目录的布局如下所示:
```
Project
|-libraries
|-lv_conf.h
|-lvgl
|-readme.txt
|-TFT_eSPI
|-ui
|-README.md
|-ui
```
4. 最后,将工程目录下 `libraries` 文件夹中的 `lv_conf.h`、`lvgl` 和 `ui` 复制到 Arduino 的库目录中(可以在 `File` > `Preferences` > `Settings` > `Sketchbook location` 中找到或更改库文件夹的路径)。如果需要使用本地安装的 `lvgl`,请跳过复制 `lvgl` 和 `lv_conf.h`,然后参考 [steps](#配置-lvgl) 来配置 LVGL。最终的 Arduino 库文件夹的布局如下所示:
```
Arduino
|-libraries
|-ESP32_Display_Panel
|-ESP_Panel_Conf.h
|-lv_conf.h
|-lvgl
|-ui
|-other_lib_1
|-other_lib_2
```
| [ESP32-S3-USB-OTG](https://docs.espressif.com/projects/esp-dev-kits/en/latest/esp32s3/esp32-s3-usb-otg/index.html) | SPI | ST7789 | - | - |
### 接口总线
| **接口总线** | **版本** |
| ---------------------------------------------------------------------------------------------------- | -------- |
| I2C | - |
| SPI | - |
| [3-wire SPI + RGB](https://components.espressif.com/components/espressif/esp_lcd_panel_io_additions) | v1.0.0 |
### LCD 控制器
| **LCD 控制器** | **版本** |
| -------------------------------------------------------------------------------- | -------- |
| [ILI9341](https://components.espressif.com/components/espressif/esp_lcd_ili9341) | 1.0.2 |
| [GC9503](https://components.espressif.com/components/espressif/esp_lcd_gc9503) | 1.0.0 |
| [GC9A01](https://components.espressif.com/components/espressif/esp_lcd_gc9a01) | 1.0.1 |
| ST7262 | - |
| ST7789 | - |
| [ST7796](https://components.espressif.com/components/espressif/esp_lcd_st7796) | 1.0.0 |
### 触摸控制器
| **触摸控制器** | **版本** |
| ---------------------------------------------------------------------------------------- | -------- |
| [esp_lcd_touch](https://components.espressif.com/components/espressif/esp_lcd_touch) | 1.0.4 |
| [CST816S](https://components.espressif.com/components/espressif/esp_lcd_touch_cst816s) | 1.0.3 |
| [FT5x06](https://components.espressif.com/components/espressif/esp_lcd_touch_ft5x06) | 1.0.5~1 |
| [GT1151](https://components.espressif.com/components/espressif/esp_lcd_touch_gt1151) | 1.0.5~1 |
| [GT911](https://components.espressif.com/components/espressif/esp_lcd_touch_gt911) | 1.0.7~1 |
| [TT21100](https://components.espressif.com/components/espressif/esp_lcd_touch_tt21100) | 1.0.7~1 |
| [STMPE610](https://components.espressif.com/components/espressif/esp_lcd_touch_stmpe610) | 1.0.6 |
## 依赖项版本
| **名称** | **版本** |
| ------------------------------------------------------------ | ------------------ |
| ESP32_Display_Panel | v0.0.2 |
| [ESP32_IO_Expander](https://github.com/esp-arduino-libs/ESP32_IO_Expander) | >= v0.0.1 |
| [arduino-esp32](https://github.com/espressif/arduino-esp32) | >= v2.0.9,< 3.0.0 |
## 如何使用
关于如何在 Arduino IDE 中使用库,请参阅 [Arduino IDE v1.x.x](https://docs.arduino.cc/software/ide-v1/tutorials/installing-libraries) 或者 [Arduino IDE v2.x.x](https://docs.arduino.cc/software/ide-v2/tutorials/ide-v2-installing-a-library) 的文档。Arduino 库文件夹的路径可以在 `File` > `Preferences` > `Settings` > `Sketchbook location` 中找到或更改。
### 示例
以下是使用 ESP32_Display_Panel 的一些示例。要在 Arduino IDE 中访问它们,请导航到 `File` > `Examples` > `ESP32_Display_Panel`。如果没有 ESP32_Display_Panel 选项,请检查库是否已正确安装,并首先选择一个 esp32 开发板。
#### Panel
* [Draw Color Bar](examples/Panel/DrawColorBar/): 此示例演示如何绘制简单的彩条。
* [Read Touch Point](examples/Panel/ReadTouchPoint/): 此示例演示如何读取触摸点。
#### LVGL
要配置 LVGL(v8.3.x),请参阅[此处](#配置-lvgl)以获取更多详细信息。
* [Porting](examples/LVGL/Porting/): 此示例演示如何移植 LVGL (v8.3.x)。
#### Squareline
要移植 Squarelina 项目(v1.3.x),请参阅[此处](#移植-Squareline-工程)获取更多详细信息。
- [Porting](examples/Squareline/Porting/): 此示例演示如何移植 Squareline 项目。
- [WiFiClock](examples/Squareline/WiFiClock/): 此示例实现了一个简单的 Wi-Fi 时钟。
### 详细使用说明
以下是如何使用 ESP32_Display_Panel 的详细说明。
#### 配置 ESP32_Display_Panel
ESP32_Display_Panel 具有自己的配置文件,称为 `ESP_Panel_Conf.h`。在安装 ESP32_Display_Panel 后,按照以下配置步骤进行操作:
1. 进入 Arduino 存放库的目录。
2. 进入 `ESP32_Display_Panel` 文件夹,将 `ESP_Panel_Conf_Template.h` 复制并放置在 `ESP32_Display_Panel` 文件夹之外。它应该与 `ESP32_Display_Panel` 文件夹在同一级别,然后将其重命名为 `ESP_Panel_Conf.h`。
3. 最终,包含 `ESP_Panel_Conf.h` 的 Arduino 库所在文件夹的布局应如下所示:
```
Arduino
|-libraries
|-ESP32_Display_Panel
|-other_lib_1
|-other_lib_2
|-ESP_Panel_Conf.h
```
4. 请参考[支持的开发板列表](#支持的开发板和驱动)来检查当前开发板是否兼容,如果兼容请跳转至“[对于支持的开发板](#对于支持的开发板)”一节,否则跳转至“[对于不支持的开发板](#对于不支持的开发板)”一节。
##### 对于支持的开发板
1. 打开 `ESP_Panel_Conf.h` 文件,首先,将宏 `ESP_PANEL_USE_SUPPORTED_BOARD` 设置为 `1`(默认值为 `1`)。然后,根据目标开发板的名称在其下方将格式为 `ESP_PANEL_BOARD_` 的宏定义取消注释。
2. 以 *ESP32_S3_BOX* 开发板为例,下面是修改后的 `ESP_Panel_Conf.h` 文件的部分内容:
```c
...
// #define ESP_PANEL_BOARD_ESP32_C3_LCDKIT
#define ESP_PANEL_BOARD_ESP32_S3_BOX
// #define ESP_PANEL_BOARD_ESP32_S3_BOX_3
...
```
3. 之后,请跳转至“[使用接口](#使用接口)”一节使用 ESP32_Display_Panel 提供的功能。
##### 对于不支持的开发板
由于 ESP32_Display_Panel 只能使用内部支持的驱动程序,请确认自定义开发板的 **LCD**、**触摸**和**接口总线**位于[支持的驱动程序列表](#supported-boards--drivers)中。然后按照下面的步骤配置库:
1. 打开 `ESP_Panel_Conf.h` 文件,将宏 `ESP_PANEL_USE_SUPPORTED_BOARD` 设置为 `0`,如下所示:
```c
#define ESP_PANEL_USE_SUPPORTED_BOARD (0)
```
2. 根据需要修改其他宏定义的值,它们代表了 LCD、触摸和其他设备初始化时所用的可调参数。
* 以下是 **LCD** 的一些重要宏定义:
```c
/* Set to 0 if not using LCD */
#define ESP_PANEL_USE_LCD (0)
/**
* LCD controller name. Choose one of the following:
* - ILI9341
* - GC9503, GC9A01
* - ST7262, ST7789, ST7796
*/
#define ESP_PANEL_LCD_NAME ST7789
/* LCD resolution in pixels */
#define ESP_PANEL_LCD_H_RES (320)
#define ESP_PANEL_LCD_V_RES (240)
/* LCD Bus Settings */
/**
* If set to 1, the bus will skip to initialize the corresponding host. Users need to initialize the host in advance.
* It is useful if other devices use the same host. Please ensure that the host is initialized only once.
*/
#define ESP_PANEL_LCD_BUS_SKIP_INIT_HOST (0)
/**
* LCD bus type. Choose one of the following:
* - 0: I2C (not supported yet)
* - 1: SPI
* - 2: I80 (not supported yet)
* - 3: RGB
*/
#define ESP_PANEL_LCD_BUS_TYPE (1)
/**
* LCD bus parameters.
*
* Please refer to https://docs.espressif.com/projects/esp-idf/en/latest/esp32s3/api-reference/peripherals/lcd.html for details.
*/
#define ESP_PANEL_LCD_BUS_HOST_ID (1)
...
/* LCD Color Settings */
/* LCD color depth in bits */
#define ESP_PANEL_LCD_COLOR_BITS (16)
/*
* LCD Color Space. Choose one of the following:
* - 0: RGB
* - 1: BGR
*/
#define ESP_PANEL_LCD_COLOR_SPACE (0)
#define ESP_PANEL_LCD_INEVRT_COLOR (0)
/* LCD Transformation Flags */
#define ESP_PANEL_LCD_SWAP_XY (0)
#define ESP_PANEL_LCD_MIRROR_X (0)
#define ESP_PANEL_LCD_MIRROR_Y (0)
/* LCD Other Settings */
/* IO num of RESET pin, set to -1 if not use */
#define ESP_PANEL_LCD_IO_RST (-1)
#define ESP_PANEL_LCD_RST_LEVEL (0)
```
* 以下是 **LCD 触摸**的一些重要宏定义:
```c
/* Set to 0 if not using LCD touch */
#define ESP_PANEL_USE_LCD_TOUCH (0)
/**
* LCD Touch IC name. Choose one of the following:
* - CST816S
* - FT5x06
* - GT1151, GT911
* - TT21100
* - STMPE610
*/
#define ESP_PANEL_LCD_TOUCH_NAME TT21100
/* LCD Touch resolution in pixels */
#define ESP_PANEL_LCD_TOUCH_H_RES (ESP_PANEL_LCD_H_RES)
#define ESP_PANEL_LCD_TOUCH_V_RES (ESP_PANEL_LCD_V_RES)
/* LCD Touch Bus Settings */
/**
* If set to 1, the bus will skip to initialize the corresponding host. Users need to initialize the host in advance.
* It is useful if other devices use the same host. Please ensure that the host is initialized only once.
*/
#define ESP_PANEL_LCD_TOUCH_BUS_SKIP_INIT_HOST (0)
/**
* LCD touch bus type. Choose one of the following:
* - 0: I2C
* - 1: SPI
*/
#define ESP_PANEL_LCD_TOUCH_BUS_TYPE (0)
/**
* LCD touch bus parameters.
*
* Please refer to https://docs.espressif.com/projects/esp-idf/en/latest/esp32s3/api-reference/peripherals/lcd.html for details.
*/
#define ESP_PANEL_LCD_TOUCH_BUS_HOST_ID (0)
...
/* LCD Touch Transformation Flags */
#define ESP_PANEL_LCD_TOUCH_SWAP_XY (0)
#define ESP_PANEL_LCD_TOUCH_MIRROR_X (0)
#define ESP_PANEL_LCD_TOUCH_MIRROR_Y (0)
/* LCD Touch Other Settings */
#define ESP_PANEL_LCD_TOUCH_IO_RST (-1)
#define ESP_PANEL_LCD_TOUCH_IO_INT (-1)
#define ESP_PANEL_LCD_TOUCH_RST_LEVEL (0)
#define ESP_PANEL_LCD_TOUCH_INT_LEVEL (0)
```
* 以下是**背光**的一些重要宏定义:
```c
#define ESP_PANEL_USE_BL (0)
/* IO num of backlight pin */
#define ESP_PANEL_LCD_IO_BL (45)
/* If the backlight is on when high level, set to 1; otherwise to 0 */
#define ESP_PANEL_LCD_BL_ON_LEVEL (1)
/* Set to 1 if use PWM for backlight brightness control. */
#define ESP_PANEL_LCD_BL_USE_PWM (0)
/**
* Backlight LEDC Parameters.
*
* Please refer to https://docs.espressif.com/projects/esp-idf/en/latest/esp32s3/api-reference/peripherals/ledc.html for details.
*/
#define ESP_PANEL_LCD_BL_PWM_TIMER (0)
...
```
3. 配置好 `ESP_Panel_Conf.h` 文件后,请跳转至“[使用接口](#使用接口)”一节查看 ESP32_Display_Panel 提供的函数。
#### 使用接口
以下代码展示了常用函数接口的使用:
```
#include
// Create an ESP_Panel object
ESP_Panel *panel = new ESP_Panel();
// Initialize and start the ESP_Panel object
panel->init();
panel->begin();
// Get the LCD object and operate it
panel->getLcd()->setCallback(callback, NULL);
panel->getLcd()->drawBitmap(0, 0, width, height, color);
// Get the LCD touch object and operate it
panel->getLcdTouch()->readData();
bool touched = panel->getLcdTouch()->getTouchState();
if(touched) {
TouchPoint point = panel->getLcdTouch()->getPoint();
Serial.printf("Touch point: x %d, y %d\n", point.x, point.y);
}
// Get the backlight object and operate it
panel->getBacklight()->on();
panel->getBacklight()->off();
panel->getBacklight()->setBrightness(50);
// Release the ESP_Panel object
delete panel;
```
### 配置开发板
以下是在不同开发板上开发 GUI 应用程序的建议配置。这些设置可以根据具体要求进行调整。
前往 Arduino IDE 中的工具菜单以配置以下设置
| Supported Boards | Selected Board | PSRAM | Flash Mode | Flash Size | USB CDC On Boot | Partition Scheme |
| :---------------------: | :----------------: | :------: | :--------: | :--------: | :-------------: | :---------------------: |
| ESP32-C3-LCDkit | ESP32C3 Dev Module | Disabled | QIO | 4MB (32Mb) | Enabled | Default 4MB with spiffs |
| ESP32-S3-Box | ESP32-S3-Box | - | - | - | - | 16M Flash (3MB) |
| ESP32-S3-Box-3 | ESP32S3 Dev Module | OPI | QIO 80MHz | 16MB | Enabled | 16M Flash (3MB) |
| ESP32-S3-Box-3(beta) | ESP32S3 Dev Module | OPI | QIO 80MHz | 16MB | Enabled | 16M Flash (3MB) |
| ESP32-S3-Box-Lite | ESP32-S3-Box | - | - | - | - | 16M Flash (3MB) |
| ESP32-S3-EYE | ESP32S3 Dev Module | OPI | QIO 80MHz | 8MB | Enabled | 8M with spiffs |
| ESP32-S3-Korvo-2 | ESP32S3 Dev Module | OPI | QIO 80MHz | 16MB | Disabled | 16M Flash (3MB) |
| ESP32-S3-LCD-EV-Board | ESP32S3 Dev Module | OPI | QIO 80MHz | 16MB | **See Note 1** | 16M Flash (3MB) |
| ESP32-S3-LCD-EV-Board-2 | ESP32S3 Dev Module | OPI | QIO 80MHz | 16MB | **See Note 1** | 16M Flash (3MB) |
| ESP32-S3-USB-OTG | ESP32-S3-USB-OTG | - | - | - | - | 8M with spiffs |
**Note:**
1. 根据使用的端口启用 "USB CDC On Boot":
* 如果使用 UART端口,则禁用此配置;如果使用 USB端口,则启用它。
* 如果此配置与先前的刷写不同,应首先启用 `Erase All Flash Before Sketch Upload`,然后在刷写后可以禁用它。
2. 若要查看更多输出日志,请将 `Core Debug Level` 设置为 `Info` 或更低级别
### 配置 LVGL
LVGL 有配置文件 `lv_conf.h`。在安装lvgl(v8.3.x)之后,请按照以下配置步骤进行操作:
1. 导航到 Arduino 库安装的目录(库文件夹的路径可以在 `File` > `Preferences` > `Settings` > `Sketchbook location` 中找到或更改)。
2. 进入 `lvgl` 文件夹,复制 `lv_conf_template.h` 并将副本放在`lvgl`文件夹外部的相同目录级别。然后将复制的文件重命名为`lv_conf.h`。
3. 最后,Arduino 库文件夹的布局如下所示:
```
Arduino
|-libraries
|-lv_conf.h
|-lvgl
|-other_lib_1
|-other_lib_2
```
4. 打开 `lv_conf.h` 文件,并将第一个 `#if 0` 改为 `#if 1` 以启用文件的内容。
5. 根据需求设置其他配置,以下是一些常见的配置项:
```c
#define LV_COLOR_DEPTH 16 // 通常使用 16 位色深(RGB565),
// 但也可以通过将其设置为 `32` 来支持 24 位色深(RGB888)
#define LV_COLOR_16_SWAP 1 // 如果使用 RGB LCD(例如 ESP32-S3-LCD-Ev-Board/-2),将其设置为 `0`
#define LV_MEM_CUSTOM 1
#define LV_MEMCPY_MEMSET_STD 1
#define LV_TICK_CUSTOM 1
#define LV_ATTRIBUTE_FAST_MEM IRAM_ATTR // 获取更高的性能但占用更多的 SRAM
#define LV_FONT_MONTSERRAT_N 1 // 启用所有需要使用的内部字体(`N`应该替换为字体大小)
```
6. 获取更多信息,请参考[ LVGL 文档](https://docs.lvgl.io/8.3/get-started/platforms/arduino.html)。
### 移植 Squareline 工程
利用 Squareline Studio 可以通过图像化编辑的方式快捷地设计出精美的 UI,如果想要在 Arduino IDE 中使用 Squareline 导出的 UI 源文件,可以参考以下步骤进行移植:
1. 首先,在 Squareline Studio 中创建一个新的工程,进入 `Create` -> `Arduino` 一栏,选择 `Arduino with TFT-eSPI` 作为工程模板,然后在右侧的 `PROJECT SETTINGS` 一栏需要根据目标开发板的 LCD 属性进行配置,如 `Resolution` and `Color depth`,最后点击 `Create` 按钮创建工程。
2. 对于已有的工程,也可以在导航栏中点击 `File` -> `Project Settings` 按钮进入工程设置,然后在 `BOARD PROPERTIES` 一栏配置 `Board Group` 为 `Arduino`,`Board` 为 `Arduino with TFT-eSPI`,并且根据目标开发板的 LCD 属性在 `DISPLAY PROPERTIES` 一栏进行配置,最后点击 `Save` 按钮保存工程设置。
3. 完成 UI 设计并且配置好导出路径后,即可依次点击菜单栏中的 `Export` -> `Create Template Project` 和 `Export UI Files` 按钮导出工程及 UI 源文件,该工程目录的布局如下所示:
```
Project
|-libraries
|-lv_conf.h
|-lvgl
|-readme.txt
|-TFT_eSPI
|-ui
|-README.md
|-ui
```
4. 最后,将工程目录下 `libraries` 文件夹中的 `lv_conf.h`、`lvgl` 和 `ui` 复制到 Arduino 的库目录中(可以在 `File` > `Preferences` > `Settings` > `Sketchbook location` 中找到或更改库文件夹的路径)。如果需要使用本地安装的 `lvgl`,请跳过复制 `lvgl` 和 `lv_conf.h`,然后参考 [steps](#配置-lvgl) 来配置 LVGL。最终的 Arduino 库文件夹的布局如下所示:
```
Arduino
|-libraries
|-ESP32_Display_Panel
|-ESP_Panel_Conf.h
|-lv_conf.h
|-lvgl
|-ui
|-other_lib_1
|-other_lib_2
```