
Textream
A free macOS teleprompter with real-time word tracking, classic auto-scroll, and voice-activated scrolling.
Built for streamers, interviewers, presenters, and podcasters.
Download · Features · How It Works · Build
---
## What is Textream?
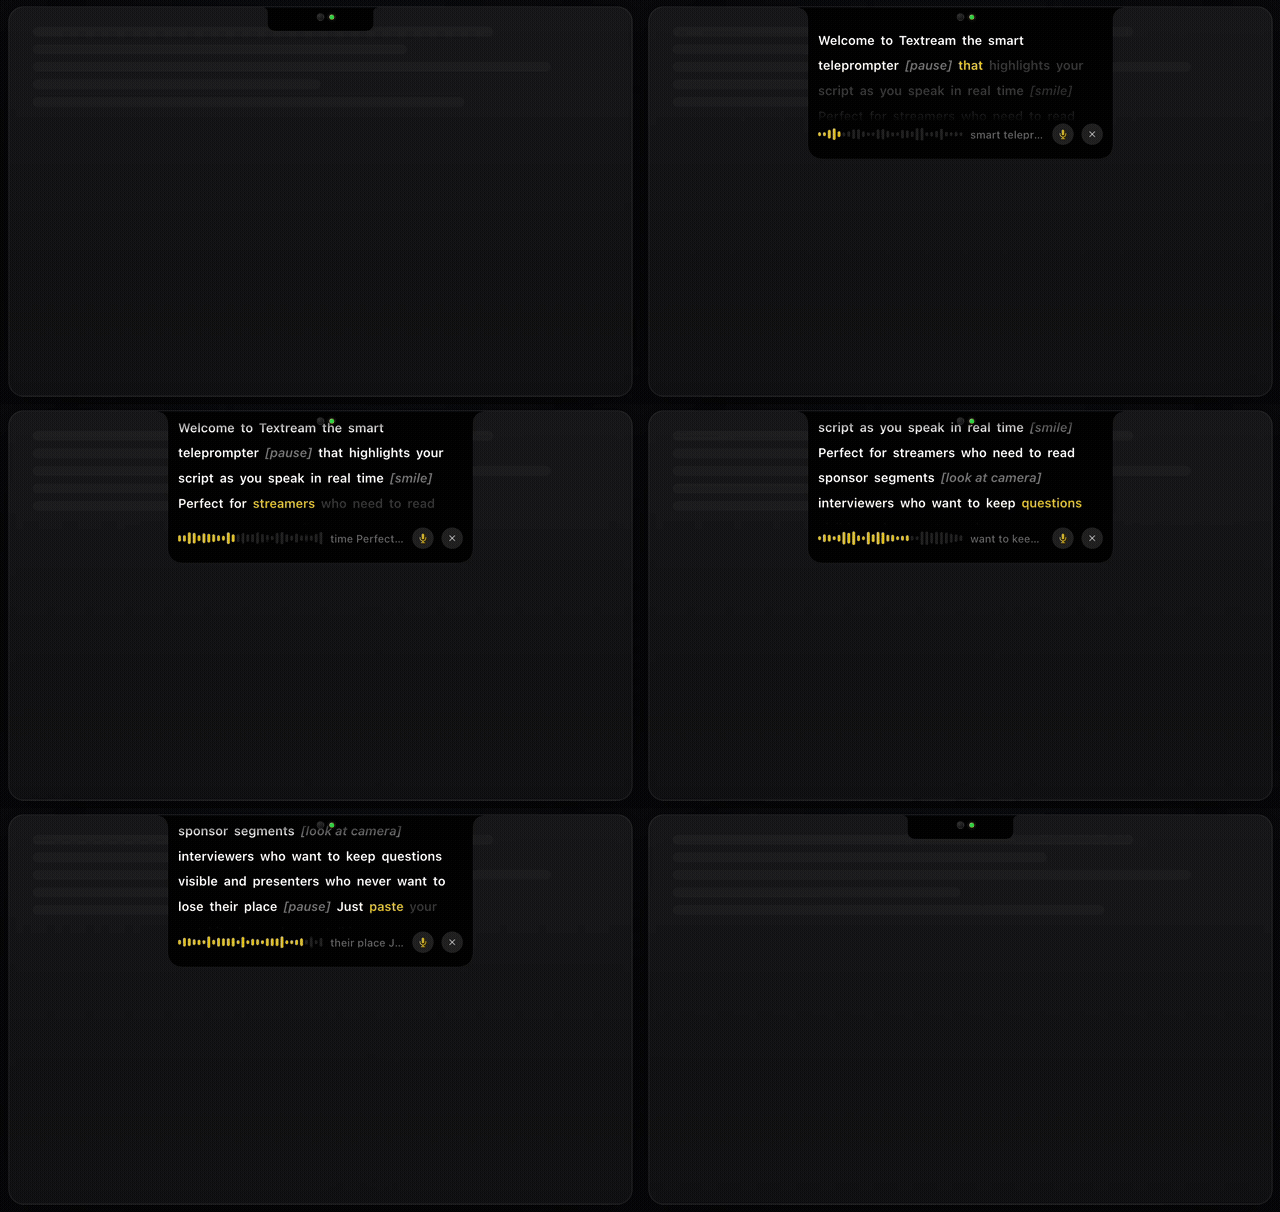
Textream is a free, open-source macOS app that guides you through your script with three modes: **word tracking** (highlights each word as you say it), **classic** (constant-speed auto-scroll), and **voice-activated** (scrolls while you speak, pauses when you're silent). It displays your text in a sleek **Dynamic Island-style overlay** at the top of your screen, a **draggable floating window**, or **fullscreen on a Sidecar iPad** — visible only to you, invisible to your audience.
Paste your script, hit play, and start speaking. When you're done, the overlay closes automatically.
## Download
**[Download the latest .dmg from Releases](https://github.com/f/textream/releases/latest)**
Or install with Homebrew:
```bash
brew install f/textream/textream
```
> Requires **macOS 15 Sequoia** or later. Works on Apple Silicon and Intel.
### First launch
Since Textream is distributed outside the Mac App Store, macOS may block it on first open. Run this once in Terminal:
```bash
xattr -cr /Applications/Textream.app
```
Then right-click the app → **Open**. After the first launch, macOS remembers your choice.
## Features
### Guidance Modes
| Mode | Description | Microphone |
|---|---|---|
| **Word Tracking** (default) | On-device speech recognition highlights each word as you say it. No cloud, no latency, works offline. Supports dozens of languages. | Required |
| **Classic** | Auto-scrolls at a constant speed. No microphone needed. | Not needed |
| **Voice-Activated** | Scrolls while you speak, pauses when you're silent or muted. Perfect for natural pacing. | Required |
- **Scroll speed** — Adjustable 0.5–8 words/s for Classic and Voice-Activated modes.
- **Speech language** — Choose your preferred speech recognition language for Word Tracking mode.
- **Mouse scroll to catch up** — In Classic and Voice-Activated modes, scroll with your mouse to jump ahead or back. The timer pauses while you scroll and resumes from the new position.
### Overlay Modes
| Mode | Description |
|---|---|
| **Pinned to Notch** | A Dynamic Island–shaped overlay anchored below the MacBook notch. Sits above all apps. |
| **Floating Window** | A draggable window you can place anywhere on screen. Always on top. |
| **Fullscreen** | Fullscreen teleprompter on any display. Press **Esc** to stop. |
#### Pinned to Notch options
- **Follow Mouse** — The notch moves to whichever display your cursor is on.
- **Fixed Display** — Pin the notch to a specific screen.
#### Floating Window options
- **Follow Cursor** — The window follows your mouse cursor. A floating stop button lets you dismiss it.
- **Glass Effect** — Translucent frosted glass background with adjustable opacity (0–60%).
#### Fullscreen options
- **Display selection** — Choose which screen to show the fullscreen teleprompter on.
- **Esc to stop** — Press the Escape key to dismiss the fullscreen overlay.
### Size
- **Width** — Adjustable overlay width (280–500 px).
- **Height** — Adjustable text area height (100–400 px).
### Font & Color
| Setting | Options |
|---|---|
| **Font Family** | Sans, Serif, Mono, OpenDyslexic (dyslexia-friendly) |
| **Font Size** | XS (14 pt), SM (16 pt), LG (20 pt), XL (24 pt) |
| **Highlight Color** | White, Yellow, Green, Blue, Pink, Orange |
### External Display & Sidecar
| Mode | Description |
|---|---|
| **Off** | No external display output. |
| **Teleprompter** | Fullscreen teleprompter on the selected external display or Sidecar iPad. |
| **Mirror** | Flipped output for prompter mirror rigs. |
- **Mirror axis** — Horizontal (standard for mirrors), Vertical, or Both (180° rotation).
- **Target display** — Pick from connected external displays and Sidecar iPads.
- **Hide from screen share** — Hides the overlay from screen recordings and video calls.
### Remote Connection
View your teleprompter on **any device** — phone, tablet, or another computer — via a local network browser connection.
- **Enable in Settings → Remote** — Starts a lightweight HTTP + WebSocket server on your Mac.
- **QR code** — Scan the generated QR code from your phone or tablet to open the teleprompter instantly.
- **Real-time sync** — Words highlight, waveform animates, and progress updates in real time over WebSocket.
- **No app needed** — Works in any modern browser. No installation required on the remote device.
- **Configurable port** — Default port 7373, adjustable in advanced settings.
- **Fully local** — All traffic stays on your local network. Nothing leaves your Wi-Fi.
### Director Mode
Let someone else control your teleprompter remotely. A director can write, edit, and push scripts to your teleprompter in real time from any browser.
- **Enable in Settings → Director** — Starts a dedicated HTTP + WebSocket server (default port 7575).
- **Remote web UI** — The director opens a mobile-friendly web page with a full-featured script editor.
- **Live text editing** — The director types or pastes a script, hits Go, and your teleprompter starts immediately with word tracking.
- **Read-locked highlighting** — Already-read text is highlighted and locked in the web editor. Only unread text remains editable.
- **Real-time sync** — Word progress, waveform, mic status, and audio levels stream to the director's browser at 10 Hz.
- **Single-page mode** — Director mode works with a single page of text. Multi-page scripts are not used.
- **Editor disabled** — When director mode is active, the macOS editor is replaced with a QR code overlay so the director has full control.
- **QR code** — Scan or share the QR code from Settings or the editor overlay to connect the director instantly.
### File Support
- **PowerPoint notes import** — Drop a .pptx file to extract presenter notes as pages. For Keynote or Google Slides, export to PowerPoint first.
- **Save as .textream files** — Save your scripts as .textream files to reuse anytime. Keep your notes organized across presentations.
- **Multi-page support** — Navigate between pages with automatic advance. In follow-cursor mode, pages auto-advance with a 3-second countdown.
### Other
- **Live waveform** — Visual voice activity indicator so you always know the mic is picking you up.
- **Tap to jump** — Tap any word in the overlay to jump the tracker to that position.
- **Pause & resume** — Go off-script, take a break, come back. The tracker picks up where you left off.
- **Mute / unmute** — Toggle the microphone on or off from the overlay in any mode.
- **Completely private** — All processing happens on-device. No accounts, no tracking, no data leaves your Mac.
- **Auto update checker** — Checks GitHub Releases for new versions on launch and from the Textream menu.
- **Open source** — MIT licensed. Contributions welcome.
## Who it's for
| Use case | How Textream helps |
|---|---|
| **Streamers** | Read sponsor segments, announcements, and talking points without looking away from the camera. |
| **Interviewers** | Keep your questions visible while maintaining natural eye contact with your guest. |
| **Presenters** | Deliver keynotes, demos, and talks with confidence. Never lose your place. |
| **Podcasters** | Follow show notes, ad reads, and topic outlines hands-free while recording. |
## How It Works
1. **Paste your script** — Drop your talking points, interview questions, or full script into the text editor.
2. **Hit play** — The Dynamic Island overlay slides down from the top of your screen.
3. **Start speaking** — Words highlight in real-time as you read. When you finish, the overlay closes automatically.
## Building from Source
### Requirements
- macOS 15+
- Xcode 16+
- Swift 5.0+
### Build
```bash
git clone https://github.com/f/textream.git
cd textream/Textream
open Textream.xcodeproj
```
Build and run with ⌘R in Xcode.
### Project structure
```
Textream/
├── Textream.xcodeproj
├── Info.plist
└── Textream/
├── TextreamApp.swift # App entry point, deep link handling
├── ContentView.swift # Main text editor UI + About view
├── TextreamService.swift # Service layer, URL scheme handling
├── SpeechRecognizer.swift # On-device speech recognition engine
├── NotchOverlayController.swift # Dynamic Island + floating overlay
├── ExternalDisplayController.swift # Sidecar / external display output
├── NotchSettings.swift # User preferences and presets
├── SettingsView.swift # Tabbed settings UI
├── MarqueeTextView.swift # Word flow layout and highlighting
├── BrowserServer.swift # Remote connection HTTP + WebSocket server
├── DirectorServer.swift # Director mode HTTP + WebSocket server
├── PresentationNotesExtractor.swift # PPTX presenter notes extraction
├── UpdateChecker.swift # GitHub release update checker
└── Assets.xcassets/ # App icon and colors
```
## URL Scheme
Textream supports the `textream://` URL scheme for launching directly into the overlay:
```
textream://read?text=Hello%20world
```
It also registers as a macOS Service, so you can select text in any app and send it to Textream via the Services menu.
## Director Mode API
The Director Mode exposes an HTTP server and a WebSocket server on your local network. You can build your own director client using the protocol below.
### Ports
| Service | Default Port | Configurable in |
|---|---|---|
| **HTTP** (serves the built-in web UI) | `7575` | Settings → Director → Advanced |
| **WebSocket** (bidirectional communication) | `7576` (HTTP port + 1) | Automatic |
### Connecting
1. Open a WebSocket connection to `ws://:` (e.g. `ws://192.168.1.42:7576`).
2. The server immediately begins sending **state frames** as JSON at ~10 Hz once a script is active.
3. Send **command frames** as JSON to control the teleprompter.
### Commands (Client → App)
Send JSON messages over the WebSocket:
#### `setText` — Start reading a new script
```json
{
"type": "setText",
"text": "Welcome everyone to today's live stream..."
}
```
Replaces the current text, starts word tracking, and opens the teleprompter overlay. This is equivalent to pressing **Go** in the built-in web UI.
#### `updateText` — Edit unread text while active
```json
{
"type": "updateText",
"text": "Welcome everyone to today's live stream We changed the rest of the script...",
"readCharCount": 42
}
```
Updates the full script text while preserving the read position. `readCharCount` is the number of characters already read (locked). Only text after this offset is replaced. Use this for live editing during a read.
#### `stop` — Stop the teleprompter
```json
{
"type": "stop"
}
```
Stops word tracking and dismisses the overlay.
### State (App → Client)
The server broadcasts a JSON object on every tick (~100 ms):
```json
{
"words": ["Welcome", "everyone", "to", "today's", "live", "stream"],
"highlightedCharCount": 24,
"totalCharCount": 120,
"isActive": true,
"isDone": false,
"isListening": true,
"fontColor": "#F5F5F7",
"lastSpokenText": "Welcome everyone to today's",
"audioLevels": [0.12, 0.34, 0.08, ...]
}
```
| Field | Type | Description |
|---|---|---|
| `words` | `string[]` | The script split into words (same order as displayed in the overlay). |
| `highlightedCharCount` | `int` | Number of characters recognized so far. Use this to determine the read boundary. |
| `totalCharCount` | `int` | Total character count of the full script. |
| `isActive` | `bool` | `true` when the teleprompter overlay is visible and a script is loaded. |
| `isDone` | `bool` | `true` when `highlightedCharCount >= totalCharCount` (finished reading). |
| `isListening` | `bool` | `true` when the microphone is actively listening. |
| `fontColor` | `string` | CSS color of the text in the overlay (user preference). |
| `lastSpokenText` | `string` | Last recognized speech fragment. |
| `audioLevels` | `double[]` | Array of audio level samples (0.0–1.0) for waveform visualization. |
When the overlay is not active, the server sends a frame with `isActive: false` and empty arrays.
### Example: Minimal Python Client
```python
import asyncio, json, websockets
async def director():
async with websockets.connect("ws://192.168.1.42:7576") as ws:
# Send a script
await ws.send(json.dumps({
"type": "setText",
"text": "Hello everyone, welcome to the show."
}))
# Listen for state updates
async for msg in ws:
state = json.loads(msg)
pct = 0
if state["totalCharCount"] > 0:
pct = state["highlightedCharCount"] / state["totalCharCount"] * 100
print(f"Progress: {pct:.0f}% Done: {state['isDone']}")
if state["isDone"]:
break
# Stop
await ws.send(json.dumps({"type": "stop"}))
asyncio.run(director())
```
## License
MIT
---
Original idea by Semih Kışlar — thanks to him!
Made by Fatih Kadir Akin