[](https://github.com/firstcontributions/open-source-badges)
[ ](https://join.slack.com/t/firstcontributors/shared_invite/zt-1hg51qkgm-Xc7HxhsiPYNN3ofX2_I8FA)
[](https://opensource.org/licenses/MIT)
[](https://www.codetriage.com/roshanjossey/first-contributions)
# ပထမအကြိမ် ကူညီထောက်ပံ့ခြင်း
ဘယ်အရာမဆို ပထမဦးဆုံးလုပ်ဆောင်အခါ အခက်အခဲတွေ့ကြုံရပါတယ်။ အထူးသဖြင့် လူအများနဲ့ ပေါင်းသင်းလုပ်ကိုင်ကြတဲ့ အခါ မထင်မှတ်ထားတဲ့ အမှားများတွေ့ရတတ်ပြီး အဆင်မပြေတာတွေဖြစ်တတ်ပါတယ်။ Open source software များကတော့ လူအများနဲ့ ပေါင်းသင်းဆက်ဆံလုပ်ကိုင် ကြရတာပါ။ ဒါကြောင့်မို့ ပထမဦးဆုံးအကြိမ် open-source project များကို ပါဝင် ကူညီထောက်ပံ့သူများကို ပထမဆုံးအကြိမ် ကူညီထောက်ပံ့နိုင်ဖို့နဲ့ လွယ်ကူ ရိုးရှင်းတဲ့ လေ့လာနည်းဖြစ်ဖို့ ရည်ရွယ်ပါတယ်။
လေ့ကျင်ခန်း စာစောင်တွေနဲ့ ဗီဒီယိုတွေက အကူအညီရနိုင်သော်လဲ တကယ်လက်တွေ့လုပ်ဆောင်တာထက် ပိုကောင်းတာမရှိပါဘူး။ ဒီ project က ပထမဆုံးအကြိမ် ကူညီထောက်ပံ့ပေးမဲ့ သူတွေအတွက် လွယ်ကူ ရှိးရှင်းပြီး အကူအညီအထောက်ပံ့ဖြစ်စေဖို့ ရည်ရွယ်ပါတယ်။ **မှတ်ထားပါ** : သင်ကသက်တောင်သက်သာရှိလေလေ သင်ကပိုကောင်းကောင်းသင်ယူနိုင်လေ ဖြစ်ပါတယ်။ သင်သာ အောက်မှာရှိတဲ့ အဆင့်တိုင်းလုပ်သွားလျှင် သင့်ရဲ့ ပထမဆုံး ကူညီထောက်ပံခြင်းမှာ အဆင်ပြေစွာ ပြီးမြောက်သွားမှာဆိုတာ အာမခံပါတယ်။
_command line (သို့) terminal အသုံးပြုရတာ အဆင်မပြေပါက [GUI tools အသုံးပြုပုံများကို ဒီမှာကြည့်ရန်](#အခြား-Tools-များ-အသုံးပြုသည့်-tutorial)_
](https://join.slack.com/t/firstcontributors/shared_invite/zt-1hg51qkgm-Xc7HxhsiPYNN3ofX2_I8FA)
[](https://opensource.org/licenses/MIT)
[](https://www.codetriage.com/roshanjossey/first-contributions)
# ပထမအကြိမ် ကူညီထောက်ပံ့ခြင်း
ဘယ်အရာမဆို ပထမဦးဆုံးလုပ်ဆောင်အခါ အခက်အခဲတွေ့ကြုံရပါတယ်။ အထူးသဖြင့် လူအများနဲ့ ပေါင်းသင်းလုပ်ကိုင်ကြတဲ့ အခါ မထင်မှတ်ထားတဲ့ အမှားများတွေ့ရတတ်ပြီး အဆင်မပြေတာတွေဖြစ်တတ်ပါတယ်။ Open source software များကတော့ လူအများနဲ့ ပေါင်းသင်းဆက်ဆံလုပ်ကိုင် ကြရတာပါ။ ဒါကြောင့်မို့ ပထမဦးဆုံးအကြိမ် open-source project များကို ပါဝင် ကူညီထောက်ပံ့သူများကို ပထမဆုံးအကြိမ် ကူညီထောက်ပံ့နိုင်ဖို့နဲ့ လွယ်ကူ ရိုးရှင်းတဲ့ လေ့လာနည်းဖြစ်ဖို့ ရည်ရွယ်ပါတယ်။
လေ့ကျင်ခန်း စာစောင်တွေနဲ့ ဗီဒီယိုတွေက အကူအညီရနိုင်သော်လဲ တကယ်လက်တွေ့လုပ်ဆောင်တာထက် ပိုကောင်းတာမရှိပါဘူး။ ဒီ project က ပထမဆုံးအကြိမ် ကူညီထောက်ပံ့ပေးမဲ့ သူတွေအတွက် လွယ်ကူ ရှိးရှင်းပြီး အကူအညီအထောက်ပံ့ဖြစ်စေဖို့ ရည်ရွယ်ပါတယ်။ **မှတ်ထားပါ** : သင်ကသက်တောင်သက်သာရှိလေလေ သင်ကပိုကောင်းကောင်းသင်ယူနိုင်လေ ဖြစ်ပါတယ်။ သင်သာ အောက်မှာရှိတဲ့ အဆင့်တိုင်းလုပ်သွားလျှင် သင့်ရဲ့ ပထမဆုံး ကူညီထောက်ပံခြင်းမှာ အဆင်ပြေစွာ ပြီးမြောက်သွားမှာဆိုတာ အာမခံပါတယ်။
_command line (သို့) terminal အသုံးပြုရတာ အဆင်မပြေပါက [GUI tools အသုံးပြုပုံများကို ဒီမှာကြည့်ရန်](#အခြား-Tools-များ-အသုံးပြုသည့်-tutorial)_
 #### သင့်ကွန်ပျူတာထဲမှာ Git မသွင်းရသေးလျှင် [ဒီမှာ သွင်းနည်းကြည့်ရန်](https://help.github.com/articles/set-up-git/).
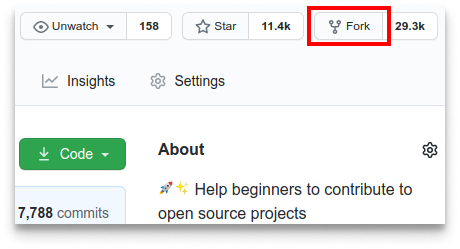
## ဒီ repository ကို fork လုပ်ပါ
Fork လုပ်ဖို့အတွက် စာမျက်နှာအပေါ်နားမှရှိတဲ့ fork ခလုတ် ကိုနှိပ်ပါ။
ဒီ repository က သင့် အကောင့်ကို ပုံစံတူပွားအနေနဲ့ ရောက်လာပါမယ်။
## ဒီ repository ကို clone လုပ်ပါ
#### သင့်ကွန်ပျူတာထဲမှာ Git မသွင်းရသေးလျှင် [ဒီမှာ သွင်းနည်းကြည့်ရန်](https://help.github.com/articles/set-up-git/).
## ဒီ repository ကို fork လုပ်ပါ
Fork လုပ်ဖို့အတွက် စာမျက်နှာအပေါ်နားမှရှိတဲ့ fork ခလုတ် ကိုနှိပ်ပါ။
ဒီ repository က သင့် အကောင့်ကို ပုံစံတူပွားအနေနဲ့ ရောက်လာပါမယ်။
## ဒီ repository ကို clone လုပ်ပါ
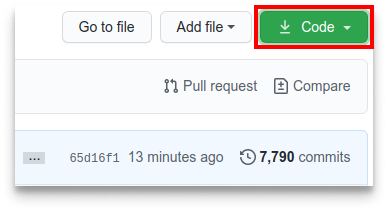 ခုနက fork လုပ်ထားတဲ့ repository ကို သင့်ကွန်ပျူတာထဲ clone လုပ်ပါမယ်။ သင့် Github အကောင့်ကိုသွားပြီး fork လုပ်ထားတဲ့ repository ကို ဖွင့်ပါ။ Code ဆိုတဲ့ ခလုတ်လေးကို နှိပ်ပြီး _copy to clipboard_ icon လေးကို နှိပ်ပါ။
command line (သို့) terminal ကိုဖွင့်ပြီး အောက်က Git command ကို run ပါ။
```
git clone "ခုနက copy ထားတဲ့ လင့်ခ်"
```
"ခုနက copy ထားတဲ့ လင့်ခ်" (quotation marks မထည့်ရပါ) ဆိုတာဟာ ဒီ repository (ဒီပရောဂျက်ရဲ့ သင့် fork) ရဲ့ လင့်ခ်ပဲ ဖြစ်ပါတယ်။ ဒီနေရာမှာ အဆင်မပြေဖြစ်ခဲ့ရင် အပေါ်က အဆင့်များကို ပြန်လုပ်ပါ။
ခုနက fork လုပ်ထားတဲ့ repository ကို သင့်ကွန်ပျူတာထဲ clone လုပ်ပါမယ်။ သင့် Github အကောင့်ကိုသွားပြီး fork လုပ်ထားတဲ့ repository ကို ဖွင့်ပါ။ Code ဆိုတဲ့ ခလုတ်လေးကို နှိပ်ပြီး _copy to clipboard_ icon လေးကို နှိပ်ပါ။
command line (သို့) terminal ကိုဖွင့်ပြီး အောက်က Git command ကို run ပါ။
```
git clone "ခုနက copy ထားတဲ့ လင့်ခ်"
```
"ခုနက copy ထားတဲ့ လင့်ခ်" (quotation marks မထည့်ရပါ) ဆိုတာဟာ ဒီ repository (ဒီပရောဂျက်ရဲ့ သင့် fork) ရဲ့ လင့်ခ်ပဲ ဖြစ်ပါတယ်။ ဒီနေရာမှာ အဆင်မပြေဖြစ်ခဲ့ရင် အပေါ်က အဆင့်များကို ပြန်လုပ်ပါ။
 ဥပမာ:
```
git clone https://github.com/this-is-you/first-contributions.git
```
`this-is-you` ဆိုတာ သင့်ရဲ့ Github username ပဲ ဖြစ်ပါတယ်။ ဒီအဆင့်တွေက Github မှာရှိတဲ့ first-contributions repository ကို သင့်ကွန်ပျူတာထဲသို့ ကူးထည့်တာပဲ ဖြစ်ပါတယ်။
## Branch အသစ်လုပ်ခြင်း
သင် copy လုပ်ထားတဲ့ repository directory ကို မရောက်သေးရင် အောက်က command ကို run ပြီး ရောက်အောင်သွားပါ။
```
cd first-contributions
```
Branch အသစ်ကို `git checkout` command ကို run ပြီးလုပ်ပါ။
```
git checkout -b your-new-branch-name
```
ဥပမာ:
```
git checkout -b add-alonzo-church
```
(Branch နာမည်ဘာဖြစ်ဖြစ်ရပါတယ် သို့သော်လဲ ဒီ project ကသင့် နာမည်ကိုထပ်ထည့်မှာဖြစ်လို့ _add_ သင့်နာမည်ကို အားလုံးနဲ့ အဆင်ပြေအောင်ထည့်ပေးပါ။)
## ပြောင်းစရာရှိတာများ ပြောင်းပြီး ထိုပြောင်းလဲမှုများကို commit လုပ်ခြင်း
သင့် text editor မှာ `Contributors.md` ကိုဖွင့်ပါ။ ထိပ်ဆုံးနှင့်နောက်ဆုံးမှလွဲ၍ သင့်ရဲ့ နာမည်ကို အဆင်ပြေတဲ့ နေရာမှာထည့်ပြီး save ပါ။
ဥပမာ:
```
git clone https://github.com/this-is-you/first-contributions.git
```
`this-is-you` ဆိုတာ သင့်ရဲ့ Github username ပဲ ဖြစ်ပါတယ်။ ဒီအဆင့်တွေက Github မှာရှိတဲ့ first-contributions repository ကို သင့်ကွန်ပျူတာထဲသို့ ကူးထည့်တာပဲ ဖြစ်ပါတယ်။
## Branch အသစ်လုပ်ခြင်း
သင် copy လုပ်ထားတဲ့ repository directory ကို မရောက်သေးရင် အောက်က command ကို run ပြီး ရောက်အောင်သွားပါ။
```
cd first-contributions
```
Branch အသစ်ကို `git checkout` command ကို run ပြီးလုပ်ပါ။
```
git checkout -b your-new-branch-name
```
ဥပမာ:
```
git checkout -b add-alonzo-church
```
(Branch နာမည်ဘာဖြစ်ဖြစ်ရပါတယ် သို့သော်လဲ ဒီ project ကသင့် နာမည်ကိုထပ်ထည့်မှာဖြစ်လို့ _add_ သင့်နာမည်ကို အားလုံးနဲ့ အဆင်ပြေအောင်ထည့်ပေးပါ။)
## ပြောင်းစရာရှိတာများ ပြောင်းပြီး ထိုပြောင်းလဲမှုများကို commit လုပ်ခြင်း
သင့် text editor မှာ `Contributors.md` ကိုဖွင့်ပါ။ ထိပ်ဆုံးနှင့်နောက်ဆုံးမှလွဲ၍ သင့်ရဲ့ နာမည်ကို အဆင်ပြေတဲ့ နေရာမှာထည့်ပြီး save ပါ။
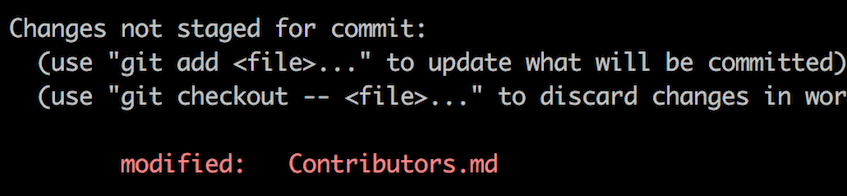 ပြီးရင် ဒီ folder ရှိတဲ့နေရာကိုသွားပြီး `git status` command ကို run ပါ။ သင်ဘာတွေပြောင်းထားလဲဆိုတာ မြင်ရပါလိမ့်မယ်။
ဒီပြောင်းလဲမှုတွေကို သင့်ရဲ့ branch ကိုထည့်ဖို့အတွက် `git add` command ကို run ပါ။
```
git add Contributors.md
```
အခု commit လုပ်ဖို့ `git commit` command ကို run ပေးပါ။
```
git commit -m "Add to Contributors list"
```
`` နေရာမှာ သင့်နာမည်ကို အစားထိုးပါ။
## သင့်ရဲ့ ပြောင်းလဲ ပြုပြင်မှုကိုများကို Github သို့တင်ပါ။
ပြောင်းလဲမှုများကို Github သို့တင်ဖို့အတွက် `git push` ကို run ပါ။
```
git push origin
```
`` နေရာမှာ သင်အသစ်လုပ်ထားတဲ့ branch နာမည်ကိုထည့်ပါ။
## သင်ပြောင်းထားတာ တွေကို review လုပ်ဖို့ submit လုပ်ပါ။
သင့် GitHub က သင့် repository မှာ `Compare & pull request` ဆိုတဲ့ ခလုတ်မြင်နေရမှာပါ။ အဲ့ဒီ ခလုတ်ကို နှိပ်လိုက်ပါ။
ပြီးရင် ဒီ folder ရှိတဲ့နေရာကိုသွားပြီး `git status` command ကို run ပါ။ သင်ဘာတွေပြောင်းထားလဲဆိုတာ မြင်ရပါလိမ့်မယ်။
ဒီပြောင်းလဲမှုတွေကို သင့်ရဲ့ branch ကိုထည့်ဖို့အတွက် `git add` command ကို run ပါ။
```
git add Contributors.md
```
အခု commit လုပ်ဖို့ `git commit` command ကို run ပေးပါ။
```
git commit -m "Add to Contributors list"
```
`` နေရာမှာ သင့်နာမည်ကို အစားထိုးပါ။
## သင့်ရဲ့ ပြောင်းလဲ ပြုပြင်မှုကိုများကို Github သို့တင်ပါ။
ပြောင်းလဲမှုများကို Github သို့တင်ဖို့အတွက် `git push` ကို run ပါ။
```
git push origin
```
`` နေရာမှာ သင်အသစ်လုပ်ထားတဲ့ branch နာမည်ကိုထည့်ပါ။
## သင်ပြောင်းထားတာ တွေကို review လုပ်ဖို့ submit လုပ်ပါ။
သင့် GitHub က သင့် repository မှာ `Compare & pull request` ဆိုတဲ့ ခလုတ်မြင်နေရမှာပါ။ အဲ့ဒီ ခလုတ်ကို နှိပ်လိုက်ပါ။
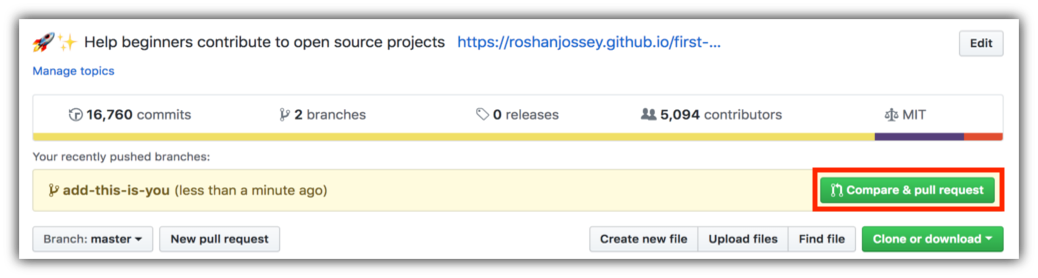 အခု pull request ကို submit လုပ်လိုက်ပါ။
 သင့်ရဲ့ပြောင်းလဲမှုတွေကို ဒီ project ရဲ့ master branch မှာ ထည့်သွင်းပေးမှာဖြစ်ပါတယ်။ ဒါကြောင့် ဒီ project ရဲ့ master branch မှာ ထည့်သွင်းပြီးရင် သင့်မှာ notification email ရောက်လာပါလိမ့်မယ်။
## ဒါပြီးရင် ဘာတွေဆက် လေ့လာမလဲ
Congratulation! Open Source Project တွေမှာ အမြဲလုပ်ရလေ့ရှိတဲ့ _fork -> clone -> edit -> pull request_ လုပ်ငန်းစဥ်ကို သင် အောင်မြင်စွာ လုပ်နိုင်ခဲ့ပါပြီ။
အခု သင်ကူညီထောက်ပံ့ခဲ့တာကို သင့်သူငယ်ချင်းတွေကို share ချင်ရင် [ဒီ web app](https://firstcontributions.github.io/#social-share) ကို သွားပါ။
တခြားအကူအညီများနဲ့ မေးစရာများရှိပါက ကျွန်တော်တို့ရဲ့ Slack team ကို ဝင်ရောက် မေးမြန်းနိုင်ပါတယ်။[Join slack team သို့ ဝင်ရန်](https://join.slack.com/t/firstcontributors/shared_invite/zt-1hg51qkgm-Xc7HxhsiPYNN3ofX2_I8FA).
နောက်ထပ် ပရောဂျက်များကိုလည်း ဝင်ရောက်ကူညီလိုပါက ကျွန်တော်တို့ ပြုစုထားတဲ့ ပရောဂျက်စာရင်းကို လေ့လာနိုင်ပါတယ်။ [web app ထဲမှ ပရောဂျက်စာရင်း](https://firstcontributions.github.io/#project-list).
### [အခြား ထွေလီကာလီများ](additional-material/git_workflow_scenarios/additional-material.md)
## အခြား Tools များ အသုံးပြုသည့် tutorial
|
သင့်ရဲ့ပြောင်းလဲမှုတွေကို ဒီ project ရဲ့ master branch မှာ ထည့်သွင်းပေးမှာဖြစ်ပါတယ်။ ဒါကြောင့် ဒီ project ရဲ့ master branch မှာ ထည့်သွင်းပြီးရင် သင့်မှာ notification email ရောက်လာပါလိမ့်မယ်။
## ဒါပြီးရင် ဘာတွေဆက် လေ့လာမလဲ
Congratulation! Open Source Project တွေမှာ အမြဲလုပ်ရလေ့ရှိတဲ့ _fork -> clone -> edit -> pull request_ လုပ်ငန်းစဥ်ကို သင် အောင်မြင်စွာ လုပ်နိုင်ခဲ့ပါပြီ။
အခု သင်ကူညီထောက်ပံ့ခဲ့တာကို သင့်သူငယ်ချင်းတွေကို share ချင်ရင် [ဒီ web app](https://firstcontributions.github.io/#social-share) ကို သွားပါ။
တခြားအကူအညီများနဲ့ မေးစရာများရှိပါက ကျွန်တော်တို့ရဲ့ Slack team ကို ဝင်ရောက် မေးမြန်းနိုင်ပါတယ်။[Join slack team သို့ ဝင်ရန်](https://join.slack.com/t/firstcontributors/shared_invite/zt-1hg51qkgm-Xc7HxhsiPYNN3ofX2_I8FA).
နောက်ထပ် ပရောဂျက်များကိုလည်း ဝင်ရောက်ကူညီလိုပါက ကျွန်တော်တို့ ပြုစုထားတဲ့ ပရောဂျက်စာရင်းကို လေ့လာနိုင်ပါတယ်။ [web app ထဲမှ ပရောဂျက်စာရင်း](https://firstcontributions.github.io/#project-list).
### [အခြား ထွေလီကာလီများ](additional-material/git_workflow_scenarios/additional-material.md)
## အခြား Tools များ အသုံးပြုသည့် tutorial
|  |
|  |
|  |
|  |
|  |
|  |
| -------------------------------------------------------------------------------------------------------------------------------------------------------------- | ------------------------------------------------------------------------------------------------------------------------------------------------------------------------------------------------------ | ----------------------------------------------------------------------------------------------------------------------------------------------------------------------------------------------- | ----------------------------------------------------------------------------------------------------------------------------------------------------------------------------------------------- | --------------------------------------------------------------------------------------------------------------------------------------------------------------------------------------------------------------- | ----------------------------------------------------------------------------------------------------------------------------------------------------------------------------------------------------------------------------------- |
| [GitHub Desktop](../gui-tool-tutorials/github-desktop-tutorial.md) | [Visual Studio 2017](../gui-tool-tutorials/github-windows-vs2017-tutorial.md) | [GitKraken](../gui-tool-tutorials/gitkraken-tutorial.md) | [Visual Studio Code](../gui-tool-tutorials/github-windows-vs-code-tutorial.md) | [Atlassian Sourcetree](../gui-tool-tutorials/sourcetree-macos-tutorial.md) | [IntelliJ IDEA](../gui-tool-tutorials/github-windows-intellij-tutorial.md) |
|
| -------------------------------------------------------------------------------------------------------------------------------------------------------------- | ------------------------------------------------------------------------------------------------------------------------------------------------------------------------------------------------------ | ----------------------------------------------------------------------------------------------------------------------------------------------------------------------------------------------- | ----------------------------------------------------------------------------------------------------------------------------------------------------------------------------------------------- | --------------------------------------------------------------------------------------------------------------------------------------------------------------------------------------------------------------- | ----------------------------------------------------------------------------------------------------------------------------------------------------------------------------------------------------------------------------------- |
| [GitHub Desktop](../gui-tool-tutorials/github-desktop-tutorial.md) | [Visual Studio 2017](../gui-tool-tutorials/github-windows-vs2017-tutorial.md) | [GitKraken](../gui-tool-tutorials/gitkraken-tutorial.md) | [Visual Studio Code](../gui-tool-tutorials/github-windows-vs-code-tutorial.md) | [Atlassian Sourcetree](../gui-tool-tutorials/sourcetree-macos-tutorial.md) | [IntelliJ IDEA](../gui-tool-tutorials/github-windows-intellij-tutorial.md) |