# Installation Guide
Click to open a video to learn how to install Agent Zero:
[](https://www.youtube.com/watch?v=w5v5Kjx51hs)
## **Goal:** Go from zero to a first working chat with minimal setup.
## Step 1: Install Docker Desktop
Docker Desktop provides the runtime environment for Agent Zero, ensuring consistent behavior and security across platforms. The entire framework runs within a Docker container, providing isolation and easy deployment.
**Choose your operating system:**
---
## Windows Installation
**1.1. Download Docker Desktop**
Go to the [Docker Desktop download page](https://www.docker.com/products/docker-desktop/) and download the Windows version (Intel/AMD is the main download button).
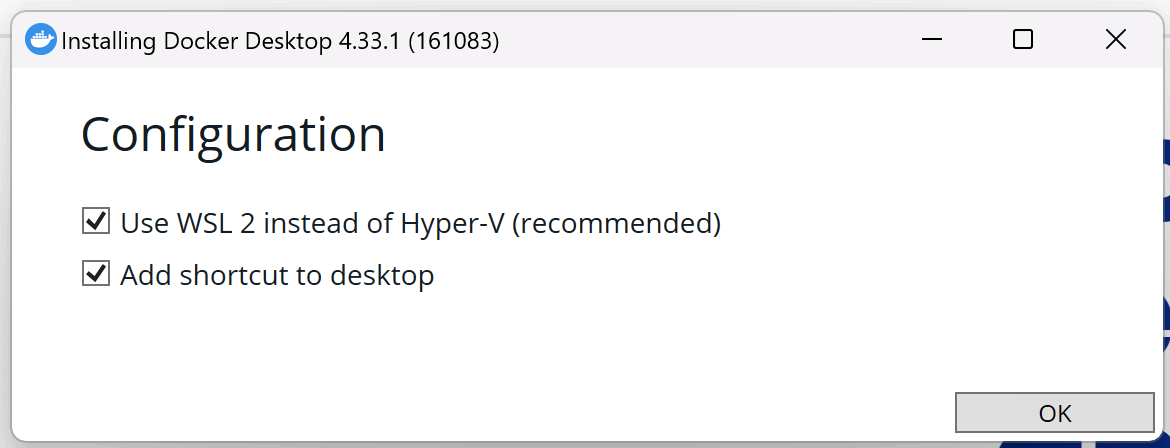
**1.2. Run the Installer**
Run the installer with default settings.
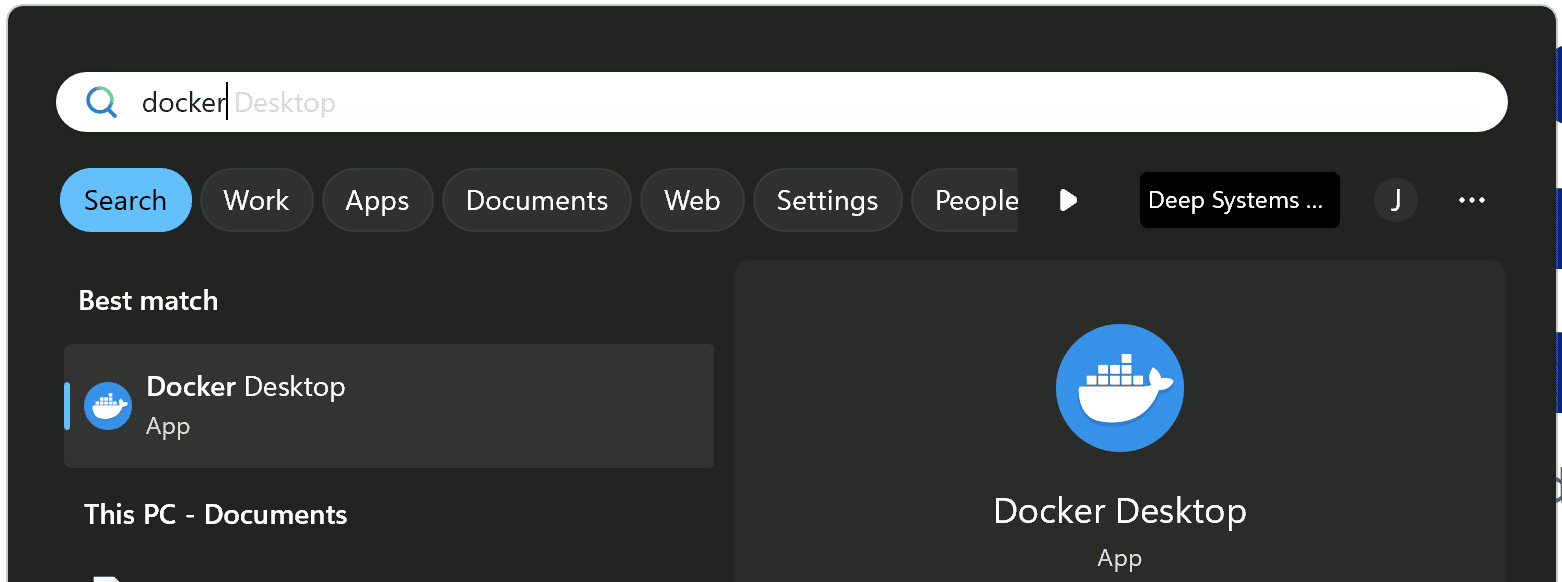
**1.3. Launch Docker Desktop**
Once installed, launch Docker Desktop from your Start menu or desktop shortcut.
✅ **Docker is now installed!**
### Continue to [Step 2: Run Agent Zero](#step-2-run-agent-zero)
---
## macOS Installation
**1.1. Download Docker Desktop**
Go to the [Docker Desktop download page](https://www.docker.com/products/docker-desktop/) and download the macOS version (choose Apple Silicon or Intel based on your Mac).
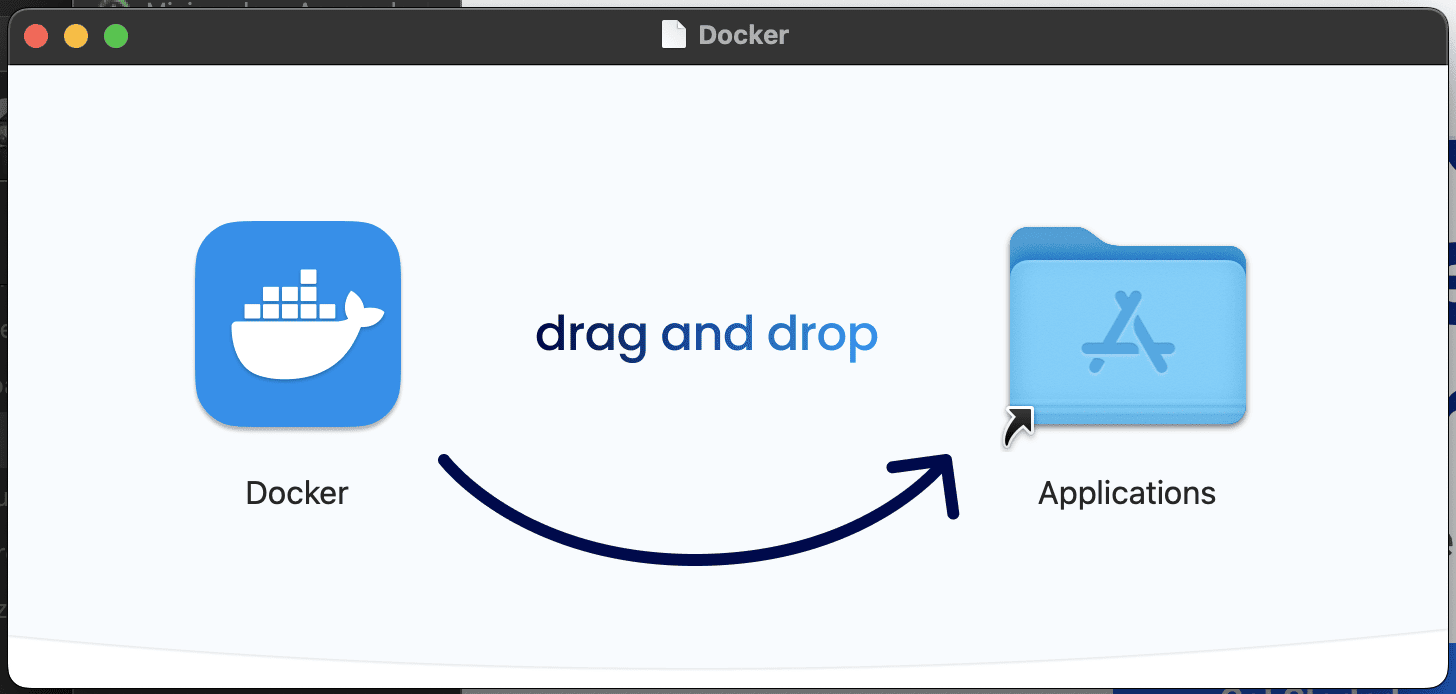
**1.2. Install Docker Desktop**
Drag and drop the Docker application to your Applications folder.
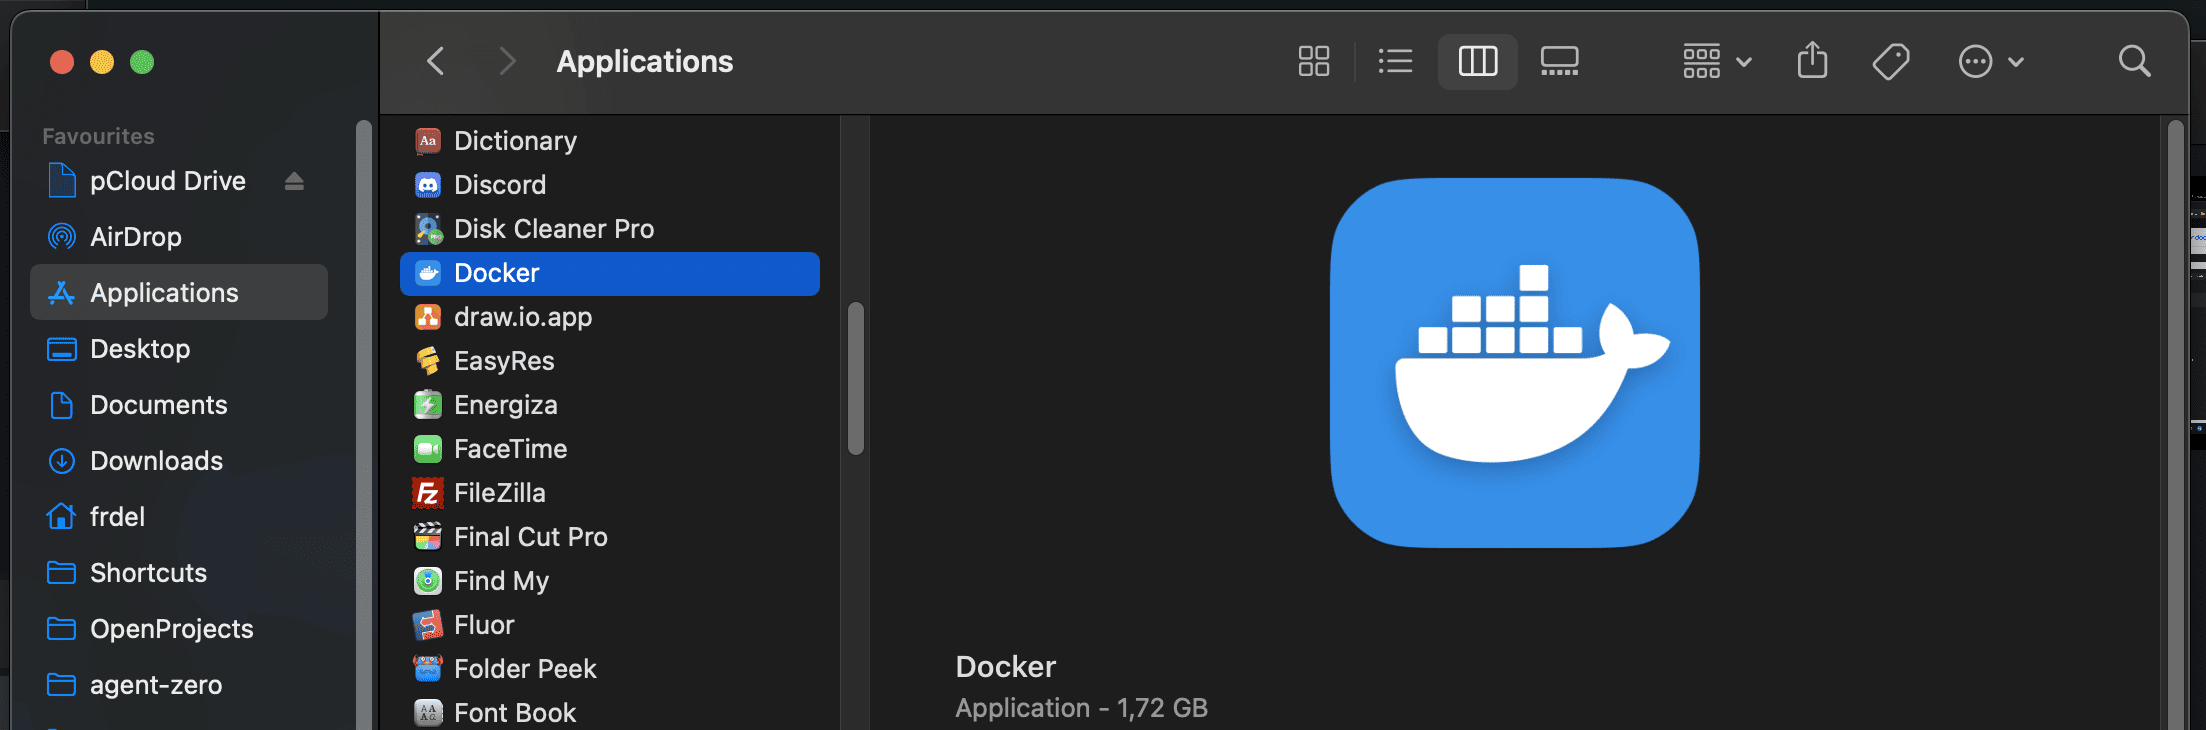
**1.3. Launch Docker Desktop**
Open Docker Desktop from your Applications folder.
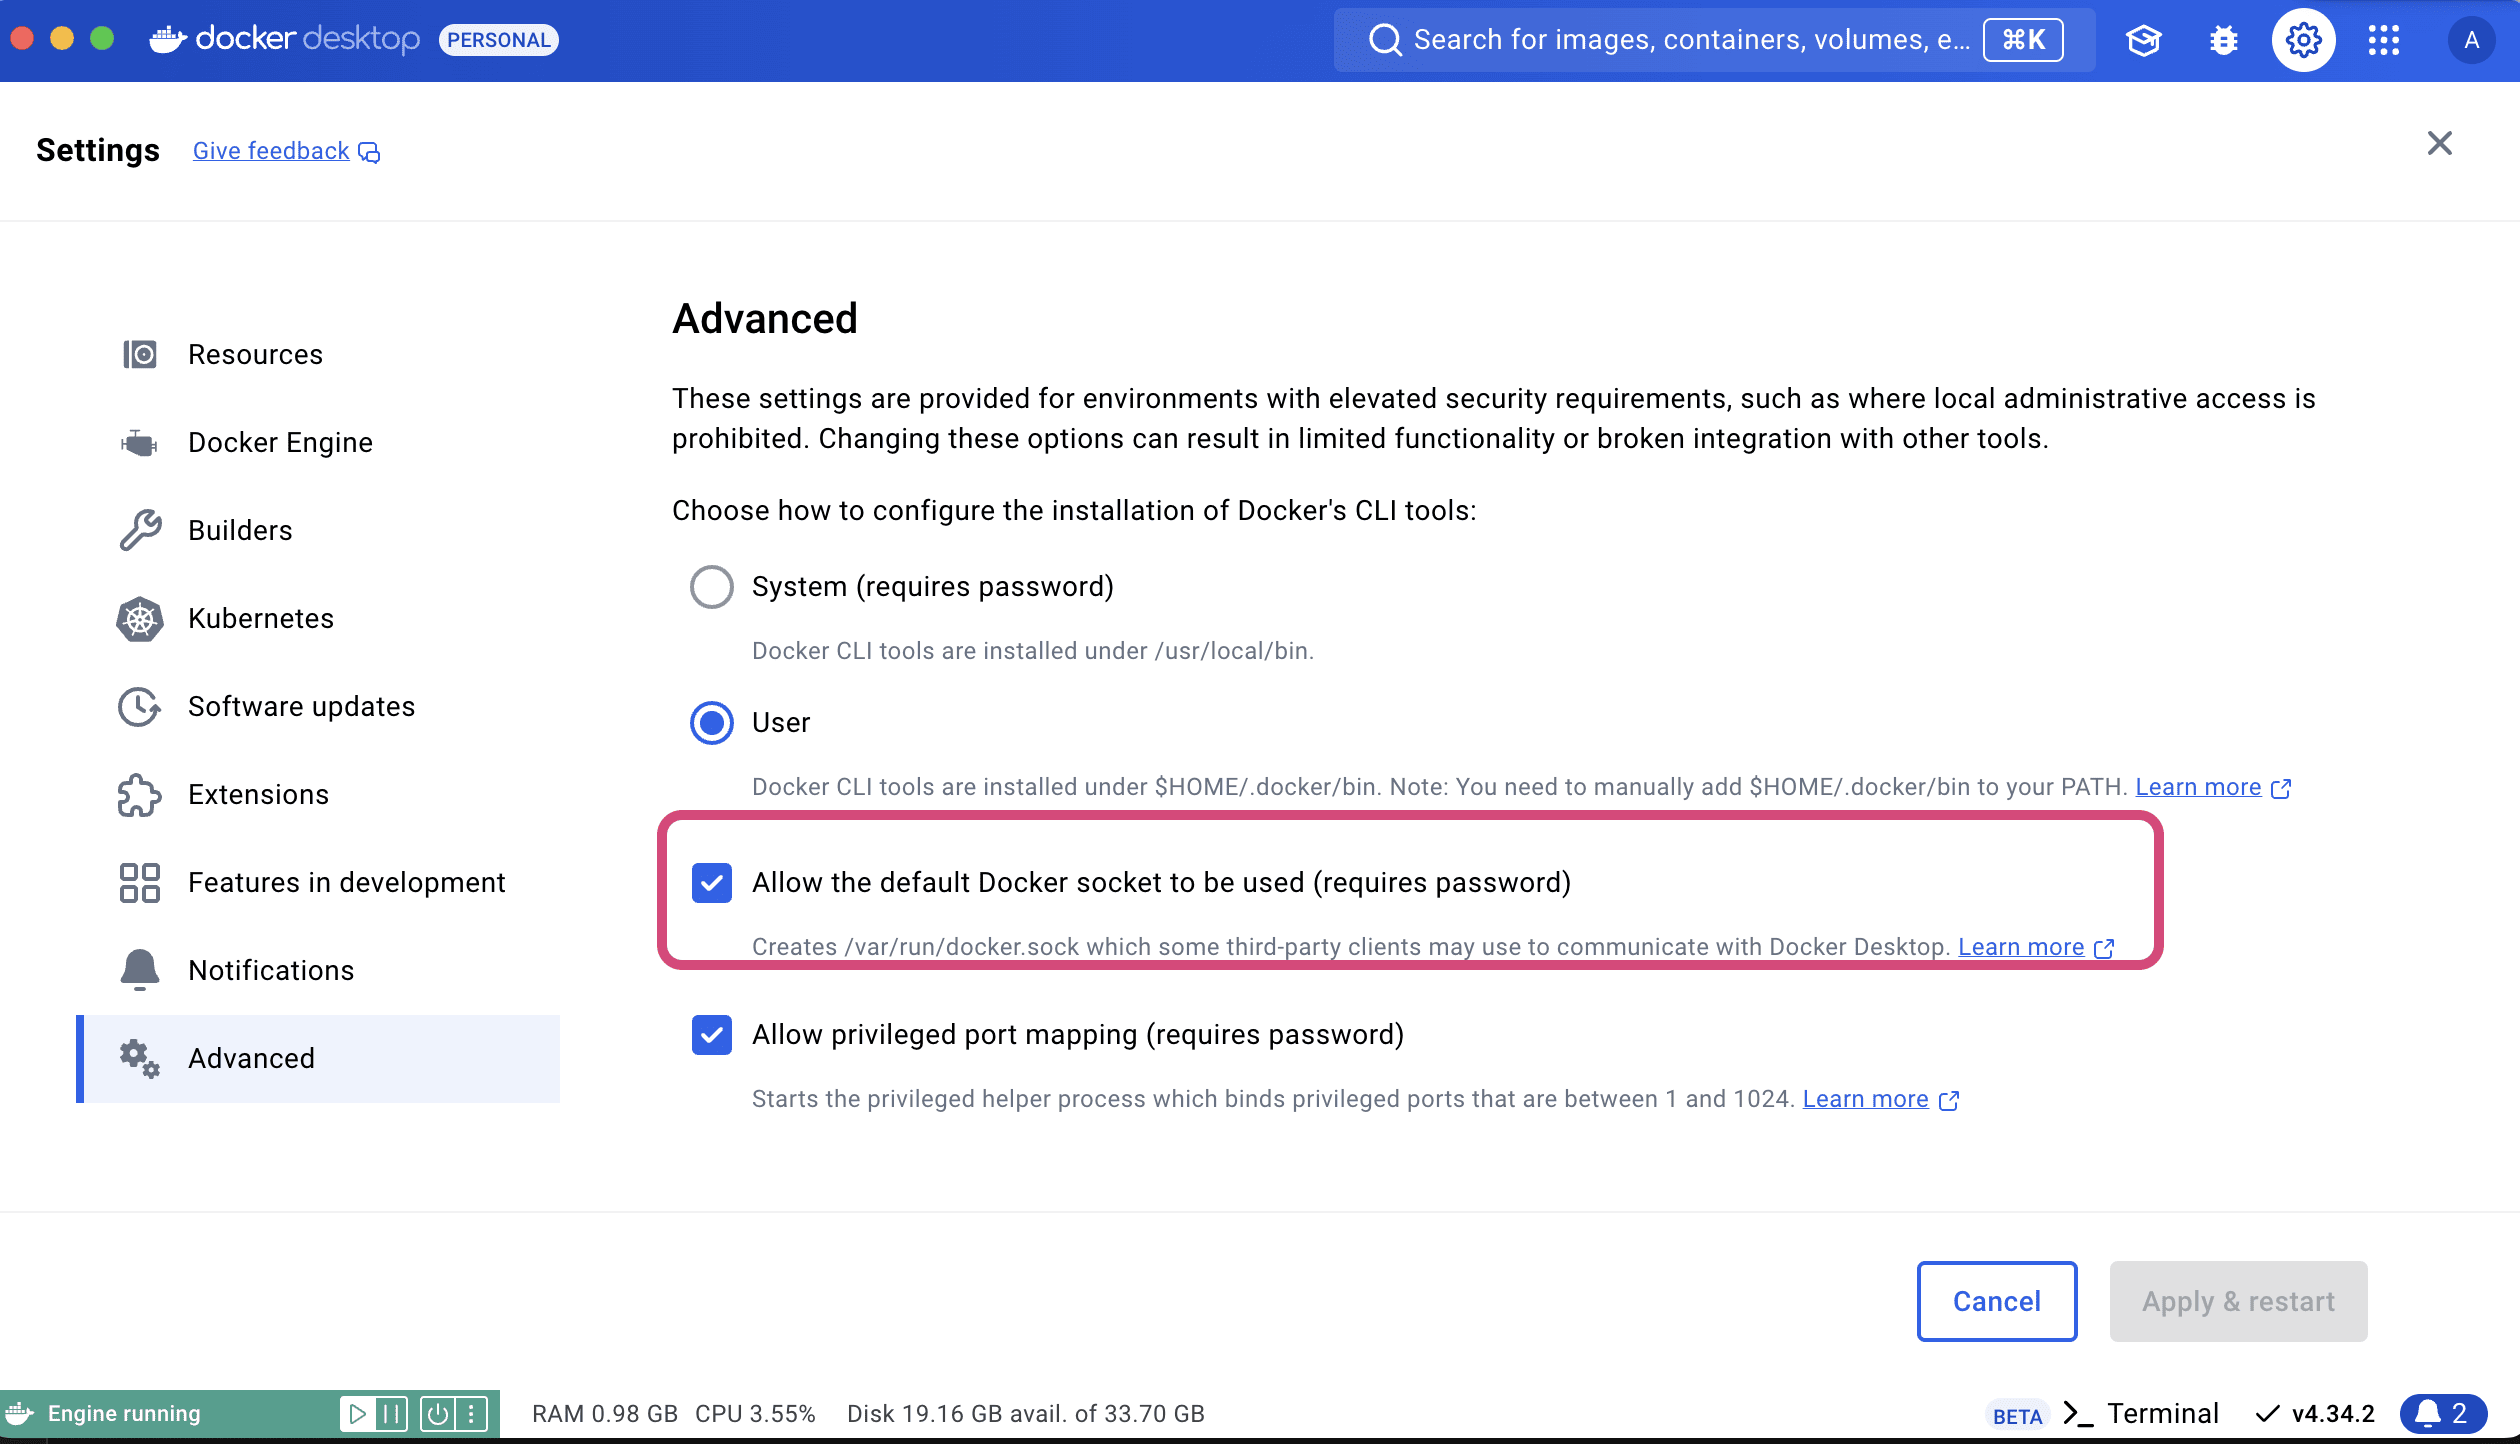
**1.4. Configure Docker Socket**
> [!NOTE]
> **Important macOS Configuration:** In Docker Desktop's preferences (Docker menu) → Settings → Advanced, enable "Allow the default Docker socket to be used (requires password)."
✅ **Docker is now installed!**
### Continue to [Step 2: Run Agent Zero](#step-2-run-agent-zero)
---
## Linux Installation
**1.1. Choose Installation Method**
You can install either Docker Desktop or docker-ce (Community Edition).
**Option A: Docker Desktop (Recommended for beginners)**
Follow the instructions for your specific Linux distribution [here](https://docs.docker.com/desktop/install/linux-install/).
**Option B: docker-ce (Lightweight alternative)**
Follow the installation instructions [here](https://docs.docker.com/engine/install/).
**1.2. Post-Installation Steps (docker-ce only)**
If you installed docker-ce, add your user to the `docker` group:
```bash
sudo usermod -aG docker $USER
```
Log out and back in, then authenticate:
```bash
docker login
```
**1.3. Launch Docker**
If you installed Docker Desktop, launch it from your applications menu.
✅ **Docker is now installed!**
> [!TIP]
> **Deploying on a VPS/Server?** For production deployments with reverse proxy, SSL, and domain configuration, see the [VPS Deployment Guide](vps-deployment.md).
---
## Step 2: Run Agent Zero
### 2.1. Pull the Agent Zero Docker Image
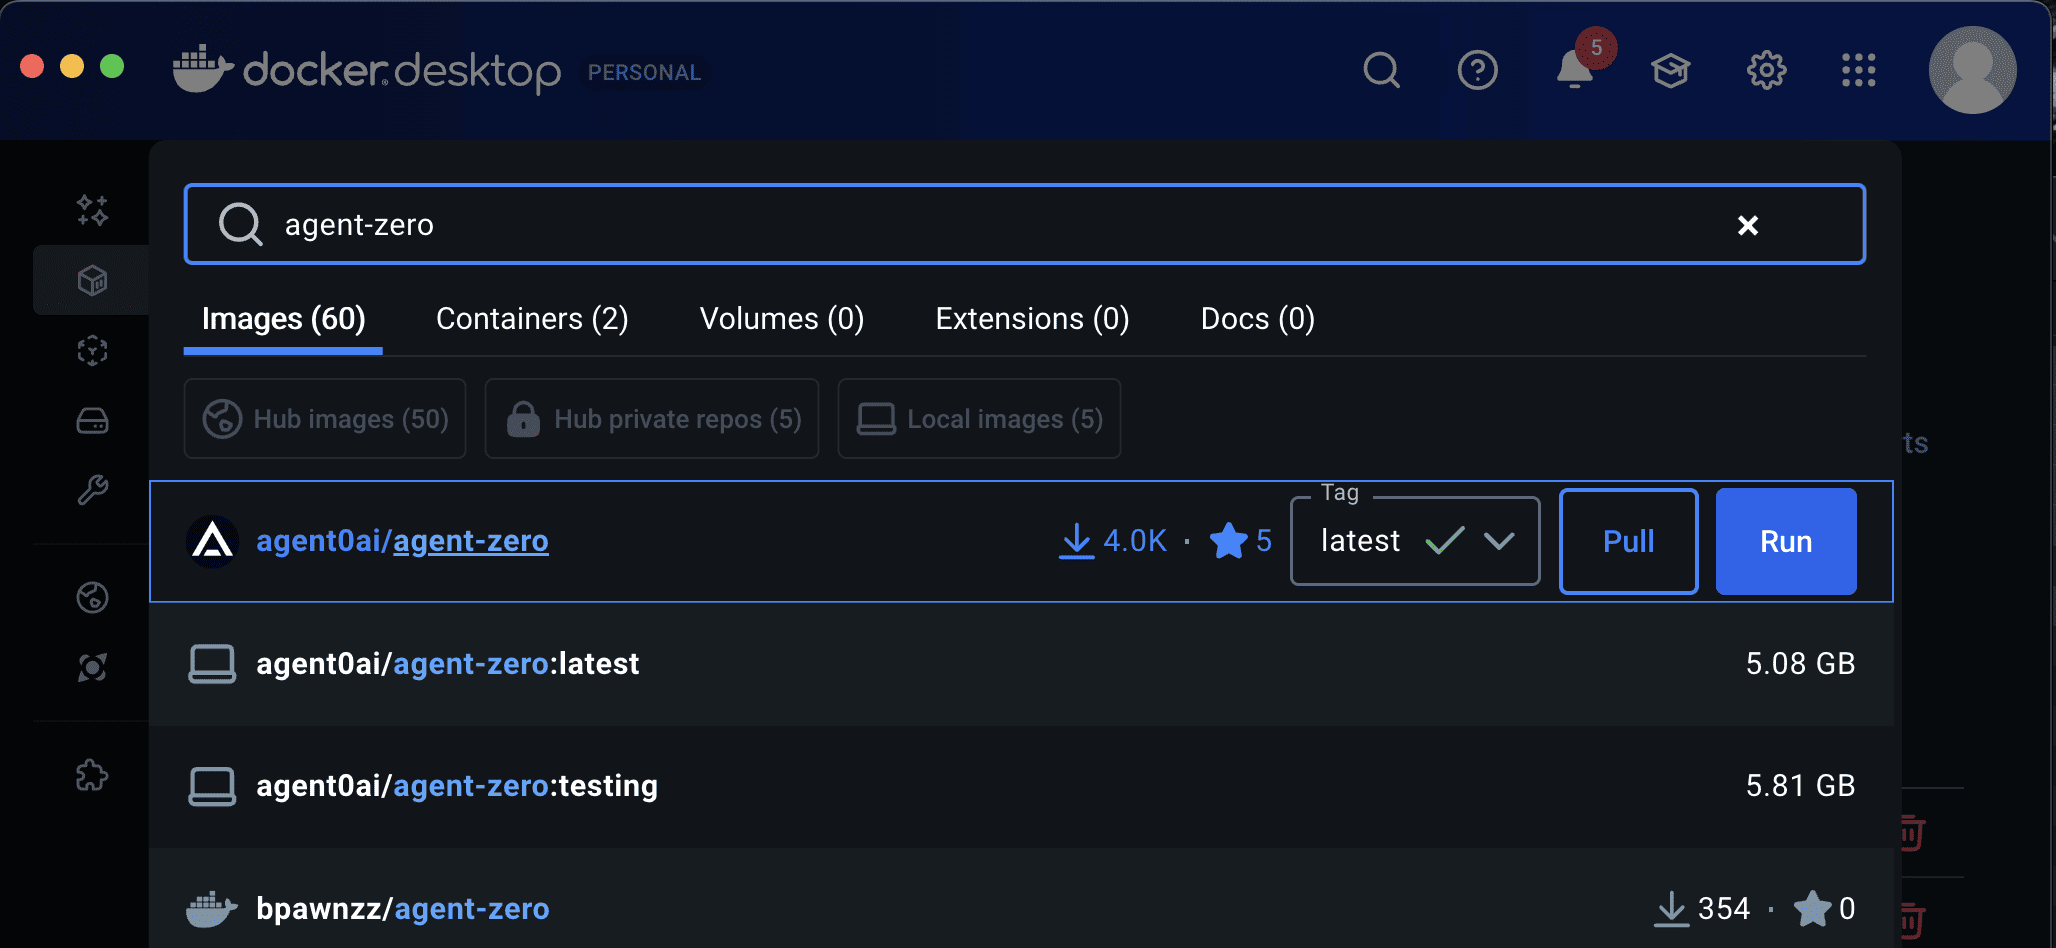
**Using Docker Desktop GUI:**
- Search for `agent0ai/agent-zero` in Docker Desktop
- Click the `Pull` button
- The image will be downloaded to your machine in a few minutes
**Using Terminal:**
```bash
docker pull agent0ai/agent-zero
```
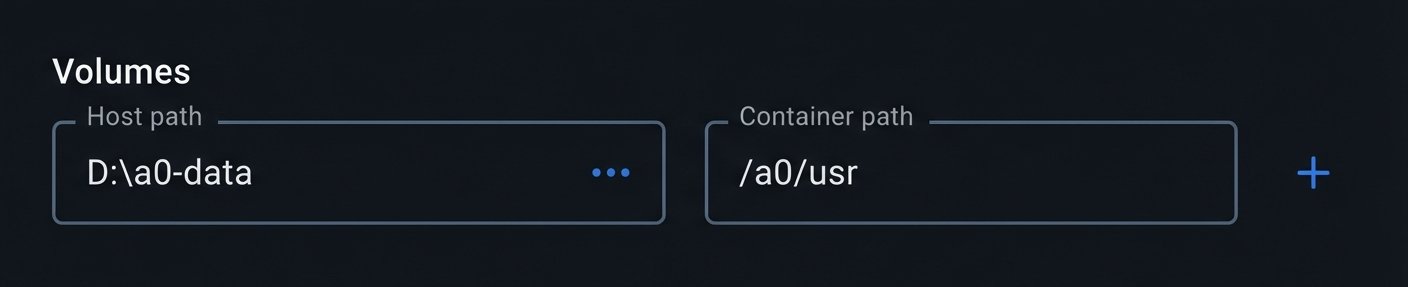
### 2.2. (Optional) Map Folders for Persistence
Choose or create a folder on your computer where Agent Zero will save its data.
### Setting up persistence is needed only if you want your data and files to remain available even after you delete the container.
You can pick any location you find convenient:
- **Windows:** `C:\agent-zero-data`
- **macOS/Linux:** `/home/user/agent-zero-data`
You can map just the `/a0/usr` directory (recommended) or individual subfolders of `/a0` to a local directory.
> [!CAUTION]
> Do **not** map the entire `/a0` directory: it contains the application code and can break upgrades.
> [!TIP]
> Choose a location that's easy to access and backup. All your Agent Zero data will be directly accessible in this directory.
### 2.3. Run the Container
**Using Docker Desktop GUI:**
- In Docker Desktop, go to the "Images" tab
- Click the `Run` button next to the `agent0ai/agent-zero` image
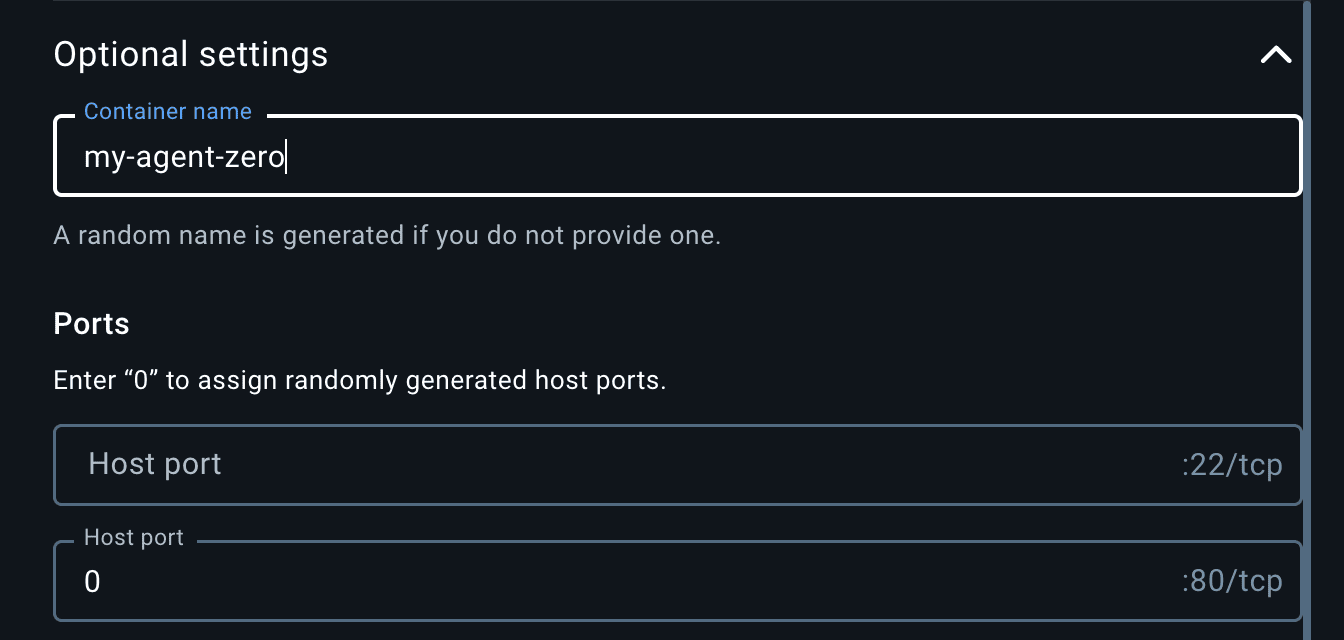
- Open the "Optional settings" menu
- **Ensure at least one host port is mapped to container port `80`** (set host port to `0` for automatic assignment)
- Click the `Run` button
The container will start and show in the "Containers" tab:
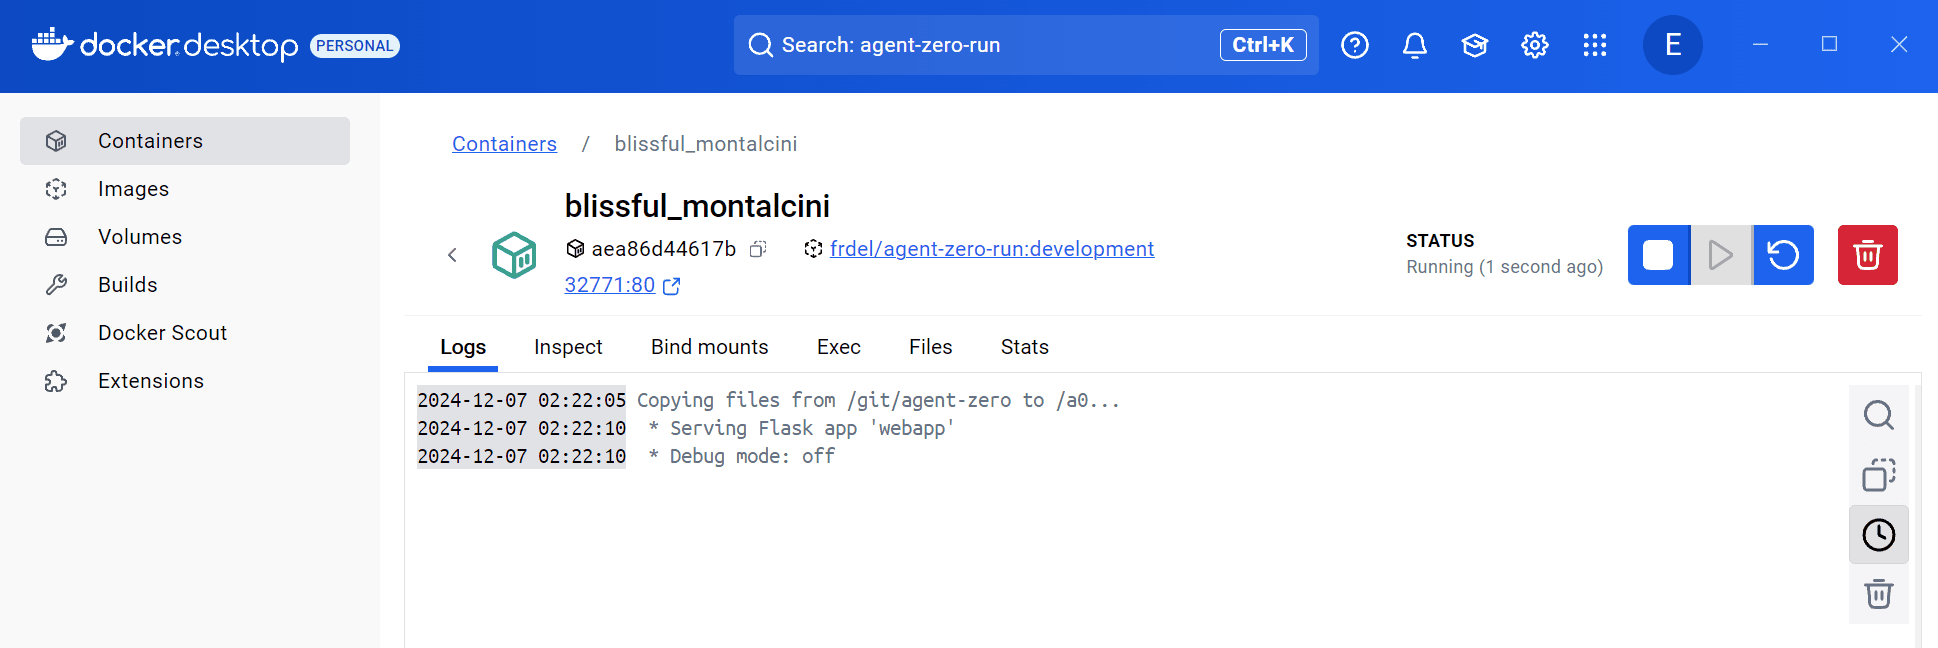
### 2.4. Access the Web UI
The framework will take a few seconds to initialize. Find the mapped port in Docker Desktop (shown as `:80`) or click the port right under the container ID:
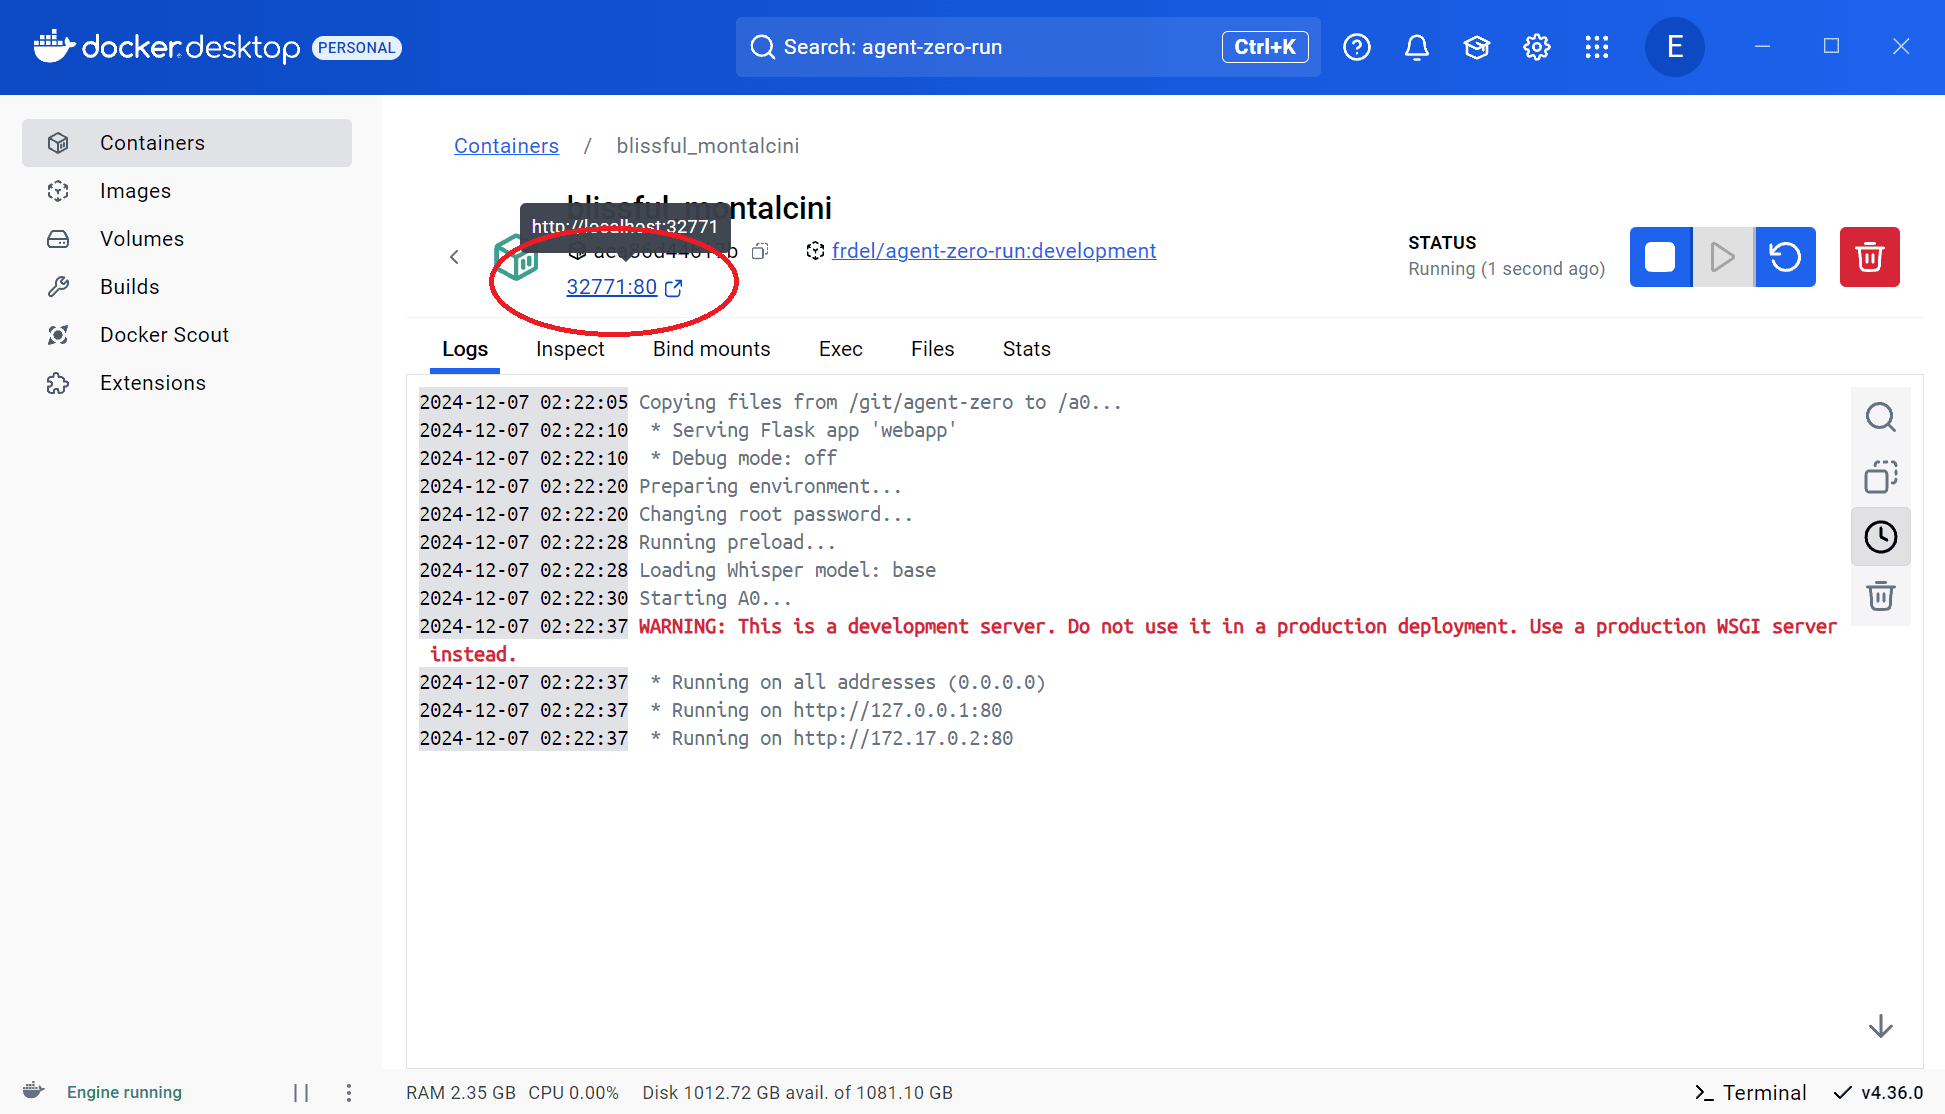
Open `http://localhost:` in your browser. The Web UI will open - Agent Zero is ready for configuration!
> [!TIP]
> You can also access the Web UI by clicking the port link directly under the container ID in Docker Desktop.
> [!NOTE]
> After starting the container, you'll find all Agent Zero files in your chosen directory. You can access and edit these files directly on your machine, and the changes will be immediately reflected in the running container.
**Running A0 using Terminal?**
```bash
docker run -p 0:80 -v /path/to/your/work_dir:/a0/usr agent0ai/agent-zero
```
- Replace `0` with a fixed port if you prefer (e.g., `50080:80`)
---
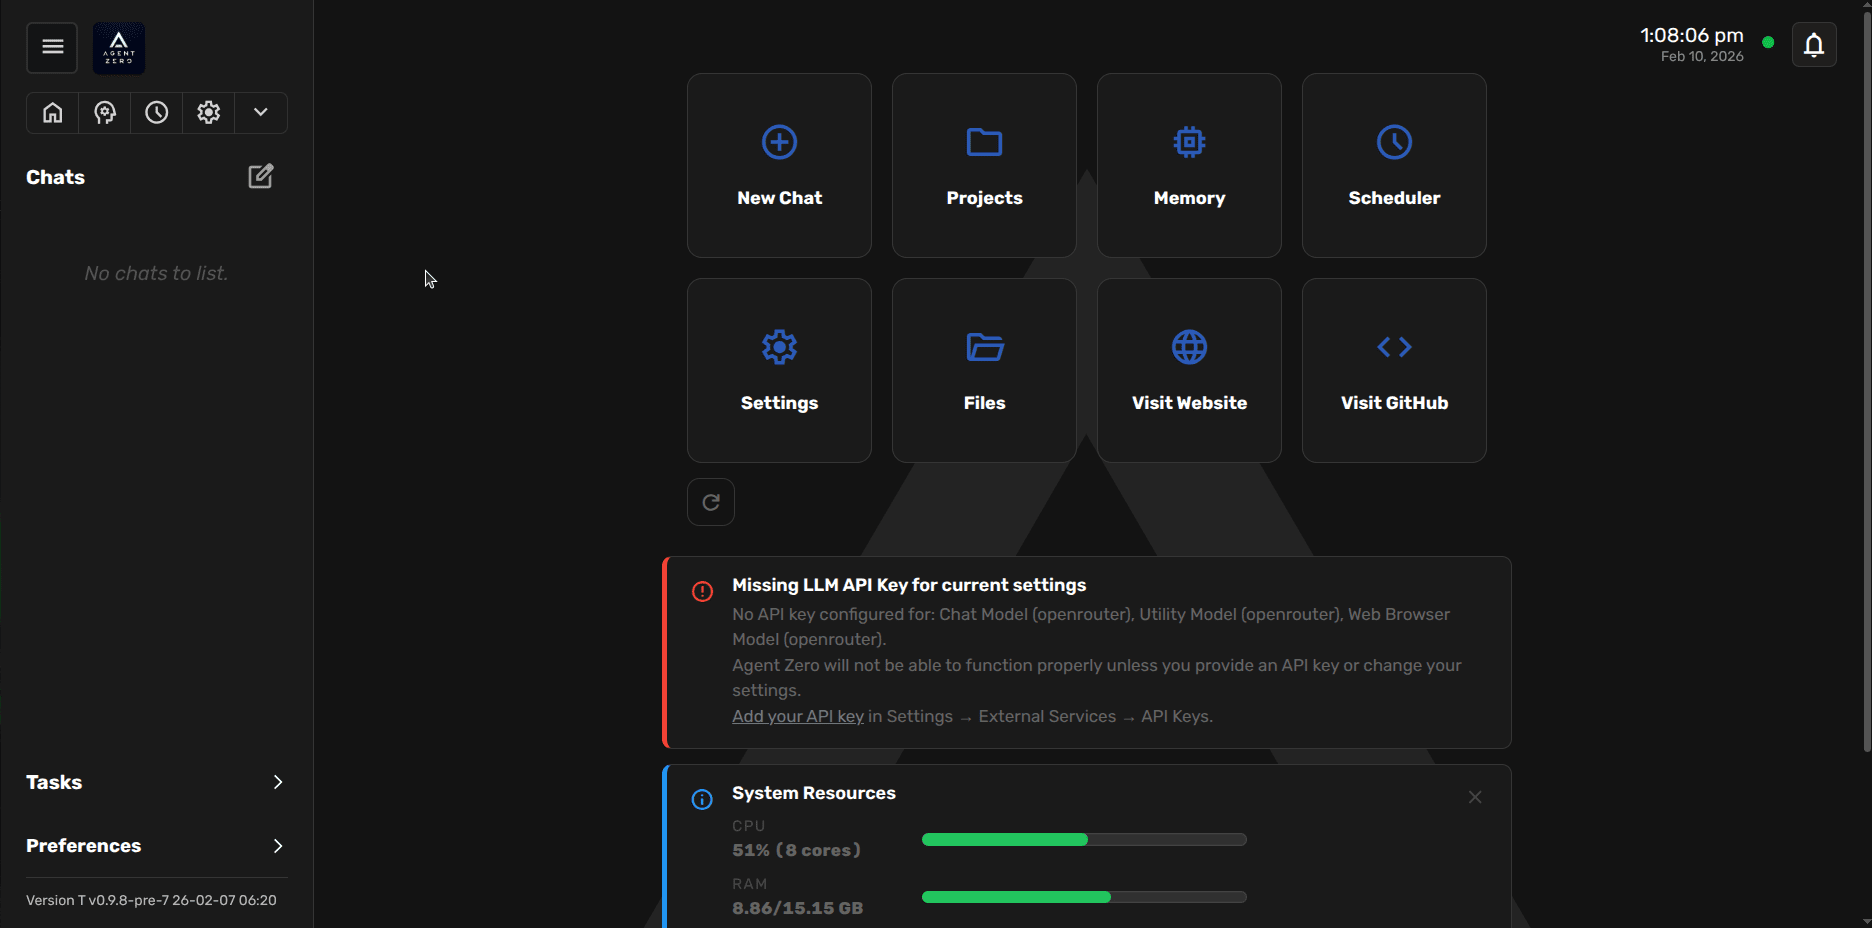
## Step 3: Configure Agent Zero
The UI will show a warning banner "Missing LLM API Key for current settings". Click on `Add your API key` to enter Settings and start configuring A0.
### Settings Configuration
Agent Zero provides a comprehensive settings interface to customize various aspects of its functionality. Access the settings by clicking the "Settings" button with a gear icon in the sidebar.
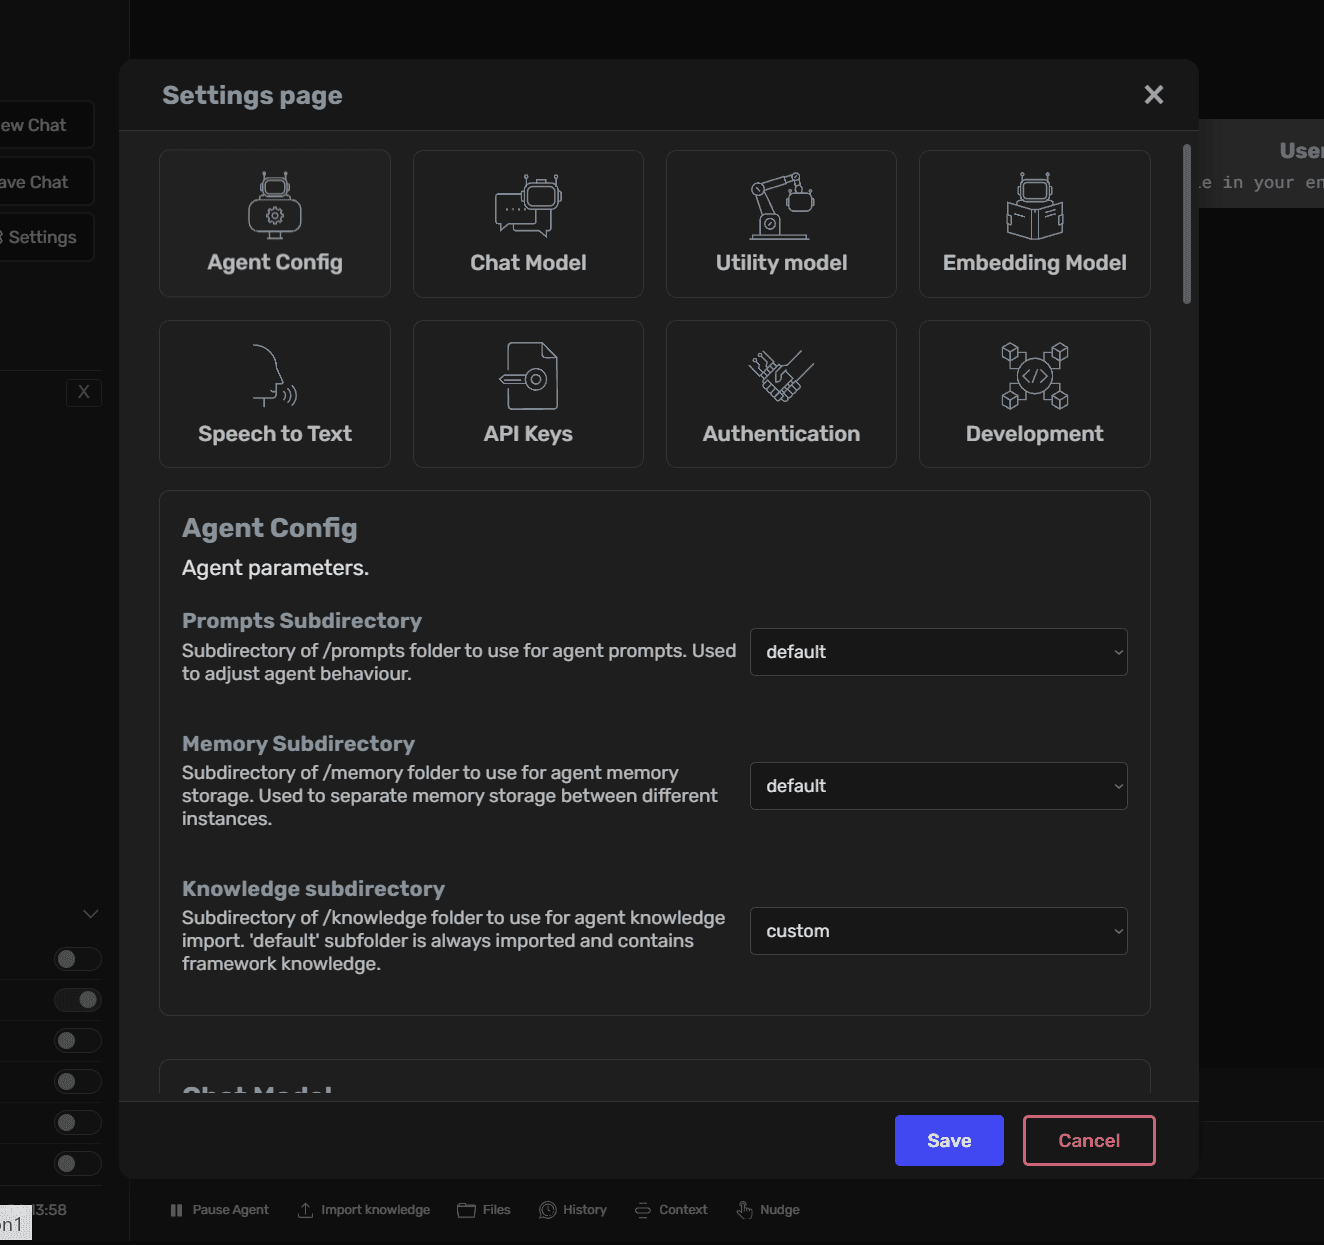
### Agent Configuration
- **Agent Profile:** Select the agent profile (e.g., `agent0`, `hacker`, `researcher`). Profiles can override prompts, tools, and extensions.
- **Memory Subdirectory:** Select the subdirectory for agent memory storage, allowing separation between different instances.
- **Knowledge Subdirectory:** Specify the location of custom knowledge files to enhance the agent's understanding.
> [!NOTE]
> Since v0.9.7, custom prompts belong in `/a0/agents//prompts/` rather than a shared `/prompts` folder. See the [Extensions guide](../developer/extensions.md#prompts) for details.
> [!NOTE]
> The Hacker profile is included in the main image. After launch, choose the **hacker** agent profile in Settings if you want the security-focused prompts and tooling. The "hacker" branch is deprecated.
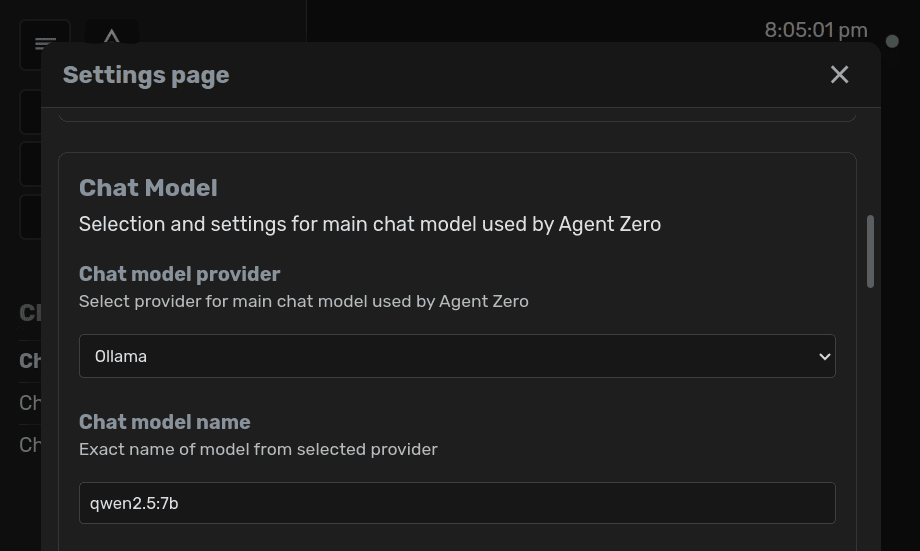
### Chat Model Settings
- **Provider:** Select the chat model provider (e.g., Anthropic)
- **Model Name:** Choose the specific model (e.g., claude-sonnet-4-5)
- **Context Length:** Set the maximum token limit for context window
- **Context Window Space:** Configure how much of the context window is dedicated to chat history
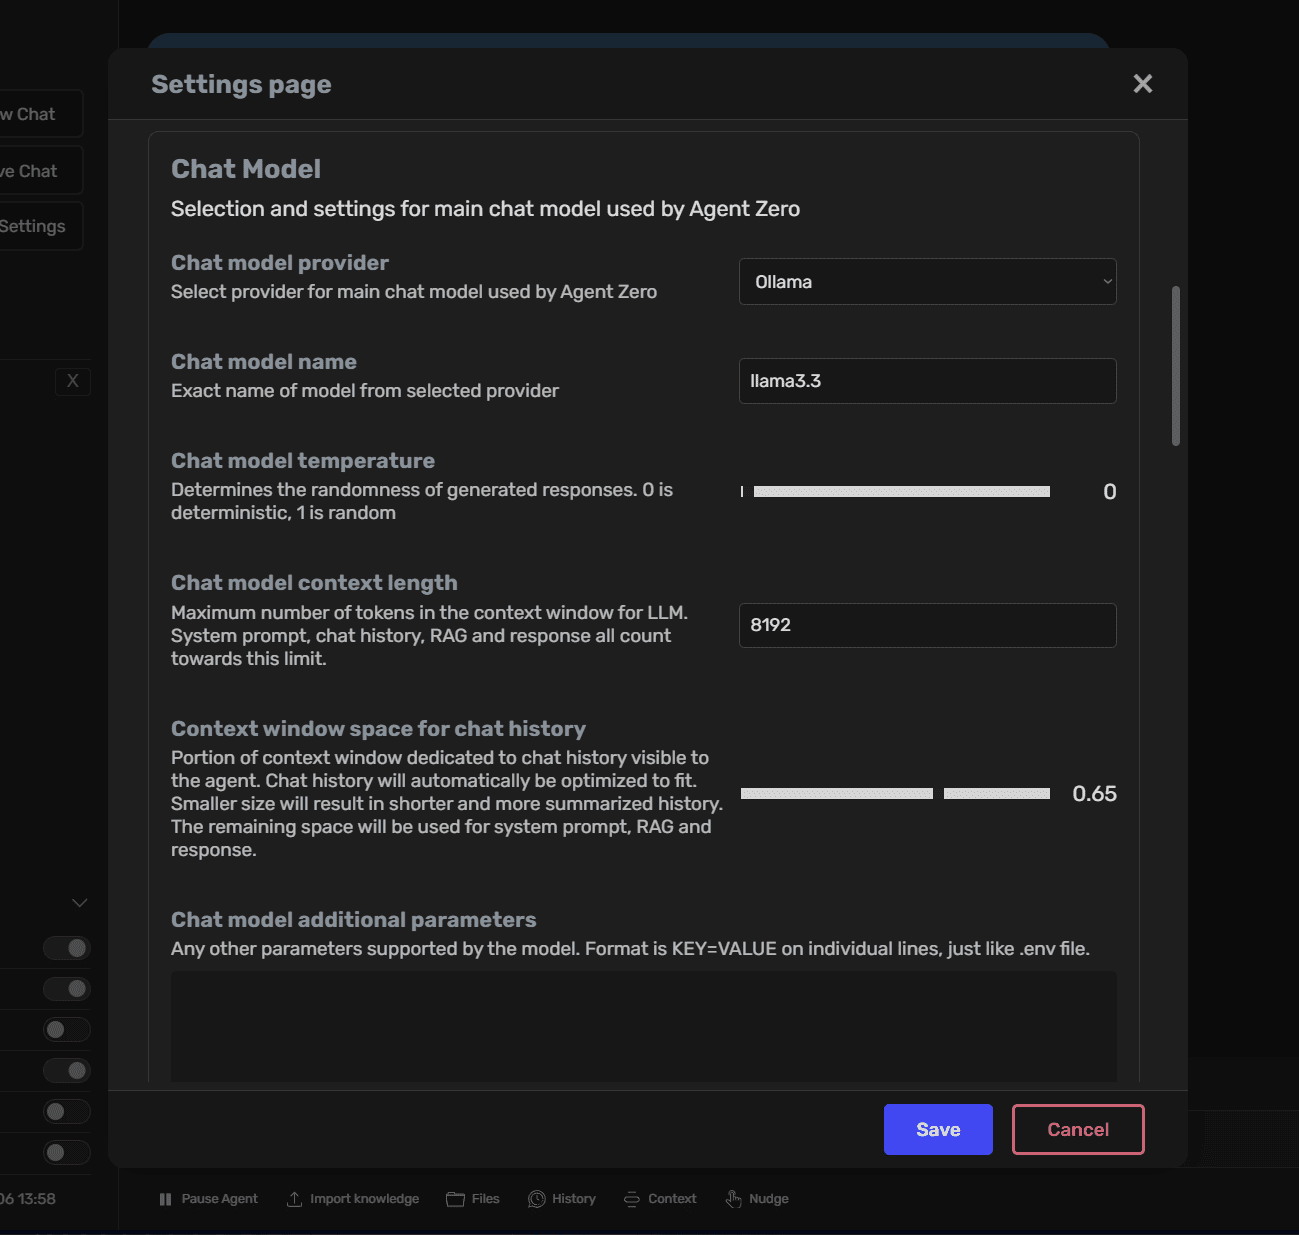
**Model naming is provider-specific.**
Use `claude-sonnet-4-5` for Anthropic, but use `anthropic/claude-sonnet-4-5` for OpenRouter. If you see "Invalid model ID," verify the provider and naming format on the provider website, or search the web for " model naming".
> [!TIP]
> **Context window tuning:** Set the total context window size first (for example, 100k), then adjust the chat history portion as a fraction of that total. A large fraction on a very large context window can still be enormous.
> [!TIP]
> **API URL:** URL of the API endpoint for the chat model - only needed for some providers like Ollama, LM Studio, Azure, etc.
### Utility Model Configuration
- **Provider & Model:** Select a model for utility tasks like memory organization and summarization
- **Temperature:** Adjust the determinism of utility responses
> [!NOTE]
> Utility models need to be strong enough to extract and consolidate memory reliably. Very small models (e.g., 4B) often fail at this; 70B-class models or high-quality cloud "flash/mini" models work best.
### Embedding Model Settings [Optional]
- **Provider:** Choose the embedding model provider (e.g., OpenAI)
- **Model Name:** Select the specific embedding model (e.g., text-embedding-3-small)
> [!NOTE]
> Agent Zero uses a local embedding model by default (runs on CPU), but you can switch to OpenAI embeddings like `text-embedding-3-small` or `text-embedding-3-large` if preferred.
### Speech to Text Options
- **Model Size:** Choose the speech recognition model size
- **Language Code:** Set the primary language for voice recognition
- **Silence Settings:** Configure silence threshold, duration, and timeout parameters for voice input
### API Keys
Configure API keys for various service providers directly within the Web UI. Click `Save` to confirm your settings.
> [!NOTE]
> **OpenAI API vs Plus subscription:** A ChatGPT Plus subscription does not include API credits. You must provide a separate API key for OpenAI usage in Agent Zero.
> [!TIP]
> For OpenAI-compatible providers (e.g., custom gateways or Z.AI/GLM), add the API key under **External Services → Other OpenAI-compatible API keys**, then select **OpenAI Compatible** as the provider in model settings.
> [!CAUTION]
> **GitHub Copilot Provider:** When using the GitHub Copilot provider, after selecting the model and entering your first prompt, the OAuth login procedure will begin. You'll find the authentication code and link in the output logs. Complete the authentication process by following the provided link and entering the code, then you may continue using Agent Zero.
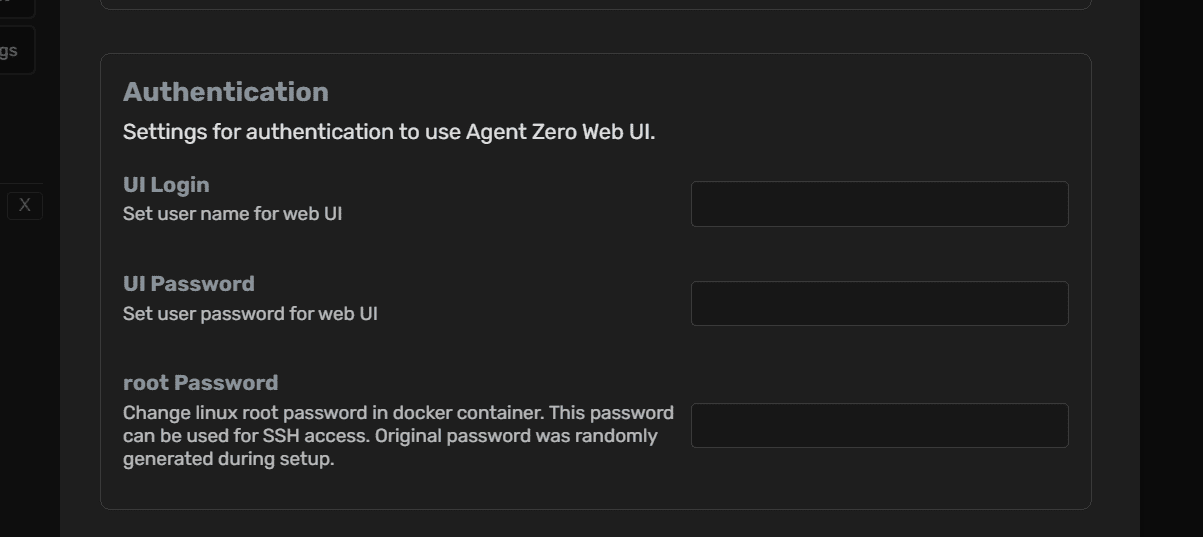
### Authentication
- **UI Login:** Set username for web interface access
- **UI Password:** Configure password for web interface security
- **Root Password:** Manage Docker container root password for SSH access
### Development Settings
- **RFC Parameters (local instances only):** Configure URLs and ports for remote function calls between instances
- **RFC Password:** Configure password for remote function calls
Learn more about Remote Function Calls in the [Development Setup guide](dev-setup.md#step-6-configure-ssh-and-rfc-connection).
> [!IMPORTANT]
> Always keep your API keys and passwords secure.
> [!NOTE]
> On Windows host installs (non-Docker), you must use RFC to run shell code on the host system. The Docker runtime handles this automatically.
---
## Choosing Your LLMs
The Settings page is the control center for selecting the Large Language Models (LLMs) that power Agent Zero. You can choose different LLMs for different roles:
| LLM Role | Description |
| --- | --- |
| `chat_llm` | This is the primary LLM used for conversations and generating responses. |
| `utility_llm` | This LLM handles internal tasks like summarizing messages, managing memory, and processing internal prompts. Using a smaller, less expensive model here can improve efficiency. |
| `browser_llm` | This LLM powers the browser agent for web navigation and interaction tasks. Vision support is recommended for better page understanding. |
| `embedding_llm` | The embedding model shipped with A0 runs on CPU and is responsible for generating embeddings used for memory retrieval and knowledge base lookups. Changing the `embedding_llm` will re-index all of A0's memory. |
**How to Change:**
1. Open Settings page in the Web UI.
2. Choose the provider for the LLM for each role (Chat model, Utility model, Browser model, Embedding model) and write the model name.
3. Click "Save" to apply the changes.
### Important Considerations
#### Model Naming by Provider
Use the naming format required by your selected provider:
| Provider | Model Name Format | Example |
| --- | --- | --- |
| OpenAI | Model name only | `claude-sonnet-4-5` |
| OpenRouter | Provider prefix mostly required | `anthropic/claude-sonnet-4-5` |
| Ollama | Model name only | `gpt-oss:20b` |
> [!TIP]
> If you see "Invalid model ID," verify the provider and naming format on the provider website, or search the web for " model naming".
#### Context Window & Memory Split
- Set the **total context window** (e.g., 100k) first.
- Then tune the **chat history portion** as a fraction of that total.
- Extremely large totals can make even small fractions very large; adjust thoughtfully.
#### Utility Model Guidance
- Utility models handle summarization and memory extraction.
- Very small models (≈4B) usually fail at reliable context extraction.
- Aim for ~70B class models or strong cloud "flash/mini" models for better results.
#### Reasoning/Thinking Models
- Reasoning can increase cost and latency. Some models perform better **without** reasoning.
- If a model supports it, disable reasoning via provider-specific parameters (e.g., Venice `disable_thinking=true`).
---
## Installing and Using Ollama (Local Models)
Ollama is a powerful tool that allows you to run various large language models locally.
---
### Windows Ollama Installation
Download and install Ollama from the official website:
Once installed, continue to [Pulling Models](#pulling-models).
---
### macOS Ollama Installation
**Using Homebrew:**
```bash
brew install ollama
```
**Using Installer:**
Download from the [official website](https://ollama.com/).
Once installed, continue to [Pulling Models](#pulling-models).
---
### Linux Ollama Installation
Run the installation script:
```bash
curl -fsSL https://ollama.com/install.sh | sh
```
Once installed, continue to [Pulling Models](#pulling-models).
---
### Pulling Models
**Finding Model Names:**
Visit the [Ollama model library](https://ollama.com/library) for a list of available models and their corresponding names. Ollama models are referenced by **model name only** (for example, `llama3.2`).
**Pull a model:**
```bash
ollama pull
```
Replace `` with the name of the model you want to use. For example: `ollama pull mistral-large`
### Configuring Ollama in Agent Zero
1. Once you've downloaded your model(s), select it in the Settings page of the GUI.
2. Within the Chat model, Utility model, or Embedding model section, choose **Ollama** as provider.
3. Write your model code as expected by Ollama, in the format `llama3.2` or `qwen2.5:7b`
4. Provide your API base URL to your Ollama API endpoint, usually `http://host.docker.internal:11434`
5. Click `Save` to confirm your settings.
> [!NOTE]
> If Agent Zero runs in Docker and Ollama runs on the host, ensure port **11434** is reachable from the container. If both services are in the same Docker network, you can use `http://:11434` instead of `host.docker.internal`.
### Managing Downloaded Models
**Listing downloaded models:**
```bash
ollama list
```
**Removing a model:**
```bash
ollama rm
```
> [!TIP]
> Experiment with different model combinations to find the balance of performance and cost that best suits your needs. E.g., faster and lower latency LLMs will help, and you can also use `faiss_gpu` instead of `faiss_cpu` for the memory.
---
## How to Update Agent Zero
> [!NOTE]
> Since v0.9, Agent Zero includes a Backup & Restore workflow in the Settings UI. This is the **safest** way to upgrade Docker instances.
### Recommended Update Process (Docker)
1. **Keep the old container running** and note its port.
2. **Pull the new image** (`agent0ai/agent-zero:latest`).
3. **Start a new container** on a different host port.
4. In the **old** instance, open **Settings → Backup & Restore** and create a backup.
5. In the **new** instance, restore that backup from the same panel.
> [!TIP]
> If the new instance fails to load settings, remove `/a0/usr/settings.json` and restart to regenerate default settings.
---
## Using Agent Zero on Your Mobile Device
Agent Zero can be accessed from mobile devices and other computers using the built-in **Tunnel feature**.
### Recommended: Using Tunnel (Remote Access)
The Tunnel feature allows secure access to your Agent Zero instance from anywhere:
1. Open Settings in the Web UI
2. Navigate to the **External Services** tab
3. Click on **Flare Tunnel** in the navigation menu
4. Click **Create Tunnel** to generate a secure HTTPS URL
5. Share this URL to access Agent Zero from any device
> [!IMPORTANT]
> **Security:** Always set a username and password in Settings → Authentication before creating a tunnel to secure your instance on the internet.
For complete details on tunnel configuration and security considerations, see the [Remote Access via Tunneling](../guides/usage.md#remote-access-via-tunneling) section in the Usage Guide.
### Alternative: Local Network Access
If you prefer to keep access limited to your local network:
1. Find the mapped port in Docker Desktop (format: `:80`, e.g., `32771:80`)
2. Access from the same computer: `http://localhost:`
3. Access from other devices on the network: `http://:`
> [!TIP]
> Find your computer's IP address with `ipconfig` (Windows) or `ifconfig`/`ip addr` (macOS/Linux). It's usually in the format `192.168.x.x` or `10.0.x.x`.
For developers or users who need to run Agent Zero directly on their system, see the [In-Depth Guide for Full Binaries Installation](dev-setup.md).
---
## Advanced: Automated Configuration via Environment Variables
Agent Zero settings can be automatically configured using environment variables with the `A0_SET_` prefix in your `.env` file. This enables automated deployments without manual configuration.
**Usage:**
Add variables to your `.env` file in the format:
```env
A0_SET_{setting_name}={value}
```
**Examples:**
```env
# Model configuration
A0_SET_chat_model_provider=anthropic
A0_SET_chat_model_name=claude-3-5-sonnet-20241022
A0_SET_chat_model_ctx_length=200000
# Memory settings
A0_SET_memory_recall_enabled=true
A0_SET_memory_recall_interval=5
# Agent configuration
A0_SET_agent_profile=custom
A0_SET_agent_memory_subdir=production
```
**Docker usage:**
When running Docker, you can pass these as environment variables:
```bash
docker run -p 50080:80 \
-e A0_SET_chat_model_provider=anthropic \
-e A0_SET_chat_model_name=claude-3-5-sonnet-20241022 \
agent0ai/agent-zero
```
**Notes:**
- These provide initial default values when settings.json doesn't exist or when new settings are added to the application. Once a value is saved in settings.json, it takes precedence over these environment variables.
- Sensitive settings (API keys, passwords) use their existing environment variables
- Container/process restart required for changes to take effect
---
### Manual Migration (Legacy or Non-Docker)
If you are migrating from older, non-Docker setups, A0 handles the migration of legacy folders and files automatically at runtime. The right place to save your files and directories is `a0/usr`.
## Conclusion
After following the instructions for your specific operating system, you should have Agent Zero successfully installed and running. You can now start exploring the framework's capabilities and experimenting with creating your own intelligent agents.
**Next Steps:**
- For production server deployments, see the [VPS Deployment Guide](vps-deployment.md)
- For development setup and extensions, see the [Development Setup Guide](dev-setup.md)
- For remote access via tunnel, see [Remote Access via Tunneling](../guides/usage.md#remote-access-via-tunneling)
If you encounter any issues during the installation process, please consult the [Troubleshooting section](../guides/troubleshooting.md) of this documentation or refer to the Agent Zero [Skool](https://www.skool.com/agent-zero) or [Discord](https://discord.gg/B8KZKNsPpj) community for assistance.


 ✅ **Docker is now installed!**
### Continue to [Step 2: Run Agent Zero](#step-2-run-agent-zero)
---
##
✅ **Docker is now installed!**
### Continue to [Step 2: Run Agent Zero](#step-2-run-agent-zero)
---
##