# gRPC UI
[](https://travis-ci.com/github/fullstorydev/grpcui/branches)
[](https://goreportcard.com/report/github.com/fullstorydev/grpcui)
`grpcui` is a command-line tool that lets you interact with gRPC servers via a browser.
It's sort of like [Postman](https://www.getpostman.com/), but for gRPC APIs instead of
REST.
In some ways, this is like an extension to [grpcurl](https://github.com/fullstorydev/grpcurl).
Whereas `grpcurl` is a command-line interface, `grpcui` provides a web/browser-based
GUI. This lets you interactively construct requests to send to a gRPC server.
With this tool you can also browse the schema for gRPC services, which is presented as a
list of available endpoints. This is enabled either by querying a server that supports
[server reflection](https://github.com/grpc/grpc/blob/master/src/proto/grpc/reflection/v1alpha/reflection.proto),
by reading proto source files, or by loading in compiled "protoset" files (files that contain
encoded file [descriptor protos](https://github.com/google/protobuf/blob/master/src/google/protobuf/descriptor.proto)).
In fact, the way the tool transforms JSON request data into a binary encoded protobuf
is using that very same schema. So, if the server you interact with does not support
reflection, you will either need the proto source files that define the service or need
protoset files that `grpcui` can use.
This repo also provides two library packages
1. `github.com/fullstorydev/grpcui`: This package contains the building blocks for embedding a
gRPC web form into any Go HTTP server. It has functions for accessing the HTML form, the
JavaScript code that powers it, as well as a sample CSS file, for styling the form.
2. `github.com/fullstorydev/grpcui/standalone`: This package goes a step further and supplies
a single, simple HTTP handler that provides the entire gRPC web UI. You can just wire this
handler into your HTTP server to embed a gRPC web page that looks exactly like the one you
see when you use the `grpcui` command-line program. This single handler uses the above
package but also supplies the enclosing HTML page, some other script dependencies (jQuery
and jQuery-UI), and additional CSS and image resources.
## Features
`grpcui` supports all kinds of RPC methods, including streaming methods. However, it requires
you to construct the entire stream of request messages all at once and then renders the entire
resulting stream of response messages all at once (so you can't interact with bidirectional
streams the way that `grpcurl` can).
`grpcui` supports both plain-text and TLS servers and has numerous options for TLS
configuration. It also supports mutual TLS, where the client is required to present a
client certificate.
As mentioned above, `grpcui` works seamlessly if the server supports the reflection
service. If not, you can supply the `.proto` source files or you can supply protoset
files (containing compiled descriptors, produced by `protoc`) to `grpcui`.
The web UI allows you to set request metadata in addition to defining the request message data.
When defining request message data, it uses a dynamic HTML form that supports data entry for
all possible kinds of protobuf messages, including rich support for well-known types (such as
`google.protobuf.Timestamp`), one ofs, and maps.
In addition to entering the data via HTML form, you can also enter the data in JSON format,
by typing or pasting the entire JSON request body into a text form.
Upon issuing an RPC, the web UI shows all gRPC response metadata, including both headers and
trailers sent by the server. And, of course, it shows a human-comprehensible response body, in
the form of an HTML table.
## Installation
### From Source
You can use the `go` tool to install `grpcui`:
```shell
go get github.com/fullstorydev/grpcui/...
go install github.com/fullstorydev/grpcui/cmd/grpcui
```
This installs the command into the `bin` sub-folder of wherever your `$GOPATH`
environment variable points. If this directory is already in your `$PATH`, then
you should be good to go.
If you have already pulled down this repo to a location that is not in your
`$GOPATH` and want to build from the sources, you can `cd` into the repo and then
run `make install`.
If you encounter compile errors, you could have out-dated versions of `grpcui`'s
dependencies. You can update the dependencies by running `make updatedeps`.
## Usage
The usage doc for the tool explains the numerous options:
```shell
grpcui -help
```
Most of the flags control how the program connects to the gRPC server that to which
requests will be sent. However, there is one flag that controls `grpcui` itself: the
`-port` flag controls what port the HTTP server should use to expose the web UI. If
no port is specified, an ephemeral port will be used (so likely a different port each
time it is run, allocated by the operating system).
### Web Form
When you run `grpcui`, it will show you a URL to put into a browser in order to access
the web UI.
```
$ grpcui -plaintext localhost:12345
gRPC Web UI available at http://127.0.0.1:60551/...
```
When you navigate to this URL, you are presented with the user interface:

The top two listboxes allow you to select the service and method of the RPC to issue.
Once a selection is made, the panel below will show a form that allows you to define an
RPC request. The form is constructed, dynamically, based on the actual request message
structure of the selected RPC.
You'll notice a second tab that lets you view (and edit) the raw JSON value for the
request data. This can be useful to copy+paste a large request message, without having
to point-and-click to define each field value, one at a time.
The third tab shows the response data. This tab is grayed out and disabled until you
actually click the "Invoke" button, which can be found at the bottom of the page.
### Request Form
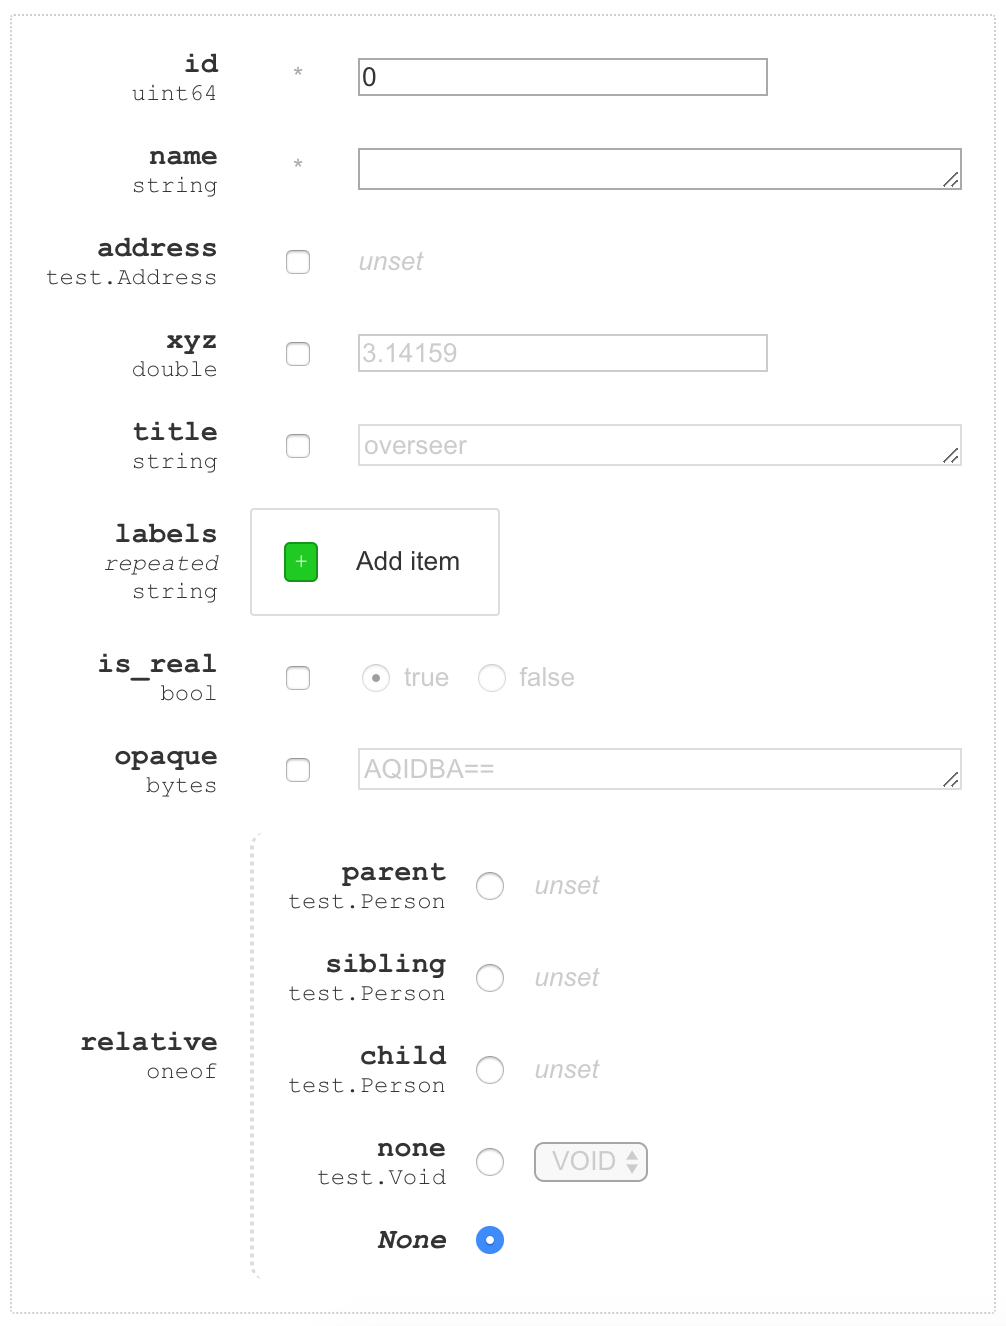
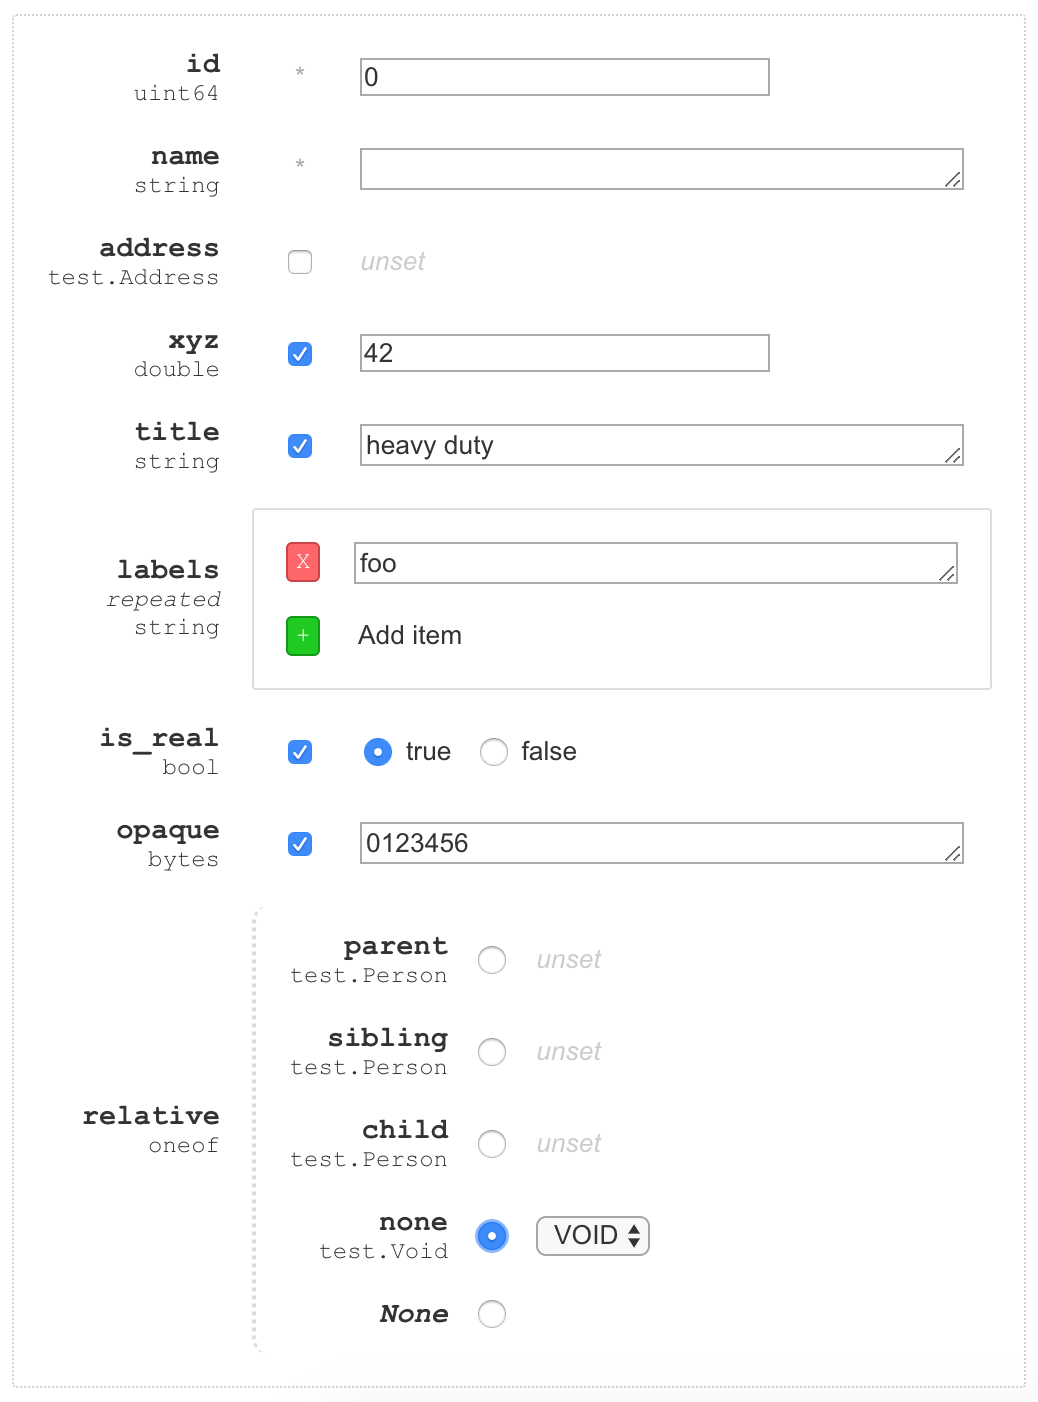
The first thing to note about the form is that it will generally be a table, where each row
is a field. The table has three important columns:
1. The first column shows the name and type of the field.
2. The second columns indicates the "cardinality" of the field. Typical fields are
optional. The second column for optional fields is a checkbox indicating whether the
field is present or not. If the field is not present, its default value is assumed.
Repeated fields show buttons in this column for adding and deletig values. The green
"+" allows you to add values to the repeated field. The red "x" next to a value will
remove that value. Finally, if the field is required (only supported in syntax
"proto2"), the column will contain only an asterisk.
3. The third column shows the value of the field. If the field is absent, this will show
the default value for the field. Fields that are nested messages show "unset", but
scalar types show their default (usually the type's zero value, but default values are
configurable when using syntax "proto2"). Absent fields are also not editable -- you
must first check the box in column two to make the field present before editing its
value. Repeated fields show a nested table that occupies columns two and three and
allows for adding and removing values.
Fields whose type is a nested message will include a nested table in column three. This
nested table has its own three columns and one row per field therein.
One-ofs are rendered a little differently. Instead of two columns indicating the presence
and value of the field, they include a nested table showing all of the possible fields
in the one-of. However, the middle column is a radio button instead of a checkbox, so that
only one of the fields can be present at any given time. In addition to a row for each
field in the one-of, there is also an option named *None*, which indicates a one-of where
no value is set.
Here's an example form for a message that has two required fields (`id` and `name`), one
repeated field (`labels`), a handful of normal optional fields, and a single one-of that
has four options. In the first image, no values are present (except, of course, for the
required fields at the top). In the second, several field values are present.
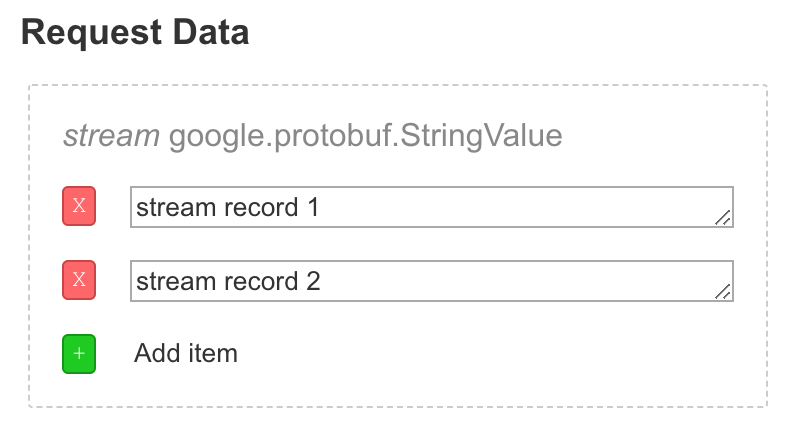
For RPCs that accept a *stream* of requests, the web form allows the user to define multiple
messages in the stream. It defaults to a single request, but the user can remove it to send none
or can send many. A stream resembles a repeated field, but the repeated "thing" is the entire
request:
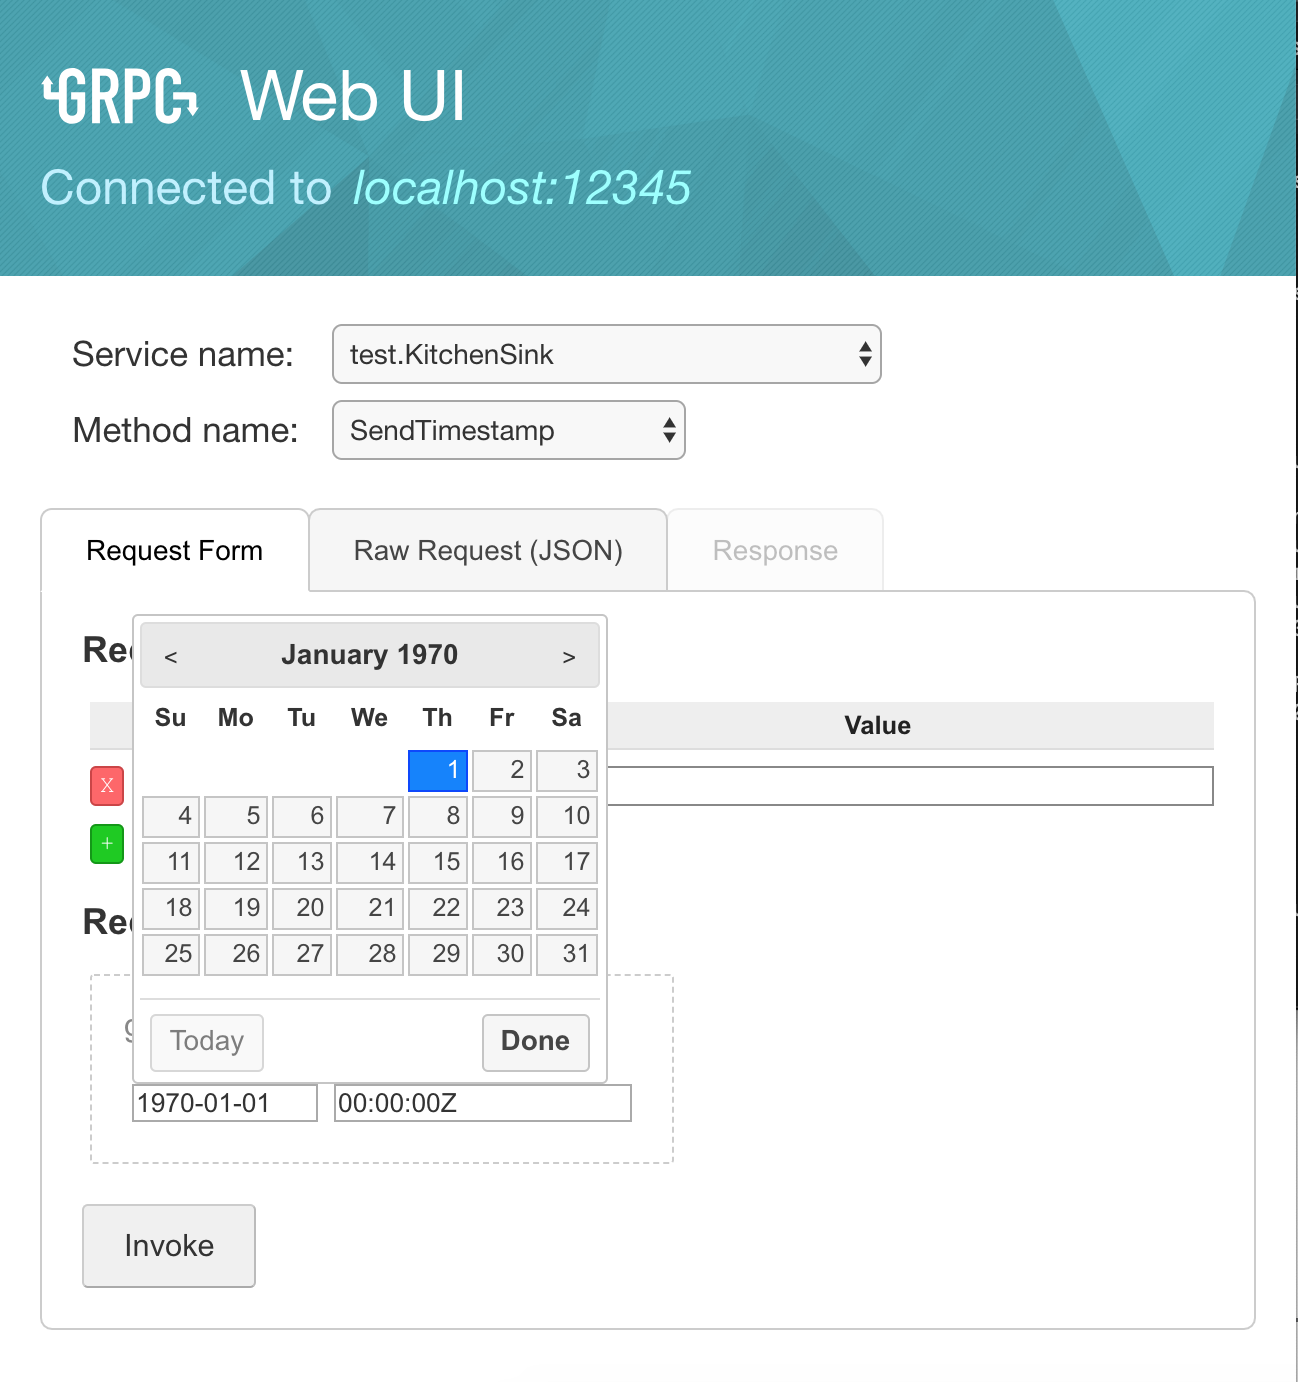
That last example also shows how well-known message types get special treatment. In that example,
the request type is `google.protobuf.StringValue`. Instead of showing a form for a message with a
single field named `value` with type `string`, the UI is simple and the "boxing" ceremony is
elided. It instead just shows a simple textbox for entering the string value.
A more interesting example of how well-known message types are treated is `google.protobuf.Timestamp`,
where a date picker is shown:
### Raw Request JSON
The second tab lets you view the JSON representation of the request data you have defined on the
first tab. You can also directly edit the JSON data -- including pasting in an entire JSON message.
The JSON representation uses the standard [JSON mapping for Protocol Buffers](https://developers.google.com/protocol-buffers/docs/proto3#json).
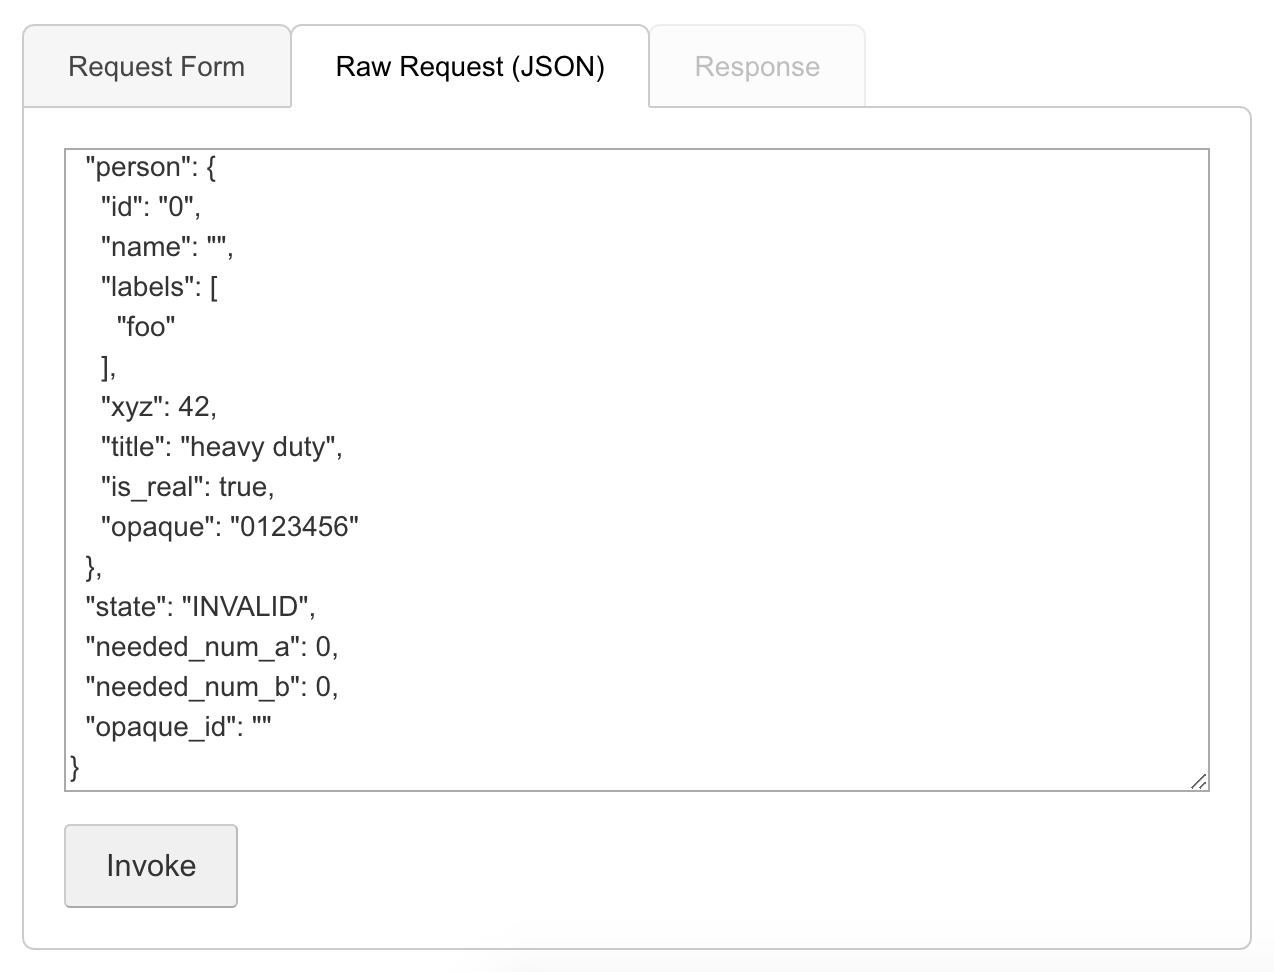
When working with an RPC that has a streaming request, the JSON data will be a JSON array, where
each element is a single message in the stream.
### Responses
When the "Invoke" button is pressed, the request data is sent to the server and the selected RPC
method is invoked. The web form will then navigate to the third tab to show the server's response.
The response tab has three sections:
1. Response Headers: Any response header metadata is shown here.
2. Response Data: Any response messages are shown here as are any error messages. RPC methods with
a streaming response may show both message data *and* an error. Error messages show the gRPC
status code and the server-defined message text.
3. Response Trailers: Finally, any response trailer metadata is shown.
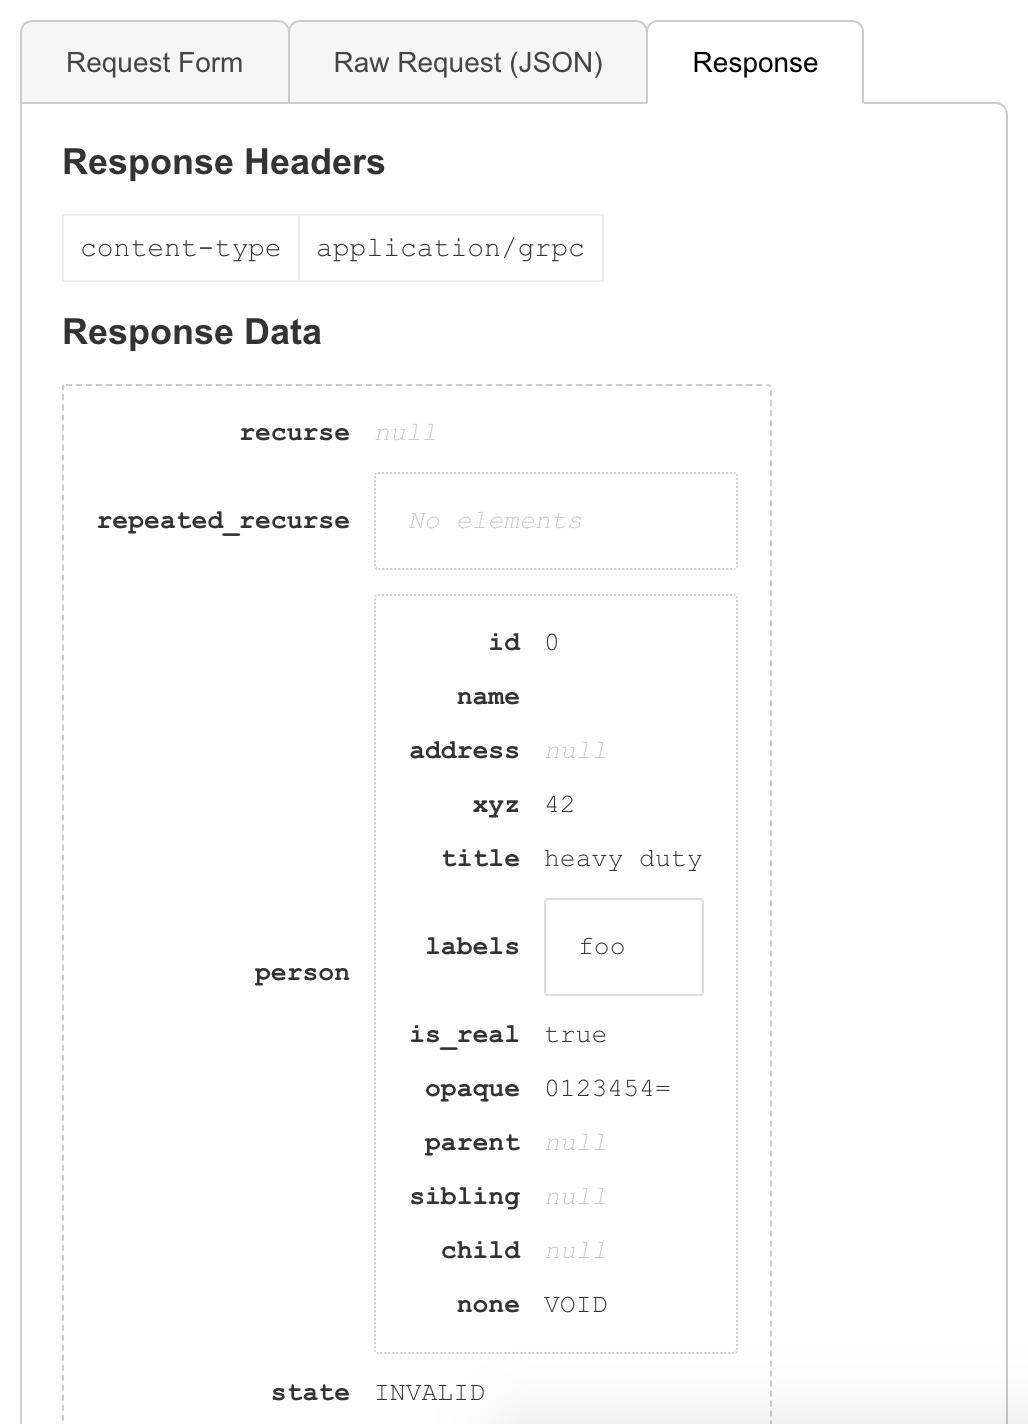
Each of these three sections is a table of data. Response messages are the most interesting, and
their structure closely resembles how messages are structured on the "Request Form" tab. Fields that
have nested messages will include a nested table.
## Descriptor Sources
The `grpcui` tool can operate on a variety of sources for descriptors. The descriptors
are required, in order for `grpcui` to understand the RPC schema, translate inputs
into the protobuf binary format as well as translate responses from the binary format
into text. The sections below document the supported sources and what command-line flags
are needed to use them.
### Server Reflection
Without any additional command-line flags, `grpcui` will try to use [server reflection](https://github.com/grpc/grpc/blob/master/src/proto/grpc/reflection/v1alpha/reflection.proto).
Examples for how to set up server reflection can be found [here](https://github.com/grpc/grpc/blob/master/doc/server-reflection.md#known-implementations).
### Proto Source Files
To use `grpcui` on servers that do not support reflection, you can use `.proto` source
files.
In addition to using `-proto` flags to point `grpcui` at the relevant proto source file(s),
you may also need to supply `-import-path` flags to tell `grpcui` the folders from which
dependencies can be imported.
Just like when compiling with `protoc`, you do *not* need to provide an import path for the
location of the standard protos included with `protoc` (which contain various "well-known
types" with a package definition of `google.protobuf`). These files are "known" by `grpcui`
as a snapshot of their descriptors is built into the `grpcui` binary.
### Protoset Files
You can also use compiled protoset files with `grpcui`. Protoset files contain binary
encoded `google.protobuf.FileDescriptorSet` protos. To create a protoset file, invoke
`protoc` with the `*.proto` files that define the service:
```shell
protoc --proto_path=. \
--descriptor_set_out=myservice.protoset \
--include_imports \
my/custom/server/service.proto
```
The `--descriptor_set_out` argument is what tells `protoc` to produce a protoset,
and the `--include_imports` argument is necessary for the protoset to contain
everything that `grpcui` needs to process and understand the schema.