# GysoTreeView
【[中文](./README_CN.md)】【[English](./README.md)】
**⭐If ok, give me a star⭐**
⭐⭐⭐⭐⭐Tree View; Mind map; Think map; tree map; 树状图;思维导图;组织机构图;层次图;树型图
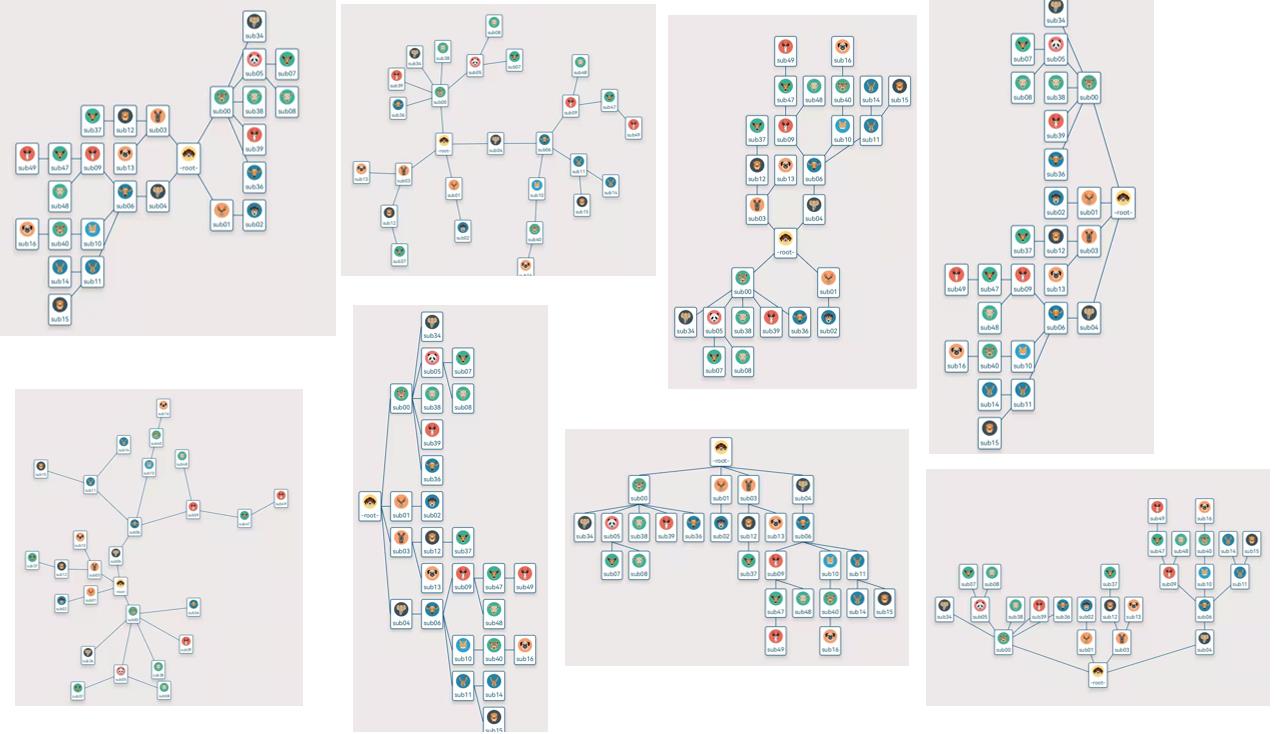
A custom tree view for Android, designed for easy drawing some tree nodes (e.g. thind mind and tree nodes). Includes smoothly zoom, move, limit and center fix animation support, and allows easy extension so you can add your own child node's customs view and touch event detection.
```groovy
dependencies {
implementation 'androidx.dynamicanimation:dynamicanimation:1.0.0'
implementation 'io.github.guaishoun:gyso-treeview:1.0.1'
}
```
### Funtions
- 🍇Smoothly zoom, move
- 🍈Fix your window view port
- 🍉Custom your subview for special node
- 🍊Custom lines between nodes
- 🍋Dynamic remove nodes
- 🍌Dynamic add nodes
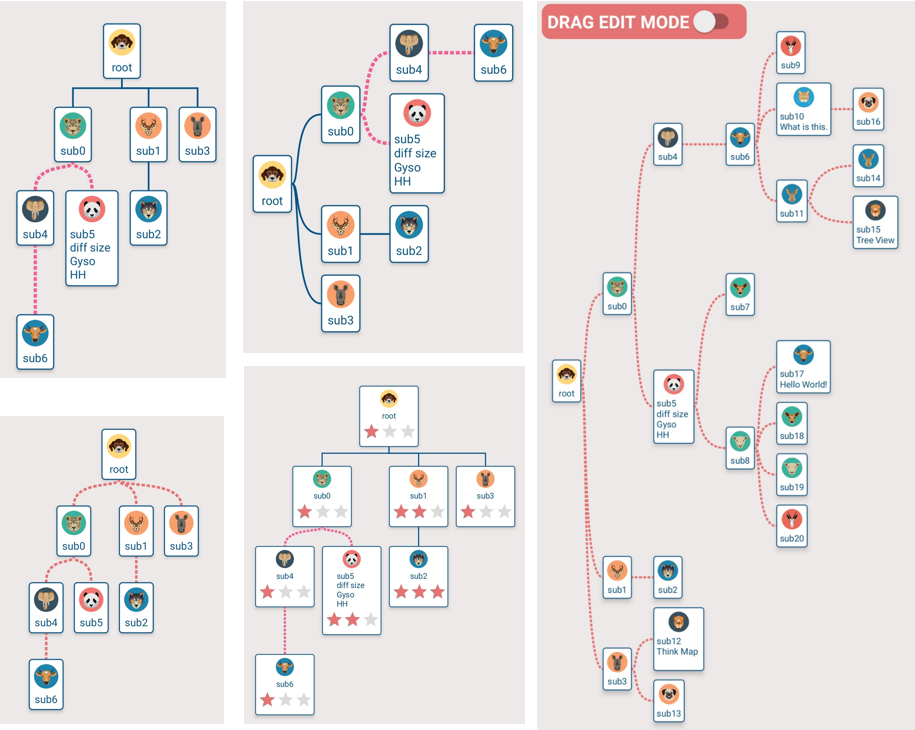
- 🥭Drag to rebuild the nodes' relationship
[Releases & downloads](https://github.com/guaishouN/android-tree-view.git)
> **Base--Line, LayoutManger, Custom node view**
 > **Add**
 > **Remove**
 > **Drag Edit Mode**
 > **Click**
 > **Zoom and Fit Window**
 #### Steps for use
```xml
```
Before presentation, Animal class means you own bean class, like this:
```java
public class Animal {
public int headId;
public String name;
}
```
To use a tree view, you should do **5 steps** as follows:
1. Customs adapter by extends TreeViewAdapter.
```java
public class AnimalTreeViewAdapter extends TreeViewAdapter {
private DashLine dashLine = new DashLine(Color.parseColor("#F06292"),6);
@Override
public TreeViewHolder onCreateViewHolder(@NonNull ViewGroup viewGroup, NodeModel node) {
//TODO in inflate item view
NodeBaseLayoutBinding nodeBinding = NodeBaseLayoutBinding.inflate(LayoutInflater.from(viewGroup.getContext()),viewGroup,false);
return new TreeViewHolder<>(nodeBinding.getRoot(),node);
}
@Override
public void onBindViewHolder(@NonNull TreeViewHolder holder) {
//TODO get view and node from holder, and then control your item view
View itemView = holder.getView();
NodeModel node = holder.getNode();
...
}
@Override
public Baseline onDrawLine(DrawInfo drawInfo) {
// TODO If you return an BaseLine, line will be draw by the return one instead of TreeViewLayoutManager's
// if(...){
// ...
// return dashLine;
// }
return null;
}
}
```
2. configure layout manager. Space unit is dp. You can custom you line by extends {@link com.gyso.treeview.line.BaseLine}
```java
int space_50dp = 50;
int space_20dp = 20;
//choose a demo line or a customs line. StraightLine, PointedLine, DashLine, SmoothLine are available.
Baseline line = new DashLine(Color.parseColor("#4DB6AC"),8);
//choose layoout manager. VerticalTreeLayoutManager,RightTreeLayoutManager are available.
TreeLayoutManager treeLayoutManager = new BoxRightTreeLayoutManager(this,space_50dp,space_20dp,line);
// TODO Other stable layout managers like below:
// new BoxDownTreeLayoutManager(this,space_50dp,space_20dp,line);
// new BoxLeftTreeLayoutManager(this,space_50dp,space_20dp,line);
// new BoxUpTreeLayoutManager(this,space_50dp,space_20dp,line);
// new BoxHorizonLeftAndRightLayoutManager(this,space_50dp,space_20dp,line);
// new BoxVerticalUpAndDownLayoutManager(this,space_50dp,space_20dp,line);
```
3. setting adapter and layout manager for your tree view.
```java
...
treeView = findViewById(R.id.tree_view);
TreeViewAdapter adapter = new AnimlTreeViewAdapter();
treeView.setAdapter(adapter);
treeView.setTreeLayoutManager(treeLayoutManager);
...
```
4. nodes data setting
```java
//Create a TreeModel by using a root node.
NodeModel node0 = new NodeModel<>(new Animal(R.drawable.ic_01,"root"));
TreeModel treeModel = new TreeModel<>(node0);
//Other nodes.
NodeModel node1 = new NodeModel<>(new Animal(R.drawable.ic_02,"sub0"));
NodeModel node2 = new NodeModel<>(new Animal(R.drawable.ic_03,"sub1"));
NodeModel node3 = new NodeModel<>(new Animal(R.drawable.ic_04,"sub2"));
NodeModel node4 = new NodeModel<>(new Animal(R.drawable.ic_05,"sub3"));
NodeModel node5 = new NodeModel<>(new Animal(R.drawable.ic_06,"sub4"));
//Build the relationship between parent node and childs,like:
//treeModel.add(parent, child1, child2, ...., childN);
treeModel.add(node0, node1, node2);
treeModel.add(node1, node3, node4);
treeModel.add(node2, node5);
//finally set this treeModel to the adapter
adapter.setTreeModel(treeModel);
```
5. If your want to edit your tree view, please use an editor.
```java
final TreeViewEditor editor = binding.baseTreeView.getEditor();
//add nodes
NodeModel a = new NodeModel<>(new Animal(R.drawable.ic_13,"add-" + atomicInteger.getAndIncrement()));
NodeModel b = new NodeModel<>(new Animal(R.drawable.ic_10,"add-" + atomicInteger.getAndIncrement()));
NodeModel c = new NodeModel<>(new Animal(R.drawable.ic_11,"add-" + atomicInteger.getAndIncrement()));
editor.addChildNodes(targetNode,a,b,c);
//remove node
editor.removeNode(toRemoveNode);
//view center in window viewport
editor.focusMidLocation()
//drag to move and build new relationship
editor.requestMoveNodeByDragging(isChecked);
```
#### Notes & limitations
Firstly, only vertical-down derection layout and right direction layout is available, more layout style should be code.
Secondly, customing lines by extends BaseLine may be a little complicate for Android beginner, and performance issues will happen if you using carefully.
Finally, this custom view will be continuely improved, if you has some innovative ideas, please tell me. Thanks for you patience.
I will tell you how it works on [my CSDN blogs](https://blog.csdn.net/guaisou/article/details/116611140).Thx.
#### Steps for use
```xml
```
Before presentation, Animal class means you own bean class, like this:
```java
public class Animal {
public int headId;
public String name;
}
```
To use a tree view, you should do **5 steps** as follows:
1. Customs adapter by extends TreeViewAdapter.
```java
public class AnimalTreeViewAdapter extends TreeViewAdapter {
private DashLine dashLine = new DashLine(Color.parseColor("#F06292"),6);
@Override
public TreeViewHolder onCreateViewHolder(@NonNull ViewGroup viewGroup, NodeModel node) {
//TODO in inflate item view
NodeBaseLayoutBinding nodeBinding = NodeBaseLayoutBinding.inflate(LayoutInflater.from(viewGroup.getContext()),viewGroup,false);
return new TreeViewHolder<>(nodeBinding.getRoot(),node);
}
@Override
public void onBindViewHolder(@NonNull TreeViewHolder holder) {
//TODO get view and node from holder, and then control your item view
View itemView = holder.getView();
NodeModel node = holder.getNode();
...
}
@Override
public Baseline onDrawLine(DrawInfo drawInfo) {
// TODO If you return an BaseLine, line will be draw by the return one instead of TreeViewLayoutManager's
// if(...){
// ...
// return dashLine;
// }
return null;
}
}
```
2. configure layout manager. Space unit is dp. You can custom you line by extends {@link com.gyso.treeview.line.BaseLine}
```java
int space_50dp = 50;
int space_20dp = 20;
//choose a demo line or a customs line. StraightLine, PointedLine, DashLine, SmoothLine are available.
Baseline line = new DashLine(Color.parseColor("#4DB6AC"),8);
//choose layoout manager. VerticalTreeLayoutManager,RightTreeLayoutManager are available.
TreeLayoutManager treeLayoutManager = new BoxRightTreeLayoutManager(this,space_50dp,space_20dp,line);
// TODO Other stable layout managers like below:
// new BoxDownTreeLayoutManager(this,space_50dp,space_20dp,line);
// new BoxLeftTreeLayoutManager(this,space_50dp,space_20dp,line);
// new BoxUpTreeLayoutManager(this,space_50dp,space_20dp,line);
// new BoxHorizonLeftAndRightLayoutManager(this,space_50dp,space_20dp,line);
// new BoxVerticalUpAndDownLayoutManager(this,space_50dp,space_20dp,line);
```
3. setting adapter and layout manager for your tree view.
```java
...
treeView = findViewById(R.id.tree_view);
TreeViewAdapter adapter = new AnimlTreeViewAdapter();
treeView.setAdapter(adapter);
treeView.setTreeLayoutManager(treeLayoutManager);
...
```
4. nodes data setting
```java
//Create a TreeModel by using a root node.
NodeModel node0 = new NodeModel<>(new Animal(R.drawable.ic_01,"root"));
TreeModel treeModel = new TreeModel<>(node0);
//Other nodes.
NodeModel node1 = new NodeModel<>(new Animal(R.drawable.ic_02,"sub0"));
NodeModel node2 = new NodeModel<>(new Animal(R.drawable.ic_03,"sub1"));
NodeModel node3 = new NodeModel<>(new Animal(R.drawable.ic_04,"sub2"));
NodeModel node4 = new NodeModel<>(new Animal(R.drawable.ic_05,"sub3"));
NodeModel node5 = new NodeModel<>(new Animal(R.drawable.ic_06,"sub4"));
//Build the relationship between parent node and childs,like:
//treeModel.add(parent, child1, child2, ...., childN);
treeModel.add(node0, node1, node2);
treeModel.add(node1, node3, node4);
treeModel.add(node2, node5);
//finally set this treeModel to the adapter
adapter.setTreeModel(treeModel);
```
5. If your want to edit your tree view, please use an editor.
```java
final TreeViewEditor editor = binding.baseTreeView.getEditor();
//add nodes
NodeModel a = new NodeModel<>(new Animal(R.drawable.ic_13,"add-" + atomicInteger.getAndIncrement()));
NodeModel b = new NodeModel<>(new Animal(R.drawable.ic_10,"add-" + atomicInteger.getAndIncrement()));
NodeModel c = new NodeModel<>(new Animal(R.drawable.ic_11,"add-" + atomicInteger.getAndIncrement()));
editor.addChildNodes(targetNode,a,b,c);
//remove node
editor.removeNode(toRemoveNode);
//view center in window viewport
editor.focusMidLocation()
//drag to move and build new relationship
editor.requestMoveNodeByDragging(isChecked);
```
#### Notes & limitations
Firstly, only vertical-down derection layout and right direction layout is available, more layout style should be code.
Secondly, customing lines by extends BaseLine may be a little complicate for Android beginner, and performance issues will happen if you using carefully.
Finally, this custom view will be continuely improved, if you has some innovative ideas, please tell me. Thanks for you patience.
I will tell you how it works on [my CSDN blogs](https://blog.csdn.net/guaisou/article/details/116611140).Thx.