# GysoTreeView
【[中文](./README_CN.md)】【[English](./README.md)】
Tree View; Mind map; Think map; tree map; 树状图;思维导图;
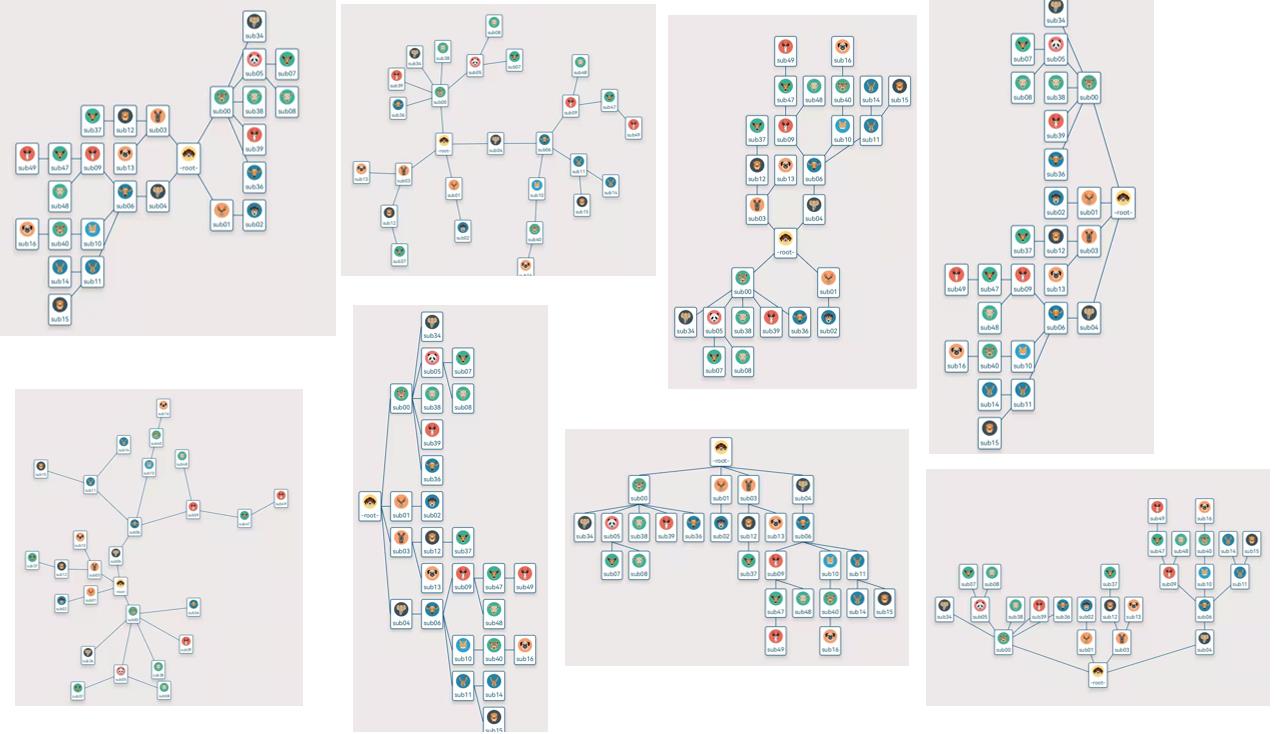
目前没发现比较好的Android树状图开源控件,于是决定自己写一个开源控件,对比了一下市面上关于思维导图或者树状图显示(如xMind,mind master等)的app,本文开源框架并不逊色。
### 特点
- 丝滑的跟随手指放缩,拖动,及惯性滑动
- 自动动画回归屏幕中心
- 支持子节点复杂布局自定义,并且节点布局点击事件与滑动不冲突
- 节点间的连接线自定义
- 可删除动态节点
- 可动态添加节点
- 支持拖动调整节点关系
- 增删、移动结构添加动画效果
[github控件连接](https://github.com/guaishouN/android-tree-view.git)
> **基础--连接线, 布局, 自定义节点View**
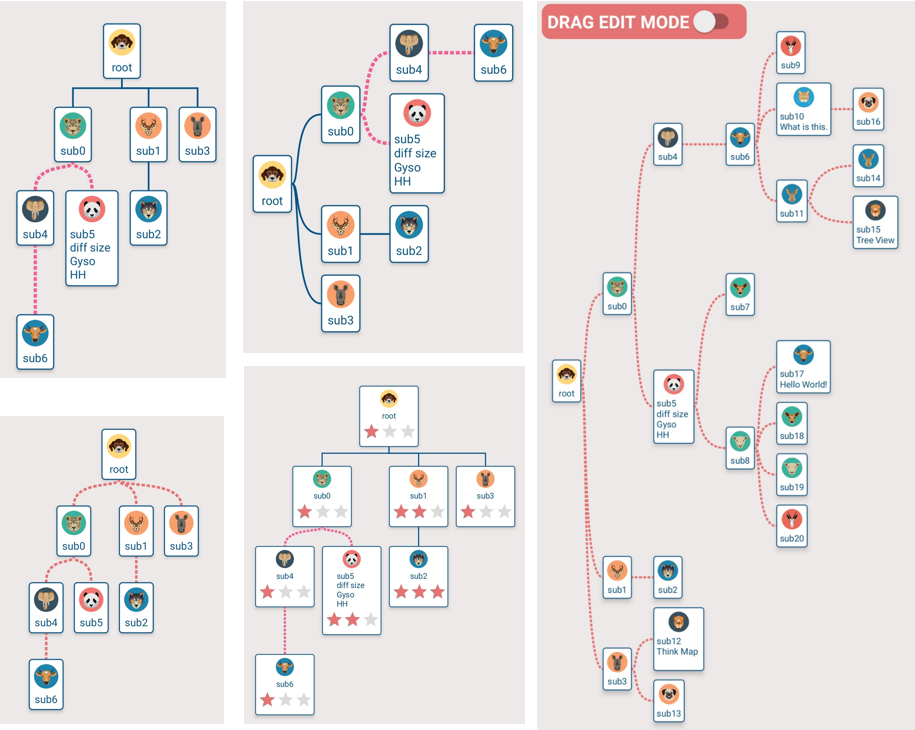 > **添加**
 > **删除**
 > **拖动节点编辑书树状图结构**
 > **放缩拖动不影响点击**
 > **放缩及适应窗口**
 #### 使用步骤:
添加依赖
```groovy
dependencies {
implementation 'androidx.dynamicanimation:dynamicanimation:1.0.0'
implementation 'io.github.guaishoun:gyso-treeview:1.0.1'
}
```
```xml
```
下面说明中Animal类是仅仅用于举例的bean
```java
public class Animal {
public int headId;
public String name;
}
```
按照以下四个步骤使用该开源控件
1 通过继承 TreeViewAdapter实现节点数据与节点视图的绑定
```java
public class AnimalTreeViewAdapter extends TreeViewAdapter {
private DashLine dashLine = new DashLine(Color.parseColor("#F06292"),6);
@Override
public TreeViewHolder onCreateViewHolder(@NonNull ViewGroup viewGroup, NodeModel node) {
//TODO in inflate item view
NodeBaseLayoutBinding nodeBinding = NodeBaseLayoutBinding.inflate(LayoutInflater.from(viewGroup.getContext()),viewGroup,false);
return new TreeViewHolder<>(nodeBinding.getRoot(),node);
}
@Override
public void onBindViewHolder(@NonNull TreeViewHolder holder) {
//TODO get view and node from holder, and then control your item view
View itemView = holder.getView();
NodeModel node = holder.getNode();
...
}
@Override
public Baseline onDrawLine(DrawInfo drawInfo) {
// TODO If you return an BaseLine, line will be draw by the return one instead of TreeViewLayoutManager's
// if(...){
// ...
// return dashLine;
// }
return null;
}
}
```
2 配置LayoutManager。主要设置布局风格(向右展开或垂直向下展开)、父节点与子节点的间隙、子节点间的间隙、节点间的连线(已经实现了直线、光滑曲线、虚线、根状线,也可通过BaseLine实现你自己的连线)
```java
int space_50dp = 50;
int space_20dp = 20;
//choose a demo line or a customs line. StraightLine, PointedLine, DashLine, SmoothLine are available.
Baseline line = new DashLine(Color.parseColor("#4DB6AC"),8);
//choose layoout manager. VerticalTreeLayoutManager,RightTreeLayoutManager are available.
TreeLayoutManager treeLayoutManager = new BoxRightTreeLayoutManager(this,space_50dp,space_20dp,line);
// TODO Box[XXX]LayoutManager 系列的布局是稳定的,其他系列的布局还在优化中:
// TODO Other stable layout managers like below:
// new BoxDownTreeLayoutManager(this,space_50dp,space_20dp,line);
// new BoxLeftTreeLayoutManager(this,space_50dp,space_20dp,line);
// new BoxUpTreeLayoutManager(this,space_50dp,space_20dp,line);
// new BoxHorizonLeftAndRightLayoutManager(this,space_50dp,space_20dp,line);
// new BoxVerticalUpAndDownLayoutManager(this,space_50dp,space_20dp,line);
```
3 把Adapter和LayoutManager设置到你的树状图
```java
...
treeView = findViewById(R.id.tree_view);
TreeViewAdapter adapter = new AnimlTreeViewAdapter();
treeView.setAdapter(adapter);
treeView.setTreeLayoutManager(treeLayoutManager);
...
```
4 设置节点数据
```java
//Create a TreeModel by using a root node.
NodeModel node0 = new NodeModel<>(new Animal(R.drawable.ic_01,"root"));
TreeModel treeModel = new TreeModel<>(root);
//Other nodes.
NodeModel node1 = new NodeModel<>(new Animal(R.drawable.ic_02,"sub0"));
NodeModel node2 = new NodeModel<>(new Animal(R.drawable.ic_03,"sub1"));
NodeModel node3 = new NodeModel<>(new Animal(R.drawable.ic_04,"sub2"));
NodeModel node4 = new NodeModel<>(new Animal(R.drawable.ic_05,"sub3"));
NodeModel node5 = new NodeModel<>(new Animal(R.drawable.ic_06,"sub4"));
//Build the relationship between parent node and childs,like:
//treeModel.add(parent, child1, child2, ...., childN);
treeModel.add(node0, node1, node2);
treeModel.add(node1, node3, node4);
treeModel.add(node2, node5);
//finally set this treeModel to the adapter
adapter.setTreeModel(treeModel);
```
5 如果你想编辑这个树状图
```java
final TreeViewEditor editor = binding.baseTreeView.getEditor();
//add nodes
NodeModel a = new NodeModel<>(new Animal(R.drawable.ic_13,"add-" + atomicInteger.getAndIncrement()));
NodeModel b = new NodeModel<>(new Animal(R.drawable.ic_10,"add-" + atomicInteger.getAndIncrement()));
NodeModel c = new NodeModel<>(new Animal(R.drawable.ic_11,"add-" + atomicInteger.getAndIncrement()));
editor.addChildNodes(targetNode,a,b,c);
//remove node
editor.removeNode(toRemoveNode);
//view center in window viewport
editor.focusMidLocation()
//drag to move and build new relationship
editor.requestMoveNodeByDragging(isChecked);
```
#### 写在最后
目前只写了垂直向下布局及向右展开布局,其他的还得花时间。对于线的实现只是实现了几种,也还得丰富。在自定义自己的BaseLine线时,Android初学者注意因为画线动作是在View的onDraw(canvas)中的,所以在里面不要new对象,不要任何耗时操作。
这个项目如果有人用就会持续更新下去。喜欢点个赞,谢谢。
关于实现,[我的CSDN](https://blog.csdn.net/guaisou/article/details/116611140)会逐渐更新。
#### 使用步骤:
添加依赖
```groovy
dependencies {
implementation 'androidx.dynamicanimation:dynamicanimation:1.0.0'
implementation 'io.github.guaishoun:gyso-treeview:1.0.1'
}
```
```xml
```
下面说明中Animal类是仅仅用于举例的bean
```java
public class Animal {
public int headId;
public String name;
}
```
按照以下四个步骤使用该开源控件
1 通过继承 TreeViewAdapter实现节点数据与节点视图的绑定
```java
public class AnimalTreeViewAdapter extends TreeViewAdapter {
private DashLine dashLine = new DashLine(Color.parseColor("#F06292"),6);
@Override
public TreeViewHolder onCreateViewHolder(@NonNull ViewGroup viewGroup, NodeModel node) {
//TODO in inflate item view
NodeBaseLayoutBinding nodeBinding = NodeBaseLayoutBinding.inflate(LayoutInflater.from(viewGroup.getContext()),viewGroup,false);
return new TreeViewHolder<>(nodeBinding.getRoot(),node);
}
@Override
public void onBindViewHolder(@NonNull TreeViewHolder holder) {
//TODO get view and node from holder, and then control your item view
View itemView = holder.getView();
NodeModel node = holder.getNode();
...
}
@Override
public Baseline onDrawLine(DrawInfo drawInfo) {
// TODO If you return an BaseLine, line will be draw by the return one instead of TreeViewLayoutManager's
// if(...){
// ...
// return dashLine;
// }
return null;
}
}
```
2 配置LayoutManager。主要设置布局风格(向右展开或垂直向下展开)、父节点与子节点的间隙、子节点间的间隙、节点间的连线(已经实现了直线、光滑曲线、虚线、根状线,也可通过BaseLine实现你自己的连线)
```java
int space_50dp = 50;
int space_20dp = 20;
//choose a demo line or a customs line. StraightLine, PointedLine, DashLine, SmoothLine are available.
Baseline line = new DashLine(Color.parseColor("#4DB6AC"),8);
//choose layoout manager. VerticalTreeLayoutManager,RightTreeLayoutManager are available.
TreeLayoutManager treeLayoutManager = new BoxRightTreeLayoutManager(this,space_50dp,space_20dp,line);
// TODO Box[XXX]LayoutManager 系列的布局是稳定的,其他系列的布局还在优化中:
// TODO Other stable layout managers like below:
// new BoxDownTreeLayoutManager(this,space_50dp,space_20dp,line);
// new BoxLeftTreeLayoutManager(this,space_50dp,space_20dp,line);
// new BoxUpTreeLayoutManager(this,space_50dp,space_20dp,line);
// new BoxHorizonLeftAndRightLayoutManager(this,space_50dp,space_20dp,line);
// new BoxVerticalUpAndDownLayoutManager(this,space_50dp,space_20dp,line);
```
3 把Adapter和LayoutManager设置到你的树状图
```java
...
treeView = findViewById(R.id.tree_view);
TreeViewAdapter adapter = new AnimlTreeViewAdapter();
treeView.setAdapter(adapter);
treeView.setTreeLayoutManager(treeLayoutManager);
...
```
4 设置节点数据
```java
//Create a TreeModel by using a root node.
NodeModel node0 = new NodeModel<>(new Animal(R.drawable.ic_01,"root"));
TreeModel treeModel = new TreeModel<>(root);
//Other nodes.
NodeModel node1 = new NodeModel<>(new Animal(R.drawable.ic_02,"sub0"));
NodeModel node2 = new NodeModel<>(new Animal(R.drawable.ic_03,"sub1"));
NodeModel node3 = new NodeModel<>(new Animal(R.drawable.ic_04,"sub2"));
NodeModel node4 = new NodeModel<>(new Animal(R.drawable.ic_05,"sub3"));
NodeModel node5 = new NodeModel<>(new Animal(R.drawable.ic_06,"sub4"));
//Build the relationship between parent node and childs,like:
//treeModel.add(parent, child1, child2, ...., childN);
treeModel.add(node0, node1, node2);
treeModel.add(node1, node3, node4);
treeModel.add(node2, node5);
//finally set this treeModel to the adapter
adapter.setTreeModel(treeModel);
```
5 如果你想编辑这个树状图
```java
final TreeViewEditor editor = binding.baseTreeView.getEditor();
//add nodes
NodeModel a = new NodeModel<>(new Animal(R.drawable.ic_13,"add-" + atomicInteger.getAndIncrement()));
NodeModel b = new NodeModel<>(new Animal(R.drawable.ic_10,"add-" + atomicInteger.getAndIncrement()));
NodeModel c = new NodeModel<>(new Animal(R.drawable.ic_11,"add-" + atomicInteger.getAndIncrement()));
editor.addChildNodes(targetNode,a,b,c);
//remove node
editor.removeNode(toRemoveNode);
//view center in window viewport
editor.focusMidLocation()
//drag to move and build new relationship
editor.requestMoveNodeByDragging(isChecked);
```
#### 写在最后
目前只写了垂直向下布局及向右展开布局,其他的还得花时间。对于线的实现只是实现了几种,也还得丰富。在自定义自己的BaseLine线时,Android初学者注意因为画线动作是在View的onDraw(canvas)中的,所以在里面不要new对象,不要任何耗时操作。
这个项目如果有人用就会持续更新下去。喜欢点个赞,谢谢。
关于实现,[我的CSDN](https://blog.csdn.net/guaisou/article/details/116611140)会逐渐更新。