# Docsify Open Course Starter Kit
[](https://docsify.js.org/)
[](https://github.com/hibbitts-design/docsify-open-course-starter-kit/blob/main/LICENSE)
> This is a starter kit to quickly create a Markdown-based open course site with the site generator [Docsify](https://docsify.js.org). Global navigation elements can be hidden for seamlessly embedding pages (i.e., into an LMS). Includes an optional "Edit this Page" link.
Docsify sites use client-side rendering, which means your content will not be indexed by search engines like Google, Bing, or DuckDuckGo.
📸 Docsify Open Course Screenshots
---
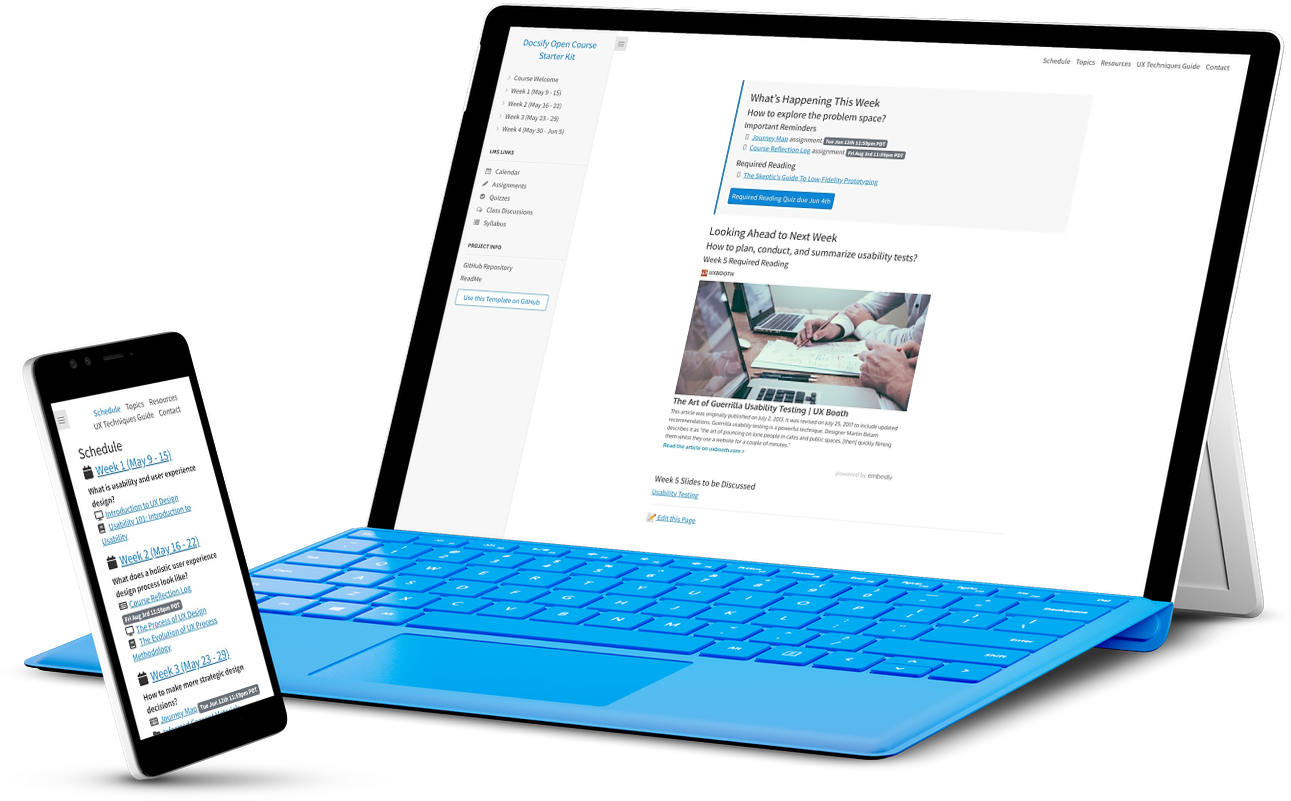
_Figure 1. Docsify Open Course Starter Kit. Explore a demo at [hibbitts-design.github.io/demo-docsify-open-course-starter-kit/](https://hibbitts-design.github.io/demo-docsify-open-course-starter-kit/#/)_
🚀 GitHub Pages Quickstart
---
**Pre-flight Checklist**
1. GitHub account
**Installation and Deployment**
1. Sign in to [GitHub](https://github.com) if you have not already done so
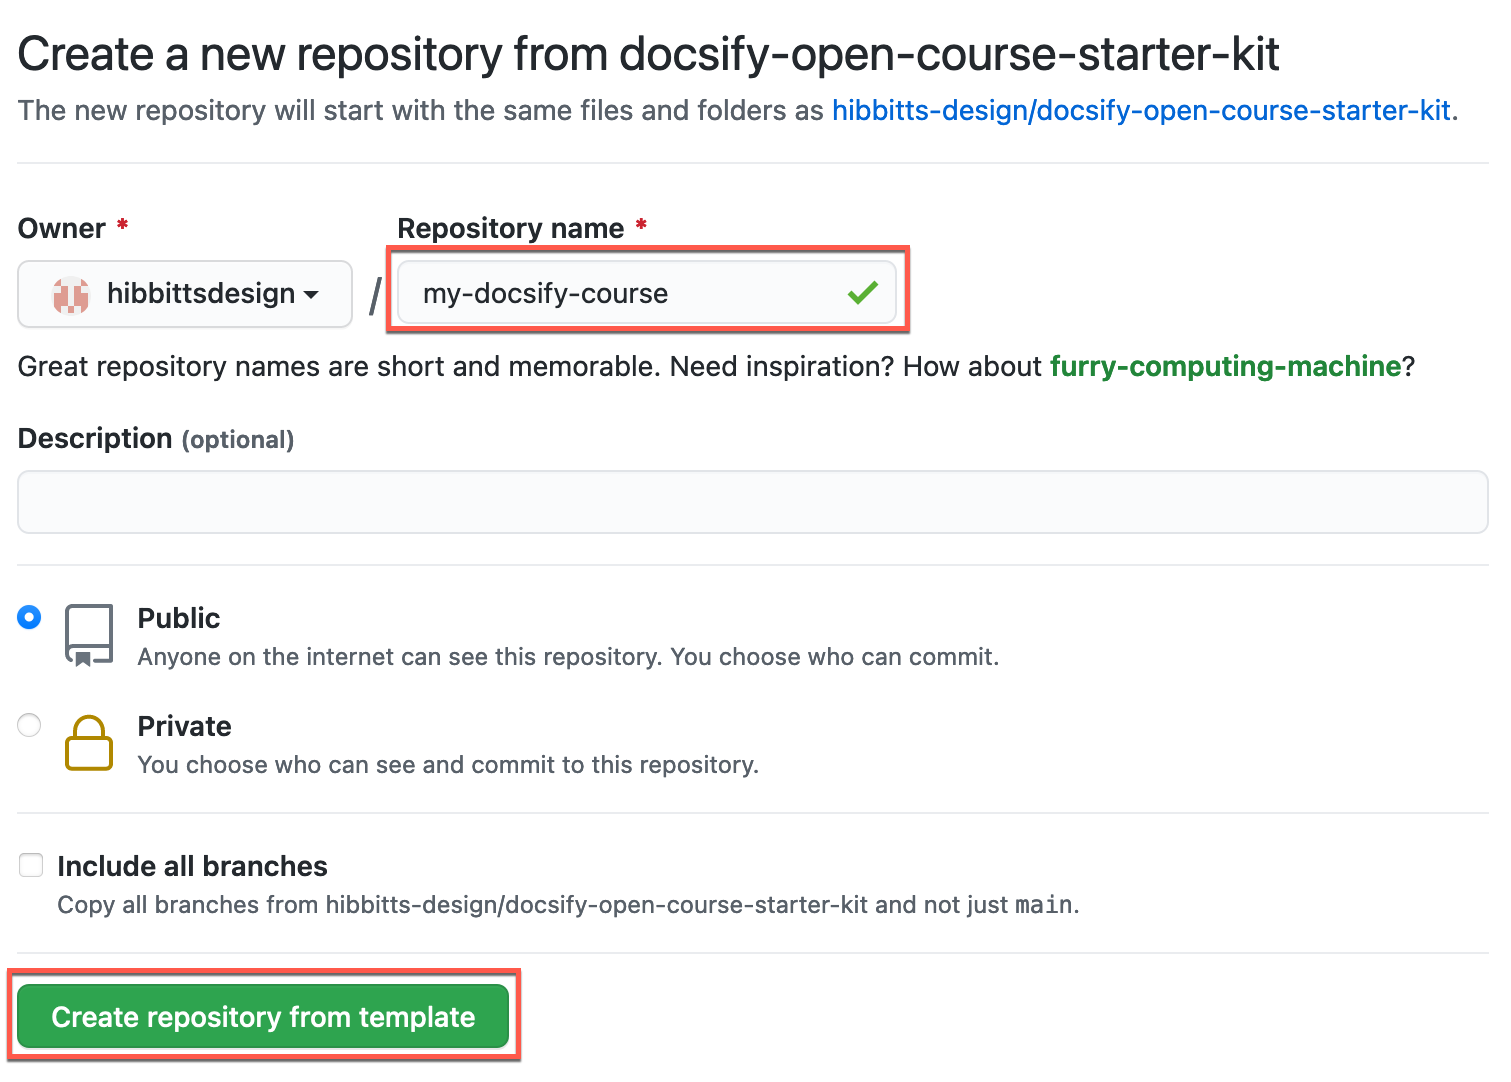
2. Tap **Use this template** on the source repository (upper-right green button) and then choose **Create a new repository**

3. Choose the name for your new repository to contain the copied site files and then tap **Create repository from template**
4. Go to **Settings** of your newly created repository, tap the **Pages** tab (on the left-hand side), choose **main branch**, then **docs folder** and finally tap the **Save** button (see more details in the [Docsify documentation](https://docsify.js.org/#/deploy?id=github-pages))

5. And you're done! (view your new site using the provided URL on the **Pages** tab - it can take up to 10 minutes for your site to be initially available)

Do you use GitLab? You can also use Docsify with [GitLab Pages](https://docsify.js.org/#/deploy?id=gitlab-pages)!
✏️ Editing Your Docsify Site Pages on GitHub
---
1. Go to the Docsify Markdown (.md) page in the `docs` folder of your repository you want to edit

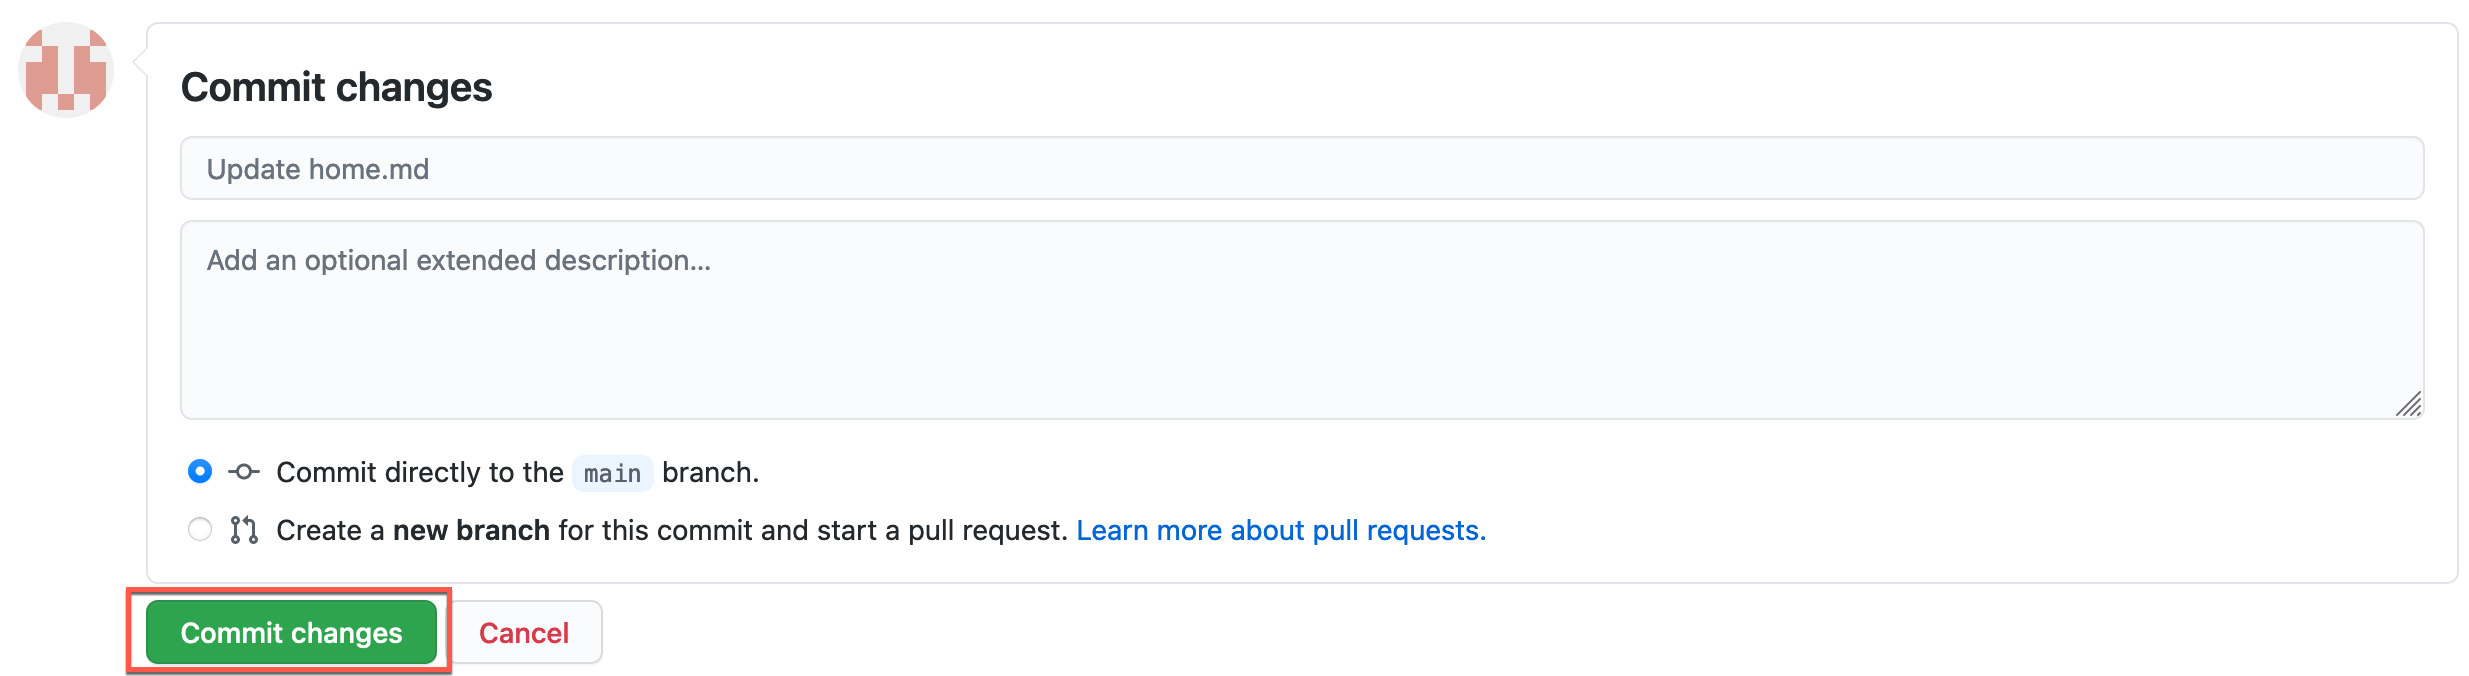
2. Tap the **Pencil Icon** (top left-hand toolbar area) to start the editor

3. Scroll down to the bottom of the page and tap the **Commit changes** button to save your changes
[Learn more about creating pages in Docsify.](https://docsify.js.org/#/more-pages)
🔗 Activating the “Edit this Page” Link on Your Docsify Site
---
1. At the top-level of your GitHub Repository copy the URL

2. Tap on the **docs** folder

2. Tap on the **index.html** file
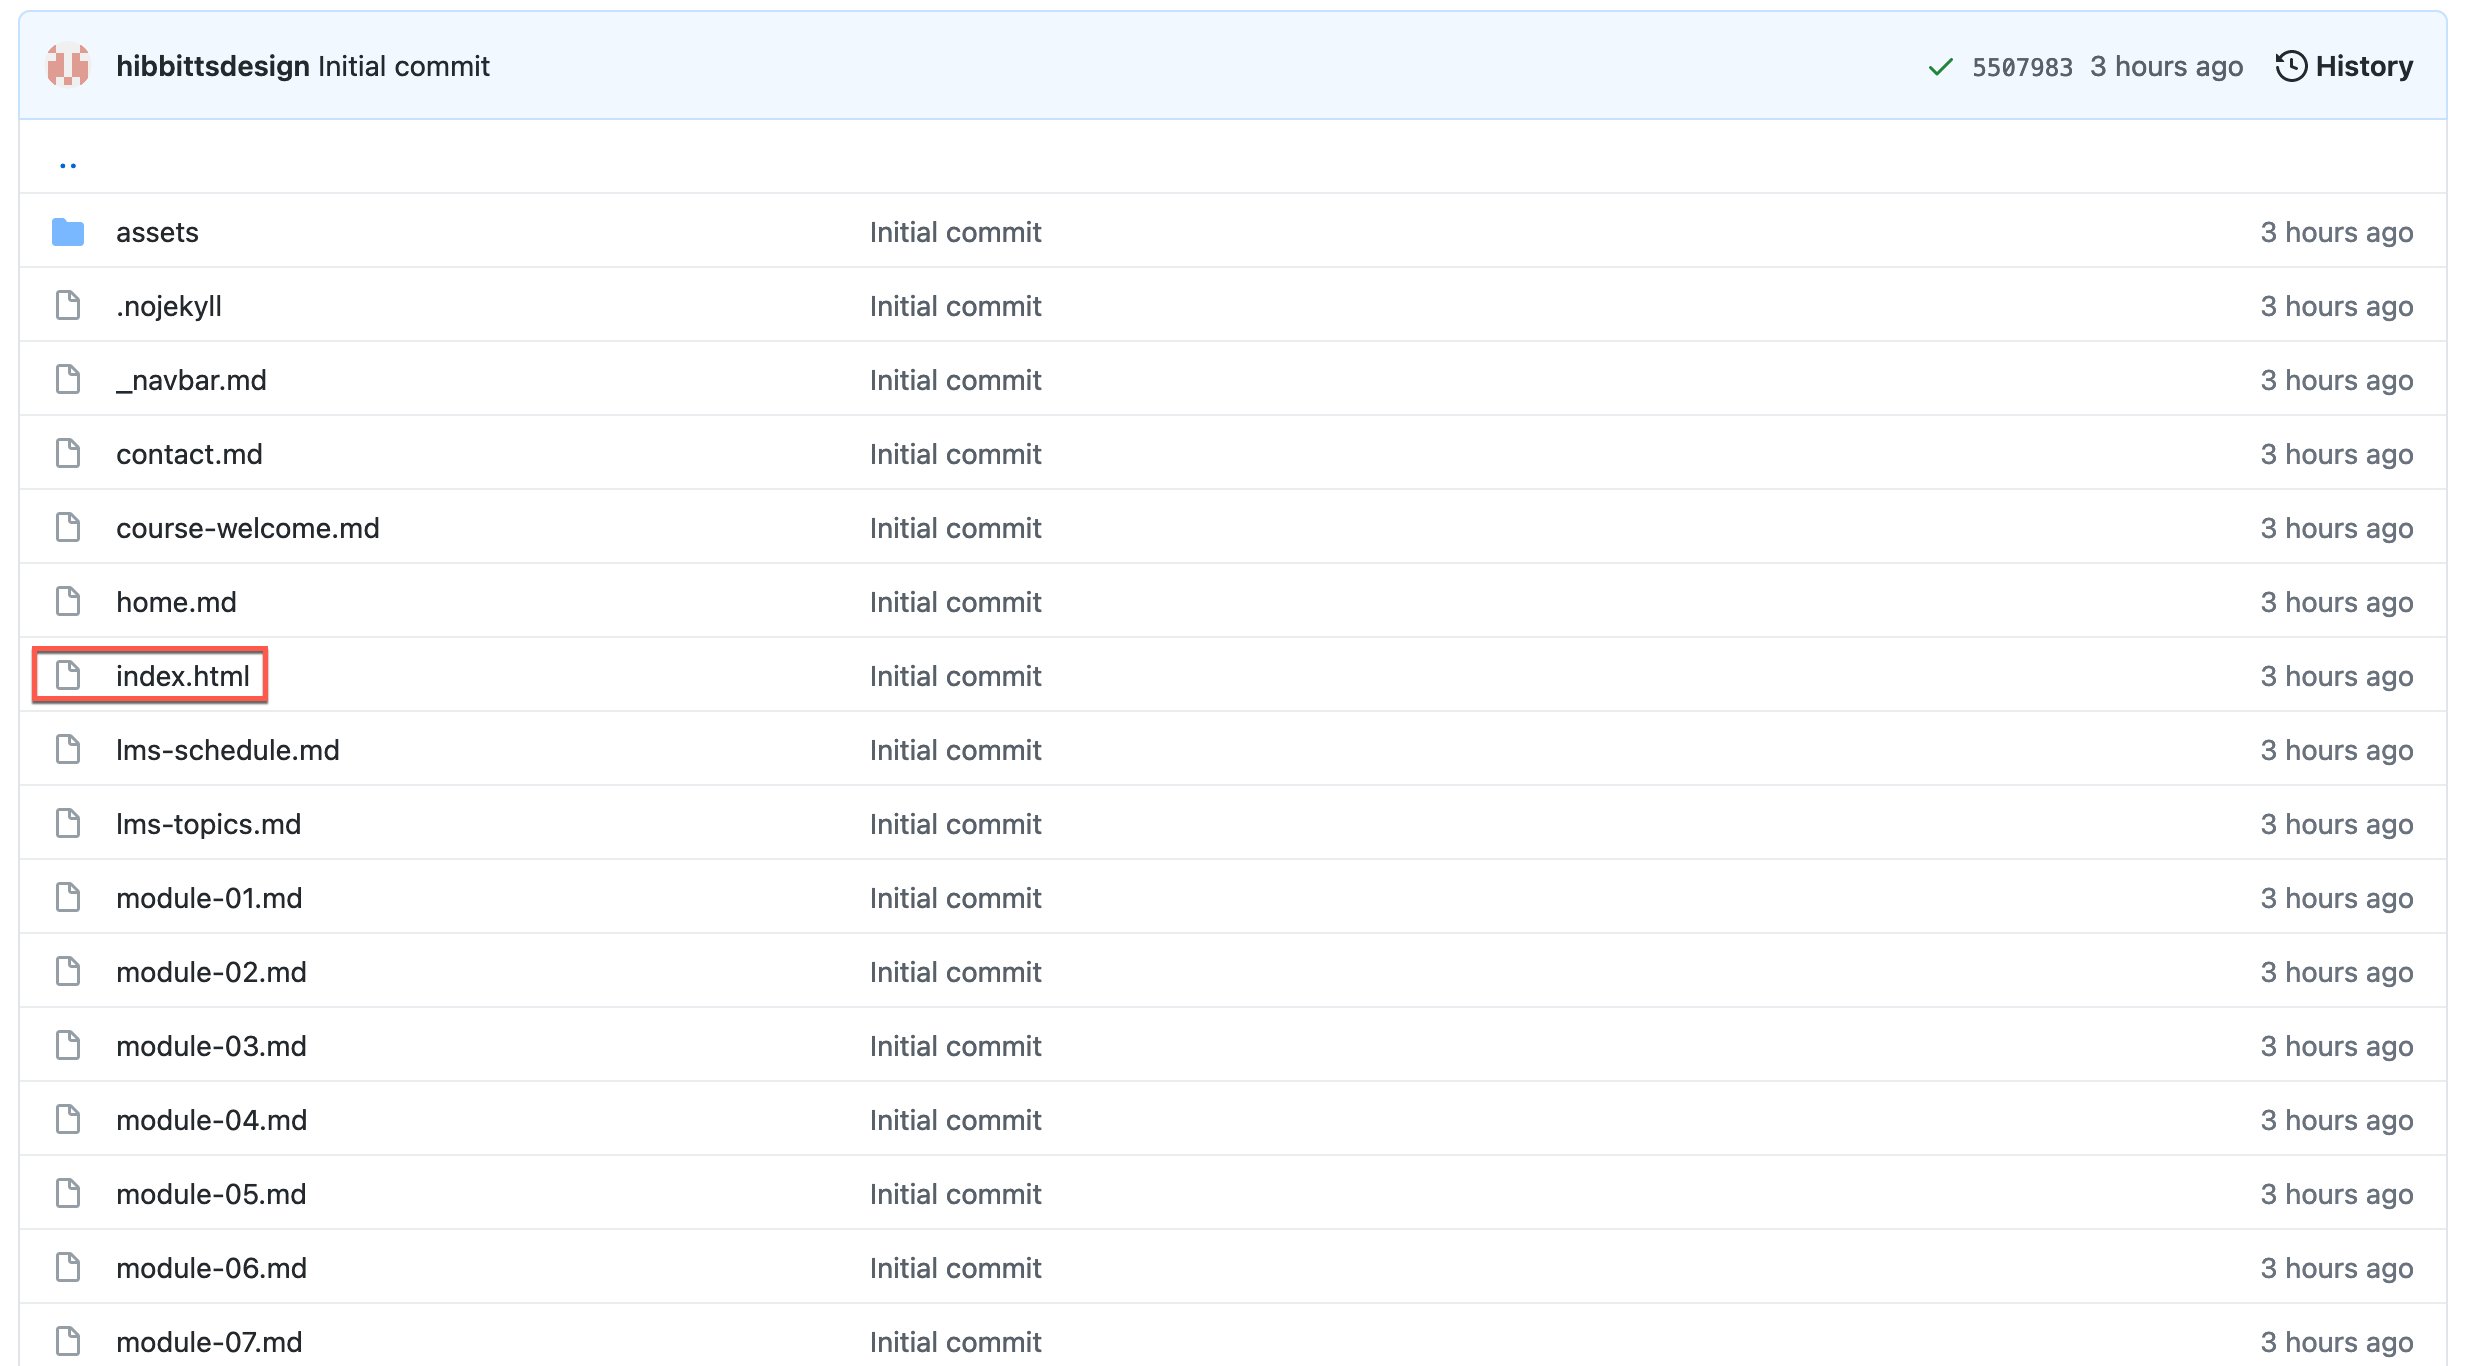
3. Tap the **Pencil Icon** (top left-hand toolbar area) to start the editor

4. Find the line `var gitLinkRepoURL = '';` and enter the URL of your own GitHub Repository between the two quotes (replace `github.com` with `github.dev` to use the GitHub.dev web-based editor currently in Beta) and then scroll down to the bottom of the page and tap the **Commit changes** button to save your changes
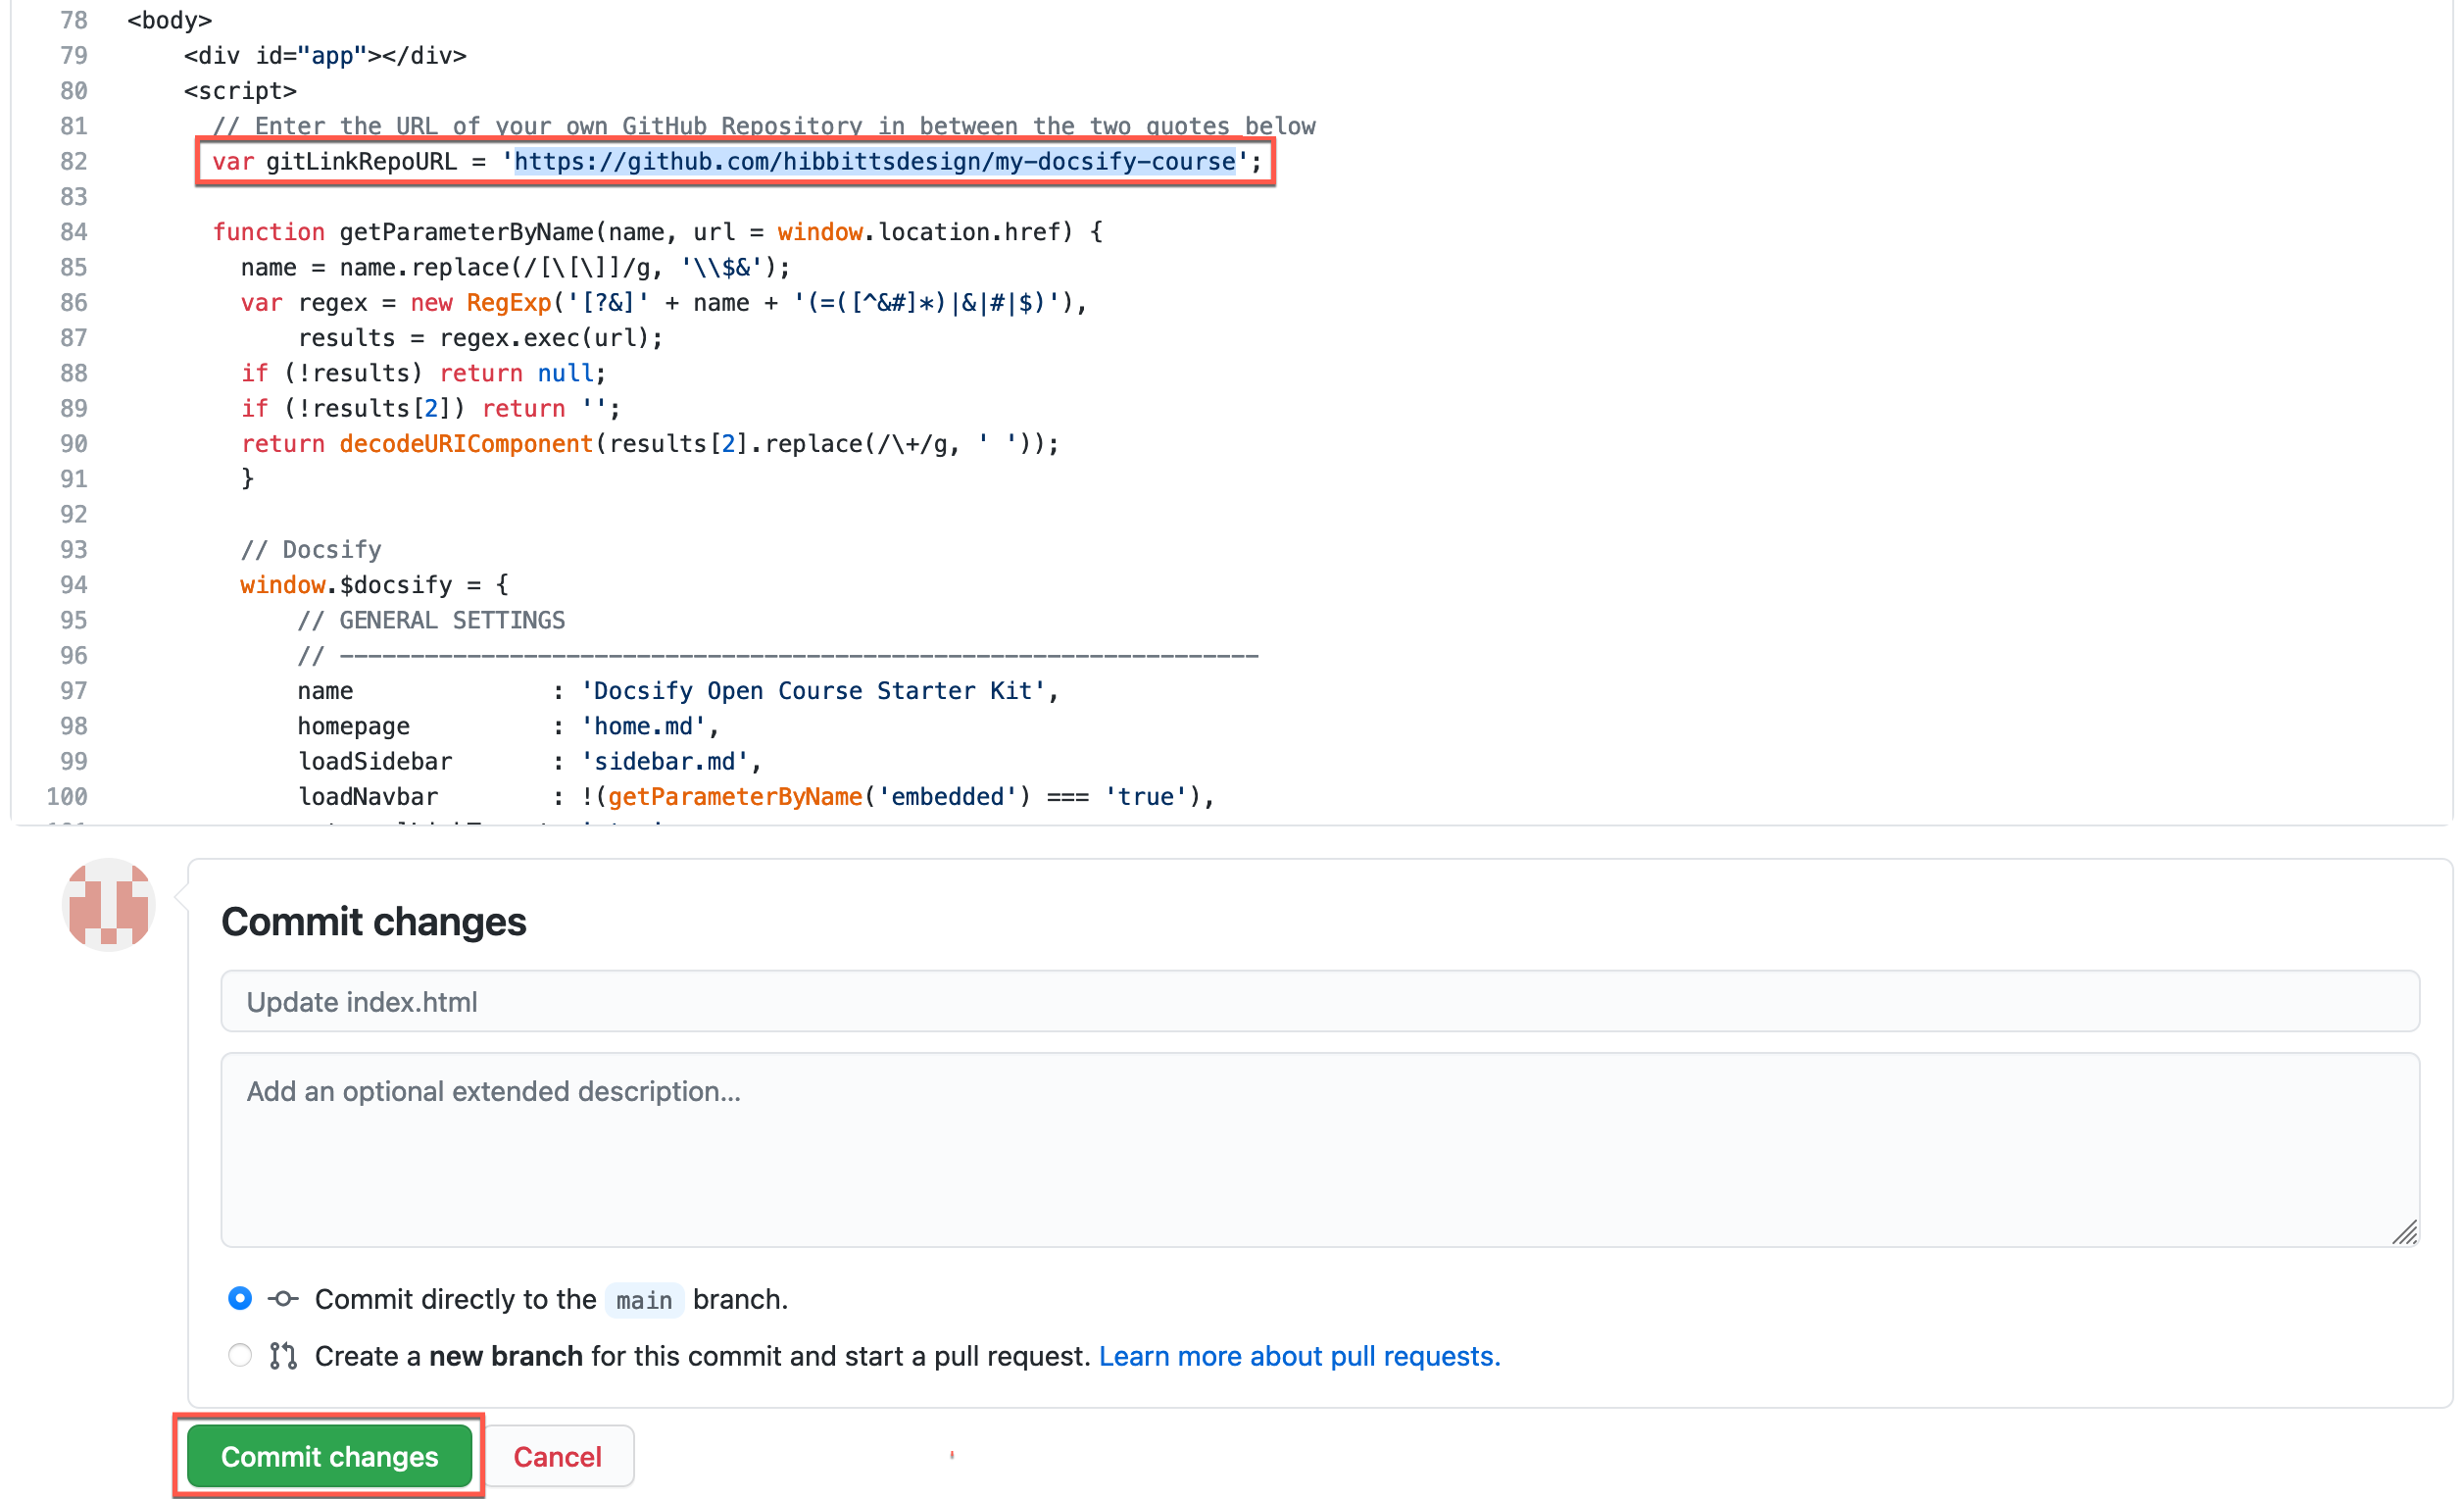
To remove the “Edit this Page” link on your Docsify site, restore the value of `gitLinkRepoURL` to `''`.
💻 Locally Editing Your Docsify Site Pages
---
**Editing Your Docsify Site Pages on Your Desktop**
1. Tap **Code** on your repository (upper-right green button)
2. Choose **Open Desktop** and follow the prompts, installing [GitHub Desktop](https://desktop.github.com/) if not already present
3. You will now be able to edit your Docsify site (in the `docs` folder) using the desktop editor of your choice (e.g. [Atom](https://atom.io/))
4. Use GitHub Desktop to push any changes to your repository.
[Learn more about using GitHub Desktop](https://help.github.com/en/desktop/contributing-to-projects/committing-and-reviewing-changes-to-your-project).
You can also clone (i.e download) a copy of your repository to your computer and [run Docsify locally](https://docsify.js.org/#/quickstart) to preview your site. See the below video for details.
🧩 Embedding your Docsify Page Content into Other Systems
---
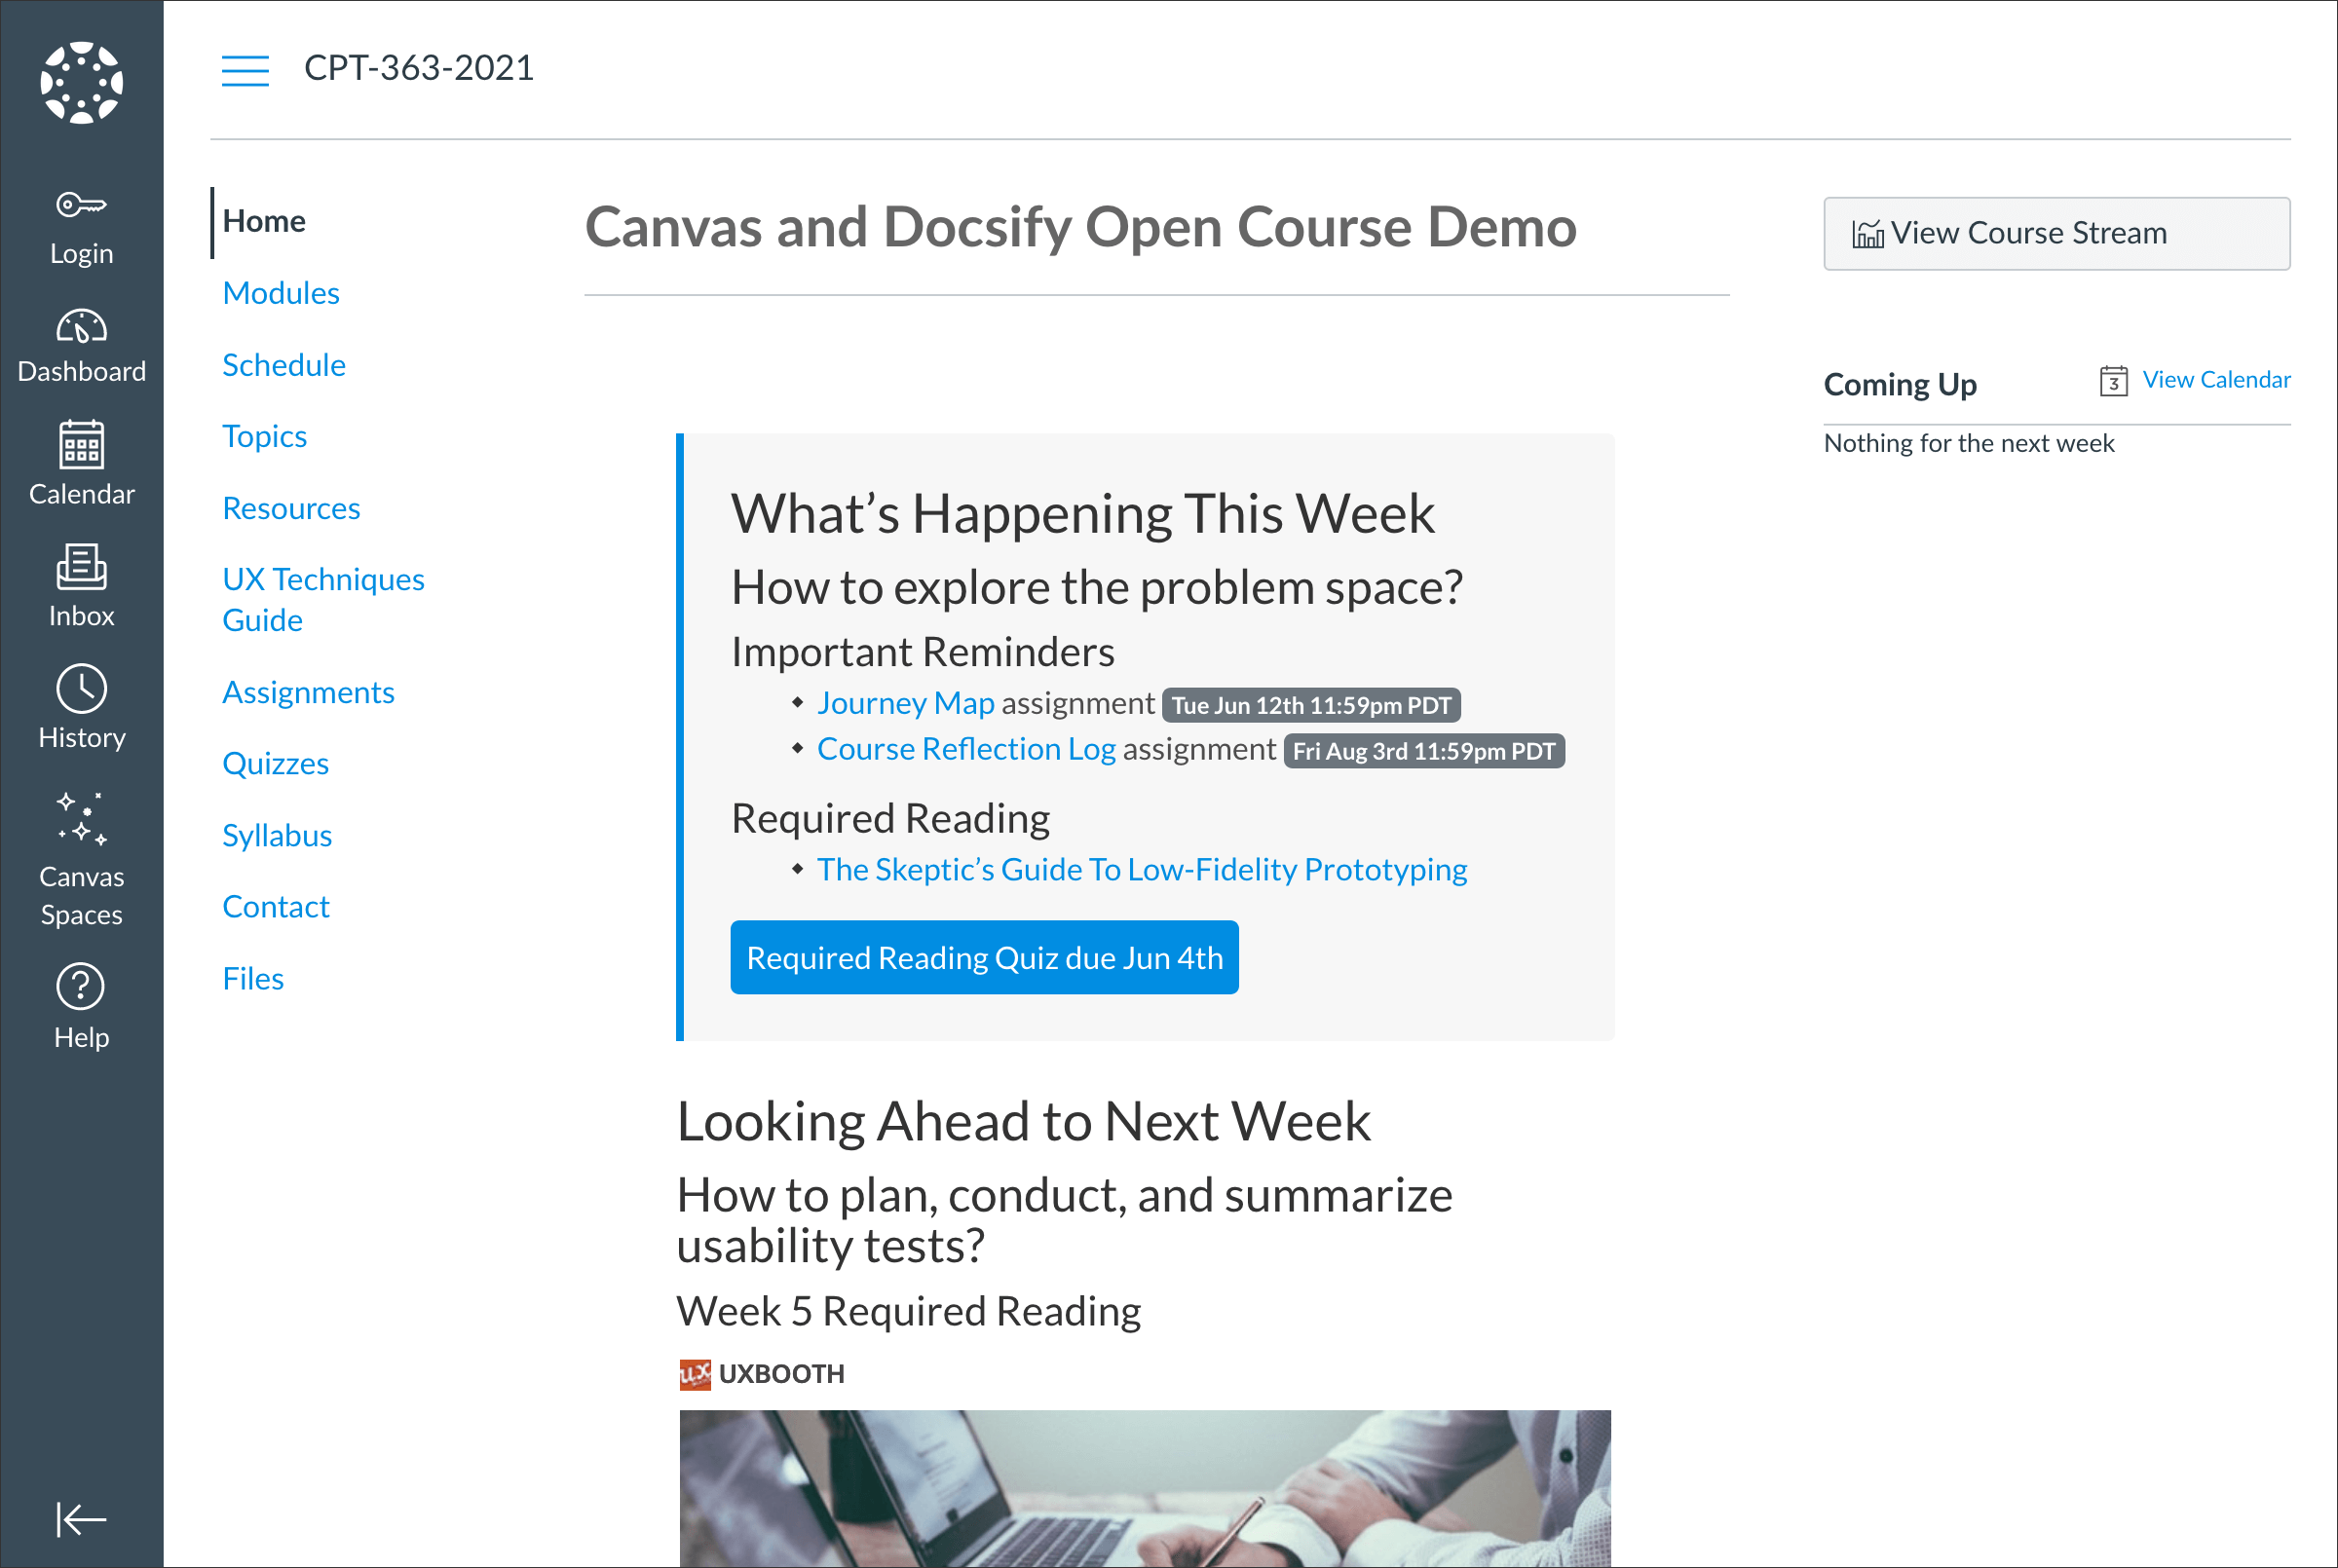
_Figure 2. Docsify Open Course Page Embedded into the Canvas LMS. Explore an example Canvas LMS course using Docsify Open Course pages for content at [https://canvas.sfu.ca/courses/44038/](https://canvas.sfu.ca/courses/44038)_
The optional `embedded` (all lowercase) URL parameter hides a site’s sidebar for seamlessly embedding Docsify page content within another platform such as Canvas LMS, Moodle, Microsoft Teams or being displayed in an existing or new Browser tab. The parameter `standalone` is supported as an alias for `embedded`.
To only display Docsify page content, add the following to a Docsify page URL:
`?embedded=true`
Example standard Docsify page:
https://hibbitts-design.github.io/demo-docsify-open-course-starter-kit/#/resources
Example Docsify page displaying only page content (i.e., no sidebar is shown):
https://hibbitts-design.github.io/demo-docsify-open-course-starter-kit/#/resources?embedded=true
To optionally show a page Table of Contents (based on included Headers), use the following:
`?embedded=true&toc=true`
Example Docsify page displaying only page content:
https://hibbitts-design.github.io/demo-docsify-open-course-starter-kit/#/resources?embedded=true
Example Docsify page displaying only page content with a page Table of Contents included:
https://hibbitts-design.github.io/demo-docsify-open-course-starter-kit/#/resources?embedded=true&toc=true
To optionally override the hiding of the navbar when displaying only page content, use the following:
`?embedded=true&navbar=true`
Example Docsify page displaying only page content:
https://hibbitts-design.github.io/demo-docsify-open-course-starter-kit/#/resources?embedded=true
Example Docsify page displaying only page content with the navbar still displayed:
https://hibbitts-design.github.io/demo-docsify-open-course-starter-kit/#/resources?embedded=true&navbar=true
To optionally hide the 'Edit this Page' link, use the following:
`?embedded=true&hidegitlink=true`
Example Docsify page displaying only page content:
https://hibbitts-design.github.io/demo-docsify-open-course-starter-kit/#/resources?embedded=true
Example Docsify page displaying only page content with the 'Edit this Page' link hidden:
https://hibbitts-design.github.io/demo-docsify-open-course-starter-kit/#/resources?embedded=true&hidegitlink=true
To optionally show the footer ('_footer.md' file), use the following:
`?embedded=true&footer=true`
Example Docsify page without footer:
https://hibbitts-design.github.io/demo-docsify-open-course-starter-kit/#/resources?embedded=true
Example Docsify page with footer shown:
https://hibbitts-design.github.io/demo-docsify-open-course-starter-kit/#/resources?embedded=true&footer=true
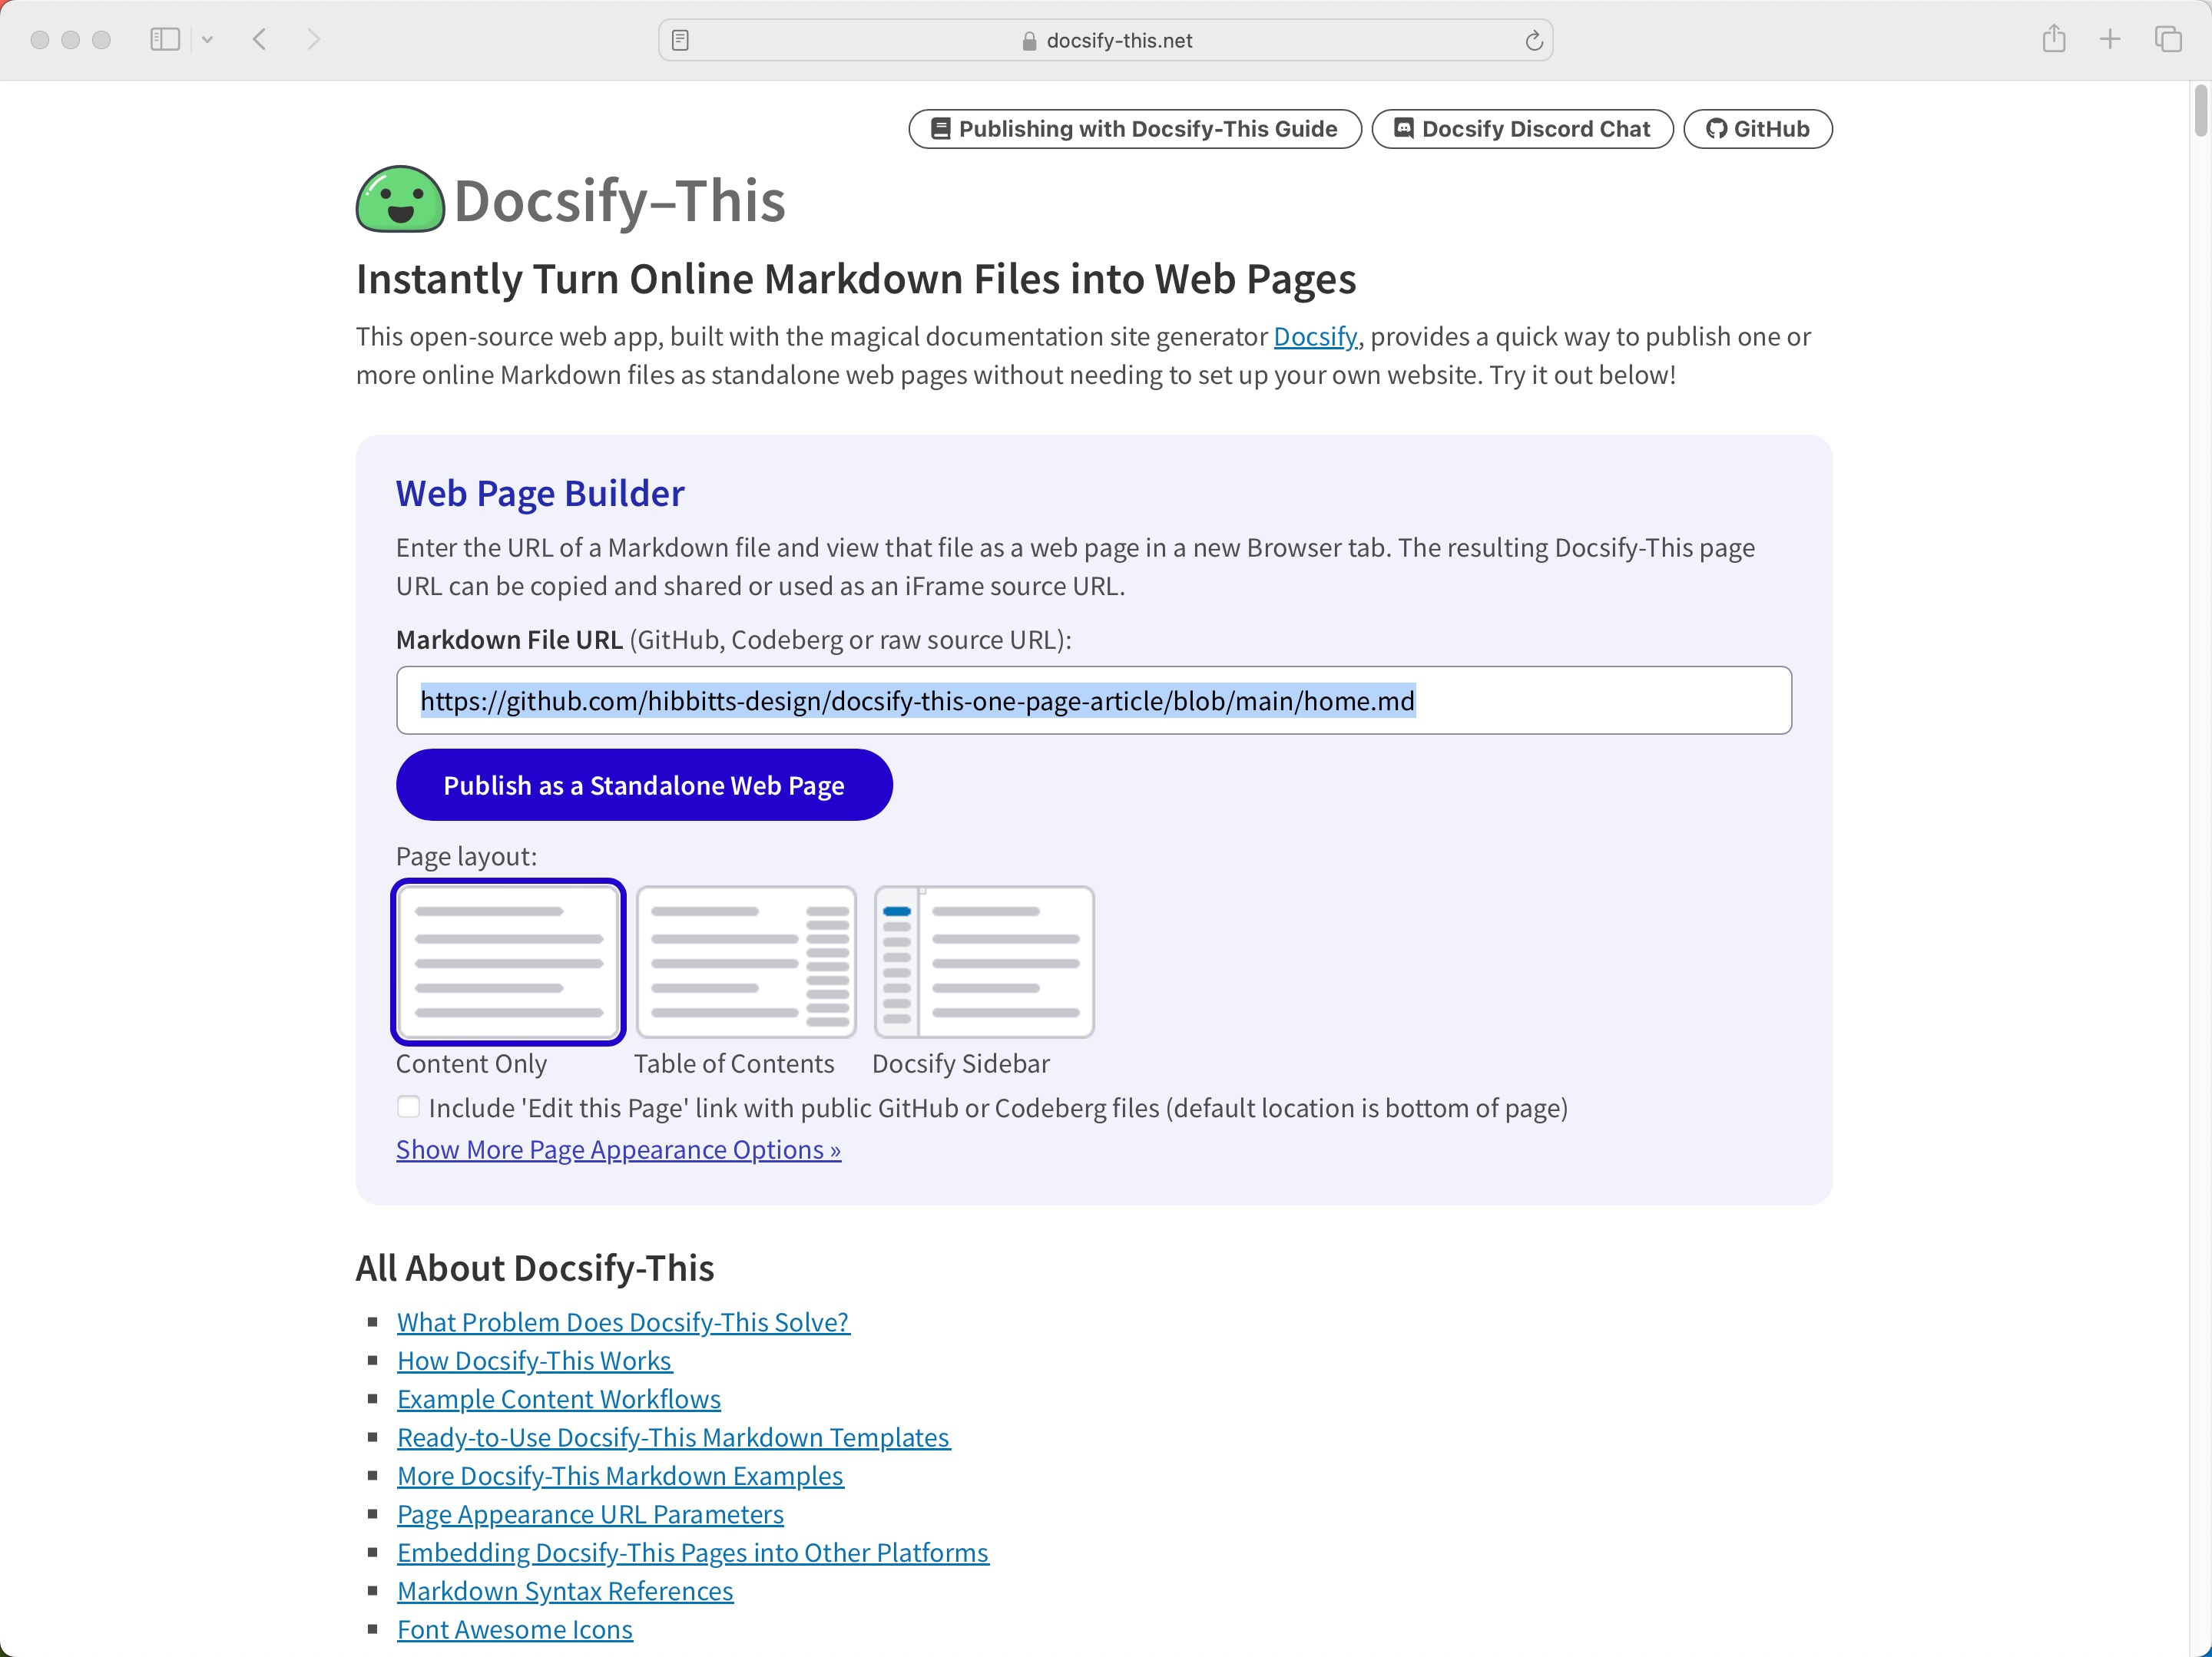
🖼 Presenting your Docsify Page Content as Standalone Webpages
---
In addition to using URL parameters when embedding Docsify page content into other systems, it is possible to permanently display all pages as standalone, and to also always display a page Table of Contents.
**To Display all Pages as Standalone**
1. Open the `index.html` file for editing.
2. Locate the line `var standalone = false;` and change it to `var standalone = true;`.
3. Save the `index.html` file and reload site.
**To Display Page Table of Contents**
1. Open the `index.html` file for editing.
2. Locate the line `var ToC = false;` and change it to `var showToC = true;`.
3. Save the `index.html` file and reload site.
Please note a page must have a series of Headings (#, ##, ###) for the Table of Contents to be displayed correctly.
❛❜ Setting the Name of your Docsify Site
---
1. Open the `index.html` file for editing.
2. Locate the line `Docsify Open Course Starter Kit` and change the text between the title tags to be displayed as the site name on the Browser tab
3. Locate the line `name: 'Docsify Open Course Starter Kit',` and change the text between the quotes to be displayed as the site name at the top of the Docsify Sidebar
4. Save the `index.html` file and reload site.
⚠️ Troubleshooting
---
_Site not displaying on GitHub Pages_
The most likely cause of not seeing your Docsify site on GitHub Pages is that the 'docs' folder is not selected as the source folder. Go to **Settings** of your repository, tap the **Pages** tab (on the left-hand side), choose **main branch**, then **docs folder** and finally tap the **Save** button.
🛠 Using an LMS to Host a Docsify Open Course Site
---
As Docsify Open Course Starter Kit does not require a web server, it can actually be hosted on many LMSs that support file libraries such as Canvas and Moodle.
For example, here is a [Docsify Open Course Site hosted within a Canvas course](https://canvas.sfu.ca/courses/44038/files/15884796/download). Single Docsify Open Course site pages can also be embedded while hosted on the same system.
**Hosting a Docsify Open Course Site on your LMS**
1. Tap **Download** on your repository page
2. Upload to your LMS file storage area, and unzip the upload file
3. Based on your LMS, determine the external URL required to load the `index.html` file within the Docsify `Docs` folder. In Canvas, an example URL would look similar to `https://canvas.sfu.ca/courses/44038/files/15884796/download`.
| :warning: | Once hosted within your LMS, changes made to the source GitHub repository are no longer automatically reflected on your hosted Docsify site. Any GitHub repository updates must be manually uploaded to the LMS file library area. |
|---|:--|
📚 Docsify and Markdown Resources
---
**Docsify**
[Docsify Documentation](https://docsify.js.org/#/?id=docsifyg)
[Docsify Basics by MichaelCurrin](https://michaelcurrin.github.io/docsify-js-tutorial/#/?id=docsify-basics)
**Docsify Themable**
[Docsify Themeable Documentation](https://jhildenbiddle.github.io/docsify-themeable/#/introduction)
[Docsify Themeable GitHub](https://github.com/jhildenbiddle/docsify-themeable)
**Markdown**
[Markdown Here Cheatsheet](https://github.com/adam-p/markdown-here/wiki/Markdown-Here-Cheatsheet)
[Markdown Guide](https://www.markdownguide.org/)
💡 Content Display Tips and Techniques
---
**Including Code Blocks**
Using [Prismjs](https://prismjs.com/) code blocks with syntax highlighting is supported for the languages [included with Docsify](https://docsify.js.org/#/language-highlight?id=language-highlighting) and as well Bash, Go, Java, Kotlin, PHP, Python and Swift. To embed a code block use the Markdown standard of triple backticks and start the block with the name of the language, for example to embed a block of Javascript code with syntax highlight the following would be used:
```javascript
function test() {
  console.log("Hello world!");
}
```
Which would then appear as:
```javascript
function test() {
console.log("Hello world!");
}
```
**Displaying Images in a Grid**
3 or more images can be transformed into a responsive grid gallery by including them in lists. For example:
```markdown
- 
- 
- 
```
🧰 Useful Markdown CSS Classes
---
`accordion`
```html
Topic One
Topic one details here.
Topic Two
Topic two details here.
```
`badge`
```html
Tue Jun 12th 11:59pm PDT
```
```html
Tue Jun 12th 11:59pm PDT
```
```html
Tue Jun 12th 11:59pm PDT
```
```html
[Tue May 16 2:30pm PT](https://www.timeanddate.com/worldclock/fixedtime.html?msg=CMPT-363+Blackboard+Mini-lectures+and+Activities&iso=20220516T1430&p1=256&ah=1&am=50)
```
`banner-image` (cropped to height of 250px on large screens, 125px on small screens)
```markdown

```
`banner-tall-image` (cropped to height of 350px on large screens, 175px on small screens)
```markdown

```
`button`
```markdown
[Required Reading Quiz due Jun 4th](https://canvas.sfu.ca/courses/44038/quizzes/166553 ':class=button')
```
`button-rounded`
```markdown
[Required Reading Quiz due Jun 4th](https://canvas.sfu.ca/courses/44038/quizzes/166553 ':class=button-rounded')
```
`button-secondary`
```markdown
[Required Reading Quiz due Jun 4th](https://canvas.sfu.ca/courses/44038/quizzes/166553 ':class=button-secondary')
```
`button-rounded-secondary`
```markdown
[Required Reading Quiz due Jun 4th](https://canvas.sfu.ca/courses/44038/quizzes/166553 ':class=button-rounded-secondary')
```
`card`
```html
## [Blog Post Title Link](#)

Blog post preview text goes here with more details about the content.
Jan 1, 1970.
[Read More](# ":class=navpill")
## [Another Blog Post](#)

Another blog post preview with different content.
Jan 1, 1970.
[Read More](# ":class=navpill")
```
`embedly-card` (for linked article previews, embedded slides/videos, etc.)
```markdown
Defining usability
```
`header-image-fade` (suggested width of 1200px to 2000px)
```markdown

```
`header-image-fade-full-width` (suggested size of 1200px to 2000px, and display of Table of Contents is not available)
```markdown

```
`header-image-full-width` (suggested size of 1200px to 2000px width and 400px to 600px height, and display of Table of Contents is not available)
```markdown

```
`header-tall-image-full-width` (suggested size of 1200px to 2000px width and 400px to 600px height, and display of Table of Contents is not available)
```markdown

```
`header-image-full-width-headings-overlay` (Suggested size of 1200px to 2000px width and 400px to 600px height, and display of Table of Contents is not available)
```markdown

# Page Title
```
`header-tall-image-full-width-headings-overlay` (Suggested size of 1200px to 2000px width and 400px to 600px height, and display of Table of Contents is not available)
```markdown

# Page Title
```
`image-75` (scale image to 75%)
```markdown

```
`image-50` (scale image to 50%)
```markdown

```
`image-25` (scale image to 25%)
```markdown

```
`image-75-border`
```markdown

```
`image-50-border`
```markdown

```
`image-25-border`
```markdown

```
`image-border`
```markdown

```
`image-border-rounded`
```markdown

```
`navpill`
```markdown
[GitHub](https://github.com/hibbitts-design/docsify-this ':class=navpill')
```
```html
GitHub
```
`responsive`
```html
```
`row` & `column`
```html
Lorem ipsum dolor sit amet, consectetur adipiscing elit.
Lorem ipsum dolor sit amet, consectetur adipiscing elit.
```
```html
Lorem ipsum dolor sit amet, consectetur adipiscing elit.
Lorem ipsum dolor sit amet, consectetur adipiscing elit.
```
```html
Lorem ipsum dolor sit amet, consectetur adipiscing elit.
Lorem ipsum dolor sit amet, consectetur adipiscing elit.
```
`video-container-4by3`
```html
```
`video-container-16by9`
Automatically added to all iFrames with the source domains 'youtube.com' or 'docs.google.com'.
```html
```
🎨 Visual Customization
---
A Docsify Open Course Starter Kit site can be visually customized using CSS within the `custom.css` file located in the folder `docs/assets/css`. Using this file new Markdown CSS classes can be defined.
CSS:
```css
.markdown-section .mybutton, .markdown-section .mybutton:hover {
cursor: pointer;
color: #CC0000;
height: auto;
display: inline-block;
border: 2px solid #CC0000;
border-radius: 4rem;
margin: 2px 0px 2px 0px;
padding: 8px 18px 8px 18px;
line-height: 1.2rem;
background-color: white;
font-family: -apple-system, "Segoe UI", "Helvetica Neue", sans-serif;
font-weight: bold;
text-decoration: none;
}
```
Markdown:
```markdown
[Required Reading Quiz due Jun 4th](https://canvas.sfu.ca/courses/44038/quizzes/166553 ':class=mybutton')
```
[Docsify Themeable CSS settings](https://jhildenbiddle.github.io/docsify-themeable/#/customization?id=base) can also be configured, as seen in the examples provided in the default `custom.css` file.
CSS:
```css
:root {
--link-color: #0F6CBF!important;
}
*/
```
It is also possible for dual CSS styling to be configured, with CSS applied to when viewing the site (with overriding custom CSS included in a `STYLE` tag in the `_sidebar.md` file) and then other CSS settings within the `custom.css` file applied to when viewing standalone pages (i.e. `?embedded=true`)
CSS in Sidebar file (`_sidebar.md`):
```css
```
🌐 Using MAMP to View Docsify Sites Locally
---
An alternative to installing Docsify locally (as described following this section) is to use MAMP to view your Docsify sites locally on your own computer.
1. Download [MAMP](https://www.mamp.info/)
2. Move your local Docsify site to the **htdocs** folder of MAMP
3. Turn MAMP on, tap **WebStart** and then tap **My Website**
4. Tap on the folder containing your local Docsify site and then tap on the **docs** folder
📼 Video Walkthrough of Local Docsify Install/Config
---
[](https://www.youtube.com/watch?v=TV88lp7egMw)
_Video 1. Generating Documentation Sites with GitHub and Docsify - Alysson Alvaran_
🙇Credits and Special Thanks
---
[Docsify Themeable](https://github.com/jhildenbiddle/docsify-themeable)
 ```
`row` & `column`
```html
```
`row` & `column`
```html