# Integrating a Policy
Like many aspects of computing, AI terms such as _model_ and _policy_ are used
in many contexts and can have differing meanings. The following diagram shows
how these terms are used in the software blocks of the AI for Industry
Challenge:
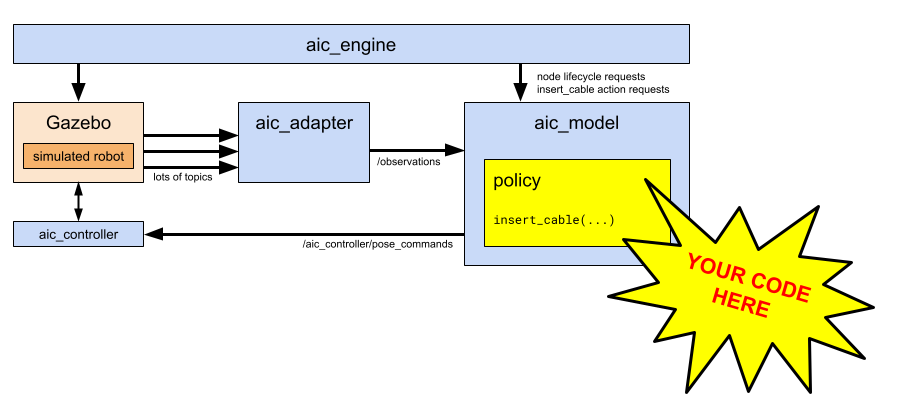
A _policy_ is the software which consumes sensor data and produces output
commands to the robot. Creating a _policy_ is at the heart of the AI for
Industry Challenge, since it is the critical block that "closes the loop"
between sensors and actuators.
More specifically, the _policy_ can receive the following data at up to 20 Hz:
* :camera: :camera: :camera: images from three cameras mounted on the robot wrist
* :mechanical_arm: joint angles of the robot arm and gripper
* :balance_scale: 3d force and 3d torque measurements at the robot wrist
* :triangular_ruler: target and actual poses of the gripper-fingers tool center
point (TCP)
* :comet: velocity of the gripper-fingers tool center point (TCP)
For convenience, the `aic_adapter` in the Challenge environment combines
time-synchronized values of the sensor suite into a single composite
`Observation` data structure, which is delivered to the `aic_model` block at 20
Hz. The user-defined `policy` is dynamically loaded at runtime into `aic_model`
and can retrieve the latest `Observation` at any time.
The policy is responsible for issuing position or velocity targets to the
`aic_controller`, which provides low-level control of the arm to manage contact
forces. The targets can be sent to `aic_controller` at any rate.
Several API styles are possible when writing a policy.
Because the Challenge is implemented in ROS, the simplest API uses the data
structures generated by the ROS 2 Python client library, `rclpy`, as shown
in the following section.
## Policy API
To integrate a policy using ROS data structures, such as `geometry_msgs.msg.Pose`,
`sensor_msgs.msg.Image`, and so on:
* define a Python class which derives from [`aic_model.Policy`](https://github.com/intrinsic-dev/aic/blob/main/aic_model/aic_model/policy.py)
* implement the [`insert_cable()`](https://github.com/intrinsic-dev/aic/blob/main/aic_model/aic_model/policy.py#L49) method, which is called when `aic_engine` requests a new task.
* supply this Python class name as a parameter to `aic_model` at runtime.
The `insert_cable()` function receives several `Callable` methods as parameters:
* `get_observation()` returns the most recent [`Observation`](https://github.com/intrinsic-dev/aic/blob/main/aic_interfaces/aic_model_interfaces/msg/Observation.msg) as a ROS message. This message is composed of several ROS submessages:
* [`sensor_msgs/Image left_image`](https://github.com/ros2/common_interfaces/blob/kilted/sensor_msgs/msg/Image.msg) (and `center_image` and `right_image`)
* [`sensor_msgs/CameraInfo left_camera_info`](https://github.com/ros2/common_interfaces/blob/kilted/sensor_msgs/msg/CameraInfo.msg) (and `center_camera_info` and `right_camera_info`)
* [`sensor_msgs/JointState joint_states`](https://github.com/ros2/common_interfaces/blob/kilted/sensor_msgs/msg/JointState.msg)
* [`geometry_msgs/WrenchStamped wrist_wrench`](https://github.com/ros2/common_interfaces/blob/kilted/geometry_msgs/msg/WrenchStamped.msg)
* [`aic_control_interfaces/ControllerState controller_state`](https://github.com/intrinsic-dev/aic/blob/main/aic_interfaces/aic_control_interfaces/msg/ControllerState.msg)
* `move_robot()` sends a `MotionUpdate` or `JointMotionUpdate` message to the robot arm controller.
* `send_feedback()` publishes a `string` as a [feedback](https://docs.ros.org/en/kilted/Tutorials/Intermediate/Creating-an-Action.html#defining-an-action) message of the `InsertCable` action, which can be useful for debugging.
The _policy_ can invoke API functions which issue motion commands to the robot.
As an implementation detail, those API functions use the `aic_model` ROS node
to publish data to the `aic_controller`, which is implemented using the
[`ros2_control`](https://control.ros.org/rolling/index.html) framework.
## Baseline Policies
We provide several baseline policy implementations in the [`aic_example_policies`](../aic_example_policies/) package that demonstrate different approaches to the cable insertion task:
- **WaveArm** - A minimal example showing the basic Policy API structure
- **CheatCode** - A "cheating" policy that uses ground truth data for training and debugging
- **RunACT** - An ACT (Action Chunking with Transformers) policy implementation
For detailed descriptions, usage instructions, and source code, see the [Example Policies README](../aic_example_policies/README.md).
To see expected scoring results for each baseline policy, see the [Scoring Test & Evaluation Guide](./scoring_tests.md).
## Tutorial: Creating a new policy node
A policy node is essentially a ROS 2 node that subscribes to observations and publishes actions to be executed.
For this tutorial, we will be using [aic_model](../aic_model/) to implement a policy node.
> [!Important]
> Take note of the prompt in the bash examples. If it starts with `(aic) $`, then it should be run from inside the pixi environment.
>
> Example:
> ```bash
> $ pixi shell # This is outside pixi environment.
> (aic) $ ros2 pkg list # This is inside the environment.
> ```
### Create a new ROS 2 package
```bash
# Run "pixi shell" to enter the pixi environment
(aic) $ ros2 pkg create my_policy_node --build-type ament_python
```
### Add AIC dependencies
Add the following to `package.xml`:
```xml
aic_control_interfaces
aic_model
aic_model_interfaces
aic_task_interfaces
geometry_msgs
rclpy
sensor_msgs
std_srvs
trajectory_msgs
```
### Create a pixi package
Create a `pixi.toml` in the directory of the `my_policy_node` package with the following contents:
```toml
[package.build.backend]
name = "pixi-build-ros"
version = "==0.3.3.20260113.c8b6a54"
channels = [
"https://prefix.dev/pixi-build-backends",
"robostack-kilted",
"conda-forge",
]
[package.host-dependencies]
ros-kilted-aic-control-interfaces = { path = "../aic_interfaces/aic_control_interfaces" }
ros-kilted-aic-model = { path = "../aic_model" }
ros-kilted-aic-model-interfaces = { path = "../aic_interfaces/aic_model_interfaces" }
ros-kilted-aic-task-interfaces = { path = "../aic_interfaces/aic_task_interfaces" }
[package.build-dependencies]
ros-kilted-aic-control-interfaces = { path = "../aic_interfaces/aic_control_interfaces" }
ros-kilted-aic-model = { path = "../aic_model" }
ros-kilted-aic-model-interfaces = { path = "../aic_interfaces/aic_model_interfaces" }
ros-kilted-aic-task-interfaces = { path = "../aic_interfaces/aic_task_interfaces" }
```
> [!Tip]
> Normally, pixi will automatically discover the dependencies from `package.xml`. But because we are building the aic interfaces from source, we need to tell pixi where to find them.
### Add the pixi package to the workspace
In the root `pixi.toml`, add the new package to `[dependencies]`.
It should look like this
```toml
[dependencies]
# ...
ros-kilted-my-policy-node = { path = "my_policy_node" }
```
### Implement `PolicyRos`
For brevity, we will reuse the code from `aic_example_policies`. See the [ROS Policy API](#ros-policy-api) section above for implementation details.
```bash
(aic) $ cp aic_example_policies/aic_example_policies/ros/WaveArm.py my_policy_node/my_policy_node/WaveArm.py
```
### Test the policy node
Terminal 1:
```bash
# Make sure to run 'export DBX_CONTAINER_MANAGER=docker'
$ distrobox enter -r aic_eval -- /entrypoint.sh
```
Terminal 2:
```bash
$ pixi reinstall ros-kilted-my-policy-node
$ pixi run ros2 run aic_model aic_model --ros-args -p use_sim_time:=true -p policy:=my_policy_node.WaveArm
```
> [!Note]
> The command above runs the `aic_model` node, which then dynamically loads and runs your specific policy implementation (`my_policy_node.WaveArm`).
### Dependency Management
This is a quick guide on how to manage dependencies under a pixi workspace. Unlike a typical ROS workspace, you will not be using any system dependencies; all dependencies must come from conda or pypi.
#### Adding dependencies
##### ROS dependencies
The pixi workspace is set up with the robostack-kilted channel. You can install most ROS packages with pixi.
```bash
$ pixi add ros-kilted-ros-core
```
##### pypi dependencies
Unlike a native ROS workspace, a pixi workspace can mix ROS and pypi dependencies.
```bash
$ pixi add --pypi torch
```
##### Local dependencies
If your package requires a local dependency in the same workspace, those dependencies must be declared on both the package's `pixi.toml` and the root `pixi.toml`.
For example, if `my_policy_node` requires `my_local_dep`,
`my_policy_node/pixi.toml`:
```toml
[package.host-dependencies]
# ...
ros-kilted-my-local-dep = { path = "../my_local_dep" }
[package.build-dependencies]
# ...
ros-kilted-my-local-dep = { path = "../my_local_dep" }
```
`pixi.toml`:
```toml
[dependencies]
# ...
ros-kilted-my-policy-node = { path = "my_policy_node" }
ros-kilted-my-local-dep = { path = "my_local_dep" }
```
> [!Tip]
> pixi automatically prefixes a ROS package with `ros--` and converts underscores to hyphens.
### Build-Run-Debug Cycle (Python)
> [!IMPORTANT]
> Changes to packages within a Pixi environment are not tracked automatically. To apply updates, you must `run pixi reinstall `.
```bash
$ pixi reinstall
```
> [!Tip]
> You may enter the pixi environment with `pixi shell` and force an "editable" install with `pip install -e`. But note that this circumvents pixi and may cause unintended side effects.
### Preparing for Submission
After you are satisfied with your policy, you will need to prepare a Docker image for submission. See [Submission](./submission.md) for details.
### Conclusion
Congratulations! You have successfully created, tested, and packaged a policy node.
In this tutorial, you have learned how to:
- Create and set up a new ROS 2 package for a policy node.
- Manage Python and ROS dependencies within a `pixi` workspace.
- Understand the build, run, and debug cycle for developing your policy.
- Prepare a Docker image for your policy for submission.
You are now equipped with the fundamental skills to develop, test, and submit your own policies for the AI for Industry Challenge. Feel free to explore the provided example policies and other documentation for more advanced concepts and inspiration.