---
title: "Introduction to Data Science"
subtitle: "Session 14: Automation, scheduling, and packages"
author: "Simon Munzert"
institute: "Hertie School | [GRAD-C11/E1339](https://github.com/intro-to-data-science-21)" #"`r format(Sys.time(), '%d %B %Y')`"
output:
xaringan::moon_reader:
css: [default, 'simons-touch.css', metropolis, metropolis-fonts]
lib_dir: libs
nature:
highlightStyle: github
highlightLines: true
countIncrementalSlides: false
ratio: '16:9'
hash: true
---
```{css, echo=FALSE}
@media print { # print out incremental slides; see https://stackoverflow.com/questions/56373198/get-xaringan-incremental-animations-to-print-to-pdf/56374619#56374619
.has-continuation {
display: block !important;
}
}
```
```{r setup, include=FALSE}
# figures formatting setup
options(htmltools.dir.version = FALSE)
library(knitr)
opts_chunk$set(
comment = " ",
prompt = T,
fig.align="center", #fig.width=6, fig.height=4.5,
# out.width="748px", #out.length="520.75px",
dpi=300, #fig.path='Figs/',
cache=F, #echo=F, warning=F, message=F
engine.opts = list(bash = "-l")
)
## Next hook based on this SO answer: https://stackoverflow.com/a/39025054
knit_hooks$set(
prompt = function(before, options, envir) {
options(
prompt = if (options$engine %in% c('sh','bash')) '$ ' else 'R> ',
continue = if (options$engine %in% c('sh','bash')) '$ ' else '+ '
)
})
library(tidyverse)
library(nycflights13)
library(kableExtra)
```
# Table of contents
1. [Automation and scripting](#automation)
2. [Scheduling](#scheduling)
3. [R packages](#rpackages)
---
class: inverse, center, middle
name: automation
# Automation and scripting
---
# Automation
---
# Automation
.pull-left-wide2[
### Motivation
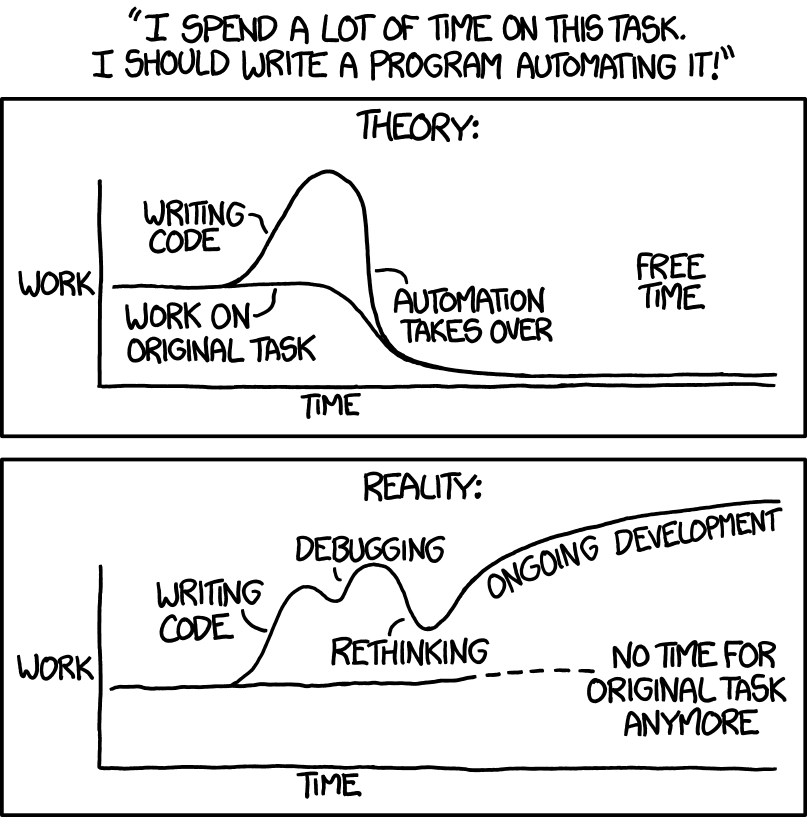
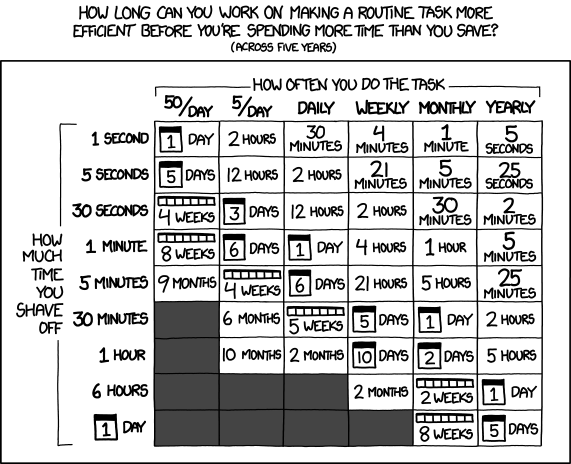
- We spend [too much time](https://itchronicles.com/technology/repetitive-tasks-cost-5-trillion-annually/) on repetitive tasks.
- We're already automating using scripts that bundle multiple commands! Next step: The pipeline as a series of scripts and commands.
- Good pipelines are modular. But you don't want to trigger 10 scripts sequentially by hand.
- Some tasks are to be repeated on a regular basis (schedule).
### When automation makes sense
- The input is variable but the process of turning input into output is highly standardized.
- You use a diverse set of software to produce the output.
- Others (humans, machines) are supposed to run the analyses.
- Time saved by automation >> Time needed to automate.
]
.pull-right-small3[
### Different ways of doing it
We will consider automation
- using **R**,
- using the **Shell** and **RScript**,
- using **make**, and
- using dedicated **scheduling tools**.
]
---
# Thinking in pipelines
.pull-left[
### Key characteristics
- Pipelines make complex projects easier to handle because they break up a monolithic script into **discrete, manageable chunks**.
- If properly done, each stage of the pipeline defines its input and its outputs.
- Pipeline modules **do not modify their inputs** (*idempotence*). Rerunning one module produces the same results as the previous run.
### Key advantages
- When you modify one stage of the pipeline, you only have to rerun the downstream, dependent stages.
- Division of labor is straightforward.
- Modules tend to be a lot easier to debug.
]
.pull-right[
]
---
# A data science pipeline is a graph
.pull-left-small2[
### Wait what
- Scripts and data files are vertices of the graph.
- Dependencies between stages are edges of the graph.
- Pipelines are not necessarily DAGS. Recursive routines are imaginable (but to be avoided?).
- Also, scripts are not necessarily hierarchical (e.g., multiple different modeling approaches of the same data in different scripts).
- An automation script gives *one* order in which you can successfully run the pipeline.
]
.pull-right-wide2[
]
---
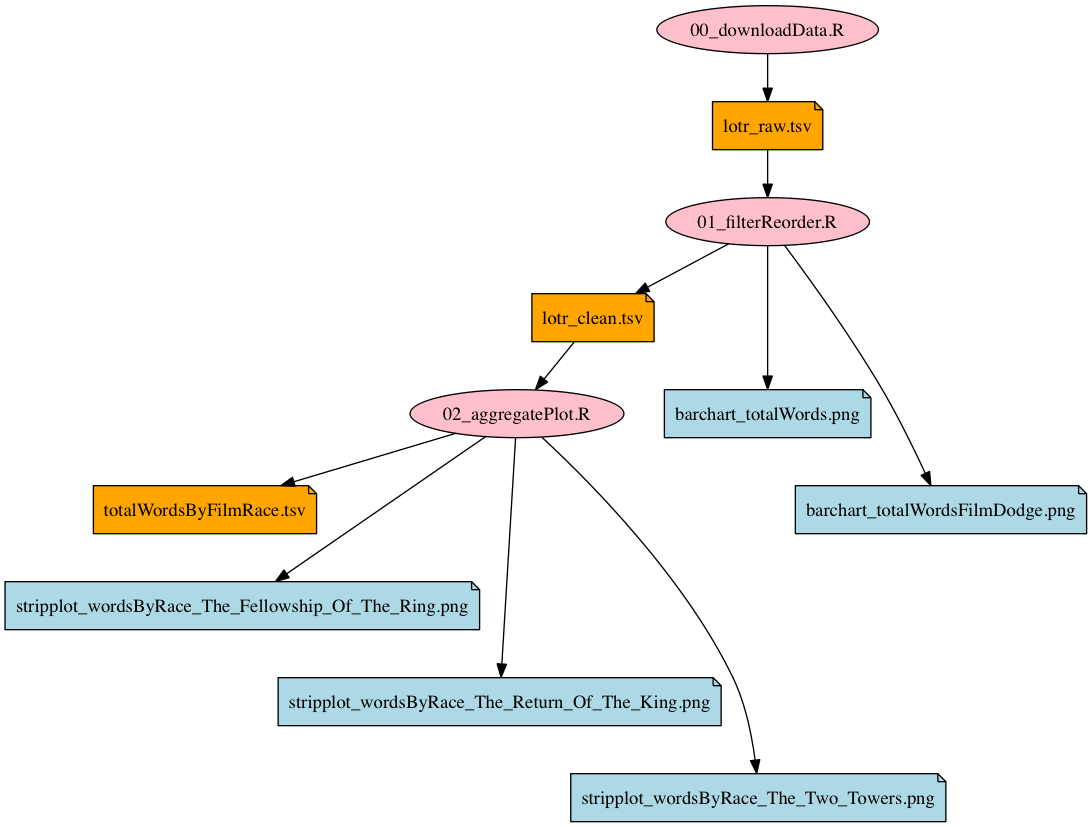
# An example pipeline
.pull-left-small[
In the following, we will work with this toy pipeline:
.footnote[1Courtesy of [Jenny Bryan](https://github.com/STAT545-UBC/STAT545-UBC-original-website).]
]
.pull-right-wide[
]
---
# An example pipeline
.pull-left-small[
In the following, we will work with this toy pipeline:
- `00-packages.R` loads the packages necessary for analysis,
]
.pull-right-wide[
`00-packages.R`:
```{r, eval = FALSE}
# install packages from CRAN
p_needed <- c("tidyverse" # tidyverse packages
)
packages <- rownames(installed.packages())
p_to_install <- p_needed[!(p_needed %in% packages)]
if (length(p_to_install) > 0) {
install.packages(p_to_install)
}
lapply(p_needed, require, character.only = TRUE)
```
]
---
# An example pipeline
.pull-left-small[
In the following, we will work with this toy pipeline:
- `00-packages.R` loads the packages necessary for analysis,
- `01-download-data.R` downloads a spreadsheet, which is stored as `lotr_raw.tsv`,
]
.pull-right-wide[
`01-download-data.R`:
```{r, eval = FALSE}
## download raw data
download.file(url = "http://bit.ly/lotr_raw-tsv",
destfile = "lotr_raw.tsv")
```
]
---
# An example pipeline
.pull-left-small[
In the following, we will work with this toy pipeline:
- `00-packages.R` loads the packages necessary for analysis,
- `01-download-data.R` downloads a spreadsheet, which is stored as `lotr_raw.tsv`,
- `02-process-data.R` imports and processes the data and exports a clean spreadsheet as `lotr_clean.tsv`, and
]
.pull-right-wide[
`02-process-data.R`:
```{r, eval = FALSE}
## import raw data
lotr_dat <- read_tsv("lotr_raw.tsv")
## reorder Film factor levels based on story
old_levels <- levels(as.factor(lotr_dat$Film))
j_order <- sapply(c("Fellowship", "Towers", "Return"),
function(x) grep(x, old_levels))
new_levels <- old_levels[j_order]
## process data set
lotr_dat <- lotr_dat %>%
# apply new factor levels to Film
mutate(Film = factor(as.character(Film), new_levels),
# revalue Race
Race = recode(Race, `Ainur` = "Wizard", `Men` = "Man")) %>%
##
## write data to file
write_tsv(lotr_dat, "lotr_clean.tsv")
```
]
---
# An example pipeline
.pull-left-small[
In the following, we will work with this toy pipeline:
- `00-packages.R` loads the packages necessary for analysis,
- `01-download-data.R` downloads a spreadsheet, which is stored as `lotr_raw.tsv`,
- `02-process-data.R` imports and processes the data and exports a clean spreadsheet as `lotr_clean.tsv`, and
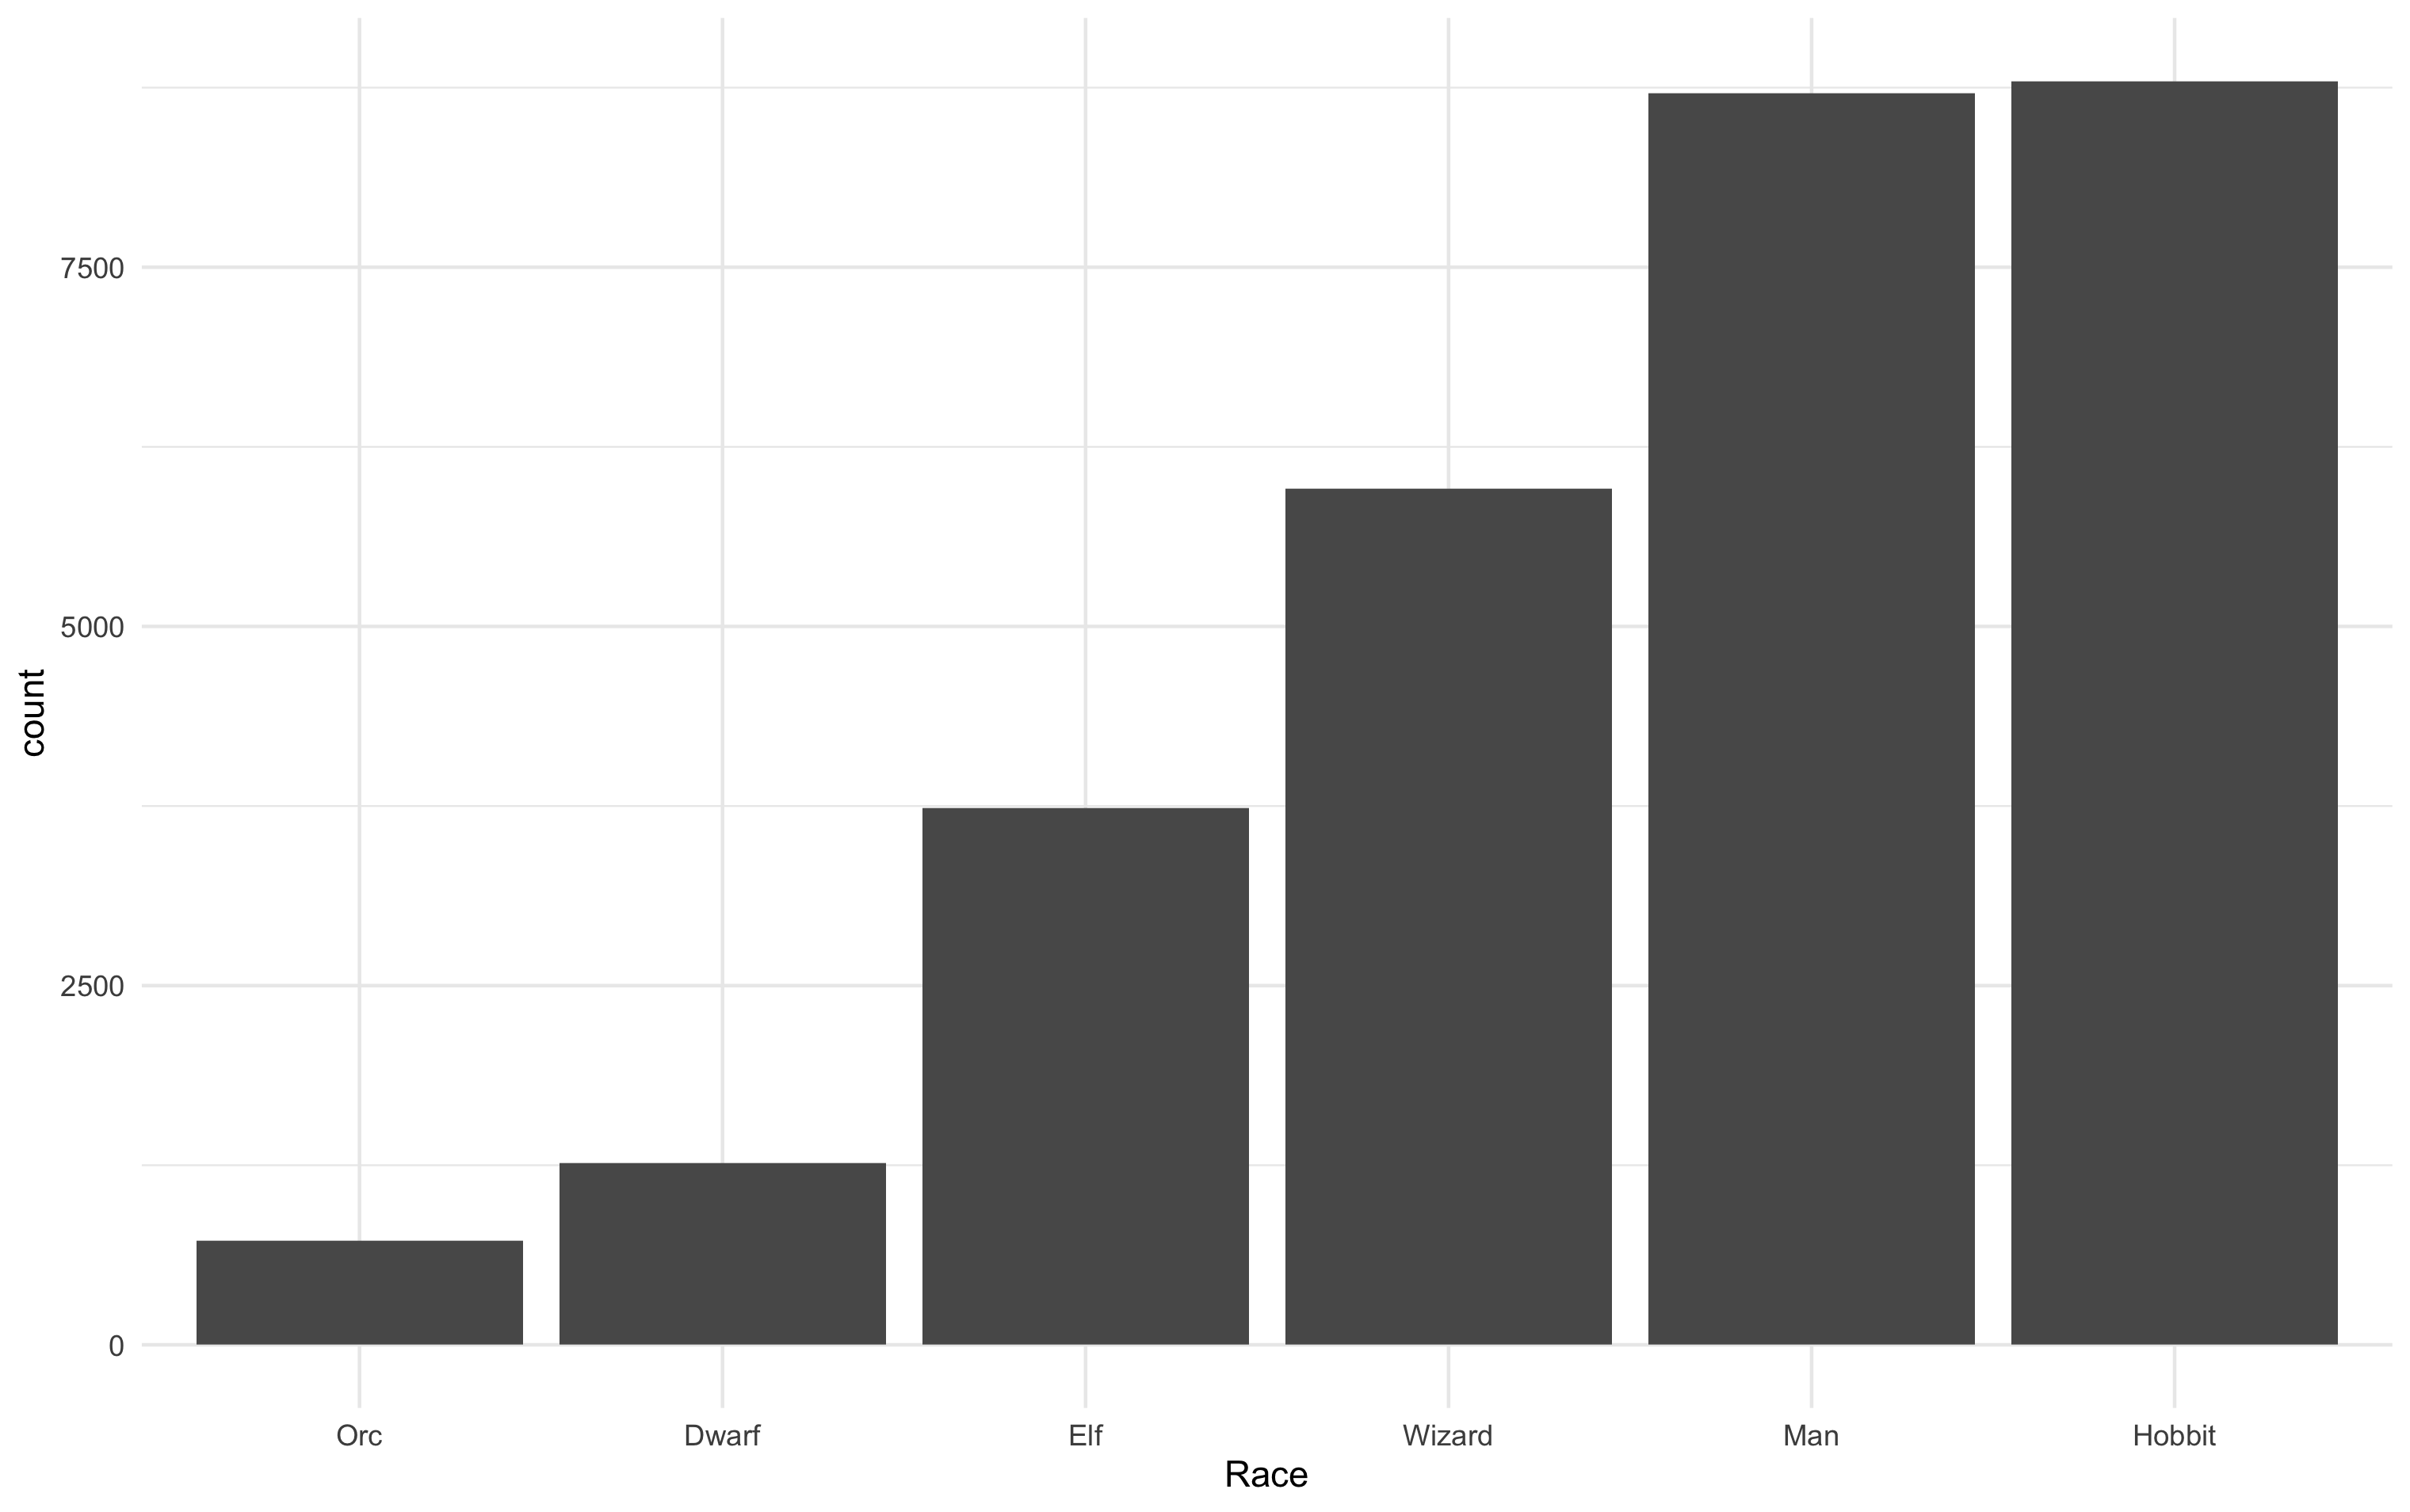
- `03-plot.R` imports the clean dataset, produces a figure and exports it as `barchart-words-by-race.png`.
]
.pull-right-wide[
`03-plot.R`:
```{r, eval = FALSE}
## import clean data
lotr_dat <- read_tsv("lotr_clean.tsv") %>%
# reorder Race based on words spoken
mutate(Race = reorder(Race, Words, sum))
## make a plot
p <- ggplot(lotr_dat, aes(x = Race, weight = Words)) + geom_bar()
ggsave("barchart-words-by-race.png", p)
```
]
---
# An example pipeline
```{r, include = FALSE}
library(tidyverse)
lotr_dat <- read_tsv("examples/01-automation-just-r/lotr_clean.tsv")
set.seed(123)
```
```{r, eval = TRUE}
slice_sample(lotr_dat, n = 10)
```
---
# An example pipeline
```{r, eval = FALSE}
p <- ggplot(lotr_dat, aes(x = Race, weight = Words)) +
geom_bar() + theme_minimal()
```
---
# Automation using pipelines in R
.pull-left[
### Motivation and usage
- The `source()` function reads and parses R code from a file or connection.
- We can build a pipeline by sourcing scripts sequentially.
- This pipeline is usually stored in a "master" script.
- The removal of previous work is optional and maybe redundant. Often the data is overwritten by default.
- It is recommended that the individual scripts are (partial) standalones, i.e. that they import all data they need by default (loading the packages could be considered an exception).
- Note that as long as the environment is not reset, it remains intact across scripts, which is a potential source of error and confusion.
]
--
.pull-right[
### Example
The master script `master.R`:
```{r, eval = FALSE}
## clean out any previous work
outputs <- c("lotr_raw.tsv",
"lotr_clean.tsv",
list.files(pattern = "*.png$"))
file.remove(outputs)
## run scripts
source("00-packages.R")
source("01-download-data.R")
source("02-process-data.R")
source("03-plot.R")
```
]
---
# Automation using the Shell and Rscript
.pull-left[
### Motivation and usage
- Alternatively to using an R master script, we can also run the pipeline from the command line.
- Note that here, the environments don't carry over across `Rscript` calls. The scripts definitely have to run in a standalone fashion (i.e., load packages, import all necessary data, etc.).
- The working directory should be set either in the script(s) or in the shell with `cd`.
]
--
.pull-right[
### Example
The master script `master.sh`:
```bash
#!/bin/sh
cd /Users/simonmunzert/github/examples/02-automation-shell-rscript
set -eux
Rscript 01-download-data.R
Rscript 02-process-data.R
Rscript 03-plot.R
```
The `set` command allows to adjust some base shell parameters:
- `-e`: Stop at first error
- `-u`: Undefined variables are an error
- `-x`: Print each command as it is run
For more information on `set`, see [here](http://linuxcommand.org/lc3_man_pages/seth.html).
]
---
# Automation using the Shell and Rscript
.pull-left[
### Motivation and usage
- Alternatively to using an R master script, we can also run the pipeline from the command line.
- Note that here, the environments don't carry over across `Rscript` calls. The scripts definitely have to run in a standalone fashion (i.e., load packages, import all necessary data, etc.).
- The working directory should be set either in the script(s) or in the shell with `cd`.
- One advantage of this approach is that it can be easily coupled with other command line tools, building a **polyglot pipeline**.
]
.pull-right[
### Example
The master script `master.sh`:
```bash
#!/bin/sh
cd /Users/simonmunzert/github/examples/02-automation-shell-rscript
set -eux
*curl -L http://bit.ly/lotr_raw-tsv > lotr_raw.tsv
Rscript 02-process-data.R
Rscript 03-plot.R
```
The `set` command allows to adjust some base shell parameters:
- `-e`: Stop at first error
- `-u`: Undefined variables are an error
- `-x`: Print each command as it is run
For more information on `set`, see [here](http://linuxcommand.org/lc3_man_pages/seth.html).
]
---
# Automation using Make
.pull-left-vwide[
### Motivation and usage
- [Make](https://en.wikipedia.org/wiki/Make_%28software%29) is an automation tool that allows us to specify and manage build processes.
- It is commonly run via the shell.
- At the heart of a make operation is the `makefile` (or `Makefile`, `GNUmakefile`), a script which serves as a recipe for the building process.
- A `makefile` is written following a particular syntax and in a declarative fashion.
- Conceptually, the recipe describes which files are built how and using what input.
### Advantages of Make
- It looks at which files you have and automatically figures out how to create the files that you have. For complex pipelines this "automation of the automation process" can be very helpful.
- While shell scripts give *one* order in which you can successfully run the pipeline, Make will figure out the parts of the pipeline (and their order) that are needed to build a desired target.
]
.pull-right-vsmall[
]
---
# Automation using Make (cont.)
.pull-left-small[
### Basic syntax
Each batch of lines indicates
- a file to be created (the target),
- the files it depends on (the prerequisites), and
- set of commands needed to construct the target from the dependent files.
Dependencies propagate.
- To create any of the `png` figures, we need `lotr_clean.tsv`.
- If this file changes, the `png`s change as well when they're built.
]
.pull-right-wide[
### Example `makefile`
```bash
all: lotr_clean.tsv barchart-words-by-race.png words-histogram.png
lotr_raw.tsv:
curl -L http://bit.ly/lotr_raw-tsv > lotr_raw.tsv
lotr_clean.tsv: lotr_raw.tsv 02-process-data.R
Rscript 02-process-data.R
barchart-words-by-race.png: lotr_clean.tsv 03-plot.R
Rscript 03-plot.R
words-histogram.png: lotr_clean.tsv
Rscript -e 'library(ggplot2);
qplot(Words, data = read.delim("$<"), geom = "histogram");
ggsave("$@")'
rm Rplots.pdf
clean:
rm -f lotr_raw.tsv lotr_clean.tsv *.png
```
]
---
# Automation using Make (cont.)
.pull-left-small[
.footnote[1While the basic syntax is simple (see right), the devil's in the detail. Check out resources listed on the next slide if you want to learn more.]
### Getting Make to run
- Using the command line, go into the directory for your project.
- Create the `Makefile` file.1
- The most basic Make commands are `make all` and `make clean` which builds (or deletes) all output as specified in the script.
]
.pull-right-wide[
### Example `makefile`
```bash
*all: lotr_clean.tsv barchart-words-by-race.png words-histogram.png
lotr_raw.tsv:
curl -L http://bit.ly/lotr_raw-tsv > lotr_raw.tsv
lotr_clean.tsv: lotr_raw.tsv 02-process-data.R
Rscript 02-process-data.R
barchart-words-by-race.png: lotr_clean.tsv 03-plot.R
Rscript 03-plot.R
words-histogram.png: lotr_clean.tsv
Rscript -e 'library(ggplot2);
qplot(Words, data = read.delim("$<"), geom = "histogram");
ggsave("$@")'
rm Rplots.pdf
*clean:
* rm -f lotr_raw.tsv lotr_clean.tsv *.png
```
]
---
# Automation using Make - FAQ
### Does it work on Windows?
To install an run `make` on Windows, check out [these instructions](https://stat545.com/make-windows.html).
### Where can I learn more?
If you consider working with Make, check out the [official manual](https://www.gnu.org/software/make/manual/make.html), [this helpful tutorial](https://makefiletutorial.com/), Karl Broman's [excellent minimal make introduction](https://kbroman.org/minimal_make/), or [this Stat545 piece](https://stat545.com/automation-overview.html).
.pull-left-vwide[
### This is dusty technology. Are there alternatives?
In the context of data science with R, the `targets` package is an interesting option. It provides R functionality to define a Make-stype pipeline. Check out the [overview](https://docs.ropensci.org/targets/) and [manual](https://books.ropensci.org/targets/).
]
.pull-right-vsmall[
]
---
class: inverse, center, middle
name: scheduling
# Scheduling
---
# Scheduling
---
# Scheduling scripts and processes
.pull-left-wide[
### Motivation
- So far, we have automated data science pipelines.
- But the execution of these pipelines still needs to be triggered.
- In some cases, it is desirable to also **automate the initialization** of R scripts (or any processes for that matter) **on a regular basis**, e.g. weekly, daily, on logon, etc.
- This makes particular sense when you have moving parts in your pipeline (most likely: data).
### Common scenarios for scheduling
1. You fetch data from the web on a regular basis (e.g., via scraping scripts or APIs).
2. You generate daily/weekly/monthly reports/tweets based on changing data.
3. You build an alert control system informing you about anomalies in a database.
]
.pull-right-small[
`Credit` [Simone Giertz](https://www.youtube.com/watch?v=Lh2-iJj3dI0)
]
---
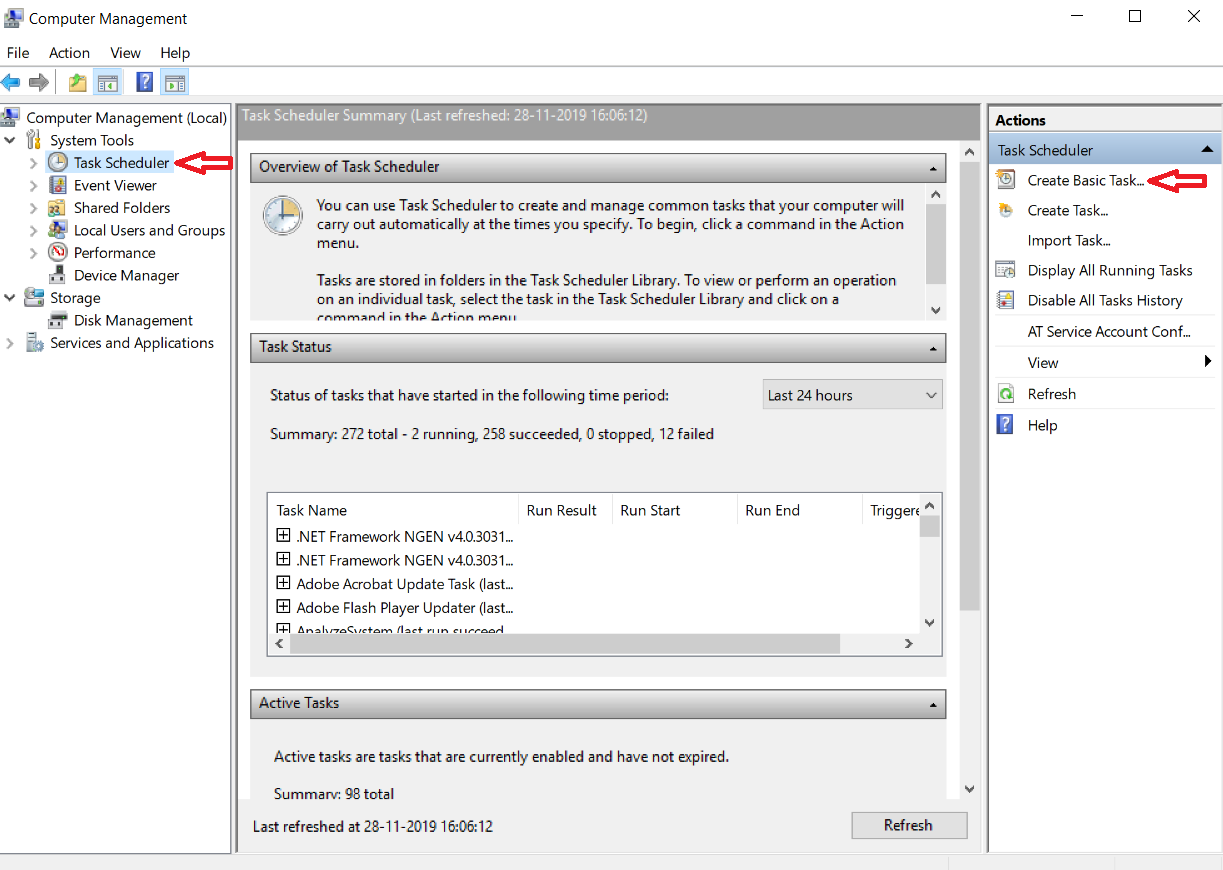
# Scheduling scripts and processes on Windows
.pull-left-small3[
### Scheduling options
- Processes on Windows can be scheduled with the [Windows Task Scheduler](https://en.wikipedia.org/wiki/Windows_Task_Scheduler).
- Manage them via a GUI (→ Control Panel) or the command line using `schtasks.exe`.
- The R package [`taskscheduleR`](https://cran.r-project.org/web/packages/taskscheduleR/vignettes/taskscheduleR.html) provides a programmable R interface to the WTS.
]
.pull-right-wide3[
### `taskscheduleR` example
```{r, eval = FALSE}
library(taskscheduleR)
myscript <- "examples/scrape-wiki.R"
## Run every 5 minutes, starting from 10:40
taskscheduler_create(
taskname = "WikiScraperR_5min", rscript = myscript,
schedule = "MINUTE", starttime = "10:40", modifier = 5)
## Run every week on Saturday and Sunday at 09:10
taskscheduler_create(
taskname = "WikiScraperR_SatSun", rscript = myscript,
schedule = "WEEKLY", starttime = "09:10",
days = c('SAT', 'SUN'))
## Delete task
taskscheduler_delete("WikiScraperR_SatSun")
## Get a data.frame of all tasks
tasks <- taskscheduler_ls()
str(tasks)
```
]
---
# Scheduling scripts and processes on a Mac
.footnote[1For more resources on scheduling with `launchd`, check out [this](https://babichmorrowc.github.io/post/launchd-jobs/) and [this](https://towardsdatascience.com/a-step-by-step-guide-to-scheduling-tasks-for-your-data-science-project-d7df4531fc41) and [this](https://zerolaunched.herokuapp.com/).]
.pull-left-small3[
### Scheduling options
- On macOS you can schedule background jobs using [`cron`](https://en.wikipedia.org/wiki/Cron) and [`launchd`](https://en.wikipedia.org/wiki/Launchd).
- `launchd`1 was created by Apple as a replacement for the popular Linux utility `cron` ([deprecated](https://developer.apple.com/library/archive/documentation/MacOSX/Conceptual/BPSystemStartup/Chapters/ScheduledJobs.html) but still usable).
- The R package [`cronR`](https://cran.r-project.org/web/packages/cronR/index.html) provides a programmable R interface.
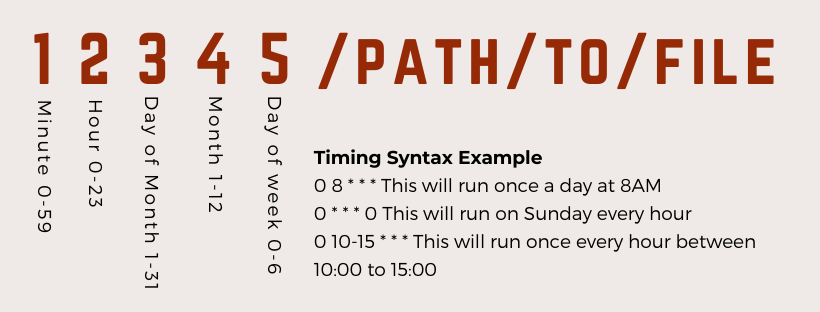
- `cron` syntax for more complex scheduling:
]
.pull-right-wide3[
### `cronR` example
```{r, eval = FALSE}
library(cronR)
myscript <- "examples/scrape-wiki.R"
# Create bash code for crontab to execute R script
cmd <- cron_rscript(myscript)
## Run every minute
cron_add(command = cmd, frequency = 'minutely',
id = 'ScraperR_1min', description = 'Every 1min')
## Run every 15 minutes (using cron syntax)
cron_add(cmd, frequency = '*/15 * * * *',
id = 'ScraperR_15min', description = 'Every 15 mins')
## Check number of running cronR jobs
cron_njobs()
## Delete task
cron_rm("WikiScraperR_1min", ask = TRUE)
```
]
---
class: inverse, center, middle
name: rpackages
# R packages
---
# Writing an R package
.pull-left[
### The state of the R package ecosystem
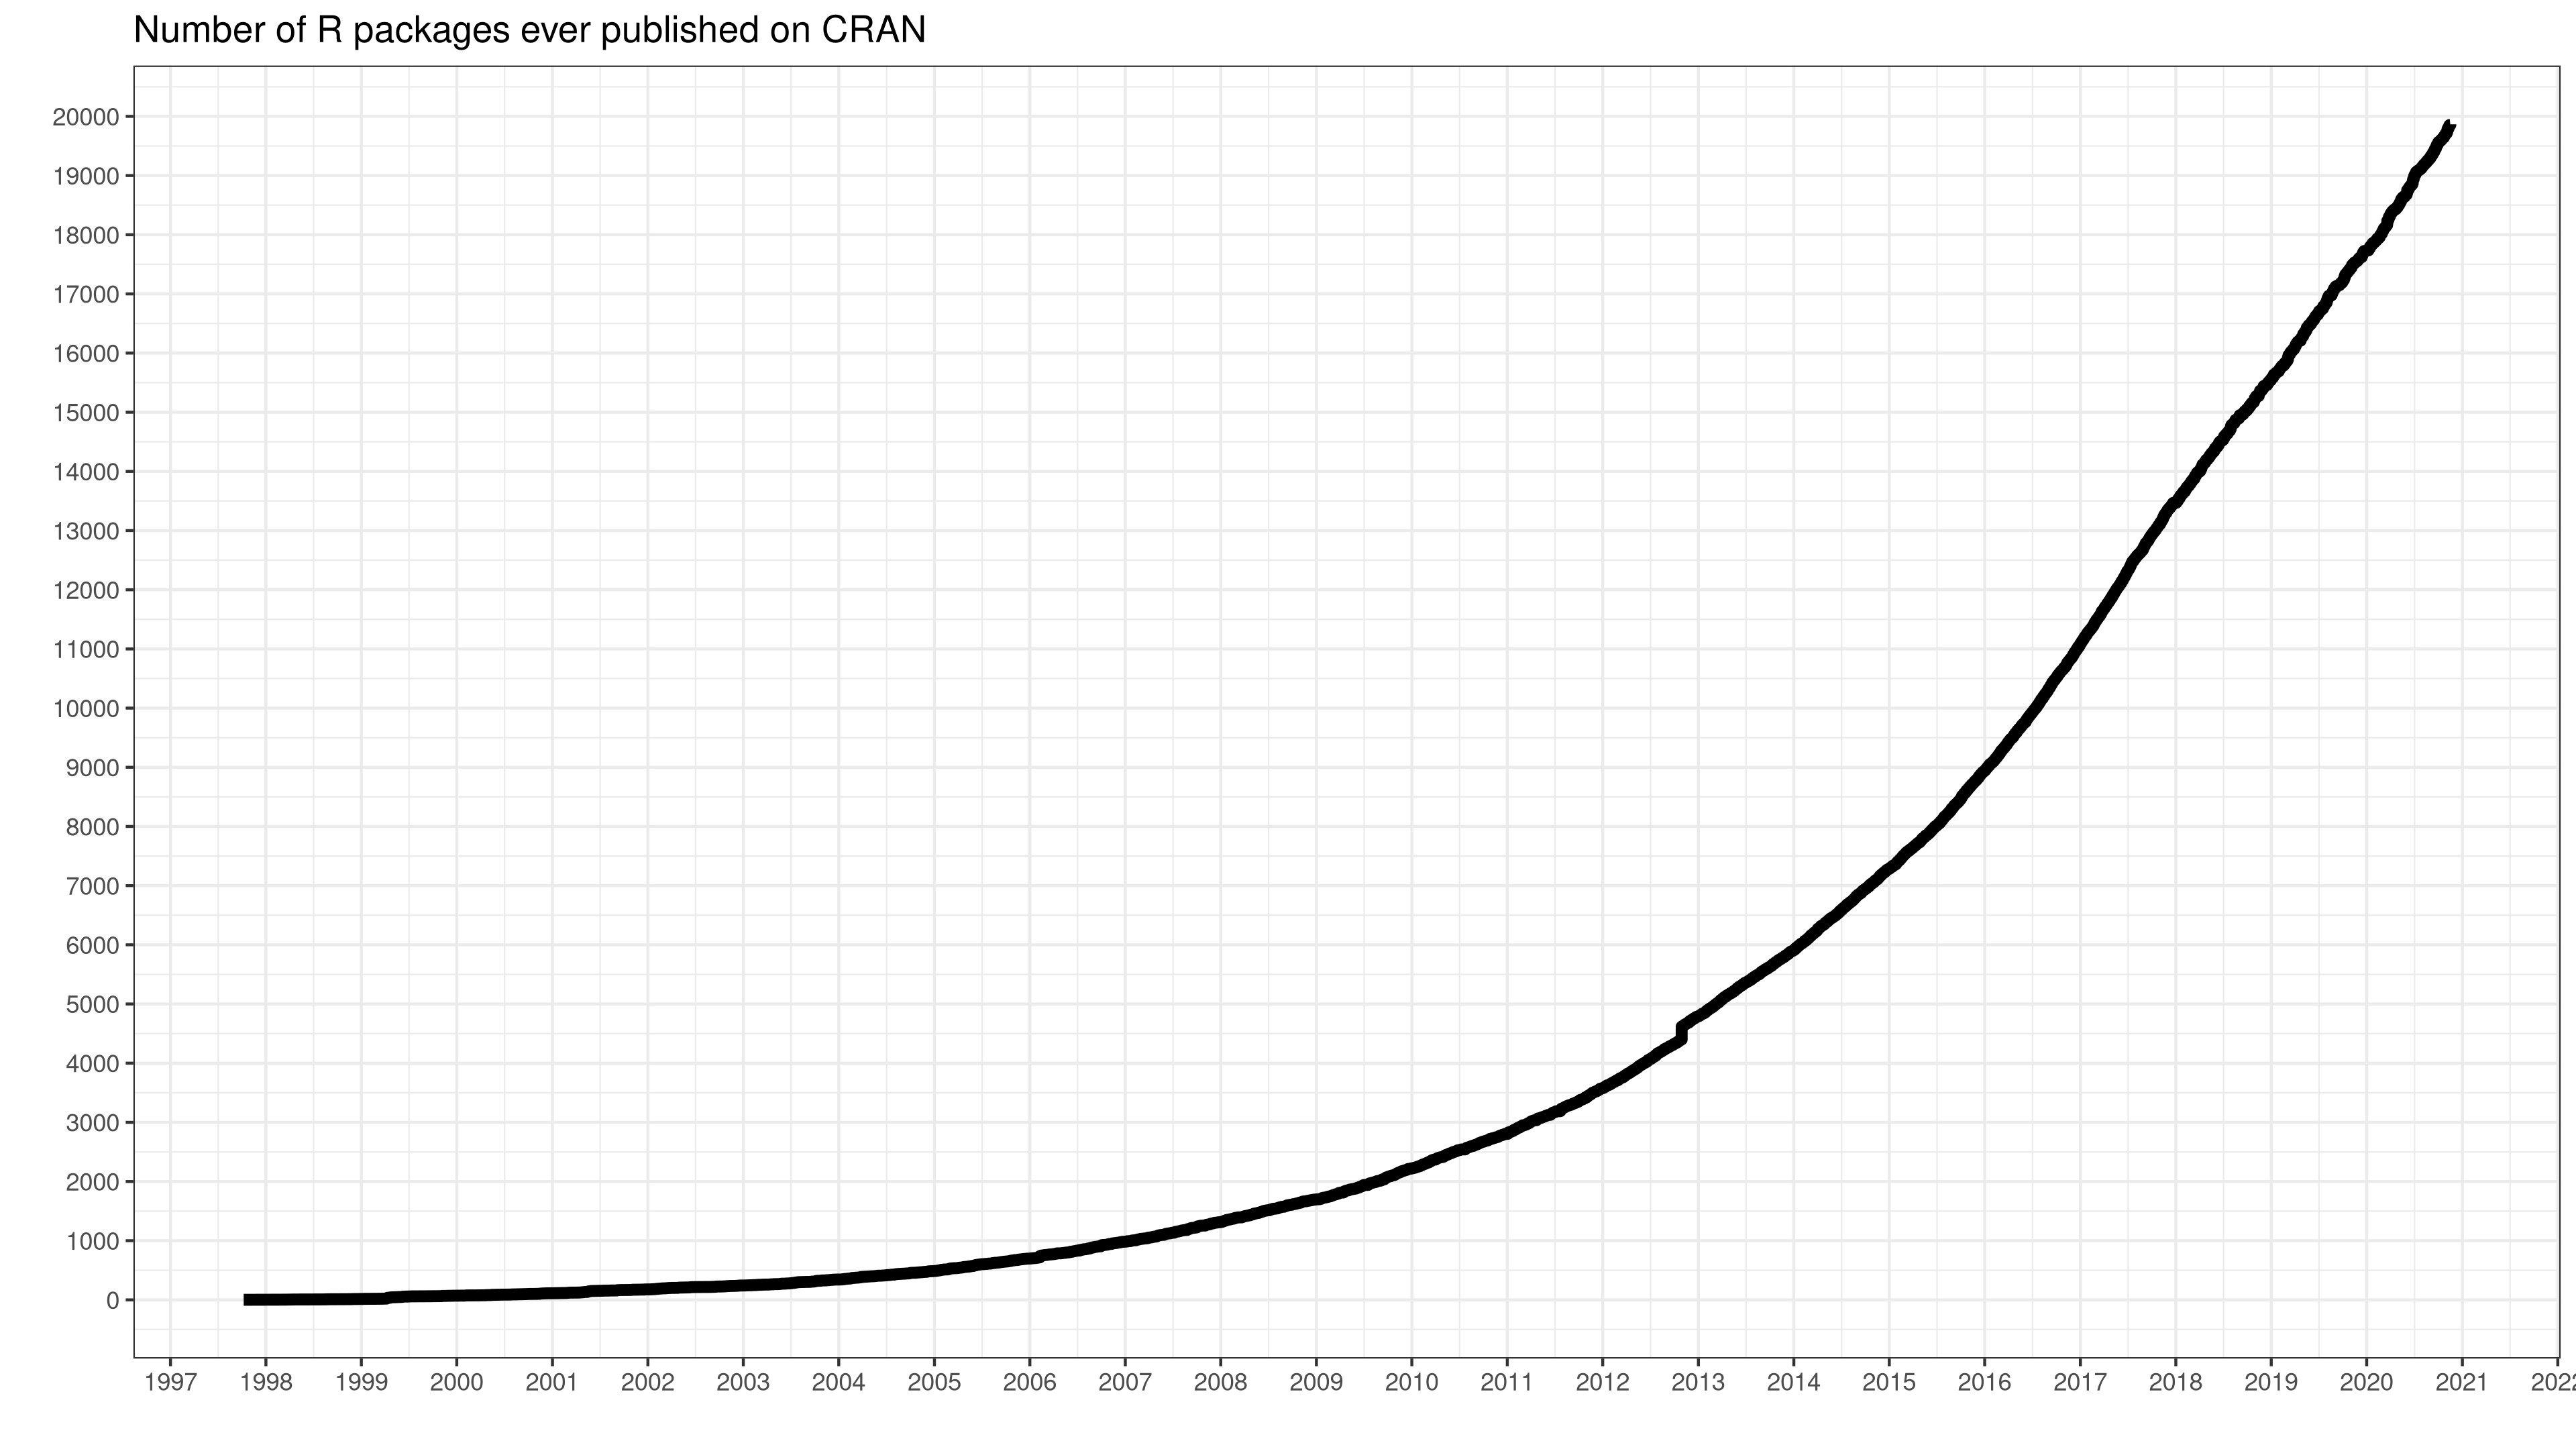
- As of November 2021, the CRAN package repository features more than 18,000 packages.
- Many, many more are available on GitHub and other code sharing platforms.
- R has a vivid community that continuous to create and build extensions and maintain the existing environment. Many of them have much more training and time to invest in software development.
- So, why should we (and with that I mean YOU) write yet another R package?
]
.pull-right-center[
`Credit` [daroczig](https://gist.github.com/daroczig/3cf06d6db4be2bbe3368)
]
---
# Why create another R package?
.pull-left-wide[
1. **Thinking in functions.** R is a functional programming language, and packages bundle functions. Thinking of projects as packages is consistent with a functional mindset.
2. **Automation and transportability.** By turning tasks into functions you save repetitive typing, keep frequently-used code together, and let code travel across projects.
3. **Collaboration and transparency.** Packages are ideal to make functionality available to others, but also to let others contribute. As a side effect, it nudges you to document your functions properly and gives you the opportunity to let others review and improve your code easily.
4. **Visibility and productization.** Publishing code in packages is potentially giving you project a big boost in visibility. Also, it is more likely to be perceived as a product than an insular project.
]
.pull-right-small[
]
---
# Creating a package from start to finish
.pull-left[
1. Choose a package name
2. Set up your package with RStudio (and GitHub)
3. Fill your package with life
- Add functions
- Write help files
- Write a `DESCRIPTION`
- Add internal data
4. Check your package
- Write tests
- Check on various operating systems
- Check for good coding practice
5. Submit to CRAN (or GitHub early in the process)
6. Promotion
- Write a vignette
- Build a package website
]
.pull-right-center[
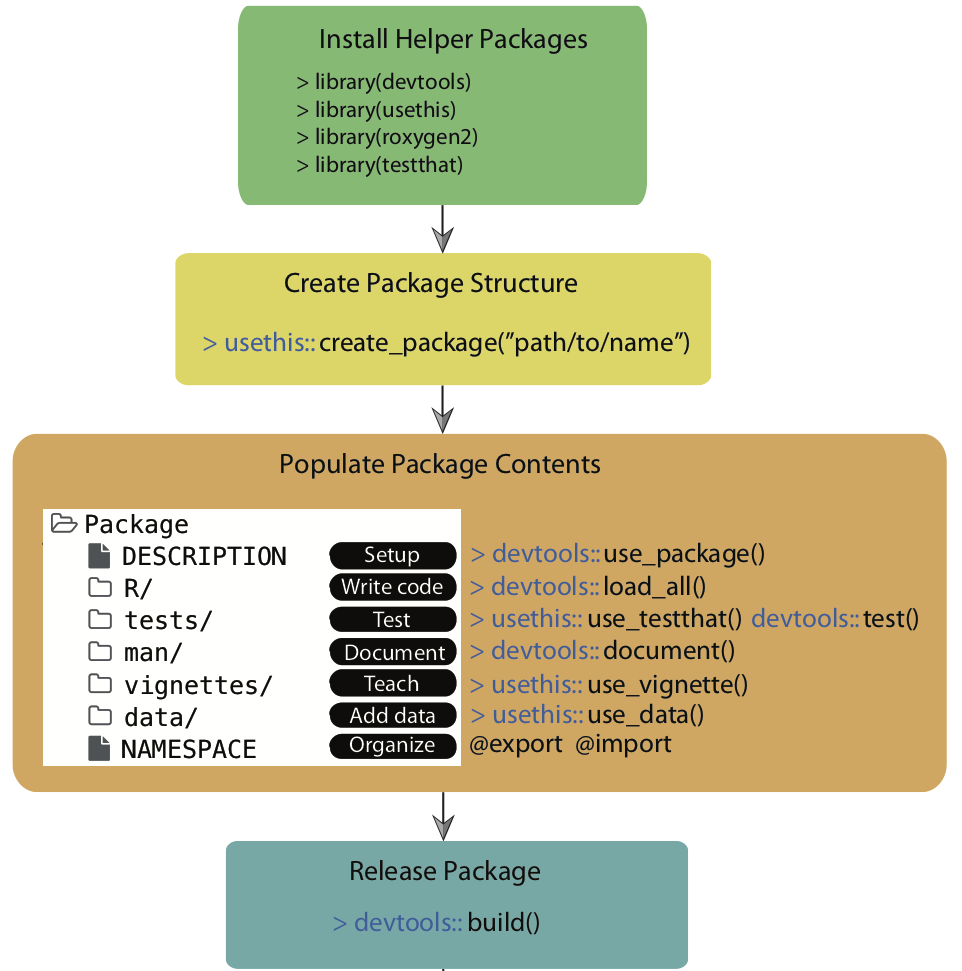
`Credit` [Simo Goshev, Steve Worthington](https://iqss.github.io/dss-rbuild/)
]
---
# Tools to get you started
.pull-left[
.pull-left-wide[
### devtools
- The workhorse of package development in R
- Provides functions that simplify common tasks, such as package setup, simulating installs, compiling from source
]
.pull-right-small[

]
]
.pull-right[
.pull-left-wide[
### usethis
- Provides workflow utilities for project development (loaded by `devtools`)
- Many `use_*()` functions to help create package tests, data, description, etc.
]
.pull-right-small[

]
]
.pull-left[
.pull-left-wide[
### testthat
- Provides functions that make it easy to describe what you expect a function to do, including catching errors, warnings, and messages.
]
.pull-right-small[

]
]
.pull-right[
.pull-left-wide[
### roxygen2
- Provides functions to streamline/automate the documentation of your packages and functions
]
.pull-right-small[
]
]
---
# An example walkthrough
In the following we will briefly study the process of creating a package.
The [example](https://www.mzes.uni-mannheim.de/socialsciencedatalab/article/r-package/#section1) is taken from [Methods Bites](https://www.mzes.uni-mannheim.de/socialsciencedatalab/), the Blog of the MZES Social Science Data Lab, and developed by [Cosima Meyer](https://cosimameyer.rbind.io/) and [Dennis Hammerschmidt](http://dennis-hammerschmidt.rbind.io/).
.pull-left-vwide[
The idea is to create a package `overviewR` that helps you to get an overview – hence, the name – of your data with particular emphasis on the extent that your distinct units of observation are covered for the entire time frame of your data set.
The package is [real](https://cosimameyer.github.io/overviewR/) and lives on both [CRAN](https://cran.r-project.org/web/packages/overviewR/index.html) and [GitHub](https://github.com/cosimameyer/overviewR). Check out the [vignette](https://cran.r-project.org/web/packages/overviewR/vignettes/overviewR_vignette.html).
]
.pull-right-vsmall[

]
---
# Step 1: Idea and name
.pull-left-small3[
### Idea
- I'll leave you alone with that one.
- ... but you might want to check out the [over 18k existing ones that live on CRAN](https://cran.r-project.org/web/packages/available_packages_by_name.html).
### Name
- Package names can only be letters and numbers and must start with a letter.
- The package `available` helps you — both with getting inspiration for a name and with checking whether your name is available.
]
.pull-right-wide3[
### Example
```{r, eval = TRUE, cache = TRUE}
library(available)
# Check for potential names
available::suggest("Easily extract information about sample")
# Check whether it's available
available::available("overviewR", browse = FALSE)
```
]
---
# Step 2: Set up your package
.pull-left-small3[
### Option 1: via RStudio and GitHub
- Use RStudio's Project Wizard and click on `File` > `New Project...` > `New Directory` > `R Package`.
- Check the box `Create a git` to set up a local git.
### Option 2: `usethis`
- Use `usethis::create_package()`, which will set up a template package directory in the specified folder.
- You have to take care of version control yourself (recommendation: initiate project on GitHub first).
]
.pull-right-wide3[
### Example
```{r, eval = FALSE}
create_package("overviewR", open = FALSE)
```
```r
✓ Creating 'overviewR/'
✓ Setting active project to '/Users/simonmunzert/github/intro-to-data-science-21/lectures/10-debugging-automation/overviewR'
✓ Creating 'R/'
✓ Writing 'DESCRIPTION'
Package: overviewR
Title: What the Package Does (One Line, Title Case)
Version: 0.0.0.9000
Authors@R (parsed):
* First Last [aut, cre] (YOUR-ORCID-ID)
Description: What the package does (one paragraph).
License: `use_mit_license()`, `use_gpl3_license()` or friends to
pick a license
Encoding: UTF-8
LazyData: true
Roxygen: list(markdown = TRUE)
RoxygenNote: 7.1.2
✓ Writing 'NAMESPACE'
✓ Writing 'overviewR.Rproj'
✓ Adding '^overviewR\\.Rproj$' to '.Rbuildignore'
✓ Adding '.Rproj.user' to '.gitignore'
✓ Adding '^\\.Rproj\\.user$' to '.Rbuildignore'
✓ Setting active project to ''
```
]
---
# Step 2: Set up your package (cont.)
.pull-left-small3[
### Basic components
1. The `DESCRIPTION` file
- stores metadata about the package
- lists dependencies if any
- is pre-generated by `roxygen2`
]
.pull-right-wide3[
### Example
```txt
Package: overviewR
Title: What the Package Does (One Line, Title Case)
Version: 0.0.0.9000
Authors@R:
person(given = "First",
family = "Last",
role = c("aut", "cre"),
email = "first.last@example.com",
comment = c(ORCID = "YOUR-ORCID-ID"))
Description: What the package does (one paragraph).
License: `use_mit_license()`, `use_gpl3_license()` or friends to pick a
license
Encoding: UTF-8
LazyData: true
Roxygen: list(markdown = TRUE)
RoxygenNote: 7.1.2
```
]
---
# Step 2: Set up your package (cont.)
.pull-left-small3[
### Basic components
1. The `DESCRIPTION` file
- stores metadata about the package
- lists dependencies if any
- is pre-generated by `roxygen2`
- it will later look like this
]
.pull-right-wide3[
### Example
```txt
Type: Package
Package: overviewR
Title: Easily Extracting Information About Your Data
Version: 0.0.2
Authors@R: c(
person("Cosima", "Meyer", email = "XX@XX.com", role = c("cre","aut")),
person("Dennis", "Hammerschmidt", email = "XX@XX.com", role = "aut"))
Description: Makes it easy to display descriptive information on
a data set. Getting an easy overview of a data set by displaying and
visualizing sample information in different tables (e.g., time and
scope conditions). The package also provides publishable TeX code to
present the sample information.
License: GPL-3
URL: https://github.com/cosimameyer/overviewR
BugReports: https://github.com/cosimameyer/overviewR/issues
Depends:
R (>= 3.5.0)
Imports:
dplyr (>= 1.0.0)
Suggests:
covr,
knitr,
rmarkdown,
spelling,
testthat
VignetteBuilder:
knitr
Encoding: UTF-8
Language: en-US
LazyData: true
RoxygenNote: 7.1.0
```
]
---
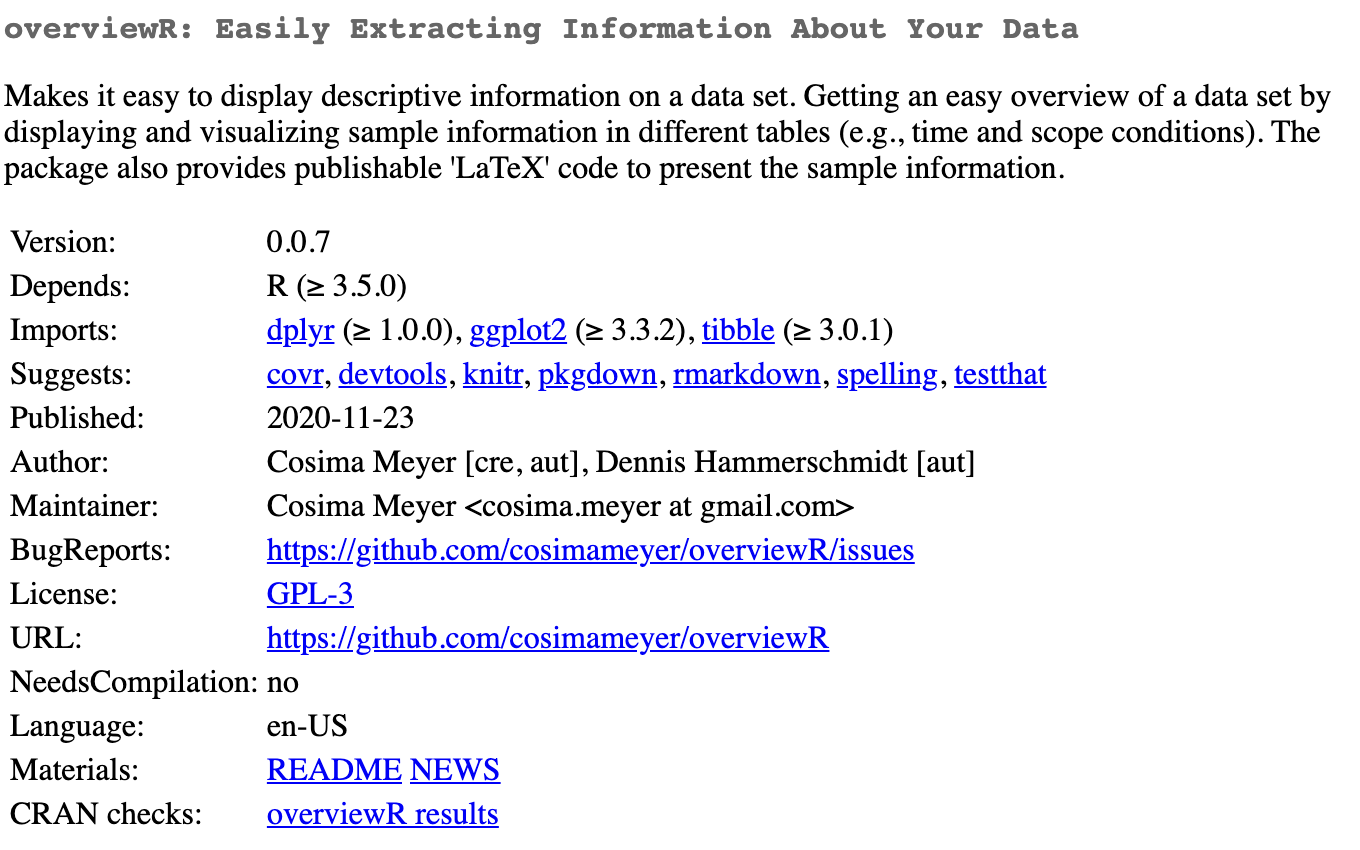
# Step 2: Set up your package (cont.)
.pull-left-small3[
### Basic components
1. The `DESCRIPTION` file
- stores metadata about the package
- lists dependencies if any
- is pre-generated by `roxygen2`
- it will later look like this
- and displayed online like this
]
.pull-right-wide3[
### Example
]
---
# Step 2: Set up your package (cont.)
.pull-left-small3[
### Basic components
1. The `DESCRIPTION` file
- stores metadata about the package
- lists dependencies if any
- is pre-generated by `roxygen2`
- it will later look like this
- and displayed online like this
2. The `NAMESPACE` file
- will later contain information on exported and imported functions.
- helps you manage (and avoid) function clashes
- will be populated automatically using `devtools::document()`
]
.pull-right-wide3[
### Example
```txt
# Generated by roxygen2: do not edit by hand
export(overview_crossplot)
export(overview_crosstab)
export(overview_heat)
export(overview_na)
export(overview_overlap)
export(overview_plot)
export(overview_print)
export(overview_tab)
importFrom(dplyr,"%>%")
importFrom(ggplot2,ggplot)
importFrom(ggrepel,geom_text_repel)
importFrom(ggvenn,ggvenn)
importFrom(stats,reorder)
importFrom(tibble,"rownames_to_column")
```
]
---
# Step 2: Set up your package (cont.)
.pull-left-small3[
### Basic components
1. The `DESCRIPTION` file
- stores metadata about the package
- lists dependencies if any
- is pre-generated by `roxygen2`
- it will later look like this
- and displayed online like this
2. The `NAMESPACE` file
- will later contain information on exported and imported functions.
- helps you manage (and avoid) function clashes
- will be populated automatically using `devtools::document()`
3. The **R** folder
- this is where all the functions you will create go
]
.pull-right-wide3[
]
---
# Step 3: Fill your package with life
.pull-left-small3[
### Adding functions
The folder **R** contains all your functions and each function is saved in a new R file where the function name and the file name are the same.
In the preamble of this file, we can add information on the function. This information will be used to render the help files.
]
.pull-right-wide3[
### Example
```txt
#' @title overview_tab
#'
#' @description Provides an overview table for the time and scope conditions of
#' a data set
#'
#' @param dat A data set object
#' @param id Scope (e.g., country codes or individual IDs)
#' @param time Time (e.g., time periods are given by years, months, ...)
#'
#' @return A data frame object that contains a summary of a sample that
#' can later be converted to a TeX output using \code{overview_print}
#' @examples
#' data(toydata)
#' output_table <- overview_tab(dat = toydata, id = ccode, time = year)
#' @export
#' @importFrom dplyr "%>%"
```
]
---
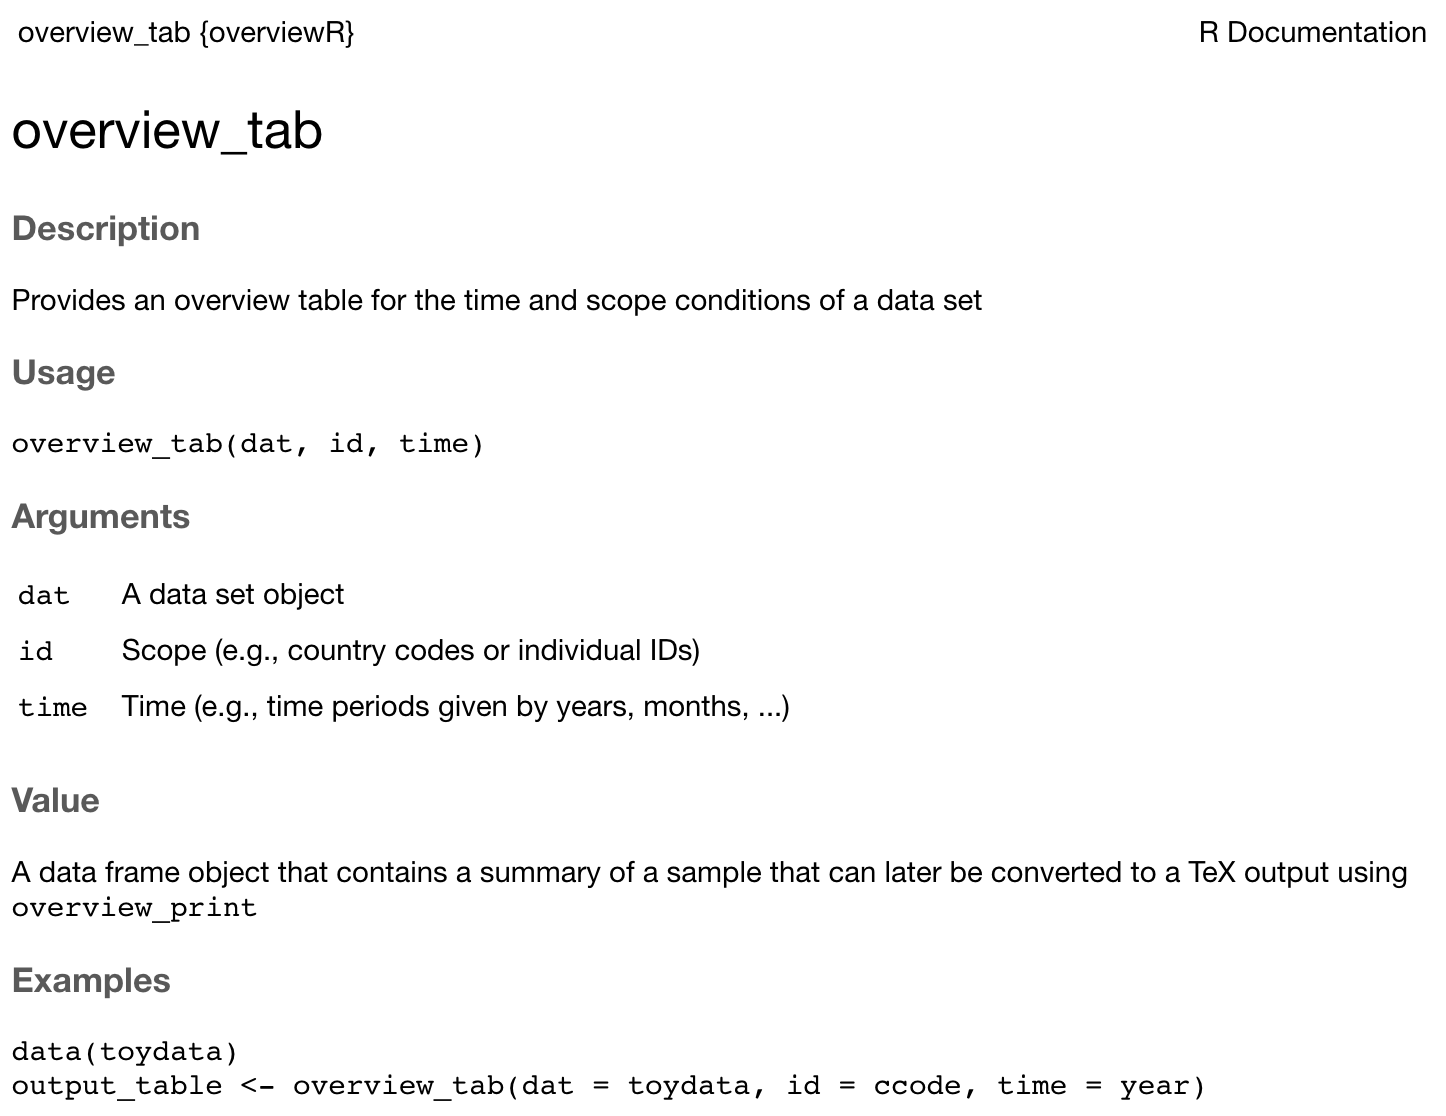
# Step 3: Fill your package with life (cont.)
.pull-left-small3[
### Adding functions
The folder **R** contains all your functions and each function is saved in a new R file where the function name and the file name are the same.
In the preamble of this file, we can add information on the function. This information will be used to render the help files.
When you execute `devtools::document()`, R automatically generates the respective help file in man as well as the new `NAMESPACE` file.
]
.pull-right-wide3[
### Example
]
---
# Step 6: Install your package!
.pull-left-small3[
### Installing a local package
We are now ready to load a developmental version of the package. This works with `devtools::install()`, which will also try to install dependencies of the package from CRAN, if they're not already installed.
You need to run this from the parent working directory that contains the package folder.
We're now ready to call functions from the package.
]
.pull-right-wide3[
### Example
```{r eval = FALSE}
install("overviewR")
```
```r
✓ checking for file ‘/Users/simonmunzert/github/intro-to-data-science-21/lectures/10-debugging-automation/examples/overviewR/DESCRIPTION’ ...
─ preparing ‘overviewR’:
✓ checking DESCRIPTION meta-information ...
─ checking for LF line-endings in source and make files and shell scripts
─ checking for empty or unneeded directories
Omitted ‘LazyData’ from DESCRIPTION
─ building ‘overviewR_0.0.0.9000.tar.gz’
Running /Library/Frameworks/R.framework/Resources/bin/R CMD INSTALL \
/var/folders/38/fqbc3hzd0rl23h350bh27_540000gp/T//RtmpAuLJL4/overviewR_0.0.0.9000.tar.gz \
--install-tests
installing to library ‘/Library/Frameworks/R.framework/Versions/4.1-arm64/Resources/library’
installing *source* package ‘overviewR’ ...
testing if installed package can be loaded from temporary location
testing if installed package can be loaded from final location
testing if installed package keeps a record of temporary installation path
DONE (overviewR)
```
]
---
# Steps 3-6
We skipped a couple of important (and some optional) steps now, including:
- Build and check a package, clean up → `devtools::check()`
- Iterative loading and testing → `devtools::load_all()`
- Adding unit tests → `usethis::use_testthat()`
- Import functions from other packages (CRAN package dependency) → `usethis::use_package()`
- Git version control and collaboration → `usethis::use_github()`
- Add a proper public description → `usethis::use_readme_rmd()`
- Build PDF manual → `devtools::build_manual()`
- Add vignettes → `usethis::use_vignette()`
- Add a licence → `usethis::use_gpl_license()`, `usethis::use_mit_license()`, ...
- Convert into a single bundled file (binary or zipped) → `devtools::build()`
- Submit to CRAN → `devtools::release()`
- Build website for your package → `pkgdown::build_site()`
Be sure to check out the [motivating example](https://www.mzes.uni-mannheim.de/socialsciencedatalab/article/r-package/#subsection4-3) and more resources (next slide).
---
# Writing R packages - FAQ
.pull-left[
### Is learning this worth the time?
Yes.
### Where can I learn more?
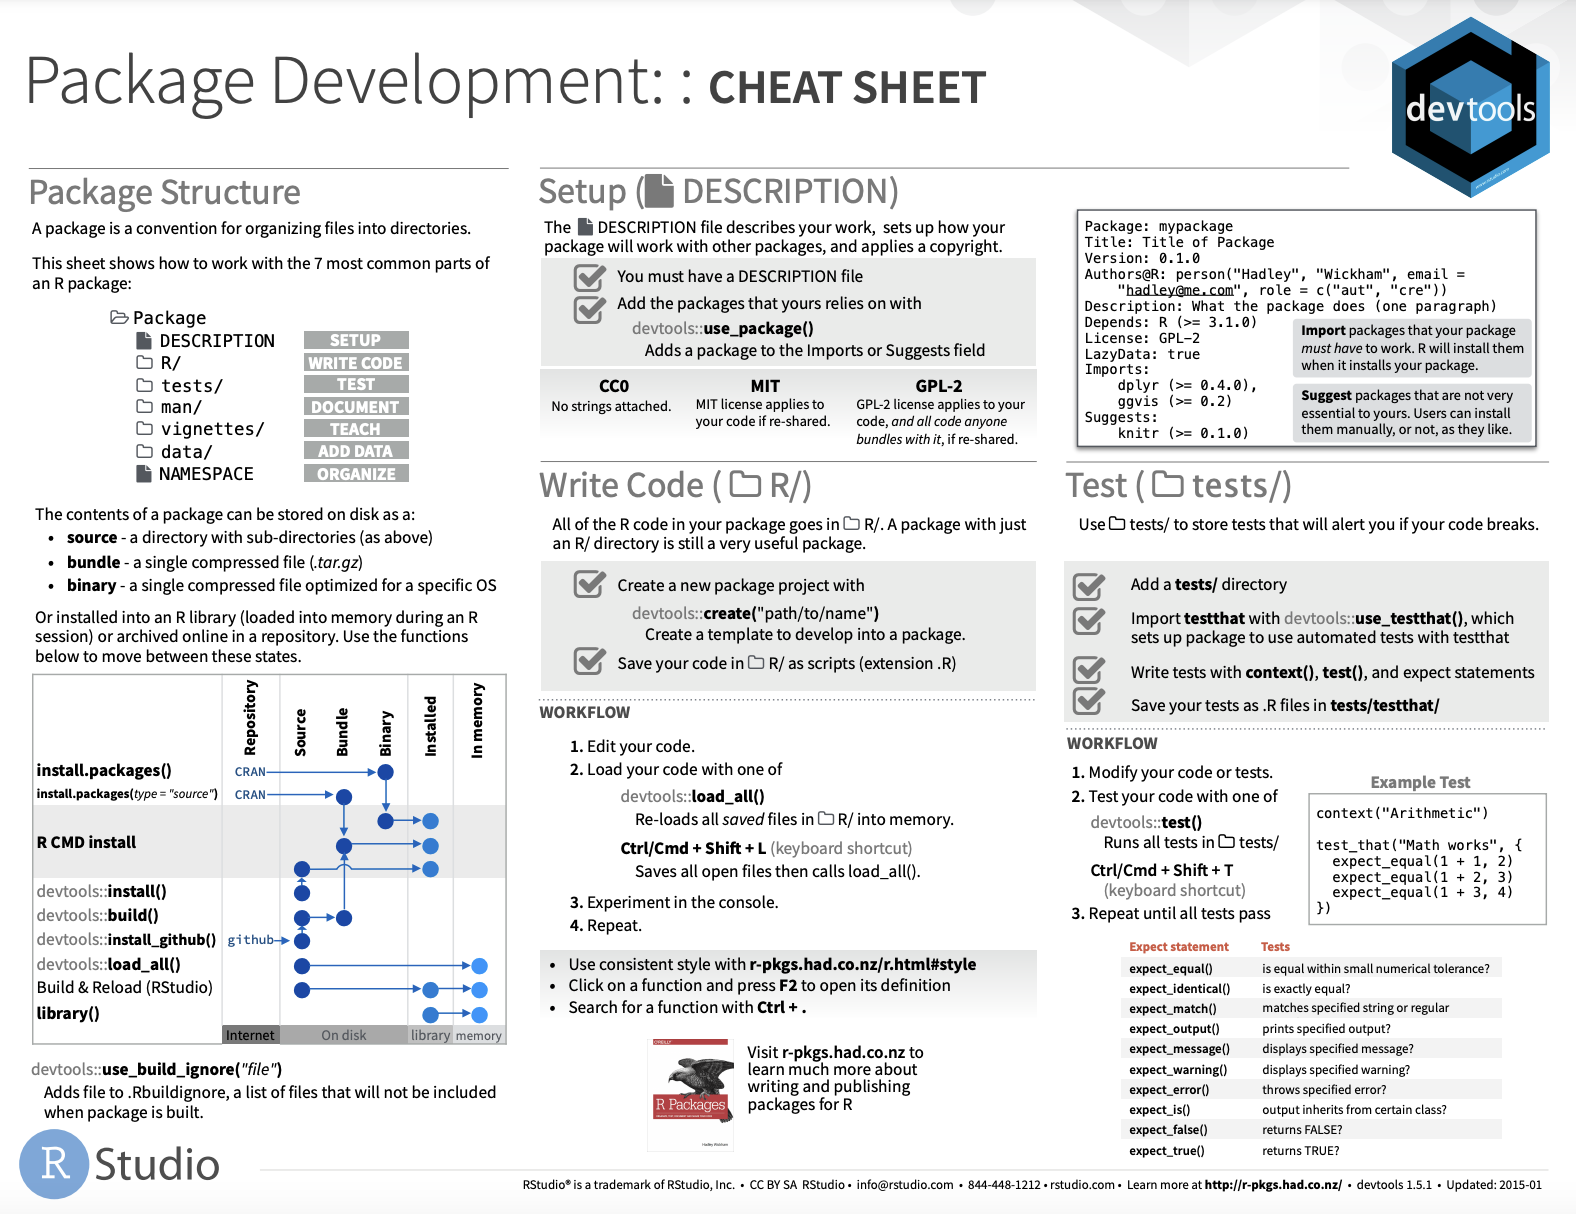
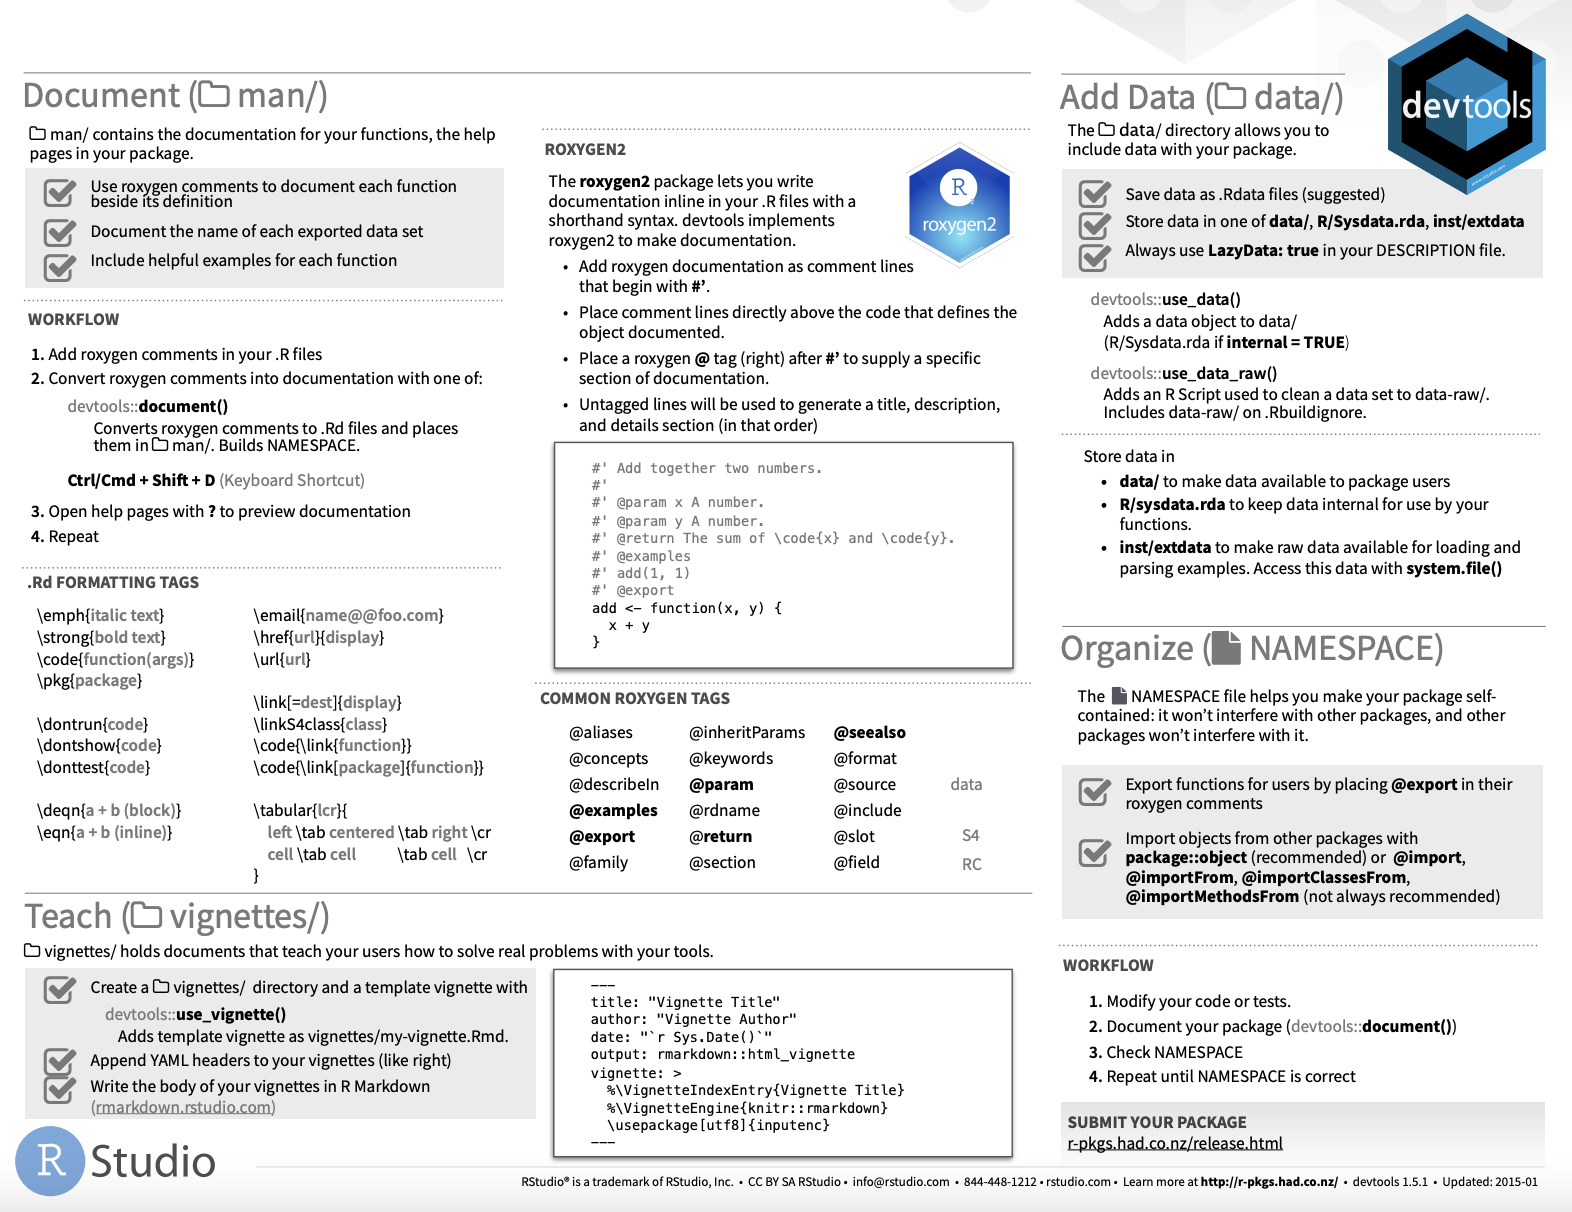
Glad that you're asking! There's tons of materials out there. Apart from the used [tutorial](https://www.mzes.uni-mannheim.de/socialsciencedatalab/article/r-package/) and the [R packages book](https://r-pkgs.org/), have a look at the [devtools cheatsheet](https://rawgit.com/rstudio/cheatsheets/master/package-development.pdf) and another overview over at [RStudio](https://support.rstudio.com/hc/en-us/articles/200486488-Developing-Packages-with-the-RStudio-IDE). Knowing how to [turn a package into a website](https://pkgdown.r-lib.org/dev/) within minutes is fascinating, too.
### When do we need a package, and when is a GitHub repo simply enough?
Do you think of your work as a project or a product? If it's the latter, maybe a package is right for you. (But... a research paper is also a product, right? 🤯)
]
.pull-right[
]