# Discord MCP Server
[](https://www.npmjs.com/package/mcp-discord-bridge)
[](https://www.npmjs.com/package/mcp-discord-bridge)
[](https://github.com/iprashantraj/mcp-discord-bridge/actions/workflows/ci.yml)
[](./LICENSE)
Control your Discord server using AI — **44 tools**, no cloning required. Works with **any MCP-compatible app**: Claude Desktop, Cursor, Windsurf, Continue.dev, Zed, Claude Code, and more.
> **What is MCP?** Model Context Protocol is an open standard that lets AI apps talk to external tools. This project is one of those tools — it gives any AI assistant the power to manage your Discord server.
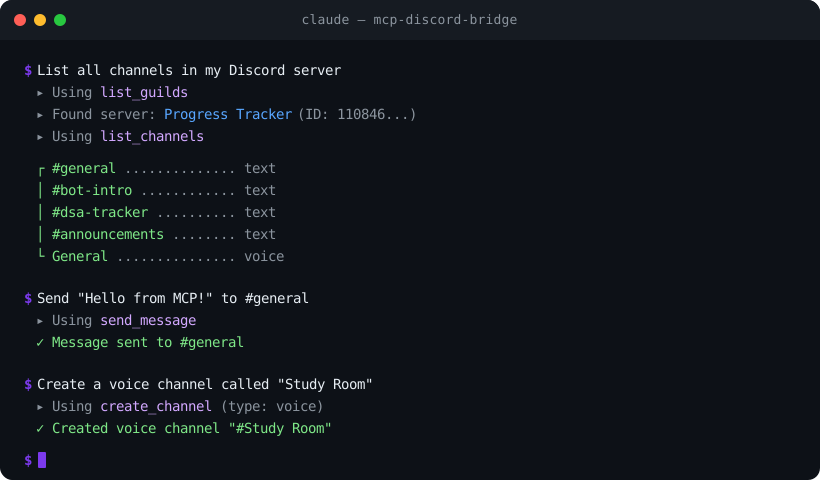
## Install in one line
```bash
npx -y mcp-discord-bridge
```
That's it — no clone, no `npm install`. Just add it to your AI app's MCP config (see [Quick Start](#quick-start-3-minutes) below).
---
## What Can It Do?
Once connected, your AI assistant can:
- **Channels** — create, delete, rename, move channels and categories
- **Messages** — read, send, edit, delete, search messages, send DMs, add/remove reactions
- **Forum Channels** — list forums, create/read/reply/delete forum posts
- **Webhooks** — create, send via, edit, and delete webhooks
- **Members** — list members, view profiles, check roles
- **Roles** — list, create, edit, delete, assign, and remove roles
- **Moderation** — kick, ban, unban, timeout members, set nicknames
- **Threads** — create, list, archive, unarchive, join, and delete threads
- **Server** — list all servers the bot is in, view channel layouts
It also runs as a **standalone Discord bot** with `/ping`, `/info`, and `/serverinfo` slash commands.
---
## Quick Start (3 minutes)
### Step 1: Create a Discord Bot
1. Go to the [Discord Developer Portal](https://discord.com/developers/applications)
2. Click **New Application** — give it a name
3. Go to **Bot** tab — click **Reset Token** — copy and save the token somewhere safe
### Step 2: Invite the Bot to Your Server
1. In the Developer Portal, go to **OAuth2 > URL Generator**
2. Check these scopes: `bot`, `applications.commands`
3. Check these permissions: `Send Messages`, `Read Message History`, `Manage Channels`, `Manage Roles`, `Manage Webhooks`, `Kick Members`, `Ban Members`, `Moderate Members`, `Manage Nicknames`
4. Open the generated URL — select your server — authorize
### Step 3: Add to Your AI App
Add this to your app's MCP config — **no cloning or installing needed**:
```json
{
"mcpServers": {
"discord": {
"command": "npx",
"args": ["-y", "mcp-discord-bridge"],
"env": {
"DISCORD_TOKEN": "paste_your_bot_token_here"
}
}
}
}
```
**Where is the config file?**
| App | Config Location |
|-----|----------------|
| **Claude Desktop** | Windows: `%APPDATA%\Claude\claude_desktop_config.json` · macOS: `~/Library/Application Support/Claude/claude_desktop_config.json` |
| **Claude Code** | `~/.claude.json` (or run `/mcp` in Claude Code) |
| **Cursor** | Settings > search "MCP" > Edit MCP Settings |
| **Windsurf** | `~/.codeium/windsurf/mcp_settings.json` |
| **Continue.dev** | `~/.continue/config.json` |
| **Zed** | `~/.config/zed/settings.json` |
### Step 4: Done!
Restart your AI app. You should now see Discord tools available. Try asking:
> *"List all channels in my Discord server"*
---
## All Available Tools (44)
| Tool | What It Does |
|------|-------------|
| **Server** | |
| `list_guilds` | List all servers the bot is in |
| `list_channels` | List all channels and categories |
| **Channels** | |
| `create_category` | Create a new category |
| `create_channel` | Create a text or voice channel |
| `delete_channel` | Delete a channel or category |
| `move_channel` | Move a channel to a different category |
| `rename_channel` | Rename a channel or category |
| **Messages** | |
| `get_channel_messages` | Fetch recent messages (up to 100) |
| `send_message` | Send a message to a channel |
| `delete_message` | Delete a message |
| `edit_message` | Edit a bot message |
| `search_messages` | Search messages by keyword |
| `send_dm` | Send a direct message to a user |
| `add_reaction` | Add an emoji reaction to a message |
| `remove_reaction` | Remove the bot's reaction from a message |
| `add_multiple_reactions` | Add multiple reactions at once |
| **Forum Channels** | |
| `list_forum_channels` | List all forum channels in a server |
| `create_forum_post` | Create a new forum post |
| `get_forum_post` | Fetch a forum post and its messages |
| `reply_to_forum_post` | Reply to a forum post |
| `delete_forum_post` | Delete a forum post |
| **Webhooks** | |
| `create_webhook` | Create a webhook for a channel |
| `send_webhook_message` | Send a message via webhook |
| `edit_webhook` | Edit a webhook |
| `delete_webhook` | Delete a webhook |
| **Members** | |
| `list_members` | List server members with roles |
| `get_member` | Get detailed info about a member |
| **Roles** | |
| `list_roles` | List all roles in a server |
| `assign_role` | Give a role to a member |
| `remove_role` | Take a role from a member |
| `create_role` | Create a new role with name, color, mentionable |
| `edit_role` | Edit a role's name or color |
| `delete_role` | Delete a role from the server |
| **Moderation** | |
| `kick_member` | Kick a member from the server |
| `ban_member` | Ban a user (with optional message cleanup) |
| `unban_member` | Unban a previously banned user |
| `timeout_member` | Timeout (mute) a member for a duration |
| `set_nickname` | Set or reset a member's nickname |
| **Threads** | |
| `create_thread` | Create a thread in a text channel |
| `list_threads` | List active and archived threads |
| `archive_thread` | Archive a thread (optionally lock it) |
| `unarchive_thread` | Unarchive a thread |
| `join_thread` | Make the bot join a thread |
| `delete_thread` | Delete a thread |
---
## Install from Source (for contributors)
If you want to modify the code or run the standalone bot:
```bash
git clone https://github.com/iprashantraj/mcp-discord-bridge.git
cd mcp-discord-bridge
npm install
cp .env.example .env # fill in DISCORD_TOKEN, CLIENT_ID, GUILD_ID
```
Then use ts-node to run directly:
```json
{
"mcpServers": {
"discord": {
"command": "npx",
"args": ["ts-node", "/full/path/to/mcp-discord-bridge/mcp-server.ts"],
"env": {
"DISCORD_TOKEN": "paste_your_bot_token_here"
}
}
}
}
```
---
## Running as a Standalone Bot
If you just want the slash commands without MCP:
```bash
# Register commands (one time)
npm run deploy-commands
# Start the bot
npm run bot
```
| Command | Description |
|---------|-------------|
| `/ping` | Check bot latency |
| `/info` | Show bot uptime and stats |
| `/serverinfo` | Show server details |
---
## Docker Deployment
The image defaults to the **MCP server** (stdio). To run the standalone bot 24/7 instead, uncomment the `command: ["node", "dist/index.js"]` line in `docker-compose.yml`, then:
```bash
docker-compose up -d # Start in background
docker-compose logs -f # View logs
```
---
## Architecture
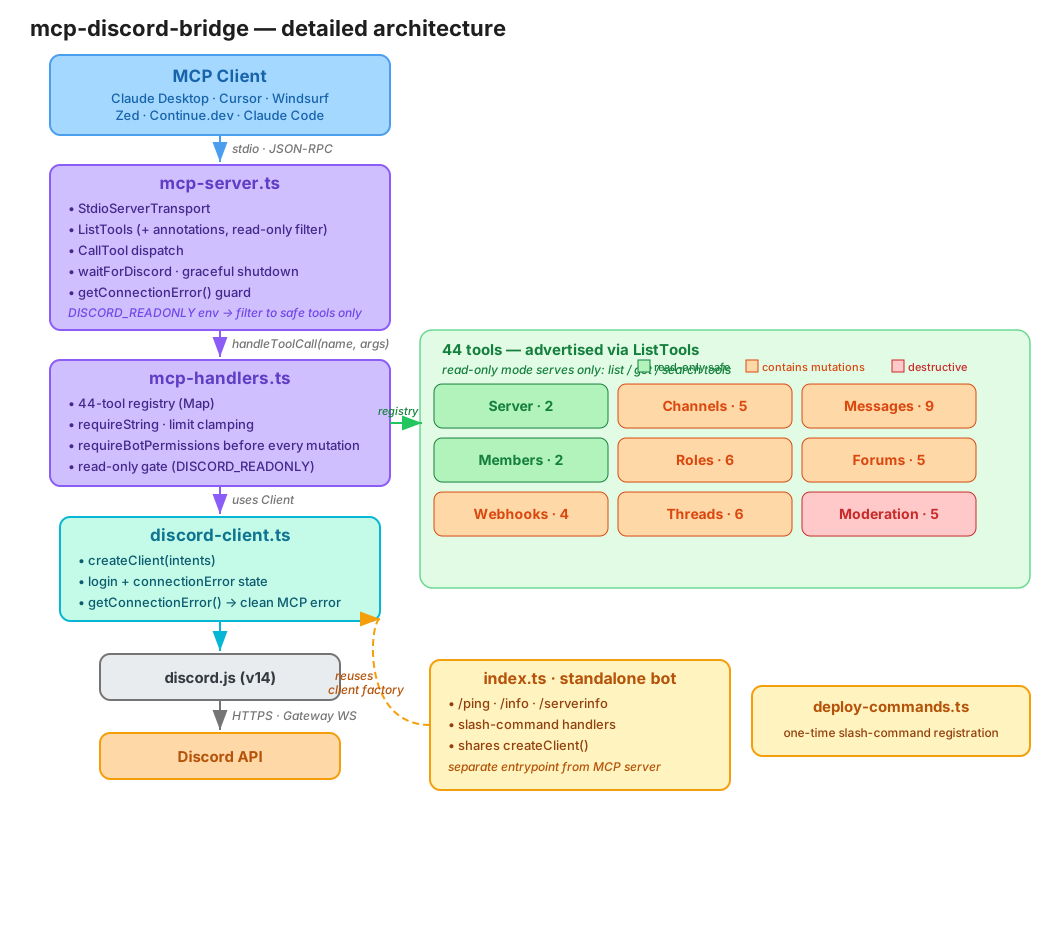
An MCP client talks to **`mcp-server.ts`** over stdio (JSON-RPC). The server advertises tools (with read-only/destructive annotations), then dispatches each call through **`mcp-handlers.ts`** — a 44-tool registry that validates args, checks bot permissions, and enforces read-only mode. Handlers act through the shared client from **`discord-client.ts`**, which owns login and connection state. The standalone bot (**`index.ts`**) is a separate entrypoint that reuses the same client factory.
> Editable source: [`assets/architecture.excalidraw`](./assets/architecture.excalidraw) — open it at [excalidraw.com](https://excalidraw.com).
---
## Development
```bash
npm run typecheck # Type check
npm run lint # Lint
npm run test # Run tests (59 tests)
npm run format # Format code
```
CI runs automatically on every push and PR via GitHub Actions.
### Project Structure
```
mcp-discord-bridge/
├── discord-client.ts # Shared Discord client setup
├── mcp-server.ts # MCP server (tool schemas + wiring)
├── mcp-handlers.ts # Tool handler logic (registry pattern)
├── index.ts # Standalone bot (slash commands)
├── deploy-commands.ts # One-time command registration
├── tests/ # Vitest test suite
├── .github/workflows/ # CI pipeline
└── Dockerfile # Multi-stage Docker build
```
---
## Read-Only Mode
This server can delete channels, ban members, and remove roles. If you only want
the AI to *read* your server, set `DISCORD_READONLY` in the `env` block:
```json
"env": {
"DISCORD_TOKEN": "your_token",
"DISCORD_READONLY": "true"
}
```
In read-only mode only the 10 read tools (`list_*`, `get_*`, `search_messages`)
are advertised and callable; every write/destructive tool is refused.
All tools also carry MCP **annotations** (`readOnlyHint` / `destructiveHint`), so
compatible clients can flag or confirm destructive actions before running them.
## Security
- **Never commit your `.env` file** — it's already in `.gitignore`
- Treat your `DISCORD_TOKEN` like a password — if leaked, regenerate it immediately in the Developer Portal
- The bot can only assign roles **below its own role** in the hierarchy (Discord enforces this)
- Grant the bot **only the permissions you need** — if you won't use moderation, don't grant Ban/Kick
- Because the AI can read channel messages *and* act on the server, treat untrusted message content as a prompt-injection risk; use **read-only mode** for safer deployments
- See [SECURITY.md](./SECURITY.md) for the full threat model and reporting policy
---
## License
[MIT](./LICENSE) — use it however you want.